
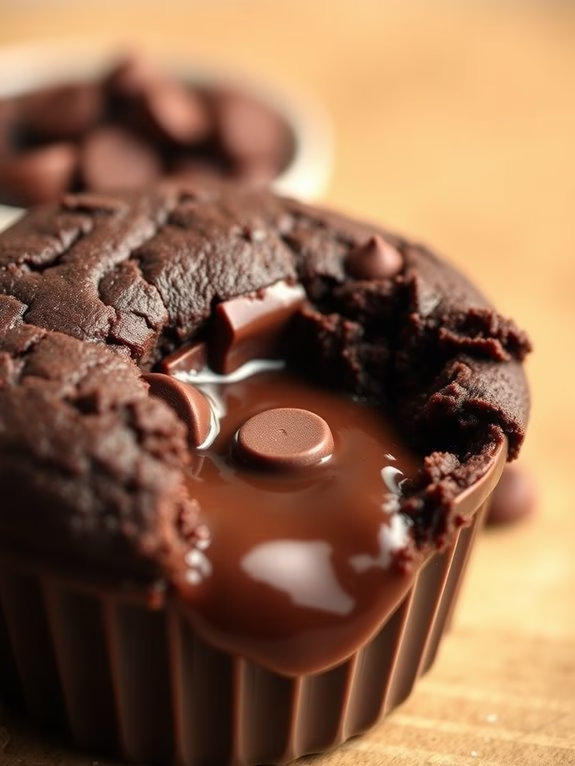
Lava cakes have a way of making any day feel special, don’t they?
There’s an undeniable thrill when that gooey center flows out, almost like a sweet little secret waiting to be shared.
With 13 unique recipes, from the timeless classic chocolate to a bold spicy chili twist, there’s a flavor adventure for every palate.
Whether you’re having a cozy evening alone or hosting a festive dinner with friends, these recipes offer a touch of luxury for everyone.
Which one will become your go-to favorite for effortless elegance?
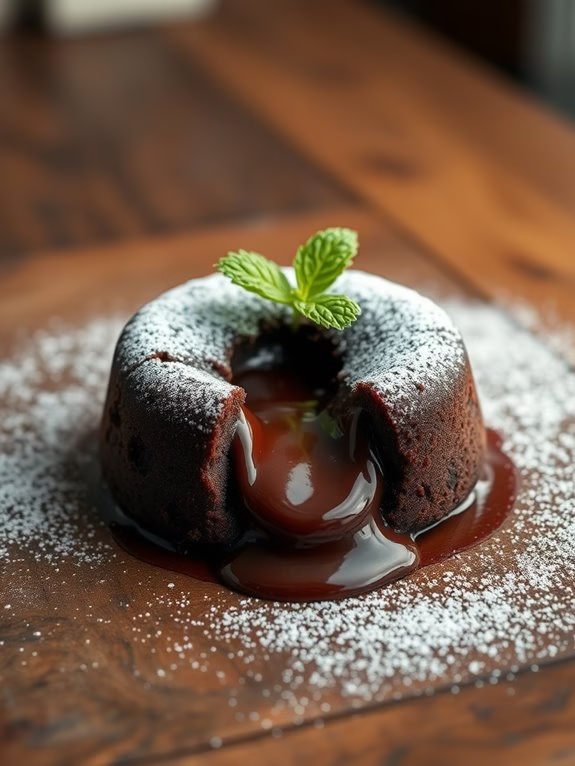
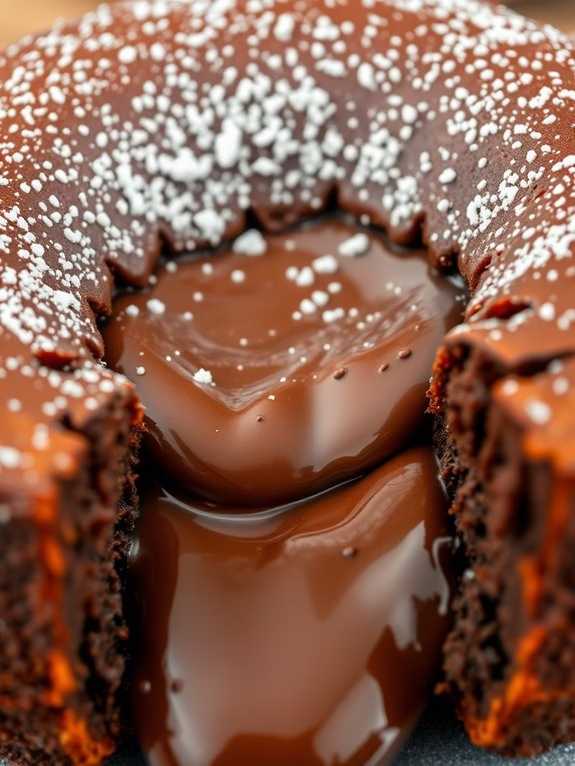
Classic Chocolate Lava Cake
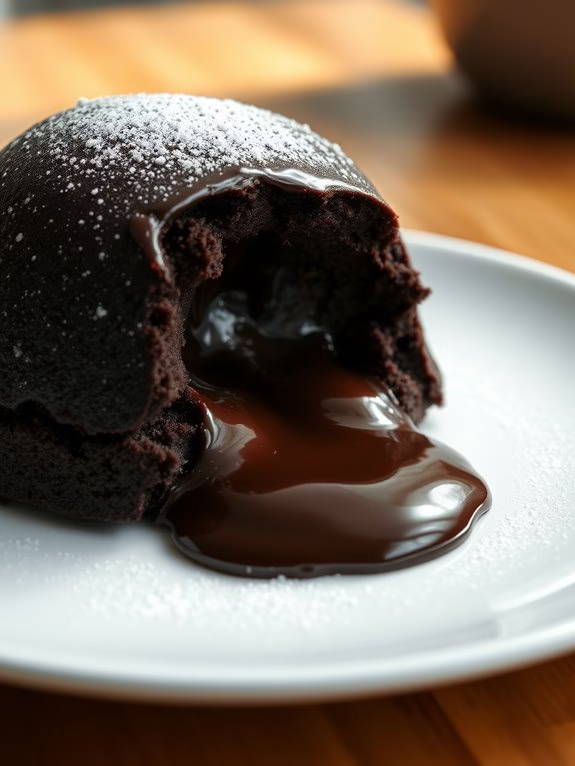
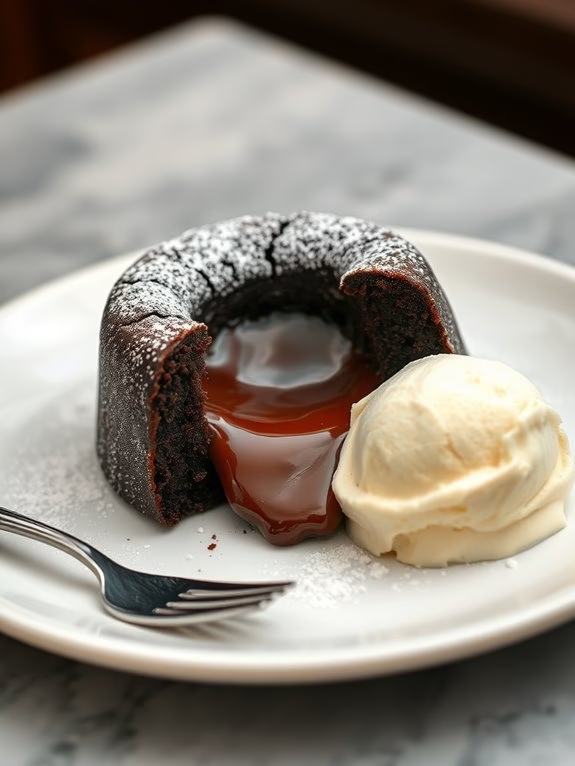
Classic Chocolate Lava Cake is a rich and decadent dessert that’s sure to impress any chocolate lover. This molten-centered cake is a perfect blend of a luscious chocolate exterior with a gooey, velvety chocolate filling that oozes out when you cut into it. Whether you’re preparing this dessert for a special occasion or simply indulging your sweet tooth, it’s a delightful treat that’s surprisingly simple to make.
The magic of this dessert lies in its simplicity and the quality of the ingredients used. With just a few basic components, you can create a luxurious dessert that looks and tastes like it came from a fancy restaurant. Best of all, the preparation time is minimal, allowing you to put together this impressive dish even at the last minute.
Here’s how to make a Classic Chocolate Lava Cake for 4-6 people.
Ingredients (Serves 4-6):
- 1 cup (170g) semisweet chocolate chips or chopped chocolate
- 1/2 cup (115g) unsalted butter
- 2 large eggs
- 2 large egg yolks
- 1/4 cup (30g) all-purpose flour
- 1/2 cup (60g) powdered sugar
- 1 teaspoon vanilla extract
- Pinch of salt
- Butter and cocoa powder for greasing the ramekins
Instructions:
- Preheat the Oven: Start by preheating your oven to 425°F (220°C). This high temperature is essential for ensuring that the outer layer of the cakes cooks quickly, while the center remains molten.
- Prepare the Ramekins: Butter four to six ramekins generously and dust them with cocoa powder. This will help prevent the cakes from sticking, making it easier to release them once baked.
- Melt Chocolate and Butter: In a microwave-safe bowl or a saucepan over simmering water, melt the chocolate and butter together. Stir until the mixture is smooth and fully combined. Allow it to cool slightly.
- Mix Eggs and Sugar: In a separate bowl, whisk together the eggs, egg yolks, and powdered sugar until the mixture is pale and slightly thickened. This should take about 1-2 minutes.
- Combine Ingredients: Gently fold the melted chocolate mixture into the egg mixture. Add the flour and salt, and mix until just combined. Be careful not to overmix, as this can make the cakes tough.
- Add Vanilla: Stir in the vanilla extract, ensuring it’s evenly distributed throughout the batter.
- Fill the Ramekins: Divide the batter evenly among the prepared ramekins, filling each about three-quarters full.
- Bake: Place the ramekins on a baking sheet and bake in the preheated oven for 12-14 minutes. The edges should be firm while the center remains soft.
- Serve: Allow the cakes to cool in the ramekins for 1 minute, then carefully invert onto plates. Serve immediately, optionally with a scoop of vanilla ice cream or a dusting of powdered sugar.
Extra Tips:
To achieve the perfect lava consistency, it’s important to keep an eye on the baking time, as ovens can vary. If your cakes are undercooked, they may collapse when flipped, while overbaking will result in a solid center. You can test one cake first if you’re unsure.
Additionally, using high-quality chocolate will make a significant difference in the flavor of your lava cakes, so opt for the best you can find. Finally, these cakes can be prepared ahead of time and stored in the fridge, then baked just before serving for ultimate freshness and impact.
White Chocolate Lava Cake

White Chocolate Lava Cake is a decadent dessert that features a warm, gooey center made of luscious white chocolate. This elegant treat is perfect for special occasions or whenever you want to impress your guests with a sophisticated dessert that looks difficult to make but is surprisingly simple.
The cake’s exterior is soft and slightly crisp, while the inside flows with rich, creamy white chocolate, creating a delightful contrast in textures and flavors.
This recipe for White Chocolate Lava Cake serves 4-6 people and provides the perfect balance of sweetness and indulgence. The subtle vanilla notes in the white chocolate pair beautifully with the buttery richness of the cake, making it a truly irresistible dessert.
Whether you’re hosting a dinner party or treating yourself to a luxurious treat, this White Chocolate Lava Cake is sure to fulfill your sweet cravings.
Ingredients (serving size: 4-6 people):
- 8 ounces white chocolate, chopped
- 1/2 cup unsalted butter, plus extra for greasing
- 2 large eggs
- 2 large egg yolks
- 1/4 cup granulated sugar
- 1 teaspoon vanilla extract
- 1/4 cup all-purpose flour
- Pinch of salt
- Powdered sugar, for dusting (optional)
Cooking Instructions:
- Preheat and Prepare: Preheat your oven to 425°F (220°C). Generously grease four to six ramekins with butter to guarantee easy release of the cakes after baking.
- Melt Chocolate and Butter: In a heatproof bowl, combine the chopped white chocolate and 1/2 cup of unsalted butter. Set the bowl over a saucepan of simmering water (double boiler) and stir until the mixture is completely melted and smooth. Remove from heat and let it cool slightly.
- Mix Eggs and Sugar: In a separate bowl, whisk together the eggs, egg yolks, and granulated sugar until the mixture is thick, pale, and slightly frothy. Add in the vanilla extract and mix well.
- Combine Mixtures: Gradually fold the melted white chocolate mixture into the egg mixture, stirring gently to combine. Be careful not to deflate the mixture.
- Add Flour: Sift the all-purpose flour and salt over the chocolate and egg mixture. Gently fold the flour into the batter until just combined, guaranteeing there are no lumps.
- Fill Ramekins: Divide the batter evenly among the prepared ramekins, filling each about three-quarters full.
- Bake: Place the ramekins on a baking sheet and bake in the preheated oven for 10-12 minutes. The edges should be firm while the centers remain soft.
- Serve: Remove the ramekins from the oven and let them cool for 1-2 minutes. Carefully invert each ramekin onto a serving plate. Dust with powdered sugar if desired, and serve immediately for the best molten center effect.
Extra Tips:
To guarantee your White Chocolate Lava Cakes have the perfect molten center, avoid over-baking them. The baking time may vary slightly depending on your oven, so keep a close eye on the cakes and look for firm edges with a soft center.
If you’re unsure about inverting the cakes, you can serve them directly in the ramekins with a spoon for a more casual presentation. Additionally, feel free to experiment with flavors by adding a splash of orange liqueur or a sprinkle of sea salt to the batter for an exciting twist.
Peanut Butter Lava Cake
Peanut Butter Lava Cake is an indulgent dessert that combines the rich flavors of chocolate with the creamy goodness of peanut butter. This decadent treat is perfect for any special occasion or when you’re just in the mood for something extraordinary. With a molten center that oozes out when you cut into it, this lava cake will impress your family and guests alike.
The beauty of a Peanut Butter Lava Cake lies in its simplicity and the delightful surprise of its gooey center. The combination of the slightly crispy outer shell with the warm, flowing peanut butter core creates a sublime experience for your taste buds. This dessert is best served warm and pairs excellently with a scoop of vanilla ice cream or a dollop of whipped cream.
Ingredients for 4-6 servings:
- 1 cup semi-sweet chocolate chips
- 1/2 cup unsalted butter
- 2 large eggs
- 2 large egg yolks
- 1/4 cup granulated sugar
- 1/4 cup all-purpose flour
- 1/2 teaspoon vanilla extract
- 1/4 cup creamy peanut butter
- Cooking spray or butter for greasing ramekins
Instructions:
- Prepare the Ramekins: Preheat your oven to 425°F (220°C). Grease four to six ramekins with cooking spray or butter to prevent the cakes from sticking. Place them on a baking sheet for easy handling.
- Melt Chocolate and Butter: In a microwave-safe bowl, combine the semi-sweet chocolate chips and unsalted butter. Microwave in 20-second intervals, stirring in between, until fully melted and smooth. Allow to cool slightly.
- Mix Eggs and Sugar: In a separate bowl, whisk together the eggs, egg yolks, and granulated sugar until the mixture becomes thick and pale. This should take about 3-5 minutes by hand or 2 minutes with an electric mixer.
- Combine Ingredients: Gradually pour the slightly cooled chocolate mixture into the egg mixture, whisking constantly to prevent the eggs from cooking. Add the flour and vanilla extract, and gently fold until just combined, being careful not to overmix.
- Fill Ramekins: Divide the batter evenly among the prepared ramekins. Spoon about a tablespoon of creamy peanut butter into the center of each ramekin, gently pressing it down so that it’s covered by the batter.
- Bake the Cakes: Place the baking sheet with the ramekins in the preheated oven. Bake for 10-12 minutes, or until the edges are firm but the centers are still soft. The top should be set, but the cakes should jiggle slightly when shaken.
- Serve: Allow the cakes to cool for 1 minute in their ramekins before gently running a knife around the edges to loosen them. Invert each ramekin onto a serving plate, tapping the bottom to release the cake. Serve immediately, optionally garnished with ice cream or whipped cream.
Extra Tips:
To guarantee that your Peanut Butter Lava Cakes have the perfect molten center, timing is essential. Keep a close watch on the oven during the last few minutes of baking.
If the cakes are overbaked, the centers will set and lose their gooey quality. Experiment with different types of chocolate or add a pinch of sea salt to the peanut butter for an extra flavor dimension.
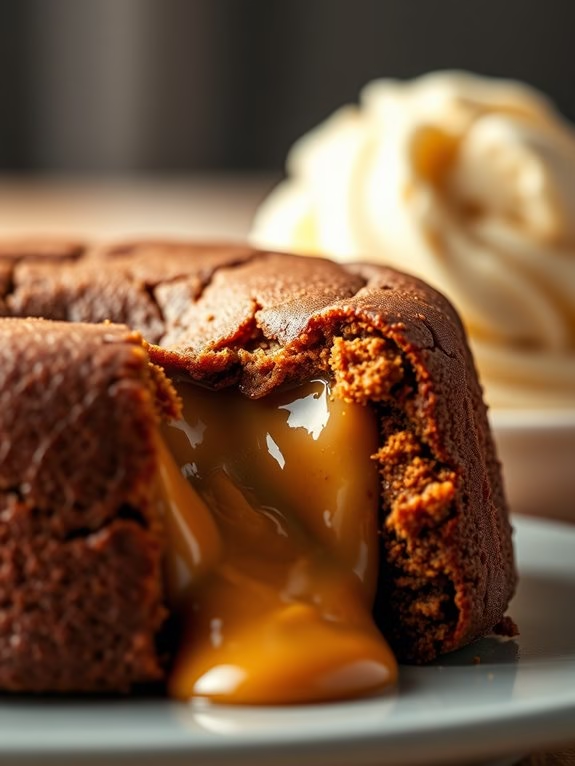
Salted Caramel Lava Cake
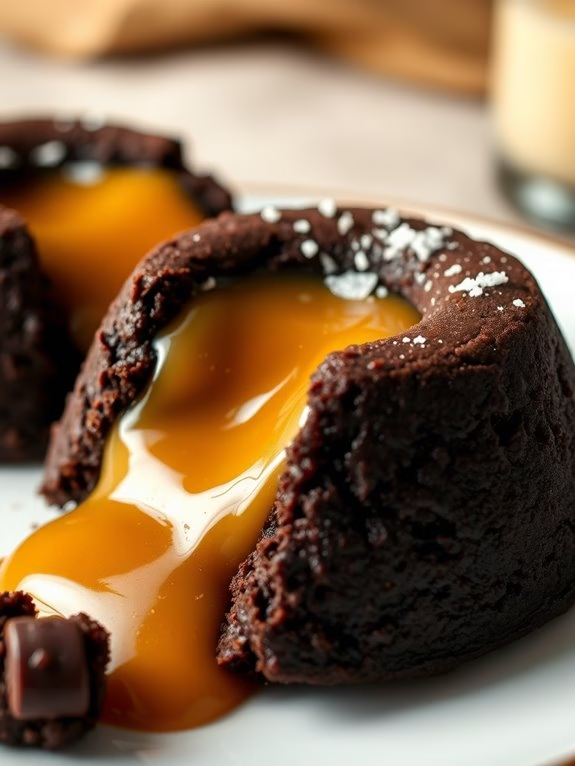
Salted Caramel Lava Cake is a decadent dessert that combines the rich indulgence of chocolate with the irresistible allure of salted caramel. This sumptuous treat features a molten caramel center encased in a tender chocolate cake, creating a delightful contrast of flavors and textures.
Perfect for special occasions or whenever you want to impress your guests, this dessert is sure to become a favorite.
The key to a successful Salted Caramel Lava Cake lies in its preparation and timing. It’s vital to have all your ingredients ready and follow the steps precisely to guarantee that the cakes have the perfect molten center.
This recipe serves 4-6 people, making it ideal for a small gathering or a cozy family dinner.
Ingredients:
- 1 cup semi-sweet chocolate chips
- 1/2 cup unsalted butter
- 2 large eggs
- 2 large egg yolks
- 1/4 cup granulated sugar
- 1/4 cup all-purpose flour
- 1/4 teaspoon salt
- 1/2 cup caramel sauce
- 1 teaspoon sea salt flakes
- Butter and cocoa powder for ramekin preparation
Instructions:
1. Preheat and Prepare Ramekins:
Preheat your oven to 425°F (220°C). Generously butter 4-6 ramekins and dust them with cocoa powder. This will prevent the cakes from sticking and allow for easy removal after baking.
2. Melt Chocolate and Butter:
In a medium microwave-safe bowl, combine the chocolate chips and butter. Microwave in 30-second intervals, stirring in between, until the mixture is smooth and fully melted.
3. Mix Eggs and Sugar:
In a separate large bowl, whisk together the eggs, egg yolks, and granulated sugar until the mixture is thick and pale. This should take about 2-3 minutes of vigorous whisking.
4. Combine Ingredients:
Slowly fold the melted chocolate mixture into the egg mixture, making sure it’s well incorporated. Then, gently fold in the flour and salt until just combined. Be careful not to overmix.
5. Add Caramel Center:
Divide the batter evenly among the prepared ramekins. Spoon a tablespoon of caramel sauce into the center of each ramekin and sprinkle a pinch of sea salt flakes over the caramel.
6. Bake the Cakes:
Place the ramekins on a baking sheet and bake in the preheated oven for 12-14 minutes. The edges should be firm while the centers remain soft.
7. Cool and Serve:
Allow the cakes to cool for 1 minute before carefully inverting them onto plates. Serve immediately, garnished with additional caramel sauce and a sprinkle of sea salt, if desired.
Extra Tips:
For best results, use high-quality chocolate and caramel sauce, as these ingredients greatly affect the flavor of the cake.
Confirm that your ramekins are well-prepared with butter and cocoa powder to prevent sticking. Timing is pivotal when baking; keep a close eye on the cakes to avoid overbaking, which can result in a less gooey center.
If you’re serving the cakes at a later time, prepare them up to the baking step and refrigerate, then bake just before serving.
Red Velvet Lava Cake

Red Velvet Lava Cake is a decadent dessert that combines the rich, velvety texture of red velvet cake with the gooey, molten center of a traditional lava cake. This dessert is perfect for special occasions or whenever you want to impress your guests with something unique and delightful.
The vibrant red color, coupled with the creamy chocolate center, makes this dessert not only a treat for the taste buds but also a feast for the eyes. This particular recipe is designed to serve 4-6 people, making it ideal for small get-togethers or intimate family dinners.
The preparation involves creating a rich, red velvet batter, which is then filled with a luscious chocolate ganache that oozes out when the cake is cut into. While the recipe requires a bit of precision, the end result is well worth the effort, offering a perfect balance of flavors and textures.
Ingredients (for 4-6 servings):
- 1/2 cup unsalted butter
- 4 oz dark chocolate, chopped
- 1 cup powdered sugar
- 2 large eggs
- 2 large egg yolks
- 1/2 cup all-purpose flour
- 1 tbsp red food coloring
- 1 tsp vanilla extract
- 1/4 tsp salt
- 4 oz cream cheese
- 2 tbsp granulated sugar
- 1 tbsp cocoa powder
- 6 oz white chocolate, chopped (for ganache)
- 1/4 cup heavy cream
Instructions:
1. Preheat the Oven: Begin by preheating your oven to 425°F (220°C). This high temperature is essential for guaranteeing that the outer layer of the cake cooks quickly, while the center remains molten.
2. Prepare the Chocolate Ganache: In a small saucepan, heat the heavy cream over medium heat until it begins to simmer. Remove from the heat and add the white chocolate, stirring until completely melted and smooth. Transfer the ganache to a bowl and refrigerate until it thickens, about 30 minutes.
3. Make the Batter: In a microwave-safe bowl, combine the butter and dark chocolate. Microwave in 30-second intervals, stirring in between, until melted and smooth. Let it cool slightly.
In a separate bowl, whisk together the powdered sugar, eggs, and egg yolks until well combined. Add the cooled chocolate mixture, flour, red food coloring, vanilla extract, and salt, and mix until smooth and well combined.
4. Prepare the Filling: In a small bowl, mix the cream cheese with granulated sugar and cocoa powder until smooth. Set aside.
5. Assemble the Cakes: Grease four to six ramekins generously with butter and dust with cocoa powder. Divide the batter evenly among the ramekins. Place a spoonful of the cream cheese mixture in the center of each and gently press down. Top with a spoonful of the chilled ganache.
6. Bake: Place the ramekins on a baking sheet and Bake in the preheated oven for 12-14 minutes, or until the edges are firm but the center is still slightly jiggly. Remove from the oven and let the cakes cool for 1 minute.
7. Serve: Carefully run a knife around the edges of each cake to loosen and invert onto serving plates. Serve immediately, while the center is still molten.
Extra Tips: Confirm that your ramekins are well-greased and dusted with cocoa powder to prevent the cakes from sticking when you invert them. Allow the cakes to cool for just a minute to make them easier to handle without risking the molten center solidifying.
If you want to prepare these in advance, you can refrigerate the batter-filled ramekins for up to a day and bake them just before serving, adding an extra minute to the baking time if needed.
Matcha Green Tea Lava Cake
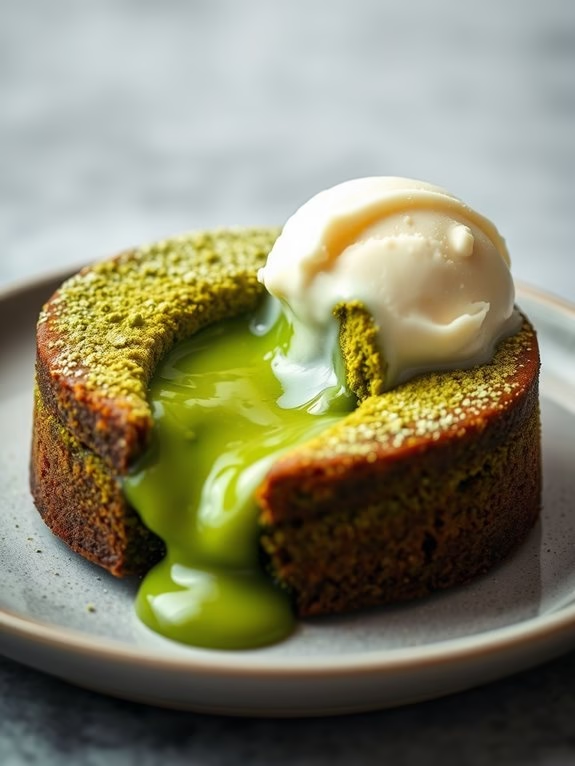
Matcha Green Tea Lava Cake is a delightful fusion of traditional Japanese flavors and the rich decadence of a classic molten dessert. This dessert is perfect for those who love the earthy, slightly bitter taste of matcha combined with the sweetness of a chocolate lava cake. The vibrant green color of the cake’s interior isn’t only visually stunning but also adds a unique twist that can impress your guests at any gathering.
Whether you’re a matcha enthusiast or just looking to try something new, this recipe is sure to become a favorite. The key to achieving the perfect Matcha Green Tea Lava Cake lies in balancing the matcha powder with the right amount of sweetness and guaranteeing the cake is baked just right for that molten center.
The exterior should be firm and slightly crispy, while the inside remains soft and gooey, flowing like lava when cut. This recipe makes enough for 4-6 people, making it an ideal choice for a small dinner party or a special family treat. Gather your ingredients, and let’s get started on this delectable adventure!
Ingredients (Serves 4-6)
- 1/2 cup unsalted butter
- 2/3 cup white chocolate chips
- 3 large eggs
- 1/3 cup granulated sugar
- 1 tablespoon matcha green tea powder
- 1/4 cup all-purpose flour
- 1/2 teaspoon vanilla extract
- A pinch of salt
- Butter or non-stick spray for greasing ramekins
Cooking Instructions
- Preheat and Prepare Ramekins: Begin by preheating your oven to 425°F (220°C). Lightly grease 4-6 ramekins with butter or spray them with non-stick spray to guarantee easy removal of the cakes after baking.
- Melt Butter and Chocolate: In a medium-sized microwave-safe bowl, combine the unsalted butter and white chocolate chips. Microwave in 20-second intervals, stirring in between, until the mixture is completely melted and smooth. Set aside to cool slightly.
- Mix Eggs and Sugar: In a separate large bowl, whisk together the eggs and granulated sugar until the mixture is pale and slightly thickened. This should take about 2-3 minutes.
- Combine and Add Dry Ingredients: Slowly pour the melted butter and chocolate mixture into the egg and sugar mixture, stirring continuously to combine. Sift in the matcha powder, flour, and a pinch of salt, mixing until just combined. Guarantee there are no lumps in the batter. Add the vanilla extract and stir.
- Fill Ramekins: Evenly distribute the batter among the prepared ramekins, filling each about three-quarters full. Place the ramekins on a baking sheet to catch any overflow.
- Bake: Bake in the preheated oven for 10-12 minutes, or until the edges are set but the center remains soft. The top should be slightly cracked, and the insides will be molten.
- Cool and Serve: Allow the cakes to cool for 1-2 minutes before running a knife around the edges to loosen them. Carefully invert the ramekins onto serving plates. Serve immediately for the best molten center experience.
Extra Tips
For the most vibrant matcha flavor, use high-quality matcha powder. If you prefer a sweeter cake, adjust the sugar to taste, but be cautious not to overpower the matcha.
Keep an eye on the baking time as it can vary depending on your oven and the size of your ramekins; the cakes should be removed once the edges are firm but the center is still soft. Serve with a dusting of matcha powder, a scoop of vanilla ice cream, or a dollop of whipped cream for an extra touch of indulgence.
Mocha Coffee Lava Cake
Mocha Coffee Lava Cake is a delightful twist on the classic molten chocolate cake, combining the rich flavors of chocolate with the deep, aromatic notes of coffee. This decadent dessert is perfect for coffee lovers and chocolate enthusiasts alike, offering an indulgent treat that’s both sophisticated and comforting. The molten center of the cake, infused with mocha, provides a luscious surprise that’s sure to impress your guests at dinner parties or special occasions.
Creating the perfect Mocha Coffee Lava Cake involves using high-quality chocolate and freshly brewed coffee to enhance the depth of flavor. The cake is best served warm, allowing the molten center to flow beautifully when cut. This recipe makes enough for 4-6 servings, making it ideal for small gatherings or intimate dinners. Whether you’re an experienced baker or a novice in the kitchen, this recipe is straightforward and sure to produce a stunning dessert.
Ingredients (Servings: 4-6):
- 1 cup (170g) semi-sweet chocolate chips
- 1/2 cup (113g) unsalted butter
- 1/4 cup (30g) all-purpose flour
- 1/2 cup (100g) granulated sugar
- 2 large eggs
- 2 large egg yolks
- 1 teaspoon vanilla extract
- 1 tablespoon instant coffee granules
- 1 tablespoon hot water
- 1/4 teaspoon salt
- Cocoa powder for dusting
- Whipped cream or vanilla ice cream for serving (optional)
Cooking Instructions:
- Preheat and Prepare Ramekins: Preheat your oven to 425°F (220°C). Grease four to six ramekins and dust them lightly with cocoa powder. This will help ascertain the cakes release easily after baking.
- Melt Chocolate and Butter: In a medium microwave-safe bowl, combine the semi-sweet chocolate chips and unsalted butter. Melt them in the microwave in 30-second intervals, stirring after each interval, until smooth. Alternatively, melt over a double boiler.
- Mix Coffee Granules: In a small bowl, dissolve the instant coffee granules in the hot water to create a concentrated coffee mixture. Stir this into the melted chocolate and butter mixture until well combined.
- Prepare Batter: In a separate large bowl, whisk together the granulated sugar, eggs, and egg yolks until thick and pale. Add in the vanilla extract and the chocolate-coffee mixture, stirring until smooth.
- Incorporate Dry Ingredients: Gently fold in the all-purpose flour and salt into the chocolate mixture until just combined. Be careful not to overmix, as this can affect the texture of the cakes.
- Fill Ramekins: Divide the batter evenly among the prepared ramekins, filling each about three-quarters full. Place the ramekins on a baking sheet for easy handling.
- Bake: Bake in the preheated oven for 12-14 minutes, or until the edges are firm but the center is still soft. The top should be just set and slightly cracked.
- Cool and Serve: Let the cakes cool for 1 minute in the ramekins, then carefully invert them onto individual plates. Serve immediately with a dusting of cocoa powder and a dollop of whipped cream or a scoop of vanilla ice cream, if desired.
Extra Tips:
For the best results, use high-quality chocolate with a cocoa content of at least 60%. This will give your Mocha Coffee Lava Cake a richer flavor and smoother texture.
If you prefer a stronger coffee flavor, you can adjust the amount of instant coffee granules to taste. Be careful not to overbake the cakes; the center should remain molten for that signature gooey texture.
If you’re making these in advance, you can prepare the batter and refrigerate it in the ramekins for up to a day before baking. Just add an extra minute or two to the baking time if baking straight from the fridge.
Raspberry Chocolate Lava Cake
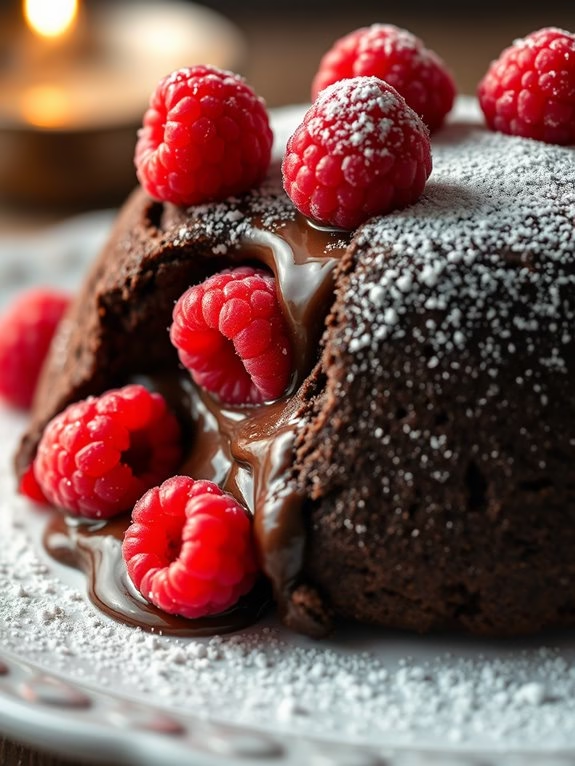
Raspberry Chocolate Lava Cake Recipe
Indulge your senses with the luxurious taste of Raspberry Chocolate Lava Cake, a dessert that combines the rich, velvety texture of molten chocolate with the sweet-tart flavor of fresh raspberries. This decadent treat is perfect for impressing guests at a dinner party or enjoying a romantic evening at home.
The gooey center, surrounded by a soft cake exterior, is complemented by the vibrant burst of raspberry, creating a stunning fusion of flavors that’s bound to delight.
Making Raspberry Chocolate Lava Cake is simpler than it seems, and with this recipe, you can easily prepare a serving size for 4-6 people. The key to achieving the perfect molten center is timing; follow these detailed instructions to guarantee your cakes are just the right consistency.
Whether you’re a seasoned baker or a novice in the kitchen, this dessert is bound to become a favorite.
Ingredients (serving size: 4-6 people):
- 1 cup (175g) of high-quality dark chocolate, chopped
- 1/2 cup (115g) unsalted butter
- 2 large eggs
- 2 large egg yolks
- 1/4 cup (50g) granulated sugar
- 2 tablespoons all-purpose flour
- 1/4 teaspoon salt
- 1/2 teaspoon vanilla extract
- 1/2 cup fresh raspberries, plus extra for garnish
- Powdered sugar, for dusting (optional)
Cooking Instructions:
- Preheat and Prepare: Preheat your oven to 425°F (220°C). Grease four to six ramekins with butter and lightly dust with flour. This will help the cakes release easily after baking.
- Melt Chocolate and Butter: In a medium-sized heatproof bowl, combine the chopped dark chocolate and butter. Place the bowl over a pot of simmering water (double boiler) and stir until both are completely melted and smooth. Remove from heat and let cool slightly.
- Mix Eggs and Sugar: In a separate large bowl, whisk together the eggs, egg yolks, and granulated sugar until the mixture is pale and slightly thickened. This should take about 2-3 minutes.
- Combine Ingredients: Gently fold the melted chocolate mixture into the egg mixture. Add the flour, salt, and vanilla extract, stirring until just combined. Be careful not to overmix.
- Add Raspberries: Gently fold in the fresh raspberries, making sure they’re evenly distributed throughout the batter.
- Fill Ramekins: Divide the batter evenly among the prepared ramekins, filling each about 3/4 full.
- Bake: Place the ramekins on a baking tray and bake in the preheated oven for 12-14 minutes, or until the edges are firm but the center is still slightly soft and jiggly. Remove from the oven and let cool for 1 minute.
- Serve: Carefully run a knife around the edge of each ramekin to loosen the cake. Invert the ramekin onto a serving plate and gently lift it away. Dust with powdered sugar if desired and garnish with extra fresh raspberries. Serve immediately.
Extra Tips: For the best results, use high-quality dark chocolate as it greatly impacts the flavor of the cake. It’s vital not to overbake the cakes; their signature molten center relies on precise timing.
If you prefer a thicker molten center, reduce the baking time by a minute. You can prepare the batter ahead of time and refrigerate it for up to a day; just bring it back to room temperature before baking.
This dessert pairs beautifully with a scoop of vanilla ice cream or a dollop of whipped cream for added indulgence.
Vegan Lava Cake
Vegan Lava Cake Recipe
Indulge in the decadence of a Vegan Lava Cake, a delightful dessert that combines the richness of chocolate with a soft, molten center. Perfect for those who follow a plant-based diet or anyone looking to enjoy a dairy-free treat, this recipe is sure to impress.
With its gooey, flowing chocolate core, each bite of this vegan lava cake is a delectable experience that will satisfy any chocolate lover’s craving. Whether you’re preparing for a special occasion or simply treating yourself, this vegan lava cake is easy to make and requires simple ingredients you might already have in your pantry.
Designed to serve 4-6 people, this recipe guarantees everyone gets a taste of this heavenly dessert. So gather your ingredients, preheat your oven, and let’s get started on creating this luscious vegan delight.
Ingredients (Serves 4-6):
- 1 cup all-purpose flour
- 1 cup almond milk (or any plant-based milk)
- 1/2 cup cocoa powder
- 1/2 cup coconut oil, melted
- 3/4 cup sugar
- 1 tablespoon vanilla extract
- 1 tablespoon apple cider vinegar
- 1 teaspoon baking soda
- 1/2 teaspoon salt
- 1/2 cup dairy-free chocolate chips
Instructions:
- Preheat the Oven: Start by preheating your oven to 350°F (175°C). This guarantees that the oven reaches the desired temperature by the time you finish preparing the batter.
- Prepare Ramekins: Take 4-6 ramekins, depending on your serving preference, and lightly grease them with coconut oil. This will prevent the cakes from sticking and help them slide out easily after baking.
- Mix Dry Ingredients: In a large mixing bowl, sift together the all-purpose flour, cocoa powder, baking soda, and salt. Sifting helps to remove any lumps and guarantees the ingredients are well combined.
- Combine Wet Ingredients: In another bowl, whisk together the almond milk, melted coconut oil, sugar, vanilla extract, and apple cider vinegar until the mixture is smooth and uniform.
- Create the Batter: Slowly add the wet ingredients into the dry ingredients, stirring gently with a spatula until you achieve a smooth batter. Be careful not to overmix, as this can lead to a denser cake.
- Add Chocolate Chips: Fold in the dairy-free chocolate chips into the batter. These chips will melt during baking, contributing to the molten center of the lava cake.
- Fill Ramekins: Divide the batter evenly among the prepared ramekins, filling each about three-quarters full to allow room for the cakes to rise.
- Bake: Place the ramekins on a baking sheet and bake in the preheated oven for about 15-18 minutes. The edges should be firm while the center remains soft and gooey.
- Cool and Serve: Allow the cakes to cool for a few minutes before carefully inverting each onto a plate. Serve immediately for the best molten effect.
Extra Tips:
For even more flavor, consider adding a pinch of cinnamon or espresso powder to the batter. If you prefer a richer chocolate taste, opt for dark cocoa powder.
Additionally, these cakes can be prepared ahead of time; simply store them in the fridge and bake them just before serving. For a more decadent presentation, top the cakes with a scoop of vegan ice cream or a sprinkle of powdered sugar. Enjoy your vegan lava cake warm to experience the full, gooey delight!
Gluten-Free Lava Cake

Gluten-Free Lava Cake Recipe
Indulging in a decadent dessert doesn’t have to be off-limits for those adhering to a gluten-free diet. This sumptuous Gluten-Free Lava Cake is the perfect solution, combining rich chocolate flavor with a gooey, molten center that will satisfy any sweet tooth. Made with simple, gluten-free ingredients, this dessert isn’t only delicious but also easy to prepare, guaranteeing that everyone at your gathering can enjoy a warm, chocolatey treat.
This recipe yields 4-6 servings and is perfect for intimate gatherings or special occasions. It uses high-quality dark chocolate and gluten-free flour to create a dessert that’s both indulgent and suitable for those with gluten sensitivities. With just a few steps and minimal ingredients, you can whip up a dessert that feels gourmet while accommodating dietary needs.
Ingredients (serving size: 4-6 people):
- 1/2 cup (1 stick) unsalted butter
- 1 cup high-quality dark chocolate chips
- 2 large eggs
- 2 large egg yolks
- 1/4 cup granulated sugar
- 2 tablespoons gluten-free all-purpose flour
- 1 teaspoon vanilla extract
- A pinch of salt
- Optional: powdered sugar for dusting
Cooking Instructions:
- Preheat the Oven: Begin by preheating your oven to 425°F (220°C). This guarantees that your oven reaches the necessary temperature for the lava cakes to bake properly.
- Prepare Ramekins: Lightly grease 4-6 ramekins with butter or non-stick spray, and place them on a baking sheet. This will prevent the cakes from sticking and make them easier to remove once baked.
- Melt Chocolate and Butter: In a microwave-safe bowl, combine the butter and dark chocolate chips. Microwave in 30-second intervals, stirring in between, until the mixture is smooth and fully melted. Allow it to cool slightly.
- Mix Wet Ingredients: In a separate large mixing bowl, whisk together the eggs, egg yolks, and granulated sugar until the mixture is pale and thick. This will help incorporate air into the batter, making the cakes light and fluffy.
- Combine Mixtures: Gradually pour the melted chocolate into the egg mixture, whisking continuously to prevent the eggs from cooking. Add the vanilla extract and stir until well combined.
- Add Dry Ingredients: Gently fold in the gluten-free flour and a pinch of salt, taking care not to overmix. This guarantees that the cakes remain tender.
- Fill Ramekins: Divide the batter evenly among the prepared ramekins, filling each about 3/4 full. This allows room for the cakes to rise while baking.
- Bake: Place the baking sheet with the ramekins in the preheated oven and bake for 12-14 minutes, or until the edges are firm but the center remains soft.
- Cool and Serve: Allow the cakes to cool for 1-2 minutes before carefully inverting them onto serving plates. Dust with powdered sugar if desired, and serve immediately while the centers are still molten.
Extra Tips:
For the best results, guarantee that your ramekins are well-greased to prevent sticking. If you’re unsure about your oven’s temperature accuracy, consider using an oven thermometer to confirm that the cakes bake evenly.
Additionally, the batter can be prepared ahead of time and stored in the refrigerator for up to a day, allowing you to bake the cakes just before serving. This makes it a convenient dessert option for entertaining.
Spicy Chili Chocolate Lava Cake
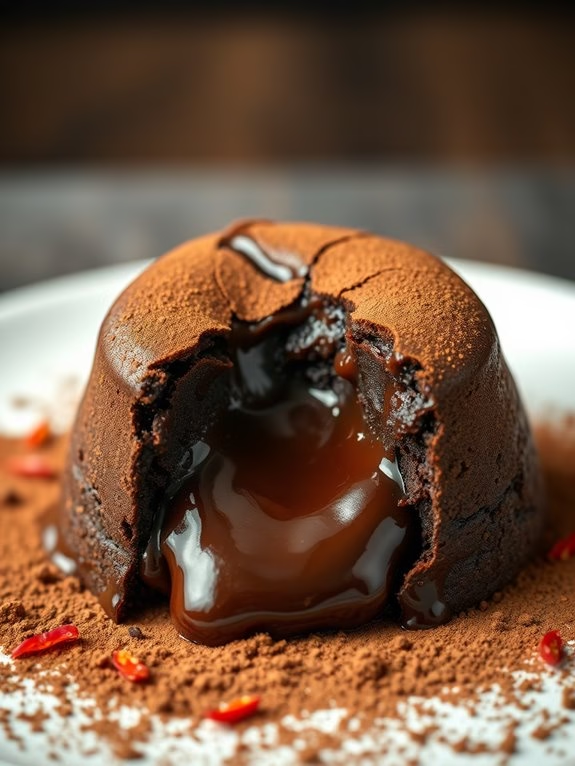
Spicy Chili Chocolate Lava Cake
Indulge in the rich and decadent world of chocolate with a fiery twist by preparing a Spicy Chili Chocolate Lava Cake. This dessert combines the velvety smoothness of molten chocolate with the subtle heat of chili, creating an unforgettable taste adventure. Perfect for those who love a bit of spice with their sweetness, this lava cake is ideal for special occasions or when you simply want to elevate your dessert game.
The contrasting flavors not only tantalize the taste buds but also leave a lingering warmth that complements the gooey chocolate center. This recipe serves 4-6 people, making it an excellent choice for a cozy gathering or a small dinner party. The preparation involves creating a luscious chocolate batter infused with chili powder, which is then baked until the exterior is firm but the interior remains molten.
Serve it warm to experience the delightful ooze of chocolate as you cut into the cake, releasing a burst of spicy-sweet flavor.
Ingredients:
- 1 cup (175g) dark chocolate, chopped
- 1/2 cup (115g) unsalted butter
- 2 large eggs
- 2 large egg yolks
- 1/4 cup (50g) granulated sugar
- 1/2 teaspoon vanilla extract
- 1/4 cup (30g) all-purpose flour
- 1/2 teaspoon ground cinnamon
- 1/4 teaspoon cayenne pepper
- 1/4 teaspoon chili powder
- Pinch of salt
- Butter and cocoa powder (for greasing ramekins)
Cooking Instructions:
- Preheat the Oven: Start by preheating your oven to 425°F (220°C). This guarantees that your oven is hot enough to cook the cakes quickly, giving them the desired molten center.
- Prepare the Ramekins: Generously butter 4-6 ramekins, then dust them with cocoa powder. This step helps the cakes release easily after baking.
- Melt Chocolate and Butter: In a heatproof bowl, combine the dark chocolate and butter. Place over a pot of simmering water, stirring occasionally until melted and smooth. Alternatively, you can use a microwave in short bursts, stirring between each interval.
- Mix Eggs and Sugar: In a separate bowl, whisk together the eggs, egg yolks, and granulated sugar until the mixture is pale and slightly thickened. This process incorporates air, which helps the cakes rise.
- Combine Ingredients: Slowly add the melted chocolate mixture to the egg mixture, stirring continuously to avoid cooking the eggs. Mix until well combined.
- Add Dry Ingredients: Sift in the flour, cinnamon, cayenne pepper, chili powder, and salt. Gently fold the dry ingredients into the wet mixture until just combined, being careful not to overmix.
- Fill the Ramekins: Evenly distribute the batter among the prepared ramekins, filling each about 3/4 full to allow room for rising.
- Bake the Cakes: Place the ramekins on a baking sheet and bake in the preheated oven for 12-14 minutes. The edges should be firm while the center remains soft.
- Serve: Let the cakes cool for a minute, then run a knife around the edges and invert onto serving plates. Serve immediately for the best molten center experience.
Extra Tips:
To guarantee the perfect lava texture, keep a close watch on the cakes during the last few minutes of baking, as oven temperatures may vary. Adjust the chili powder to your taste preference; a little goes a long way in adding heat.
If you’re preparing this dessert in advance, you can refrigerate the batter in the ramekins and bake them fresh when needed, adjusting the baking time slightly. For an added touch, serve with a scoop of vanilla ice cream or a dollop of whipped cream to balance the spice.
Orange Zest Lava Cake
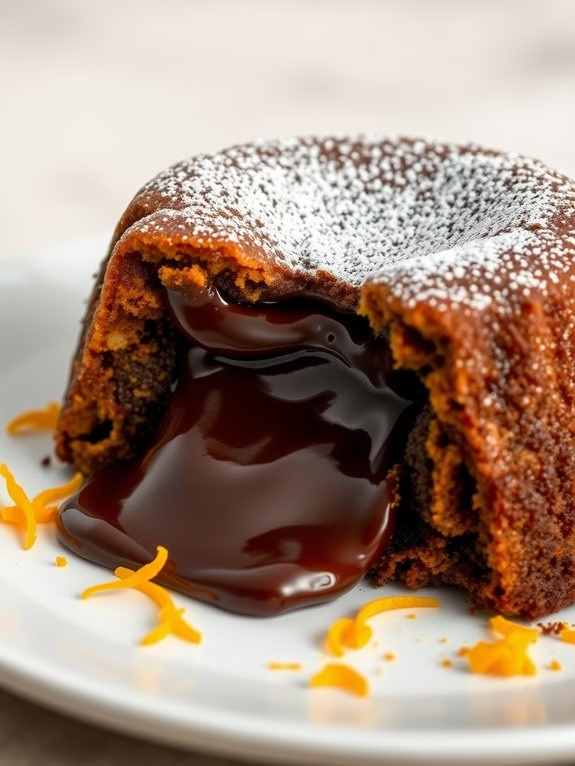
Indulge in the decadent delight of an Orange Zest Lava Cake, a sumptuous dessert that combines the rich flavors of chocolate with the zesty brightness of orange. This culinary masterpiece offers a molten center that oozes out upon cutting, creating an irresistible treat that’s perfect for special occasions or when you simply want to spoil yourself and your loved ones.
The addition of orange zest not only enhances the cake’s flavor profile but also adds a revitalizing twist that perfectly complements the chocolate.
Orange Zest Lava Cake is surprisingly simple to prepare, despite its gourmet appearance. By following a few straightforward steps, you can impress your guests with a dessert that looks and tastes like it came from a high-end restaurant. This recipe serves 4-6 people, making it ideal for a small dinner party or family gathering.
The key to mastering this cake is in the timing and temperature, guaranteeing the outer layer is cooked while the center remains deliciously gooey.
Ingredients (serving size: 4-6 people):
- 1 cup semi-sweet chocolate chips or chunks
- 1/2 cup unsalted butter
- 1/2 cup all-purpose flour
- 1/2 cup powdered sugar
- 2 large eggs
- 2 egg yolks
- 1 teaspoon vanilla extract
- 1 tablespoon orange zest
- A pinch of salt
- Non-stick spray or butter for greasing
- Optional: powdered sugar and orange slices for garnish
Cooking Instructions:
- Preheat Oven and Prepare Ramekins: Preheat your oven to 425°F (220°C). Grease 4 to 6 ramekins with non-stick spray or butter to prevent the cakes from sticking.
- Melt Chocolate and Butter: In a microwave-safe bowl, combine the chocolate chips and butter. Microwave in 30-second intervals, stirring in between, until both are completely melted and smooth.
- Mix Dry Ingredients: In a separate bowl, sift together the flour, powdered sugar, and salt. This will guarantee the dry ingredients are well-combined and free of lumps.
- Combine Wet Ingredients: In another bowl, whisk the eggs, egg yolks, and vanilla extract until smooth. Add the melted chocolate mixture and stir until fully incorporated.
- Incorporate Orange Zest: Add the orange zest to the chocolate and egg mixture, stirring until evenly distributed to infuse the batter with citrusy flavor.
- Combine Mixtures: Gradually fold the dry ingredients into the wet mixture using a spatula, mixing gently until just combined. Be careful not to overmix, as this can affect the cake’s texture.
- Fill Ramekins: Divide the batter evenly among the prepared ramekins, filling each about 3/4 full to allow room for the cakes to rise.
- Bake Lava Cakes: Place ramekins on a baking tray and bake in the preheated oven for 12-14 minutes. The edges should be firm, while the center remains soft.
- Rest and Serve: Allow the cakes to rest for 1 minute once removed from the oven. Gently run a knife around the edges, invert onto plates, and serve immediately. Optionally, dust with powdered sugar and garnish with orange slices.
Extra Tips:
For the best results, use high-quality chocolate, as it greatly affects the flavor of the lava cake. If you want to prepare the batter in advance, you can store it in the ramekins in the fridge for up to 24 hours before baking.
Just remember to let them come to room temperature before placing them in the oven. Always keep an eye on the baking time, as even a minute too long can result in a fully cooked center, losing the signature lava flow.
Nutella Lava Cake
Indulge in the rich and gooey delight of Nutella Lava Cake, a heavenly dessert that’s perfect for chocolate lovers. This decadent treat combines the creamy, nutty flavor of Nutella with the classic molten chocolate cake, resulting in a dessert that’s both sophisticated and irresistibly delicious.
Whether you’re preparing for a special occasion or simply treating yourself to a sweet escape, Nutella Lava Cake is certain to impress with its warm, flowing center and tender, cakey exterior.
Creating Nutella Lava Cake is surprisingly easy, making it an excellent choice for both seasoned bakers and beginners. With just a few simple ingredients and minimal preparation time, you can whip up a batch of these delightful cakes in under 30 minutes.
Served warm and fresh from the oven, each cake reveals a luscious core of melted Nutella, creating a perfect balance of textures and flavors. Pair it with a scoop of vanilla ice cream or a dollop of whipped cream for an extra touch of indulgence.
Ingredients for Nutella Lava Cake (Serves 4-6):
- 1/2 cup unsalted butter
- 1 cup semisweet chocolate chips
- 2 tablespoons Nutella
- 2 large eggs
- 2 large egg yolks
- 1/4 cup granulated sugar
- 1 teaspoon vanilla extract
- 1/4 cup all-purpose flour
- Pinch of salt
- Powdered sugar (optional, for dusting)
Cooking Instructions:
- Preheat the Oven: Preheat your oven to 425°F (220°C). Grease 4-6 ramekins (depending on the size) with butter and lightly dust them with flour, tapping out any excess. This will help the cakes release easily after baking.
- Melt the Chocolate and Butter: In a microwave-safe bowl, combine the unsalted butter and semisweet chocolate chips. Heat in 30-second intervals, stirring after each, until the mixture is smooth and completely melted. Stir in the Nutella until well combined.
- Prepare the Egg Mixture: In a separate bowl, whisk together the eggs, egg yolks, granulated sugar, and vanilla extract until the mixture is thick and pale.
- Combine and Fold: Gently fold the melted chocolate mixture into the egg mixture until fully incorporated. Be careful not to deflate the eggs. Sift in the flour and a pinch of salt, and fold gently until just combined.
- Fill the Ramekins: Divide the batter evenly among the prepared ramekins, filling each about 3/4 full. Place the ramekins on a baking sheet to catch any overflow.
- Bake the Cakes: Bake in the preheated oven for 12-14 minutes, or until the edges are firm but the centers are still slightly jiggly. Be careful not to overbake, as you want the center to remain molten.
- Serve Immediately: Allow the cakes to cool for 1-2 minutes before gently running a knife around the edges to loosen them. Invert the ramekins onto serving plates, tapping gently to release the cakes. Dust with powdered sugar if desired, and serve immediately.
Extra Tips:
For the best results, make sure all your ingredients are at room temperature before you start. This helps them blend together more smoothly.
Also, be precise with your baking time; keep an eye on the cakes to ascertain the centers remain molten. If you prefer a richer chocolate flavor, you can substitute dark chocolate chips for semisweet.
Finally, if you want to prepare ahead of time, you can make the batter and fill the ramekins, then refrigerate them until you’re ready to bake. Just add an extra minute or two to the baking time if they’re cold from the fridge.
Enjoy this luscious treat with your favorite ice cream or whipped topping for the ultimate dessert experience!