
The holiday season is all about sharing good food with the people we love. I’ve gathered a delightful collection of simple Christmas potluck side dish recipes that will shine on your festive table. Think roasted garlic parmesan Brussels sprouts and a colorful Mediterranean couscous salad. These dishes are not only easy to make, but they also promise to leave a lasting impression. Ready to see what else is on the menu?
Roasted Garlic Parmesan Brussels Sprouts
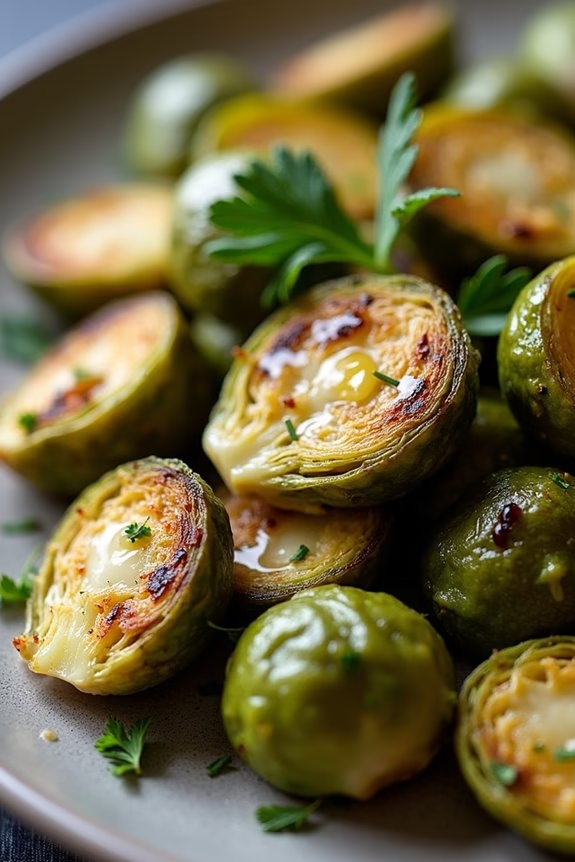
Roasted Garlic Parmesan Brussels Sprouts are a delightful addition to any Christmas potluck, bringing a perfect blend of flavors and textures to the table. These Brussels sprouts are roasted to perfection, allowing them to develop a crispy exterior while maintaining a tender interior. The combination of garlic and parmesan elevates the natural earthiness of the Brussels sprouts, creating a side dish that’s both savory and irresistible. This dish not only complements any main course but also stands out as a star on its own.
Ideal for serving 4-6 people, this recipe is simple yet sophisticated, making it a perfect choice for holiday gatherings. The ingredients are straightforward, guaranteeing that you can create a flavorful dish without spending too much time in the kitchen. Whether you’re a seasoned chef or a beginner looking to impress your guests, these Roasted Garlic Parmesan Brussels Sprouts are sure to be a hit at your next Christmas potluck.
Ingredients:
- 1 ½ pounds Brussels sprouts, trimmed and halved
- 3 tablespoons olive oil
- 4 cloves garlic, minced
- ½ cup grated Parmesan cheese
- Salt and pepper to taste
- 1 tablespoon lemon juice
- Optional: 1 tablespoon chopped fresh parsley for garnish
Instructions:
- Preheat the Oven: Start by preheating your oven to 400°F (200°C). This guarantees that the Brussels sprouts will roast evenly and develop a nice golden-brown color.
- Prepare the Brussels Sprouts: Rinse the Brussels sprouts under cold water and pat them dry with a towel. Trim the ends and remove any yellow leaves before slicing them in half.
- Season the Sprouts: In a large mixing bowl, combine the halved Brussels sprouts, olive oil, minced garlic, salt, and pepper. Toss everything together until the sprouts are well-coated with the mixture.
- Roast the Sprouts: Spread the seasoned Brussels sprouts evenly on a baking sheet, cut side down, to promote even browning. Roast in the preheated oven for 20-25 minutes, or until the edges are crispy and the sprouts are tender when pierced with a fork.
- Add Parmesan and Lemon: Remove the baking sheet from the oven and sprinkle the grated Parmesan cheese over the Brussels sprouts. Return them to the oven for an additional 3-5 minutes until the cheese is melted and bubbly. Drizzle with lemon juice before serving to enhance the flavors.
- Garnish and Serve: Transfer the roasted Brussels sprouts to a serving platter and, if desired, garnish with chopped fresh parsley. Serve hot and enjoy!
Extra Tips:
When selecting Brussels sprouts, look for ones that are firm and bright green for the best flavor. If you prefer a bit more caramelization, you can increase the oven temperature to 425°F (220°C) but keep a close eye to prevent burning.
For an extra flavor boost, consider adding a sprinkle of red pepper flakes or a drizzle of balsamic glaze before serving. Finally, if you’re preparing this dish ahead of time, you can reheat the sprouts at 350°F (175°C) for about 10 minutes before serving.
Cranberry Pecan Wild Rice Pilaf
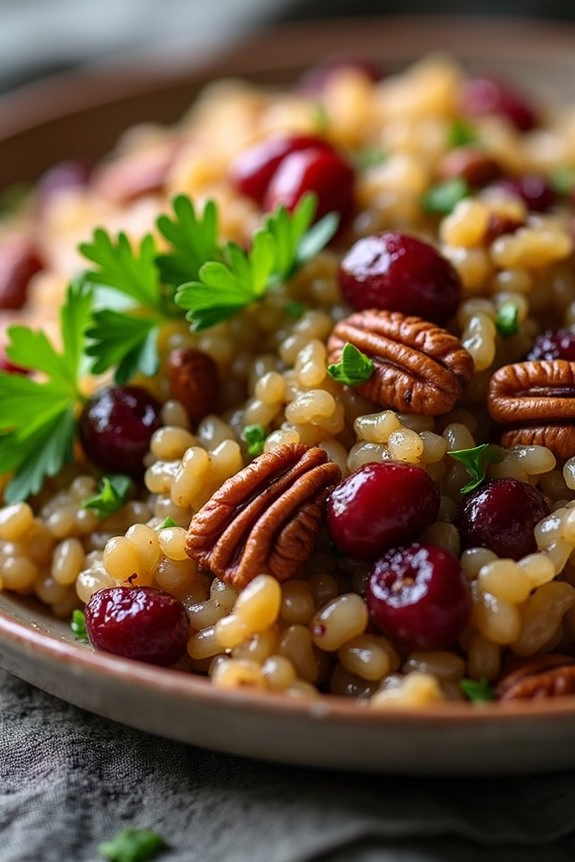
Cranberry Pecan Wild Rice Pilaf is a delightful and colorful side dish that brings festive flavors to any holiday table. The nutty taste of wild rice pairs beautifully with the sweetness of dried cranberries and the crunch of toasted pecans, making it a perfect addition to a Christmas potluck. This dish adds a lovely texture contrast and a pop of color, making it as visually appealing as it’s delicious.
Whether you’re hosting a big family gathering or attending a small holiday dinner, this pilaf is certain to be a hit.
In addition to its fantastic taste, Cranberry Pecan Wild Rice Pilaf is also a healthy choice, packed with fiber and antioxidants. The earthy flavors of the wild rice are complemented by the subtle sweetness of cranberries and the rich, buttery flavor of pecans. The dish is also seasoned with aromatic herbs, enhancing the overall flavor profile.
Best of all, it can be prepared ahead of time, allowing you to focus on other holiday preparations. Serve it warm or at room temperature for a versatile side dish that your guests will love.
Ingredients for 4-6 servings:
- 1 cup wild rice
- 2 cups vegetable broth
- 1/2 cup dried cranberries
- 1/2 cup pecans, roughly chopped
- 1 small onion, finely chopped
- 2 cloves garlic, minced
- 2 tablespoons olive oil
- 1 teaspoon salt
- 1/2 teaspoon black pepper
- 1/2 teaspoon dried thyme
- 1/4 teaspoon ground cinnamon
- 2 tablespoons fresh parsley, chopped (optional, for garnish)
Cooking Instructions:
- Prepare the Rice: Rinse the wild rice under cold water to remove any excess starch. This will help prevent the rice from becoming sticky as it cooks.
- Cook the Rice: In a medium-sized saucepan, bring the vegetable broth to a boil. Add the wild rice, reduce the heat to low, cover, and simmer for about 45-50 minutes or until the rice is tender and has absorbed most of the liquid. Once cooked, fluff the rice with a fork and set aside.
- Toast the Pecans: In a dry skillet over medium heat, add the chopped pecans. Toast them for about 5 minutes, stirring frequently to avoid burning, until they’re a light golden brown and fragrant. Remove from heat and set aside.
- Sauté Aromatics: In a large skillet, heat the olive oil over medium heat. Add the chopped onion and sauté for about 3-4 minutes until they become translucent. Add the minced garlic and cook for another minute until fragrant.
- Combine Ingredients: Add the cooked wild rice to the skillet with the onions and garlic. Stir in the dried cranberries, toasted pecans, salt, pepper, thyme, and cinnamon. Mix well to ascertain all ingredients are evenly distributed and heated through.
- Finish the Dish: Taste and adjust seasoning if necessary. Transfer the pilaf to a serving dish and garnish with fresh parsley if desired.
Extra Tips:
When cooking the wild rice, be patient; it takes longer than regular rice due to its sturdy texture. If you find the rice isn’t tender after the recommended cooking time, you can add a little more broth and continue simmering.
To make this dish more festive, consider adding a splash of orange juice or zest for added brightness. Additionally, if you prefer a bit of a savory kick, consider adding a pinch of cayenne pepper.
This dish can be made a day in advance and reheated before serving, allowing the flavors to meld beautifully.
Honey Glazed Carrots
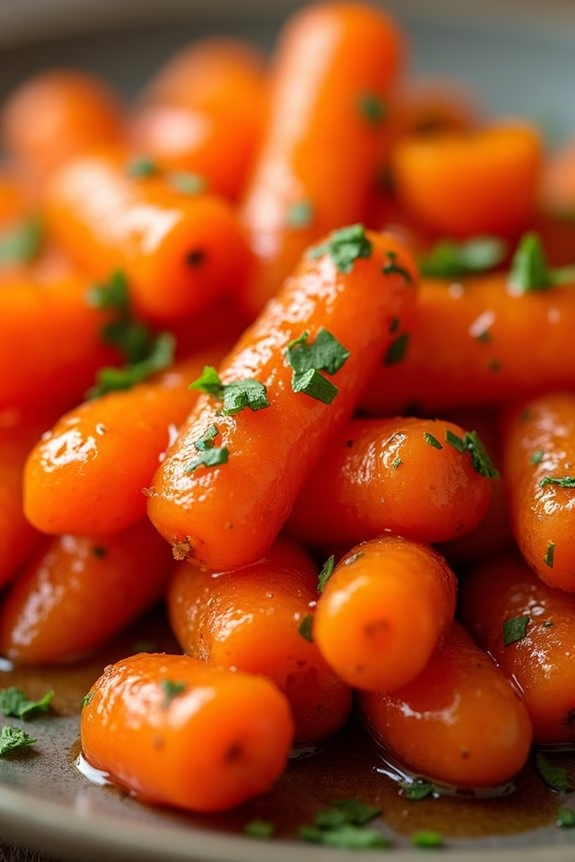
Honey glazed carrots are a delightful and colorful addition to any Christmas potluck. This side dish combines the natural sweetness of carrots with a luscious honey glaze, providing a perfect balance of flavors that will complement any main course. The carrots are cooked until tender, then coated with a rich and sticky glaze that accentuates their sweetness, making them irresistible.
This dish isn’t only delicious but also easy to prepare, allowing you to enjoy the festivities without spending too much time in the kitchen.
Whether you’re hosting a large gathering or attending a potluck, honey glazed carrots are sure to be a hit. The vibrant orange color adds a festive touch to the holiday table, and the sweet aroma will entice your guests. This recipe is designed to serve 4-6 people, making it ideal for small to medium-sized gatherings.
With just a few simple ingredients and straightforward steps, you can create a crowd-pleasing side dish that will leave everyone asking for seconds.
Ingredients (Serves 4-6):
- 1 ½ pounds of carrots, peeled and cut into 2-inch pieces
- 3 tablespoons of unsalted butter
- 3 tablespoons of honey
- 2 tablespoons of brown sugar
- 1 tablespoon of apple cider vinegar
- Salt and pepper to taste
- Fresh parsley, chopped (optional, for garnish)
Cooking Instructions:
- Prepare the Carrots: Peel the carrots and cut them into uniform 2-inch pieces. This guarantees even cooking. If the carrots are thick, consider cutting them in half lengthwise to guarantee they cook through evenly.
- Cook the Carrots: Bring a large pot of salted water to a boil. Add the carrot pieces and cook for about 5-7 minutes until they’re just tender but not mushy. Drain the carrots and set them aside.
- Make the Glaze: In a large skillet over medium heat, melt the butter. Once melted, add the honey, brown sugar, and apple cider vinegar. Stir the mixture until the sugar is completely dissolved and the glaze is smooth.
- Combine the Carrots and Glaze: Add the cooked carrots to the skillet. Toss them gently to guarantee they’re evenly coated with the glaze. Continue to cook for an additional 5 minutes, stirring occasionally, until the glaze thickens slightly and clings to the carrots.
- Season and Serve: Season the glazed carrots with salt and pepper to taste. Transfer them to a serving dish and, if desired, sprinkle with freshly chopped parsley for a pop of color and added freshness.
Extra Tips: To save time on the day of your potluck, you can pre-cook the carrots a day in advance and store them in the refrigerator. When you’re ready to serve, simply reheat them in the skillet with the glaze.
Additionally, for a spicier kick, try adding a pinch of red pepper flakes to the glaze. This will complement the sweetness of the honey and give the dish an exciting twist. Be sure to adjust the sweetness and seasoning to your personal preference to create a balanced flavor that suits your taste.
Creamy Mashed Potatoes With Chives
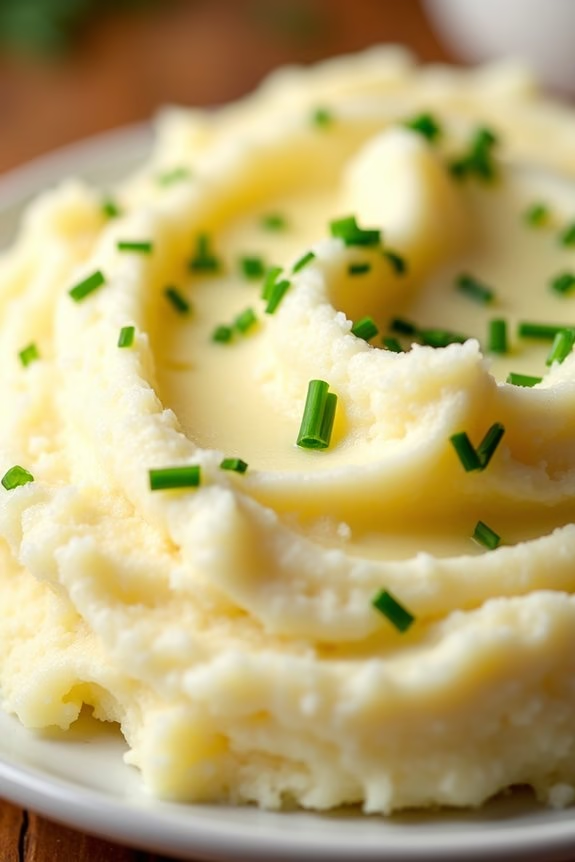
Creamy mashed potatoes with chives is a classic side dish that brings a touch of elegance and flavor to any holiday table. This dish combines the smooth, velvety texture of mashed potatoes with the fresh, mild onion-like flavor of chives, creating a delightful harmony that pairs well with a variety of main courses. Ideal for a Christmas potluck, these mashed potatoes are sure to be a crowd-pleaser, satisfying both traditionalists and those seeking something a little extra.
The key to truly creamy mashed potatoes lies in the choice of potatoes and the method of preparation. Yukon Gold potatoes are preferred for their naturally buttery taste and smooth texture. By using a combination of butter, cream, and sour cream, these mashed potatoes achieve a luxurious creaminess, while the addition of fresh chives adds a subtle pop of color and flavor that balances the richness. This recipe is designed to serve 4-6 people, making it perfect for a small gathering or as part of a larger holiday feast.
Ingredients (serving size 4-6 people):
- 2 pounds Yukon Gold potatoes
- 1/2 cup unsalted butter
- 1/2 cup heavy cream
- 1/4 cup sour cream
- Salt, to taste
- Freshly ground black pepper, to taste
- 1/4 cup fresh chives, finely chopped
Cooking Instructions:
- Prepare the Potatoes: Peel and cut the potatoes into evenly sized chunks. This guarantees they cook at the same rate, preventing any undercooked pieces.
- Boil the Potatoes: Place the potato chunks in a large pot and cover them with cold water. Add a generous pinch of salt to the water. Bring to a boil over medium-high heat, then reduce the heat to maintain a simmer. Cook until the potatoes are fork-tender, about 15-20 minutes.
- Drain and Dry: Once the potatoes are cooked, drain them well. Return the potatoes to the pot and place it back on the stove over low heat for 1-2 minutes to allow excess moisture to evaporate.
- Mash the Potatoes: Using a potato masher or a ricer, mash the potatoes until smooth. Avoid over-mashing as this can make the potatoes gluey.
- Add Butter and Cream: In a small saucepan, melt the butter over low heat. Stir in the heavy cream and warm gently. Pour the butter and cream mixture into the mashed potatoes, stirring to combine.
- Incorporate Sour Cream and Season: Add the sour cream to the potatoes and mix until smooth. Season with salt and freshly ground black pepper to taste.
- Fold in Chives: Gently fold in the chopped chives, making sure they’re evenly distributed throughout the mashed potatoes.
- Serve: Transfer the creamy mashed potatoes with chives to a serving dish. Garnish with additional chives if desired.
Extra Tips:
To achieve the perfect texture, make certain the potatoes are fully cooked before mashing. Under-cooked potatoes can lead to a lumpy mash. For an even richer flavor, consider using a combination of heavy cream and milk. If you prefer a lighter dish, substitute some of the butter and cream with chicken broth.
Finally, taste as you go to guarantee the seasoning is just right for your palate. Enjoy your creamy mashed potatoes with chives as a comforting and delicious addition to your Christmas potluck!
Balsamic Roasted Root Vegetables
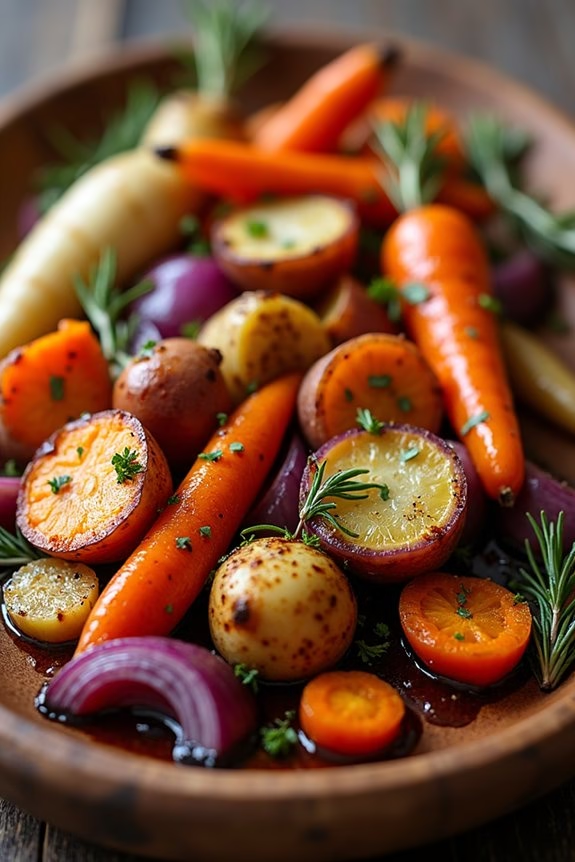
Balsamic Roasted Root Vegetables are a delightful and colorful addition to any Christmas potluck spread. This dish combines the earthy flavors of root vegetables with the tangy sweetness of balsamic vinegar, resulting in a side dish that’s both comforting and sophisticated. The roasting process brings out the natural sugars in the vegetables, creating a caramelized exterior that’s irresistible. Perfect for sharing, this recipe is designed to serve 4-6 people, making it an ideal choice for a festive gathering.
Root vegetables are a staple of winter cuisine, providing warmth and sustenance during the colder months. In this recipe, a medley of carrots, parsnips, sweet potatoes, and red onions are roasted to perfection, tossed in a balsamic glaze that adds depth and complexity to the dish. The addition of fresh herbs like rosemary or thyme enhances the flavor profile, while a touch of olive oil guarantees that the vegetables are tender on the inside and crisp on the outside.
Serve these balsamic roasted root vegetables alongside your favorite holiday main courses to delight your guests with a dish that’s as visually appealing as it’s delicious.
Ingredients (Serves 4-6):
- 2 large carrots
- 2 parsnips
- 1 large sweet potato
- 1 red onion
- 3 tablespoons olive oil
- 3 tablespoons balsamic vinegar
- 2 teaspoons honey
- 1 teaspoon salt
- 1/2 teaspoon black pepper
- 1 teaspoon fresh rosemary, chopped
- 1 teaspoon fresh thyme, chopped
Cooking Instructions:
- Preheat the Oven: Begin by preheating your oven to 425°F (220°C). This high temperature is vital for achieving the caramelization that makes roasted vegetables so delicious.
- Prepare the Vegetables: Peel the carrots, parsnips, and sweet potato. Cut them into uniform pieces, approximately 1-inch in size, to promote even cooking. Peel and cut the red onion into wedges.
- Mix the Glaze: In a small bowl, whisk together the olive oil, balsamic vinegar, honey, salt, and pepper. This mixture will serve as both a glaze and seasoning for the vegetables.
- Combine Ingredients: Place the cut vegetables in a large mixing bowl. Pour the balsamic glaze over the vegetables, and add the chopped rosemary and thyme. Toss everything together until the vegetables are evenly coated.
- Roast the Vegetables: Spread the vegetables in a single layer on a baking sheet lined with parchment paper or aluminum foil for easy cleanup. Roast in the preheated oven for 30-35 minutes, turning halfway through, until the vegetables are tender and golden brown.
- Serve: Once cooked, remove the vegetables from the oven and transfer to a serving platter. Garnish with additional fresh herbs if desired, and serve warm.
Extra Tips:
For the best results, guarantee that all vegetable pieces are cut to a similar size to promote even roasting. If you prefer a more robust flavor, you can marinate the vegetables in the glaze for an hour before roasting.
Additionally, feel free to experiment with different root vegetables such as turnips or beets, or add garlic cloves for an extra punch of flavor. Keep an eye on the vegetables towards the end of cooking to avoid burning, as some ovens may vary in heat distribution. Enjoy your balsamic roasted root vegetables as a versatile side that pairs well with any main course.
Garlic Butter Green Beans With Almonds
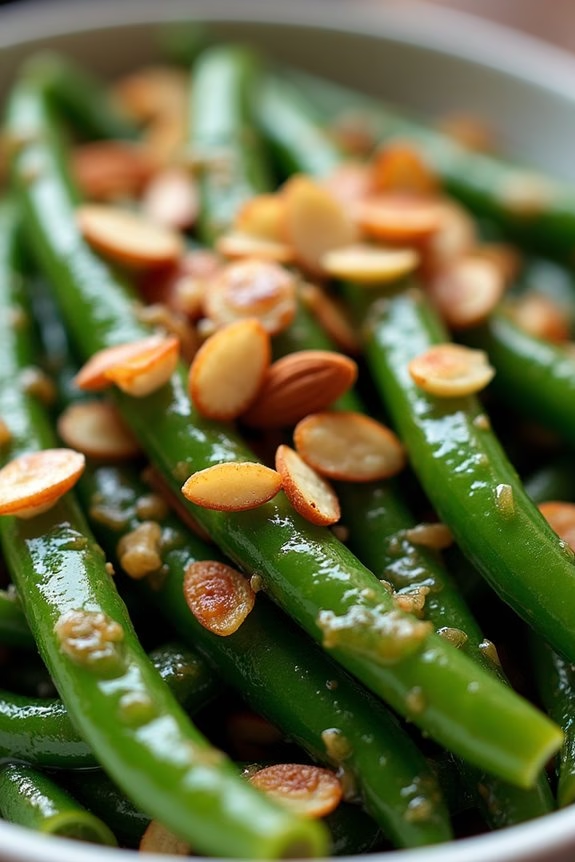
Garlic Butter Green Beans with Almonds is a delightful side dish that brings a burst of flavor and a satisfying crunch to any Christmas potluck. Perfectly cooked green beans are elevated with the rich taste of garlic-infused butter and the nutty goodness of toasted almonds. This dish pairs beautifully with almost any main course, making it a versatile and crowd-pleasing addition to your holiday spread.
The vibrant green color of the beans contrasts beautifully with the golden slivers of almonds, making it as visually appealing as it’s tasty. It’s a simple yet elegant dish that’s quick to prepare and can even be made ahead of time, saving you precious moments during the busy holiday season.
Whether you’re a seasoned cook or a kitchen novice, this recipe is straightforward and sure to impress your guests.
Ingredients (serving size: 4-6 people):
- 1 1/2 pounds fresh green beans, trimmed
- 3 tablespoons unsalted butter
- 3 cloves garlic, minced
- 1/4 cup sliced almonds
- Salt and pepper to taste
- Optional: 1 tablespoon lemon juice
Cooking Instructions:
- Prepare the Green Beans: Start by washing the green beans thoroughly under running water. Trim the ends and blanch them in boiling water for about 3-4 minutes until they’re bright green and tender-crisp. Immediately transfer them to a bowl of ice water to stop the cooking process. Drain well and set aside.
- Toast the Almonds: In a large skillet over medium heat, add the sliced almonds. Stir frequently for about 3-4 minutes until they’re golden brown and fragrant. Be careful not to burn them. Remove the almonds from the skillet and set aside.
- Make the Garlic Butter: In the same skillet, melt the butter over medium heat. Add the minced garlic and sauté for about 1 minute until it becomes fragrant, making sure it doesn’t burn.
- Combine and Season: Add the drained green beans to the skillet with the garlic butter. Toss them to coat well. Season with salt and pepper to taste. Cook for another 2-3 minutes until the beans are heated through.
- Finish and Serve: Add the toasted almonds to the skillet and toss to combine. If using, drizzle the lemon juice over the top for added brightness. Transfer to a serving dish and serve immediately.
Extra Tips:
To guarantee the green beans remain vibrant and crisp, don’t overcook them during the blanching process. If preparing in advance, you can blanch the green beans and toast the almonds ahead of time, then combine and heat just before serving.
For an extra layer of flavor, consider adding a pinch of red pepper flakes or a sprinkle of freshly grated Parmesan cheese before serving. Adjust the seasoning according to your preference, and enjoy this festive and delicious side dish!
Sweet Potato Casserole With Marshmallow Topping
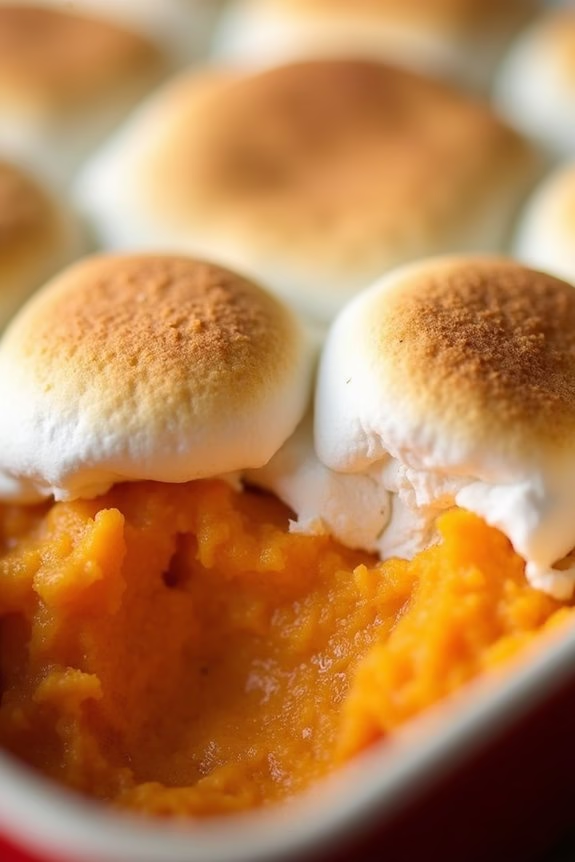
Sweet Potato Casserole with Marshmallow Topping is a classic holiday dish that brings warmth and sweetness to any festive gathering. This dish combines the creamy texture of mashed sweet potatoes with a delightful brown sugar and butter mixture, all topped with a golden layer of gooey marshmallows.
It’s a perfect blend of sweet and savory, making it a favorite among adults and children alike. Whether you’re hosting a Christmas potluck or simply adding to your holiday feast, this casserole is guaranteed to be a crowd-pleaser.
The combination of sweet potatoes and marshmallows might seem unconventional at first, but it’s a traditional comfort food that many look forward to during the holiday season. The natural sweetness of the potatoes is complemented by the caramelized topping, creating a dish that’s both indulgent and heartwarming.
With easy-to-follow steps and readily available ingredients, preparing this sweet potato casserole is a stress-free way to add a touch of nostalgia and flavor to your holiday table.
Ingredients (serving size: 4-6 people)
- 4 large sweet potatoes
- 1/2 cup brown sugar
- 1/2 cup unsalted butter, melted
- 1 teaspoon vanilla extract
- 1/2 cup whole milk
- 1/2 teaspoon salt
- 1/2 teaspoon ground cinnamon
- 1/4 teaspoon ground nutmeg
- 2 cups mini marshmallows
Cooking Instructions
- Preheat the Oven: Begin by preheating your oven to 350°F (175°C) to make certain it’s ready for baking once the casserole is assembled.
- Prepare the Sweet Potatoes: Peel the sweet potatoes and cut them into chunks. Boil them in a large pot of water until they’re fork-tender, which should take about 20 minutes. Drain the potatoes well.
- Mash the Sweet Potatoes: Transfer the cooked sweet potatoes to a large mixing bowl. Add the melted butter, brown sugar, vanilla extract, milk, salt, cinnamon, and nutmeg. Use a masher or electric mixer to mash the potatoes until smooth and creamy.
- Assemble the Casserole: Spread the mashed sweet potato mixture evenly into a greased 9×13-inch baking dish. Smooth the top with a spatula or the back of a spoon.
- Add the Marshmallow Topping: Evenly distribute the mini marshmallows over the top of the sweet potato mixture, making sure they cover the entire surface.
- Bake the Casserole: Place the baking dish in the preheated oven and bake for 25-30 minutes, or until the marshmallows are puffed and golden brown. Keep an eye on the marshmallows to prevent them from burning.
- Serve: Remove from the oven and let it cool for a few minutes before serving. Enjoy this sweet and savory delight with your holiday meal.
Extra Tips
For an added crunch, consider sprinkling chopped pecans or walnuts over the marshmallows before baking. This will provide a nice contrast to the soft texture of the casserole.
If you’re preparing this dish ahead of time, you can prepare the sweet potato mixture and store it in the refrigerator. When you’re ready to serve, simply spread the mixture in the baking dish, add the marshmallows, and bake. This dish also reheats well, making it a convenient choice for holiday leftovers.
Classic Caesar Salad With Homemade Croutons
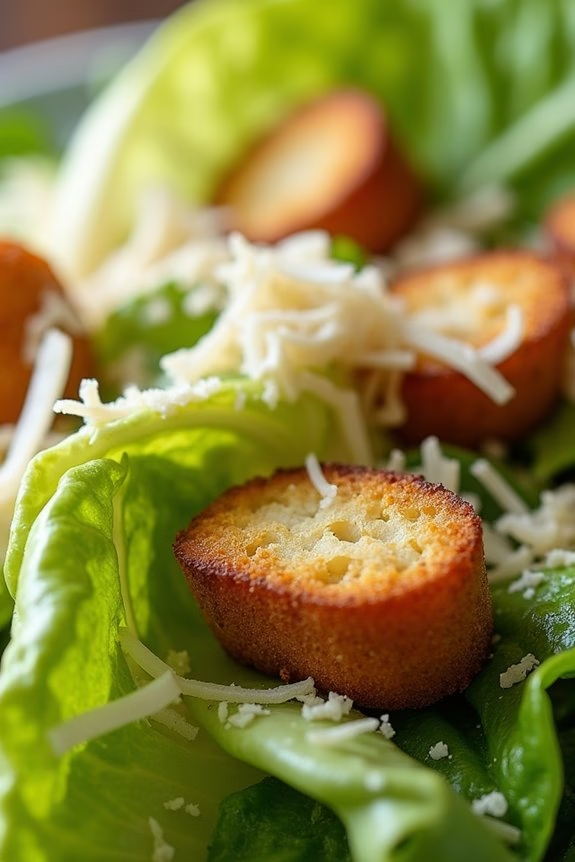
Elevate your Christmas potluck spread with a Classic Caesar Salad featuring homemade croutons. This timeless dish combines crisp romaine lettuce with a creamy, tangy dressing, topped with crunchy, golden-brown croutons for the ideal balance of flavors and textures.
Whether you’re hosting a holiday gathering or attending one, this Caesar salad is sure to be a crowd-pleaser, offering a revitalizing contrast to heavier festive fare.
The key to a standout Caesar salad lies in its dressing and croutons. The dressing is a luscious blend of Parmesan cheese, Dijon mustard, anchovy paste, garlic, lemon juice, and olive oil, delivering a savory, umami-rich taste.
For the croutons, day-old bread is your best friend, providing the perfect texture for toasting to perfection. Paired together, these elements transform simple romaine lettuce into a delectable dish that will have your guests coming back for seconds.
Ingredients for 4-6 servings:
- 2 large heads of romaine lettuce
- 1/2 cup freshly grated Parmesan cheese
- 1 cup day-old bread, cubed
- 1/4 cup olive oil (for croutons)
- 1 clove garlic, minced
- 1 teaspoon anchovy paste
- 1 teaspoon Dijon mustard
- 2 tablespoons lemon juice
- 1/2 cup olive oil (for dressing)
- Salt and pepper to taste
Cooking Instructions:
- Prepare the Lettuce:
- Wash and dry the romaine lettuce thoroughly. Tear or chop the leaves into bite-sized pieces and set them aside in a large salad bowl.
- Make the Croutons:
- Preheat the oven to 375°F (190°C).
- Toss the cubed day-old bread with 1/4 cup of olive oil, a pinch of salt, and a dash of pepper. Spread the bread cubes in a single layer on a baking sheet.
- Bake for 10-15 minutes, or until the croutons are golden brown and crisp. Stir halfway through to guarantee even browning. Remove from the oven and let cool.
- Prepare the Dressing:
- In a small bowl, whisk together minced garlic, anchovy paste, Dijon mustard, and lemon juice until well combined.
- Gradually add 1/2 cup of olive oil while continuing to whisk, creating a smooth and emulsified dressing. Season with salt and pepper to taste.
- Assemble the Salad:
- Add the croutons and grated Parmesan cheese to the bowl with the romaine lettuce.
- Drizzle the dressing over the salad, tossing gently to guarantee all leaves are evenly coated.
- Serve immediately to maintain the crispness of the lettuce and croutons.
Extra Tips:
For peak flavor, use fresh and high-quality ingredients, especially when it comes to the Parmesan cheese and olive oil. Adjust the consistency of the dressing by adding more lemon juice or olive oil, depending on your preference for tartness or creaminess.
If you prefer a more traditional Caesar salad flavor, you can add a coddled egg to the dressing for extra richness. Finally, feel free to add grilled chicken or shrimp for a protein boost, making it a more substantial dish suitable for a main course.
Herbed Mushroom Risotto
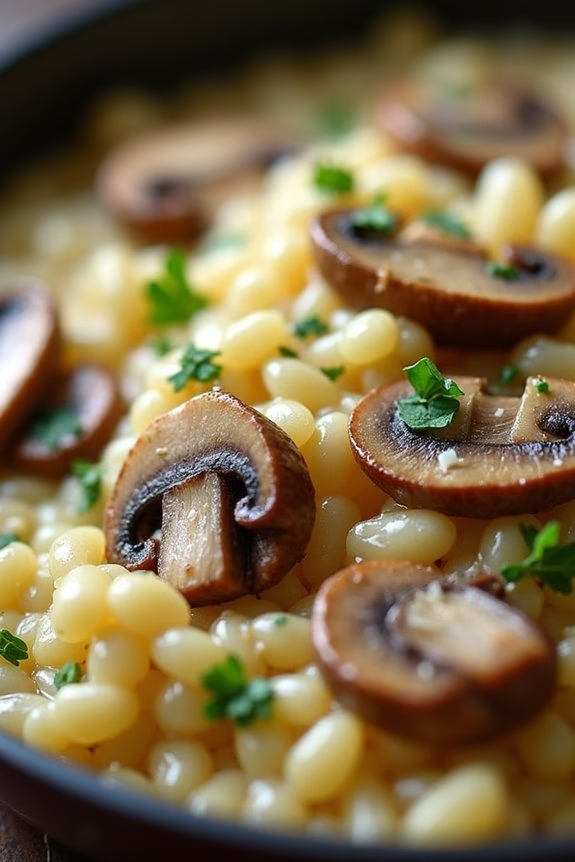
Herbed Mushroom Risotto is a delightful and creamy side dish that’s perfect for a Christmas potluck. The earthy flavors of mushrooms combined with fragrant herbs create a comforting and rich dish that’s sure to impress your guests. Risotto is all about patience and technique, allowing the rice to slowly absorb the broth and release its starches, creating a luscious, velvety texture. This dish pairs beautifully with roasted meats and other holiday favorites, making it a versatile addition to your festive spread.
Preparing Herbed Mushroom Risotto requires attention to detail and a bit of time, but the results are well worth the effort. The key is to use a good quality Arborio rice, which is renowned for its ability to absorb flavors while maintaining a creamy texture. Fresh herbs such as thyme and parsley elevate the dish, providing a fresh contrast to the rich, umami flavors of the mushrooms. With a little preparation and care, you can create a risotto that’s both sophisticated and comforting, perfect for sharing with loved ones during the holiday season.
Ingredients (Serves 4-6):
- 2 tablespoons olive oil
- 1 small onion, finely chopped
- 2 cloves garlic, minced
- 250g (about 9 oz) of mixed mushrooms, sliced
- 1 1/2 cups Arborio rice
- 1/2 cup dry white wine
- 4 cups vegetable or chicken broth, warmed
- 1/2 cup grated Parmesan cheese
- 2 tablespoons butter
- 1 tablespoon fresh thyme, chopped
- 2 tablespoons fresh parsley, chopped
- Salt and pepper to taste
Cooking Instructions:
- Prepare the Ingredients: Begin by heating the olive oil in a large pan over medium heat. Add the chopped onion and sauté until translucent, about 3-4 minutes. Stir in the minced garlic and cook for another minute until fragrant.
- Cook the Mushrooms: Add the sliced mushrooms to the pan, stirring occasionally until they’re golden brown and have released their moisture, approximately 5-7 minutes.
- Toast the Rice: Stir the Arborio rice into the mushroom mixture, ensuring it’s well-coated with oil and begins to toast slightly. This should take about 2-3 minutes, and you’ll notice a nutty aroma.
- Deglaze with Wine: Pour in the white wine, stirring constantly until the liquid is mostly absorbed by the rice. This step adds depth to the flavor profile of the risotto.
- Add Broth Gradually: Begin adding the warm broth to the rice, one ladle at a time. Stir frequently, allowing each addition to be absorbed before adding the next. This process should take about 18-20 minutes until the rice is creamy and tender but still has a slight bite.
- Finish the Risotto: Once the rice is cooked to your liking, remove the pan from heat. Stir in the Parmesan cheese, butter, thyme, and parsley. Season with salt and pepper to taste. Allow the risotto to sit for a couple of minutes to thicken before serving.
Extra Tips:
When making risotto, it’s important to stir frequently but not constantly. This helps the rice release its starches, creating that creamy texture without becoming too mushy. Use freshly grated Parmesan for the best flavor and creaminess, and feel free to adjust the amount of herbs to suit your taste.
If you prefer a more robust mushroom flavor, consider using a mix of varieties such as cremini, shiitake, and porcini. Finally, if you don’t have white wine, you can substitute with an equal amount of additional broth or even a splash of lemon juice for a touch of acidity.
Cheesy Scalloped Potatoes
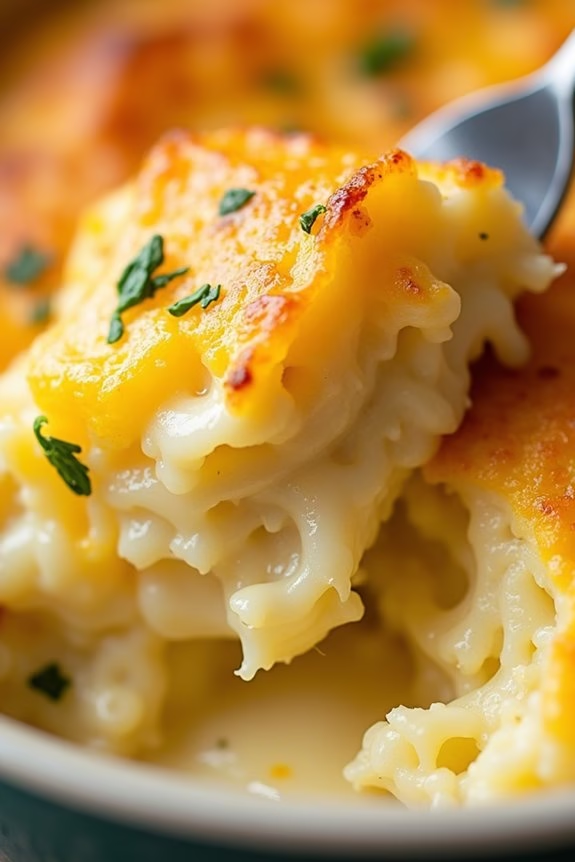
Cheesy Scalloped Potatoes are a classic, comforting side dish that’s perfect for any Christmas potluck. This dish features thinly sliced potatoes layered in a creamy, cheesy sauce that bakes to perfection, resulting in a golden-brown crust with a rich, creamy interior. The combination of tender potatoes and melted cheese creates a mouthwatering flavor that complements any holiday spread, making it a beloved favorite among guests.
The key to this dish’s success lies in the balance of flavors and textures. By using a variety of cheeses and incorporating aromatic ingredients such as garlic and onions, you can enhance the dish’s depth and complexity. Additionally, the layering of the potatoes guarantees even cooking and a satisfying distribution of flavors. Whether you’re serving it alongside a holiday ham or turkey, Cheesy Scalloped Potatoes are sure to impress and delight your family and friends.
Ingredients (serves 4-6):
- 2 pounds of potatoes (such as Yukon Gold or Russet), thinly sliced
- 1 medium onion, thinly sliced
- 2 cloves of garlic, minced
- 2 cups of heavy cream
- 1 cup of whole milk
- 2 tablespoons of unsalted butter
- 2 cups of shredded cheddar cheese
- 1 cup of shredded Gruyère cheese
- 1 teaspoon of salt
- 1/2 teaspoon of black pepper
- 1/2 teaspoon of nutmeg
- 1 tablespoon of fresh thyme leaves or 1 teaspoon of dried thyme
- Cooking spray or extra butter for greasing the baking dish
Cooking Instructions:
- Preheat the Oven: Begin by preheating your oven to 350°F (175°C). This guarantees that the oven is ready for baking once your dish is prepared.
- Prepare the Baking Dish: Grease a 9×13-inch baking dish with cooking spray or butter to prevent the potatoes from sticking during baking.
- Slice the Potatoes and Onions: Using a mandoline or a sharp knife, thinly slice the potatoes to about 1/8-inch thick. Similarly, slice the onion thinly. Set aside.
- Make the Creamy Sauce: In a medium saucepan over medium heat, melt the butter. Add the minced garlic and sliced onion, sautéing until the onion is translucent. Pour in the heavy cream and milk, then add the salt, pepper, and nutmeg. Stir the mixture until well combined.
- Assemble the Dish: Arrange half of the sliced potatoes in an even layer in the prepared baking dish. Pour half of the cream mixture over the potatoes and sprinkle with half of the shredded cheddar and Gruyère cheeses. Repeat the layers with the remaining potatoes, cream mixture, and cheeses.
- Add Herbs and Bake: Sprinkle the thyme leaves over the top of the assembled dish. Cover the baking dish with aluminum foil and bake in the preheated oven for 45 minutes.
- Finish Baking: After 45 minutes, remove the foil and continue baking for an additional 30 minutes, or until the potatoes are tender and the top is golden brown and bubbly.
- Rest and Serve: Allow the dish to rest for about 10 minutes before serving. This resting time helps the sauce to thicken slightly, making it easier to serve.
Extra Tips:
For the best results, choose potatoes that are starchy, such as Yukon Gold or Russet, as they yield a creamier texture. If you prefer a stronger cheese flavor, consider adding a bit of Parmesan or blue cheese to the cheese mixture.
When slicing the potatoes, try to keep them uniformly thin to guarantee even cooking. If you don’t have a mandoline, take extra care with your knife work. Finally, feel free to customize the dish with additional spices or herbs such as paprika or rosemary for added depth of flavor.
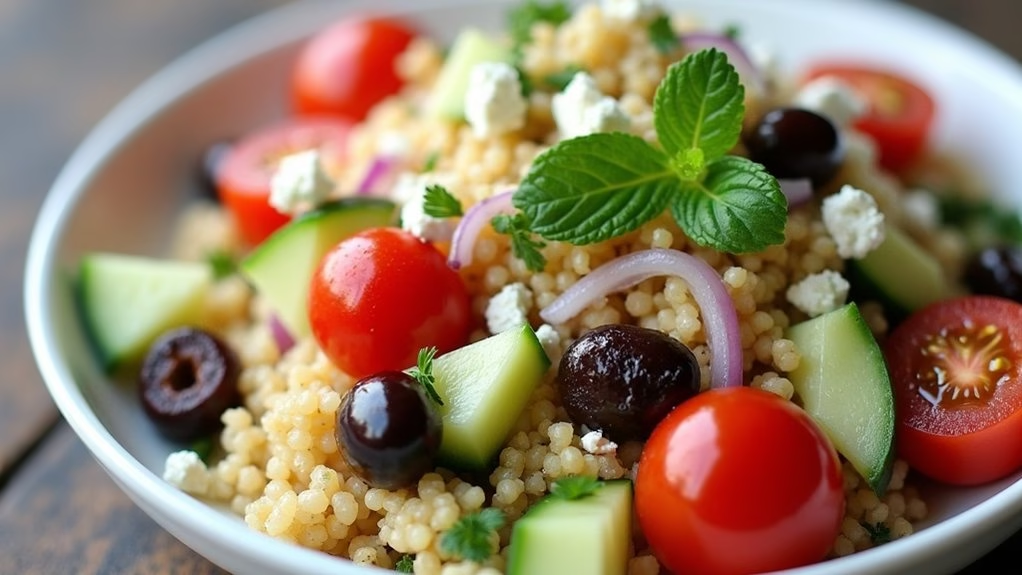
Mediterranean Couscous Salad
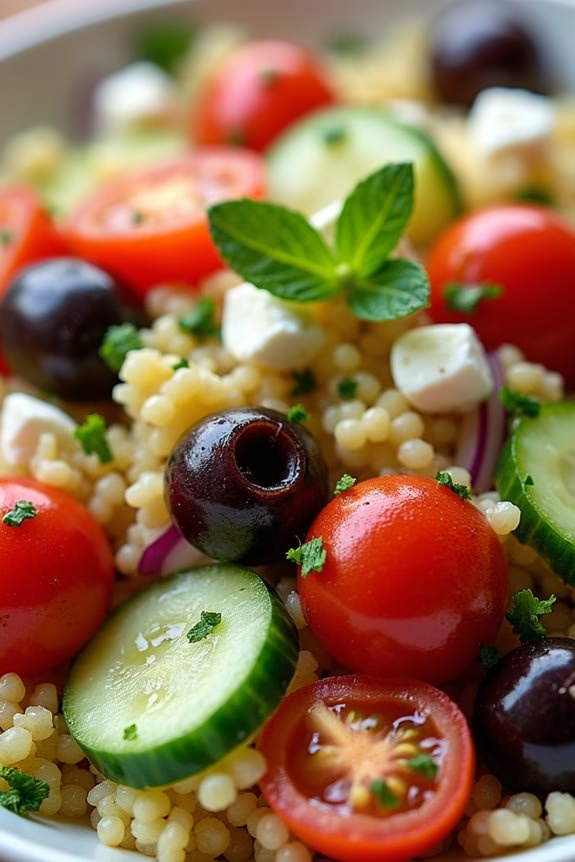
Mediterranean Couscous Salad is a vibrant and flavorful dish that brings together the essence of the Mediterranean diet into a simple and delightful side dish. Perfect for a Christmas potluck, this salad combines fluffy couscous with fresh vegetables, herbs, and a tangy dressing.
It’s not only visually appealing but also packed with nutrients, making it a healthy addition to your holiday table. The versatility of this dish allows it to complement any main course, from roasted meats to vegetarian spreads.
This salad is quick to prepare and can be made ahead of time, which is ideal for the busy holiday season. The combination of ingredients such as cherry tomatoes, cucumbers, olives, and feta cheese creates a symphony of flavors that will have everyone coming back for seconds.
The light lemon-olive oil dressing ties everything together, providing a rejuvenating contrast to heavier holiday dishes. Whether you’re hosting or attending a potluck, this Mediterranean Couscous Salad is sure to be a hit.
Ingredients (Serves 4-6):
- 1 cup couscous
- 1 1/4 cups boiling water
- 1 cup cherry tomatoes, halved
- 1 cucumber, diced
- 1/2 red onion, finely chopped
- 1/2 cup Kalamata olives, pitted and sliced
- 1/2 cup feta cheese, crumbled
- 1/4 cup fresh parsley, chopped
- 1/4 cup fresh mint, chopped
- 1/4 cup olive oil
- 2 tablespoons fresh lemon juice
- Salt and pepper to taste
Cooking Instructions:
- Prepare the Couscous: In a medium-sized bowl, place the couscous and pour the boiling water over it. Cover the bowl with a lid or plastic wrap and let it sit for about 5 minutes. This allows the couscous to absorb the water and become fluffy.
- Fluff the Couscous: Once the couscous has absorbed all the water, remove the lid and use a fork to fluff it up gently. This will separate the grains and prevent clumping.
- Prepare the Vegetables: While the couscous is resting, prepare the vegetables. Halve the cherry tomatoes, dice the cucumber, and finely chop the red onion. Slice the Kalamata olives and set everything aside.
- Mix the Salad: In a large mixing bowl, combine the fluffed couscous, cherry tomatoes, cucumber, red onion, olives, and crumbled feta cheese. Toss gently to guarantee even distribution of ingredients.
- Add Fresh Herbs: Add the chopped parsley and mint to the salad. These herbs will add a fresh and fragrant element to the dish.
- Make the Dressing: In a small bowl, whisk together the olive oil, fresh lemon juice, salt, and pepper. Adjust the seasoning according to taste.
- Toss the Salad: Pour the dressing over the couscous salad and toss everything together until well combined. Confirm that the dressing coats all the ingredients evenly.
- Chill and Serve: For best results, allow the salad to chill in the refrigerator for at least 30 minutes before serving. This will help the flavors meld together beautifully.
Extra Tips:
When preparing Mediterranean Couscous Salad, feel free to customize it with additional ingredients like roasted red peppers, artichoke hearts, or sun-dried tomatoes for added depth of flavor.
If you prefer a gluten-free option, substitute couscous with quinoa. To keep the salad fresh, add the dressing just before serving if you’re making it in advance.
Also, taste and adjust the seasoning prior to serving, as chilling can sometimes mute flavors. Enjoy the vibrant taste of the Mediterranean on your holiday table!