
As I start planning this year’s holiday menu, I’m so excited to incorporate the flavors of the coast with a seafood Christmas dinner. Picture starting with grilled garlic butter lobster tails and moving on to lemon herb baked cod with a side of creamy Tuscan shrimp. Each dish is sure to bring a vibrant burst of ocean flavors to your table. If you’re looking to elevate your holiday feast with some coastal-inspired recipes, you’re in for a treat. Let’s explore these delicious options together!
Grilled Garlic Butter Lobster Tails
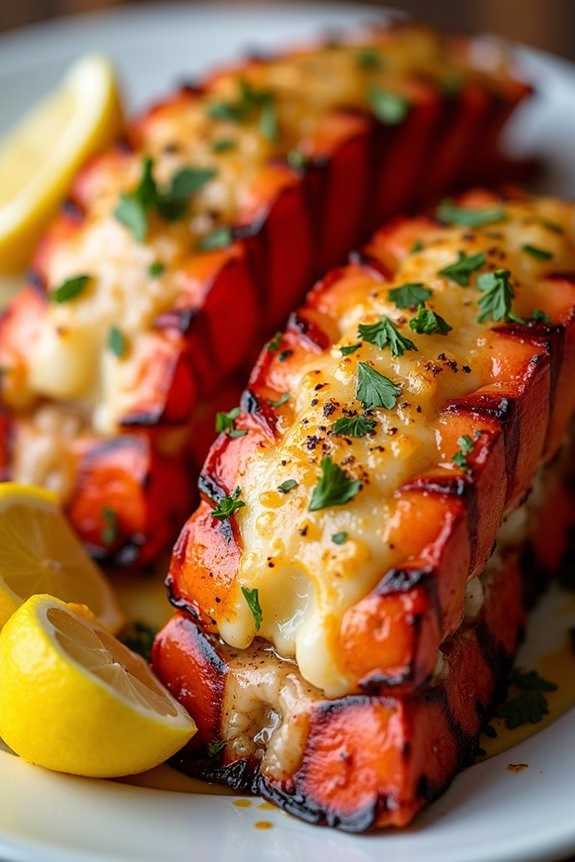
Grilled Garlic Butter Lobster Tails are an exquisite and indulgent addition to any Seafood Christmas Dinner, offering a touch of elegance and a burst of flavor that will impress your guests. This dish combines the richness of lobster with the savory goodness of garlic and butter, creating a melt-in-your-mouth experience that’s both luxurious and satisfying.
Perfectly grilled, these lobster tails are a fantastic way to celebrate the festive season with something a bit different and undeniably delicious.
Whether you’re hosting a large gathering or an intimate dinner, this recipe for Grilled Garlic Butter Lobster Tails serves 4-6 people and is surprisingly simple to prepare. The key lies in high-quality ingredients and careful attention to the grilling process to guarantee that the lobster tails remain tender and flavorful.
With just a few ingredients and steps, you can create a standout dish that will leave everyone reaching for seconds.
Ingredients:
- 4-6 lobster tails
- 1/2 cup unsalted butter, melted
- 4 cloves garlic, minced
- 1 tablespoon lemon juice
- 1 teaspoon paprika
- Salt and freshly ground black pepper, to taste
- Fresh parsley, chopped for garnish
- Lemon wedges, for serving
Cooking Instructions:
- Prepare the Lobster Tails: Begin by thawing the lobster tails if they’re frozen. Use a pair of kitchen scissors to cut down the top shell of each lobster tail, stopping just before the tail fin. Carefully pull apart the shell slightly and use your fingers to loosen the meat from the shell, keeping it attached at the base. Lift the meat above the shell, letting the shell support it beneath.
- Make the Garlic Butter Mixture: In a small bowl, combine the melted butter, minced garlic, lemon juice, paprika, salt, and pepper. Mix well to ascertain the ingredients are thoroughly combined, creating a fragrant and flavorful basting mixture.
- Preheat the Grill: Preheat your grill to medium-high heat, approximately 400°F (200°C), making sure that the grill grates are clean and well-oiled to prevent sticking.
- Baste the Lobster: Generously brush the garlic butter mixture over the lobster meat, making sure that it’s well-coated. Reserve some of the butter mixture for additional basting during grilling.
- Grill the Lobster Tails: Place the lobster tails meat side up on the preheated grill. Close the grill lid and cook for 5-7 minutes. Open the lid, baste again with the garlic butter mixture, and continue cooking for an additional 5-7 minutes or until the lobster meat is opaque and slightly firm to the touch.
- Serve: Once done, remove the lobster tails from the grill and transfer them to a platter. Garnish with freshly chopped parsley and serve with lemon wedges on the side for an extra citrusy kick.
Extra Tips:
To enhance the flavor, you can add a pinch of cayenne pepper to the garlic butter mixture if you enjoy a bit of heat.
It’s important to keep an eye on the lobster while grilling to prevent overcooking, which can make the meat tough.
If you don’t have access to a grill, you can broil the lobster tails in the oven using the same method, adjusting the cooking time as needed.
Finally, using fresh lemon juice over bottled will greatly enhance the flavor profile of the dish, making it fresher and more vibrant.
Lemon Herb Baked Cod
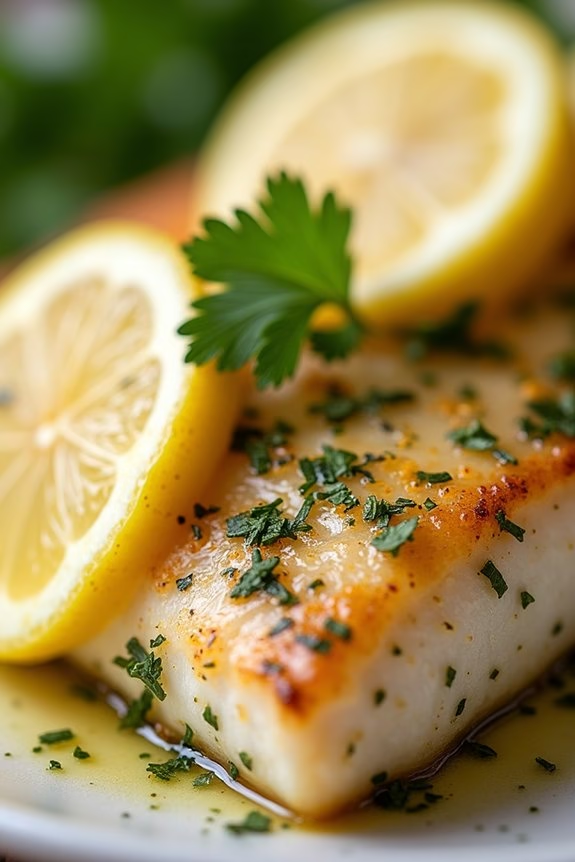
Lemon Herb Baked Cod is a delightful and light seafood dish that’s perfect for a festive Christmas dinner. This dish features tender, flaky cod fillets infused with the bright, fresh flavors of lemon and herbs. It’s an elegant yet simple dish that highlights the natural sweetness of the cod while complementing it with a zesty citrus twist.
Baking the cod guarantees that it remains moist and succulent, making it a pleasing addition to any holiday spread. This recipe is designed for a serving size of 4-6 people, making it an ideal choice for family gatherings or intimate dinners with friends. The preparation is straightforward, allowing you to enjoy more time with your guests rather than spending hours in the kitchen.
The combination of fresh herbs and lemon creates a fragrant aroma that fills your kitchen, inviting your guests to the table with anticipation.
Ingredients:
- 4-6 cod fillets (about 6 ounces each)
- 3 tablespoons olive oil
- 2 tablespoons lemon juice
- 2 teaspoons lemon zest
- 3 cloves garlic, minced
- 1 teaspoon dried thyme
- 1 teaspoon dried parsley
- 1 teaspoon dried oregano
- Salt and pepper, to taste
- Lemon slices, for garnish
- Fresh parsley, chopped for garnish
Cooking Instructions:
- Preheat Oven: Start by preheating your oven to 400°F (200°C). Preparing a hot oven guarantees that the cod cooks evenly and maintains its moisture.
- Prepare the Baking Dish: Lightly grease a baking dish with a bit of olive oil. This prevents the fillets from sticking to the dish during baking.
- Make the Herb Mixture: In a small bowl, combine the olive oil, lemon juice, lemon zest, minced garlic, thyme, parsley, oregano, salt, and pepper. Mix well to create a flavorful herb marinade.
- Marinate the Cod Fillets: Place the cod fillets in a single layer in the prepared baking dish. Pour the herb mixture over the fillets, ensuring they’re well-coated. Let them marinate for about 10 minutes to allow the flavors to infuse.
- Bake the Cod: Place the baking dish in the preheated oven and bake for 15-20 minutes, or until the cod flakes easily with a fork. The cooking time may vary depending on the thickness of the fillets.
- Serve: Once cooked, remove the baking dish from the oven. Garnish with fresh lemon slices and chopped parsley before serving. Enjoy this dish hot for the best flavor.
Extra Tips:
For the best results, choose fresh, high-quality cod fillets. Thicker fillets may require a slightly longer baking time, so adjust accordingly.
If you prefer a bit more color and flavor, consider broiling the cod for the last 2 minutes of baking. This will give the top a slight crisp. Additionally, pairing this Lemon Herb Baked Cod with a side of steamed vegetables or a light salad will enhance the overall dining experience.
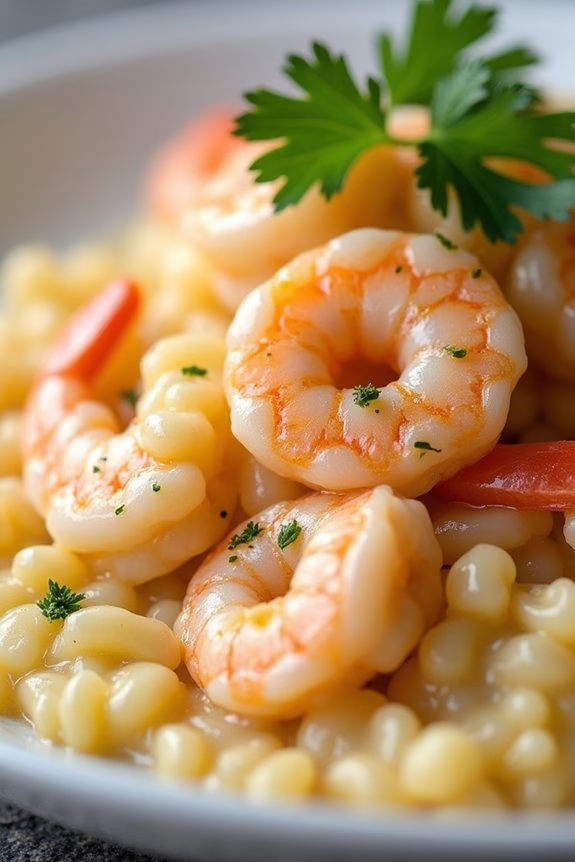
Creamy Tuscan Shrimp
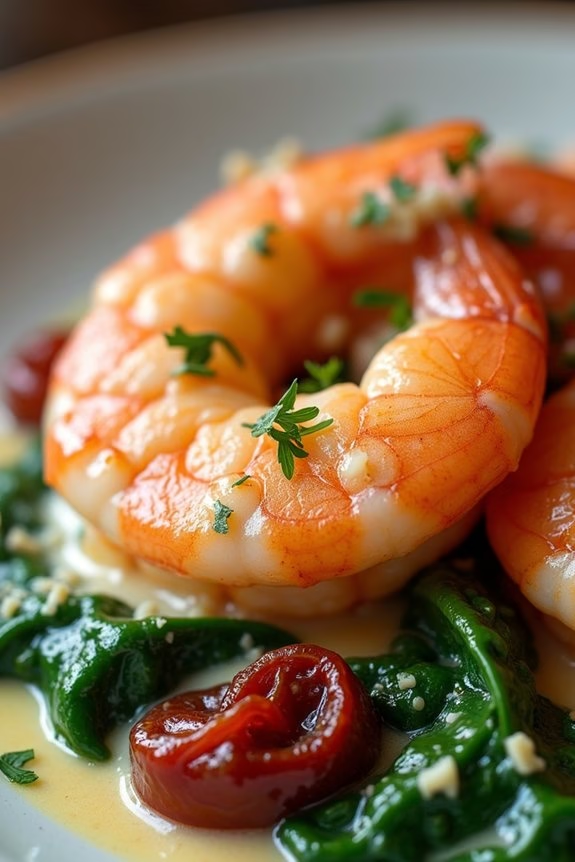
Creamy Tuscan Shrimp is a delicious and elegant dish that makes for a stunning centerpiece at any Christmas dinner. This dish combines succulent shrimp with a rich and creamy sauce infused with sun-dried tomatoes, garlic, and spinach. The combination of flavors is both comforting and sophisticated, making it an ideal choice for a festive meal.
Whether served over pasta, alongside crusty bread, or simply on its own, this flavorful dish is sure to impress your guests and become a new holiday favorite.
The beauty of this dish lies in its simplicity and the freshness of its ingredients. By using high-quality shrimp and a few pantry staples, you can create a restaurant-quality meal in the comfort of your own home. This recipe is perfect for a serving size of 4-6 people, making it an excellent choice for smaller gatherings or as part of a larger spread.
The creamy sauce, infused with the natural sweetness of shrimp, is sure to be a hit with seafood lovers and those new to shellfish alike.
Ingredients (Serves 4-6):
- 1 1/2 pounds large shrimp, peeled and deveined
- 2 tablespoons olive oil
- 3 tablespoons unsalted butter
- 5 cloves garlic, minced
- 1 cup heavy cream
- 1/2 cup chicken broth
- 1/2 cup grated Parmesan cheese
- 1 teaspoon Italian seasoning
- 1/2 teaspoon crushed red pepper flakes
- 1 cup sun-dried tomatoes, chopped (oil-packed and drained)
- 3 cups fresh spinach leaves
- Salt and pepper to taste
- Fresh parsley, chopped (for garnish)
Cooking Instructions:
1. Prepare the Shrimp:
Begin by ensuring your shrimp are properly cleaned, peeled, and deveined. Pat them dry with paper towels to remove excess moisture.
2. Cook the Shrimp:
Heat 1 tablespoon of olive oil in a large skillet over medium-high heat. Add the shrimp and cook for about 2-3 minutes on each side until they’re pink and opaque. Remove the shrimp from the skillet and set aside.
3. Make the Sauce:
In the same skillet, add the remaining tablespoon of olive oil and the butter. Once the butter is melted, add the minced garlic and sauté for about 1 minute until fragrant.
4. Add Liquid Ingredients:
Pour in the chicken broth and heavy cream, stirring to combine. Bring the mixture to a simmer.
5. Incorporate Cheese and Seasoning:
Stir in the Parmesan cheese, Italian seasoning, and crushed red pepper flakes. Continue stirring until the cheese melts and the sauce thickens slightly.
6. Add Vegetables:
Add the sun-dried tomatoes and spinach to the sauce. Cook for about 3-4 minutes until the spinach is wilted.
7. Combine Shrimp and Sauce:
Return the cooked shrimp to the skillet, tossing them gently to coat in the sauce. Allow the mixture to heat through, about 2 minutes.
8. Season and Serve:
Taste and season with salt and pepper as needed. Garnish with freshly chopped parsley and serve immediately.
Extra Tips:
To enhance the flavor of your Creamy Tuscan Shrimp, consider using freshly grated Parmesan cheese for a richer taste. If you prefer a thicker sauce, allow it to simmer for a few extra minutes to reduce slightly.
For a spicier kick, increase the amount of crushed red pepper flakes. This dish pairs beautifully with pasta, rice, or a side of steamed vegetables, making it a versatile addition to your holiday menu.
If you’re preparing this dish ahead of time, keep the shrimp and sauce separate and combine them just before serving to maintain the shrimp’s tender texture.
Seared Scallops With Lemon Caper Sauce
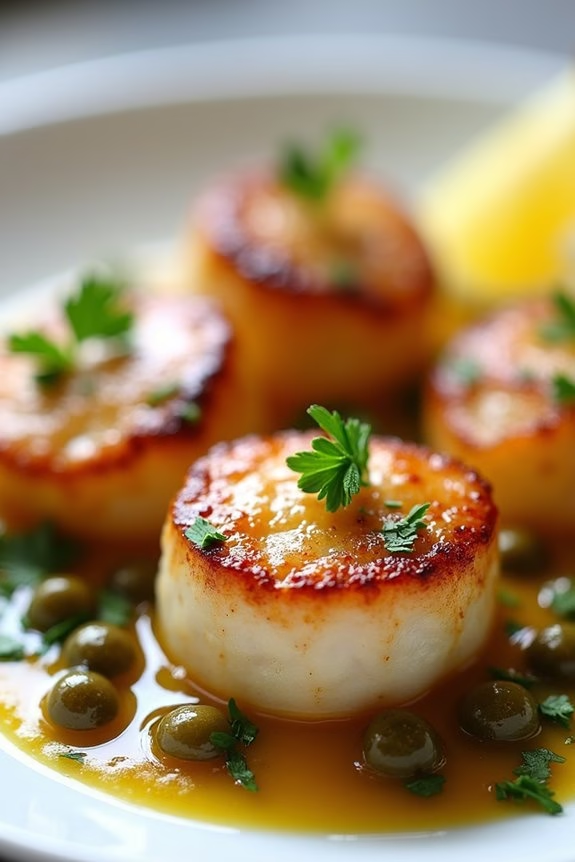
Cooking a seafood dish for Christmas dinner can be both elegant and delightful, and Seared Scallops With Lemon Caper Sauce offers a perfect blend of simplicity and sophistication. This dish showcases the sweet and delicate flavor of the scallops, complemented by the tangy and savory notes of lemon and capers. It’s a dish that not only looks stunning on the plate but also highlights the freshness of the sea, making it a perfect centerpiece for your holiday table.
The key to mastering this recipe lies in perfectly searing the scallops to achieve a golden-brown crust while keeping the interior tender and juicy. Paired with a zesty lemon caper sauce, this dish is both vibrant and invigorating. The sauce adds depth and a burst of flavor that enhances the natural sweetness of the scallops. This recipe serves 4-6 people, making it ideal for a festive gathering.
Ingredients for Seared Scallops With Lemon Caper Sauce:
- 1 ½ pounds large sea scallops
- Salt and freshly ground black pepper
- 2 tablespoons olive oil
- 2 tablespoons unsalted butter
- 2 cloves garlic, minced
- 1/4 cup fresh lemon juice
- 1/4 cup chicken or seafood broth
- 2 tablespoons capers, drained
- 1 tablespoon fresh parsley, chopped
- Lemon wedges for serving
Cooking Instructions:
- Prepare the Scallops: Pat the scallops dry with paper towels to remove any excess moisture. Season both sides with salt and freshly ground black pepper. This step guarantees a good sear and prevents the scallops from steaming.
- Heat the Pan: In a large skillet, heat the olive oil over medium-high heat until it shimmers. The pan needs to be hot enough to sear the scallops quickly.
- Sear the Scallops: Add the scallops to the skillet, making sure not to overcrowd the pan. Cook for about 2-3 minutes on each side until they’re golden brown and opaque in the center. Remove the scallops from the pan and set them aside on a plate.
- Make the Sauce: In the same skillet, reduce the heat to medium and add the butter. Once melted, add the minced garlic and sauté for about 30 seconds until fragrant.
- Add the Liquid Ingredients: Pour in the lemon juice and broth, stirring to combine. Bring the mixture to a simmer, allowing it to reduce slightly for about 2-3 minutes.
- Finish the Sauce: Stir in the capers and chopped parsley. Return the scallops to the skillet and gently spoon the sauce over them to warm through, about 1-2 minutes.
- Serve: Transfer the scallops to a serving platter, spoon the lemon caper sauce over the top, and garnish with fresh lemon wedges. Serve immediately for the best flavor and texture.
Extra Tips:
When cooking scallops, it’s essential to keep an eye on the heat to prevent them from overcooking and turning rubbery. The scallops should be golden brown on the outside and just opaque in the center for maximum tenderness.
If possible, use fresh scallops for the best taste and texture, but if using frozen, make sure they’re fully thawed and dried before searing. Additionally, the lemon caper sauce can be made ahead of time and gently warmed before serving, allowing you more time to focus on perfecting the scallops.
Seafood Paella With Saffron Rice
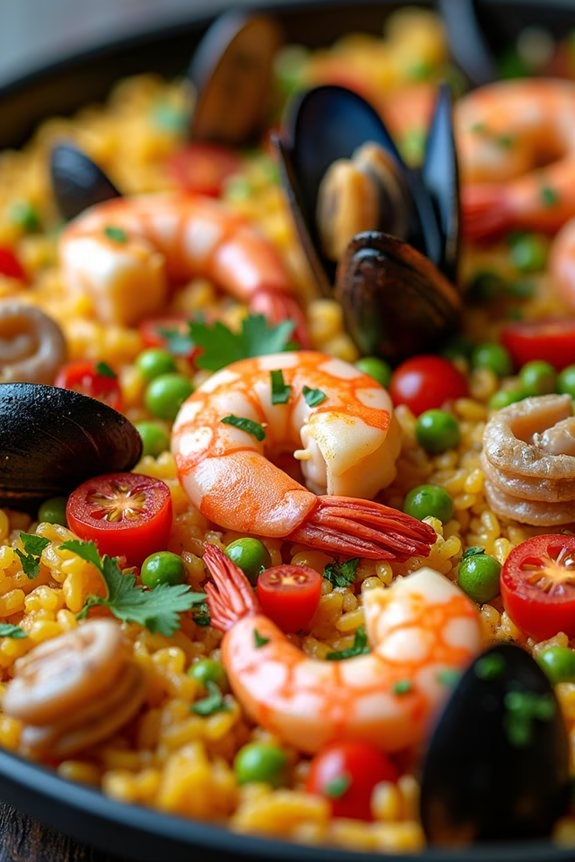
Seafood Paella With Saffron Rice is a vibrant and flavorful dish that brings the taste of the ocean to your Christmas dinner table. Originating from the coastal regions of Spain, this dish combines a variety of seafood with aromatic saffron-infused rice, creating a festive and colorful platter that’s certain to impress your guests.
The beauty of this dish lies in its ability to showcase the natural flavors of fresh seafood, complemented by a medley of spices and vegetables. The preparation of Seafood Paella is an experience in itself, as it requires careful layering of ingredients to guarantee that each component is cooked to perfection.
The saffron rice provides a fragrant base that absorbs the rich flavors of the seafood, while the addition of peas, bell peppers, and tomatoes adds color and texture to the dish. Whether you’re hosting a small family gathering or a larger festive feast, this Seafood Paella promises to be a standout feature of your Christmas menu.
Ingredients (Serves 4-6):
- 2 cups Bomba or Arborio rice
- 1/2 teaspoon saffron threads
- 3 tablespoons olive oil
- 1 onion, finely chopped
- 3 cloves garlic, minced
- 1 red bell pepper, sliced
- 1 can (14 oz) diced tomatoes
- 4 cups seafood stock or chicken broth
- 1/2 pound large shrimp, peeled and deveined
- 1/2 pound mussels, scrubbed and debearded
- 1/2 pound clams, scrubbed
- 1/2 pound squid, cleaned and sliced into rings
- 1 cup frozen peas
- 1 teaspoon smoked paprika
- Salt and pepper to taste
- 2 tablespoons chopped fresh parsley
- Lemon wedges for serving
Cooking Instructions:
- Prepare the Saffron Rice: In a small bowl, soak the saffron threads in 2 tablespoons of warm water and set aside for about 10 minutes to release their color and aroma.
- Cook the Base: In a large paella pan or wide, shallow skillet, heat the olive oil over medium heat. Add the chopped onion and garlic, sautéing until they become translucent, about 5 minutes.
- Add Vegetables: Stir in the sliced red bell pepper and cook for another 5 minutes until the peppers soften. Then add the diced tomatoes, cooking until the mixture thickens slightly.
- Toast the Rice: Add the rice to the pan, stirring well to coat it in the oil and tomato mixture. Cook for about 2 minutes until the rice is slightly toasted and opaque.
- Pour in the Stock: Pour in the seafood stock or chicken broth, along with the saffron water, and bring the mixture to a boil. Reduce the heat to low, cover, and simmer for about 10 minutes.
- Add Seafood: Arrange the shrimp, mussels, clams, and squid on top of the rice. Sprinkle with smoked paprika, salt, and pepper. Cover again and cook for another 10-15 minutes, or until the seafood is cooked through and the mussels and clams have opened.
- Incorporate the Peas: Stir in the frozen peas during the last 5 minutes of cooking. Once the seafood is cooked, remove the pan from heat and let it sit, covered, for 5 minutes to allow the flavors to meld.
- Garnish and Serve: Sprinkle the paella with fresh parsley and serve with lemon wedges on the side for squeezing over the top.
Extra Tips:
When preparing Seafood Paella With Saffron Rice, it’s important to not stir the rice too often after adding the broth, as this helps achieve the traditional crusty bottom layer known as “socarrat.”
Ascertain your seafood is fresh, as it greatly impacts the flavor of the dish. If mussels or clams don’t open during cooking, discard them. Adjust the seasoning to your preference, but be cautious with salt as the seafood and broth may already be quite salty.
Enjoy the process, and remember that paella is a dish meant to be shared and savored with loved ones.
Crab-Stuffed Mushrooms
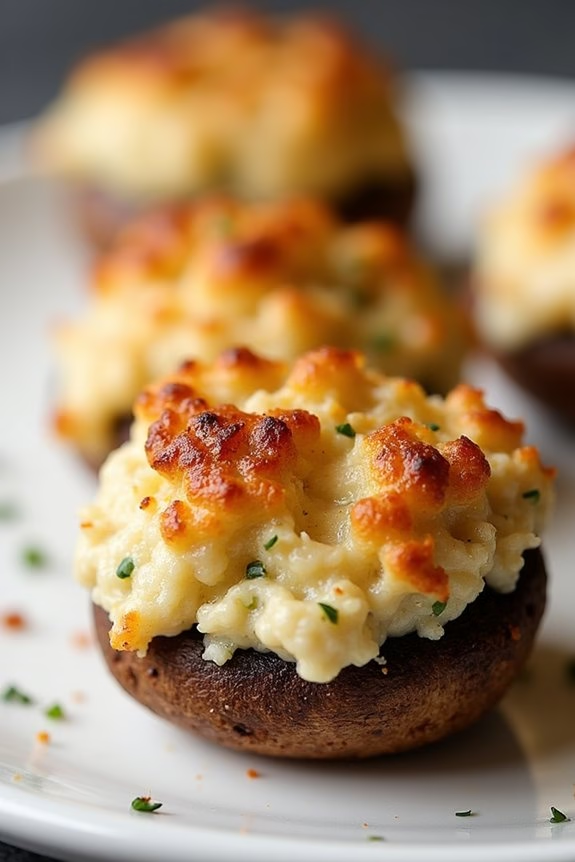
Crab-stuffed mushrooms are a delightful addition to any Christmas dinner, offering a luxurious and flavorful appetizer that’s sure to impress your guests. These delectable bites feature tender mushroom caps filled with a rich and savory crab filling, combining the sweetness of crab meat with the earthy tones of mushrooms. Perfectly seasoned and topped with a crispy breadcrumb topping, crab-stuffed mushrooms aren’t only delicious but also elegant, making them an ideal choice for festive gatherings.
When preparing crab-stuffed mushrooms, the key is to balance the flavors and textures. The stuffing should be moist but firm, ensuring it holds its shape within the mushroom caps. Using fresh, high-quality crab meat will elevate the dish, providing a sweetness that complements the umami of the mushrooms. Additionally, a touch of cream cheese adds creaminess, while herbs like parsley and chives bring freshness, creating a harmonious blend of flavors that will delight your taste buds.
Ingredients for 4-6 servings:
- 20 large white or cremini mushrooms
- 8 oz fresh crab meat, picked over for shells
- 4 oz cream cheese, softened
- 1/4 cup grated Parmesan cheese
- 1/4 cup mayonnaise
- 2 tablespoons chopped fresh parsley
- 2 tablespoons chopped fresh chives
- 1 teaspoon lemon juice
- 1/2 teaspoon garlic powder
- 1/4 teaspoon salt
- 1/4 teaspoon black pepper
- 1/2 cup breadcrumbs
- 2 tablespoons melted butter
Cooking Instructions:
- Prepare the Mushrooms: Preheat your oven to 375°F (190°C). Gently clean the mushrooms with a damp cloth and remove the stems. Set the caps aside for stuffing. You can finely chop the stems and add them to the stuffing mixture if desired.
- Mix the Stuffing: In a medium bowl, combine the crab meat, cream cheese, Parmesan cheese, mayonnaise, parsley, chives, lemon juice, garlic powder, salt, and black pepper. Mix until all ingredients are well incorporated and the mixture is smooth and creamy.
- Stuff the Mushrooms: Using a small spoon, fill each mushroom cap generously with the crab mixture. Place the stuffed mushrooms on a baking sheet lined with parchment paper.
- Prepare the Topping: In a small bowl, combine the breadcrumbs with the melted butter. Mix until the breadcrumbs are evenly coated.
- Top and Bake: Sprinkle the breadcrumb mixture over the stuffed mushrooms to create a crispy topping. Bake in the preheated oven for 20-25 minutes, or until the mushrooms are tender and the tops are golden brown.
- Serve: Remove the mushrooms from the oven and let them cool for a few minutes before serving. Arrange them on a platter and garnish with additional chopped parsley if desired.
Extra Tips:
When selecting mushrooms for this dish, choose ones that are firm and have a nice cup shape to hold the stuffing well. If you prefer a spicier kick, you can add a pinch of cayenne pepper or a few dashes of hot sauce to the crab mixture.
To save time, you can prepare the stuffing mixture a day in advance and refrigerate it until you’re ready to stuff the mushrooms. Just be sure to let it come to room temperature before stuffing and baking. This dish is best served warm, so try to time the baking to coincide with the serving of other parts of your meal.
Baked Clams Oreganata
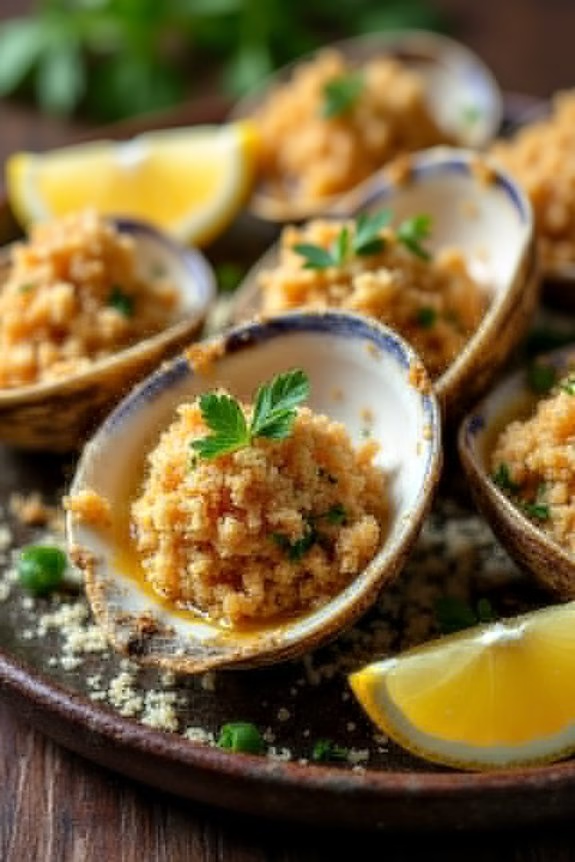
Baked Clams Oreganata is a classic Italian-American dish that can make your Christmas dinner extra special with its savory and fragrant flavors. This dish features clams topped with a delicious mixture of breadcrumbs, herbs, and spices, all baked to perfection. It’s a delightful appetizer that can be enjoyed by seafood lovers and is sure to impress your guests.
Traditionally, this dish is served with a squeeze of lemon and a sprinkle of fresh parsley, adding a touch of brightness to the rich, savory flavors.
This recipe for Baked Clams Oreganata serves 4-6 people, making it an ideal starter for your holiday feast. The clams are baked in their shells, topped with a seasoned breadcrumb mixture that crisps up beautifully in the oven. The simplicity of this dish allows the natural flavors of the clams to shine through, enhanced by the aromatic herbs and spices.
It’s a relatively easy dish to prepare, allowing you to focus on other elements of your Christmas dinner without feeling overwhelmed.
Ingredients (serves 4-6 people):
- 24 littleneck clams, scrubbed
- 1 cup breadcrumbs
- 2 cloves garlic, minced
- 1/4 cup fresh parsley, chopped
- 1/4 cup grated Parmesan cheese
- 1/2 teaspoon dried oregano
- 1/2 teaspoon salt
- 1/4 teaspoon black pepper
- 1/4 teaspoon crushed red pepper flakes
- 1/4 cup olive oil
- 2 tablespoons lemon juice
- Lemon wedges, for serving
Cooking Instructions:
- Preheat the Oven: Preheat your oven to 450°F (230°C). This will guarantee it’s hot enough to cook the clams quickly and evenly.
- Prepare the Clams: Thoroughly scrub the clams to remove any dirt. Place them in a single layer on a baking sheet.
- Make the Breadcrumb Mixture: In a mixing bowl, combine the breadcrumbs, minced garlic, chopped parsley, grated Parmesan, oregano, salt, black pepper, and crushed red pepper flakes. Mix well.
- Moisten the Mixture: Drizzle the olive oil and lemon juice over the breadcrumb mixture. Stir until the mixture is evenly moistened but not too wet.
- Top the Clams: Carefully spoon the breadcrumb mixture over each clam, pressing lightly to make sure it adheres to the clam.
- Bake the Clams: Place the baking sheet in the preheated oven and bake for 8-10 minutes, or until the breadcrumb topping is golden brown and the clams have opened.
- Serve: Remove from the oven and transfer the clams to a serving platter. Garnish with lemon wedges and additional parsley, if desired. Serve immediately.
Extra Tips: When selecting clams, choose ones that are tightly closed; this indicates they’re fresh. If any clams remain open after tapping them, discard those as they’re likely dead.
It’s important not to overcook the clams, as they can become rubbery. Keep an eye on them while baking, and remove them as soon as they open and the topping is golden. For a bit of variation, you can add some finely chopped pancetta or bacon to the breadcrumb mixture for an extra layer of flavor.
Lobster Bisque With Sherry
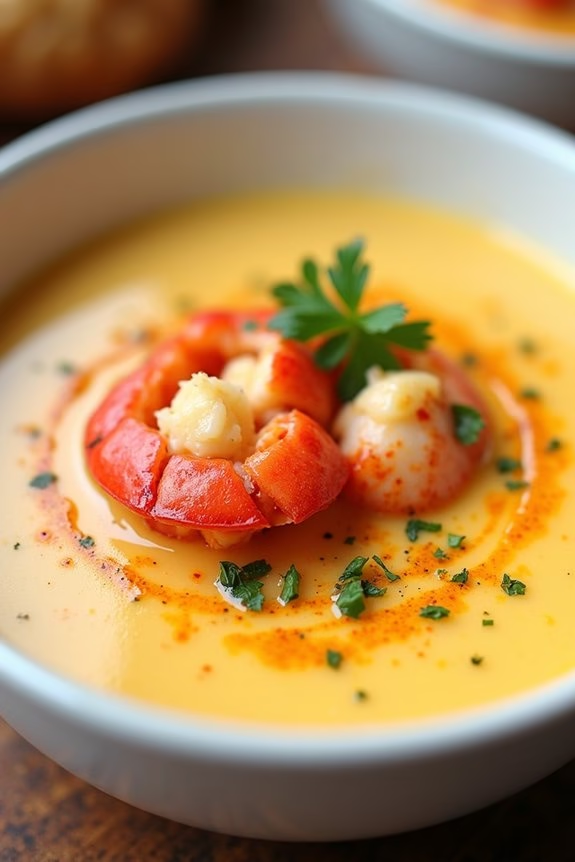
Lobster Bisque With Sherry is a luxurious and flavorful seafood dish perfect for a special Christmas dinner. This creamy soup is rich with the delicate flavors of lobster, enhanced by the subtle warmth of sherry and a blend of aromatic vegetables. Bisque is traditionally a smooth, creamy soup made from crustaceans, and lobster is one of the most elegant choices for this classic dish. The sherry adds depth and complexity, making this bisque an indulgent starter that will impress your family and friends.
Preparing Lobster Bisque With Sherry requires some patience and attention to detail, but the results are well worth the effort. The key to a perfect bisque is extracting the maximum flavor from the lobster shells, which form the base of the stock. This recipe will guide you through the steps to create a bisque that’s velvety and full of rich lobster essence. The recipe serves 4-6 people, making it ideal for a festive gathering.
Ingredients:
- 2 lobsters (about 1 to 1.5 pounds each)
- 4 tablespoons butter
- 1 medium onion, chopped
- 1 carrot, chopped
- 2 stalks celery, chopped
- 3 cloves garlic, minced
- 2 tablespoons tomato paste
- 1 teaspoon paprika
- 1/4 cup all-purpose flour
- 1/2 cup dry sherry
- 4 cups fish or seafood stock
- 1/4 cup heavy cream
- Salt and pepper to taste
- 1 tablespoon lemon juice
- 1 tablespoon fresh parsley, chopped
Cooking Instructions:
- Prepare the Lobster: Start by cooking the lobsters in a large pot of salted boiling water for about 8-10 minutes, or until they turn bright red. Remove the lobsters, let them cool slightly, then extract the meat from the claws and tails. Set the meat aside and reserve the shells for the stock.
- Make the Stock: In a large pot, melt 2 tablespoons of butter over medium heat. Add the chopped onion, carrot, celery, and garlic. Sauté for about 5 minutes until the vegetables are softened. Add the lobster shells and tomato paste, stirring to coat the shells. Cook for another 5 minutes.
- Add Liquid Ingredients: Pour in the sherry, scraping any browned bits from the bottom of the pot. Allow the sherry to reduce by half. Add the fish stock and bring to a boil. Reduce the heat and let it simmer, uncovered, for about 30 minutes to extract the flavors.
- Blend and Strain: Remove the pot from heat and strain the stock through a fine mesh sieve, pressing down on the solids to extract as much liquid as possible. Discard the solids and return the strained liquid to a clean pot.
- Thicken the Bisque: In a separate saucepan, melt the remaining 2 tablespoons of butter over medium heat. Stir in the flour and paprika to form a roux, cooking for about 3 minutes. Slowly whisk the roux into the strained lobster stock until smooth and slightly thickened.
- Finish the Bisque: Stir in the heavy cream and season with salt, pepper, and lemon juice. Add the reserved lobster meat and gently heat through. Avoid boiling the bisque at this stage to maintain its creamy texture.
- Serve: Ladle the bisque into bowls, garnish with chopped parsley, and serve warm.
Extra Tips: When making Lobster Bisque With Sherry, take care not to overcook the lobster meat, as it can become tough. If you prefer a smoother texture, use an immersion blender to purée the bisque further after adding the cream, but before adding the lobster meat.
Additionally, selecting a good-quality sherry is important as it greatly influences the flavor profile of the bisque. If you don’t have fish stock, you can substitute with a mild chicken stock, but the flavor may vary slightly.
Shrimp and Crab Risotto
Indulge in a luxurious and festive meal this Christmas with a rich and creamy Shrimp and Crab Risotto. This seafood delight brings together plump shrimp and sweet crab in a perfectly cooked, creamy risotto that’s sure to impress your family and friends. The dish is a celebration of flavors, combining the delicate taste of seafood with the earthy richness of Arborio rice and a hint of white wine.
It’s an ideal centerpiece for your Christmas dinner, offering a satisfying and elegant option that pairs beautifully with a crisp white wine.
Making Shrimp and Crab Risotto is a rewarding culinary experience that involves patience and attention to detail. The key to a successful risotto lies in the gradual addition of stock and consistent stirring, which allows the rice to release its starches, creating a creamy texture.
The addition of shrimp and crab not only enhances the flavor but also adds a touch of sophistication to your holiday meal. This recipe is designed to serve 4-6 people, making it perfect for an intimate gathering or a small family celebration.
Ingredients for 4-6 servings:
- 1 pound (450g) large shrimp, peeled and deveined
- 8 ounces (225g) lump crab meat
- 1 1/2 cups Arborio rice
- 4 cups chicken or seafood stock
- 1 cup dry white wine
- 1 medium onion, finely chopped
- 3 cloves garlic, minced
- 1/2 cup grated Parmesan cheese
- 2 tablespoons unsalted butter
- 2 tablespoons olive oil
- 1 tablespoon lemon juice
- Salt and pepper to taste
- Fresh parsley, chopped, for garnish
Cooking Instructions:
- Prepare the Stock: In a medium saucepan, bring the chicken or seafood stock to a simmer over low heat. Keep it warm but not boiling throughout the cooking process.
- Cook the Shrimp: In a large skillet, heat 1 tablespoon of olive oil over medium heat. Add the shrimp and a pinch of salt. Cook until pink and opaque, about 3 minutes per side. Remove from the skillet and set aside.
- Sauté the Aromatics: In the same skillet, add the remaining tablespoon of olive oil. Sauté the chopped onion until translucent, about 5 minutes. Add the minced garlic and cook for another minute until fragrant.
- Cook the Rice: Add the Arborio rice to the skillet with the onions and garlic. Stir constantly for about 2 minutes until the rice is toasted and well-coated with the oil.
- Deglaze with Wine: Pour in the white wine, stirring until it’s mostly absorbed by the rice. This will add depth of flavor to the risotto.
- Add the Stock Gradually: Begin adding the warm stock, one ladleful at a time. Stir continuously, allowing each addition to be absorbed before adding the next. Continue this process for about 18-20 minutes, or until the rice is creamy and tender.
- Add Seafood and Finish: Once the rice is cooked, gently fold in the cooked shrimp and crab meat. Stir in the Parmesan cheese, butter, and lemon juice. Season with salt and pepper to taste.
- Garnish and Serve: Remove the risotto from the heat and let it sit for a few minutes. Serve hot, garnished with freshly chopped parsley.
Extra Tips:
For the best results, use fresh seafood if possible, as it will enhance the overall flavor and texture of the dish. If fresh crab isn’t available, high-quality canned crab can be a suitable substitute.
Remember to keep the stock warm throughout the process; adding cold stock can disrupt the cooking of the rice. Consistent stirring is essential to achieve the creamy texture characteristic of a good risotto.
Finally, adjust the seasoning to your taste, keeping in mind that Parmesan cheese can add a salty note to the dish. Enjoy your Shrimp and Crab Risotto with a glass of the same white wine used in cooking for a perfectly paired dining experience.
Cedar Plank Salmon With Maple Glaze
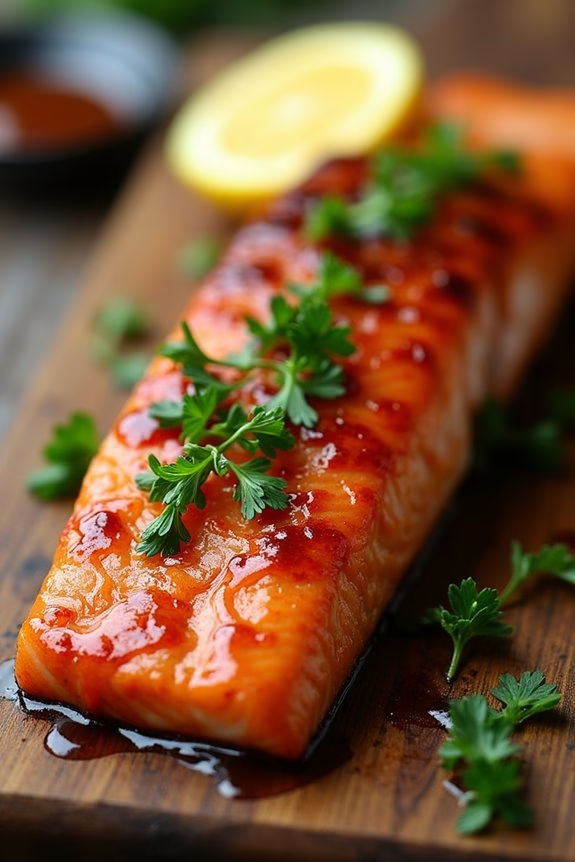
Cedar Plank Salmon With Maple Glaze is a delightful and festive dish that can elevate your Christmas dinner with its rich flavors and impressive presentation. The combination of the smoky cedar aroma with the sweetness of the maple glaze creates a harmonious balance that enhances the natural taste of the salmon.
This dish not only pleases the palate but also adds an elegant touch to your holiday table, making it a memorable centerpiece for your seafood-themed Christmas dinner. Perfect for serving 4-6 people, Cedar Plank Salmon With Maple Glaze is simple to prepare yet yields a gourmet result that will impress your guests.
The key to success with this recipe is in the quality of the ingredients and the preparation of the cedar plank, which infuses the salmon with a subtle smokiness that complements the sweet and savory glaze. This dish is a wonderful way to celebrate the holiday season with friends and family, offering a unique twist to traditional Christmas fare.
Ingredients (Serves 4-6):
- 2 pounds salmon fillet, skin on
- 1 cedar plank, pre-soaked in water for at least 2 hours
- 1/4 cup maple syrup
- 2 tablespoons soy sauce
- 2 tablespoons Dijon mustard
- 1 tablespoon olive oil
- 2 cloves garlic, minced
- Salt and pepper to taste
- Fresh lemon slices for garnish
- Chopped fresh parsley for garnish
Instructions:
- Preheat the Grill: Begin by preheating your grill to medium heat, around 350°F (175°C). While the grill is heating, verify your cedar plank has been soaking in water for at least 2 hours to prevent it from catching fire during grilling.
- Prepare the Maple Glaze: In a small bowl, combine the maple syrup, soy sauce, Dijon mustard, olive oil, and minced garlic. Whisk the ingredients together until they’re well blended. This will be your maple glaze.
- Season the Salmon: Pat the salmon fillet dry with paper towels. Season both sides with salt and pepper to taste. Place the salmon on the soaked cedar plank, skin-side down.
- Apply the Maple Glaze: Using a brush or a spoon, generously apply the maple glaze over the salmon fillet. Confirm the entire surface is covered for maximum flavor absorption.
- Grill the Salmon: Carefully place the cedar plank with the salmon on the preheated grill. Close the lid and allow the salmon to cook for about 20-25 minutes, or until it flakes easily with a fork. The internal temperature should reach 145°F (63°C).
- Remove and Rest: Once cooked, remove the cedar plank from the grill. Let the salmon rest for a few minutes before serving to allow the juices to redistribute.
- Garnish and Serve: Garnish the salmon with fresh lemon slices and chopped parsley. Serve directly from the cedar plank for a rustic presentation.
Extra Tips:
When preparing Cedar Plank Salmon With Maple Glaze, the soaking of the cedar plank is essential to prevent burning. You can enhance the flavor by soaking the plank in a mixture of water and white wine or apple cider.
Be sure to monitor the grill’s temperature to avoid overcooking the salmon; a meat thermometer can be a handy tool for checking doneness. Additionally, feel free to adjust the glaze’s sweetness by varying the amount of maple syrup to suit your taste preferences. Enjoy this delightful dish as part of your festive seafood Christmas dinner!
Mussels in White Wine and Garlic
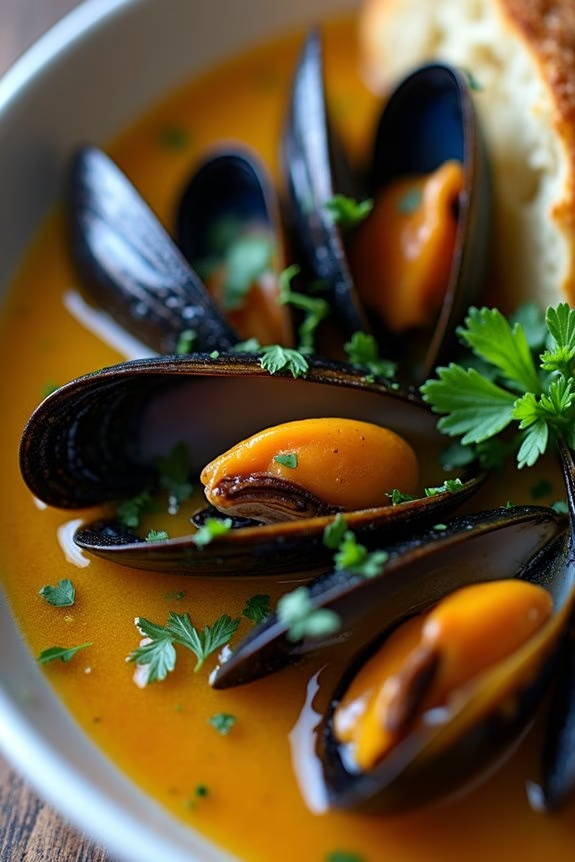
Mussels in white wine and garlic is a timeless dish that brings a touch of elegance to any Christmas dinner. The aromatic blend of white wine and garlic infuses the tender mussels, creating a flavorful and sophisticated meal that’s certain to impress your guests. The preparation is simple and quick, allowing you to spend more time enjoying the company of family and friends during the holiday season. This dish is perfect as a starter or a main course, pairing beautifully with crusty bread to soak up the delicious broth.
Ideal for a serving size of 4-6 people, this recipe combines fresh mussels with a fragrant wine sauce that highlights the natural sweetness of the seafood. When selecting mussels, opt for those that are tightly closed and have a fresh, briny scent. The quality of your ingredients will greatly affect the final taste, so choose a good quality dry white wine and fresh herbs to enhance the dish’s flavors. Once prepared, this impressive yet simple dish will become a staple in your holiday menu for years to come.
Ingredients:
- 4 pounds fresh mussels
- 2 tablespoons olive oil
- 4 cloves garlic, minced
- 1 shallot, finely chopped
- 1 cup dry white wine
- 1/2 cup chicken or fish stock
- 3 tablespoons unsalted butter
- 1/4 cup fresh parsley, chopped
- Freshly ground black pepper, to taste
- Lemon wedges, for serving
- Crusty bread, for serving
Cooking Instructions:
- Clean the Mussels: Begin by cleaning the mussels under cold running water. Remove any beards and scrub the shells with a brush to remove any debris. Discard any mussels that are open and don’t close when tapped.
- Sauté Aromatics: In a large pot or Dutch oven, heat the olive oil over medium heat. Add the minced garlic and chopped shallot, and sauté until they’re fragrant and the shallot is translucent, about 2-3 minutes.
- Add Liquids: Pour in the white wine and chicken or fish stock. Increase the heat to high and bring the mixture to a boil.
- Cook the Mussels: Once the liquid is boiling, add the cleaned mussels to the pot. Cover with a lid and let them steam for 5-7 minutes, or until all the mussels have opened. Shake the pot occasionally to guarantee even cooking.
- Finish the Sauce: Remove the pot from the heat and discard any mussels that haven’t opened. Stir in the unsalted butter and chopped parsley, and season with freshly ground black pepper to taste.
- Serve: Serve the mussels in bowls with ladles of the white wine and garlic broth. Garnish with lemon wedges and serve with crusty bread on the side to soak up the flavorful sauce.
Extra Tips:
When preparing mussels, it’s important to keep them cool and covered with a damp cloth until you’re ready to cook them. This helps maintain their freshness.
For an added layer of flavor, consider adding a pinch of red pepper flakes during the sautéing of the garlic and shallots for a subtle kick. Additionally, if you prefer a creamier sauce, you can stir in a splash of heavy cream or crème fraîche right before serving.
Always taste the broth before serving to adjust seasoning, as the saltiness can vary depending on the mussels and stock used. Enjoy your festive meal!
Smoked Salmon and Dill Quiche
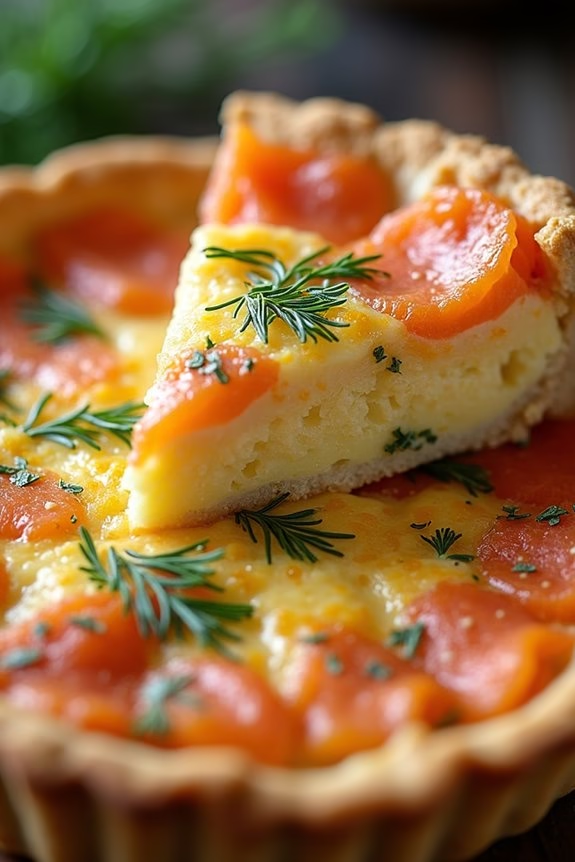
Smoked salmon and dill quiche is a delightful and elegant dish that perfectly complements a festive seafood Christmas dinner. This quiche combines the rich, smoky flavors of salmon with the fresh, aromatic notes of dill, all encased in a buttery, flaky crust. It’s a dish that promises to impress your guests with both its taste and presentation.
Whether served as a main attraction or as part of a larger spread, this quiche is sure to become a holiday favorite.
The beauty of this smoked salmon and dill quiche lies in its simplicity and versatility. You can prepare it in advance and serve it warm or at room temperature, making it an ideal option for stress-free holiday entertaining.
The creamy, savory custard filling pairs beautifully with the delicate salmon, while the dill adds a revitalizing burst of flavor that cuts through the richness. This dish not only looks stunning on the table but also provides a satisfying and sophisticated addition to your Christmas menu.
Ingredients for 4-6 servings:
- 1 pre-made pie crust
- 200g smoked salmon, sliced
- 4 large eggs
- 1 cup heavy cream
- 1/2 cup whole milk
- 1 tablespoon fresh dill, chopped
- 1/4 teaspoon salt
- 1/4 teaspoon black pepper
- 1/4 teaspoon nutmeg
- 1 cup shredded Gruyère cheese
- Optional: lemon wedges for serving
Cooking Instructions:
- Preheat the Oven: Begin by preheating your oven to 350°F (175°C). This guarantees that your quiche bakes evenly and achieves the perfect consistency.
- Prepare the Pie Crust: Roll out the pre-made pie crust and fit it into a 9-inch quiche or pie pan. Trim any excess dough from the edges. Use a fork to prick the bottom of the crust lightly to prevent it from bubbling up during baking.
- Blind Bake the Crust: Line the crust with parchment paper and fill it with pie weights or dried beans. Bake the crust in the preheated oven for about 10 minutes. Remove the weights and parchment paper, then bake for an additional 5 minutes until the crust is lightly golden. Remove from oven and set aside.
- Prepare the Filling: In a mixing bowl, whisk together the eggs, heavy cream, and whole milk until well combined. Add the chopped dill, salt, black pepper, and nutmeg, and mix thoroughly.
- Assemble the Quiche: Spread the smoked salmon slices evenly over the bottom of the pre-baked crust. Pour the egg mixture over the salmon. Sprinkle the shredded Gruyère cheese over the top.
- Bake the Quiche: Place the assembled quiche in the oven and bake for 30-35 minutes, or until the filling is set and the top is golden brown. To test for doneness, insert a knife into the center; it should come out clean.
- Cool and Serve: Allow the quiche to cool for at least 10 minutes before slicing. Serve warm or at room temperature, optionally with lemon wedges on the side for a fresh tang.
Extra Tips:
When preparing smoked salmon and dill quiche, verify that the pie crust remains crisp by blind baking it before adding the filling. This step is essential to avoid a soggy bottom.
Additionally, feel free to experiment with different types of cheese, such as cheddar or feta, to personalize the flavor. If you prefer a more pronounced dill taste, increase the amount or add a sprinkle of fresh dill on top just before serving.
Finally, remember that this quiche can be made a day ahead and gently reheated, making it a convenient option for a busy holiday schedule.
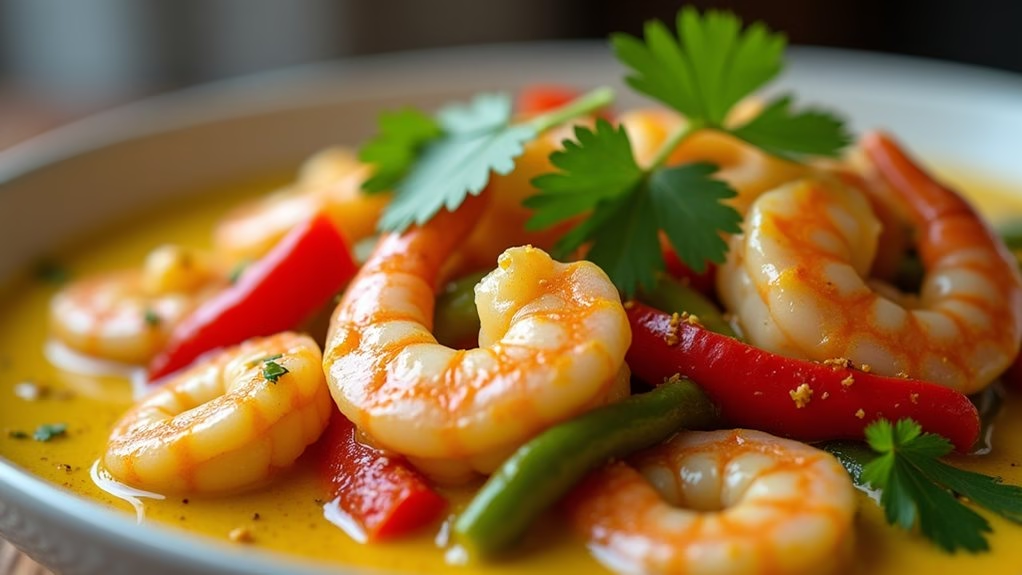
Coconut Curry Shrimp
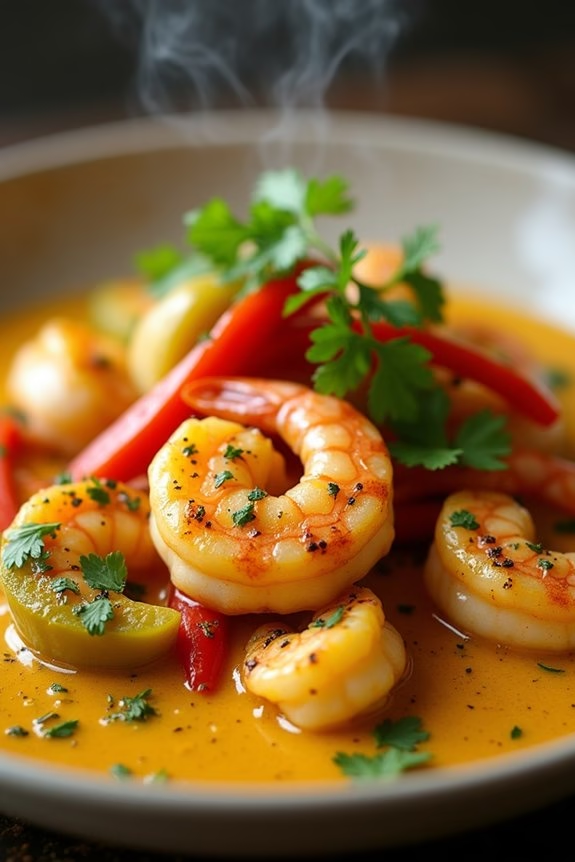
Coconut Curry Shrimp is a delightful dish that brings together the rich, creamy flavors of coconut milk with the subtle heat of curry spices and the fresh, delicate taste of shrimp. This dish is perfect for a festive Christmas dinner, offering a unique twist on traditional holiday fare.
The aromatic blend of garlic, ginger, and lime complements the sweet and savory notes of the coconut curry, creating a symphony of flavors that your guests will love. Not only is Coconut Curry Shrimp delicious, but it’s also relatively easy to prepare, making it an excellent choice for both novice and experienced cooks.
This dish can be served over a bed of fluffy jasmine rice or with warm naan bread to soak up the flavorful sauce. It’s an ideal way to bring a touch of exotic flair to your holiday table, guaranteeing your Christmas dinner is both memorable and mouthwatering.
Ingredients for 4-6 servings:
- 1 1/2 pounds large shrimp, peeled and deveined
- 2 tablespoons coconut oil
- 1 medium onion, finely chopped
- 3 cloves garlic, minced
- 1 tablespoon fresh ginger, grated
- 1 tablespoon curry powder
- 1 teaspoon ground cumin
- 1 teaspoon ground coriander
- 1/2 teaspoon turmeric
- 1 can (14 ounces) coconut milk
- 1 tablespoon fish sauce
- 1 tablespoon brown sugar
- 1 red bell pepper, sliced
- 1 green bell pepper, sliced
- Salt and pepper to taste
- Juice of 1 lime
- Fresh cilantro for garnish
Cooking Instructions:
- Prepare the Shrimp: Rinse the peeled and deveined shrimp under cold water and pat them dry with paper towels. Set aside.
- Sauté Aromatics: In a large skillet or wok, heat the coconut oil over medium heat. Add the chopped onion and sauté until translucent, about 3-4 minutes. Stir in the minced garlic and grated ginger, cooking for an additional 1-2 minutes until fragrant.
- Add Spices: Sprinkle the curry powder, ground cumin, coriander, and turmeric over the onion mixture. Stir well to combine and allow the spices to cook for 1 minute to enhance their flavors.
- Create the Sauce: Pour the coconut milk into the skillet, stirring to blend with the spices. Add the fish sauce and brown sugar, stirring until the sugar has dissolved. Bring the mixture to a gentle simmer.
- Cook the Shrimp and Vegetables: Add the shrimp and bell peppers to the skillet. Stir to coat the shrimp and vegetables with the sauce. Cook until the shrimp are pink and opaque, about 4-5 minutes.
- Season and Serve: Season the curry with salt and pepper to taste. Squeeze the juice of one lime over the shrimp and stir. Garnish with fresh cilantro before serving.
Extra Tips:
For the best flavor, use fresh shrimp if possible, and verify they’re properly cleaned before cooking. Adjust the level of spice to your preference by adding a pinch of cayenne pepper or a splash of hot sauce if you like your curry with a bit more heat.
If the sauce is too thick, you can thin it out with a splash of chicken or vegetable broth. This dish pairs beautifully with jasmine rice or naan, which can help to balance out the richness of the coconut curry. For a complete meal, consider serving with a side of steamed vegetables or a simple green salad.