
When it comes to holiday gatherings, I love creating a spread that’s as inviting as it is delicious. Rustic Christmas appetizers are my go-to for adding cozy charm to the festivities. Picture a kitchen filled with the aroma of thyme-infused mushroom tartlets and the gooey warmth of baked Camembert. There’s also the sweet-savory delight of bacon-wrapped dates to satisfy every palate. Each bite is like a warm embrace, perfect for sharing cherished moments with loved ones.
Savory Mushroom and Thyme Tartlets
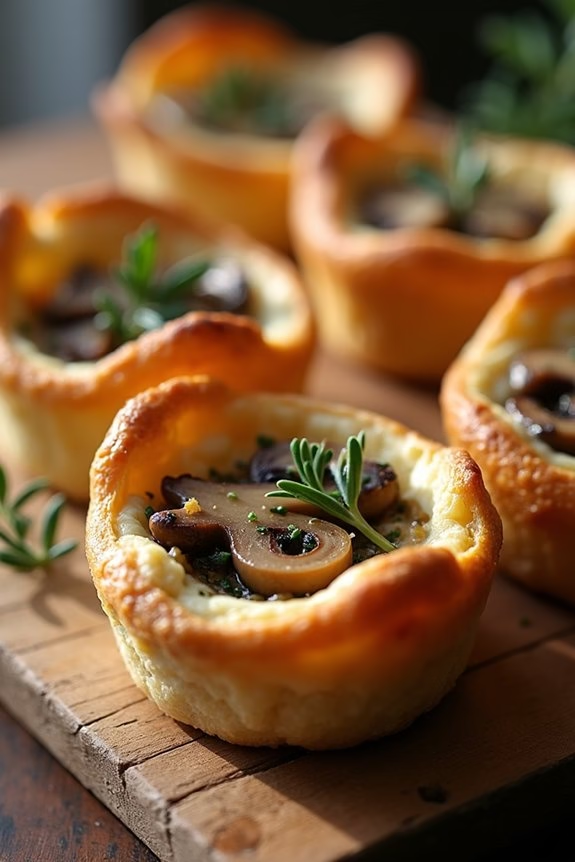
Savory Mushroom and Thyme Tartlets are a delightful addition to any rustic Christmas gathering, offering a burst of flavor in every bite. These tartlets combine the earthiness of mushrooms with the fragrant aroma of thyme, all encased in a buttery, flaky crust. The filling is rich and creamy, making it a perfect savory treat to serve as an appetizer during the festive season.
Whether you’re hosting a large family dinner or a cozy holiday party, these tartlets will certainly impress your guests and set the tone for a memorable meal.
The preparation of these tartlets is both simple and rewarding, requiring some basic ingredients that come together beautifully. The key to achieving the perfect balance of flavors is using fresh mushrooms and thyme, which lend an aromatic depth to the dish. A touch of cream and cheese adds a luscious texture to the filling, while a hint of garlic enhances the savory notes.
These tartlets are ideal for preparing in advance, allowing you to enjoy the festivities alongside your guests without spending too much time in the kitchen.
Ingredients for 4-6 servings:
- 1 sheet of puff pastry, thawed
- 1 tablespoon olive oil
- 1 small onion, finely chopped
- 2 cloves garlic, minced
- 250g (about 9 oz) cremini or button mushrooms, sliced
- 1 teaspoon fresh thyme leaves
- Salt and pepper to taste
- 1/4 cup heavy cream
- 1/4 cup grated parmesan cheese
- 1 egg, beaten (for egg wash)
Cooking Instructions:
- Preheat Oven: Begin by preheating your oven to 400°F (200°C). Line a baking sheet with parchment paper to prevent the tartlets from sticking.
- Prepare Puff Pastry: Roll out the puff pastry sheet on a lightly floured surface. Cut into 6 equal squares and place them on the prepared baking sheet. Use a fork to prick the center of each square, leaving a small border around the edges.
- Cook Filling: Heat olive oil in a skillet over medium heat. Add the chopped onion and sauté until translucent, about 3-4 minutes. Stir in the minced garlic and cook for an additional minute until fragrant.
- Sauté Mushrooms: Add the sliced mushrooms to the skillet and cook until they’re golden brown and softened, approximately 5-7 minutes. Stir in the fresh thyme leaves, and season with salt and pepper to taste.
- Add Cream and Cheese: Pour in the heavy cream and stir in the grated parmesan cheese. Cook for another 2-3 minutes, allowing the mixture to thicken slightly. Remove from heat and let it cool for a few minutes.
- Assemble Tartlets: Spoon the mushroom mixture onto the center of each puff pastry square, making sure to leave the border clear. Brush the edges of the pastry with the beaten egg to guarantee a golden finish.
- Bake: Place the tartlets in the preheated oven and bake for 15-20 minutes, or until the pastry is puffed and golden brown.
- Serve: Remove from the oven and let them cool slightly before serving warm.
Extra Tips:
To save time on the day of your event, you can prepare the mushroom filling a day in advance and store it in the refrigerator. Simply reheat it lightly before assembling the tartlets.
If you’re looking for a bit of variation, try adding a handful of spinach or swapping out the parmesan for goat cheese for a tangier flavor. Additionally, always make sure your puff pastry is properly thawed before use, as this helps in achieving that perfect flaky texture.
Rustic Brie and Cranberry Puff Pastry Bites
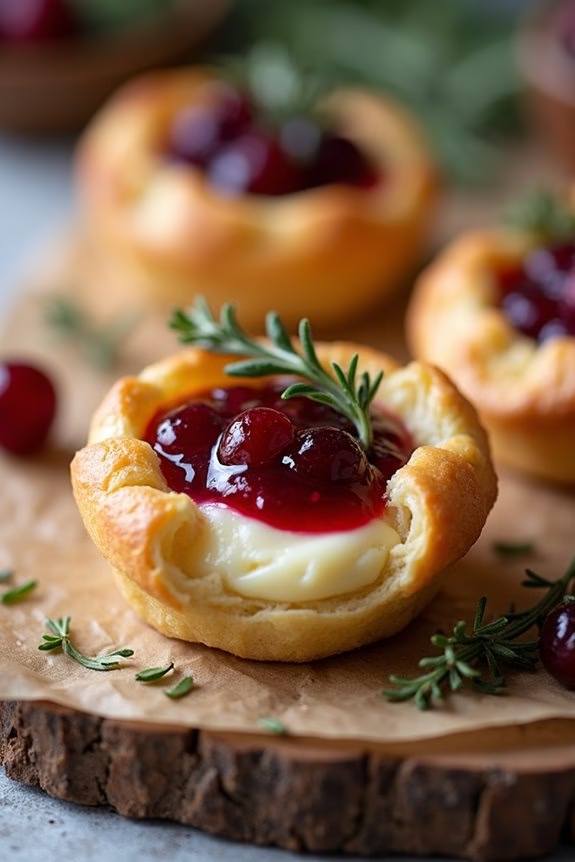
Rustic Brie and Cranberry Puff Pastry Bites are the perfect holiday appetizer that brings together the rich and creamy flavors of Brie cheese with the sweet and tangy taste of cranberry sauce, all encased in a golden, flaky puff pastry.
These bites are easy to make, and their elegant presentation makes them a delightful addition to any festive gathering. With their harmonious combination of textures and flavors, they’re sure to impress even the most discerning palates.
Ideal for serving 4-6 people, this recipe is perfect for those who want to prepare a stunning appetizer with minimal effort. The bites can be prepared ahead of time and baked just before serving, guaranteeing they’re warm and inviting.
The simplicity of the ingredients allows the natural flavors to shine through, making this dish a crowd favorite.
Ingredients:
- 1 sheet of puff pastry, thawed
- 8 oz Brie cheese, cut into small cubes
- 1/2 cup cranberry sauce
- 1 egg, beaten (for egg wash)
- Fresh thyme leaves (optional, for garnish)
Instructions:
- Prepare the Puff Pastry: Preheat your oven to 375°F (190°C). On a lightly floured surface, roll out the thawed puff pastry sheet until it’s about 1/8 inch thick. Using a sharp knife or a pastry cutter, cut the pastry into 3×3 inch squares.
- Assemble the Bites: Place a cube of Brie cheese in the center of each pastry square. Add a teaspoon of cranberry sauce on top of the Brie. If desired, sprinkle a few fresh thyme leaves for additional flavor.
- Shape the Pastry: Carefully bring the corners of each pastry square up to meet in the center, pinching them together to seal the edges. You can twist the top slightly to guarantee it’s sealed and to create a nice presentation.
- Brush with Egg Wash: Place the assembled pastry bites on a baking sheet lined with parchment paper. Brush each bite with the beaten egg to give them a beautiful golden color when baked.
- Bake the Bites: Bake in the preheated oven for 15-20 minutes, or until the pastry is puffed and golden brown. Keep an eye on them to guarantee they don’t overbake.
- Serve: Once baked, remove the bites from the oven and let them cool slightly on a wire rack. Serve warm to enjoy the gooey Brie and sweet cranberry sauce.
Extra Tips:
When working with puff pastry, make sure it remains cold as it will be easier to handle and will puff up better when baked. If the pastry becomes too soft, just pop it back in the refrigerator for a few minutes.
Additionally, you can customize these bites by adding nuts, such as chopped walnuts or pecans, for added crunch. Remember to taste the cranberry sauce before using, as some varieties can be sweeter than others, allowing you to adjust the amount used to suit your preference.
Enjoy these bites fresh out of the oven for the best taste and texture.
Herb-Crusted Goat Cheese Log
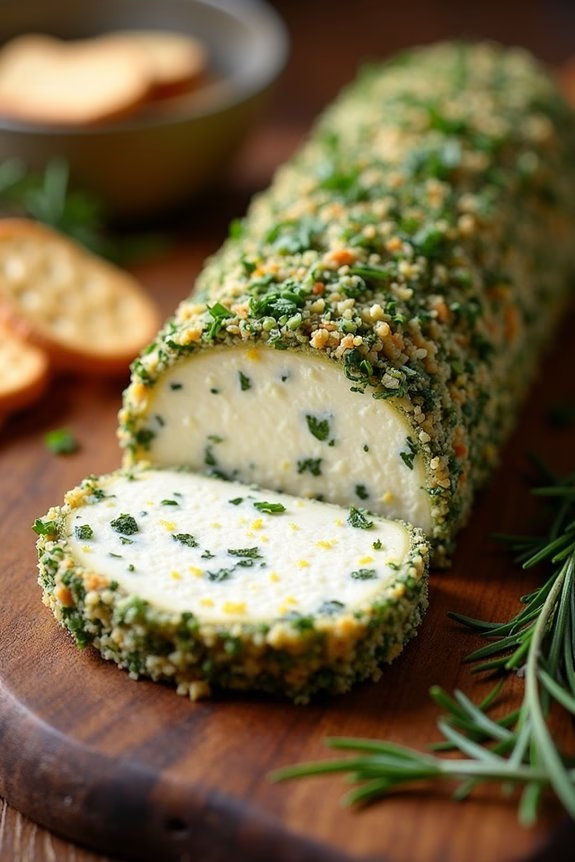
Herb-Crusted Goat Cheese Log is a delightful and sophisticated appetizer perfect for any rustic Christmas gathering. This dish combines the tangy and creamy texture of goat cheese with a flavorful crust made from a variety of fresh herbs and spices. Not only is it visually appealing, but it also offers a revitalizing and savory taste that complements a wide range of other holiday dishes.
Ideal for serving a small group, this dish is easy to prepare and adds an elegant touch to your festive spread.
The key to making the perfect Herb-Crusted Goat Cheese Log is using fresh herbs and high-quality goat cheese. The herbs provide a vibrant, aromatic crust that enhances the cheese’s natural flavor, while a touch of garlic and lemon zest adds a subtle zing. This appetizer pairs beautifully with an assortment of crackers, freshly baked bread, or crisp vegetable sticks.
With just a few simple steps, you can create a delicious and eye-catching appetizer that will impress your guests and set the tone for a memorable holiday feast.
Ingredients for 4-6 people:
- 10 ounces of goat cheese
- 2 tablespoons of fresh parsley, finely chopped
- 2 tablespoons of fresh chives, finely chopped
- 1 tablespoon of fresh thyme leaves
- 1 tablespoon of fresh rosemary, finely chopped
- 1 clove of garlic, minced
- Zest of 1 lemon
- 1 tablespoon of olive oil
- Salt and pepper to taste
- Assorted crackers or bread for serving
Cooking Instructions:
- Prepare the Herb Mixture: Begin by finely chopping the fresh parsley, chives, thyme, and rosemary. Combine these herbs in a shallow bowl. Add the minced garlic and lemon zest to the bowl, mixing well to evenly distribute the ingredients.
- Season the Goat Cheese: Take the goat cheese and place it on a clean surface. Drizzle the olive oil over the cheese, ensuring it’s lightly coated. Sprinkle a pinch of salt and pepper over the cheese for seasoning.
- Coat the Cheese Log: Roll the goat cheese in the herb mixture, pressing gently so that the herbs adhere to the surface. Make sure the entire log is evenly coated with the herb mixture for a consistent flavor profile.
- Chill the Cheese Log: Wrap the herb-crusted goat cheese log in plastic wrap and refrigerate for at least 30 minutes. This chilling time allows the flavors to meld together and makes the cheese easier to slice.
- Serve: Once chilled, remove the cheese log from the refrigerator and unwrap it. Place it on a serving platter alongside an assortment of crackers or bread. Slice the cheese log into rounds or serve it whole, allowing guests to spread it on their chosen accompaniments.
Extra Tips:
For the best flavor, use the freshest herbs available and high-quality goat cheese. If preparing the dish ahead of time, the goat cheese log can be refrigerated for up to 24 hours, allowing you to focus on other preparations on the day of your event.
Experiment with other herbs or spices to customize the flavor profile to your liking, such as adding crushed red pepper flakes for a hint of heat. Additionally, consider drizzling a little honey or balsamic glaze over the top before serving for an extra layer of flavor and elegance.
Caramelized Onion and Gruyere Tart

Caramelized Onion and Gruyere Tart is a delightful appetizer that brings a touch of elegance and warmth to any rustic Christmas gathering. This savory tart combines the rich and nutty flavors of Gruyere cheese with the sweet, caramelized goodness of onions, all nestled in a buttery, flaky crust.
The combination of these ingredients creates a harmonious balance of sweet and savory that’s sure to impress your guests and make your holiday celebration even more special. Perfect for a serving size of 4-6 people, this tart can be prepared ahead of time, allowing you to enjoy the company of your guests without the stress of eleventh-hour cooking.
The Caramelized Onion and Gruyere Tart isn’t only visually appealing but also bursts with flavor, making it an ideal starter for your festive feast. With its golden brown crust and gooey cheese topping, this appetizer is sure to become a holiday favorite.
Ingredients:
- 1 sheet of puff pastry, thawed
- 3 large onions, thinly sliced
- 2 tablespoons olive oil
- 1 tablespoon unsalted butter
- 1 teaspoon sugar
- Salt and pepper to taste
- 1 cup grated Gruyere cheese
- 1 teaspoon fresh thyme leaves
- 1 egg, beaten (for egg wash)
Cooking Instructions:
1. Preheat the Oven: Begin by preheating your oven to 400°F (200°C). Line a baking sheet with parchment paper to prevent sticking.
2. Prepare the Onions: In a large skillet over medium heat, add olive oil and butter. Once the butter has melted, add the sliced onions. Stir occasionally, allowing the onions to cook down and caramelize for about 25-30 minutes.
Sprinkle in the sugar, salt, and pepper, stirring to combine. Once the onions are a deep golden brown, remove from heat and let them cool slightly.
3. Roll Out the Pastry: On a lightly floured surface, roll out the thawed puff pastry to fit your baking sheet. Transfer the pastry to the prepared baking sheet.
4. Assemble the Tart: Spread the caramelized onions evenly over the puff pastry, leaving a small border around the edges. Sprinkle the grated Gruyere cheese over the onions, then scatter fresh thyme leaves on top.
5. Apply the Egg Wash: Brush the exposed edges of the pastry with the beaten egg to give the crust a nice golden color once baked.
6. Bake the Tart: Place the tart in the preheated oven and bake for about 20-25 minutes or until the pastry is puffed and golden brown and the cheese is melted and bubbly.
7. Cool and Serve: Once baked, remove the tart from the oven and allow it to cool for a few minutes before slicing and serving. This will help the tart to set and make it easier to cut.
Extra Tips:
For an added depth of flavor, consider adding a splash of balsamic vinegar to the onions during the final few minutes of caramelizing. This will enhance the sweetness and add a tangy note.
Additionally, verify the onions are cooked slowly over medium heat to achieve the perfect caramelization without burning. If you’re making this tart ahead of time, you can reheat it in a warm oven before serving to maintain its crispiness.
Finally, feel free to experiment with the addition of other herbs like rosemary or oregano for a different flavor profile.
Warm Spinach and Artichoke Dip
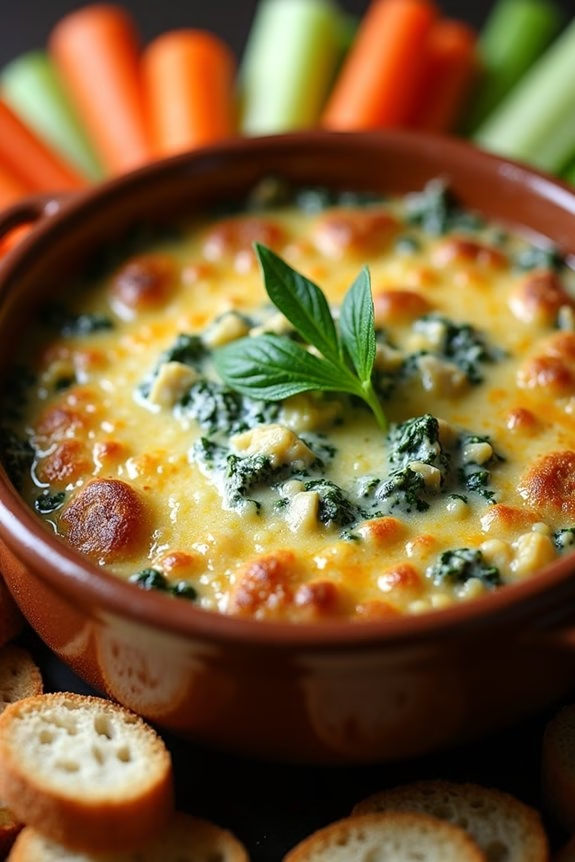
Add a cozy and inviting touch to your holiday gathering with this delicious Warm Spinach and Artichoke Dip. Perfect for a rustic Christmas appetizer, this creamy and cheesy dip is a crowd-pleaser that pairs beautifully with toasted baguette slices or crunchy vegetable sticks. The combination of tender spinach and flavorful artichokes, enveloped in a rich blend of cheeses, provides the perfect balance of flavors that will keep your guests coming back for more.
This recipe is designed to serve 4-6 people, making it an ideal choice for a small gathering or family get-together. Not only is it easy to prepare, but it also requires minimal ingredients, allowing you to focus on the joy of the holiday season. Whether you’re hosting a festive party or simply want a delicious snack to enjoy while decorating the tree, this Warm Spinach and Artichoke Dip is sure to become a favorite.
Ingredients:
- 1 cup frozen spinach, thawed and drained
- 1 can (14 ounces) artichoke hearts, drained and chopped
- 1 cup cream cheese, softened
- 1/2 cup sour cream
- 1/2 cup mayonnaise
- 1 cup grated Parmesan cheese
- 1 cup shredded mozzarella cheese
- 2 cloves garlic, minced
- Salt and pepper to taste
- Optional: Red pepper flakes for a bit of heat
Instructions:
- Preheat the Oven: Begin by preheating your oven to 375°F (190°C). This will guarantee that your dip bakes evenly and develops a golden crust on top.
- Prepare the Spinach and Artichokes: Make certain to thoroughly drain the thawed spinach by pressing it with paper towels to remove excess moisture. Chop the drained artichoke hearts into small pieces.
- Mix the Base: In a large mixing bowl, combine the softened cream cheese, sour cream, and mayonnaise. Stir until the mixture is smooth and fully combined.
- Add the Flavors: Stir in the grated Parmesan cheese, shredded mozzarella cheese, minced garlic, and a pinch of salt and pepper. Mix until the cheeses are evenly distributed.
- Combine Everything: Add the drained spinach and chopped artichokes to the cheese mixture. Stir everything together until the spinach and artichokes are evenly coated with the creamy mixture.
- Transfer to a Baking Dish: Spoon the mixture into a baking dish, spreading it evenly. If you like a bit of heat, sprinkle red pepper flakes on top.
- Bake: Place the dish in the preheated oven and bake for about 25-30 minutes, or until the top is golden brown and bubbly.
- Serve: Remove the dip from the oven and let it cool for a few minutes before serving. It pairs wonderfully with toasted baguette slices, pita chips, or fresh vegetable sticks.
Extra Tips:
For a more rustic presentation, consider serving the dip in a hollowed-out bread bowl. This not only adds to the visual appeal but also provides an additional edible component to the dish.
If you’re short on time, you can prepare the dip a day in advance and store it in the refrigerator. When ready to serve, simply bake as directed.
Finally, feel free to customize the dip by adding your favorite herbs or spices, such as thyme or dill, for a unique twist.
Prosciutto-Wrapped Asparagus Bundles
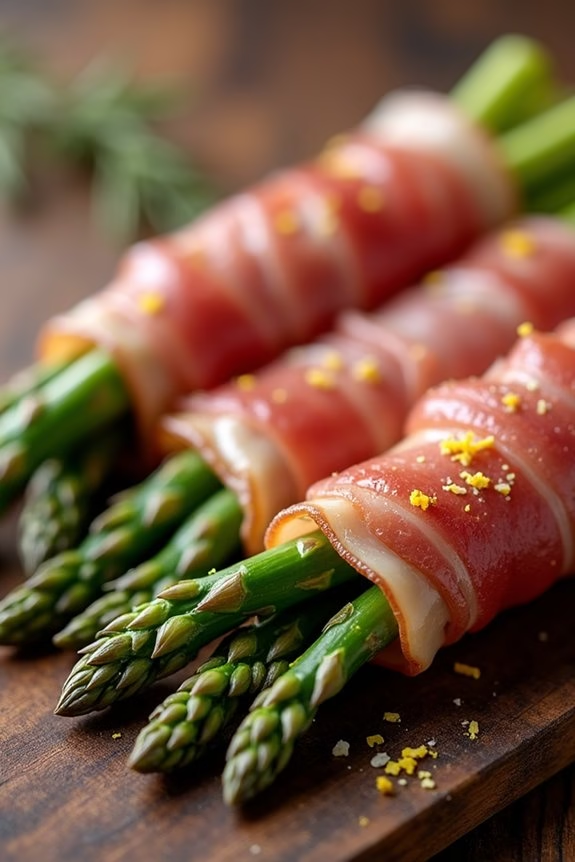
Transform your holiday table with the delightful flavors and rustic charm of Prosciutto-Wrapped Asparagus Bundles. This appetizer perfectly combines the earthy taste of fresh asparagus with the savory, slightly salty essence of prosciutto.
It’s an elegant yet simple dish that captures the spirit of Christmas with its vibrant green and pink hues, making it a feast for both the eyes and the palate. The bundles aren’t only visually appealing but also easy to prepare, allowing you to spend more time with family and friends during the festive season.
Whether you’re hosting a party or simply enjoying a cozy gathering at home, these bundles make for a perfect appetizer to start your meal. The crispy prosciutto contrasts beautifully with the tender asparagus, and a touch of lemon zest adds a revitalizing zing.
They can be made ahead of time and popped in the oven just before serving, guaranteeing they’re warm and inviting for your guests. Serve them as a side dish or a standalone appetizer to impress your loved ones with this delightful, rustic recipe.
Ingredients (Serves 4-6):
- 1 bunch of fresh asparagus (about 24 stalks)
- 12 slices of prosciutto
- 2 tablespoons olive oil
- 1 teaspoon lemon zest
- Salt and pepper to taste
- 1 tablespoon freshly grated Parmesan cheese (optional)
Cooking Instructions:
- Prepare the Asparagus: Preheat your oven to 400°F (200°C). Rinse the asparagus under cold water and pat dry. Trim the tough ends of the asparagus stalks, typically about 1-2 inches from the bottom.
- Season the Asparagus: In a large bowl, toss the asparagus with olive oil, lemon zest, salt, and pepper. Make sure each spear is evenly coated with the seasoning.
- Wrap with Prosciutto: Take 3-4 asparagus spears and wrap them tightly with a slice of prosciutto, starting at one end and working your way to the other. Place the wrapped bundles on a baking sheet lined with parchment paper. Repeat with the remaining asparagus and prosciutto slices.
- Bake the Bundles: Place the baking sheet in the preheated oven and bake for 10-15 minutes, or until the prosciutto is crispy and the asparagus is tender. Keep an eye on them to prevent overcooking.
- Serve: Remove the bundles from the oven and let them cool slightly. If desired, sprinkle freshly grated Parmesan cheese over the top before serving.
Extra Tips:
When selecting asparagus, opt for spears that are uniformly thick to guarantee even cooking. If you prefer a bit of a kick, add a pinch of red pepper flakes to the olive oil mixture before coating the asparagus.
For an extra layer of flavor, you can drizzle a balsamic glaze over the cooked bundles before serving. If making ahead, prepare the bundles up to the baking step, refrigerate, and bake just before serving to keep them fresh and warm.
Cheddar and Chive Mini Scones

Cheddar and Chive Mini Scones are a delightful addition to any rustic Christmas appetizer spread. These bite-sized treats offer a savory twist on the classic scone, combining the sharpness of cheddar cheese with the fresh, onion-like flavor of chives.
Ideal for serving at holiday gatherings, these mini scones aren’t only pleasing to the palate but also make for an attractive presentation on a festive table. Their rich, buttery texture pairs wonderfully with a variety of spreads and toppings, making them a versatile choice for your appetizer menu.
Perfectly portioned for a serving size of 4-6 people, these mini scones are easy to prepare and bake, guaranteeing you can spend more time enjoying the festivities and less time in the kitchen.
Whether you’re hosting a cozy family get-together or a larger holiday party, Cheddar and Chive Mini Scones are sure to be a hit. Their warm, comforting flavors, combined with the rustic charm of homemade baking, will surely leave your guests asking for the recipe.
Ingredients:
- 2 cups all-purpose flour
- 2 teaspoons baking powder
- 1/2 teaspoon baking soda
- 1/2 teaspoon salt
- 1/4 teaspoon black pepper
- 1/2 cup unsalted butter, cold and diced
- 1 cup sharp cheddar cheese, grated
- 1/4 cup fresh chives, finely chopped
- 3/4 cup buttermilk
- 1 egg, beaten (for egg wash)
Cooking Instructions:
- Preheat the Oven: Begin by preheating your oven to 400°F (200°C). This guarantees that it reaches the proper temperature by the time your scones are ready to bake.
- Prepare Dry Ingredients: In a large mixing bowl, combine the all-purpose flour, baking powder, baking soda, salt, and black pepper. Stir to mix the ingredients thoroughly.
- Incorporate Butter: Add the cold, diced butter to the dry ingredients. Using a pastry cutter or your fingers, blend the butter into the flour mixture until it resembles coarse crumbs.
- Add Cheese and Chives: Stir in the grated cheddar cheese and finely chopped chives, ensuring they’re evenly distributed throughout the mixture.
- Mix in Buttermilk: Pour in the buttermilk and gently mix until the dough begins to come together. Be careful not to overmix; the dough should be slightly sticky but manageable.
- Shape the Scones: On a lightly floured surface, turn out the dough and knead it gently a few times. Roll it out to about 1/2-inch thickness. Using a small round cutter, cut out the scones and place them on a baking sheet lined with parchment paper.
- Apply Egg Wash: Lightly brush the tops of the scones with the beaten egg. This will give them a lovely golden brown color when baked.
- Bake: Place the scones in the preheated oven and bake for 12-15 minutes, or until they’re golden brown and cooked through.
- Cool and Serve: Allow the scones to cool slightly on a wire rack before serving. They’re best enjoyed warm.
Extra Tips:
For the best results, be certain that your butter is very cold before incorporating it into the flour mixture. This helps create the flaky texture that’s characteristic of a great scone.
If you don’t have buttermilk on hand, you can make a substitute by adding 1 tablespoon of lemon juice or white vinegar to 3/4 cup of milk and letting it sit for 5 minutes. Additionally, feel free to experiment with different herbs, such as rosemary or thyme, to complement the cheddar and chive flavor.
Roasted Red Pepper and Feta Crostini
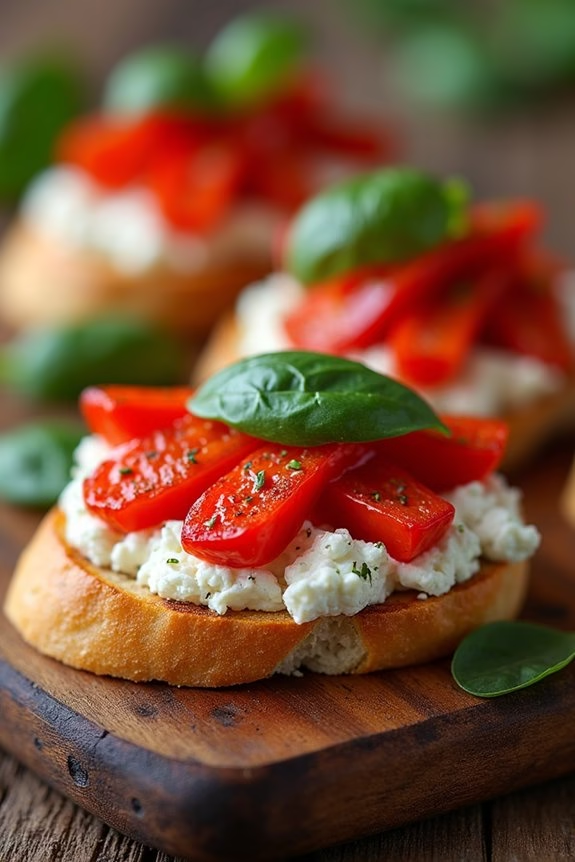
Roasted Red Pepper and Feta Crostini is an elegant yet simple appetizer that’s perfect for adding a rustic charm to your Christmas gatherings. The vibrant colors of roasted red peppers combined with the creamy tang of feta cheese create a delightful contrast that’s both appetizing and festive. This dish is perfect for those looking to offer their guests a flavorful start to their holiday meal, effortlessly combining Mediterranean-inspired ingredients with the cozy warmth of freshly toasted crostini.
The key to a successful Roasted Red Pepper and Feta Crostini is balancing the flavors and textures. The roasted red peppers bring a sweet, smoky taste, while the feta cheese offers a salty, creamy contrast. The crostini, when toasted just right, provides a satisfying crunch that complements the softness of the toppings. This appetizer isn’t only visually appealing but also an explosion of flavors that sets the stage for a memorable meal.
Ingredients (serves 4-6 people):
- 1 baguette, sliced into 1/2 inch slices
- 2 large red bell peppers
- 8 oz feta cheese, crumbled
- 2 tablespoons olive oil
- 1 tablespoon balsamic vinegar
- 2 cloves garlic, minced
- Fresh basil leaves, for garnish
- Salt and pepper to taste
Instructions:
- Prepare the Red Peppers: Preheat your oven to 450°F (230°C). Place the red bell peppers on a baking sheet and roast them in the oven for about 20-25 minutes, turning occasionally, until the skin is charred and blistered. Remove from the oven and place the peppers in a bowl, covering them with plastic wrap to steam for about 10 minutes. This will make peeling easier.
- Peel and Slice the Peppers: Once the peppers are cool enough to handle, peel off the charred skin, remove the seeds, and slice them into thin strips. Set aside.
- Prepare the Crostini: While the peppers are roasting, arrange the baguette slices on a separate baking sheet. Brush each slice lightly with olive oil and toast them in the oven for about 5-7 minutes, or until they’re golden and crisp. Remove from the oven.
- Combine Ingredients: In a small bowl, mix the crumbled feta cheese with the minced garlic, olive oil, and balsamic vinegar. Season with salt and pepper to taste.
- Assemble the Crostini: Spread the feta mixture generously on each toasted baguette slice. Top with a few strips of roasted red pepper.
- Garnish and Serve: Add a fresh basil leaf on top of each crostini for garnish. Serve immediately while the crostini are still warm.
Extra Tips: To enhance the flavor of your crostini, consider adding a sprinkle of crushed red pepper flakes for a little heat. If you prefer a creamier texture, blend the feta mixture with a bit of Greek yogurt. Make sure to keep an eye on the crostini as they toast, as they can burn quickly. Roasting the peppers on an open flame (like a gas stove or grill) can add an extra smoky flavor, which can intensify the overall taste of the dish. Enjoy your delightful, rustic appetizer!
Smoked Salmon and Dill Potato Pancakes

Indulge in the delightful combination of flavors with Smoked Salmon and Dill Potato Pancakes, a perfect rustic Christmas appetizer that’s both elegant and satisfying. These potato pancakes, also known as latkes, are crispy on the outside and tender on the inside, beautifully complemented by the rich, smoky taste of salmon and the fresh, fragrant aroma of dill.
The dish isn’t only a feast for the taste buds but also a visual treat, making it an ideal starter for any festive gathering. This recipe serves 4-6 people, providing an excellent appetizer portion for each guest. The key to perfecting this dish lies in achieving the right texture for the potato pancakes and balancing the smoky salmon with the revitalizing dill.
The following ingredients and step-by-step instructions will guide you in creating these delicious pancakes that promise to be a hit at your holiday table.
Ingredients:
- 1 pound potatoes, peeled and grated
- 1 small onion, grated
- 2 large eggs, beaten
- 1/4 cup all-purpose flour
- Salt and pepper to taste
- 1/4 cup fresh dill, chopped
- 2 tablespoons olive oil
- 8 ounces smoked salmon, thinly sliced
- 1/2 cup sour cream
- Lemon wedges, for garnish
Cooking Instructions:
- Prepare the Potatoes: Start by peeling and grating the potatoes. Place the grated potatoes in a clean kitchen towel and squeeze out as much liquid as possible. This step is essential to guarantee your pancakes are crispy and not soggy.
- Mix the Ingredients: In a large bowl, combine the grated potatoes, grated onion, beaten eggs, flour, salt, pepper, and half of the chopped dill. Mix well until all ingredients are thoroughly combined.
- Heat the Oil: In a large skillet, heat the olive oil over medium-high heat. Make sure the oil is hot before adding the potato mixture, as this will help form a crispy crust.
- Cook the Pancakes: Scoop about 1/4 cup of the potato mixture for each pancake. Flatten slightly with a spatula and cook for 3-4 minutes on each side, or until golden brown and crispy. Transfer to a paper towel-lined plate to drain excess oil.
- Assemble the Dish: Once the pancakes are cooked, top each pancake with a slice of smoked salmon. Add a dollop of sour cream on top and sprinkle with the remaining chopped dill.
- Serve and Garnish: Arrange the pancakes on a serving platter. Garnish with lemon wedges on the side and serve immediately while still warm.
Extra Tips:
For the best results, make certain that you dry the potatoes thoroughly to remove excess moisture, which can prevent the pancakes from achieving the desired crispiness.
If you prefer a more robust flavor, consider adding a pinch of smoked paprika to the potato mixture. When selecting smoked salmon, opt for a high-quality variety to enhance the overall taste of the dish.
Finally, these pancakes are best served fresh; however, they can be reheated in the oven to regain their crisp texture if needed. Enjoy this rustic appetizer that brings a touch of elegance to your holiday celebrations.
Garlic and Herb Stuffed Mushrooms

Stuffed mushrooms are a classic appetizer that brings elegance and flavor to any gathering, and this Garlic and Herb Stuffed Mushrooms recipe is no exception.
These bite-sized delights are perfect for a rustic Christmas appetizer, offering a burst of garlic and herb goodness encased in tender mushroom caps. With their savory filling and subtle earthiness, they’re sure to be a hit among your guests. The combination of fresh herbs, creamy cheese, and aromatic garlic creates a rich and satisfying taste that pairs beautifully with the soft texture of the mushrooms.
Preparing these delicious stuffed mushrooms is simple and requires only a handful of ingredients. The mushrooms are first cleaned and then filled with a mixture of cream cheese, garlic, herbs, and breadcrumbs, before being baked to perfection. This recipe serves 4-6 people, making it ideal for small gatherings or as a starter for a festive dinner. Whether you’re a seasoned cook or a beginner in the kitchen, this recipe is easy to follow and bound to impress.
Ingredients (serves 4-6):
- 24 large white mushrooms
- 3 cloves garlic, minced
- 1/4 cup fresh parsley, chopped
- 1/4 cup fresh chives, chopped
- 1/2 cup cream cheese, softened
- 1/4 cup grated Parmesan cheese
- 1/2 cup breadcrumbs
- 2 tablespoons olive oil
- Salt and pepper to taste
Cooking Instructions:
- Preheat the Oven: Start by preheating your oven to 375°F (190°C) to guarantee it’s hot and ready when your mushrooms are prepared.
- Prepare the Mushrooms: Gently wipe the mushrooms with a damp cloth to clean them. Remove the stems carefully and set the caps aside. Chop the stems finely for later use.
- Make the Filling: In a medium-sized bowl, combine the minced garlic, chopped parsley, chives, chopped mushroom stems, cream cheese, Parmesan cheese, breadcrumbs, and olive oil. Mix thoroughly until the ingredients are well combined. Season with salt and pepper to taste.
- Stuff the Mushrooms: Using a spoon, fill each mushroom cap generously with the prepared filling. Press the filling lightly to guarantee it stays in place.
- Bake the Mushrooms: Place the stuffed mushrooms on a baking sheet lined with parchment paper or a lightly greased baking dish. Bake in the preheated oven for 20-25 minutes, or until the mushrooms are tender and the filling is golden brown on top.
- Serve: Remove from the oven and let them cool slightly before serving. Arrange the mushrooms on a platter and garnish with additional chopped parsley if desired.
Extra Tips:
For the best results, choose mushrooms that are firm and unblemished. If you prefer a bit of heat, consider adding a pinch of red pepper flakes to the filling mixture.
For a more robust flavor, you can experiment with different types of cheese, such as feta or goat cheese. It’s also advisable to serve the stuffed mushrooms warm, as they taste best when freshly baked and slightly cooled.
If you’re preparing these in advance, you can assemble them ahead of time and bake just before serving to guarantee they’re piping hot and delicious.
Fig and Blue Cheese Flatbread
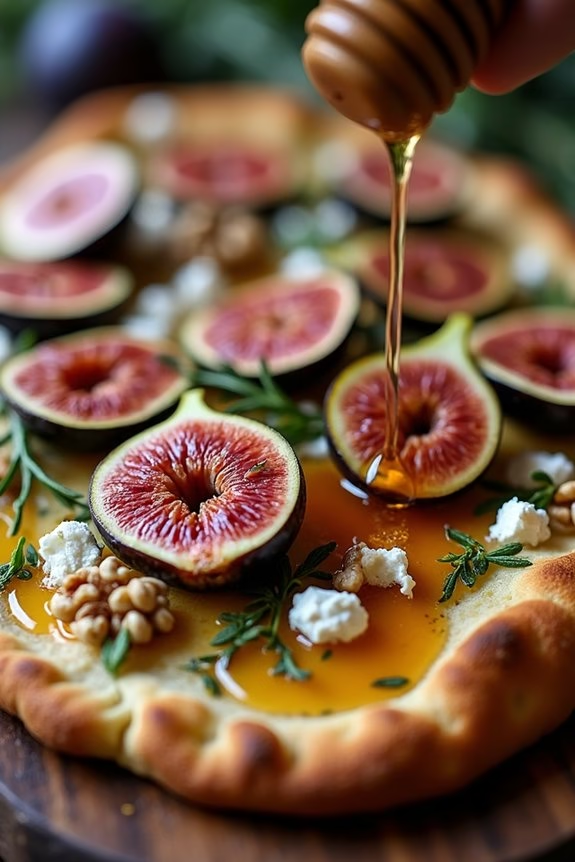
The Fig and Blue Cheese Flatbread is a delightful appetizer that combines the rich flavors of ripe figs and creamy blue cheese with the hearty texture of a flatbread crust. This rustic dish is perfect for a holiday gathering, providing a sophisticated yet simple starter that will impress your guests. The sweetness of the figs complements the tanginess of the blue cheese, creating a harmonious balance that’s further enhanced by the addition of fresh herbs and a drizzle of honey.
This recipe is designed to serve 4-6 people, making it a great choice for small gatherings or an intimate family dinner. The preparation is straightforward and doesn’t require extensive culinary skills, allowing even novice chefs to create a stunning appetizer. The flatbread can be prepared ahead of time, with the final assembly and baking done just before serving to guarantee that it’s warm and inviting.
Ingredients:
- 2 flatbreads or naan
- 8 fresh figs, quartered
- 1 cup crumbled blue cheese
- 2 tablespoons olive oil
- 2 tablespoons honey
- 1 teaspoon fresh rosemary, finely chopped
- 1 teaspoon fresh thyme leaves
- Salt and pepper to taste
- Optional: 1/4 cup walnuts, roughly chopped
Cooking Instructions:
- Preheat the Oven: Start by preheating your oven to 400°F (200°C). This guarantees that the flatbreads will cook evenly and develop a crispy crust.
- Prepare the Flatbreads: Place the flatbreads on a large baking sheet lined with parchment paper. Brush each flatbread with olive oil, ensuring an even coating to help the ingredients adhere and the crust to become crispy.
- Assemble the Toppings: Evenly distribute the quartered figs over the flatbreads. Next, sprinkle the crumbled blue cheese over the figs, making sure each piece has a good amount for a balanced flavor. Add the walnuts at this stage if using.
- Season and Bake: Sprinkle the chopped rosemary, thyme leaves, salt, and pepper over the top. Place the baking sheet in the preheated oven and bake for 12-15 minutes, or until the cheese is melted and bubbly and the edges of the flatbreads are golden brown.
- Finish with Honey: Remove the flatbreads from the oven and immediately drizzle with honey while they’re still warm. This allows the honey to melt slightly and integrate with the other flavors.
- Slice and Serve: Let the flatbreads cool for a few minutes, then slice into wedges and serve warm.
Extra Tips:
For an added layer of flavor, consider using a flavored honey, such as lavender or truffle-infused honey, which can elevate the dish’s complexity. If fresh figs are unavailable, dried figs can be rehydrated slightly in warm water for a similar effect.
Additionally, feel free to experiment with different types of blue cheese, such as Gorgonzola or Roquefort, to find the taste that best suits your palate. Finally, serving the flatbread with a side of arugula tossed in a light vinaigrette can complement the rich flavors beautifully.
Baked Camembert With Rosemary and Garlic
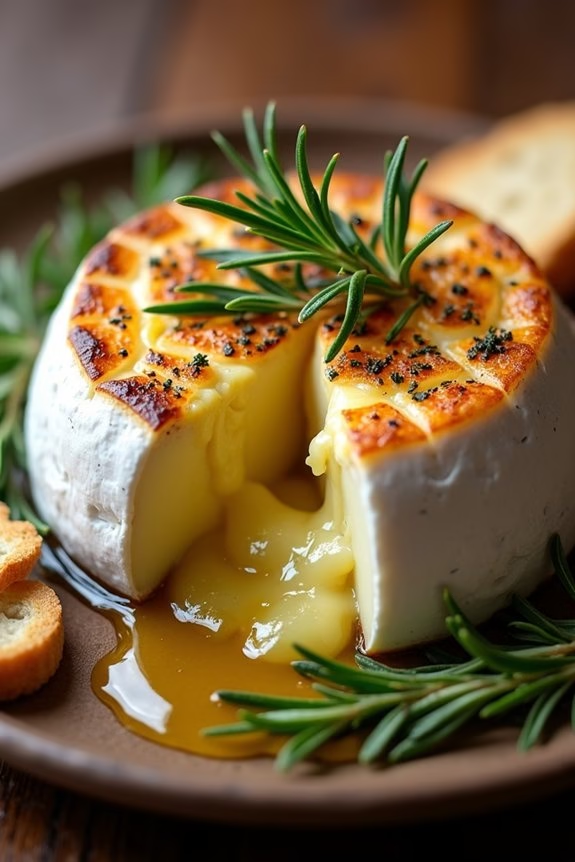
Baked Camembert with Rosemary and Garlic is an elegant and rustic appetizer that brings a warm, gooey indulgence to any Christmas gathering. This dish combines the creamy texture of Camembert cheese with the aromatic flavors of fresh rosemary and the subtle, savory notes of garlic. It’s the perfect centerpiece for a holiday cheese board or as a standalone appetizer that invites guests to dip crusty bread or crackers into the molten cheese.
The preparation of Baked Camembert with Rosemary and Garlic is delightfully simple, yet the result is sophisticated and rich in flavor. The cheese is baked until it reaches a soft, melty consistency, while the rosemary and garlic infuse it with a fragrant aroma. As the cheese bakes, the rind becomes slightly crisp, creating a textural contrast that enhances the overall experience. This dish is sure to be a hit at any festive gathering, offering a comforting and luxurious treat for your family and friends.
Ingredients (Serves 4-6):
- 1 wheel of Camembert cheese (about 250g)
- 2 cloves of garlic, thinly sliced
- 2 sprigs of fresh rosemary
- 1 tablespoon of olive oil
- A pinch of sea salt
- A pinch of freshly ground black pepper
- A small loaf of crusty bread or a selection of crackers for serving
Cooking Instructions:
- Preheat the Oven: Begin by preheating your oven to 180°C (350°F). This guarantees the cheese will melt evenly and develop a deliciously gooey center.
- Prepare the Cheese: Remove any plastic or paper packaging from the Camembert, then place it back into its wooden box (or a small ovenproof dish if it didn’t come with one). Score the top of the cheese in a criss-cross pattern with a sharp knife to allow the flavors to penetrate.
- Add Flavorings: Insert the slices of garlic into the cuts on top of the cheese, distributing them evenly. Strip the rosemary leaves from one sprig and sprinkle them over the top. Drizzle the olive oil over the cheese and season with sea salt and freshly ground black pepper to taste.
- Bake the Cheese: Place the prepared Camembert in the preheated oven and bake for 15-20 minutes, or until the cheese is bubbling and the top is golden brown.
- Prepare to Serve: While the cheese is baking, slice the crusty bread or arrange the crackers on a serving platter. Once the cheese is ready, carefully remove it from the oven and let it sit for a couple of minutes to settle before serving.
Extra Tips:
To guarantee a perfectly baked Camembert, make sure not to overbake it, as this can cause the cheese to become too runny. If you prefer a more intense flavor, you can add a splash of white wine to the dish before baking.
Additionally, experiment with other herbs like thyme or a touch of honey for a sweet contrast. Always serve the cheese immediately for the best texture and flavor, and encourage guests to dip and enjoy while it’s warm.
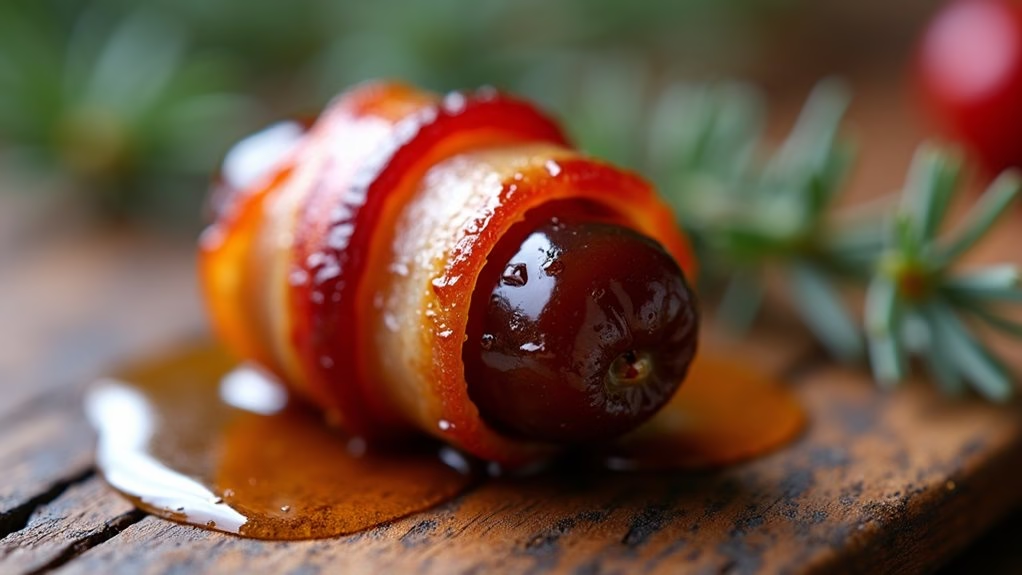
Honey-Glazed Bacon-Wrapped Dates
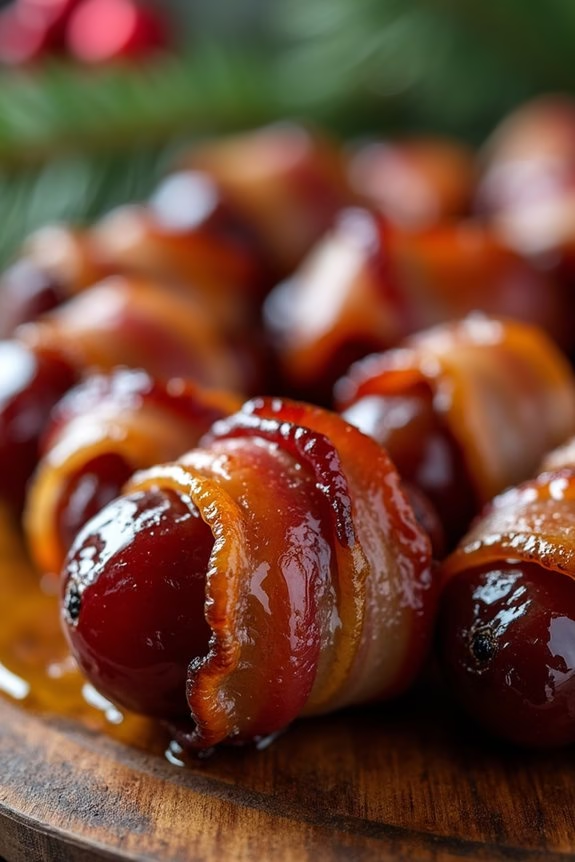
There’s something undeniably magical about the combination of sweet and savory flavors, and this honey-glazed bacon-wrapped dates recipe captures that magic perfectly. This dish is the ultimate crowd-pleaser at any Christmas gathering, bringing together the natural sweetness of dates, the smoky saltiness of bacon, and the subtle richness of honey.
As you prepare this appetizer, the tantalizing aroma will fill your kitchen, setting the mood for a festive and cozy holiday celebration. Whether you’re hosting a large family event or an intimate dinner, these bacon-wrapped dates are bound to delight your guests.
The charm of this rustic appetizer lies in its simplicity and the quality of its ingredients. Dates, with their rich, caramel-like flavor, provide a natural sweetness that pairs beautifully with the crispiness of bacon. The honey glaze adds a glossy finish and an extra layer of flavor, making each bite irresistibly delicious.
With minimal preparation time, these honey-glazed bacon-wrapped dates aren’t only delicious but also convenient for a busy holiday schedule. Prepare to impress your guests with this delightful, rustic Christmas appetizer.
Ingredients (Serving Size: 4-6 people):
- 24 Medjool dates, pitted
- 12 slices of bacon, cut in half
- 1/4 cup of honey
- 1 tablespoon of balsamic vinegar
- Toothpicks
Cooking Instructions:
- Preheat the Oven: Start by preheating your oven to 375°F (190°C). This guarantees that your dates will cook evenly and the bacon will become perfectly crisp.
- Prepare the Dates: If your dates aren’t already pitted, carefully remove the pits using a small knife. Confirm the dates remain intact to hold their shape during cooking.
- Wrap the Dates: Take each date and wrap it with a half slice of bacon. Secure the bacon in place by inserting a toothpick through the center of the date.
- Arrange on Baking Sheet: Place the bacon-wrapped dates on a baking sheet lined with parchment paper or a silicone baking mat. This will prevent sticking and make cleanup easier.
- Prepare the Honey Glaze: In a small bowl, mix together the honey and balsamic vinegar. Stir until well combined.
- Glaze the Dates: Using a pastry brush, coat each bacon-wrapped date with the honey and balsamic mixture. Confirm each piece is generously covered.
- Bake: Place the baking sheet in the preheated oven and bake for 20-25 minutes. Halfway through the cooking time, flip the dates to guarantee even browning on all sides. The bacon should be crispy and the dates caramelized.
- Serve: Once cooked, remove the dates from the oven and let them cool slightly. Arrange them on a serving platter and enjoy the sweet and savory bites!
Extra Tips:
For an added surprise, consider stuffing each date with a small piece of cheese or a whole almond before wrapping it with bacon. Blue cheese or goat cheese works particularly well, offering a creamy contrast to the sweetness of the date and the saltiness of the bacon.
Keep an eye on the dates as they bake to prevent the honey glaze from burning. If the bacon isn’t crisping up as quickly as you’d like, you can increase the oven temperature to 400°F (200°C) for the last few minutes of baking.