

I totally get it—when life gets hectic, finding time for healthy meals can feel impossible. But don’t worry, I’ve got you covered with 11 quick and nutritious recipes that are packed with flavor. From avocado toast with a perfectly poached egg to a refreshing Greek yogurt parfait, each meal is ready in under 30 minutes. Curious about how you can easily nourish your body and enjoy delicious food? Let’s check out these possibilities together.
Avocado Toast With Poached Egg

Avocado Toast With Poached Egg is a delightful and nutritious breakfast or brunch option that’s quick to prepare and incredibly satisfying. Combining creamy avocado, perfectly poached eggs, and a crisp toast base, this dish is both visually appealing and packed with essential nutrients. The creamy texture of the avocado pairs beautifully with the soft, runny yolk of the poached egg, creating a harmonious blend of flavors that’s both comforting and invigorating.
This recipe is perfect for serving 4-6 people, making it an excellent choice for a family breakfast or a small brunch gathering. Not only is it delicious, but it’s also a great way to start your day with healthy fats and proteins. Whether you’re a seasoned cook or a beginner, this dish is easy to master and can be adapted to suit your taste preferences.
Ingredients (Serves 4-6):
- 4-6 slices of whole-grain bread
- 4-6 ripe avocados
- 4-6 large eggs
- 1 tablespoon white vinegar
- Salt and pepper to taste
- Red pepper flakes (optional)
- Fresh lemon juice (from 1 lemon)
- Fresh cilantro or parsley for garnish
Instructions:
- Prepare the Avocados: Cut the avocados in half, remove the pits, and scoop the flesh into a bowl. Mash the avocado with a fork until you reach your desired consistency. Add a squeeze of lemon juice, salt, and pepper to taste, and mix well.
- Poach the Eggs: Fill a medium-sized saucepan with water and bring it to a simmer over medium heat. Add the white vinegar to the water. Crack each egg into a small bowl or cup. Gently slide each egg into the simmering water, one at a time. Poach the eggs for about 3-4 minutes until the whites are firm but the yolks are still runny. Use a slotted spoon to carefully remove the eggs from the water and set them on a paper towel to drain.
- Toast the Bread: While the eggs are poaching, toast the slices of whole-grain bread until they’re golden brown and crisp.
- Assemble the Toasts: Spread a generous amount of the mashed avocado mixture onto each slice of toast. Carefully place a poached egg on top of each avocado toast.
- Garnish and Serve: Sprinkle each toast with a pinch of red pepper flakes, if using, and garnish with fresh cilantro or parsley. Serve immediately to enjoy the toast at its best.
Extra Tips: For perfectly poached eggs, verify the water is at the right simmer, not boiling, which helps maintain the egg’s shape. Use the freshest eggs possible, as they hold together better when poached. If you prefer a different texture, you can leave the avocado in chunks instead of mashing it. Additionally, feel free to add toppings such as sliced tomatoes, feta cheese, or smoked salmon for extra flavor and variety.
Veggie Stir-Fry With Quinoa
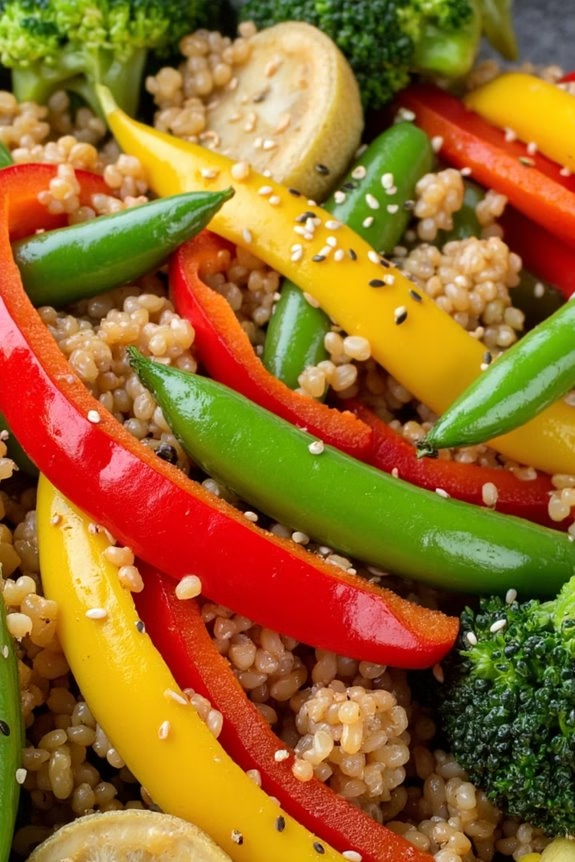
Veggie Stir-Fry With Quinoa is a nutritious and vibrant dish that’s perfect for those looking to enjoy a quick and healthy meal. Packed with colorful vegetables and paired with protein-rich quinoa, this dish not only satisfies your taste buds but also provides essential nutrients.
It’s perfect for a family dinner, meal prep, or even a casual get-together with friends. The beauty of this recipe lies in its flexibility; you can easily customize it with your favorite vegetables and spices to suit your palate.
This dish is designed to serve 4-6 people, making it an ideal choice for family meals or leftovers for lunch throughout the week. The stir-fry method guarantees that the vegetables retain their vibrant colors and crisp texture, while the quinoa adds a satisfying, nutty element.
Quinoa, being a complete protein and rich in fiber, complements the vegetables perfectly, making this dish both filling and nutritious. Whether you’re a seasoned cook or a kitchen novice, this recipe is straightforward and easy to follow.
Ingredients:
- 1 cup of quinoa
- 2 cups of water
- 2 tablespoons of olive oil
- 1 large red bell pepper, sliced
- 1 large yellow bell pepper, sliced
- 1 medium zucchini, sliced
- 1 cup of broccoli florets
- 1 cup of snap peas
- 3 cloves of garlic, minced
- 1 tablespoon of soy sauce
- 1 tablespoon of sesame oil
- Salt and pepper to taste
- 2 tablespoons of chopped fresh cilantro (optional)
- 1 tablespoon of sesame seeds (optional)
Cooking Instructions:
- Prepare the Quinoa: Rinse the quinoa under cold water using a fine mesh sieve. In a medium saucepan, bring 2 cups of water to a boil. Add the rinsed quinoa, reduce the heat to low, cover, and let it simmer for 15 minutes, or until the water is absorbed and quinoa is fluffy. Remove from heat and fluff with a fork.
- Heat the Oil: In a large skillet or wok, heat 2 tablespoons of olive oil over medium-high heat. Confirm the oil is hot before adding any vegetables to prevent sticking.
- Cook the Vegetables: Add the minced garlic to the hot oil and sauté for about 30 seconds until fragrant. Add the sliced red and yellow bell peppers, zucchini, broccoli florets, and snap peas. Stir-fry the vegetables for about 5-7 minutes, or until they’re tender-crisp.
- Season the Stir-Fry: Drizzle the soy sauce and sesame oil over the vegetables. Stir well to coat all the vegetables evenly. Add salt and pepper to taste, and continue to stir-fry for another 2 minutes.
- Combine with Quinoa: Add the cooked quinoa to the vegetable mixture in the skillet. Stir to combine all the ingredients thoroughly, guaranteeing the quinoa is evenly distributed among the vegetables.
- Finish and Serve: Once the mixture is well combined and heated through, remove from heat. Garnish with chopped fresh cilantro and sesame seeds if using. Serve hot.
Extra Tips:
For an added protein boost, consider adding tofu or chicken to the stir-fry. If you prefer more heat, add a pinch of red pepper flakes or a splash of sriracha sauce.
Make sure to chop the vegetables evenly for uniform cooking, and avoid overcrowding the pan to guarantee all ingredients cook evenly. If you’re preparing this dish in advance, store the quinoa and vegetables separately to maintain the best texture and flavor when reheated.
Greek Yogurt Parfait With Berries

Greek Yogurt Parfait With Berries is a delightful and nutritious way to start your day or enjoy as a revitalizing snack. This dish combines creamy Greek yogurt with a medley of fresh, vibrant berries, layered with a delightful crunch of granola. It’s not only visually appealing but also packed with protein, vitamins, and antioxidants. The combination of flavors and textures makes it a satisfying treat that’s both healthy and delicious.
Perfect for a quick breakfast or a guilt-free dessert, this parfait takes only minutes to prepare. You can easily customize it based on the fruits in season or your personal preferences. The Greek yogurt provides a rich and creamy base, while the berries add natural sweetness and tartness. The granola contributes a satisfying crunch that ties the whole dish together. Ideal for serving 4-6 people, this recipe can easily be adjusted for larger gatherings or scaled down for a single serving treat.
Ingredients for 4-6 servings:
- 4 cups Greek yogurt
- 2 cups mixed fresh berries (such as strawberries, blueberries, raspberries, and blackberries)
- 1 cup granola
- 2 tablespoons honey
- 1 teaspoon vanilla extract
- Fresh mint leaves (optional, for garnish)
Instructions:
- Prepare the Yogurt Base: In a large mixing bowl, combine the Greek yogurt with the vanilla extract. Stir until the vanilla is evenly incorporated into the yogurt. This will enhance the flavor profile of the yogurt, giving it a subtle sweetness and aroma.
- Layer the Parfait: In individual serving glasses or bowls, start by adding a generous spoonful of the yogurt mixture to the bottom. Follow this with a layer of mixed berries. Confirm that the berries are evenly distributed for a burst of flavor in every bite.
- Add the Granola: Sprinkle a layer of granola over the berries. This will provide the crunchy texture that contrasts beautifully with the creaminess of the yogurt.
- Repeat the Layers: Continue layering the yogurt, berries, and granola until the glasses or bowls are filled, finishing with a layer of berries on top.
- Drizzle with Honey: Drizzle honey over the top layer of berries. This adds a natural sweetness and a glossy finish to your parfait.
- Garnish and Serve: If desired, garnish each parfait with fresh mint leaves for an added touch of freshness and color. Serve immediately or refrigerate for up to an hour before serving.
Extra Tips:
When making Greek Yogurt Parfait With Berries, feel free to experiment with different types of berries or even add a few slices of banana for extra sweetness.
If you’re looking for a dairy-free option, you can substitute Greek yogurt with coconut or almond yogurt. To make the parfait even more nutritious, consider adding a sprinkle of chia seeds or flaxseeds for added fiber and omega-3 fatty acids.
Remember that the granola will soften over time, so if you prefer a crunchy texture, add it right before serving.
Spinach and Feta Stuffed Chicken Breast

Spinach and Feta Stuffed Chicken Breast is a delightful and nutritious dish that combines the savory flavors of feta cheese with the fresh taste of spinach, all enveloped within juicy chicken breasts. This recipe is perfect for a family dinner or a small gathering, offering a gourmet experience that’s surprisingly easy to prepare. Not only is it delicious, but it also provides a healthy dose of protein, vitamins, and minerals, making it a great choice for those looking to maintain a balanced diet.
This recipe is designed to serve 4-6 people, making it ideal for a dinner party or a wholesome family meal. The combination of flavors and textures in this dish will surely impress your guests, while the straightforward preparation guarantees that you can enjoy the cooking process without stress. Follow these steps to create a mouthwatering meal that’s both nutritious and satisfying.
Ingredients (serves 4-6):
- 4 large chicken breasts
- 1 cup fresh spinach, chopped
- 1/2 cup feta cheese, crumbled
- 1/4 cup sun-dried tomatoes, chopped
- 2 cloves garlic, minced
- 1 tablespoon olive oil
- 1 teaspoon dried oregano
- Salt and pepper to taste
- Toothpicks or kitchen twine
Cooking Instructions:
- Preheat the Oven: Start by preheating your oven to 375°F (190°C). This guarantees that the chicken will cook evenly and thoroughly.
- Prepare the Filling: In a medium-sized bowl, combine the chopped spinach, crumbled feta cheese, sun-dried tomatoes, and minced garlic. Mix well until the ingredients are evenly distributed.
- Prepare the Chicken: Using a sharp knife, carefully slice a pocket into each chicken breast. Be cautious not to cut all the way through. This pocket will hold the filling.
- Stuff the Chicken: Spoon the spinach and feta mixture into each chicken breast pocket. Use toothpicks or kitchen twine to secure the opening and keep the filling inside while cooking.
- Season the Chicken: Drizzle the olive oil over the stuffed chicken breasts. Sprinkle each with dried oregano, salt, and pepper to taste, guaranteeing the seasoning coats the outside evenly.
- Bake the Chicken: Place the stuffed chicken breasts in a baking dish and cover with foil. Bake in the preheated oven for 25-30 minutes, or until the chicken is cooked through and no longer pink inside. Remove the foil for the last 5 minutes of cooking to allow the chicken to brown slightly.
- Rest and Serve: Once cooked, remove the chicken from the oven and let it rest for a few minutes before serving. This allows the juices to redistribute, keeping the chicken moist.
Extra Tips:
For the best results, make sure to use fresh spinach rather than frozen, as it will provide a fresher taste and better texture. If you prefer a bit of a kick, consider adding a pinch of red pepper flakes to the filling mixture.
Additionally, using an oven thermometer can help guarantee your oven is at the correct temperature, which is essential for perfectly cooked chicken. Finally, if you find the chicken difficult to stuff or close, try using a meat mallet to gently flatten the breasts before slicing the pockets. This can make handling and stuffing the chicken easier.
Chickpea Salad With Lemon Dressing
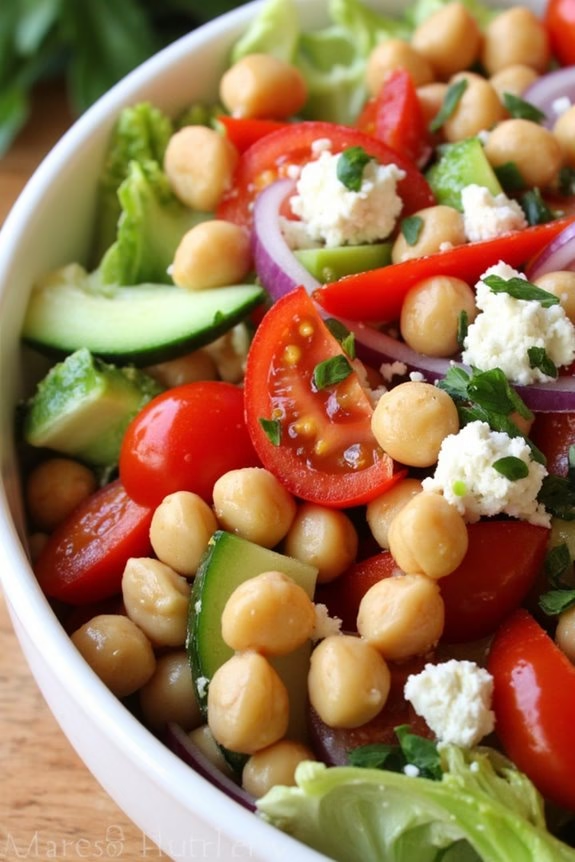
Chickpea Salad With Lemon Dressing is a revitalizing and nutritious dish that combines the hearty texture of chickpeas with the zesty flavor of lemon. This salad is perfect for a light lunch or as a side dish at dinner. Packed with protein and fiber from the chickpeas, and a burst of freshness from the vegetables and dressing, it’s both satisfying and healthy.
The simplicity of the ingredients allows the natural flavors to shine, making it a favorite for those who appreciate clean and wholesome eating. The lemon dressing is the star of the show, adding a tangy zest that elevates the salad. It’s made with freshly squeezed lemon juice, olive oil, and a hint of honey for a touch of sweetness.
This dressing not only brings all the ingredients together but also enhances their natural flavors. When combined with the chickpeas, crunchy vegetables, and fresh herbs, it creates a symphony of taste and texture that’s delightful to the palate. This salad can be made ahead of time, making it a convenient option for meal prep or a quick grab-and-go meal.
Ingredients (Serves 4-6):
- 2 cans (15 ounces each) chickpeas, drained and rinsed
- 1 cup cherry tomatoes, halved
- 1 cucumber, diced
- 1 red bell pepper, diced
- 1 small red onion, finely chopped
- 1/4 cup fresh parsley, chopped
- 1/4 cup feta cheese, crumbled (optional)
- 1/4 cup olive oil
- 3 tablespoons freshly squeezed lemon juice
- 1 tablespoon honey
- Salt and pepper to taste
Cooking Instructions:
- Prepare the Vegetables: Start by washing and drying all the vegetables. Dice the cucumber and red bell pepper, halve the cherry tomatoes, and finely chop the red onion and parsley. Set them aside.
- Mix the Salad Base: In a large mixing bowl, combine the drained and rinsed chickpeas with the prepared vegetables. Add the cherry tomatoes, cucumber, red bell pepper, red onion, and parsley into the bowl.
- Make the Dressing: In a small bowl or a jar with a lid, mix together the olive oil, freshly squeezed lemon juice, and honey. Add a pinch of salt and pepper, then whisk or shake until the dressing is well combined and emulsified.
- Combine: Pour the lemon dressing over the chickpea and vegetable mixture. Toss everything together gently to guarantee the salad is evenly coated with the dressing.
- Add Cheese: If using, sprinkle the crumbled feta cheese over the salad and give it a final toss to incorporate the cheese.
- Chill and Serve: Allow the salad to chill in the refrigerator for at least 30 minutes before serving. This resting time helps the flavors meld together beautifully.
Extra Tips: For best results, use fresh lemon juice rather than bottled for a more vibrant and authentic flavor. Feel free to customize the salad by adding other vegetables like avocado or spinach, or even some grilled chicken for extra protein.
If you prefer a spicier kick, add a pinch of red pepper flakes to the dressing. This salad can be stored in the refrigerator for up to 3 days, making it an excellent make-ahead dish for busy weeks.
Zucchini Noodles With Pesto
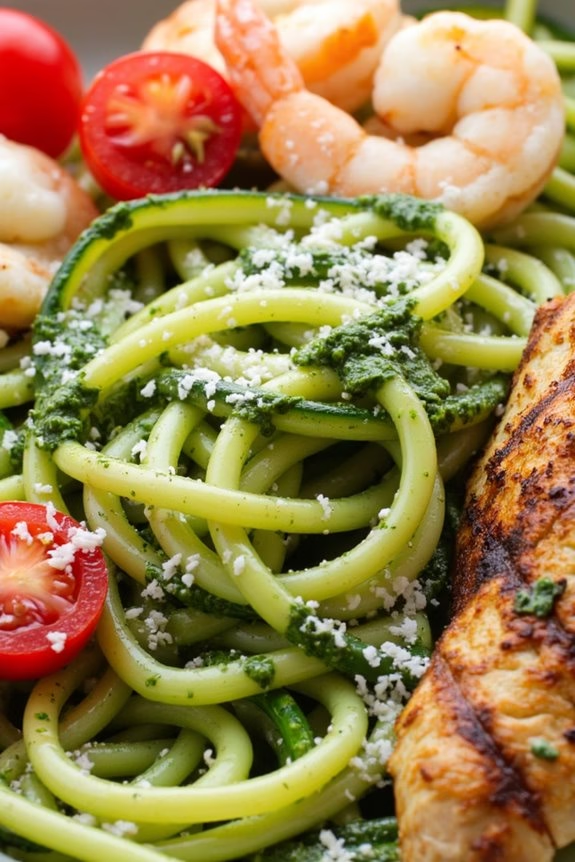
Zucchini Noodles With Pesto is a delightful and healthy alternative to traditional pasta dishes. This recipe combines the light and fresh taste of zucchini with the rich, savory flavor of pesto. It’s perfect for those who are looking to reduce their carb intake without sacrificing flavor.
Plus, it’s quick to prepare, making it an ideal choice for busy weeknights or when you want a nutritious meal without spending hours in the kitchen.
The zucchini noodles, often referred to as “zoodles,” are made by spiralizing fresh zucchini, turning them into long, thin strands that mimic the texture of spaghetti. When topped with a homemade pesto sauce made from fresh basil, garlic, pine nuts, Parmesan cheese, and olive oil, these zoodles become a flavorful and satisfying meal.
This dish can be served warm as a main course or cold as a revitalizing salad, making it versatile for any occasion.
Ingredients (Serves 4-6):
- 4 medium zucchini
- 2 cups fresh basil leaves
- 3 cloves garlic
- 1/2 cup pine nuts
- 1/2 cup grated Parmesan cheese
- 1/2 cup extra-virgin olive oil
- Salt and pepper to taste
- Optional: Cherry tomatoes, halved
- Optional: Grilled chicken or shrimp for added protein
Cooking Instructions:
- Prepare the Zucchini Noodles: Wash the zucchini thoroughly and cut off the ends. Using a spiralizer, create noodles from the zucchini. If you don’t have a spiralizer, you can use a vegetable peeler to create thin strips.
- Make the Pesto Sauce: In a food processor, combine the basil leaves, garlic, pine nuts, and Parmesan cheese. Pulse until the ingredients are finely chopped. With the processor running, gradually add the olive oil until the mixture is smooth. Season with salt and pepper to taste.
- Combine the Noodles and Pesto: In a large bowl, toss the zucchini noodles with the pesto sauce until they’re well coated. If desired, add cherry tomatoes and grilled chicken or shrimp for extra flavor and protein.
- Serve: Serve the zucchini noodles immediately if you prefer them warm. Alternatively, chill them in the refrigerator for about 30 minutes if you wish to serve them as a cold dish.
Extra Tips: When making zucchini noodles, it’s important not to overcook them as they can become soggy. If you prefer them slightly cooked, you can sauté them in a pan with a bit of olive oil for 2-3 minutes before adding the pesto.
If using store-bought pesto to save time, look for a brand that uses high-quality ingredients. Also, feel free to experiment with different nuts such as walnuts or almonds in the pesto for a unique twist.
Black Bean and Corn Tacos
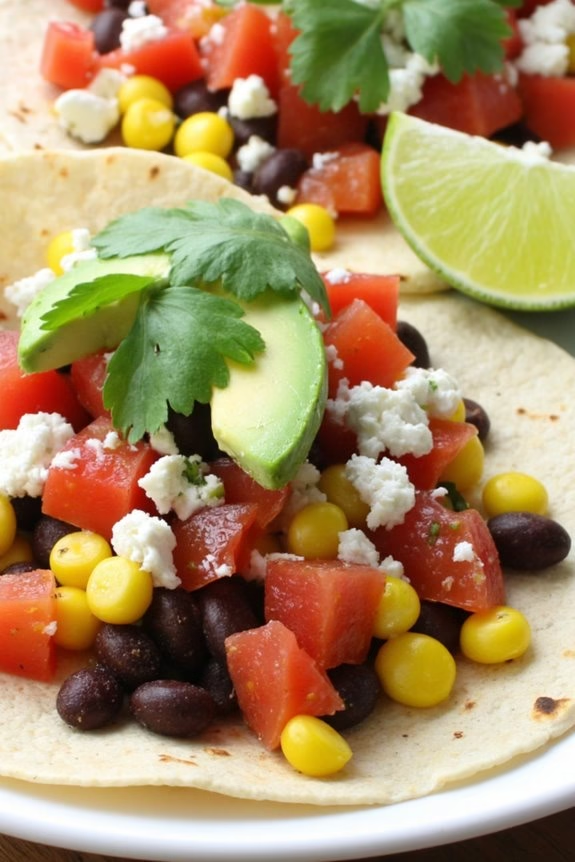
Black Bean and Corn Tacos are a delicious and nutritious meal that can be whipped up in no time, making them perfect for busy weeknights or a quick lunch option. This vegetarian dish is packed with protein from the black beans and a burst of flavor from the corn, making it not only healthy but also satisfying.
The combination of fresh vegetables, spices, and creamy toppings creates a delightful blend of textures and tastes that everyone will love. These tacos are versatile and can be customized according to your preference. Whether you like them spicy or mild, with soft or crispy tortillas, this recipe is a great starting point.
Plus, it’s a fantastic way to incorporate more plant-based meals into your diet. Serve these tacos to your family or guests, and they’ll surely be asking for seconds. Here’s how to make Black Bean and Corn Tacos for a serving size of 4-6 people.
Ingredients:
- 2 cans (15 oz each) of black beans, drained and rinsed
- 1 cup of corn kernels (fresh, frozen, or canned)
- 1 tablespoon of olive oil
- 1 medium onion, finely chopped
- 2 cloves of garlic, minced
- 1 teaspoon of ground cumin
- 1 teaspoon of chili powder
- Salt and pepper to taste
- 8-12 corn or flour tortillas
- 1 cup of diced tomatoes
- 1 avocado, sliced
- 1/4 cup of chopped fresh cilantro
- 1/2 cup of crumbled feta or cotija cheese
- Lime wedges for serving
Cooking Instructions:
- Prepare the Ingredients: Begin by draining and rinsing the black beans in a colander. If you’re using frozen corn, thaw it by running it under warm water. Set aside both ingredients for later use.
- Cook the Vegetables: In a large skillet, heat the olive oil over medium heat. Add the chopped onion and sauté for about 3-4 minutes until it becomes translucent. Then, add the minced garlic and cook for another minute until fragrant.
- Combine Beans and Spices: Stir in the black beans and corn to the skillet with the onions and garlic. Add the cumin, chili powder, salt, and pepper. Mix everything well and cook for about 5-7 minutes, allowing the flavors to meld together.
- Warm the Tortillas: While the bean mixture is cooking, warm your tortillas in a separate skillet or directly over a gas flame for a few seconds on each side until they’re heated through and slightly charred.
- Assemble the Tacos: Lay the warmed tortillas on a serving plate. Spoon the black bean and corn mixture onto each tortilla. Top with diced tomatoes, avocado slices, crumbled feta or cotija cheese, and a sprinkle of cilantro.
- Serve: Serve the tacos with lime wedges on the side for an extra burst of flavor.
Extra Tips:
For an added kick, you can include sliced jalapeños or a dash of hot sauce to the tacos. If you prefer a creamier texture, consider adding a dollop of Greek yogurt or sour cream on top.
To save time, you can prepare the black bean mixture in advance and store it in the fridge for up to two days, making it easy to assemble tacos on busy days. Remember, these tacos can be adapted with different toppings based on what’s in season or what you have in your pantry, making them a versatile and adaptable meal option.
Quick Shrimp and Broccoli Stir-Fry

Quick Shrimp and Broccoli Stir-Fry is a delightful and nutritious meal that combines the tender flavors of shrimp with the vibrant crunch of broccoli, all enveloped in a savory sauce. This dish is perfect for those nights when you need a quick and healthy dinner on the table in no time. Not only is it easy to prepare, but it also packs a nutritional punch, providing protein from the shrimp and a range of vitamins and minerals from the broccoli.
With minimal ingredients and cook time, this stir-fry is an excellent option for busy weeknights or when you want to impress your family with a delectable homemade meal.
The beauty of this recipe lies in its simplicity and the fresh flavors of its ingredients. The shrimp are cooked to perfection, guaranteeing they’re juicy and flavorful, while the broccoli retains its bright green color and crisp texture. The sauce, made with soy sauce, garlic, and ginger, ties everything together, adding a rich and aromatic depth to the dish.
Paired with steamed rice or noodles, this stir-fry isn’t only satisfying but also adaptable to any dietary needs or preferences. Whether you’re a seasoned cook or a kitchen novice, this Quick Shrimp and Broccoli Stir-Fry is a foolproof dish that will quickly become a household favorite.
Ingredients (Serves 4-6):
- 1.5 pounds large shrimp, peeled and deveined
- 1 pound broccoli florets
- 2 tablespoons vegetable oil
- 1 tablespoon sesame oil
- 3 cloves garlic, minced
- 1 tablespoon fresh ginger, minced
- 1/4 cup low-sodium soy sauce
- 2 tablespoons oyster sauce
- 1 tablespoon cornstarch
- 1/4 cup water
- 1 tablespoon honey
- Salt and pepper to taste
- Optional: sesame seeds and sliced green onions for garnish
Cooking Instructions:
- Prepare the Ingredients: Begin by washing the broccoli florets and peeling and deveining the shrimp if not already done. Mince the garlic and ginger. Set aside.
- Make the Sauce: In a small bowl, whisk together the soy sauce, oyster sauce, cornstarch, water, and honey until smooth. This will be the sauce for your stir-fry.
- Cook the Shrimp: Heat 1 tablespoon of vegetable oil in a large skillet or wok over medium-high heat. Add the shrimp and season with a pinch of salt and pepper. Cook for 2-3 minutes until they turn pink and are opaque. Remove the shrimp from the skillet and set aside.
- Stir-Fry the Broccoli: In the same skillet, add the remaining vegetable oil and sesame oil. Add the minced garlic and ginger, stirring for about 30 seconds until fragrant. Add the broccoli florets and stir-fry for 4-5 minutes until they’re bright green and tender-crisp.
- Combine Everything: Return the cooked shrimp to the skillet with the broccoli. Pour the sauce over the shrimp and broccoli, stirring well to coat everything evenly. Cook for an additional 2-3 minutes until the sauce thickens and everything is heated through.
- Serve: Transfer the stir-fry to a serving dish, and garnish with sesame seeds and sliced green onions if desired. Serve immediately with steamed rice or noodles.
Extra Tips:
When cooking Quick Shrimp and Broccoli Stir-Fry, make sure not to overcook the broccoli and shrimp to maintain their ideal texture and flavor. Adjust the sauce’s thickness by adding a bit more water if needed.
For added heat, you can include a pinch of red pepper flakes or a dash of hot sauce. To make this dish gluten-free, substitute the soy sauce with tamari or a gluten-free soy sauce alternative. Enjoy experimenting with additional vegetables, such as bell peppers or snap peas, to add more variety and color to your stir-fry.
Caprese Salad With Balsamic Glaze
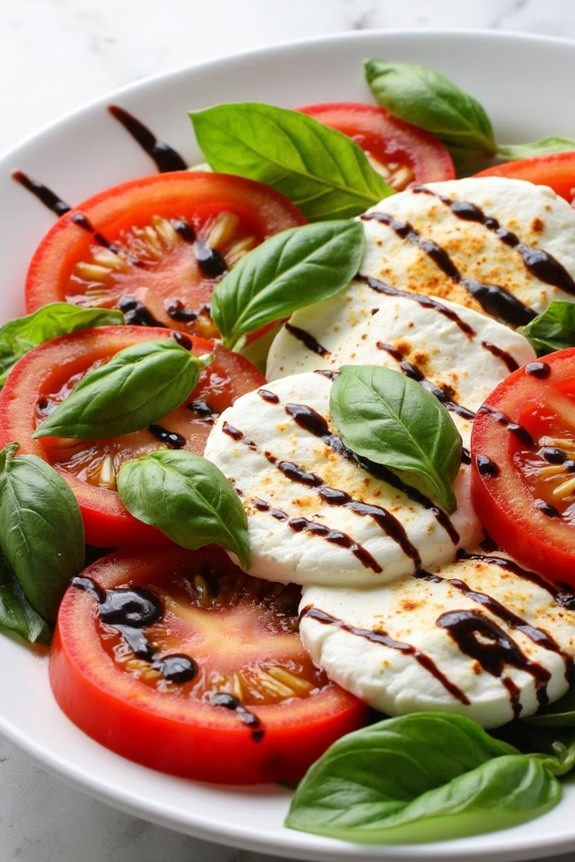
Caprese Salad With Balsamic Glaze is a classic Italian dish that highlights fresh ingredients and simple preparation. This vibrant salad isn’t only delicious but also incredibly healthy, making it a perfect addition to any meal. The combination of ripe tomatoes, creamy mozzarella cheese, fresh basil, and a sweet-tangy balsamic glaze creates a symphony of flavors that dance on your palate.
Whether you’re serving it as an appetizer, side dish, or light main course, Caprese Salad is sure to impress your family and friends.
This dish is all about using the freshest and highest quality ingredients available. The beauty of Caprese Salad lies in its simplicity, allowing each component to shine through. The balsamic glaze adds a rich depth and sweetness that complements the freshness of the tomatoes and basil.
With minimal preparation and no cooking required, this recipe is perfect for busy weeknights, casual gatherings, or elegant dinners. Let’s plunge into the ingredients and steps to create this delightful salad for 4-6 people.
Ingredients
- 4 large ripe tomatoes
- 1 pound fresh mozzarella cheese
- 1 cup fresh basil leaves
- 1/4 cup balsamic glaze
- 1/4 cup extra virgin olive oil
- Salt and pepper to taste
Instructions
- Prepare the Ingredients: Begin by washing and drying the tomatoes and basil leaves. Slice the tomatoes into 1/4 inch thick rounds. Slice the mozzarella cheese into similar-sized rounds. Set aside.
- Assemble the Salad: On a large serving platter, arrange the tomato and mozzarella slices alternately, in overlapping layers. Tuck fresh basil leaves between the layers to guarantee each bite includes all three key ingredients.
- Season the Salad: Drizzle the extra virgin olive oil evenly over the salad. Sprinkle salt and freshly ground black pepper to taste, adjusting according to your preference.
- Add the Balsamic Glaze: Finish by drizzling the balsamic glaze over the entire salad. For an artistic touch, you can use a spoon or squeeze bottle to create a decorative pattern with the glaze.
- Serve and Enjoy: Allow the salad to sit for a few minutes so the flavors can meld together. Serve at room temperature for peak taste and enjoy the delightful combination of flavors.
Extra Tips
When making Caprese Salad, the quality of ingredients is key. Use the freshest tomatoes you can find, preferably heirloom or vine-ripened, for the best flavor.
Similarly, opt for high-quality mozzarella cheese, such as buffalo mozzarella, for its creamy texture and taste. If balsamic glaze isn’t readily available, you can make your own by reducing balsamic vinegar over low heat until it thickens.
Finally, this salad is best enjoyed fresh, so try to assemble it just before serving to maintain its vibrant appearance and taste.
Overnight Oats With Almond Butter

Overnight Oats With Almond Butter is a nutritious and convenient breakfast option that’s perfect for busy mornings. This recipe combines the heartiness of oats with the creamy richness of almond butter, providing a balanced meal that will keep you satisfied until lunch. By preparing it the night before, you can save time in the morning and have a delicious, healthy breakfast ready to go.
This dish isn’t only quick and easy to prepare but also customizable to suit your taste preferences. You can add your favorite toppings, such as fresh fruits, nuts, or seeds, to enhance the flavor and nutritional value. Overnight oats are also versatile, as you can adjust the sweetness, texture, and additional ingredients to match what’s available in your pantry or what you’re in the mood for.
Ingredients for 4-6 servings:
- 3 cups rolled oats
- 3 cups almond milk (or any milk of choice)
- 1 cup almond butter
- 1/4 cup honey or maple syrup
- 1 teaspoon vanilla extract
- 1 teaspoon cinnamon
- 1/4 teaspoon salt
- 1/2 cup chopped almonds (optional)
- Fresh fruits for topping (e.g., bananas, berries, apples)
Cooking Instructions:
- Combine the Dry Ingredients: In a large mixing bowl, add the rolled oats, cinnamon, and salt. Stir these dry ingredients together until they’re evenly mixed.
- Mix the Wet Ingredients: In another bowl, whisk together the almond milk, almond butter, honey or maple syrup, and vanilla extract. Make sure the almond butter is well incorporated into the liquid mixture to guarantee even flavor throughout the oats.
- Combine Wet and Dry Ingredients: Pour the wet mixture over the dry oats mixture. Stir until the oats are fully coated and everything is well combined. This will guarantee that the oats absorb the flavors overnight.
- Add Optional Ingredients: If you like some extra crunch, fold in the chopped almonds at this stage. This is optional, but it adds a nice texture to the creamy oats.
- Refrigerate Overnight: Transfer the mixture into a large airtight container or divide it evenly among individual jars. Seal and refrigerate overnight, or for at least 6 hours, allowing the oats to soak up the liquid and soften.
- Serve and Enjoy: In the morning, give the oats a good stir. Serve them cold, or warm them up if you prefer. Top with your choice of fresh fruits before serving to add a burst of freshness and color.
Extra Tips:
For a creamier texture, consider using a thicker milk option like coconut milk. If you prefer a sweeter taste, feel free to add a bit more honey or maple syrup.
Additionally, overnight oats can be stored in the refrigerator for up to four days, making them an excellent meal prep option. To keep your oats from becoming too thick, make sure to maintain a good liquid-to-oats ratio and stir before serving.
You can also switch up almond butter with peanut butter or any nut butter of choice to vary the flavor profile.
Tomato and Basil Omelette

Tomato and Basil Omelette is a simple yet delicious dish that brings together the fresh flavors of ripe tomatoes and aromatic basil in a fluffy, protein-rich omelette. This dish is perfect for breakfast, brunch, or even a light dinner, offering a healthy and satisfying meal that’s quick to prepare.
The combination of juicy tomatoes and the hint of fresh basil adds a burst of flavor, making each bite a delightful experience. Not only is this dish flavorful, but it’s also nutritious, providing essential vitamins, minerals, and protein to fuel your day.
Whether you’re a seasoned cook or a beginner in the kitchen, this recipe is easy to follow and requires minimal ingredients, making it a perfect choice for anyone looking to enjoy a healthy meal without spending too much time cooking.
The Tomato and Basil Omelette can be served as is, or you can pair it with a side salad or whole-grain bread to create a more complete meal. With just a few ingredients and simple steps, you can have this delicious dish ready to serve for 4-6 people in no time.
Ingredients (for 4-6 servings):
- 12 large eggs
- 1 cup cherry tomatoes, halved
- 1/2 cup fresh basil leaves, chopped
- 1/2 cup milk
- 1 cup shredded mozzarella cheese
- Salt and pepper to taste
- 2 tablespoons olive oil or butter
Cooking Instructions:
- Prepare the Eggs: Crack the eggs into a large mixing bowl. Add the milk, salt, and pepper. Whisk the mixture until the eggs are fully beaten and the ingredients are well combined.
- Heat the Pan: Place a large non-stick skillet over medium heat. Add the olive oil or butter and allow it to heat until it begins to shimmer or melt.
- Cook the Tomatoes: Add the halved cherry tomatoes to the skillet. Sauté them for about 2-3 minutes until they start to soften. Stir occasionally to guarantee even cooking.
- Add the Egg Mixture: Pour the egg mixture over the tomatoes in the skillet. Allow it to cook for a few minutes without stirring until the edges start to set.
- Sprinkle Cheese and Basil: Once the egg begins to set, sprinkle the shredded mozzarella cheese evenly over the top. Follow with the chopped basil leaves, spreading them evenly.
- Finish Cooking: Reduce the heat to low. Cover the skillet with a lid and let the omelette cook for about 5-7 minutes or until the center is fully set and the cheese is melted.
- Serve the Omelette: Once cooked, remove the skillet from the heat. Carefully slide the omelette onto a serving platter or cut it into portions directly in the pan. Serve immediately while hot.
Extra Tips:
For a fluffier omelette, you can separate the egg whites from the yolks and beat them separately before folding them back together.
If you prefer a spicier version, consider adding a pinch of red pepper flakes or finely chopped jalapeños for an extra kick.
When choosing tomatoes, opt for ripe and sweet varieties to enhance the overall flavor of the dish.
Finally, if you find the omelette difficult to flip without breaking, you can finish cooking it in the oven by placing the skillet (oven-safe) under a broiler for a couple of minutes until the top is fully set.