
When the holiday hustle takes over, having quick yet delightful Christmas dinner recipes is a true lifesaver. I’ve gathered some favorites that will make your festive table shine without keeping you in the kitchen all day. From a classic roast chicken to creamy mushroom risotto, these dishes are simple, tasty, and sure to impress. Curious about effortlessly elevating your holiday menu? Let’s explore these culinary gems together.
Classic Roast Chicken With Herbs
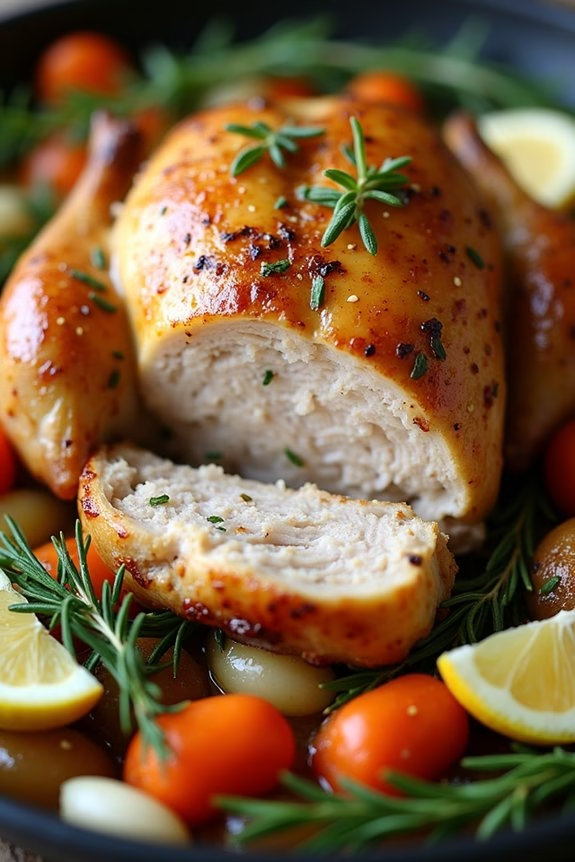
A classic roast chicken with herbs is an important centerpiece for any Christmas dinner. This dish combines the timeless flavors of fresh herbs and succulent chicken, creating a mouthwatering experience that’s perfect for holiday gatherings. The aroma of rosemary, thyme, and garlic infuses the chicken, resulting in a tender and juicy roast that’s sure to impress family and friends. This recipe is designed for 4-6 people, making it ideal for an intimate yet festive celebration.
Roasting chicken is an art that brings together simple ingredients to create a dish that’s both elegant and comforting. The use of herbs not only enhances the flavor but also offers a beautiful presentation, making your Christmas table look as delightful as the meal tastes. By following this recipe, you’ll be able to achieve a golden, crispy skin and a flavorful, moist interior that will have everyone asking for seconds.
Ingredients for 4-6 People:
- 1 whole chicken (about 4-5 pounds)
- 3 tablespoons olive oil
- 2 teaspoons salt
- 1 teaspoon black pepper
- 1 lemon, halved
- 1 bunch fresh rosemary
- 1 bunch fresh thyme
- 1 head of garlic, halved horizontally
- 1 onion, quartered
- 3 carrots, peeled and cut into large pieces
- 3 celery stalks, cut into large pieces
- 1 cup chicken broth
Cooking Instructions:
- Preheat the Oven: Set your oven to 425°F (220°C) to make sure it’s hot enough to create a crispy skin.
- Prepare the Chicken: Remove the giblets from the chicken cavity. Rinse the chicken inside and out under cold water, then pat dry with paper towels. This helps the skin crisp up during roasting.
- Season the Chicken: Rub the chicken with olive oil, salt, and pepper, guaranteeing an even coat. Squeeze the lemon halves over the chicken, and place them inside the cavity along with the rosemary, thyme, and garlic halves.
- Arrange Vegetables: In a large roasting pan, spread the onion, carrots, and celery evenly. This serves as a bed for the chicken and adds flavor to the drippings.
- Place the Chicken: Position the chicken on top of the vegetables in the roasting pan. Pour chicken broth into the pan to keep the vegetables moist and add flavor to the juices.
- Roast the Chicken: Place the roasting pan in the preheated oven. Roast for approximately 1.5 to 2 hours, or until the internal temperature of the chicken reaches 165°F (74°C) and the juices run clear when the thigh is pierced.
- Rest and Serve: Once cooked, remove the chicken from the oven and let it rest for about 15-20 minutes. This allows the juices to redistribute, resulting in a juicier chicken. Carve and serve alongside the roasted vegetables.
Extra Tips:
For an even more flavorful roast, consider making a simple herb butter by mixing softened butter with chopped rosemary, thyme, and garlic. Gently lift the skin of the chicken and spread the herb butter directly underneath before roasting. This won’t only add a rich taste but also help to keep the meat moist.
Additionally, if you prefer a more robust flavor, marinate the chicken in the refrigerator with the herbs and lemon for a few hours or overnight before cooking. Always make sure your chicken reaches the proper internal temperature for food safety, and remember that resting the chicken is important for the best texture and juiciness.
Honey-Glazed Ham With Pineapple
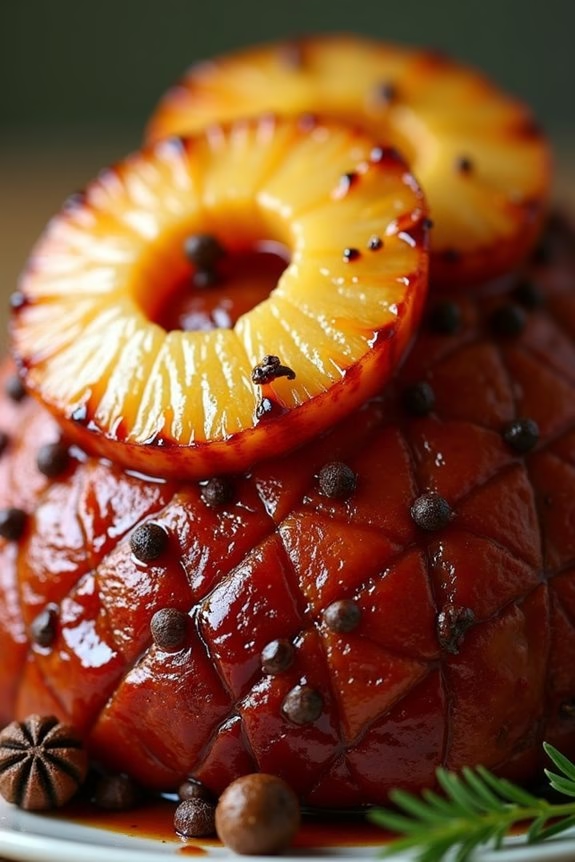
The holiday season is the perfect time to indulge in a sumptuous feast, and nothing says Christmas dinner quite like a Honey-Glazed Ham with Pineapple. This dish combines the savory flavor of ham with the sweet and tangy taste of pineapple and honey, creating a mouthwatering centerpiece for your festive table. The glaze caramelizes beautifully in the oven, adding a shiny, appetizing finish to the ham.
Whether you’re hosting a large gathering or a cozy family dinner, this recipe is certain to impress and satisfy your loved ones. This honey-glazed ham isn’t only delicious but also surprisingly easy to prepare, making it an ideal choice for both novice and experienced cooks. The recipe serves 4-6 people, making it perfect for an intimate gathering or as part of a larger holiday spread.
By following these simple steps, you’ll be able to create a stunning and flavorful dish that will have everyone coming back for seconds. So, let’s get started on creating this festive delight!
Ingredients (Serves 4-6):
- 1 fully cooked bone-in half ham (about 5-6 pounds)
- 1 cup honey
- 1/2 cup brown sugar
- 1/4 cup Dijon mustard
- 1/4 cup apple cider vinegar
- 1 can (20 ounces) pineapple slices in juice, drained (reserve juice)
- Whole cloves
Cooking Instructions:
- Preheat the Oven: Begin by preheating your oven to 325°F (163°C) to guarantee it’s ready for baking the ham.
- Prepare the Ham: Place the ham, cut side down, in a large roasting pan. Score the surface of the ham in a diamond pattern using a sharp knife, making cuts about 1/4 inch deep. Insert whole cloves into the intersections of the cuts.
- Make the Glaze: In a medium saucepan, combine honey, brown sugar, Dijon mustard, apple cider vinegar, and the reserved pineapple juice. Heat the mixture over medium heat, stirring until the sugar is dissolved and the glaze is smooth. Let it simmer for about 5 minutes to thicken slightly.
- Glaze the Ham: Pour half of the glaze over the ham, spreading it evenly with a brush or spoon. Reserve the remaining glaze for later.
- Bake the Ham: Cover the ham loosely with aluminum foil and place it in the preheated oven. Bake for about 1.5 to 2 hours, basting with the remaining glaze every 30 minutes.
- Add Pineapple Slices: During the last 30 minutes of baking, arrange the pineapple slices over the top of the ham. This will allow the pineapple to caramelize slightly and infuse the ham with its sweet flavor.
- Finish Baking: Remove the foil for the last 15 minutes of baking to allow the glaze to caramelize and give the ham a glossy finish. The ham is done when it reaches an internal temperature of 140°F (60°C).
- Rest and Serve: Once cooked, remove the ham from the oven and let it rest for at least 10 minutes before slicing. This helps the juices redistribute, guaranteeing a moist and flavorful dish. Serve with the caramelized pineapple slices and any remaining glaze.
Extra Tips:
For the best results, make sure to use a sharp knife when scoring the ham to guarantee even cooking and enhanced flavor absorption. If you prefer a slightly spicier glaze, you can add a pinch of cayenne pepper or a dash of hot sauce to the glaze mixture.
Remember to periodically check the ham while it bakes to guarantee it doesn’t dry out; covering it with foil helps retain moisture. Additionally, if you have leftovers, they make for delicious sandwiches or can be used in a variety of other recipes. Enjoy your festive Honey-Glazed Ham with Pineapple!
Garlic Butter Shrimp Pasta
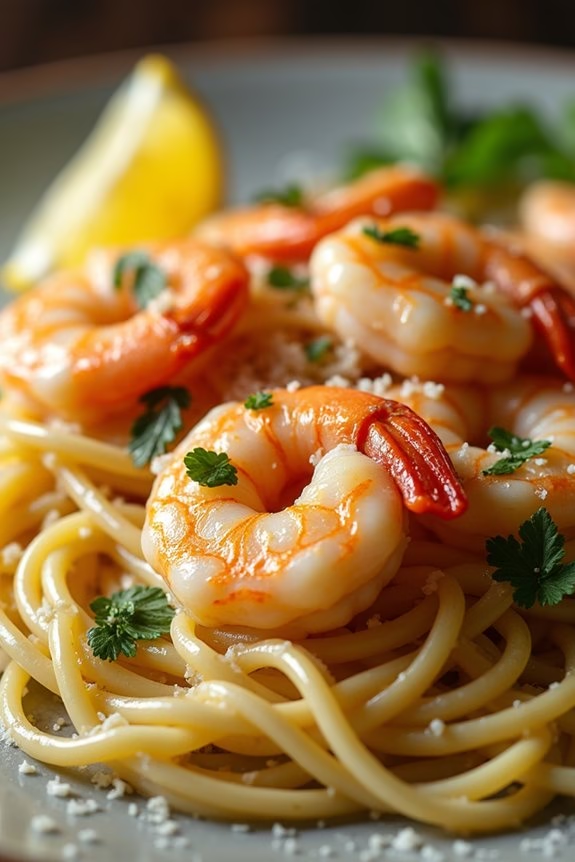
Garlic Butter Shrimp Pasta is a delightful and savory dish that perfectly combines the rich flavors of garlic, butter, and succulent shrimp with the comforting texture of pasta. This dish is ideal for a Christmas dinner, offering a touch of elegance and sophistication to your holiday table.
The creamy garlic butter sauce coats the pasta beautifully, and the shrimp adds a touch of luxury, making it a festive and satisfying meal for your loved ones. This recipe serves 4-6 people, perfect for a family gathering or a small holiday party.
It’s a quick and easy dish to prepare, allowing you more time to enjoy the festivities with your guests. The combination of garlic and butter is classic, and when paired with shrimp and pasta, it creates a harmonious balance of flavors that are sure to impress.
Ingredients:
- 1 pound large shrimp, peeled and deveined
- 12 ounces of fettuccine or spaghetti
- 4 tablespoons unsalted butter
- 4 cloves garlic, minced
- 1/4 teaspoon red pepper flakes (optional)
- 1 cup heavy cream
- 1/2 cup grated Parmesan cheese
- Salt and pepper, to taste
- 2 tablespoons chopped fresh parsley
- 1 tablespoon olive oil
- Lemon wedges, for serving
Cooking Instructions:
1. Cook the Pasta: In a large pot of boiling salted water, cook the fettuccine or spaghetti according to package instructions until al dente. Drain the pasta, reserving about 1 cup of pasta water, and set aside.
2. Prepare the Shrimp: Pat the shrimp dry with paper towels and season with salt and pepper. In a large skillet over medium heat, add 1 tablespoon of olive oil. Once hot, add the shrimp and cook for 2-3 minutes on each side until golden and cooked through. Remove the shrimp from the skillet and set aside.
3. Make the Sauce: In the same skillet, melt 4 tablespoons of unsalted butter over medium heat. Add the minced garlic and red pepper flakes, sautéing for about 1 minute until fragrant. Stir in the heavy cream and let it simmer for 2-3 minutes, reducing slightly.
Add the Parmesan cheese and stir until melted and smooth.
4. Combine: Return the cooked shrimp to the skillet along with the cooked pasta. Toss everything together until the pasta is well coated with the sauce. If the sauce is too thick, add some reserved pasta water, a little at a time, until the desired consistency is reached.
5. Season and Serve: Season with additional salt and pepper to taste. Garnish with chopped fresh parsley and serve immediately with lemon wedges on the side for an extra zesty kick.
Extra Tips: For the best results, use fresh shrimp as it enhances the flavor and texture of the dish. If you’re using frozen shrimp, make sure to thaw them completely before cooking.
Also, be careful not to overcook the shrimp as they can become tough and rubbery. This dish can be adjusted for spiciness by altering the amount of red pepper flakes. Finally, always reserve some pasta water to adjust the sauce consistency as needed.
One-Pan Balsamic Pork Tenderloin
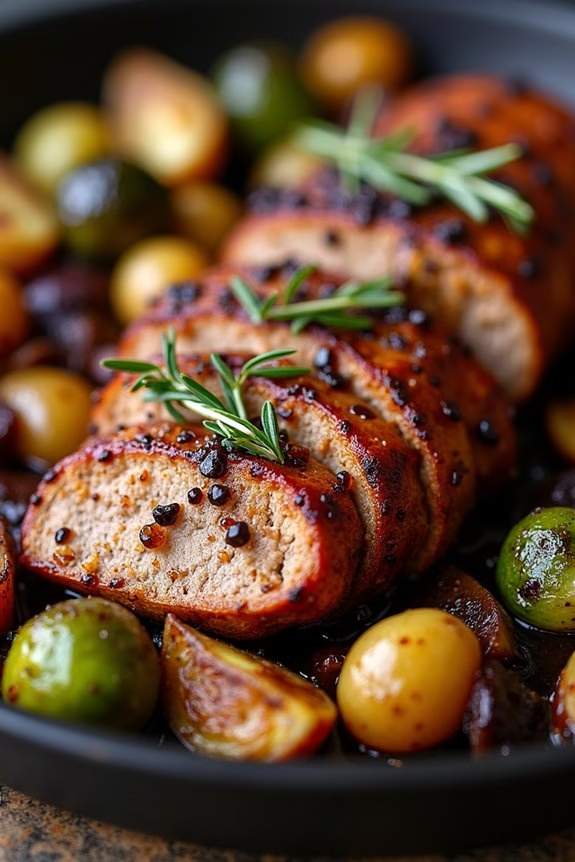
One-Pan Balsamic Pork Tenderloin is a delicious and elegant dish that’s perfect for a Christmas dinner. This recipe combines the rich, tangy flavors of balsamic vinegar with the tender, juicy pork, creating a mouthwatering main course that will impress your guests. The best part is that it’s cooked in one pan, making clean-up a breeze and allowing you to focus on enjoying the holiday festivities.
The combination of savory herbs and sweet balsamic glaze makes this dish a standout, and it pairs beautifully with a variety of sides. The recipe is designed to serve 4-6 people, guaranteeing that everyone at your table will have a hearty serving. The pork tenderloin is seared to perfection and then roasted with vegetables, allowing all the flavors to meld together harmoniously.
The balsamic glaze not only adds a touch of acidity to balance the richness of the pork but also contributes a lovely caramelized color and flavor. This dish is sure to be a hit at your Christmas gathering, leaving your family and friends raving about the meal.
Ingredients for 4-6 servings:
- 2 pork tenderloins (about 1.5 lbs each)
- 1/2 cup balsamic vinegar
- 1/4 cup honey
- 3 cloves garlic, minced
- 2 tablespoons olive oil
- 1 tablespoon fresh rosemary, chopped
- 1 tablespoon fresh thyme, chopped
- Salt and pepper to taste
- 1 pound baby potatoes, halved
- 1 pound Brussels sprouts, halved
- 1 large red onion, cut into wedges
Cooking Instructions:
- Preheat the Oven: Preheat your oven to 400°F (200°C) to make sure it’s hot enough to roast the pork and vegetables evenly.
- Prepare the Marinade: In a small bowl, whisk together the balsamic vinegar, honey, minced garlic, olive oil, rosemary, thyme, salt, and pepper. This will be used to marinate the pork and enhance its flavor.
- Marinate the Pork: Place the pork tenderloins in a large resealable plastic bag or a shallow dish. Pour half of the balsamic mixture over the pork, making sure it’s well-coated. Seal the bag or cover the dish and let the pork marinate for at least 30 minutes at room temperature or up to 4 hours in the refrigerator for deeper flavor.
- Prepare the Vegetables: While the pork is marinating, prepare the vegetables. Halve the baby potatoes and Brussels sprouts and cut the red onion into wedges. Place them on a large rimmed baking sheet.
- Combine Vegetables and Remaining Marinade: Drizzle the remaining balsamic mixture over the vegetables. Toss the vegetables to coat them evenly with the marinade.
- Sear the Pork: Heat a large oven-safe skillet over medium-high heat. Once hot, remove the pork from the marinade (discarding the marinade) and sear each side for about 2-3 minutes or until a golden crust forms.
- Roast the Dish: Transfer the seared pork to the baking sheet with the vegetables. Place in the preheated oven and roast for 25-30 minutes or until the pork reaches an internal temperature of 145°F (63°C).
- Rest and Serve: Once cooked, remove the pork from the oven and let it rest for 5-10 minutes before slicing. This allows the juices to redistribute, guaranteeing a juicy, tender bite. Serve the sliced pork with the roasted vegetables.
Extra Tips:
For an even more flavorful dish, consider preparing the marinade a day in advance to allow the flavors to develop further. If you prefer your vegetables extra crispy, you can separate them from the pork while resting and return them to the oven for an additional 5-10 minutes.
Make sure you have a meat thermometer on hand to check the pork’s doneness accurately; overcooking can lead to dry meat. Finally, feel free to experiment with different herbs or add a splash of orange juice to the marinade for a citrusy twist.
Quick Beef Stroganoff
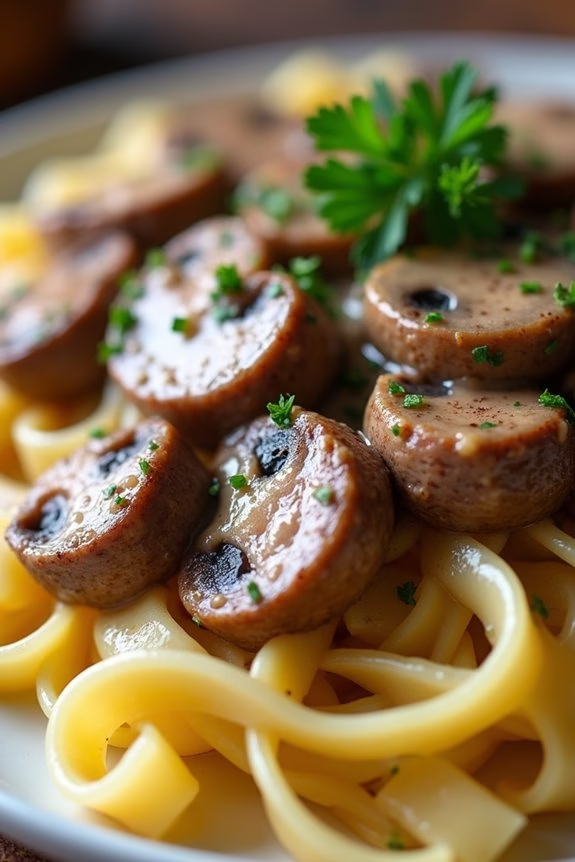
Quick Beef Stroganoff is a classic comfort food dish that’s perfect for a cozy Christmas dinner. This version of the dish isn’t only delicious but also quick and easy to prepare, making it ideal for those who want to spend more time with family and less time in the kitchen. With tender strips of beef, earthy mushrooms, and a creamy sauce, this dish is sure to please everyone at the table.
Beef Stroganoff has its origins in Russian cuisine, but it has become a beloved dish worldwide. Its rich and savory flavors are complemented by a hint of tanginess from sour cream, making it a delightful meal that pairs well with a variety of side dishes. This recipe serves 4-6 people, making it suitable for smaller family gatherings or intimate holiday dinners.
Ingredients for Quick Beef Stroganoff (Serves 4-6):
- 1 1/2 pounds of beef sirloin, cut into thin strips
- 2 tablespoons of olive oil
- 1 medium onion, finely chopped
- 2 cloves of garlic, minced
- 8 ounces of mushrooms, sliced
- 1 cup of beef broth
- 1 tablespoon of Worcestershire sauce
- 1 teaspoon of Dijon mustard
- 1 cup of sour cream
- Salt and pepper to taste
- Cooked egg noodles or rice, for serving
- Fresh parsley, chopped, for garnish
Cooking Instructions:
- Prepare the Beef: Begin by slicing the beef sirloin into thin strips. Season the strips with a pinch of salt and pepper to enhance the flavor.
- Sauté the Beef: In a large skillet over medium-high heat, add the olive oil. Once the oil is hot, add the beef strips in batches, cooking each batch for about 2-3 minutes until browned on all sides. Remove the beef from the skillet and set it aside.
- Cook the Vegetables: In the same skillet, add the chopped onion and garlic. Sauté for about 2 minutes until the onion becomes translucent. Add the sliced mushrooms and continue cooking for another 5 minutes until the mushrooms are tender and browned.
- Make the Sauce: Pour in the beef broth, Worcestershire sauce, and Dijon mustard. Stir well to combine and bring the mixture to a simmer. Let it cook for about 5 minutes to allow the flavors to meld.
- Add the Sour Cream: Reduce the heat to low and stir in the sour cream, mixing until the sauce is smooth and creamy. Return the cooked beef to the skillet and stir to coat the beef in the sauce. Cook for an additional 2-3 minutes until everything is heated through.
- Serve: Taste and adjust the seasoning with salt and pepper if needed. Serve the Beef Stroganoff hot over cooked egg noodles or rice. Garnish with fresh parsley for a pop of color and freshness.
Extra Tips:
For the best results, avoid overcooking the beef as it can become tough and chewy. The key is to quickly brown the beef strips to retain their juiciness.
If you prefer a thicker sauce, you can add a tablespoon of flour to the mushroom mixture before adding the broth. This will help thicken the sauce as it simmers.
Finally, feel free to experiment with different mushrooms for added flavor complexity, such as cremini or shiitake mushrooms.
Lemon Herb Baked Salmon
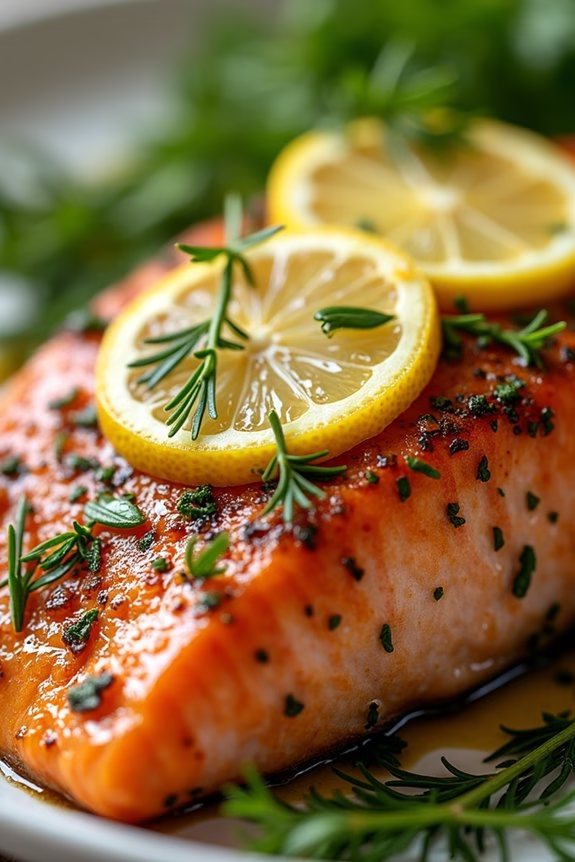
Lemon Herb Baked Salmon is an elegant and delicious dish perfect for a festive Christmas dinner. The combination of fresh herbs and zesty lemon creates a vibrant and flavorful profile that complements the rich and tender salmon fillets. This dish isn’t only appealing to the eye with its bright colors, but it’s also healthy and easy to prepare, making it an excellent choice for both experienced cooks and beginners looking to impress their guests during the holiday season.
The preparation of Lemon Herb Baked Salmon involves a simple yet effective method of marinating the fish with a mixture of lemon juice, garlic, and a blend of fresh herbs. This allows the flavors to infuse into the salmon, guaranteeing a moist and flavorful result. Baked in the oven, the salmon retains its juiciness while developing a slightly crisp exterior. This recipe serves 4-6 people, making it ideal for a family gathering or a small dinner party.
Ingredients (serving size: 4-6 people):
- 4-6 salmon fillets (about 6 ounces each)
- 3 tablespoons olive oil
- 3 tablespoons fresh lemon juice
- 2 cloves garlic, minced
- 2 teaspoons lemon zest
- 1 tablespoon fresh dill, chopped
- 1 tablespoon fresh parsley, chopped
- 1 tablespoon fresh thyme leaves
- Salt and pepper to taste
- Lemon slices, for garnish
- Fresh dill sprigs, for garnish
Instructions:
- Preheat the Oven: Preheat your oven to 375°F (190°C) to guarantee it’s ready for baking the salmon.
- Prepare the Marinade: In a small mixing bowl, combine the olive oil, fresh lemon juice, minced garlic, lemon zest, chopped dill, parsley, thyme, and a pinch of salt and pepper. Stir well to create a uniform marinade.
- Marinate the Salmon: Place the salmon fillets in a shallow baking dish. Pour the prepared marinade over the fish, guaranteeing each fillet is evenly coated. Allow the salmon to marinate for at least 15 minutes at room temperature to absorb the flavors.
- Bake the Salmon: Transfer the baking dish to the preheated oven. Bake the salmon for 15-20 minutes, or until the fish is opaque and flakes easily with a fork. The exact cooking time may vary depending on the thickness of the fillets.
- Garnish and Serve: Once baked, remove the salmon from the oven and let it rest for a few minutes. Garnish with fresh lemon slices and dill sprigs before serving to enhance the presentation and add a touch of freshness.
Extra Tips: For an even more intense flavor, you can marinate the salmon for up to an hour in the refrigerator, but avoid longer marination as the acid from the lemon juice can begin to “cook” the fish. If you prefer a slightly crispier texture, consider broiling the salmon for the last 2-3 minutes of cooking time.
Serve the Lemon Herb Baked Salmon with a side of roasted vegetables or a fresh green salad to complete the meal.
Easy Stuffed Bell Peppers
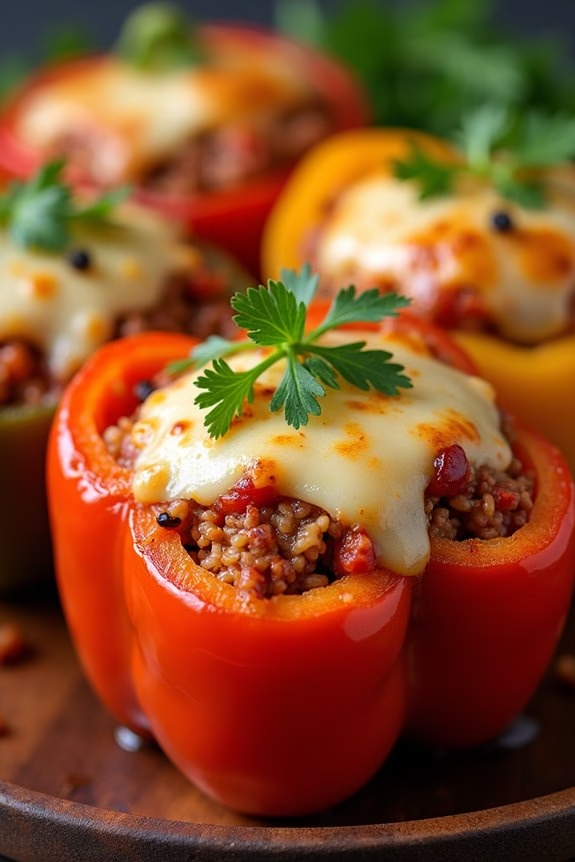
If you’re looking for a festive dish that’s both colorful and delicious, Easy Stuffed Bell Peppers are a perfect choice for your Christmas dinner. This dish brings together vibrant bell peppers filled with a savory blend of rice, meat, and aromatic spices. Not only does it make for an eye-catching presentation, but it also delivers a comforting and hearty flavor profile that’s sure to impress your guests.
Ideal for a serving size of 4-6 people, this recipe is straightforward to prepare and doesn’t require advanced cooking skills, making it a great addition to any holiday meal plan.
The beauty of this recipe lies in its versatility. You can customize the stuffing to accommodate dietary preferences or simply to use what ingredients you have on hand. Whether you opt for ground beef, turkey, or a vegetarian filling, the end result is a warm, satisfying dish that feels like a celebration in itself.
Let’s explore the ingredients and the step-by-step guide to create this delightful centerpiece for your holiday table.
Ingredients for 4-6 people:
- 6 large bell peppers (any color)
- 1 pound ground beef or turkey
- 1 cup cooked rice
- 1 medium onion, diced
- 2 cloves garlic, minced
- 1 can (14.5 oz) diced tomatoes, drained
- 1 teaspoon Italian seasoning
- 1 teaspoon salt
- 1/2 teaspoon black pepper
- 1 cup shredded mozzarella cheese
- 1 tablespoon olive oil
- Optional: chopped fresh parsley for garnish
Cooking Instructions:
- Prepare the Peppers: Preheat your oven to 375°F (190°C). Cut the tops off the bell peppers and remove the seeds and membranes. Lightly brush the outside of the peppers with olive oil and place them upright in a baking dish.
- Cook the Filling: In a large skillet over medium heat, add the olive oil and sauté the diced onion until translucent, about 3-4 minutes. Add the minced garlic and cook for another minute until fragrant.
- Brown the Meat: Add the ground beef or turkey to the skillet. Cook until browned, breaking it apart with a spoon, about 5-7 minutes. Drain excess fat if necessary.
- Mix the Filling Ingredients: Add the drained diced tomatoes, cooked rice, Italian seasoning, salt, and black pepper to the meat mixture. Stir well to combine, and let it simmer for 5 minutes to blend the flavors.
- Stuff the Peppers: Spoon the meat and rice mixture into each bell pepper, packing it tightly. Place the stuffed peppers in the baking dish, ensuring they remain upright.
- Bake the Peppers: Cover the baking dish with aluminum foil and bake in the preheated oven for 30 minutes.
- Add Cheese and Finish Baking: Remove the foil, sprinkle shredded mozzarella cheese over the top of each pepper, and return to the oven. Bake uncovered for an additional 10-15 minutes, or until the cheese is melted and bubbly.
- Serve: Remove the peppers from the oven and let them cool slightly. Garnish with chopped fresh parsley if desired, and serve warm.
Extra Tips:
To guarantee your peppers stand upright in the baking dish, you can slice a small piece off the bottom of each pepper to create a flat surface.
Additionally, you can experiment with different cheeses like cheddar or parmesan for a varied flavor. If you prefer a bit of heat, consider adding a dash of crushed red pepper flakes to the filling.
Finally, to save time, the filling can be prepared a day in advance and stored in the refrigerator until you’re ready to stuff and bake the peppers.
Creamy Mushroom Risotto
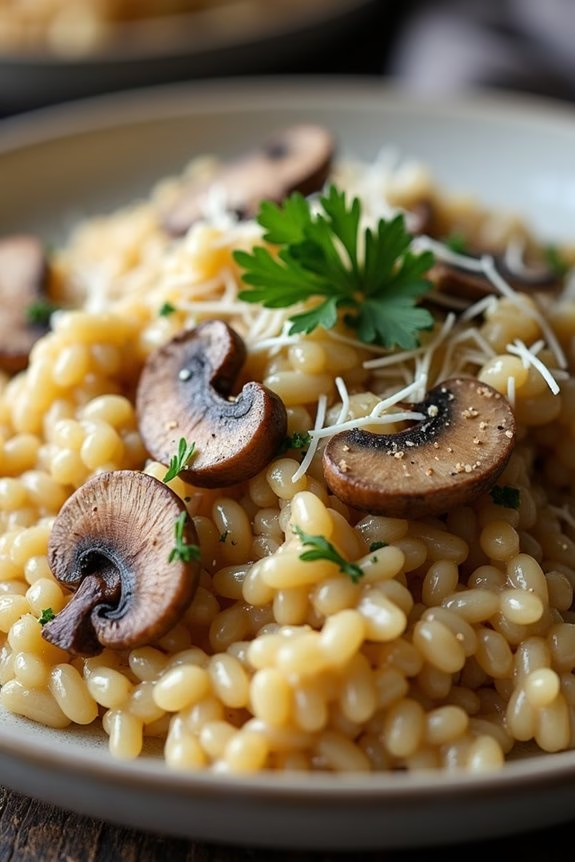
Creamy Mushroom Risotto is a classic Italian dish that’s perfect for a comforting Christmas dinner. This rich and flavorful dish combines Arborio rice with earthy mushrooms, creating a luscious and creamy texture that will delight your taste buds. The key to a perfect risotto lies in the constant stirring and the gradual addition of hot broth, which allows the rice to release its starches and achieve its signature creamy consistency. With the incorporation of Parmesan cheese and a hint of white wine, this dish becomes an indulgent centerpiece for your holiday meal.
Preparing Creamy Mushroom Risotto for Christmas dinner isn’t only about the taste but also about the experience of cooking it. The aroma of sautéed mushrooms and onions fills the kitchen, creating a warm and inviting atmosphere. The process of making risotto can be meditative, as you slowly stir the rice and watch it transform into a silky and satisfying dish.
Whether you’re hosting a small family gathering or an intimate dinner with friends, this risotto is sure to impress your guests with its depth of flavor and comforting qualities.
Ingredients (Serves 4-6):
- 1 ½ cups Arborio rice
- 1 pound assorted mushrooms (such as cremini, shiitake, and button), sliced
- 1 medium onion, finely chopped
- 3 cloves garlic, minced
- 1 cup dry white wine
- 4-5 cups chicken or vegetable broth
- 1 cup grated Parmesan cheese
- 2 tablespoons olive oil
- 3 tablespoons unsalted butter
- Salt and pepper to taste
- Fresh parsley, chopped (for garnish)
Cooking Instructions:
- Prepare the broth: In a saucepan, heat the chicken or vegetable broth over low heat. Keep it warm while you prepare the risotto.
- Sauté the mushrooms: In a large pan, heat 1 tablespoon of olive oil and 1 tablespoon of butter over medium heat. Add the sliced mushrooms and sauté until they’re golden brown and have released their moisture, about 6-8 minutes. Season with salt and pepper. Remove the mushrooms from the pan and set aside.
- Cook the onions and garlic: In the same pan, add the remaining olive oil and butter. Add the chopped onions and garlic, and cook until the onions are translucent, about 3-4 minutes.
- Toast the rice: Add the Arborio rice to the pan with the onions and garlic. Stir constantly for about 2 minutes until the rice is lightly toasted.
- Deglaze with wine: Pour in the white wine and stir until it’s mostly absorbed by the rice.
- Add the broth gradually: Begin adding the warm broth, one ladle at a time, stirring frequently. Allow each addition of broth to be absorbed before adding the next. Continue this process until the rice is creamy and al dente, about 18-20 minutes.
- Incorporate mushrooms and cheese: Once the rice is cooked, return the sautéed mushrooms to the pan. Stir in the grated Parmesan cheese until melted and well combined. Adjust seasoning with salt and pepper as needed.
- Serve and garnish: Spoon the risotto onto plates or bowls, and garnish with chopped fresh parsley. Serve immediately while hot.
Extra Tips:
When making Creamy Mushroom Risotto, it’s important to keep the broth warm throughout the cooking process. Cold broth slows down the cooking of the rice and can result in a less creamy texture.
Be patient and resist the urge to add too much broth at once; this slow addition is what gives risotto its signature creaminess. Feel free to experiment with different types of mushrooms or add a touch of truffle oil for an extra layer of flavor.
Sheet Pan Chicken Fajitas

Sheet Pan Chicken Fajitas offer a simple yet flavorful twist on a classic dish, making them an excellent addition to your Christmas dinner lineup. This recipe combines colorful bell peppers, onions, and seasoned chicken strips all roasted together on a single sheet pan. The result is a deliciously vibrant and aromatic meal that can be served directly from the oven. The ease of preparation and cleanup makes it a perfect choice for a stress-free holiday gathering.
The key to this dish’s success lies in the balance of spices and the roasting process. By using a medley of spices, including cumin, chili powder, and paprika, you can achieve the traditional fajita flavor without the need for a skillet. Roasting the ingredients together not only saves time but also guarantees that each component absorbs the rich flavors of the spices, resulting in tender, juicy chicken and perfectly cooked vegetables. Serve these fajitas with warm tortillas and your favorite toppings, like guacamole, sour cream, and fresh cilantro, to create a festive meal that everyone will enjoy.
Ingredients for 4-6 servings:
- 1 1/2 pounds boneless, skinless chicken breasts
- 3 bell peppers (any color), sliced
- 1 large red onion, sliced
- 3 tablespoons olive oil
- 2 teaspoons chili powder
- 1 teaspoon cumin
- 1 teaspoon paprika
- 1/2 teaspoon garlic powder
- 1/2 teaspoon onion powder
- 1/2 teaspoon salt
- 1/4 teaspoon black pepper
- 1 tablespoon lime juice
- 8-12 flour tortillas
- Optional toppings: sour cream, guacamole, sliced jalapeños, chopped cilantro, shredded cheese
Cooking Instructions:
- Preheat the Oven: Begin by preheating your oven to 400°F (200°C) to make sure it reaches the correct temperature by the time your ingredients are ready to be roasted.
- Prepare the Chicken and Vegetables: Slice the chicken breasts into thin strips. Similarly, slice the bell peppers and red onion. Make certain all pieces are approximately the same size to promote even cooking.
- Season the Ingredients: In a large bowl, combine the chicken strips, sliced bell peppers, and onion. Drizzle with olive oil and sprinkle the chili powder, cumin, paprika, garlic powder, onion powder, salt, and black pepper over the mixture. Toss everything until the chicken and vegetables are well-coated with the spices and oil.
- Arrange on a Sheet Pan: Spread the seasoned chicken and vegetables evenly across a large sheet pan. Make sure the ingredients are in a single layer to allow for proper roasting.
- Roast in the Oven: Place the sheet pan in the preheated oven and roast for approximately 20-25 minutes. Stir halfway through the cooking time to guarantee even cooking and browning.
- Finish with Lime Juice: Once the chicken is cooked through and the vegetables are tender, remove the sheet pan from the oven. Drizzle the lime juice over the cooked ingredients to add a fresh, zesty flavor.
- Warm the Tortillas: While the fajita mixture is cooling slightly, warm the flour tortillas in the oven or a dry skillet for a minute or two until they’re soft and pliable.
- Serve: Transfer the roasted chicken and vegetables to a serving dish and serve with the warm tortillas and your choice of optional toppings.
Extra Tips:
For maximum flavor, consider marinating the chicken in the spices and olive oil for a few hours or overnight before cooking. This will allow the flavors to penetrate the meat more deeply. If you’re short on time, this step can be skipped without sacrificing too much flavor.
Additionally, you can customize the heat level by adjusting the amount of chili powder or adding a pinch of cayenne pepper. Finally, make certain all ingredients are spread out in a single layer on the sheet pan to achieve the best roasting results, as overcrowding can lead to steaming rather than roasting.
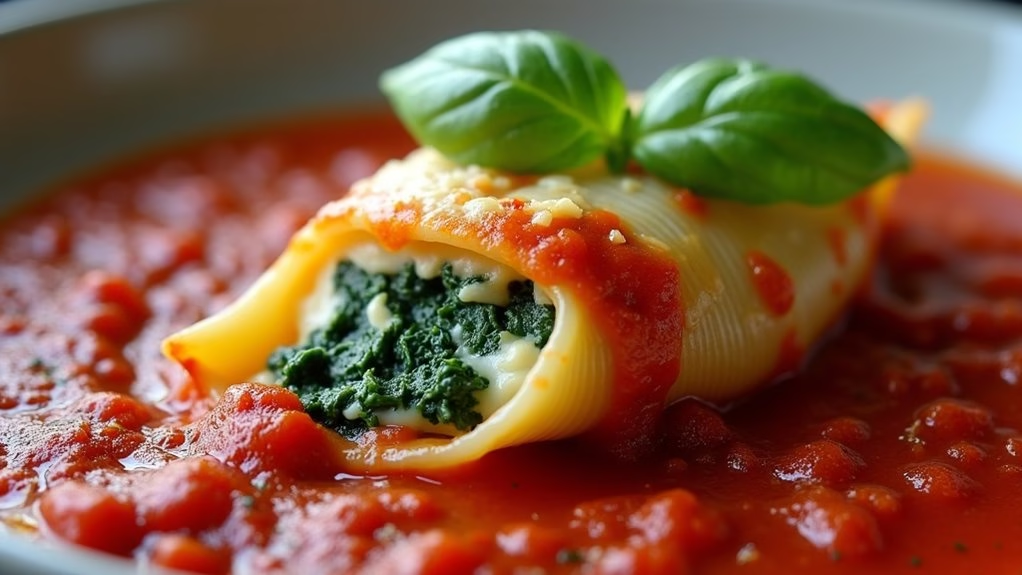
Spinach and Ricotta Stuffed Shells
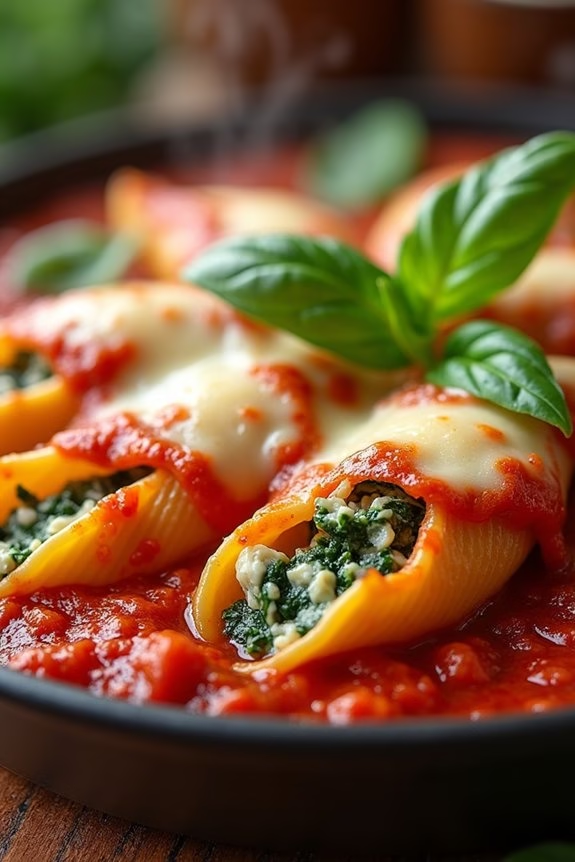
Spinach and Ricotta Stuffed Shells are a delightful addition to any Christmas dinner, offering a comforting combination of creamy ricotta, vibrant spinach, and savory tomato sauce all encased in tender pasta shells. This dish is a crowd-pleaser that not only satisfies vegetarians but also appeals to anyone who appreciates a hearty, flavorful meal.
The rich filling and bubbling cheese make this dish both indulgent and satisfying, perfect for the festive season when you’re looking to impress family and friends.
Preparing Spinach and Ricotta Stuffed Shells is relatively straightforward, making it an excellent choice for both novice and experienced cooks. The key to the dish is balancing the flavors of the filling with the tangy tomato sauce and guaranteeing that the pasta shells are cooked to perfection.
Once baked, the dish can be served directly from the oven, offering a warm and inviting aroma that fills your home with the spirit of the season. Follow the recipe below to create this delicious dish that serves 4-6 people.
Ingredients:
- 20 jumbo pasta shells
- 15 oz ricotta cheese
- 1 cup grated mozzarella cheese
- 1/2 cup grated Parmesan cheese
- 1 large egg, lightly beaten
- 2 cups fresh spinach, chopped
- 2 cloves garlic, minced
- 1 teaspoon dried Italian herbs
- Salt and pepper to taste
- 3 cups marinara sauce
- 2 tablespoons olive oil
- Fresh basil leaves for garnish (optional)
Instructions:
- Preheat the oven: Start by preheating your oven to 375°F (190°C). This guarantees that it’s at the right temperature by the time you’re ready to bake the dish.
- Prepare the pasta shells: Bring a large pot of salted water to a boil. Add the jumbo pasta shells and cook them for about 8-10 minutes, or until they’re al dente. Drain the shells and set them aside to cool slightly.
- Make the filling: In a large mixing bowl, combine the ricotta cheese, half of the mozzarella cheese, Parmesan cheese, egg, chopped spinach, minced garlic, Italian herbs, salt, and pepper. Mix everything together until the filling is smooth and well-incorporated.
- Stuff the shells: Using a spoon, carefully fill each cooked pasta shell with the ricotta and spinach mixture. Be generous with the filling to guarantee each shell is well-stuffed.
- Assemble the dish: Spread a layer of marinara sauce on the bottom of a baking dish. Arrange the stuffed shells over the sauce in a single layer. Pour the remaining marinara sauce over the top of the shells, ensuring they’re well-covered.
- Add cheese and bake: Sprinkle the remaining mozzarella cheese over the top of the shells. Drizzle with olive oil and cover the baking dish with aluminum foil. Bake in the preheated oven for 20 minutes. Remove the foil and bake for another 10 minutes, or until the cheese is bubbly and golden brown.
- Serve: Remove the dish from the oven and let it cool for a few minutes before serving. Garnish with fresh basil leaves if desired, and enjoy!
Extra Tips:
When making Spinach and Ricotta Stuffed Shells, try to use fresh, high-quality ricotta cheese for the best texture and flavor. If you want to add a bit of a kick to the dish, consider incorporating a pinch of red pepper flakes into the filling.
To save time, you can prepare the stuffed shells ahead of time and refrigerate them, covered, for up to a day before baking. Just remember to adjust the baking time slightly if the dish is cold when it goes into the oven.
With these tips, your Spinach and Ricotta Stuffed Shells will be a festive hit at your holiday table!