

As a busy host during the holiday season, it’s crucial to have a selection of quick and delightful appetizers ready to go. Last Christmas, while juggling between setting the table and preparing food, I found these recipes to be lifesavers. Serving elegant cranberry Brie bites or savory bacon-wrapped dates can make entertaining feel effortless. Curious to see how your holiday hosting can be both easy and memorable? Let’s explore some recipes that will surely impress your guests.
Cranberry Brie Bites
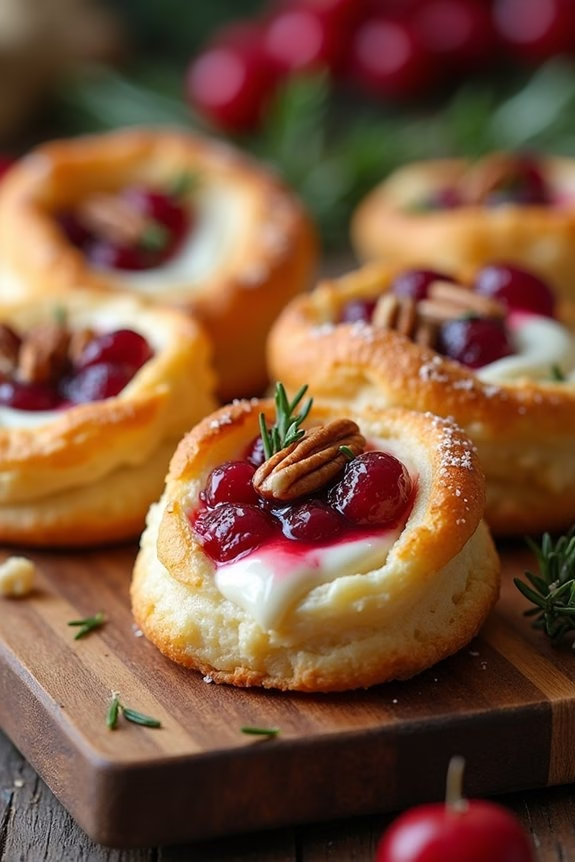
Cranberry Brie Bites are an elegant and delicious appetizer perfect for holiday gatherings, offering a delightful combination of flavors and textures. The creamy, mild taste of Brie cheese complements the tangy, sweet cranberry sauce, all enveloped in a crisp, buttery puff pastry shell. This bite-sized treat isn’t only visually appealing but also incredibly easy to prepare, making it a favorite for both home cooks and professional chefs during the festive season.
Whether you’re hosting a Christmas party or attending a potluck, these Cranberry Brie Bites are sure to captivate your guests. With minimal ingredients and a simple preparation process, you can whip up a batch in no time. The warm, melted Brie pairs beautifully with the tart cranberries and the flaky pastry, creating a mouthwatering experience in every bite. Serve them fresh from the oven for the best taste and texture.
Ingredients (Serves 4-6):
- 1 sheet of puff pastry, thawed
- 8 ounces of Brie cheese, cut into small cubes
- 1/2 cup of cranberry sauce (homemade or store-bought)
- 1/4 cup of chopped pecans (optional)
- 1 tablespoon of fresh rosemary, finely chopped
- 1 egg, beaten (for egg wash)
Cooking Instructions:
- Preheat the Oven: Start by preheating your oven to 375°F (190°C). This guarantees the oven is hot enough to give the puff pastry a nice crisp texture.
- Prepare the Puff Pastry: Roll out the thawed puff pastry on a lightly floured surface. Cut the pastry into approximately 3-inch squares. You should be able to get about 12 pieces from one sheet.
- Assemble the Bites: Place each puff pastry square into a mini muffin tin, pressing down gently to create a cup shape. Into each pastry cup, add a cube of Brie cheese.
- Add Toppings: Spoon about a teaspoon of cranberry sauce over the Brie in each pastry cup. Sprinkle some chopped pecans and a bit of rosemary on top for added flavor and crunch.
- Apply Egg Wash: Using a pastry brush, lightly brush the edges of the puff pastry with the beaten egg. This gives the pastry a golden, glossy finish once baked.
- Bake the Bites: Place the muffin tin in the preheated oven and bake for about 15-20 minutes, or until the pastry is puffed and golden brown, and the Brie is melted.
- Cool and Serve: Allow the Cranberry Brie Bites to cool in the muffin tin for a few minutes before transferring them to a serving platter. Serve warm for the best experience.
Extra Tips:
For a more robust flavor, consider using a cranberry sauce with added orange zest or a hint of cinnamon. Be sure to thaw the puff pastry properly to avoid breaking when handling, and don’t skip the egg wash; it adds a wonderful sheen to the pastry.
If pecans aren’t to your taste, you can substitute with walnuts or omit them entirely for a nut-free version. These bites can also be prepared in advance and baked right before serving, allowing you more time to enjoy the festivities.
Prosciutto-Wrapped Asparagus

Prosciutto-Wrapped Asparagus is a delightful appetizer that combines the fresh, crisp taste of asparagus with the savory, rich flavor of prosciutto. It’s an elegant yet simple dish that can be prepared quickly and impress your guests at any holiday gathering. The natural saltiness of the prosciutto perfectly complements the tender, roasted asparagus, making it a harmonious blend of textures and flavors.
This dish not only looks sophisticated but also offers a burst of freshness and indulgence in every bite, making it an ideal starter for your Christmas feast.
Preparing Prosciutto-Wrapped Asparagus is incredibly straightforward, requiring only a few ingredients and minimal prep time. This appetizer is perfect for a serving size of 4-6 people, guaranteeing everyone gets a taste of this delightful combination. With the right balance between the earthy asparagus and the cured meat, this dish is sure to become a festive favorite.
Whether you’re hosting a large family gathering or a small intimate dinner, this appetizer will set the perfect tone for the rest of the meal.
Ingredients (for 4-6 people):
- 1 pound of fresh asparagus spears
- 8 slices of prosciutto
- 2 tablespoons of olive oil
- 1/2 teaspoon of freshly ground black pepper
- 1/4 teaspoon of sea salt
- 1 tablespoon of grated Parmesan cheese (optional)
Cooking Instructions:
- Preheat the Oven: Start by preheating your oven to 400°F (200°C). This will guarantee that it reaches the right temperature by the time you’re ready to cook the asparagus.
- Prepare the Asparagus: Wash the asparagus thoroughly under cold water and pat dry with a paper towel. Trim the tough ends off the asparagus spears by snapping or cutting about 1-2 inches from the bottom.
- Wrap with Prosciutto: Lay a slice of prosciutto on a clean surface. Place an asparagus spear at one end of the prosciutto slice and roll it up tightly, leaving the tip and end of the asparagus exposed. Repeat this process for all the asparagus spears.
- Arrange on Baking Sheet: Place the wrapped asparagus on a baking sheet lined with parchment paper. Make sure to leave a little space between each spear to guarantee even cooking.
- Season and Drizzle: Lightly drizzle the wrapped asparagus with olive oil, then sprinkle with salt and freshly ground black pepper. The prosciutto is naturally salty, so be careful not to over-salt.
- Bake: Put the baking sheet in the preheated oven and bake for 12-15 minutes, or until the prosciutto is crispy and the asparagus is tender.
- Optional Garnish: If desired, sprinkle freshly grated Parmesan cheese over the asparagus just before serving for an added layer of flavor.
Extra Tips:
When preparing Prosciutto-Wrapped Asparagus, it’s important to select asparagus that’s fresh and firm, as this will provide the best texture after baking. Avoid overcooking the asparagus to prevent it from becoming too soft; it should be tender yet still have a slight crunch.
If you prefer a more caramelized flavor, consider broiling the asparagus for the last 1-2 minutes of cooking, but watch closely to prevent burning. This dish can also be prepared ahead of time and stored in the refrigerator until ready to bake, making it a convenient option for busy holiday preparations.
Stuffed Mushrooms

Stuffed mushrooms are a classic appetizer that brings a touch of elegance and flavor to any holiday gathering. The combination of savory filling and tender mushroom caps creates a delightful bite-sized treat that’s perfect for Christmas celebrations. Whether you’re hosting a party or enjoying a cozy family dinner, these festive stuffed mushrooms are sure to be a crowd-pleaser.
The filling is a harmonious blend of cream cheese, fresh herbs, garlic, and Parmesan cheese, delivering a rich and creamy texture. These flavors are complemented by the earthy notes of the mushrooms, making each bite a flavorful experience. Not only are they delicious, but stuffed mushrooms are also easy to prepare and can be made ahead of time, allowing you to focus on other holiday preparations.
Ingredients for 4-6 Servings:
- 24 large white or cremini mushroom caps
- 8 ounces cream cheese, softened
- 1/4 cup grated Parmesan cheese
- 2 cloves garlic, minced
- 2 tablespoons chopped fresh parsley
- 1 tablespoon chopped fresh chives
- 1/2 teaspoon salt
- 1/4 teaspoon black pepper
- 2 tablespoons olive oil
Cooking Instructions:
- Preparation: Preheat your oven to 375°F (190°C). Remove the stems from the mushrooms and set the caps aside. Finely chop the stems and reserve them.
- Prepare the Filling: In a medium bowl, mix together the softened cream cheese, chopped mushroom stems, Parmesan cheese, minced garlic, parsley, chives, salt, and black pepper until well combined. The mixture should be creamy and well-incorporated.
- Stuff the Mushrooms: Using a small spoon or piping bag, fill each mushroom cap with the prepared filling. Be generous with the filling, forming a small mound on top of each cap.
- Arrange the Mushrooms: Place the stuffed mushrooms on a baking sheet lined with parchment paper. Drizzle the olive oil over the mushrooms to help them brown and add a bit of extra flavor.
- Bake the Mushrooms: Bake in the preheated oven for 20-25 minutes, or until the mushrooms are tender and the filling is golden brown on top.
- Serve: Once baked, allow the mushrooms to cool slightly before transferring them to a serving platter. Garnish with additional chopped parsley if desired.
Extra Tips:
When preparing stuffed mushrooms, it’s important to choose mushrooms that are uniform in size for even cooking. If you find that your filling is too thick, you can add a tablespoon of milk to achieve the desired consistency.
Additionally, these stuffed mushrooms can be prepared a day in advance; simply store them covered in the refrigerator and bake just before serving. For a variation in flavor, consider adding crumbled bacon or chopped nuts to the filling for added texture and taste.
Caprese Skewers
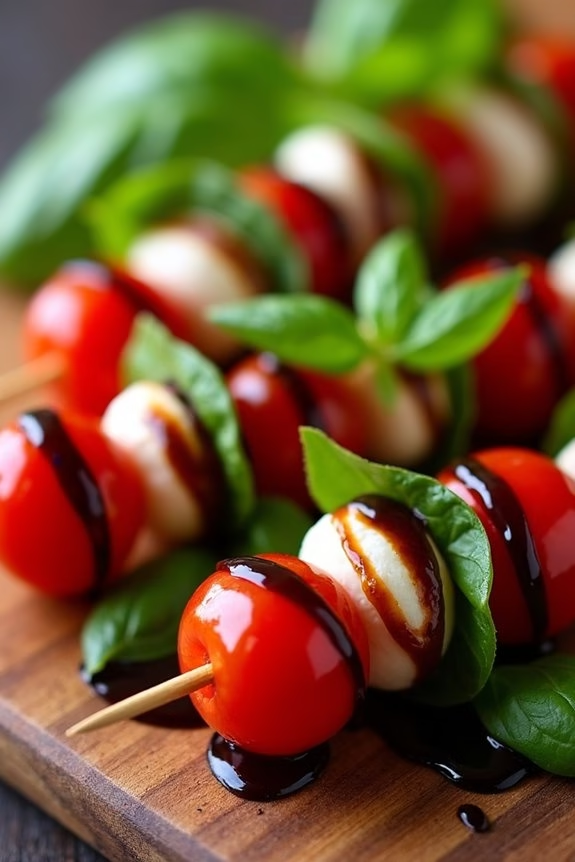
Caprese Skewers are a delightful and visually appealing appetizer that combines the fresh flavors of basil, mozzarella, and tomatoes. Perfect for Christmas gatherings, these skewers offer a quick and easy way to serve something light yet flavorful. The vibrant colors of the ingredients make them an attractive addition to your holiday table, and their simplicity means you can prepare them in advance, allowing you to enjoy more time with your guests.
This dish takes the classic Italian Caprese salad and transforms it into a fun, bite-sized appetizer. The skewers are drizzled with balsamic glaze, enhancing the natural sweetness of the tomatoes and balancing the creamy richness of the mozzarella. Whether you’re hosting a large party or an intimate family dinner, these Caprese Skewers are sure to be a hit with everyone.
Ingredients (for 4-6 servings):
- 20 cherry tomatoes
- 20 fresh basil leaves
- 20 small mozzarella balls (bocconcini)
- 2 tablespoons extra virgin olive oil
- Salt and pepper to taste
- 1/4 cup balsamic glaze
- 20 wooden skewers (6-inch)
Instructions:
- Prepare Ingredients: Begin by washing the cherry tomatoes and basil leaves thoroughly. Pat them dry with a paper towel to remove excess moisture. Drain the mozzarella balls and set aside.
- Assemble Skewers: Take a wooden skewer and start by threading a cherry tomato onto it. Follow with a fresh basil leaf and then a mozzarella ball. Repeat the sequence until the skewer is filled, leaving a small space at the end for handling. Repeat this process for all skewers.
- Season Skewers: Once all the skewers are assembled, arrange them on a serving platter. Drizzle them generously with extra virgin olive oil, and then season with salt and pepper according to your taste.
- Add Balsamic Glaze: Finally, drizzle the balsamic glaze over the skewers. Be careful to distribute the glaze evenly for a consistent flavor profile.
- Serve: Serve the skewers immediately for the freshest taste, or cover them and refrigerate for up to an hour before serving.
Extra Tips:
To enhance the flavors even more, consider using a flavored balsamic glaze, such as fig or raspberry, which complements the sweetness of the tomatoes beautifully.
If you’re preparing these skewers in advance, store them in the refrigerator and only drizzle the balsamic glaze just before serving to prevent the skewers from becoming soggy.
For a little variation, you can also add a slice of prosciutto or salami to each skewer for a savory twist.
Smoked Salmon Crostini
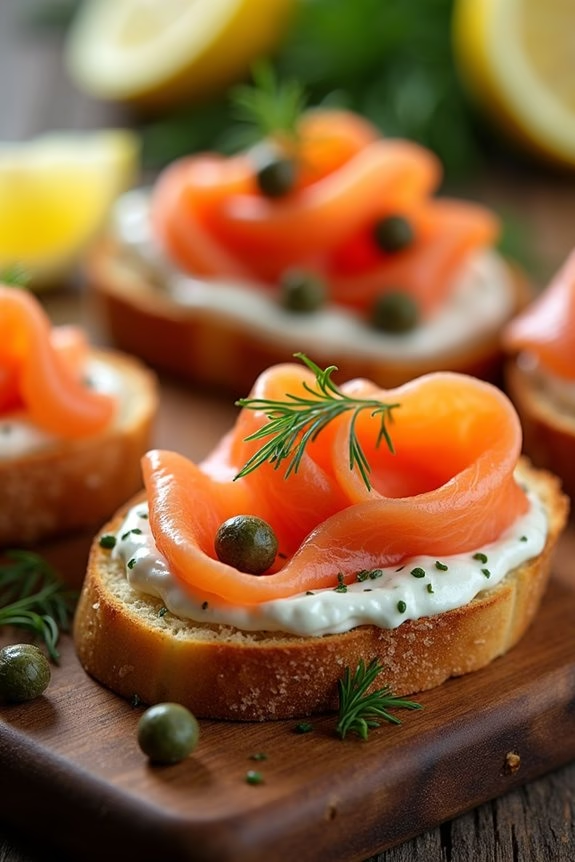
Smoked Salmon Crostini is an elegant and delicious appetizer that’s perfect for your Christmas celebrations. This dish combines the rich, savory flavors of smoked salmon with the creamy texture of herbed cream cheese, all served on crispy, toasted baguette slices. The addition of capers and dill adds a zesty and invigorating touch, making it a delightful starter that will impress your guests.
Whether you’re hosting a festive gathering or simply looking for a sophisticated appetizer, these crostini are sure to be a hit. This appetizer isn’t only easy to assemble but also visually stunning, making it a great choice for holiday entertaining. The contrasting colors of the salmon, cream cheese, and garnishes create a beautiful presentation that will catch the eye of anyone at the table.
This recipe serves 4-6 people, making it ideal for small gatherings or as part of a larger spread of appetizers.
Ingredients for 4-6 servings:
- 1 French baguette
- 8 oz cream cheese, softened
- 2 tbsp fresh dill, finely chopped
- 1 tbsp lemon juice
- 8 oz smoked salmon, thinly sliced
- 2 tbsp capers
- 1 tbsp olive oil
- Salt and pepper to taste
- Fresh dill sprigs, for garnish
- Lemon wedges, for garnish
Cooking Instructions:
- Preheat the Oven: Preheat your oven to 350°F (175°C). This temperature will guarantee that your baguette slices achieve a perfect golden-brown crispness without burning.
- Prepare the Baguette: Slice the French baguette into 1/2-inch thick slices. Arrange them in a single layer on a baking sheet. Brush each slice lightly with olive oil to help them crisp up nicely.
- Toast the Baguette: Place the baking sheet in the preheated oven and bake the baguette slices for about 10-12 minutes, or until they’re golden brown and crispy. Remove from the oven and let them cool slightly.
- Make the Herbed Cream Cheese: In a mixing bowl, combine the softened cream cheese, chopped fresh dill, lemon juice, salt, and pepper. Mix well until the ingredients are fully incorporated and the mixture is smooth and creamy.
- Assemble the Crostini: Spread a generous layer of the herbed cream cheese onto each toasted baguette slice. Top with a slice of smoked salmon, a few capers, and a sprig of fresh dill.
- Garnish and Serve: Arrange the crostini on a serving platter. Garnish with lemon wedges for guests to squeeze over the top if desired. Serve immediately to enjoy the best texture and flavor.
Extra Tips:
When preparing Smoked Salmon Crostini, consider using high-quality smoked salmon for the best flavor. If you prefer, you can add a touch of red onion or a sprinkle of black pepper for additional flavor complexity.
Additionally, the herbed cream cheese can be made a day in advance and stored in the refrigerator, making it a convenient option for busy holiday cooking. Remember to let the cream cheese come to room temperature before spreading it on the crostini for easier application.
Enjoy this delightful appetizer as part of your festive spread!
Spinach Artichoke Dip
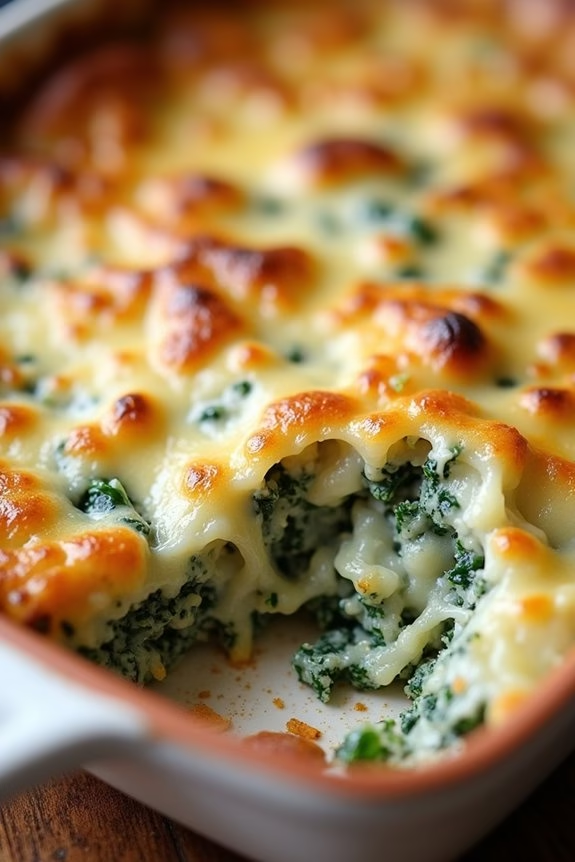
Spinach Artichoke Dip is a classic appetizer that combines the creamy texture of cheese with the robust flavors of spinach and artichokes. Perfect for holiday gatherings, this warm and gooey dip is sure to be a hit at your Christmas party.
Whether served with crisp crackers, fresh vegetables, or warm bread, this dish is versatile and easy to prepare in advance, making it an ideal choice for busy hosts.
The balance of rich cheeses, tender artichokes, and vibrant spinach creates a delightful harmony that’s both indulgent and comforting. The dip can be quickly assembled and baked, allowing you to spend more time with your guests.
With simple ingredients and straightforward steps, even novice cooks can create this crowd-pleaser with ease. Let’s explore the ingredients and steps needed to create this delicious dish for 4-6 people.
Ingredients:
- 1 (10-ounce) package frozen chopped spinach, thawed and drained
- 1 (14-ounce) can artichoke hearts, drained and chopped
- 1 cup sour cream
- 1/2 cup mayonnaise
- 1 cup grated Parmesan cheese
- 1 cup mozzarella cheese, shredded
- 2 cloves garlic, minced
- 1/2 teaspoon salt
- 1/4 teaspoon black pepper
- 1/4 teaspoon red pepper flakes (optional)
Instructions:
1. Preheat the oven: Start by preheating your oven to 350°F (175°C). This will confirm it’s ready for baking once your dip is assembled.
2. Prepare the spinach: If using frozen spinach, make sure it’s fully thawed and drained. Squeeze out excess moisture using a clean kitchen towel or paper towels to prevent the dip from becoming watery.
3. Mix the ingredients: In a large mixing bowl, combine the thawed and drained spinach, chopped artichoke hearts, sour cream, mayonnaise, Parmesan cheese, mozzarella cheese, and minced garlic.
Add salt, black pepper, and red pepper flakes if you prefer a hint of spice. Stir everything together until well combined.
4. Transfer to a baking dish: Pour the mixture into an oven-safe baking dish, spreading it evenly for consistent cooking. A dish approximately 8×8 inches works well for this serving size.
5. Bake the dip: Place the baking dish in the preheated oven and bake for 20-25 minutes, or until the top is golden brown and the dip is bubbly. This will confirm the cheese is fully melted and the flavors meld together beautifully.
6. Serve hot: Once baked, remove the dish from the oven and let it cool for a few minutes. Serve the dip warm with your choice of crackers, bread, or vegetable sticks.
Extra Tips:
For an added layer of flavor, consider incorporating a dash of nutmeg or substituting some of the mozzarella with fontina cheese for a creamier texture.
If you’re preparing this dish ahead of time, assemble the dip and store it in the refrigerator up to a day before baking. Simply allow it to come to room temperature before placing it in the oven to confirm even cooking.
Adjust the spice level by altering the amount of red pepper flakes, or omit them entirely for a milder version.
Mini Quiches

Mini quiches are a delightful and versatile appetizer perfect for Christmas gatherings. They’re small, savory tarts filled with a delicious mixture of eggs, cheese, vegetables, and meats. These bite-sized treats aren’t only easy to make, but they also offer a burst of flavor in every bite.
Whether you’re hosting a festive dinner or a casual holiday party, mini quiches are sure to impress your guests and add a touch of elegance to your appetizer spread.
One of the best things about mini quiches is their adaptability. You can customize the fillings to suit your taste or dietary preferences, making them an excellent choice for a diverse crowd. From classic combinations like spinach and feta to more indulgent options like bacon and cheddar, the possibilities are endless.
Plus, their small size makes them perfect for portion control, allowing guests to enjoy a variety of flavors without feeling overstuffed. Now, let’s plunge into the ingredients and steps required to create these delightful mini quiches for 4-6 people.
Ingredients (Serves 4-6):
- 1 package of pre-made pie crusts or pastry dough
- 4 large eggs
- 1 cup heavy cream
- 1 cup shredded cheese (cheddar, Swiss, or your choice)
- 1/2 cup cooked and crumbled bacon or diced ham
- 1/2 cup finely chopped spinach or other vegetables (optional)
- 1/4 cup finely chopped onion
- Salt and pepper to taste
- Non-stick cooking spray or butter for greasing
Cooking Instructions:
- Preheat the Oven: Begin by preheating your oven to 375°F (190°C). This guarantees that the mini quiches cook evenly and develop a nice golden-brown crust.
- Prepare the Dough: Roll out the pre-made pie crusts or pastry dough on a lightly floured surface. Using a round cookie cutter or a glass, cut out circles that are slightly larger than the cups of a mini muffin tin.
- Grease the Muffin Tin: Lightly grease the cups of a mini muffin tin with non-stick cooking spray or butter to prevent the quiches from sticking.
- Line the Muffin Cups: Gently press each dough circle into a muffin cup, making sure it’s well-fitted and forms a neat cup shape.
- Prepare the Filling: In a mixing bowl, whisk together the eggs, heavy cream, salt, and pepper until smooth. Stir in the shredded cheese, crumbled bacon or ham, chopped spinach, and onion.
- Fill the Quiches: Carefully spoon the egg mixture into each pastry-lined muffin cup, filling them about three-quarters full. Be sure not to overfill to avoid spillage during baking.
- Bake: Place the muffin tin in the preheated oven and bake for 20-25 minutes, or until the quiches are puffed and lightly golden. The centers should be set and not jiggly.
- Cool and Serve: Allow the mini quiches to cool for a few minutes in the tin before gently removing them with a small spatula or knife. Serve warm or at room temperature.
Extra Tips:
For a crispier crust, consider pre-baking the pastry cups for 5 minutes before adding the filling. This helps to prevent the crust from becoming soggy.
You can also prepare the mini quiches ahead of time and reheat them in the oven just before serving. Additionally, feel free to experiment with different fillings, such as mushrooms, bell peppers, or different cheeses, to suit your preferences or dietary needs.
Deviled Eggs
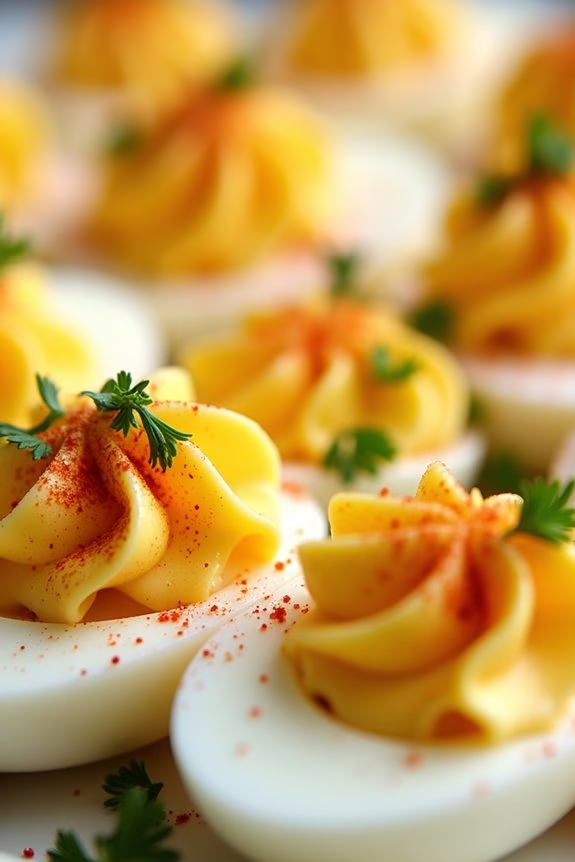
Deviled eggs are a quintessential appetizer that adds a touch of elegance and nostalgia to any Christmas gathering. These little bites of creamy, tangy goodness aren’t only delicious but also incredibly easy to make, making them a perfect choice for festive entertaining.
By combining simple ingredients with a few special touches, you can create a treat that will impress your guests and complement your holiday spread beautifully.
The classic version of deviled eggs involves hard-boiled eggs, mayonnaise, mustard, and a few seasonings, but there’s always room for creativity and personalization. You can experiment with different spices, garnishes, and flavors to add your own twist to this traditional favorite.
Serve these deviled eggs on a platter with a sprinkle of paprika and a sprig of fresh dill for a presentation that’s as delightful as the taste.
Ingredients for 4-6 People:
- 6 large eggs
- 3 tablespoons mayonnaise
- 1 teaspoon Dijon mustard
- 1 teaspoon white vinegar
- Salt and pepper to taste
- Paprika, for garnish
- Fresh dill or chives, for garnish
Cooking Instructions:
- Boil the Eggs: Place the eggs in a single layer in a saucepan and cover them with water. Bring the water to a rolling boil over medium-high heat. Once boiling, cover the saucepan with a lid, remove it from the heat, and let the eggs sit for about 10-12 minutes.
- Cool and Peel: After the eggs have finished cooking, transfer them to a bowl of ice water to cool for about 5 minutes. This will make peeling easier and prevent overcooking. Once cooled, gently tap each egg on a hard surface and peel away the shells.
- Prepare the Filling: Slice each egg in half lengthwise and carefully remove the yolks, placing them in a medium-sized bowl. Arrange the egg whites on a serving platter.
- Mix the Filling: Mash the egg yolks with a fork until smooth. Add the mayonnaise, Dijon mustard, white vinegar, salt, and pepper. Mix until the filling is creamy and well combined.
- Fill the Egg Whites: Spoon the yolk mixture into a piping bag or a resealable plastic bag with a snipped corner. Pipe the filling into the hollow of each egg white, filling them generously.
- Garnish and Serve: Lightly sprinkle the filled eggs with paprika and add a small sprig of fresh dill or a sprinkle of chopped chives for a festive touch. Serve the deviled eggs chilled.
Extra Tips:
To guarantee your deviled eggs are a hit, make sure the eggs are properly cooked but not overdone, as this will prevent the yolks from developing a greenish tint.
For an extra creamy filling, consider adding a splash of heavy cream or a dollop of sour cream to the yolk mixture. If you want to add a bit of heat, try incorporating a dash of hot sauce or a pinch of cayenne pepper.
Prepare them a few hours in advance and refrigerate, but garnish just before serving for the best visual appeal.
Cheese and Charcuterie Board
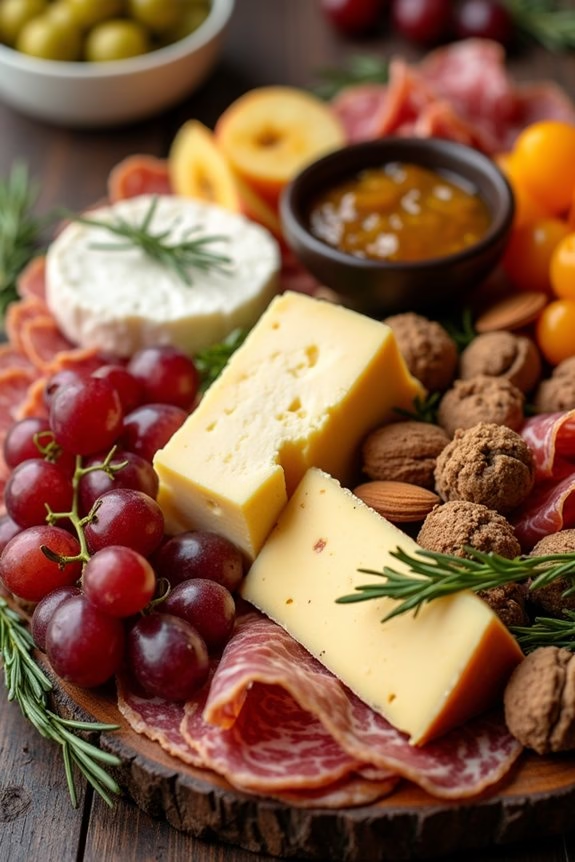
A Cheese and Charcuterie Board is the perfect festive appetizer for your Christmas celebrations. It’s not only visually stunning but also offers a variety of flavors and textures that cater to every palate.
Whether you’re hosting a large gathering or an intimate dinner, this board will surely impress your guests and set the tone for a delightful evening. The beauty of a cheese and charcuterie board lies in its versatility; you can customize it to suit your preferences and dietary needs, ensuring everyone has something to enjoy.
Creating a Cheese and Charcuterie Board is more about assembly than cooking, making it a stress-free option during the busy holiday season. The key is to choose a balance of cheeses, meats, and accompaniments that complement each other.
For this recipe, we’ll focus on ingredients that are readily available and appeal to a broad audience, providing a well-rounded experience in every bite. Let’s plunge into the ingredients and steps needed to create a Cheese and Charcuterie Board that serves 4-6 people.
Ingredients:
- 3 types of cheese (such as brie, aged cheddar, and gouda)
- 2 types of cured meats (such as prosciutto and salami)
- Crackers and/or sliced baguette
- Fresh fruits (such as grapes and apple slices)
- Dried fruits (such as apricots and figs)
- Nuts (such as almonds or walnuts)
- Olives and/or pickles
- Honey or fig jam
- Fresh herbs (such as rosemary or thyme) for garnish
Instructions:
- Prepare the Board: Start with a large, clean wooden board or platter. If you don’t have a large board, you can use a few smaller ones to create a similar effect.
- Arrange the Cheeses: Place the cheeses on the board first. Space them apart to allow room for slicing and serving. For a visually appealing display, vary the shapes by using wedges, blocks, or rounds.
- Add the Meats: Fold or roll the cured meats and place them near the cheeses. This not only makes them easy to grab but also creates an inviting look. Consider using a mix of textures, such as soft prosciutto and firmer salami.
- Include Crackers and Bread: Arrange the crackers and sliced baguette around the board. You can fan them out or stack them for added visual interest.
- Place Fresh and Dried Fruits: Fill in the gaps with fresh fruits like grapes and apple slices. Add dried fruits like apricots and figs for a sweet contrast to the savory elements.
- Scatter Nuts: Sprinkle nuts in small clusters around the board. They add a nice crunch and pair well with both cheeses and fruits.
- Add Olives and Pickles: Use small bowls for olives and pickles to keep their juices from spreading onto the dry ingredients. Place the bowls on the board in between other items.
- Serve with Honey or Jam: Place a small dish with honey or fig jam on the board. This sweet addition is perfect for drizzling over cheese.
- Garnish with Herbs: Finish off by adding sprigs of fresh herbs like rosemary or thyme for a festive touch and a hint of aroma.
Extra Tips:
When assembling your Cheese and Charcuterie Board, remember that balance is key. Try to include a variety of flavors—sweet, savory, and tangy—to appeal to different taste preferences.
Also, consider the dietary restrictions of your guests; offering a mix of gluten-free crackers or a few vegan options can go a long way in ensuring everyone feels included.
Finally, don’t be afraid to get creative with your presentation. The more varied and colorful your board, the more inviting it will be to your guests. Enjoy the process, as creating this board is as delightful as eating it!
Bacon-Wrapped Dates
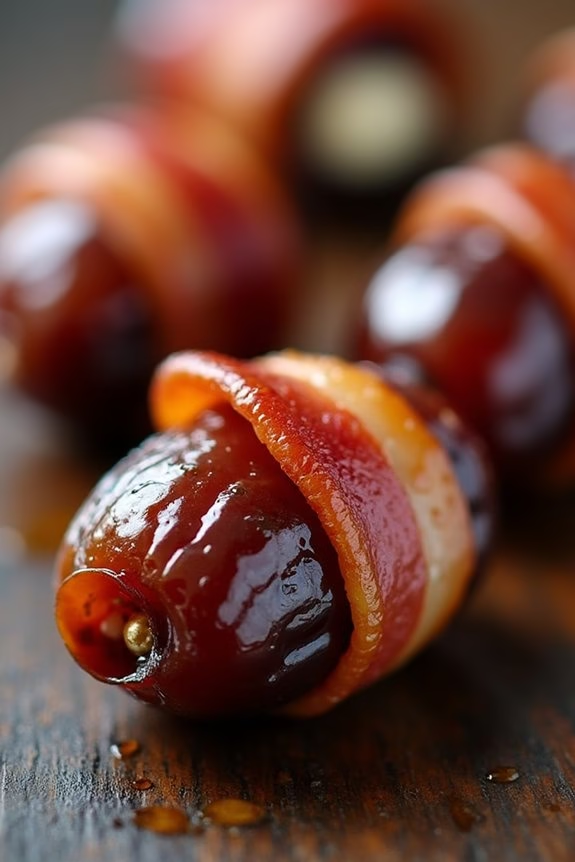
Bacon-wrapped dates are the perfect blend of sweet and savory flavors, making them an irresistible appetizer for any Christmas gathering. The natural sweetness of the dates pairs harmoniously with the smoky saltiness of the bacon, creating a delectable bite-sized treat that’s certain to be a hit.
This dish isn’t only easy to prepare but also requires minimal ingredients, allowing you to spend more time enjoying the festivities with your loved ones. Ideal for serving 4-6 people, bacon-wrapped dates can be prepared ahead of time and popped in the oven just before your guests arrive.
This recipe is versatile and can be enhanced with additional flavors, such as stuffing the dates with cheese or nuts. Whether you choose to keep them simple or add a twist, these little morsels are bound to be a crowd-pleaser.
Ingredients (serving size: 4-6 people):
- 24 Medjool dates, pitted
- 12 slices of bacon, cut in half
- 24 toothpicks
- Optional: 24 almonds or 3 oz of blue cheese, goat cheese, or cream cheese
Instructions:
- Preheat the Oven: Preheat your oven to 375°F (190°C) and line a baking sheet with parchment paper or foil for easy cleanup.
- Prepare the Dates: If desired, stuff each pitted date with an almond or a small amount of cheese. To do this, gently open the date along the slit where the pit was removed and insert the filling.
- Wrap with Bacon: Take a half-slice of bacon and wrap it around each date, securing it with a toothpick. Confirm that the bacon overlaps slightly so it stays in place.
- Arrange on Baking Sheet: Place the bacon-wrapped dates evenly on the prepared baking sheet, making sure they aren’t touching each other. This confirms they cook evenly and the bacon becomes crispy.
- Bake: Place the baking sheet in the preheated oven and bake for 20-25 minutes, or until the bacon is golden brown and crispy, turning them halfway through cooking to confirm even browning.
- Cool and Serve: Once cooked, remove the baking sheet from the oven and allow the dates to cool for a few minutes before serving. This allows the bacon to firm up slightly, making them easier to handle.
Extra Tips:
When selecting bacon for this recipe, opt for a thinner cut as it will wrap around the dates more easily and crisp up better in the oven.
If you’re preparing these ahead of time, you can wrap the dates and store them in the refrigerator for up to 24 hours before baking. Just be sure to bring them to room temperature before cooking to confirm even baking.
Additionally, if you prefer a touch of spice, consider adding a sprinkle of cayenne pepper or a drizzle of honey before serving for a delightful contrast of flavors.
Shrimp Cocktail
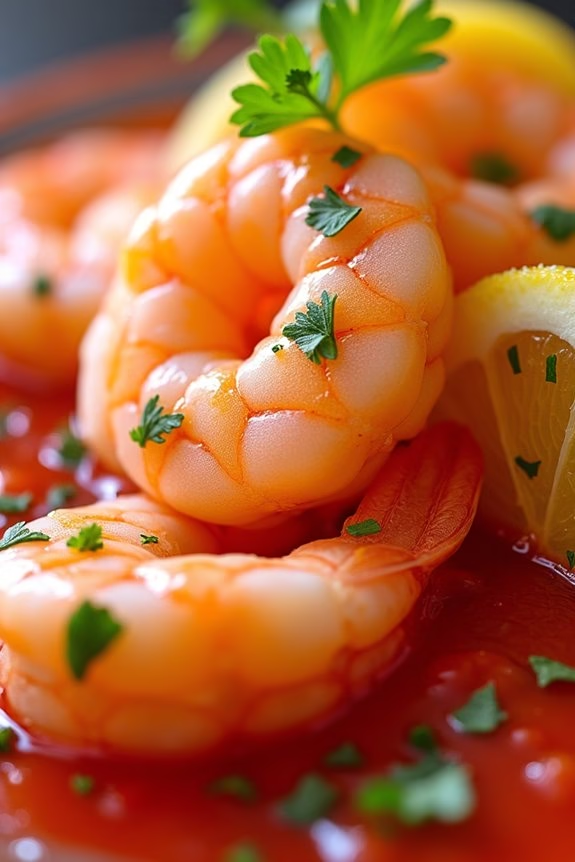
Shrimp Cocktail is a classic and elegant appetizer, perfect for Christmas gatherings. This dish is simple to prepare and offers a revitalizing taste that captivates guests with its bright and zesty flavors. The combination of chilled shrimp and tangy cocktail sauce creates a delightful culinary experience that will leave your family and friends craving more. The key to an exceptional Shrimp Cocktail lies in the quality of the shrimp and the balance of flavors in the cocktail sauce.
Make sure you have fresh, high-quality shrimp for this recipe, as their natural sweetness is essential to the dish. The cocktail sauce, a blend of ketchup, horseradish, lemon juice, and Worcestershire sauce, adds a spicy and tangy kick that complements the shrimp perfectly. By following this recipe, you can easily create a delicious Shrimp Cocktail that serves 4-6 people, making it an ideal choice for your Christmas appetizer menu.
Ingredients for 4-6 people:
- 1 pound large shrimp, peeled and deveined
- 1 tablespoon salt
- 1 tablespoon lemon juice
- 1 cup ketchup
- 2 tablespoons prepared horseradish
- 1 tablespoon lemon juice
- 1 teaspoon Worcestershire sauce
- 1 dash hot sauce (optional)
- 1 tablespoon chopped fresh parsley (for garnish)
- Lemon wedges (for serving)
Cooking Instructions:
- Prepare the Shrimp: Begin by bringing a large pot of water to a boil. Add 1 tablespoon of salt and 1 tablespoon of lemon juice to the water. Once boiling, add the shrimp and cook them for about 2-4 minutes, or until they turn pink and opaque. Be careful not to overcook them.
- Chill the Shrimp: As soon as the shrimp are cooked, drain them and immediately transfer them to a bowl of ice water. This will stop the cooking process and help maintain their firm texture. Allow the shrimp to chill for at least 5 minutes, then drain and pat them dry with paper towels.
- Prepare the Cocktail Sauce: In a mixing bowl, combine the ketchup, horseradish, 1 tablespoon of lemon juice, Worcestershire sauce, and hot sauce if using. Stir until all the ingredients are well blended. Adjust the flavors to taste, adding more horseradish for heat or lemon juice for tanginess.
- Serve: Arrange the chilled shrimp on a serving platter with a bowl of the cocktail sauce in the center. Garnish with chopped parsley and serve with lemon wedges on the side for squeezing over the shrimp.
Extra Tips:
When selecting shrimp, opt for those that are fresh or freshly frozen and thawed just before cooking to guarantee the best flavor and texture. If you prefer a milder cocktail sauce, reduce the amount of horseradish.
For an extra layer of flavor, consider adding a pinch of celery salt to the sauce. Remember, presentation is key—arranging the shrimp neatly around the cocktail sauce will make the dish more appealing. Enjoy your Shrimp Cocktail with a glass of chilled white wine or sparkling water for a truly festive touch.
Pigs in a Blanket

Pigs in a Blanket are a classic, crowd-pleasing appetizer that are perfect for Christmas gatherings. These bite-sized delights feature savory cocktail sausages wrapped in a blanket of flaky, golden-brown pastry.
They’re simple to prepare, require minimal ingredients, and are always a hit at holiday parties. Whether served as part of a festive buffet or as a starter to a holiday meal, these delightful morsels are bound to become a staple in your holiday recipe repertoire.
This recipe serves 4-6 people and is designed to be both quick and easy, making it ideal for those who want to spend more time with family and less time in the kitchen. The combination of buttery pastry and juicy sausage makes for a delicious treat that can be enjoyed by both adults and kids alike.
Serve them with your favorite dipping sauces for an extra burst of flavor.
Ingredients:
- 24 cocktail sausages
- 1 package of refrigerated crescent roll dough (8 oz)
- 1 tablespoon Dijon mustard (optional)
- 1 egg (beaten, for egg wash)
- Poppy seeds or sesame seeds (optional, for garnish)
Instructions:
- Preheat the Oven: Begin by preheating your oven to 375°F (190°C). This guarantees that the oven is ready to bake the Pigs in a Blanket to golden perfection.
- Prepare the Dough: Unroll the crescent roll dough on a clean, flat surface. If desired, spread a thin layer of Dijon mustard over the dough for added flavor. Separate the dough along the perforated lines into triangles.
- Wrap the Sausages: Take one cocktail sausage and place it on the wide end of a dough triangle. Roll the sausage towards the narrow end, ensuring it’s snugly wrapped in the dough. Repeat this process with the remaining sausages and dough triangles.
- Apply the Egg Wash: Place the wrapped sausages seam-side down on a baking sheet lined with parchment paper. Brush each piece with the beaten egg to help achieve a shiny, golden-brown finish when baked.
- Optional Garnish: For added texture and flavor, sprinkle poppy seeds or sesame seeds on top of each wrapped sausage.
- Bake: Place the baking sheet in the preheated oven and bake for 12-15 minutes, or until the pastry is golden brown and puffed. Keep an eye on them to prevent over-browning.
- Serve: Remove from the oven and let cool for a few minutes before serving. These are best enjoyed warm and can be served with dips such as ketchup, honey mustard, or barbecue sauce.
Extra Tips:
For an even tastier version, consider adding a small slice of cheese inside each wrap before rolling the sausage. If you prefer a spicier option, use jalapeño or cheese-filled sausages.
You can also prepare these in advance and store them in the refrigerator for a few hours before baking, which makes them ideal for last-minute preparations.
Finally, make sure to use parchment paper or a non-stick baking tray to prevent sticking and for easy cleanup.