
As the holiday season approaches, my thoughts drift to festive gatherings brimming with delightful dishes that evoke warmth and joy. One Christmas, I curated a meal using the Pioneer Woman’s wonderful recipes, creating a memorable feast. Picture the savory scent of Prime Rib Roast mingling with the sweetness of Honey-Glazed Ham. I’m excited to share more about this homestyle feast with you. Let’s explore these comforting recipes together.
Prime Rib Roast
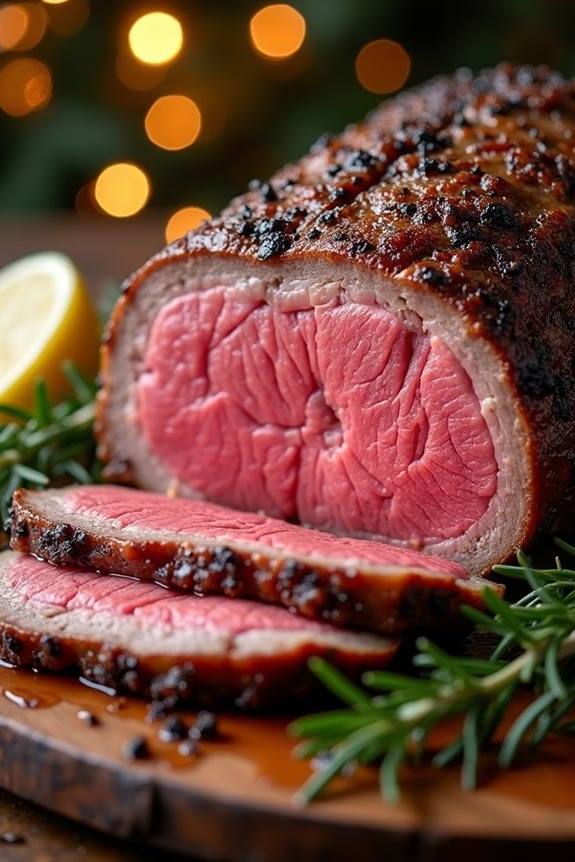
Prime Rib Roast is a classic centerpiece for a festive Christmas dinner, embodying both elegance and flavor in every bite. This dish is known for its rich, juicy taste and tender texture, making it a favorite for holiday gatherings. The key to a perfect Prime Rib Roast lies in selecting a well-marbled cut and cooking it to the right temperature to guarantee maximum flavor and tenderness.
This recipe for Prime Rib Roast serves 4-6 people and combines simple seasoning with a meticulous cooking process to bring out the natural flavors of the beef. Whether you’re hosting a small family dinner or a larger holiday feast, this recipe will impress your guests and elevate your Christmas dining experience.
Ingredients:
- 1 (4 to 5 pound) Prime Rib Roast, bone-in
- 3 cloves garlic, minced
- 2 tablespoons olive oil
- 1 tablespoon salt
- 1 teaspoon black pepper, freshly ground
- 1 tablespoon fresh rosemary, chopped
- 1 tablespoon fresh thyme, chopped
- 1 tablespoon Dijon mustard
Cooking Instructions:
- Preparation:
- Remove the Prime Rib Roast from the refrigerator and let it sit at room temperature for about 1-2 hours. This allows the roast to cook more evenly.
- Preheat your oven to 450°F (232°C).
- Seasoning:
- In a small bowl, mix the minced garlic, olive oil, salt, black pepper, rosemary, thyme, and Dijon mustard until well combined.
- Rub the seasoning mixture all over the surface of the Prime Rib Roast, confirming it’s well coated on all sides.
- Roasting:
- Place the seasoned roast on a rack in a roasting pan, bone side down.
- Insert a meat thermometer into the thickest part of the roast, making sure it doesn’t touch the bone.
- Roast in the preheated oven for 15 minutes to sear the outside, then reduce the oven temperature to 325°F (163°C).
- Cooking:
- Continue roasting until the internal temperature reaches your desired doneness:
- 120°F (49°C) for rare
- 130°F (54°C) for medium-rare
- 140°F (60°C) for medium
- This usually takes about 1.5 to 2 hours, depending on the size of the roast.
- Resting:
- Remove the roast from the oven and transfer it to a cutting board.
- Tent it loosely with foil and let it rest for at least 20 minutes. Resting allows the juices to redistribute throughout the meat, guaranteeing a juicy and flavorful roast.
- Serving:
- Carve the roast into slices and serve with your favorite accompaniments.
Extra Tips:
When cooking a Prime Rib Roast, using a meat thermometer is essential to achieving the perfect level of doneness. Avoid cutting into the roast immediately after cooking, as this can cause the juices to escape, resulting in a less tender roast.
Additionally, if you’re using a roast with a thick fat cap, consider trimming some of the excess fat before seasoning, but leave enough to add flavor during cooking.
Finally, for added depth of flavor, try experimenting with different fresh herbs or a splash of red wine in the seasoning mixture.
Honey-Glazed Ham
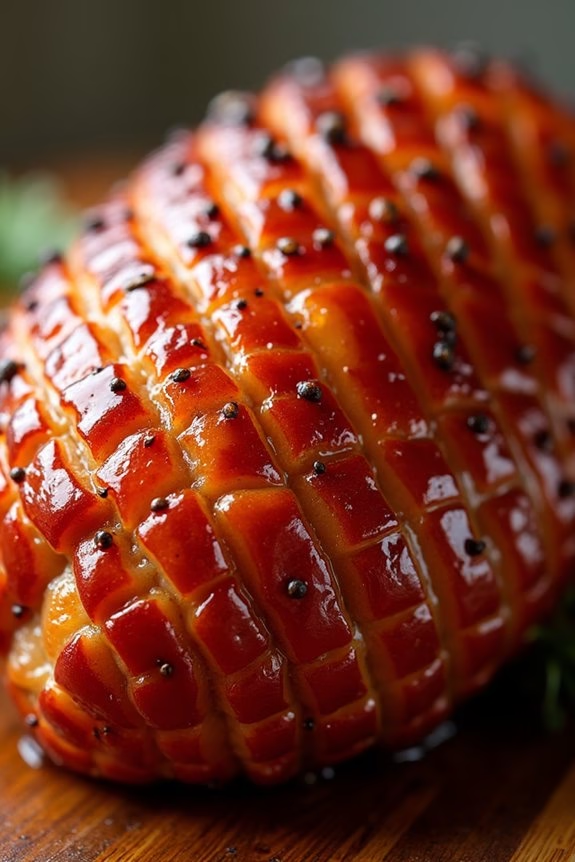
The Pioneer Woman’s Honey-Glazed Ham is a delightful centerpiece for any Christmas dinner. This dish combines the sweet richness of honey with the savory depth of a perfectly cooked ham, creating a mouthwatering experience. The glaze isn’t only visually appealing, coating the ham with a glossy sheen, but it also infuses the meat with a tantalizingly sweet flavor that pairs beautifully with the ham’s natural saltiness.
Whether you’re hosting a festive gathering or enjoying a cozy family meal, this honey-glazed ham is bound to impress and satisfy your guests.
Preparing a honey-glazed ham is a simple yet rewarding process. With a little patience and care, you can create a dish that’s both elegant and delicious. This recipe serves 4-6 people, making it perfect for an intimate holiday gathering. The key to success lies in the balance of flavors in the glaze and the careful cooking of the ham to guarantee it remains juicy and tender.
Ingredients:
- 1 fully cooked bone-in ham (approximately 5-6 pounds)
- 1 cup honey
- 1/2 cup brown sugar
- 1/4 cup Dijon mustard
- 1/4 cup apple cider vinegar
- 1/4 teaspoon ground cloves
- 1/4 teaspoon ground cinnamon
- 1/4 teaspoon ground nutmeg
Cooking Instructions:
- Preheat Your Oven: Begin by preheating your oven to 325°F (165°C). This will guarantee your ham cooks evenly.
- Prepare the Ham: Place the ham in a large roasting pan, cut side down. If the ham has a rind, score it diagonally with a sharp knife to create a diamond pattern. This will allow the glaze to penetrate the meat more effectively.
- Make the Glaze: In a medium saucepan over medium heat, combine the honey, brown sugar, Dijon mustard, apple cider vinegar, ground cloves, cinnamon, and nutmeg. Stir the mixture until the sugar has dissolved and the glaze is smooth.
- Apply the Glaze: Brush half of the glaze generously over the ham, ensuring it gets into the scored cuts. Reserve the remaining glaze for later.
- Bake the Ham: Cover the roasting pan with aluminum foil and place it in the preheated oven. Bake the ham for approximately 1 1/2 to 2 hours, or until the internal temperature reaches 140°F (60°C). Baste the ham with the pan juices every 30 minutes to keep it moist.
- Finish with a Final Glaze: Remove the foil and brush the ham with the remaining glaze. Increase the oven temperature to 400°F (200°C) and bake for an additional 15-20 minutes, or until the glaze is caramelized and the ham is golden brown.
- Rest the Ham: Once done, remove the ham from the oven and let it rest for 10-15 minutes before slicing. This allows the juices to redistribute throughout the meat, keeping it moist.
Extra Tips:
For an added depth of flavor, consider incorporating a tablespoon of bourbon or whiskey into the glaze. This will give your ham a subtle, smoky undertone.
When selecting a ham, choose one that isn’t pre-sliced for the best result, as it will retain more moisture during cooking. If you prefer a stronger spice flavor, feel free to adjust the amount of cloves, cinnamon, and nutmeg to your taste.
Finally, remember to use a meat thermometer to guarantee your ham reaches the proper internal temperature, ensuring it’s safe to eat while still being deliciously tender.
Herb-Roasted Turkey
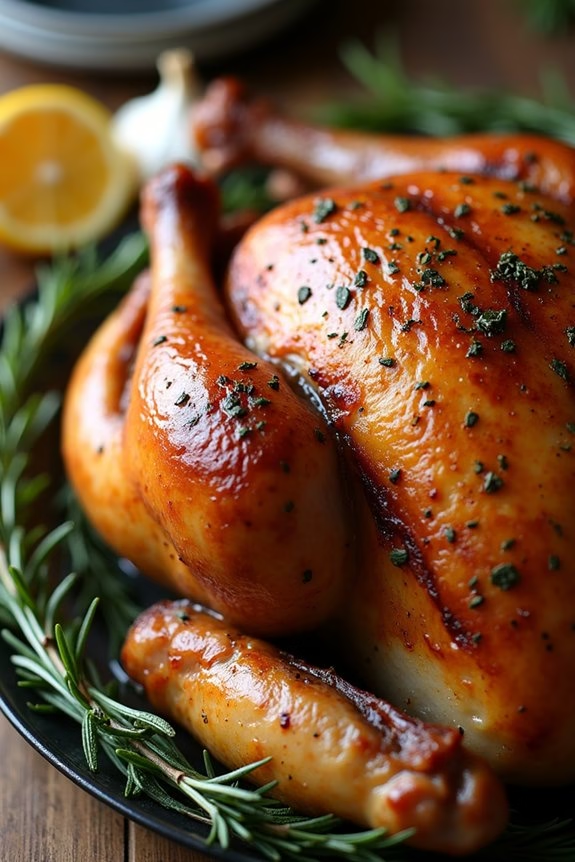
Herb-Roasted Turkey is a delightful centerpiece for your Christmas dinner, bringing a fragrant medley of fresh herbs and succulent turkey to the festive table. This Pioneer Woman classic combines tradition with rich, aromatic flavors that are bound to impress your family and guests.
The turkey is roasted to perfection, achieving a golden-brown skin while retaining its juicy and tender meat. The infusion of herbs, such as rosemary, thyme, and sage, adds a layer of complexity that complements the natural flavors of the turkey, making it an unforgettable culinary experience.
The Herb-Roasted Turkey is perfect for serving 4-6 people, making it an ideal choice for intimate holiday gatherings. The preparation process may seem intimidating, but with careful attention to detail and a little patience, you’ll be rewarded with a dish that truly embodies the spirit of Christmas.
Whether you’re a seasoned cook or a beginner, this recipe will guide you through every step to guarantee your turkey is the highlight of your dinner table.
Ingredients:
- 1 whole turkey (10-12 pounds)
- 1/2 cup unsalted butter, softened
- 1 tablespoon fresh rosemary, chopped
- 1 tablespoon fresh thyme, chopped
- 1 tablespoon fresh sage, chopped
- 1 tablespoon kosher salt
- 1 teaspoon black pepper
- 1 lemon, halved
- 1 head of garlic, halved crosswise
- 2 cups chicken broth
Cooking Instructions:
- Preheat Oven: Preheat your oven to 325°F (163°C) to prepare for roasting.
- Prepare the Turkey: Remove the giblets from the turkey cavity. Rinse the turkey under cold water and pat it dry with paper towels. Place the turkey on a rack in a large roasting pan.
- Prepare Herb Butter: In a small bowl, mix the softened butter with the chopped rosemary, thyme, and sage. Add in the salt and pepper, stirring until well combined.
- Season the Turkey: Carefully loosen the skin of the turkey breast by sliding your fingers between the skin and the meat. Spread half of the herb butter mixture under the skin, and rub the remaining butter all over the outside of the turkey. Make sure the entire bird is evenly coated with the herb butter.
- Stuff the Cavity: Insert the halved lemon and garlic inside the turkey cavity for added flavor.
- Roast the Turkey: Pour the chicken broth into the bottom of the roasting pan to keep the turkey moist. Place the turkey in the preheated oven and roast for approximately 3 to 3 1/2 hours, or until the internal temperature reaches 165°F (74°C) in the thickest part of the breast and thigh.
- Rest the Turkey: Once done, remove the turkey from the oven and let it rest for 20-30 minutes before carving. This allows the juices to redistribute, making sure the meat remains juicy and flavorful.
Extra Tips:
When preparing the Herb-Roasted Turkey, be certain to allow the turkey to come to room temperature before roasting, which helps in even cooking.
Basting the turkey every 30 minutes with the juices from the pan can enhance the flavor and keep the turkey moist. If the skin begins to brown too quickly, loosely cover the turkey with aluminum foil to prevent burning.
Finally, using a meat thermometer is essential to make sure the turkey is cooked to a safe temperature without overcooking.
Creamy Mashed Potatoes
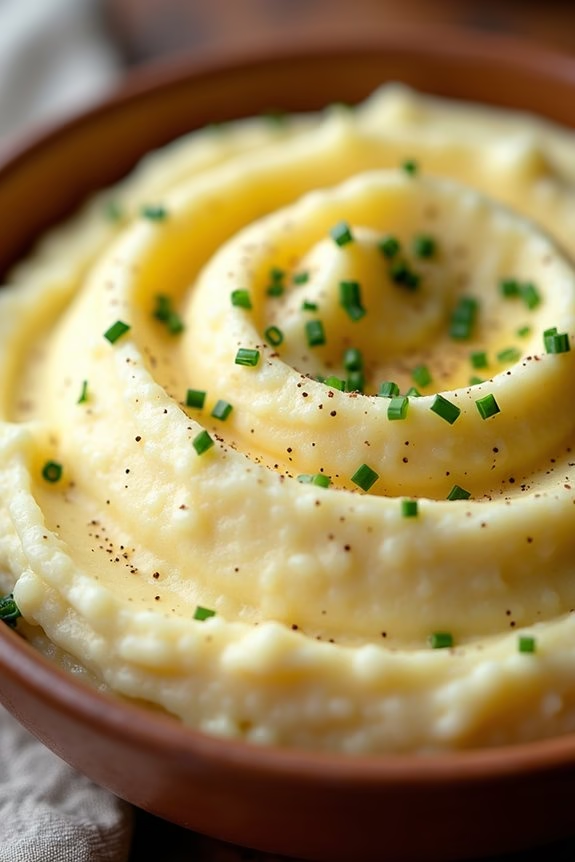
There’s nothing quite like a serving of creamy mashed potatoes to bring comfort to a Christmas dinner table, and Pioneer Woman’s recipe is perfect for achieving just that. The key to these luxurious mashed potatoes is using Yukon Gold potatoes for their buttery flavor and creamy texture, coupled with generous amounts of butter and cream cheese to make them extra decadent.
Whether you’re serving them alongside a holiday roast or as a standout side dish, these mashed potatoes are sure to be a hit with family and friends alike.
Attaining the perfect consistency is all about technique. This recipe not only guides you through the process of boiling and mashing the potatoes but also shows you how to incorporate the right balance of ingredients to create a dish that’s rich, smooth, and full of flavor.
Follow these simple steps to whip up a batch of Pioneer Woman’s Creamy Mashed Potatoes that will leave everyone asking for seconds.
Ingredients for 4-6 People:
- 3 pounds of Yukon Gold potatoes
- 1 stick (1/2 cup) of unsalted butter
- 1/2 cup of whole milk
- 1/2 cup of heavy cream
- 4 ounces of cream cheese
- Salt, to taste
- Freshly ground black pepper, to taste
- Fresh chives, chopped (optional, for garnish)
Cooking Instructions:
- Prepare the Potatoes: Peel the Yukon Gold potatoes and cut them into evenly sized chunks. This ensures that they cook uniformly. Place the potatoes in a large pot and cover them with cold water by about an inch. Add a generous pinch of salt to the water.
- Boil the Potatoes: Bring the pot to a boil over medium-high heat, then reduce to a simmer. Cook until the potatoes are tender and can be easily pierced with a fork, approximately 15-20 minutes.
- Drain and Dry: Once cooked, drain the potatoes thoroughly in a colander. Allow them to sit for a few minutes to steam dry, which helps to remove excess moisture and leads to a fluffier texture.
- Mash the Potatoes: Return the potatoes to the pot. Add the butter, cream cheese, milk, and heavy cream. Use a potato masher or a hand mixer to mash the potatoes until smooth and creamy. Be careful not to over-mix, as this can make the potatoes gummy.
- Season and Serve: Season the mashed potatoes with salt and freshly ground black pepper to taste. If desired, garnish with freshly chopped chives before serving.
Extra Tips:
For an even richer flavor, consider roasting a few cloves of garlic and mashing them into the potatoes along with the other ingredients.
If you prefer a lighter version, substitute the heavy cream with additional milk. Remember to taste and adjust the seasoning as needed before serving.
These mashed potatoes can be made ahead of time and reheated gently over low heat, stirring occasionally, to maintain their creamy texture.
Sweet Potato Casserole
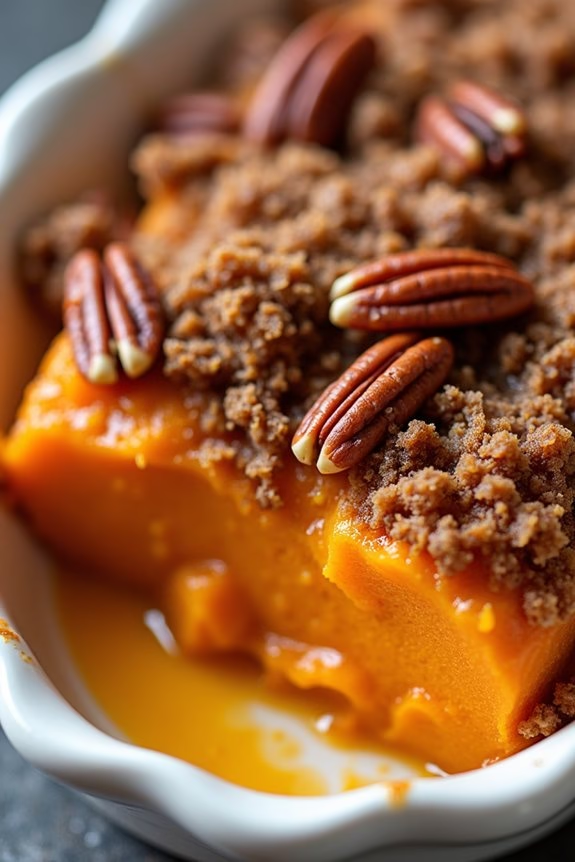
Sweet Potato Casserole is a delicious and comforting dish that shines during the holiday season, particularly at Christmas dinners. This classic recipe combines the natural sweetness of sweet potatoes with a crunchy pecan topping, creating a perfect blend of textures and flavors.
It’s a crowd-pleaser that often steals the spotlight on the dinner table, thanks to its delectable combination of creamy, smooth sweet potatoes and a buttery, nutty topping.
This casserole is easy to prepare and can be made in advance, freeing up valuable cooking time on the actual holiday. The sweet potatoes are first cooked and mashed, then mixed with ingredients that enhance their natural sweetness.
The pecan topping, featuring brown sugar and butter, adds a delightful crunch that contrasts beautifully with the soft sweet potato base. Serve this casserole alongside your favorite holiday entrees for a festive and satisfying meal.
Ingredients (Serves 4-6):
- 4 large sweet potatoes
- 1/2 cup granulated sugar
- 2 large eggs
- 1/2 cup milk
- 1/4 cup unsalted butter, melted
- 1 teaspoon vanilla extract
- 1/2 teaspoon salt
Topping:
- 1/2 cup all-purpose flour
- 1/2 cup brown sugar
- 1/4 cup unsalted butter, melted
- 1 cup chopped pecans
Instructions:
- Prepare the Sweet Potatoes:
- Preheat your oven to 350°F (175°C).
- Peel and chop the sweet potatoes into chunks. Place them in a large pot of boiling water and cook until tender, about 20 minutes. Drain and let them cool slightly.
- Make the Sweet Potato Mixture:
- In a large mixing bowl, combine the cooked sweet potatoes, granulated sugar, eggs, milk, melted butter, vanilla extract, and salt. Mash or use a mixer to blend the mixture until smooth and creamy.
- Assemble the Casserole:
- Transfer the sweet potato mixture into a greased 9×13-inch baking dish, spreading it evenly.
- Prepare the Topping:
- In a separate bowl, mix together the flour, brown sugar, melted butter, and chopped pecans until the mixture is crumbly.
- Add the Topping:
- Sprinkle the pecan mixture evenly over the sweet potato layer in the baking dish.
- Bake the Casserole:
- Place the dish in the preheated oven and bake for 30-35 minutes, or until the topping is golden brown and the casserole is heated through.
- Serve:
- Allow the casserole to cool for a few minutes before serving warm.
Extra Tips:
For an even richer flavor, consider adding a pinch of cinnamon or nutmeg to the sweet potato mixture. If you’re preparing this dish ahead of time, cover and refrigerate the unbaked casserole for up to two days.
When ready to bake, bring it to room temperature before placing it in the oven. If you prefer a sweeter topping, you can increase the amount of brown sugar slightly.
This casserole also pairs wonderfully with a dollop of whipped cream or a scoop of vanilla ice cream for a dessert-like finish.
Green Bean Casserole
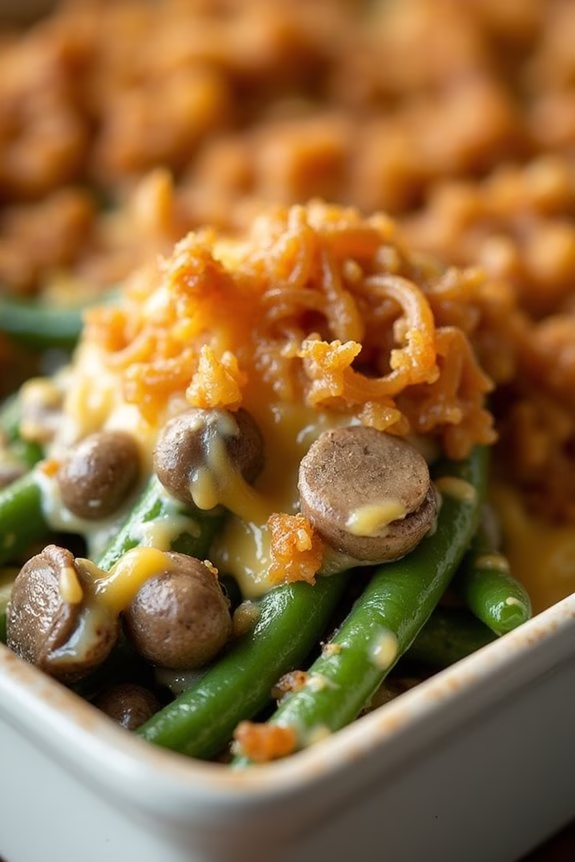
The Pioneer Woman’s Green Bean Casserole is a timeless side dish that adds a comforting touch to any Christmas dinner spread. This classic recipe combines tender green beans with a rich, creamy mushroom sauce, all topped with crispy onions for the perfect blend of flavors and textures.
Whether you’re hosting a large family gathering or a cozy meal with close friends, this dish is sure to satisfy everyone’s taste buds and bring a touch of holiday nostalgia to your table.
Perfect for serving 4-6 people, this green bean casserole is both simple to prepare and deliciously festive. With a few fresh ingredients and a bit of love, you’ll have a dish that complements any holiday feast beautifully.
So gather around, share some laughs, and enjoy this delightful casserole that has become a staple in Christmas celebrations.
Ingredients:
- 1 pound fresh green beans, trimmed and halved
- 4 tablespoons unsalted butter
- 1 pound button mushrooms, sliced
- 1/4 cup all-purpose flour
- 2 cups whole milk
- 1 cup chicken broth
- 1 teaspoon salt
- 1/2 teaspoon black pepper
- 1/4 teaspoon ground nutmeg
- 1 cup grated sharp cheddar cheese
- 1 1/2 cups French fried onions
Cooking Instructions:
- Preheat the oven: Start by preheating your oven to 350°F (175°C), ensuring it’s ready for baking once the casserole is assembled.
- Blanch the green beans: Bring a large pot of salted water to a boil. Add the green beans and cook for about 3-4 minutes until they’re vibrant green and slightly tender. Drain them and immediately transfer them to a bowl of ice water to stop the cooking process. Drain again and set aside.
- Prepare the mushroom sauce: In a large skillet, melt the butter over medium heat. Add the sliced mushrooms and sauté until they’re browned and tender, about 5-7 minutes. Sprinkle the flour over the mushrooms, stirring constantly for 1 minute to cook the flour.
- Create the sauce: Gradually whisk in the milk and chicken broth, ensuring there are no lumps. Continue to cook, stirring constantly, until the sauce thickens, about 5 minutes. Season with salt, pepper, and nutmeg to taste.
- Combine the ingredients: Remove the skillet from the heat and stir in the grated cheddar cheese until melted and smooth. Add the blanched green beans and 1 cup of French fried onions, mixing until everything is well coated with the sauce.
- Assemble the casserole: Transfer the mixture to a 9×13-inch baking dish, spreading it evenly. Sprinkle the remaining 1/2 cup of French fried onions over the top.
- Bake the casserole: Place the dish in the preheated oven and bake for 25-30 minutes, or until the casserole is bubbly and the topping is golden brown.
- Serve and enjoy: Once done, remove the dish from the oven and let it sit for a few minutes before serving. Enjoy this comforting and delicious green bean casserole as part of your Christmas dinner.
Extra Tips:
For an extra burst of flavor, consider adding some crispy bacon bits or toasted almonds to the topping before baking.
You can also substitute frozen green beans if fresh ones aren’t available, just adjust the blanching time accordingly.
To save time, prepare the mushroom sauce a day in advance and assemble the casserole just before baking.
This dish pairs wonderfully with roasted turkey or ham, making it a versatile addition to any holiday meal.
Cornbread Dressing
Cornbread dressing is a classic Southern staple that brings warmth and comfort to any holiday table, especially during Christmas. This recipe, inspired by the Pioneer Woman, combines crumbled cornbread with flavorful aromatics, savory herbs, and a touch of sweetness from dried cranberries. The result is a deliciously moist and hearty dressing that complements any main dish, from roasted turkey to glazed ham.
Perfect for serving 4-6 people, this cornbread dressing is easy to prepare and can be made ahead of time to alleviate the stress of holiday cooking. Whether you’re hosting a large family gathering or an intimate dinner, this recipe is sure to become a beloved tradition.
Ingredients:
- 4 cups crumbled cornbread
- 2 cups cubed day-old bread
- 1 cup chicken broth
- 1/2 cup unsalted butter
- 1 medium onion, finely chopped
- 2 stalks celery, diced
- 2 cloves garlic, minced
- 1/2 cup dried cranberries
- 2 eggs, beaten
- 1 tablespoon fresh sage, chopped
- 1 tablespoon fresh thyme, chopped
- Salt and pepper to taste
Cooking Instructions:
- Preheat the Oven: Begin by preheating your oven to 375°F (190°C). This guarantees your dressing will cook evenly and achieve a golden-brown crust.
- Prepare the Bread Mixture: In a large mixing bowl, combine the crumbled cornbread and cubed day-old bread. This combination provides the perfect texture for your dressing.
- Sauté Aromatics: In a large skillet, melt the unsalted butter over medium heat. Add the chopped onion, diced celery, and minced garlic. Sauté until the vegetables are tender and fragrant, about 5-7 minutes.
- Mix Ingredients: Add the sautéed vegetables to the bread mixture. Stir in the dried cranberries, beaten eggs, chopped sage, and thyme. Gradually pour in the chicken broth, mixing until the ingredients are well combined and the bread is moistened.
- Season and Transfer: Season the mixture with salt and pepper to taste. Transfer the dressing to a lightly greased baking dish, spreading it evenly.
- Bake the Dressing: Place the baking dish in the preheated oven and bake for 25-30 minutes, or until the top is golden brown and the dressing is cooked through.
Extra Tips:
For a richer flavor, consider using a combination of chicken broth and turkey drippings if you have them on hand. If you prefer a crunchier texture, toast the bread cubes before mixing them with the cornbread.
You can also prepare the dressing a day ahead, refrigerate it, and bake it just before serving to save time on the big day. Adjust the seasoning according to your taste, and feel free to add nuts or other dried fruits for added flavor and texture.
Cranberry Sauce
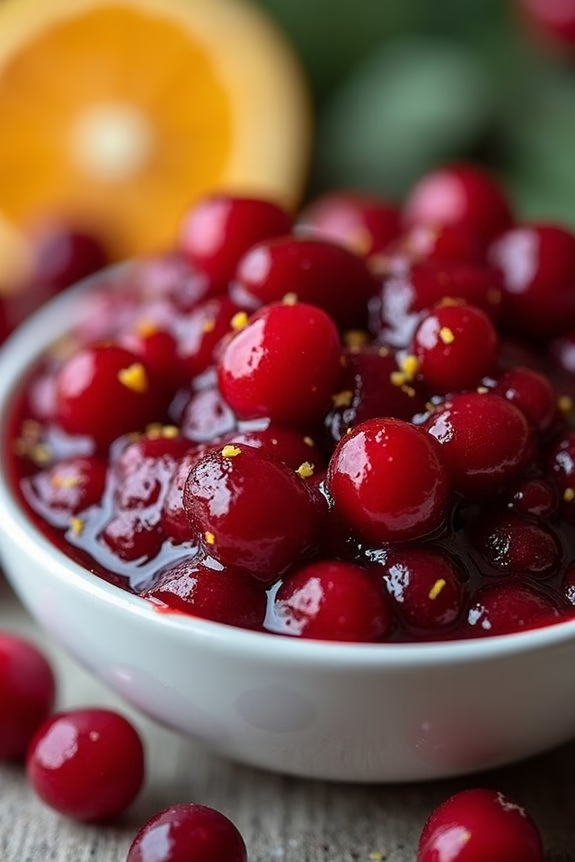
Cranberry sauce is a quintessential component of any Christmas dinner, adding a burst of tangy sweetness that perfectly complements the rich and savory flavors of a holiday feast. The Pioneer Woman brings her unique twist to this classic dish, creating a sauce that’s not only delicious but also beautiful in its vibrant red hue.
By making your own cranberry sauce from scratch, you can control the sweetness and spice levels to suit your personal taste, ensuring it’s a hit with everyone at the table. This homemade cranberry sauce is incredibly easy to prepare and only requires a few simple ingredients.
The natural tartness of fresh cranberries is balanced with the right amount of sugar and hints of citrus, creating a delightful combination that pairs well with roasted turkey or ham. Whether you’re hosting a large gathering or a cozy family dinner, this recipe is perfect for serving 4-6 people and can easily be doubled if needed.
Ingredients:
- 12 ounces fresh cranberries
- 1 cup granulated sugar
- 1 cup water
- Zest of 1 orange
- 1/4 cup freshly squeezed orange juice
- 1/2 teaspoon ground cinnamon
- Pinch of salt
Cooking Instructions:
- Prepare the Ingredients: Begin by rinsing the cranberries under cold water. Discard any soft or damaged cranberries, then set them aside in a colander to drain.
- Combine Ingredients: In a medium saucepan, combine the sugar, water, orange zest, orange juice, ground cinnamon, and a pinch of salt. Stir the mixture over medium heat until the sugar has completely dissolved.
- Cook the Cranberries: Add the fresh cranberries to the saucepan and bring the mixture to a boil. Once boiling, reduce the heat to low and let it simmer. Stir occasionally and allow the cranberries to cook for about 10-15 minutes, or until they’ve burst and the sauce has thickened.
- Cool the Sauce: Remove the saucepan from heat and let the cranberry sauce cool at room temperature. It will continue to thicken as it cools. Once cooled, transfer the sauce to a serving dish or airtight container.
- Refrigerate: For best results, refrigerate the cranberry sauce for at least 2 hours before serving. This allows the flavors to meld together beautifully.
Extra Tips:
For an extra layer of flavor, consider adding a splash of brandy or a handful of chopped pecans to the cranberry sauce before serving.
If you prefer a smoother texture, you can use a blender or food processor to puree the sauce to your desired consistency. Cranberry sauce can be made up to three days in advance and stored in the refrigerator, making it a convenient dish to prepare ahead of time for stress-free holiday cooking.
Parker House Rolls
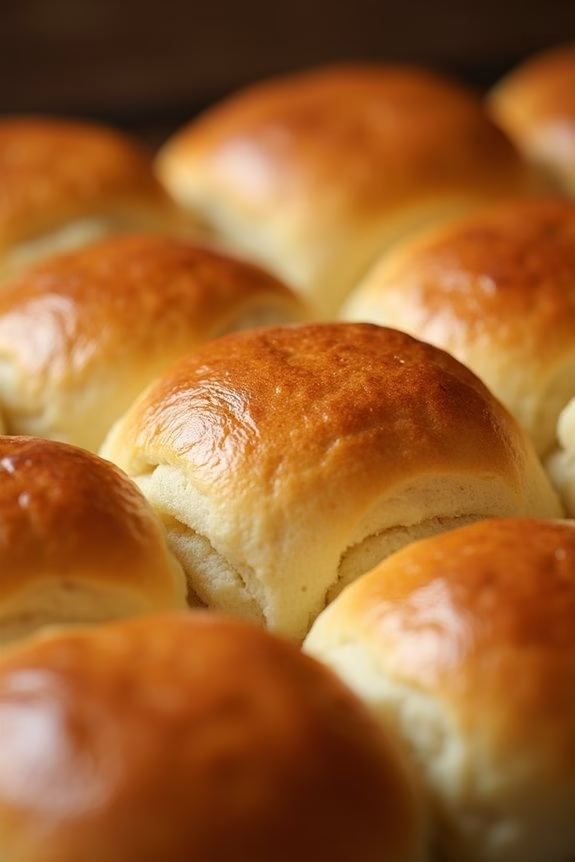
Pioneer Woman’s Parker House Rolls are the perfect addition to any Christmas dinner, offering a soft and buttery complement to your festive feast. These classic rolls, with their fluffy texture and slightly sweet flavor, have been a holiday staple for generations.
When served warm, straight from the oven, they bring a comforting and inviting aroma that fills the house with the spirit of the season. Whether you’re hosting a grand family gathering or a cozy meal for a few, these rolls are sure to be a hit.
Creating your own Parker House Rolls is easier than you might think, and they can be made ahead of time, allowing you to focus on other aspects of your holiday meal. The key to their delightful texture lies in the dough, which is enriched with milk and butter, and then shaped into their iconic folded form.
With a few simple ingredients and a bit of patience, you’ll be able to bake these irresistible rolls that will have everyone reaching for seconds.
Ingredients (Serves 4-6):
- 1 cup whole milk
- 1/4 cup unsalted butter, plus more for brushing
- 1/4 cup sugar
- 1 package (2 1/4 teaspoons) active dry yeast
- 3 1/2 to 4 cups all-purpose flour
- 1 1/2 teaspoons salt
- 2 large eggs
Instructions:
- Warm the Milk and Butter: In a small saucepan over medium heat, combine the milk, 1/4 cup of unsalted butter, and sugar. Heat until the butter is melted and the mixture is warm but not hot (around 110°F). Remove from heat and let it cool slightly.
- Activate the Yeast: Pour the warm milk mixture into a large mixing bowl and sprinkle the yeast over it. Let it sit for 5 minutes until the yeast is foamy.
- Make the Dough: Add 3 1/2 cups of flour and salt to the yeast mixture. Mix well until a dough forms. Add the eggs one at a time, mixing well after each addition. Gradually add more flour if necessary until the dough is soft and slightly sticky.
- Knead the Dough: Turn the dough onto a lightly floured surface and knead for about 8-10 minutes until the dough is smooth and elastic. Place the dough in a greased bowl, cover with a damp cloth, and let it rise in a warm place for about 1 to 1.5 hours, or until it has doubled in size.
- Shape the Rolls: Once the dough has risen, punch it down and turn it out onto a lightly floured surface. Roll it out to about 1/2 inch thickness. Use a round cutter to cut out circles. Fold each circle in half and place them on a greased baking sheet, seam side down, spacing them about 1 inch apart.
- Second Rise: Cover the rolls with a damp cloth and let them rise again for about 30 minutes, until puffy.
- Bake the Rolls: Preheat your oven to 350°F (175°C). Brush the tops of the rolls with melted butter. Bake for 15-20 minutes, or until golden brown.
- Serve: Remove the rolls from the oven and brush them again with melted butter. Serve warm.
Extra Tips:
When making Parker House Rolls, make sure that the milk isn’t too hot when adding the yeast, as this can kill the yeast and prevent the dough from rising.
If you’re short on time, you can prepare the dough a day in advance and let it rise slowly in the refrigerator overnight. This not only saves time on the day of your event but can also enhance the flavor of the rolls.
Finally, if you prefer a slightly sweeter roll, you can increase the sugar content to suit your taste.
Roasted Brussels Sprouts
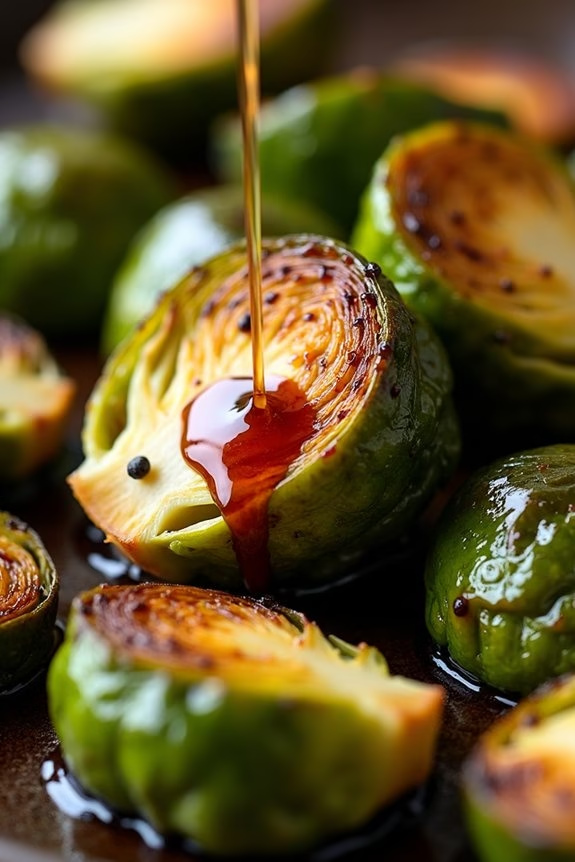
Roasted Brussels sprouts are a delicious and healthy side dish that’s perfect for your Christmas dinner. Known for their nutty flavor and crispy texture, these tiny cabbages transform into a delightful treat when roasted to perfection.
The Pioneer Woman’s version of roasted Brussels sprouts takes this classic dish to the next level by adding a mouth-watering balsamic glaze, which delivers a sweet and tangy accent that complements the hearty flavor of the sprouts. Whether you’re serving a large family gathering or an intimate holiday meal, this dish is bound to be a crowd-pleaser.
This recipe serves 4-6 people and is simple enough to prepare, making it an excellent choice for Christmas dinner. By roasting the Brussels sprouts, you bring out their natural sweetness while maintaining a satisfying crunch. The balsamic glaze not only enhances the flavor but also adds an elegant touch to your holiday table.
With just a few steps and minimal ingredients, you can create a dish that looks and tastes gourmet without spending hours in the kitchen.
Ingredients:
- 2 pounds Brussels sprouts, trimmed and halved
- 3 tablespoons olive oil
- Salt, to taste
- Freshly ground black pepper, to taste
- 1/2 cup balsamic vinegar
- 2 tablespoons honey
Cooking Instructions:
- Preheat the Oven: Begin by preheating your oven to 400°F (200°C). This temperature is ideal for roasting Brussels sprouts, guaranteeing they become crispy on the outside while remaining tender on the inside.
- Prepare the Brussels Sprouts: Wash and dry the Brussels sprouts thoroughly. Trim off the ends and remove any yellow or damaged outer leaves. Cut each sprout in half to allow for even roasting.
- Season the Sprouts: In a large bowl, combine the halved Brussels sprouts with olive oil, salt, and freshly ground black pepper. Toss the sprouts until they’re evenly coated in the oil and seasoning.
- Arrange the Sprouts: Spread the seasoned Brussels sprouts in a single layer on a baking sheet. Make sure they aren’t overcrowded, as this will guarantee they roast evenly and become crispy.
- Roast the Sprouts: Place the baking sheet in the preheated oven and roast for 25-30 minutes, or until the sprouts are golden brown and crispy. Stir them halfway through the cooking time to guarantee even browning.
- Prepare the Balsamic Glaze: While the sprouts are roasting, make the balsamic glaze. In a small saucepan, combine the balsamic vinegar and honey. Bring the mixture to a boil over medium heat, then reduce the heat to low and simmer for about 10 minutes, or until the glaze has thickened and reduced by half.
- Combine and Serve: Once the Brussels sprouts are done roasting, remove them from the oven and transfer them to a serving dish. Drizzle the balsamic glaze over the top, and toss to combine. Serve immediately for the best flavor and texture.
Extra Tips:
For added flavor, consider incorporating some chopped bacon or pancetta into the dish before roasting. The salty, smoky notes of the bacon pair wonderfully with the sweetness of the balsamic glaze.
If you’re looking to add a bit of crunch, sprinkle some toasted nuts, such as almonds or pecans, over the top just before serving. To guarantee your Brussels sprouts roast evenly, try to select sprouts that are roughly the same size. If some are markedly larger, consider cutting them into quarters.
Enjoy this festive dish as part of your Pioneer Woman Christmas dinner menu!
Butternut Squash Soup
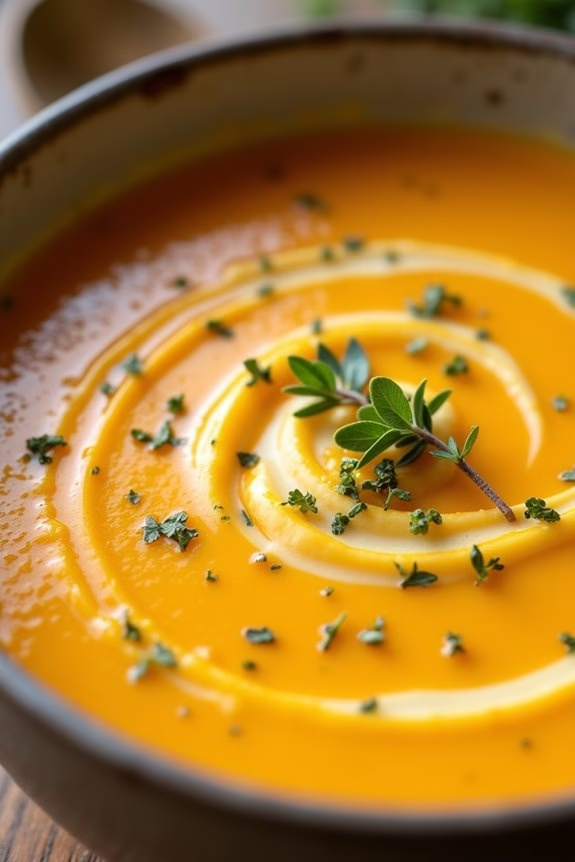
Butternut squash soup is a comforting and velvety dish perfect for Christmas dinner. Its warm, rich flavors make it an ideal starter to complement the festive spirit. The silky texture and subtly sweet taste of the squash are highlighted by aromatic spices and creamy additions, creating an inviting bowl of soup that warms both body and soul.
This recipe is inspired by the rustic charm of the Pioneer Woman, ensuring a simple yet delicious addition to your holiday menu. Making butternut squash soup is a straightforward process that requires minimal ingredients, yet delivers maximum flavor. This recipe serves 4-6 people, making it a great choice for a cozy Christmas gathering with family or friends.
Whether you’re an experienced cook or a kitchen novice, you’ll find this dish easy to prepare with delightful results that will surely impress your guests.
Ingredients for 4-6 servings:
- 1 large butternut squash, peeled, seeded, and cubed
- 2 tablespoons olive oil
- Salt and pepper, to taste
- 1 large onion, chopped
- 2 cloves garlic, minced
- 1 teaspoon ground cinnamon
- 1/2 teaspoon ground nutmeg
- 4 cups chicken or vegetable broth
- 1/2 cup heavy cream
- Fresh thyme leaves, for garnish (optional)
Cooking Instructions:
- Prepare the Squash: Preheat your oven to 400°F (200°C). Toss the cubed butternut squash with olive oil, salt, and pepper. Spread the cubes in a single layer on a baking sheet. Roast in the preheated oven for 25-30 minutes or until the squash is tender and lightly caramelized.
- Sauté Aromatics: In a large pot, heat a tablespoon of olive oil over medium heat. Add the chopped onion and sauté until translucent, about 5 minutes. Stir in the minced garlic, cinnamon, and nutmeg, and cook for an additional minute until fragrant.
- Combine Ingredients: Add the roasted butternut squash to the pot, followed by the chicken or vegetable broth. Bring the mixture to a boil, then reduce the heat and let it simmer for about 10-15 minutes to allow the flavors to meld.
- Blend the Soup: Use an immersion blender to puree the soup directly in the pot until smooth. Alternatively, transfer the soup in batches to a countertop blender and blend until creamy, then return it to the pot.
- Add Cream: Stir in the heavy cream, allowing it to heat through gently. Adjust the seasoning with more salt and pepper if needed.
- Serve: Ladle the soup into bowls and garnish with fresh thyme leaves if desired. Serve hot and enjoy your delicious Christmas starter.
Extra Tips:
For extra depth of flavor, consider adding a splash of apple cider or a pinch of cayenne pepper for a hint of heat. If you prefer a dairy-free version, substitute the heavy cream with coconut milk for a creamy texture without compromising on taste.
To make peeling and cutting butternut squash easier, microwave the whole squash for a couple of minutes to soften the skin slightly before peeling. This dish can be prepared in advance and reheated just before serving, allowing you more time to enjoy the festivities.
Spinach and Cheese Stuffed Shells

Spinach and Cheese Stuffed Shells are the perfect addition to your Pioneer Woman Christmas Dinner. This delightful dish combines creamy cheese, nutritious spinach, and hearty pasta shells to create a comforting and flavorful meal that will please both vegetarians and meat-lovers alike.
The shells are generously stuffed with a savory mixture of ricotta, mozzarella, and Parmesan cheeses, paired with fresh spinach that adds a pop of color and nutrition. Baked to perfection with a rich tomato sauce and more melted cheese on top, these stuffed shells are sure to become a holiday favorite.
The beauty of Spinach and Cheese Stuffed Shells lies in their simplicity and versatility. Whether you’re hosting a large family gathering or an intimate dinner, this recipe can be easily scaled to suit your needs.
The dish can also be prepared ahead of time, making it a stress-free addition to your holiday menu. Serve it alongside a crisp salad and some crusty bread for a complete meal that will leave everyone satisfied. Let’s plunge into the recipe, which serves 4-6 people, and discover how you can bring this delicious dish to your Christmas table.
Ingredients:
- 20 jumbo pasta shells
- 1 tablespoon olive oil
- 2 cloves garlic, minced
- 1 (10-ounce) package fresh spinach
- 1 cup ricotta cheese
- 1 cup shredded mozzarella cheese, divided
- 1/2 cup grated Parmesan cheese
- 1 egg
- 1 teaspoon Italian seasoning
- Salt and pepper to taste
- 2 cups marinara sauce
- Fresh basil leaves for garnish (optional)
Cooking Instructions:
- Preheat and Prepare the Pasta: Preheat your oven to 375°F (190°C). Cook the jumbo pasta shells according to the package instructions until al dente. Drain and set aside.
- Sauté the Spinach: In a large skillet, heat olive oil over medium heat. Add minced garlic and sauté for about 30 seconds until fragrant. Add the spinach and cook until wilted, about 3-4 minutes. Remove from heat and let cool slightly.
- Prepare the Cheese Mixture: In a large mixing bowl, combine ricotta cheese, 1/2 cup of mozzarella cheese, Parmesan cheese, egg, Italian seasoning, salt, and pepper. Mix until well combined. Stir in the cooled spinach mixture.
- Stuff the Shells: Carefully fill each cooked pasta shell with the cheese and spinach mixture. Use a spoon to stuff generously and place them in a single layer in a greased baking dish.
- Assemble the Dish: Pour the marinara sauce evenly over the stuffed shells. Sprinkle the remaining 1/2 cup of mozzarella cheese on top.
- Bake: Cover the baking dish with aluminum foil and bake in the preheated oven for 20 minutes. Remove the foil and bake for an additional 10 minutes, or until the cheese is bubbly and golden.
- Serve: Garnish with fresh basil leaves before serving, if desired. Enjoy your delicious Spinach and Cheese Stuffed Shells warm.
Extra Tips:
To save time, use pre-washed spinach and pre-shredded cheese. You can also prepare the stuffed shells a day ahead and refrigerate until you’re ready to bake them.
Simply allow a few extra minutes of baking time if the dish is cold from the fridge. For a little extra flavor, consider adding a pinch of red pepper flakes to the cheese mixture for a slight kick. This dish is also freezer-friendly, making it a convenient option for busy holiday preparations.
Baked Macaroni and Cheese

Baked Macaroni and Cheese is a classic comfort dish that’s perfect for a Pioneer Woman Christmas dinner. It combines creamy, cheesy goodness with the satisfying texture of baked pasta, making it an ideal side dish or even a main course. This dish brings together the flavors of sharp cheddar with a touch of creaminess and a golden, crispy topping that’s sure to please any crowd.
Whether you’re hosting a festive gathering or simply want to indulge in a rich, satisfying meal, this recipe is sure to become a holiday favorite.
The following recipe serves 4-6 people and is perfect for a family dinner or a small holiday party. With a mix of simple ingredients and straightforward steps, you can easily prepare this dish in advance or bake it right before your guests arrive. The combination of cheeses and the baked crust not only provides a delightful texture but also a warm, comforting flavor that will remind you of home.
Ingredients:
- 1 pound elbow macaroni
- 4 cups sharp cheddar cheese, shredded
- 2 cups milk
- 1 cup heavy cream
- 1/2 cup unsalted butter
- 1/4 cup all-purpose flour
- Salt and pepper to taste
- 1 teaspoon dry mustard
- 1/2 teaspoon paprika
- 1 cup breadcrumbs
Cooking Instructions:
- Prepare the Pasta: Begin by preheating your oven to 350°F (175°C). Cook the macaroni according to the package instructions until al dente. Drain and set aside.
- Make the Cheese Sauce: In a large saucepan, melt the butter over medium heat. Once melted, whisk in the flour, stirring constantly for about 1-2 minutes to create a roux. Slowly add in the milk and cream, whisking continuously until the mixture is smooth and begins to thicken.
- Add the Cheese and Spices: Gradually stir in the shredded cheddar cheese, mixing until the cheese is fully melted and the sauce is smooth. Add the dry mustard, paprika, salt, and pepper, and stir to combine.
- Combine with Pasta: Add the cooked macaroni to the cheese sauce, stirring gently until all the pasta is evenly coated with the sauce.
- Prepare for Baking: Transfer the macaroni and cheese mixture into a greased 9×13 inch baking dish. Sprinkle the breadcrumbs evenly over the top to create a crispy crust.
- Bake the Dish: Place the baking dish in the preheated oven and bake for 25-30 minutes, or until the top is golden brown and the cheese is bubbly.
- Serve and Enjoy: Once baked, remove the dish from the oven and let it cool for a few minutes before serving. Enjoy the creamy, cheesy delight with your Christmas dinner.
Extra Tips:
For an even richer flavor, you can mix in additional cheeses such as Gruyère or Parmesan with the cheddar. If you prefer a spicier dish, you can add a pinch of cayenne pepper to the cheese sauce.
To make the topping extra crispy, you can mix the breadcrumbs with a little melted butter before sprinkling them on top. This dish can also be prepared in advance and refrigerated; just be sure to add a few extra minutes to the baking time if baking from cold.
Chocolate Pecan Pie
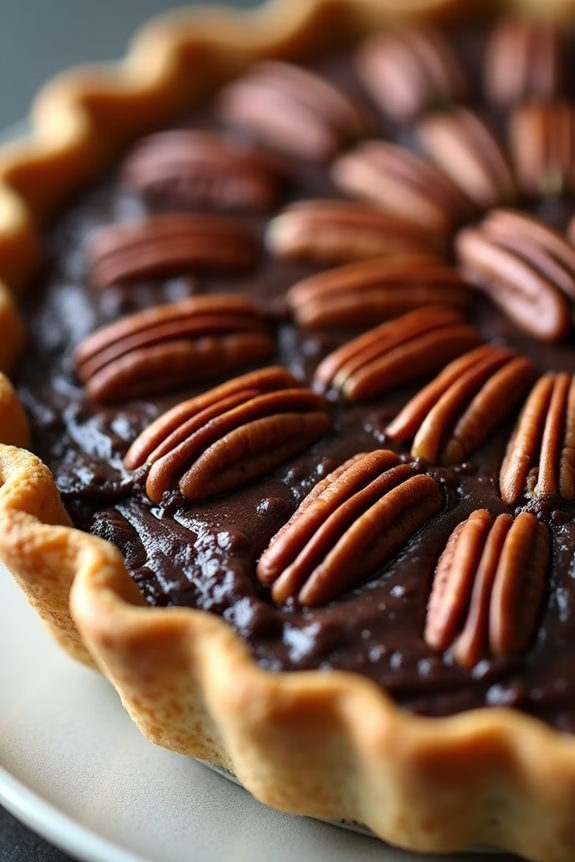
Indulge in the delightful combination of rich chocolate and the classic Southern pecan pie with this irresistible Chocolate Pecan Pie recipe. Perfect for the holiday season, this dessert brings together the buttery crunch of pecans with a luscious, smooth chocolate filling.
Whether you’re hosting a festive dinner or simply want to treat your family, this pie is bound to be a showstopper on your Christmas table. Crafted to serve 4-6 people, this pie offers a harmonious blend of sweetness and texture that will leave your guests craving more.
The combination of semi-sweet chocolate, brown sugar, and toasted pecans creates a decadent filling encased in a flaky pie crust. Follow this recipe to create a memorable dessert experience that captures the spirit of a Pioneer Woman Christmas Dinner.
Ingredients (Serves 4-6):
- 1 refrigerated pie crust (or homemade if preferred)
- 1 cup pecan halves, toasted
- 1 cup semi-sweet chocolate chips
- 3 large eggs
- 1 cup light corn syrup
- 1/2 cup packed light brown sugar
- 1/4 cup unsalted butter, melted
- 1 teaspoon vanilla extract
- 1/4 teaspoon salt
Cooking Instructions:
- Prepare the Pie Crust: Preheat your oven to 350°F (175°C). Roll out the pie crust and fit it into a 9-inch pie dish. Trim any excess dough and flute the edges for a decorative look. Set aside.
- Toast the Pecans: Spread the pecan halves on a baking sheet and toast in the preheated oven for about 8-10 minutes, stirring once halfway through. Keep an eye on them to avoid burning. Once toasted, let them cool slightly.
- Prepare the Chocolate: In a microwave-safe bowl, melt the semi-sweet chocolate chips in 20-second intervals, stirring in between until smooth. Set aside to cool slightly.
- Mix the Filling: In a large mixing bowl, whisk together the eggs, light corn syrup, brown sugar, melted butter, vanilla extract, and salt until well combined. Gradually stir in the melted chocolate until the mixture is smooth and uniform.
- Assemble the Pie: Arrange the toasted pecan halves evenly in the bottom of the prepared pie crust. Pour the chocolate mixture over the pecans, making sure they’re evenly distributed.
- Bake the Pie: Place the pie on the center rack of the preheated oven. Bake for 50-60 minutes, or until the filling is set and slightly puffed. The center should be slightly wobbly when gently shaken.
- Cool and Serve: Remove the pie from the oven and let it cool completely on a wire rack, allowing the filling to set further. Once cooled, slice and serve, optionally topping with a dollop of whipped cream or a scoop of vanilla ice cream.
Extra Tips:
For best results, make sure all ingredients used are at room temperature. This guarantees a smooth filling that bakes evenly.
If you prefer a deeper chocolate flavor, you can use dark chocolate chips instead of semi-sweet. Additionally, when toasting the pecans, keep a close watch as nuts can quickly go from toasted to burnt.
If you’re making your pie crust from scratch, consider adding a tablespoon of cocoa powder to the dough for an extra chocolate boost. Enjoy this decadent dessert fresh, or store leftovers in the fridge to enjoy the next day.
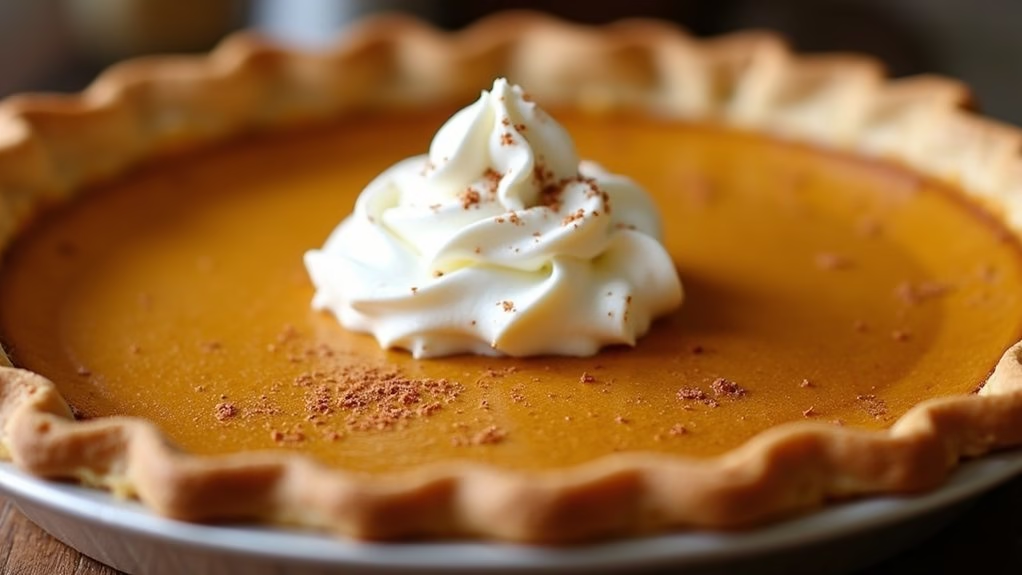
Classic Pumpkin Pie
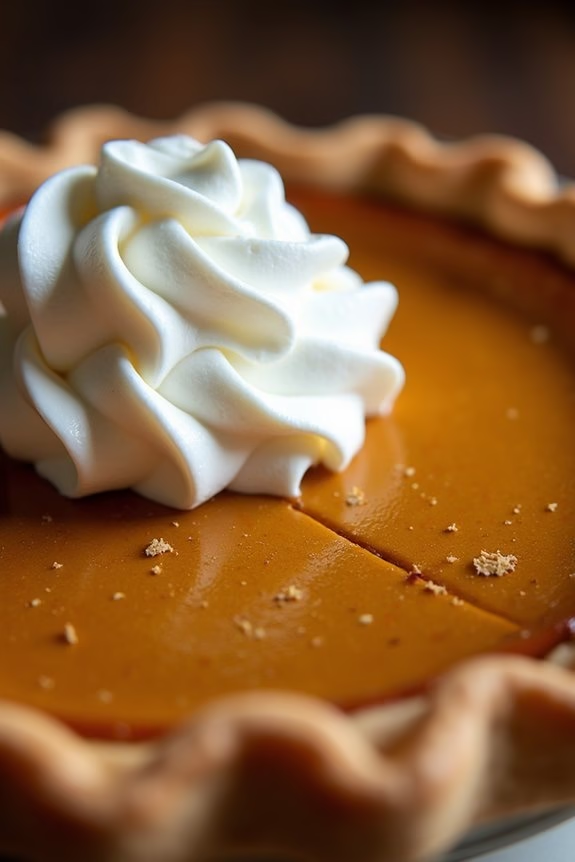
The Classic Pumpkin Pie is a quintessential dessert that graces many holiday tables, particularly during the festive Christmas season. With its smooth, spiced filling and flaky, buttery crust, this pie encapsulates the warmth and joy of the holidays in every bite. Perfect for both novice and experienced bakers, this recipe offers a delightful blend of rich pumpkin flavor and aromatic spices, guaranteeing that your Christmas dinner ends on a sweet note.
Whether you’re serving it at a family gathering or a festive party, this Classic Pumpkin Pie is sure to be a hit. It combines traditional ingredients with easy-to-follow steps, making it an enjoyable baking experience. Imagine the aroma of cinnamon, nutmeg, and ginger wafting through your kitchen as you prepare this beloved dessert. This recipe serves 4-6 people, making it an ideal choice for an intimate holiday celebration.
Ingredients:
- 1 unbaked 9-inch pie crust
- 1 ¾ cups pumpkin puree
- ¾ cup granulated sugar
- ½ teaspoon salt
- 1 teaspoon ground cinnamon
- ½ teaspoon ground ginger
- ¼ teaspoon ground cloves
- 2 large eggs
- 1 ¼ cups evaporated milk
- Whipped cream, for serving
Cooking Instructions:
- Preheat the Oven: Start by preheating your oven to 425°F (220°C). This guarantees that your pie will bake evenly and the crust will turn a perfect golden brown.
- Prepare the Pie Filling: In a large mixing bowl, combine the pumpkin puree, sugar, salt, cinnamon, ginger, and cloves. Mix until the spices are evenly distributed throughout the pumpkin.
- Incorporate the Eggs: Crack the eggs into the pumpkin mixture and beat gently until they’re fully integrated, resulting in a smooth consistency.
- Add the Evaporated Milk: Gradually stir in the evaporated milk, mixing until all ingredients are well combined and the filling is creamy and uniform.
- Fill the Pie Crust: Pour the prepared pumpkin filling into the unbaked pie crust, smoothing out the top with a spatula to guarantee even baking.
- Bake the Pie: Place the pie on the center rack of your preheated oven and bake for 15 minutes. Then, reduce the oven temperature to 350°F (175°C) and continue baking for an additional 40-50 minutes, or until a knife inserted into the center comes out clean.
- Cool the Pie: Remove the pie from the oven and allow it to cool on a wire rack. This cooling period allows the filling to set properly and enhances the flavors of the spices.
- Serve: Once cooled, slice the pie and serve with a dollop of whipped cream for an added touch of indulgence.
Extra Tips:
To guarantee your Classic Pumpkin Pie is perfect, consider using a glass pie dish which helps monitor the crust’s browning process. If the edges of the crust brown too quickly, cover them with strips of aluminum foil to prevent burning.
For a more complex flavor, try substituting part of the granulated sugar with brown sugar. Additionally, allowing the pie to cool completely before serving will enhance the texture and flavor, making each slice irresistible.