
Every year, our office Christmas potluck is the highlight of the season, and I’ve found some recipes that truly make me stand out.
I adore watching my colleagues’ faces light up with each bite, from the creamy spinach and artichoke dip to the sweet peppermint bark brownies.
If you want to wow your team with minimal effort, I’ve gathered a collection of easy and crowd-pleasing recipes that could be your secret weapon.
Ready to impress?
Festive Spinach and Artichoke Dip

The Festive Spinach and Artichoke Dip is a delightful addition to any office Christmas potluck, providing a creamy, savory dish that can be enjoyed by all. This dip blends the rich flavors of spinach and artichokes with a hint of garlic and a medley of cheeses, creating a warm, inviting appetizer that pairs perfectly with crackers, bread, or fresh vegetables.
Whether you’re a seasoned cook or a beginner in the kitchen, this simple yet delicious recipe is certain to impress your colleagues and add a touch of holiday cheer to your gathering.
Ideal for serving 4-6 people, this recipe is both easy to prepare and packed with flavor. The combination of cream cheese, mozzarella, and Parmesan gives the dip a luscious texture, while the addition of garlic and red pepper flakes provides a subtle kick.
The artichokes add a unique depth of flavor, complementing the fresh spinach beautifully. Perfectly baked to a golden brown, this dip is best served warm and is sure to become a crowd favorite at your festive event.
Ingredients (Serves 4-6)
- 1 (10 oz) package of frozen chopped spinach, thawed and drained
- 1 (14 oz) can of artichoke hearts, drained and roughly chopped
- 1 cup cream cheese, softened
- 1 cup sour cream
- 1 cup mayonnaise
- 1 cup grated mozzarella cheese
- 1/2 cup grated Parmesan cheese
- 2 cloves garlic, minced
- 1/2 teaspoon salt
- 1/4 teaspoon black pepper
- 1/4 teaspoon red pepper flakes
Cooking Instructions
- Preheat the Oven: Start by preheating your oven to 350°F (175°C). This will guarantee that your dip bakes evenly and reaches the perfect golden-brown top.
- Mix the Base Ingredients: In a large mixing bowl, combine the softened cream cheese, sour cream, and mayonnaise. Use a hand mixer or a whisk to blend these ingredients until smooth and creamy.
- Add the Spinach and Artichokes: Once the base is smooth, fold in the drained spinach and chopped artichoke hearts. Make sure to mix well so the vegetables are evenly distributed throughout the dip.
- Incorporate the Cheese and Seasonings: Add the grated mozzarella, Parmesan cheese, minced garlic, salt, black pepper, and red pepper flakes to the bowl. Stir until all the ingredients are fully combined.
- Transfer to Baking Dish: Pour the mixture into an oven-safe baking dish and spread it evenly. Smooth the top with a spatula for an even bake.
- Bake the Dip: Place the dish in the preheated oven and bake for 25-30 minutes, or until the top is bubbly and golden brown.
- Cool and Serve: Allow the dip to cool for a few minutes before serving. This will help it set and make it easier to scoop.
Extra Tips
For an extra layer of flavor, consider adding a sprinkle of smoked paprika or a dash of fresh lemon juice before baking. If you prefer a bit more heat, increase the amount of red pepper flakes or add a diced jalapeño.
Be certain your spinach is thoroughly drained to avoid a watery dip, and feel free to use fresh spinach if you prefer. Simply sauté it briefly before mixing it into the dip.
This dish can be prepared a day in advance and warmed up just before serving, making it a convenient choice for a busy holiday schedule.
Cranberry Brie Bites
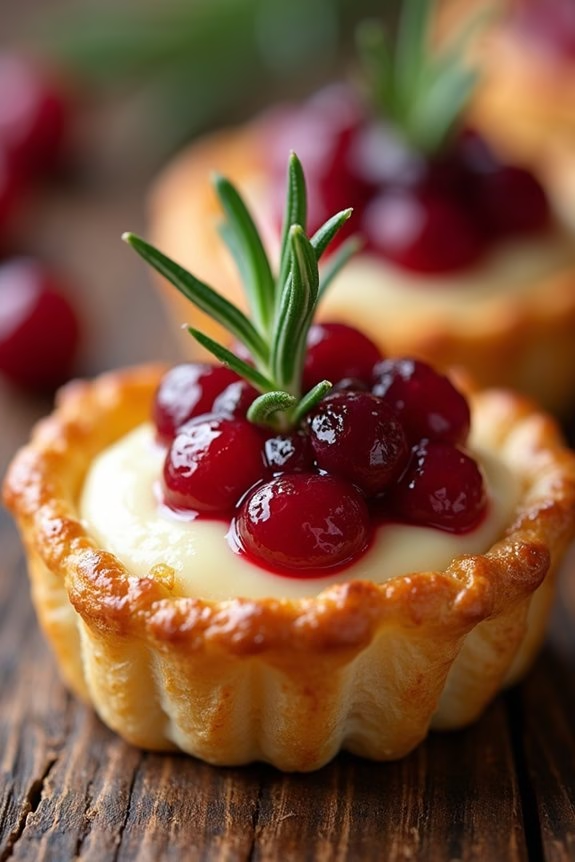
Cranberry Brie Bites are a delightful and festive appetizer that will add a touch of elegance to any office Christmas potluck. These bite-sized treats combine the creamy richness of Brie cheese with the tartness of cranberry sauce, all nestled in a flaky puff pastry shell. Perfect for sharing, they’re sure to be a hit with your colleagues and bring a little holiday cheer to the table.
The beauty of Cranberry Brie Bites lies in their simplicity and the balance of flavors. They’re easy to prepare, requiring just a handful of ingredients, and can be assembled quickly, making them ideal for busy holiday schedules.
Whether you’re an experienced cook or a kitchen novice, you’ll find this recipe straightforward and rewarding, producing a dish that looks as beautiful as it tastes.
Ingredients (Serves 4-6):
- 1 sheet of puff pastry, thawed
- 1/2 cup cranberry sauce (homemade or store-bought)
- 4 oz Brie cheese, cut into small cubes
- 1 egg, beaten (for egg wash)
- Fresh rosemary sprigs (optional, for garnish)
Cooking Instructions:
- Prepare the Puff Pastry: Preheat your oven to 375°F (190°C). Unroll the thawed puff pastry sheet onto a lightly floured surface. Use a sharp knife or a pizza cutter to cut the pastry into 12 equal squares.
- Assemble the Bites: Place each puff pastry square into the cups of a mini muffin tin, pressing gently to form little pastry cups. Place a cube of Brie cheese into each pastry cup, followed by a generous teaspoon of cranberry sauce.
- Add the Egg Wash: Brush the edges of the pastry with the beaten egg. This will give your bites a beautiful golden color as they bake.
- Bake: Place the muffin tin in the preheated oven and bake for 12-15 minutes, or until the puff pastry is golden brown and the cheese is melted and bubbly.
- Garnish and Serve: Once baked, remove the bites from the oven and let them cool slightly before removing them from the tin. If desired, garnish each bite with a small sprig of fresh rosemary for an added festive touch and serve warm.
Extra Tips:
For the best results, verify your puff pastry is thoroughly thawed before you start. This will make it easier to work with and prevent any tearing.
If you prefer a less sweet bite, opt for a cranberry sauce with less added sugar, or make your own to control the sweetness level. Additionally, these bites are best served warm, but if you need to make them ahead of time, they can be reheated briefly in a low oven before serving.
Finally, if you’re short on time, you can use pre-cut puff pastry cups or shells available in the freezer section of many grocery stores.
Holiday Stuffed Mushrooms
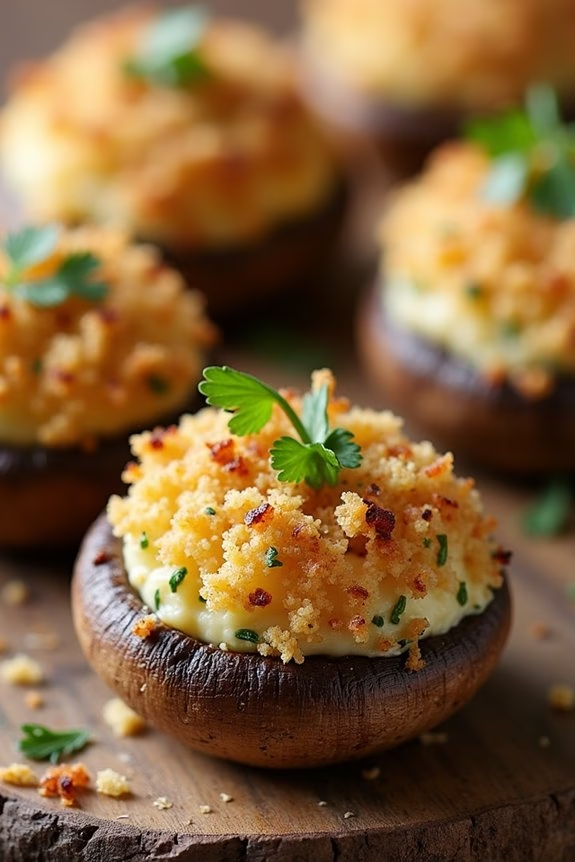
A festive addition to any office Christmas potluck is a platter of Holiday Stuffed Mushrooms. These bite-sized delights are packed with savory flavors that will impress your colleagues and bring a touch of elegance to the gathering. The combination of tender mushroom caps and a scrumptious filling made with herbs, cheese, and breadcrumbs creates a satisfying appetizer that will have everyone coming back for more.
Whether you’re an experienced cook or a beginner, this recipe is straightforward and guarantees delicious results every time. Perfect for serving four to six people, this recipe for Holiday Stuffed Mushrooms is both simple and delightful. The key to success lies in using fresh ingredients and balancing the flavors of the stuffing.
With the right combination of seasonings and a bit of oven magic, these stuffed mushrooms will become a highlight of your holiday spread. Get ready to wow your co-workers with a dish that’s as pleasing to the eye as it’s to the palate.
Ingredients (serving size: 4-6 people):
- 24 large button mushrooms
- 3 tablespoons olive oil
- 1 small onion, finely chopped
- 2 cloves garlic, minced
- 1/2 cup breadcrumbs
- 1/4 cup grated Parmesan cheese
- 2 tablespoons chopped fresh parsley
- 1 teaspoon dried thyme
- Salt and pepper to taste
- 1/4 cup cream cheese, softened
Cooking Instructions:
- Preheat the Oven: Start by preheating your oven to 375°F (190°C). This guarantees that the mushrooms will cook evenly and develop a nice, golden brown color.
- Prepare the Mushrooms: Gently clean the mushrooms with a damp paper towel to remove any dirt. Carefully remove the stems from the mushroom caps and set the caps aside. Finely chop the stems for use in the stuffing.
- Cook the Aromatics: In a large skillet over medium heat, add 2 tablespoons of olive oil. Once hot, add the chopped onion and garlic. Sauté them for about 3-4 minutes until the onion becomes translucent and fragrant.
- Make the Filling: Add the chopped mushroom stems to the skillet and cook for an additional 2-3 minutes. Stir in the breadcrumbs, Parmesan cheese, parsley, thyme, salt, and pepper. Cook until the breadcrumbs are golden and the mixture is well combined. Remove from heat and let cool slightly.
- Mix in the Cream Cheese: Once the breadcrumb mixture has cooled, stir in the softened cream cheese until the filling is creamy and well incorporated.
- Stuff the Mushrooms: Using a spoon, fill each mushroom cap generously with the prepared stuffing mixture. Arrange the stuffed mushrooms on a baking sheet lined with parchment paper.
- Bake the Mushrooms: Drizzle the remaining tablespoon of olive oil over the stuffed mushrooms. Place the baking sheet in the preheated oven and bake for 20-25 minutes, or until the mushrooms are tender, and the tops are golden brown.
- Serve: Once cooked, remove the mushrooms from the oven and let them cool slightly before transferring them to a serving platter. Enjoy them warm as part of your potluck spread.
Extra Tips:
For an extra burst of flavor, consider adding a pinch of red pepper flakes to the filling for a hint of heat. If you want to prepare these stuffed mushrooms ahead of time, simply assemble them and store them covered in the refrigerator.
When ready to serve, just pop them in the oven and bake as directed. Additionally, you can experiment with different cheeses like feta or goat cheese for a unique twist. Remember, the key to a great stuffed mushroom is balancing the moisture in the filling, so avoid overstuffing to prevent them from becoming soggy. Enjoy your festive feast!
Maple Glazed Carrots
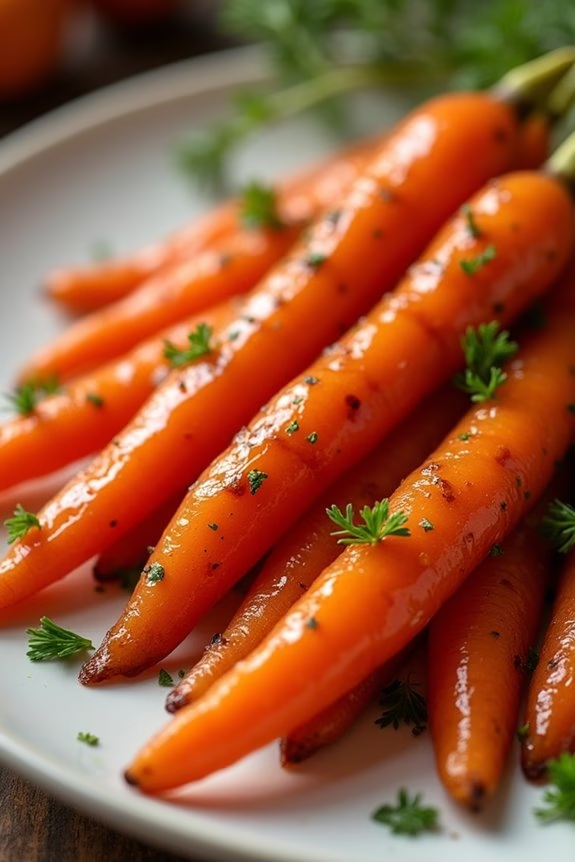
Maple Glazed Carrots are a delightful side dish perfect for any holiday gathering, especially a festive office Christmas potluck. The sweet, sticky glaze pairs beautifully with the natural sweetness of the carrots, creating a dish that’s both simple to prepare and a crowd-pleaser.
The subtle hint of maple syrup adds a rich depth of flavor that enhances the bright, earthy taste of the carrots, making it an irresistible complement to any main course.
This recipe is designed to serve 4-6 people, making it ideal for small to medium-sized gatherings. The combination of butter, maple syrup, and a touch of seasoning creates a glaze that clings to the carrots, guaranteeing every bite is bursting with flavor.
Whether you’re cooking for a potluck or a family dinner, these Maple Glazed Carrots will surely be a hit.
Ingredients:
- 2 pounds of carrots, peeled and cut into 2-inch pieces
- 3 tablespoons unsalted butter
- 1/4 cup pure maple syrup
- Salt to taste
- Freshly ground black pepper to taste
- 1 tablespoon fresh parsley, chopped (optional for garnish)
Cooking Instructions:
- Prepare the Carrots: Begin by peeling the carrots and cutting them into even 2-inch pieces. This guarantees they cook uniformly.
- Cook the Carrots: In a large pot, bring salted water to a boil and add the carrot pieces. Cook for about 5-7 minutes until they’re just tender but not mushy. Drain the carrots and set them aside.
- Make the Glaze: In a large skillet, melt the butter over medium heat. Once melted, add the maple syrup and stir to combine. Let it simmer for a minute until it thickens slightly.
- Combine Carrots and Glaze: Add the drained carrots into the skillet with the glaze. Toss them gently to guarantee each piece is well coated with the maple butter mixture.
- Season and Finish: Season the glazed carrots with salt and freshly ground black pepper to taste. Let them cook for an additional 2-3 minutes in the glaze, stirring occasionally until they’re perfectly glazed and shiny.
- Garnish and Serve: Transfer the Maple Glazed Carrots to a serving dish. If desired, sprinkle with freshly chopped parsley for a pop of color and added flavor before serving.
Extra Tips:
When cutting the carrots, try to keep them as uniform as possible to guarantee even cooking. If using baby carrots, you can skip the peeling and simply trim the ends.
For an extra layer of flavor, consider adding a pinch of cinnamon or nutmeg to the glaze. If you prefer a slightly tangy taste, a splash of lemon juice can balance the sweetness of the maple syrup.
This dish can be prepared a few hours in advance and reheated gently before serving, making it convenient for potlucks and large gatherings.
Savory Sausage Rolls

Savory Sausage Rolls are a delectable treat that are perfect for your office Christmas potluck. These rolls are a delightful combination of flaky pastry and flavorful sausage filling, making them an irresistible addition to any festive gathering.
The golden, crispy crust encases a well-seasoned sausage mixture, creating a satisfying bite that will leave your colleagues coming back for more. Not only are they delicious, but these sausage rolls are also easy to make, guaranteeing you spend less time in the kitchen and more time enjoying the holiday festivities.
This recipe serves 4-6 people, making it ideal for a small office potluck. Whether you’re an experienced cook or a beginner, these sausage rolls are foolproof and promised to impress. The key to making these rolls truly exceptional is using high-quality sausage meat and fresh herbs to enhance the flavor.
With just a few simple ingredients, you can create a crowd-pleasing dish that embodies the spirit of the season.
Ingredients:
- 1 pound (450g) sausage meat
- 1 sheet of puff pastry (approximately 9×9 inches)
- 1 small onion, finely chopped
- 1 clove garlic, minced
- 1 tablespoon fresh parsley, chopped
- 1 tablespoon fresh thyme, chopped
- 1 egg, beaten (for egg wash)
- Salt and pepper to taste
Cooking Instructions:
- Preheat the Oven: Preheat your oven to 400°F (200°C) to make sure it’s perfectly hot when your sausage rolls are ready to bake.
- Prepare the Sausage Filling: In a mixing bowl, combine the sausage meat, finely chopped onion, minced garlic, parsley, thyme, salt, and pepper. Mix thoroughly until all ingredients are evenly distributed throughout the sausage meat.
- Roll Out the Pastry: On a lightly floured surface, roll out the puff pastry to smoothen it and remove any creases. Make sure it’s approximately 9×9 inches in size if it’s not already pre-rolled.
- Shape the Sausage Roll: Place the sausage mixture along one edge of the pastry, shaping it into a log. Leave a small margin on all sides to allow for sealing.
- Wrap the Filling: Carefully roll the pastry over the sausage meat, tucking in the edges as you go to make a tight, secure roll. Once fully rolled, press the seam gently to seal it.
- Seal and Cut: Brush the edge of the pastry with a little beaten egg to help seal it. Cut the roll into smaller pieces, each about 2 inches in width, giving you approximately 8-10 rolls.
- Egg Wash and Bake: Place the rolls seam-side down on a baking sheet lined with parchment paper. Brush the tops with the beaten egg to give them a lovely golden color when baked.
- Bake: Bake in the preheated oven for 20-25 minutes, or until the pastry is golden brown and puffed, and the sausage filling is thoroughly cooked.
- Cool and Serve: Allow the sausage rolls to cool slightly before serving. They can be enjoyed warm or at room temperature.
Extra Tips:
To make sure your sausage rolls are perfectly cooked and flavorful, use good quality sausage meat, preferably from a local butcher.
For added flavor, feel free to experiment with additional herbs or spices, such as sage or paprika. If you have time, chill the sausage rolls in the refrigerator for about 10 minutes before baking; this helps the pastry hold its shape better in the oven.
Finally, these sausage rolls can be prepared a day in advance and baked just before serving, allowing you to focus on other preparations for your potluck.
Gingerbread Spice Cupcakes
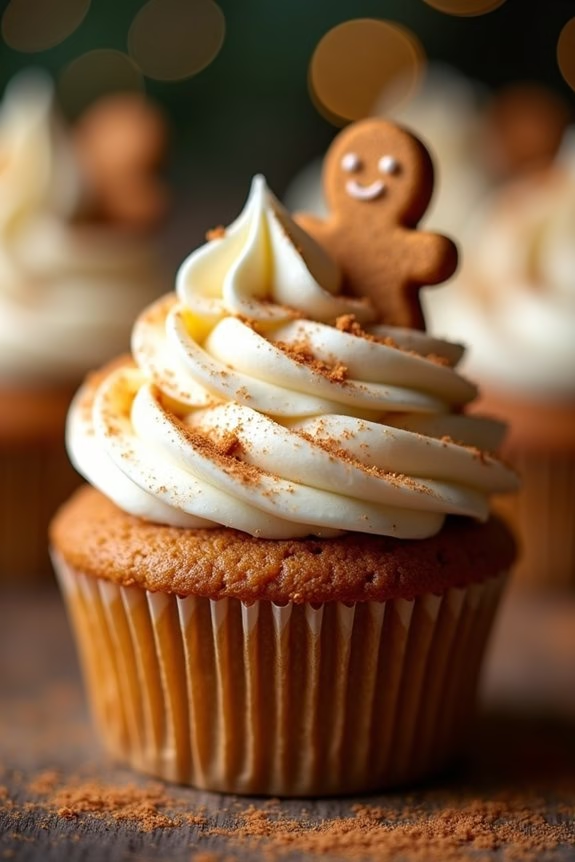
Gingerbread Spice Cupcakes are the perfect festive treat for your office Christmas potluck. These cupcakes are infused with the warm flavors of ginger, cinnamon, and nutmeg, bringing the spirit of the holiday season into every bite. The moist and fluffy texture, combined with a luscious cream cheese frosting, makes them an irresistible addition to any holiday dessert table.
With their delightful aroma and classic taste, these cupcakes are certain to be a hit among your colleagues and add a touch of homemade charm to your potluck spread. Designed to serve 4-6 people, this recipe yields a batch of 12 delectable cupcakes. They’re easy to make and require just a few simple steps to achieve that perfect balance of spice and sweetness.
Whether you’re a seasoned baker or new to the world of cupcakes, this recipe will guide you through the process with ease, guaranteeing a delicious outcome that will impress everyone at your holiday gathering.
Ingredients:
- 1 1/2 cups all-purpose flour
- 1 teaspoon baking powder
- 1/2 teaspoon baking soda
- 1/4 teaspoon salt
- 1 teaspoon ground ginger
- 1 teaspoon ground cinnamon
- 1/4 teaspoon ground nutmeg
- 1/4 teaspoon ground cloves
- 1/2 cup unsalted butter, softened
- 1/2 cup brown sugar, packed
- 1/4 cup molasses
- 1 large egg
- 1/2 cup buttermilk
- 1 teaspoon vanilla extract
- 8 oz cream cheese, softened
- 1/4 cup unsalted butter, softened
- 2 cups powdered sugar
- 1 teaspoon vanilla extract (for frosting)
Instructions:
- Preheat the Oven: Begin by preheating your oven to 350°F (175°C). Line a 12-cup muffin tin with paper liners to prepare for the batter.
- Mix Dry Ingredients: In a medium-sized bowl, whisk together the flour, baking powder, baking soda, salt, ginger, cinnamon, nutmeg, and cloves. This guarantees all the spices are evenly distributed.
- Cream Butter and Sugar: In a large bowl, use an electric mixer to cream the softened butter and brown sugar until light and fluffy. This should take about 2-3 minutes. Add in the molasses and egg, mixing until well combined.
- Combine Ingredients: Gradually add the dry ingredients to the wet mixture, alternating with the buttermilk, starting and ending with the flour mixture. Mix until just combined. Stir in the vanilla extract.
- Fill and Bake: Spoon the batter evenly into the prepared muffin tin, filling each cup about 2/3 full. Bake in the preheated oven for 18-20 minutes, or until a toothpick inserted into the center of a cupcake comes out clean.
- Cool the Cupcakes: Allow the cupcakes to cool in the tin for about 5 minutes before transferring them to a wire rack to cool completely.
- Prepare the Frosting: In a medium bowl, beat the softened cream cheese and butter together until smooth. Gradually add the powdered sugar, mixing until creamy. Stir in the vanilla extract.
- Frost the Cupcakes: Once the cupcakes are completely cooled, spread or pipe the cream cheese frosting generously over each cupcake.
For the best results, verify that all your ingredients are at room temperature before beginning the recipe, as this helps in achieving a smooth batter and frosting.
If you want to add an extra touch of holiday spirit, consider garnishing the frosted cupcakes with a sprinkle of cinnamon or a small gingerbread cookie. Remember, these cupcakes can be made a day in advance and stored in an airtight container, making them a convenient option for your potluck preparations.
Peppermint Bark Brownies
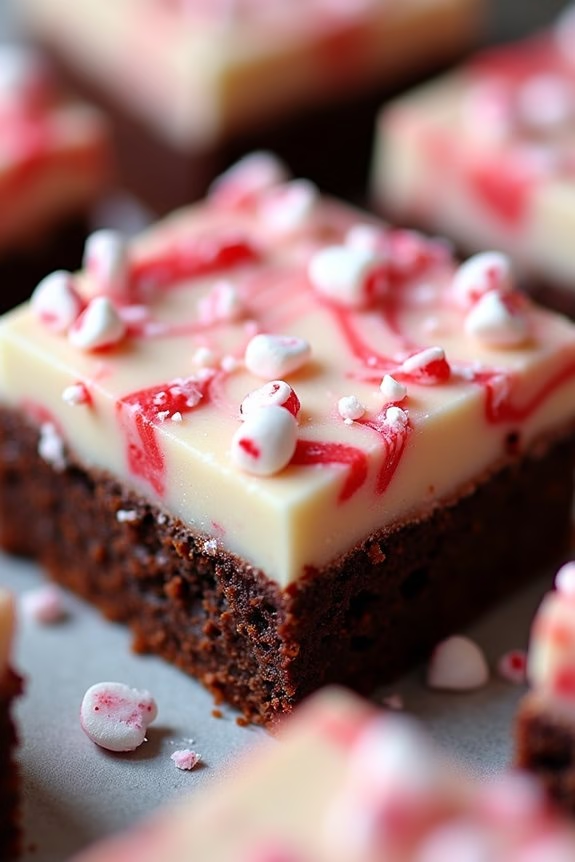
Peppermint Bark Brownies are the perfect festive treat to bring to your office Christmas potluck. With a rich chocolate base and an invigorating peppermint twist, these brownies are sure to be a hit among your colleagues. The combination of fudgy brownies and crunchy peppermint bark creates a delightful contrast in texture that everyone will love.
Whether you’re a seasoned baker or a novice in the kitchen, these brownies are simple to make and even easier to enjoy. The recipe features a classic brownie batter topped with a layer of homemade peppermint bark. This dessert not only looks stunning with its marbled chocolate and peppermint candies but also tastes divine.
The peppermint bark adds an invigorating coolness to the rich, chocolatey brownies, making them an irresistible holiday treat. Follow the recipe below to make Peppermint Bark Brownies for a serving size of 4-6 people.
Ingredients:
- 1/2 cup unsalted butter
- 1 cup granulated sugar
- 2 large eggs
- 1 teaspoon vanilla extract
- 1/3 cup unsweetened cocoa powder
- 1/2 cup all-purpose flour
- 1/4 teaspoon salt
- 1/4 teaspoon baking powder
- 1 cup semi-sweet chocolate chips
- 1/2 cup white chocolate chips
- 1/4 teaspoon peppermint extract
- 1/4 cup crushed peppermint candies
Instructions:
- Preheat and Prepare Pan: Preheat your oven to 350°F (175°C). Line an 8×8 inch baking dish with parchment paper, leaving some overhang for easy removal.
- Melt Butter and Mix Sugar: In a medium saucepan, melt the butter over low heat. Once melted, remove from heat and stir in the granulated sugar until fully dissolved.
- Combine Wet Ingredients: Add the eggs and vanilla extract to the butter-sugar mixture. Stir until well combined.
- Mix Dry Ingredients: In a separate bowl, whisk together the cocoa powder, flour, salt, and baking powder. Gradually add the dry mixture to the wet ingredients, stirring until smooth.
- Add Chocolate Chips: Fold in the semi-sweet chocolate chips, then pour the batter into the prepared baking dish, spreading it evenly.
- Bake the Brownies: Bake in the preheated oven for about 25-30 minutes, or until a toothpick inserted into the center comes out mostly clean with a few moist crumbs.
- Prepare Peppermint Bark: While the brownies are baking, melt the white chocolate chips in a microwave-safe bowl in 15-second intervals, stirring after each until smooth. Stir in the peppermint extract.
- Add Peppermint Bark Layer: Once the brownies are done baking, remove them from the oven and immediately pour the melted white chocolate over the top. Sprinkle the crushed peppermint candies evenly over the white chocolate.
- Cool and Set: Allow the brownies to cool completely in the pan, then transfer them to the refrigerator for about 30 minutes to set the peppermint bark.
- Serve: Once set, lift the brownies out of the pan using the parchment paper overhang. Cut into squares and serve.
Extra Tips:
For the best results, make sure not to overbake the brownies; a slightly underdone center will guarantee a fudgy texture.
When melting the white chocolate, be careful not to overheat it as it can seize up and become unusable. If you prefer a stronger peppermint flavor, you can increase the peppermint extract slightly, but be careful as it can quickly become overpowering.
These brownies can be stored in an airtight container at room temperature for up to three days or refrigerated for longer shelf life.
Cheesy Garlic Pull-Apart Bread
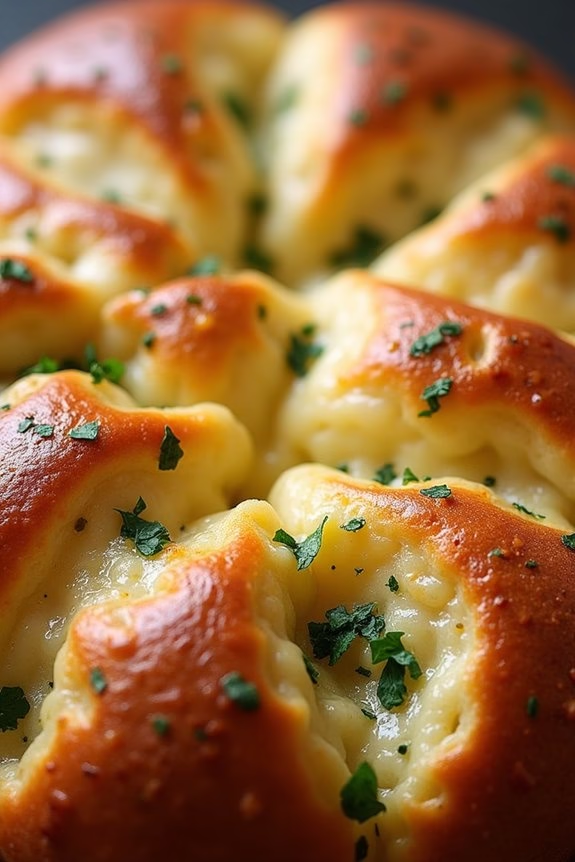
Cheesy Garlic Pull-Apart Bread is the perfect addition to any Christmas potluck, combining the warm, inviting flavors of garlic and cheese with the fun, interactive style of pull-apart bread. This dish isn’t only delicious, but it also serves as a delightful centerpiece that encourages sharing and conversation around the table.
With its golden, crispy crust, gooey cheese, and aromatic garlic butter, it’s sure to be a hit with both adults and children alike. This recipe is designed to serve 4-6 people, making it an ideal choice for smaller gatherings or as part of a larger spread. The preparation is simple, using store-bought bread as the base, and it can be assembled quickly before baking, leaving you more time to enjoy the festivities.
Follow these instructions to create a dish that’s as enjoyable to make as it’s to eat.
Ingredients for 4-6 servings:
- 1 round loaf of sourdough or Italian bread
- 1 cup shredded mozzarella cheese
- 1/2 cup grated Parmesan cheese
- 1/2 cup unsalted butter, melted
- 4 cloves garlic, minced
- 2 tablespoons fresh parsley, chopped
- 1 teaspoon dried Italian seasoning
Cooking Instructions:
1. Prepare the Bread: Preheat your oven to 350°F (175°C). Using a serrated bread knife, carefully slice the bread loaf in a criss-cross pattern, being careful not to cut all the way through. The slices should be about 1 inch apart, creating a grid-like pattern that allows the bread to remain whole at the base.
2. Make the Garlic Butter: In a small bowl, combine the melted butter, minced garlic, chopped parsley, and Italian seasoning. Mix well until all ingredients are evenly distributed.
3. Stuff the Bread: Gently pull apart the sections of the bread and use a spoon or a small brush to drizzle the garlic butter mixture into the crevices. Be sure to cover as much of the inside as possible to guarantee every bite is flavorful.
Next, stuff the shredded mozzarella and grated Parmesan cheese into the same crevices, making sure each section has a generous amount of cheese.
4. Bake the Bread: Wrap the loaf loosely in aluminum foil, guaranteeing it’s completely covered to prevent the bread from drying out. Place it on a baking sheet and bake in the preheated oven for 15 minutes. Afterward, unwrap the foil and bake for an additional 10 minutes, or until the cheese is fully melted and the top is golden and crispy.
5. Serve and Enjoy: Remove the bread from the oven and allow it to cool for a few minutes before serving. It can be served directly on the baking sheet or transferred to a serving platter. Encourage guests to pull apart the bread pieces for a fun and interactive dining experience.
Extra Tips:
For an extra flavor boost, consider adding a pinch of red pepper flakes to the garlic butter mixture for a slight kick. If you prefer a different cheese variety, feel free to experiment with a combination of cheddar, Gruyère, or even blue cheese for a unique twist.
Additionally, try using different herbs such as thyme or rosemary to suit your taste preferences. If you find the bread getting too dark during baking, cover it loosely with foil to prevent over-browning. Enjoy your Cheesy Garlic Pull-Apart Bread fresh out of the oven for the best taste and texture!
Cranberry Orange Relish

Cranberry Orange Relish is a delightful, zesty accompaniment that brightens up any holiday table. This invigorating dish combines the tartness of cranberries with the sweet citrus flavor of oranges, creating a perfect balance that complements a variety of holiday entrees. Ideal for an office Christmas potluck, this relish isn’t only easy to prepare but also a crowd-pleaser that adds a festive pop of color to your spread.
It’s a versatile dish that can be served alongside roasted turkey, ham, or even as a topping on desserts like cheesecake. The relish is best made a day in advance to allow the flavors to meld, making it an excellent choice for busy holiday preparations. With just a few simple ingredients, you can whip up this vibrant dish in no time.
The freshness of the cranberries combined with the aromatic zest and juice of oranges creates a sensory delight that will surely impress your colleagues. Perfect for serving 4-6 people, this recipe will make your office Christmas potluck an event to remember.
Ingredients:
- 12 ounces fresh cranberries
- 1 medium orange, unpeeled
- 1 cup granulated sugar
- 1/4 cup chopped walnuts (optional)
- 1/4 teaspoon cinnamon (optional)
Instructions:
- Prepare the Ingredients: Rinse the cranberries thoroughly under cold water and discard any that are soft or damaged. Cut the orange into quarters and remove any seeds, keeping the peel on.
- Blend the Fruit: In a food processor, combine the cranberries and orange quarters. Pulse the mixture until the cranberries and orange are finely chopped but not pureed. Be careful not to over-process, as you want a chunky texture.
- Sweeten the Relish: Transfer the chopped mixture into a medium-sized mixing bowl. Add the granulated sugar and stir until well combined. Taste and adjust the sugar if necessary, depending on your sweetness preference.
- Add Nuts and Spice (Optional): If using, stir in the chopped walnuts and cinnamon to add a bit of crunch and warmth to the relish.
- Chill and Serve: Cover the bowl with plastic wrap and refrigerate for at least 2 hours, or overnight for best results. This chilling time helps the flavors to meld and develop. Serve the relish chilled as a side dish or condiment.
Extra Tips:
For an added twist, you can experiment with adding other spices like a dash of nutmeg or a hint of ginger for extra warmth. If you prefer a less sweet relish, reduce the sugar slightly, or substitute with honey or maple syrup for a different flavor profile.
The relish can be made up to three days in advance, making it a convenient option for busy holiday schedules. When serving, consider garnishing with a few fresh cranberries or a sprinkle of orange zest to enhance the visual appeal.
Chocolate-Dipped Shortbread Cookies

Chocolate-Dipped Shortbread Cookies are a delightful treat perfect for any holiday gathering, especially an office Christmas potluck. These cookies combine the rich, buttery taste of classic shortbread with the indulgence of chocolate, creating a festive and delicious dessert that everyone will love. The recipe is straightforward, allowing you to create a batch of these delectable cookies with minimal effort, yet maximum impact.
Perfect for serving 4-6 people, these cookies aren’t only visually appealing with their elegant chocolate dip but also incredibly satisfying. Whether you’re a seasoned baker or a beginner, this recipe will guide you through the process of making these holiday treats with ease. So gather your ingredients, preheat the oven, and get ready to impress your colleagues with this scrumptious addition to the Christmas potluck table.
Ingredients:
- 1 cup (2 sticks) unsalted butter, softened
- 1/2 cup granulated sugar
- 1 teaspoon vanilla extract
- 2 cups all-purpose flour
- 1/4 teaspoon salt
- 1 cup semisweet or dark chocolate chips
- Sprinkles or crushed nuts (optional)
Instructions:
- Prepare the Dough: In a large mixing bowl, cream together the softened butter and sugar using an electric mixer until the mixture is light and fluffy. Add the vanilla extract and mix until well combined.
- Form the Dough: Gradually add the all-purpose flour and salt to the butter mixture. Mix until the dough comes together and is smooth. If the dough is too crumbly, add a teaspoon of milk to help bind it.
- Chill the Dough: Form the dough into a disk, wrap it in plastic wrap, and refrigerate for about 30 minutes. This helps to firm the dough, making it easier to roll out.
- Preheat the Oven: Preheat your oven to 350°F (175°C). Line a baking sheet with parchment paper.
- Roll and Cut the Dough: On a lightly floured surface, roll out the dough to about 1/4-inch thickness. Use cookie cutters to cut the dough into desired shapes and place them on the prepared baking sheet.
- Bake the Cookies: Bake the cookies in the preheated oven for 10-12 minutes, or until the edges are lightly golden. Remove from the oven and allow them to cool on a wire rack.
- Melt the Chocolate: While the cookies are cooling, melt the chocolate chips in a microwave-safe bowl in 30-second intervals, stirring in between until smooth.
- Dip the Cookies: Dip one half of each cooled cookie into the melted chocolate. Allow the excess chocolate to drip off before placing the cookies back on the parchment paper.
- Add Decorations: Before the chocolate sets, sprinkle the dipped side with sprinkles or crushed nuts, if desired. Let the chocolate set completely before serving or storing.
Extra Tips:
To guarantee your cookies have the perfect texture, make sure not to overwork the dough when mixing in the flour, as this can make the cookies tough. If you find that your dough is too sticky to roll out, simply chill it for a bit longer until it firms up.
When melting the chocolate, be careful not to overheat it, as this can cause it to seize. If you prefer a thicker chocolate coating, you can dip the cookies twice, allowing the first layer to set before dipping again.
These cookies can be stored in an airtight container for up to a week, making them an excellent make-ahead option for your potluck.
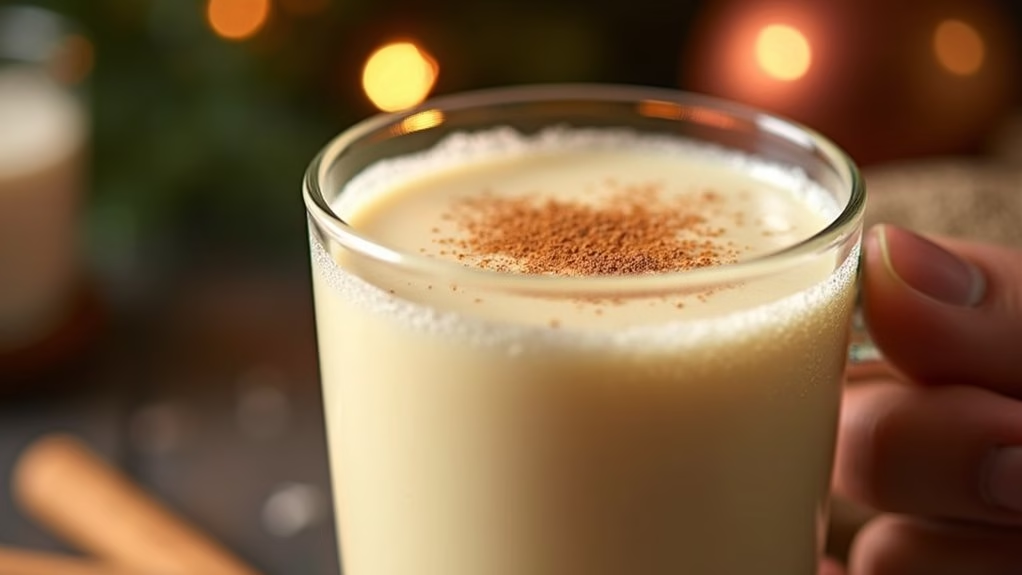
Classic Eggnog Punch
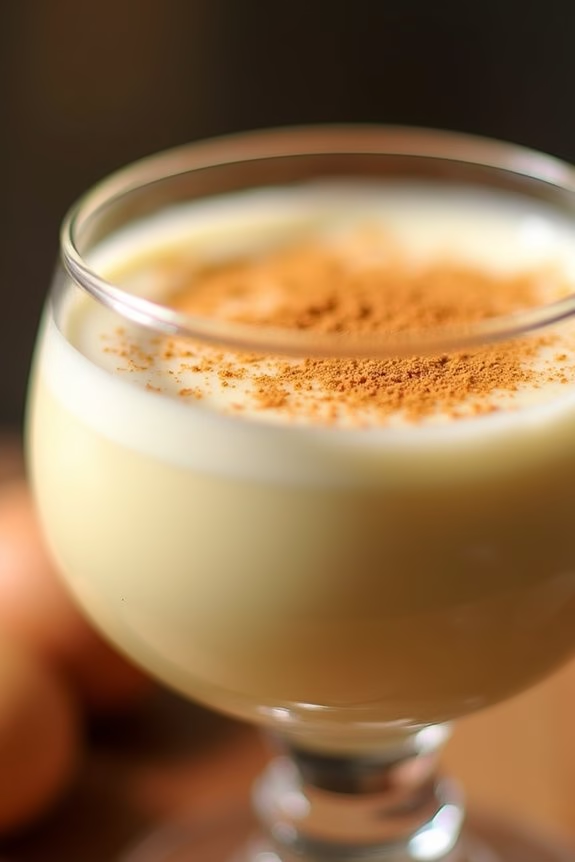
When it comes to festive gatherings, nothing says “holiday spirit” quite like a classic eggnog punch. This creamy, rich beverage has been a staple at Christmas parties for generations, bringing warmth and a touch of nostalgia to any occasion.
Whether you’re hosting an office potluck or a family get-together, this eggnog punch is sure to be a crowd-pleaser. With its smooth blend of milk, cream, sugar, and a hint of nutmeg, this punch is both decadent and invigorating, providing a perfect balance to the array of dishes typically found at holiday feasts.
The beauty of this eggnog punch lies in its simplicity and the ease with which it can be prepared, even at the final minute. It requires only a few ingredients and minimal effort, making it a convenient option for busy hosts.
Plus, it’s versatile enough to be enjoyed by itself or spiked with a splash of rum or bourbon for those who prefer a little extra kick. Serve it in a large punch bowl with a ladle, allowing your guests to help themselves, and watch as this delightful drink quickly becomes the star of your holiday spread.
Ingredients (Serving Size: 4-6 people):
- 4 cups whole milk
- 4 cups heavy cream
- 1 cup granulated sugar
- 1 tablespoon pure vanilla extract
- 1 teaspoon ground nutmeg
- 6 large eggs
- Optional: 1 cup dark rum or bourbon
- Garnish: Ground cinnamon or additional nutmeg
Cooking Instructions:
- Prepare the Egg Mixture: In a large mixing bowl, whisk together the eggs and sugar until well combined and slightly frothy. This will help to dissolve the sugar and create a smooth texture.
- Heat the Milk and Cream: In a large saucepan, combine the milk and heavy cream. Place the saucepan over medium heat and bring the mixture to a gentle simmer, stirring occasionally to prevent scorching.
- Combine the Mixtures: Slowly pour the hot milk and cream mixture into the egg mixture, whisking continuously to prevent the eggs from curdling. Once fully combined, return the entire mixture to the saucepan.
- Cook the Eggnog: Continue to cook the mixture over medium heat, stirring constantly, until it thickens slightly. This should take about 5-7 minutes. Be careful not to let it boil, as this can cause the eggs to curdle.
- Add Flavorings: Remove the saucepan from the heat and stir in the vanilla extract and ground nutmeg. If desired, add the rum or bourbon at this stage.
- Chill and Serve: Transfer the eggnog punch to a large bowl or pitcher and let it cool to room temperature. Once cooled, cover and refrigerate for at least 2 hours or until thoroughly chilled. Serve the eggnog in cups or glasses, garnished with a sprinkle of cinnamon or nutmeg.
Extra Tips:
To guarantee a perfectly smooth and velvety eggnog, always whisk the egg and sugar mixture thoroughly before combining it with the hot milk and cream. This will help to dissolve the sugar and create a homogenous mixture.
If you prefer a thicker consistency, consider adding an extra egg yolk or reducing the amount of milk slightly. For a non-alcoholic version, simply omit the rum or bourbon, or offer it on the side for guests to add to their liking.
Finally, confirm your eggnog is well-chilled before serving for the best flavor and texture.