

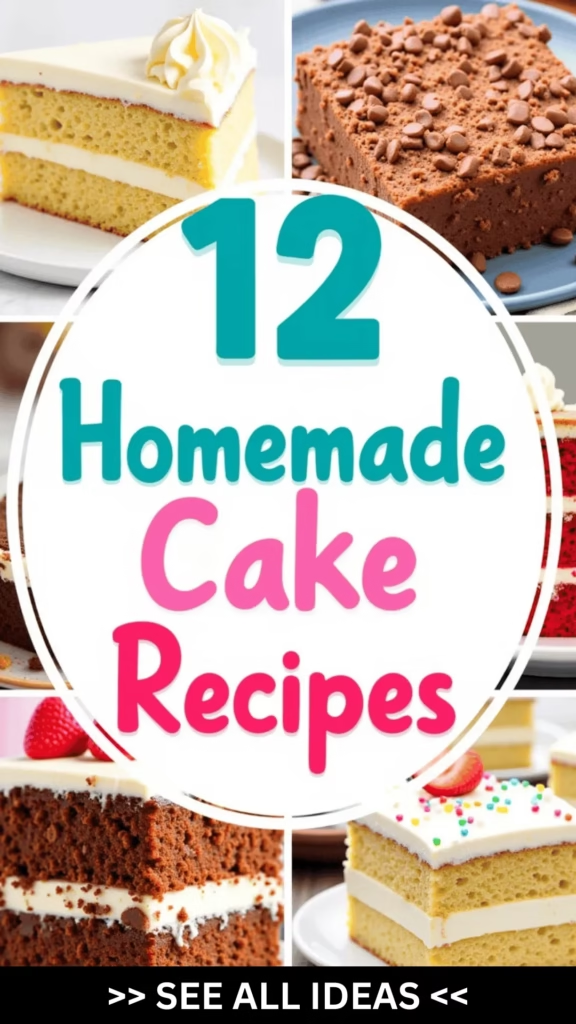
I’ve been on a sweet journey, exploring the world of homemade cakes, and I have 12 must-try recipes that promise to tantalize your taste buds.
Picture slicing into a rich, moist Classic Chocolate Cake or savoring the zest of a Lemon Drizzle Delight.
Each cake tells its own story, from the velvety embrace of Red Velvet Indulgence to the tropical escape of a Coconut Layered Fantasy.
Curious about how a Marble Swirl Perfection or an Almond Flour Elegance could transform your baking game?
Let’s uncover the secrets behind these delectable creations together.
Classic Chocolate Cake
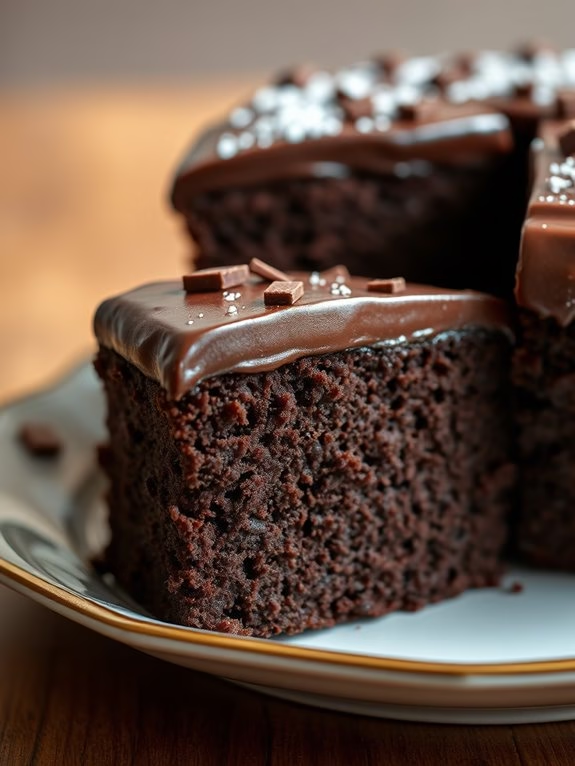
Classic Chocolate Cake
Indulge in the rich, moist decadence of a Classic Chocolate Cake, a homemade delight that never fails to impress. Perfect for birthdays, celebrations, or simply satisfying a chocolate craving, this cake is a timeless recipe that combines the perfect balance of cocoa flavor with a tender crumb. The simplicity of the ingredients allows the chocolate to shine, creating a dessert that’s as delicious as it’s beautiful.
Whether you’re an experienced baker or a novice in the kitchen, this recipe is straightforward and yields fantastic results every time. The secret to this cake’s moist texture lies in the correct proportion of ingredients and the careful mixing technique. The use of buttermilk not only adds a subtle tang but also enhances the cake’s richness, making each bite melt in your mouth.
Paired with a luscious chocolate frosting or a dusting of powdered sugar, this Classic Chocolate Cake is destined to become a family favorite. Follow this recipe to create a dessert that’s guaranteed to be the highlight of any occasion.
Ingredients (Serves 4-6):
- 1 3/4 cups all-purpose flour
- 3/4 cup unsweetened cocoa powder
- 1 1/2 teaspoons baking powder
- 1 1/2 teaspoons baking soda
- 1 teaspoon salt
- 2 cups granulated sugar
- 2 large eggs
- 1 cup buttermilk
- 1/2 cup vegetable oil
- 2 teaspoons vanilla extract
- 1 cup boiling water
Cooking Instructions:
- Preheat and Prepare Pans: Begin by preheating your oven to 350°F (175°C). Grease and flour two 9-inch round cake pans to guarantee easy removal of the cake layers once baked.
- Mix Dry Ingredients: In a large mixing bowl, sift together the flour, cocoa powder, baking powder, baking soda, and salt. Sifting helps to aerate the ingredients and removes any lumps, ensuring a smooth batter.
- Combine Wet Ingredients: In another bowl, combine the sugar, eggs, buttermilk, vegetable oil, and vanilla extract. Beat these ingredients together using an electric mixer on medium speed until the mixture is smooth and well blended.
- Incorporate Dry Ingredients: Gradually add the dry ingredients to the wet mixture, beating on low speed until just combined. Be careful not to overmix, as this can result in a dense cake.
- Add Boiling Water: Carefully stir in the boiling water until the batter is smooth and thin. This step is essential as the hot water helps dissolve the cocoa powder, enhancing the chocolate flavor.
- Bake the Cake: Divide the batter evenly between the prepared cake pans. Bake in the preheated oven for 30 to 35 minutes, or until a toothpick inserted into the center of the cakes comes out clean.
- Cool the Cakes: Remove the cakes from the oven and let them cool in the pans for about 10 minutes. Then, turn the cakes out onto wire racks to cool completely before frosting.
Extra Tips:
For an even more intense chocolate flavor, consider using high-quality cocoa powder. If you don’t have buttermilk on hand, you can make a substitute by adding 1 tablespoon of lemon juice or vinegar to a cup of milk and letting it sit for 5 minutes.
When frosting your cake, confirm that the cake layers are completely cool to prevent the frosting from melting. For added texture, you can sprinkle chocolate chips or shavings on top of the frosting. Enjoy your Classic Chocolate Cake with a scoop of vanilla ice cream or a dollop of whipped cream for a delightful treat.
Vanilla Bean Dream
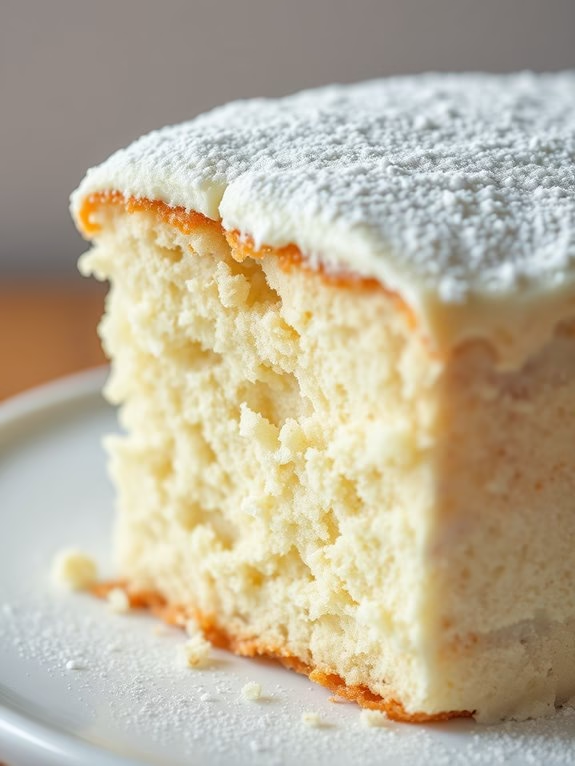
Vanilla Bean Dream
Indulge in the simple elegance of this homemade Vanilla Bean Dream cake, a timeless classic that brings the pure, rich flavor of vanilla to the forefront. This cake is perfect for any occasion, whether it’s a family gathering, a birthday celebration, or just a sweet treat to enjoy at home.
The combination of a moist, fluffy texture and the aromatic allure of real vanilla beans makes this cake an irresistible delight for both young and old. The Vanilla Bean Dream cake isn’t only delicious but also surprisingly easy to make.
With a few simple ingredients and a little bit of time, you can create a dessert that will impress your family and friends. This recipe yields a serving size of 4-6 people, guaranteeing that everyone gets to enjoy a generous slice of this delectable cake.
So, gather your ingredients and get ready to commence a baking adventure that will fill your kitchen with the heavenly scent of vanilla.
Ingredients (Serves 4-6 people):
- 1 cup unsalted butter, softened
- 1 and 1/2 cups granulated sugar
- 4 large eggs
- 1 tablespoon pure vanilla extract
- 1 vanilla bean, seeds scraped
- 2 and 1/2 cups all-purpose flour
- 2 and 1/2 teaspoons baking powder
- 1/2 teaspoon salt
- 1 cup whole milk
- 1/2 cup heavy cream
- Powdered sugar (for dusting)
Instructions:
- Preheat the Oven: Start by preheating your oven to 350°F (175°C). Grease and flour a 9×13 inch baking pan to prevent the cake from sticking.
- Cream the Butter and Sugar: In a large mixing bowl, beat the softened butter and granulated sugar together until the mixture is light and fluffy. This should take about 3-4 minutes and will help create a tender cake crumb.
- Add Eggs and Vanilla: Add the eggs one at a time, mixing well after each addition. Once combined, add the pure vanilla extract and the seeds from the vanilla bean. Mix until everything is fully incorporated and the batter is smooth.
- Combine Dry Ingredients: In a separate bowl, whisk together the all-purpose flour, baking powder, and salt. This will guarantee the leavening agents are evenly distributed.
- Alternate Adding Flour and Milk: Gradually add the dry ingredients to the wet mixture, alternating with the whole milk. Begin and end with the flour mixture, mixing just until combined after each addition. Over-mixing can result in a dense cake, so mix gently.
- Pour and Bake: Pour the batter into the prepared baking pan, spreading it evenly. Bake in the preheated oven for 30-35 minutes, or until a toothpick inserted into the center comes out clean.
- Cool and Serve: Allow the cake to cool in the pan for about 15 minutes before transferring it to a wire rack to cool completely. Dust the top with powdered sugar before serving for an elegant touch.
Extra Tips: To enhance the vanilla flavor, consider using high-quality vanilla extract and fresh vanilla beans. If you don’t have access to vanilla beans, you can substitute with an extra teaspoon of vanilla extract.
For a decorative finish, top the cake with a light vanilla glaze or a dollop of whipped cream. Adjust the baking time slightly if using different pan sizes, and remember that a slightly under-baked cake will continue to cook as it cools, guaranteeing a moist interior.
Red Velvet Indulgence
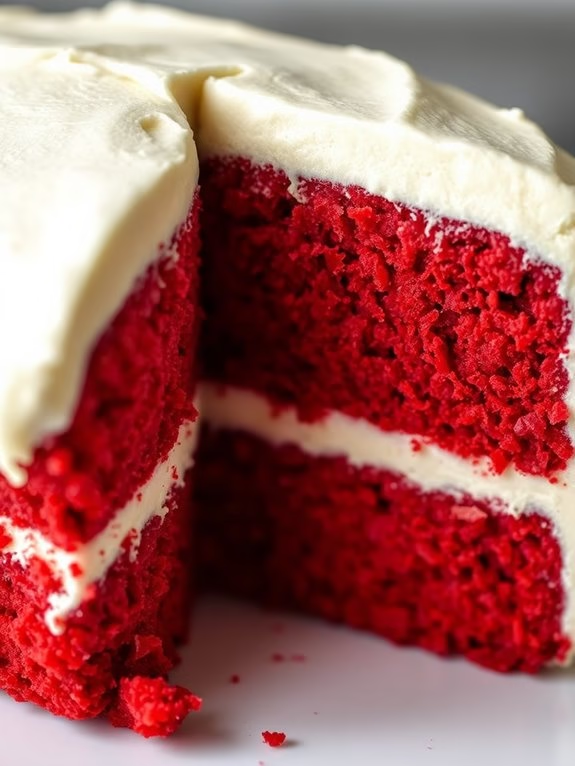
Red Velvet Indulgence is a classic cake that combines a rich, velvety texture with a hint of cocoa and a distinctive red color. This cake is perfect for special occasions or just when you want to indulge in something sweet and decadent. The combination of moist cake layers and smooth cream cheese frosting makes every bite a delightful experience.
This homemade Red Velvet Cake recipe is designed to serve 4-6 people and is perfect for a small gathering or family dessert. With simple ingredients and easy-to-follow instructions, you’ll be able to create a stunning cake that looks as good as it tastes. Gather your ingredients, preheat your oven, and get ready to enjoy a baking adventure that ends with a delicious treat.
Ingredients for Red Velvet Indulgence (Serves 4-6)
- 1 1/4 cups all-purpose flour
- 1 cup granulated sugar
- 1 tablespoon unsweetened cocoa powder
- 1/2 teaspoon baking soda
- 1/2 teaspoon baking powder
- 1/4 teaspoon salt
- 1/2 cup buttermilk
- 1/4 cup vegetable oil
- 1 large egg
- 1 teaspoon vanilla extract
- 1 teaspoon red food coloring
- 1/2 teaspoon white vinegar
- 1/2 cup unsalted butter, softened (for frosting)
- 8 ounces cream cheese, softened (for frosting)
- 2 cups powdered sugar (for frosting)
- 1 teaspoon vanilla extract (for frosting)
Cooking Instructions
- Preheat the Oven: Preheat your oven to 350°F (175°C). Grease two 8-inch round cake pans and line the bottoms with parchment paper for easy removal.
- Mix Dry Ingredients: In a large mixing bowl, sift together the flour, sugar, cocoa powder, baking soda, baking powder, and salt. This will guarantee that all dry ingredients are well combined and lump-free.
- Combine Wet Ingredients: In another bowl, whisk together the buttermilk, vegetable oil, egg, vanilla extract, and red food coloring. The mixture should be smooth and evenly colored.
- Mix the Batter: Gradually add the wet ingredients to the dry ingredients, stirring gently until just combined. Avoid over-mixing to maintain a tender cake texture.
- Add Vinegar: Stir in the white vinegar, which will react with the baking soda and enhance the cake’s texture and color.
- Bake the Cake: Divide the batter evenly between the prepared cake pans. Bake in the preheated oven for 20-25 minutes, or until a toothpick inserted into the center of the cakes comes out clean.
- Cool the Cakes: Allow the cakes to cool in the pans for 10 minutes, then remove them from the pans and let them cool completely on a wire rack.
- Prepare the Frosting: In a large bowl, beat the softened butter and cream cheese until smooth and creamy. Gradually add the powdered sugar, beating until the frosting is fluffy and well combined. Stir in the vanilla extract.
- Assemble the Cake: Place one cake layer on a serving plate and spread a generous amount of cream cheese frosting on top. Place the second cake layer on top and frost the top and sides of the cake.
- Serve: Slice and serve your Red Velvet Indulgence to delighted guests.
Extra Tips
When preparing Red Velvet Indulgence, make sure all ingredients are at room temperature before starting. This helps them combine more easily, resulting in a smoother batter and frosting.
Additionally, if you prefer a deeper red hue, you can adjust the amount of food coloring to your liking.
Finally, for a neater presentation, consider chilling the cake for 30 minutes after frosting; this will help the frosting set and make slicing easier.
Lemon Drizzle Delight
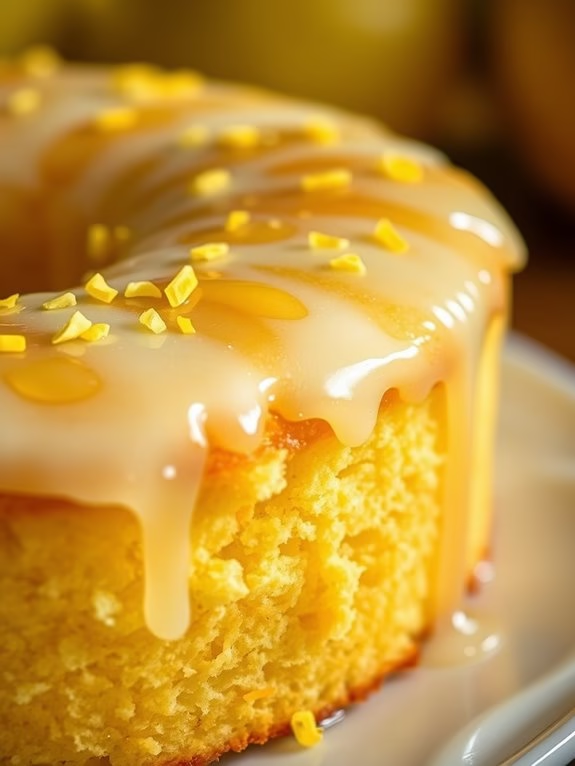
Lemon Drizzle Delight is a classic homemade cake that exudes a rejuvenating citrus flavor, perfect for a light dessert or a sweet afternoon treat. This cake is known for its moist, tender crumb and the zesty tang of lemon syrup that seeps into every bite. Paired with a hot cup of tea or coffee, Lemon Drizzle Delight is sure to bring a ray of sunshine to any occasion.
Whether you’re an experienced baker or a novice in the kitchen, this recipe is easy to follow and promises impressive results. The secret to the Lemon Drizzle Delight lies in the balance between the buttery cake and the sharp lemon drizzle that coats the surface. As the cake cools, the drizzle forms a glossy glaze, adding an extra layer of flavor and a delightful texture.
This recipe yields a cake perfect for serving 4-6 people, making it an ideal choice for a small gathering or family dessert. Let’s plunge into the ingredients and steps to create this scrumptious delight.
Ingredients for Lemon Drizzle Delight (Serves 4-6):
- 1 cup (225g) unsalted butter, softened
- 1 cup (200g) granulated sugar
- 4 large eggs
- 1 teaspoon vanilla extract
- 1 ½ cups (190g) all-purpose flour
- 1 teaspoon baking powder
- 1/4 teaspoon salt
- Zest of 2 lemons
- 1/4 cup (60ml) freshly squeezed lemon juice
- 1/2 cup (100g) granulated sugar (for the drizzle)
Cooking Instructions:
- Preheat and Prepare: Preheat your oven to 350°F (175°C). Grease and line a loaf pan with parchment paper, making sure the paper extends over the edges for easy removal.
- Cream Butter and Sugar: In a large bowl, cream together the softened butter and 1 cup of sugar using an electric mixer until the mixture is light and fluffy, about 3-5 minutes.
- Add Eggs and Vanilla: Add the eggs one at a time, beating well after each addition. Then, mix in the vanilla extract until fully incorporated.
- Combine Dry Ingredients: In a separate bowl, whisk together the flour, baking powder, and salt. Gradually add this to the wet ingredients, mixing until just combined.
- Incorporate Lemon Zest and Juice: Gently fold in the lemon zest and 1/4 cup of lemon juice until evenly distributed throughout the batter.
- Bake the Cake: Pour the batter into the prepared loaf pan, smoothing the top with a spatula. Bake in the preheated oven for 50-60 minutes, or until a toothpick inserted into the center comes out clean.
- Prepare the Drizzle: While the cake is baking, combine 1/2 cup of sugar with the remaining lemon juice in a small saucepan. Heat gently until the sugar dissolves, then set aside.
- Drizzle the Cake: Once the cake is out of the oven, allow it to cool slightly in the pan for about 10 minutes. Poke holes all over the top with a skewer or fork, then slowly pour the lemon syrup over the cake, allowing it to soak in.
- Cool and Serve: Carefully lift the cake out of the pan using the parchment paper and let it cool completely on a wire rack before serving.
Extra Tips:
To guarantee your Lemon Drizzle Delight is truly delightful, make sure your lemons are fresh and juicy for maximum flavor. When zesting the lemons, avoid the white pith as it can add bitterness.
If you prefer a sweeter glaze, you can add a touch more sugar to the drizzle. For a decorative touch, sprinkle some extra lemon zest over the top before serving. This cake also pairs beautifully with a dollop of whipped cream or a scoop of vanilla ice cream for an indulgent treat. Enjoy!
Carrot Cake Bliss
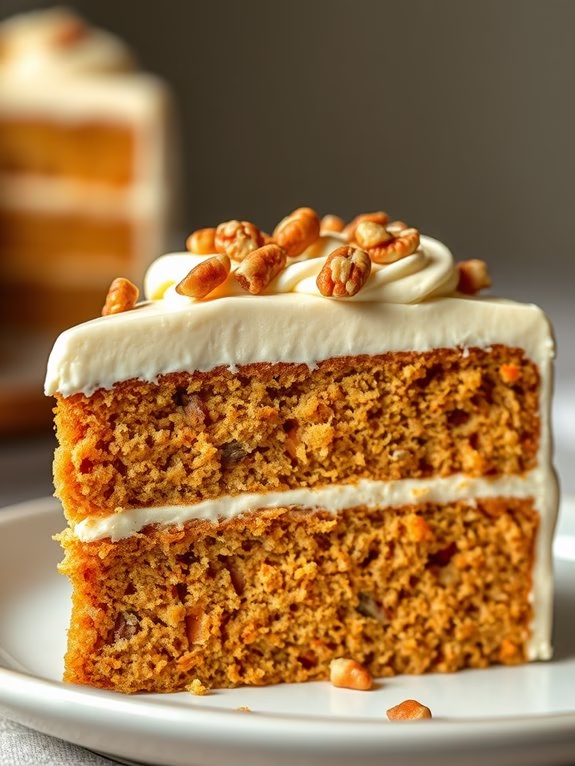
Carrot Cake Bliss is a delightful and moist cake that brings together the earthiness of carrots with the warmth of aromatic spices. This classic dessert is perfect for any occasion, whether it’s a family gathering or a special celebration.
The combination of grated carrots, crushed pineapple, and chopped nuts adds an irresistible texture, while a rich cream cheese frosting provides a perfect finishing touch that guarantees each bite is a taste of bliss.
This Carrot Cake Bliss recipe is designed to serve 4-6 people, making it an ideal choice for a small group. The recipe includes simple yet flavorful ingredients that you likely already have in your pantry.
Follow the instructions carefully to create a cake that’s as beautiful as it’s delicious. With its vibrant color and scrumptious taste, this carrot cake is sure to become a favorite in your dessert repertoire.
Ingredients (Serves 4-6):
- 1 1/2 cups all-purpose flour
- 1 cup granulated sugar
- 1/2 cup light brown sugar, packed
- 1 teaspoon baking powder
- 1 teaspoon baking soda
- 1/2 teaspoon salt
- 1 teaspoon ground cinnamon
- 1/2 teaspoon ground nutmeg
- 1/2 cup vegetable oil
- 3 large eggs
- 1 teaspoon vanilla extract
- 2 cups grated carrots
- 1/2 cup crushed pineapple, drained
- 1/2 cup chopped walnuts or pecans (optional)
- 1/2 cup raisins (optional)
Cream Cheese Frosting:
- 8 oz cream cheese, softened
- 1/2 cup unsalted butter, softened
- 2 cups powdered sugar
- 1 teaspoon vanilla extract
Instructions:
- Prepare the Oven and Pans: Preheat your oven to 350°F (175°C). Grease and flour a 9-inch round cake pan or line it with parchment paper to prevent the cake from sticking.
- Mix Dry Ingredients: In a large mixing bowl, whisk together the flour, granulated sugar, brown sugar, baking powder, baking soda, salt, cinnamon, and nutmeg until well combined.
- Combine Wet Ingredients: In a separate bowl, beat together the vegetable oil, eggs, and vanilla extract until smooth and well blended.
- Incorporate Carrots and Pineapple: Stir the grated carrots and crushed pineapple into the wet ingredients. Confirm that they’re evenly distributed throughout the mixture.
- Combine Wet and Dry Ingredients: Gradually add the wet mixture to the dry ingredients, stirring gently until just combined. Don’t overmix; the batter should be thick but smooth.
- Add Optional Ingredients: If using, fold in the chopped nuts and raisins to the batter.
- Bake the Cake: Pour the batter into the prepared cake pan and spread it evenly. Bake in the preheated oven for 35-40 minutes, or until a toothpick inserted in the center comes out clean. Allow the cake to cool in the pan for about 10 minutes before transferring it to a wire rack to cool completely.
- Prepare the Cream Cheese Frosting: In a medium bowl, beat the softened cream cheese and butter together until creamy and smooth. Gradually add the powdered sugar and vanilla extract, beating until the frosting is light and fluffy.
- Frost the Cake: Once the cake is completely cooled, spread the cream cheese frosting evenly over the top. Decorate with additional nuts or a sprinkle of cinnamon if desired.
Extra Tips: For best results, use freshly grated carrots rather than pre-packaged ones, as they provide more moisture and flavor. If you prefer a spicier cake, consider adding a pinch of ground cloves or ginger to the batter.
Allow the cake to cool fully before frosting to prevent the frosting from melting. Store any leftovers in the refrigerator to keep the cake fresh and the cream cheese frosting firm. Enjoy your Carrot Cake Bliss with a cup of tea or coffee for a truly delightful treat!
Coconut Layered Fantasy
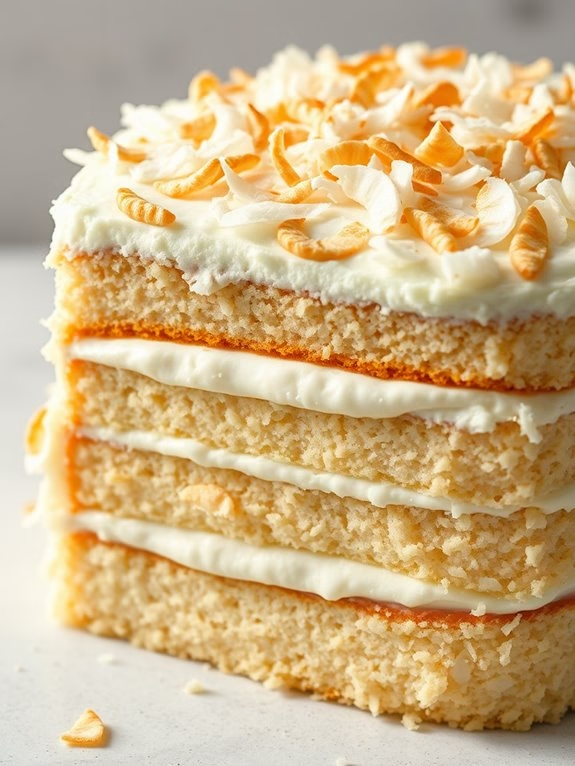
Indulge in the delightful flavors of a Coconut Layered Fantasy, a dessert that promises to transport your taste buds to a tropical paradise. This cake is perfect for any occasion, boasting layers of moist coconut sponge, silky coconut cream, and a topping of flaked coconut, creating a symphony of textures and flavors.
This homemade cake balances sweetness with the rich, nutty aroma of coconut, making it an irresistible treat for coconut lovers. The Coconut Layered Fantasy serves 4-6 people, making it an ideal choice for small gatherings or family celebrations.
Whether you’re hosting a cozy brunch or a festive dinner, this cake is sure to impress your guests with its beautiful presentation and delectable taste. Gather your ingredients and follow the step-by-step instructions to bring this tropical dream to life in your very own kitchen.
Ingredients:
- 2 cups all-purpose flour
- 1 ½ cups granulated sugar
- 1 cup unsweetened shredded coconut
- 1 cup coconut milk
- ½ cup unsalted butter, softened
- 3 large eggs
- 1 teaspoon vanilla extract
- 1 tablespoon baking powder
- ½ teaspoon salt
- 1 ½ cups heavy cream
- ½ cup powdered sugar
- 1 teaspoon coconut extract
- ½ cup sweetened flaked coconut (for topping)
Instructions:
1. Preheat and Prepare Pans: Preheat your oven to 350°F (175°C). Grease and flour two 8-inch round cake pans and line the bottoms with parchment paper to guarantee the cakes release easily after baking.
2. Mix Dry Ingredients: In a medium-sized bowl, whisk together the all-purpose flour, baking powder, and salt. This dry mixture will be added gradually to the wet ingredients, ensuring even distribution of the leavening agent throughout the batter.
3. Cream Butter and Sugar: In a large mixing bowl, beat the softened butter and granulated sugar together using an electric mixer on medium speed until light and fluffy, about 3-4 minutes. This process helps to incorporate air into the mixture, resulting in a lighter cake texture.
4. Add Eggs and Vanilla: Add the eggs one at a time, beating well after each addition. Mix in the vanilla extract to enhance the flavor profile of the cake.
5. Incorporate Dry Ingredients and Coconut Milk****: Gradually add the dry ingredients to the butter mixture, alternating with the coconut milk. Begin and end with the dry ingredients, mixing just until combined.
Fold in the unsweetened shredded coconut gently to guarantee a uniform batter.
6. Bake the Cakes: Divide the batter evenly between the prepared cake pans. Smooth the tops with a spatula and bake in the preheated oven for 25-30 minutes, or until a toothpick inserted into the center of the cakes comes out clean.
Allow the cakes to cool in the pans for 10 minutes before transferring them to a wire rack to cool completely.
7. Prepare Coconut Cream Filling: While the cakes are cooling, prepare the coconut cream filling by whipping the heavy cream, powdered sugar, and coconut extract together in a chilled bowl until stiff peaks form.
8. Assemble the Cake: Place one cake layer on a serving plate and spread a generous amount of coconut cream over the top. Place the second cake layer on top and cover the entire cake with the remaining coconut cream.
Guarantee that the sides and top are evenly coated.
9. Garnish with Flaked Coconut: Sprinkle the sweetened flaked coconut over the top of the cake, gently pressing it into the cream to adhere. This will add an extra layer of texture and flavor, making the cake visually appealing.
Extra Tips:
To enhance the coconut flavor, consider toasting the unsweetened shredded coconut before folding it into the batter. Simply spread it on a baking sheet and bake at 350°F (175°C) for about 5 minutes, stirring occasionally, until lightly golden.
Additionally, for a more exotic twist, you can add a tablespoon of rum or coconut liqueur to the cake batter or cream filling. Be sure to store any leftover cake in an airtight container in the refrigerator to maintain its freshness.
Marble Swirl Perfection
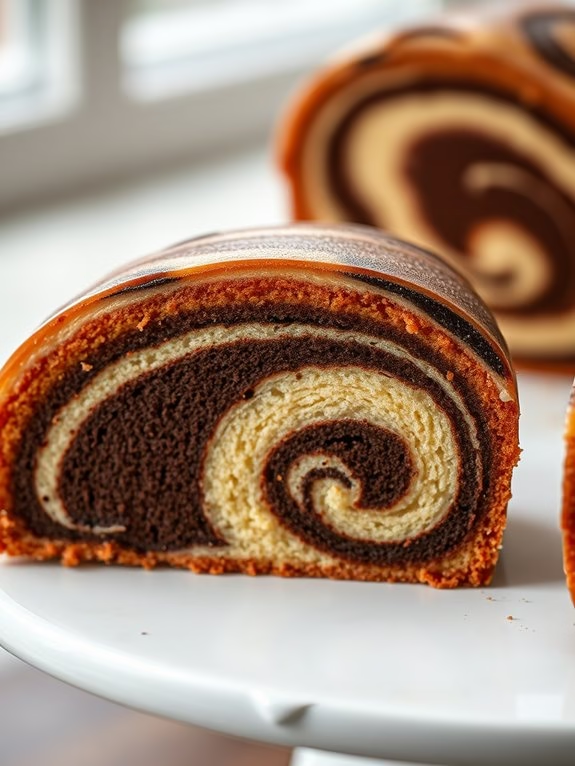
Homemade Cake Recipes: Marble Swirl Perfection****
Indulge in the classic elegance of Marble Swirl Perfection, a cake that combines the rich flavors of both vanilla and chocolate in a visually stunning swirl pattern. This delightful dessert is perfect for any occasion, offering a moist texture and a tantalizing taste that’s sure to impress friends and family alike.
Whether you’re a seasoned baker or new to the kitchen, this recipe is designed to guide you through creating a masterpiece with ease and confidence. The beauty of Marble Swirl Perfection lies in its simplicity and deliciously balanced flavors.
The key to achieving that perfect marble effect is in the gentle swirling of the two batters, creating intricate patterns that are revealed with each slice. This cake isn’t only a treat for the taste buds but also a feast for the eyes. Follow this straightforward recipe to serve 4-6 people, and enjoy the perfect combination of chocolate and vanilla in every bite.
Ingredients for Marble Swirl Perfection (Serves 4-6):
- 1 ¾ cups all-purpose flour
- 1 ½ teaspoons baking powder
- ½ teaspoon baking soda
- ½ teaspoon salt
- 1 cup granulated sugar
- ½ cup unsalted butter, softened
- 2 large eggs
- 1 teaspoon vanilla extract
- ¾ cup buttermilk
- ¼ cup unsweetened cocoa powder
- 2 tablespoons milk
Cooking Instructions:
- Preheat and Prepare: Preheat your oven to 350°F (175°C). Grease and flour a 9-inch round cake pan, guaranteeing all sides are well-coated to prevent sticking.
- Mix Dry Ingredients: In a medium bowl, whisk together the flour, baking powder, baking soda, and salt. Set aside for later use.
- Cream Butter and Sugar: In a large mixing bowl, cream together the softened butter and granulated sugar until light and fluffy, about 3-4 minutes.
- Add Eggs and Vanilla: Beat in the eggs one at a time, guaranteeing each one is fully incorporated before adding the next. Mix in the vanilla extract.
- Combine Wet and Dry Mixtures: Gradually add the dry ingredient mixture to the creamed butter and sugar, alternating with the buttermilk. Begin and end with the flour mixture, mixing until just combined.
- Divide Batter: Separate the batter into two bowls. To one bowl, add the cocoa powder and milk, stirring until fully blended and smooth.
- Create Marble Effect: Drop spoonfuls of both the vanilla and chocolate batters alternately into the prepared cake pan. Use a knife or skewer to gently swirl the batters together, creating a marbled effect. Be careful not to overmix.
- Bake the Cake: Place the pan in the preheated oven and bake for 30-35 minutes, or until a toothpick inserted into the center comes out clean. Allow the cake to cool in the pan for 10 minutes, then transfer it to a wire rack to cool completely.
Extra Tips:
For a more pronounced chocolate flavor, you can increase the amount of cocoa powder slightly, but remember to adjust the milk accordingly to maintain the batter’s consistency.
If you prefer a more subtle swirl, use fewer swirls when mixing the batters in the pan. To ascertain an even bake, make sure all ingredients are at room temperature before starting.
Once cooled, you can frost the cake with your favorite icing or enjoy it plain for a classic treat. Enjoy your Marble Swirl Perfection as a delightful end to any meal or as a sweet snack throughout the day!
Almond Flour Elegance
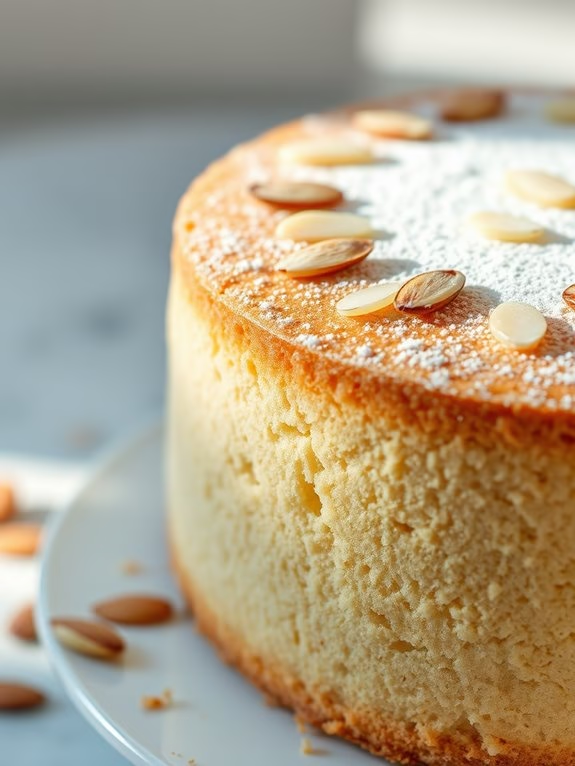
Almond Flour Elegance is a delightful twist on traditional cake recipes that brings together the nutty flavor of almond flour with a touch of elegance and sophistication. This cake is perfect for those who are seeking a gluten-free option without compromising on taste or texture. The almond flour gives the cake a rich, moist crumb, while the addition of almond extract intensifies its aromatic flavor.
Whether you’re hosting a dinner party or simply indulging in a sweet treat, this cake is sure to impress your guests with its unique taste and beautiful presentation. This recipe yields a cake that’s ideal for serving 4-6 people, making it a perfect choice for an intimate gathering or a family dessert.
The process is straightforward and doesn’t require any special equipment, which means you can whip up this delightful creation with ease. The combination of almond flour with a hint of vanilla and a touch of citrus zest elevates the cake to a new level of deliciousness.
Garnished with a dusting of powdered sugar or a drizzle of simple glaze, Almond Flour Elegance is a versatile cake that can be dressed up or enjoyed as is.
Ingredients:
- 2 cups almond flour
- 1/2 cup granulated sugar
- 1/4 cup unsalted butter, softened
- 3 large eggs
- 1 teaspoon almond extract
- 1 teaspoon vanilla extract
- 1/2 teaspoon baking powder
- 1/4 teaspoon salt
- Zest of 1 lemon
- Powdered sugar, for dusting (optional)
- Sliced almonds, for garnish (optional)
Instructions:
- Preheat the Oven: Start by preheating your oven to 350°F (175°C). Grease a 9-inch round cake pan with butter or non-stick spray, and line the bottom with parchment paper for easy removal.
- Mix Dry Ingredients: In a medium bowl, whisk together the almond flour, baking powder, and salt. This will guarantee even distribution of the leavening agent throughout the flour.
- Cream Butter and Sugar: In a large mixing bowl, beat the softened butter and granulated sugar together until the mixture is light and fluffy. This should take about 3-5 minutes using an electric mixer on medium speed.
- Add Eggs and Extracts: Add the eggs one at a time to the butter-sugar mixture, beating well after each addition. Then, mix in the almond extract, vanilla extract, and lemon zest until well combined.
- Combine Wet and Dry Ingredients: Gradually add the dry ingredients to the wet ingredients, mixing on low speed until just combined. Be careful not to overmix, as this can affect the cake’s texture.
- Bake the Cake: Pour the batter into the prepared cake pan, spreading it evenly with a spatula. Bake in the preheated oven for 25-30 minutes, or until a toothpick inserted into the center of the cake comes out clean.
- Cool and Decorate: Allow the cake to cool in the pan for 10 minutes before transferring it to a wire rack to cool completely. Once cooled, dust with powdered sugar and sprinkle with sliced almonds, if desired.
Extra Tips:
When making Almond Flour Elegance, remember that almond flour tends to brown quicker than regular flour, so keep a close eye on the cake as it bakes. If the top is browning too quickly, you can cover it loosely with aluminum foil.
Additionally, this cake can be served with a dollop of whipped cream or a scoop of vanilla ice cream for an extra touch of indulgence. For those who prefer a more pronounced citrus flavor, consider adding a tablespoon of freshly squeezed lemon juice to the batter.
Enjoy the delightful combination of flavors and textures in this elegant almond flour cake!
Strawberry Shortcake Sensation

Strawberry Shortcake Sensation
Enjoy a timeless dessert with our Strawberry Shortcake Sensation recipe, perfect for a summer gathering or a sweet treat to brighten up any day. This homemade cake is a delightful combination of light, fluffy shortcake, sweet and juicy strawberries, and a dollop of freshly whipped cream. With its vibrant colors and revitalizing taste, it’s sure to be a hit among your family and friends.
The beauty of this Strawberry Shortcake Sensation lies in its simplicity and the use of fresh ingredients. The shortcake itself is buttery and slightly crumbly, providing the perfect base for the sweet and tangy strawberries. Topped with a generous serving of whipped cream, each bite is a harmonious blend of flavors and textures. This recipe serves 4-6 people, making it ideal for a small gathering or a special family dessert.
Ingredients:
- 2 cups all-purpose flour
- 1/4 cup granulated sugar
- 1 tablespoon baking powder
- 1/2 teaspoon salt
- 1/2 cup cold unsalted butter, cubed
- 2/3 cup whole milk
- 1 teaspoon vanilla extract
- 1 pound fresh strawberries, hulled and sliced
- 1/4 cup granulated sugar (for strawberries)
- 1 cup heavy whipping cream
- 2 tablespoons powdered sugar
- 1 teaspoon vanilla extract (for whipped cream)
Cooking Instructions:
- Preheat the oven: Start by preheating your oven to 425°F (220°C). This guarantees that your shortcakes will bake evenly.
- Prepare the shortcake dough: In a large bowl, whisk together the flour, granulated sugar, baking powder, and salt. Add the cubed butter and use a pastry cutter or your fingers to work the butter into the flour mixture until it resembles coarse crumbs.
- Add wet ingredients: Stir in the milk and vanilla extract until the dough just comes together. Be careful not to overmix; the dough should be slightly sticky.
- Shape the shortcakes: Turn the dough out onto a lightly floured surface and gently pat it into a 1-inch thick rectangle. Use a biscuit cutter or a glass to cut out 6 rounds. Place them on a baking sheet lined with parchment paper.
- Bake the shortcakes: Bake in the preheated oven for 12-15 minutes, or until the tops are golden brown. Remove from the oven and let them cool on a wire rack.
- Prepare the strawberries: While the shortcakes are cooling, mix the sliced strawberries with the 1/4 cup of granulated sugar in a medium bowl. Let them sit for at least 10 minutes to macerate and release their juices.
- Whip the cream: In a chilled mixing bowl, whip the heavy cream with the powdered sugar and vanilla extract until soft peaks form.
- Assemble the shortcakes: Slice each shortcake in half horizontally. Spoon a generous amount of strawberries onto the bottom half, followed by a dollop of whipped cream. Place the top half of the shortcake over the whipped cream. Serve immediately.
Extra Tips:
For the best results, use fresh, ripe strawberries as they’ll provide the sweetest and juiciest flavor. If you prefer a less sweet dessert, you can reduce the amount of sugar added to the strawberries.
When whipping the cream, make sure your bowl and beaters are cold to achieve the perfect consistency quickly. For a creative twist, consider adding a splash of balsamic vinegar to the strawberries to enhance their natural sweetness.
Enjoy your Strawberry Shortcake Sensation with a scoop of vanilla ice cream for an extra indulgent treat.
Spiced Chai Wonder
Indulge your taste buds with a Spiced Chai Wonder, a delicious homemade cake that combines the rich, aromatic flavors of chai tea with the soft, moist texture of a perfectly baked cake. This dessert is perfect for any occasion, whether you’re hosting a cozy tea party or simply craving something special to accompany your afternoon coffee.
The warming spices of cinnamon, cardamom, and ginger create a comforting aroma that fills your kitchen as this cake bakes to perfection. The Spiced Chai Wonder not only captures the essence of a warm chai latte but also offers a delightful twist on traditional cake recipes. This cake is a wonderful way to incorporate spices into your baking routine, and its unique flavor profile is sure to impress your family and friends.
With a few simple ingredients and easy-to-follow steps, you can whip up this delightful treat in no time, serving 4-6 people who’ll savor every bite.
Ingredients
- 1 ½ cups all-purpose flour
- 1 cup granulated sugar
- ½ cup unsalted butter, softened
- 2 large eggs
- 1 teaspoon vanilla extract
- 1 teaspoon ground cinnamon
- ½ teaspoon ground cardamom
- ½ teaspoon ground ginger
- ¼ teaspoon ground cloves
- 1 teaspoon baking powder
- ½ teaspoon baking soda
- ¼ teaspoon salt
- ½ cup milk
- 2 tablespoons strong brewed chai tea or chai concentrate
Cooking Instructions
- Preheat the Oven: Begin by preheating your oven to 350°F (175°C). This guarantees the oven is hot and ready to bake your cake evenly.
- Prepare the Baking Pan: Grease a 9-inch round cake pan with butter or cooking spray. Dust lightly with flour, tapping out any excess, to prevent the cake from sticking.
- Mix Dry Ingredients: In a medium-sized bowl, whisk together the flour, baking powder, baking soda, salt, cinnamon, cardamom, ginger, and cloves. This combines the spices evenly throughout the flour.
- Cream Butter and Sugar: In a large mixing bowl, beat the softened butter and granulated sugar together until the mixture is light and fluffy. This should take about 3-4 minutes using an electric mixer on medium speed.
- Add Eggs and Vanilla: Add the eggs, one at a time, to the butter-sugar mixture, beating well after each addition. Mix in the vanilla extract until everything is fully incorporated.
- Combine Wet and Dry Ingredients: Gradually add the dry ingredient mixture to the wet ingredients, alternating with the milk, starting and ending with the dry ingredients. Mix until just combined to avoid overmixing.
- Incorporate Chai Flavor: Stir in the brewed chai tea or chai concentrate until well mixed. This will infuse the cake with a delightful chai flavor.
- Bake the Cake: Pour the batter into the prepared cake pan and smooth the top with a spatula. Bake in the preheated oven for 25-30 minutes or until a toothpick inserted into the center comes out clean.
- Cool and Serve: Allow the cake to cool in the pan for about 10 minutes before transferring it to a wire rack to cool completely. Serve warm or at room temperature.
Extra Tips
For an extra touch of sweetness and chai flavor, consider making a simple chai glaze by mixing powdered sugar with a bit more chai concentrate and drizzling it over the cooled cake.
Additionally, make sure the butter is at room temperature before creaming it with the sugar to achieve the perfect texture. If you prefer a stronger chai flavor, increase the amount of chai concentrate slightly, but be careful not to overpower the cake with too much liquid.
Enjoy your Spiced Chai Wonder with a cup of your favorite tea for a truly satisfying experience.
Matcha Green Tea Creation
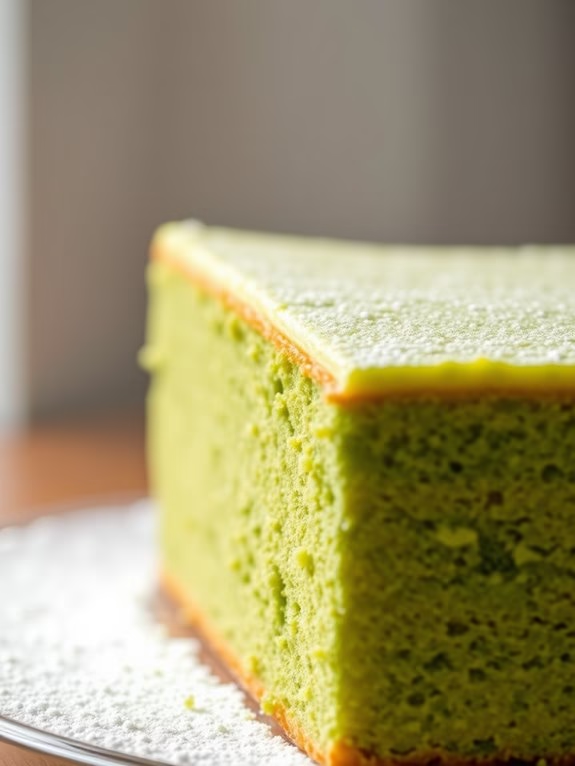
Matcha Green Tea Cake
Matcha Green Tea Cake is a delightful fusion of traditional cake with the unique flavor of matcha, a finely ground powder of specially grown and processed green tea leaves. This cake offers a delicate balance of sweetness and the earthy, aromatic essence of matcha, making it a perfect treat for those who enjoy a unique twist on classic desserts.
The vibrant green color also adds a visually appealing element to your dessert table, making it an excellent choice for special occasions or a lovely afternoon tea.
To achieve the best results with your Matcha Green Tea Cake, it’s vital to use high-quality matcha powder, as it greatly influences the flavor and color of the final product. This cake is moist, fluffy, and combines perfectly with a simple cream cheese frosting or a light dusting of powdered sugar.
Whether you’re a matcha enthusiast or trying it for the first time, this cake promises a delightful experience with its unique taste and elegant presentation.
Ingredients for 4-6 servings:
- 1 cup all-purpose flour
- 1 tablespoon matcha green tea powder
- 1 teaspoon baking powder
- 1/4 teaspoon salt
- 3/4 cup granulated sugar
- 2 large eggs
- 1/2 cup unsalted butter, melted
- 1/2 cup whole milk
- 1 teaspoon vanilla extract
- Optional: cream cheese frosting or powdered sugar for serving
Cooking Instructions:
- Preheat the Oven: Start by preheating your oven to 350°F (175°C). This guarantees that the cake bakes evenly once it’s placed inside.
- Prepare the Dry Ingredients: In a medium-sized mixing bowl, sift together the all-purpose flour, matcha green tea powder, baking powder, and salt. This step helps to remove any lumps and guarantees the ingredients are well combined.
- Mix Wet Ingredients: In another large bowl, beat together the granulated sugar and eggs until the mixture is light and fluffy. This should take about 2-3 minutes using an electric mixer on medium speed. Gradually add the melted butter, milk, and vanilla extract, mixing until everything is well incorporated.
- Combine Wet and Dry Ingredients: Slowly add the dry ingredient mixture to the wet ingredients, folding them together using a spatula. Be careful not to overmix; just combine until no streaks of flour remain.
- Prepare the Baking Pan: Grease a 9-inch round cake pan or line it with parchment paper. Pour the batter into the prepared pan, smoothing the top with a spatula to guarantee even baking.
- Bake the Cake: Place the pan in the preheated oven and bake for 25-30 minutes, or until a toothpick inserted into the center of the cake comes out clean.
- Cool and Serve: Once baked, remove the cake from the oven and let it cool in the pan for about 10 minutes. Transfer the cake to a wire rack to cool completely before serving. Optionally, top with cream cheese frosting or dust with powdered sugar for extra flavor.
Extra Tips:
When making Matcha Green Tea Cake, the quality of matcha powder is vital for the best flavor and color. Store matcha in an airtight container away from light and heat to preserve its freshness.
If you find the matcha flavor too strong, reduce the amount slightly for a milder taste. Additionally, make sure all ingredients are at room temperature before starting the recipe to guarantee the best texture and consistency of the cake.
Salted Caramel Temptation
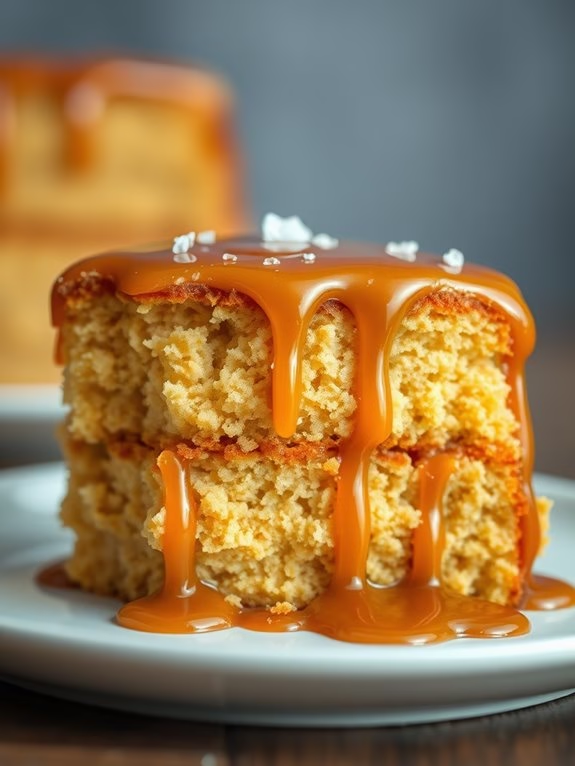
Salted Caramel Temptation
Indulge in the rich, buttery sweetness of this Salted Caramel Temptation, a homemade cake that promises to be the star of your dessert table. This delectable treat combines the smoothness of caramel with a hint of salt, creating a perfect balance of flavors that tantalize the taste buds. Ideal for any occasion, this cake isn’t only a treat for the palate but also a feast for the eyes, with its golden layers and glossy caramel drizzle.
This recipe yields a cake that serves 4-6 people, making it perfect for small gatherings. The layers of soft, moist cake are infused with caramel essence, and a generous drizzle of salted caramel sauce elevates the dessert to new heights of indulgence. To achieve the perfect texture and flavor, it’s important to follow each step carefully, guaranteeing that the caramel is cooked to perfection and the cake layers are baked to a fluffy consistency.
Ingredients:
- 1 ½ cups all-purpose flour
- 1 cup granulated sugar
- ½ cup unsalted butter, softened
- 2 large eggs
- 1 teaspoon vanilla extract
- ½ cup buttermilk
- ½ teaspoon baking powder
- ½ teaspoon baking soda
- ¼ teaspoon salt
For the Salted Caramel Sauce:
- 1 cup granulated sugar
- 6 tablespoons unsalted butter, cubed
- ½ cup heavy cream
- 1 teaspoon sea salt
Instructions:
1. Preheat the Oven: Begin by preheating your oven to 350°F (175°C). Grease and flour two 8-inch round cake pans to prevent sticking.
2. Prepare the Cake Batter: In a large bowl, cream together the softened butter and sugar until light and fluffy. Beat in the eggs one at a time, then stir in the vanilla extract.
3. Combine Dry Ingredients: In a separate bowl, whisk together the flour, baking powder, baking soda, and salt. Gradually add the dry ingredients to the creamed mixture, alternating with the buttermilk, beginning and ending with the flour mixture. Mix until just combined.
4. Bake the Cake: Divide the batter evenly between the prepared cake pans. Bake in the preheated oven for 20-25 minutes, or until a toothpick inserted into the center of the cakes comes out clean. Allow the cakes to cool in the pans for 10 minutes, then turn them out onto a wire rack to cool completely.
5. Make the Salted Caramel Sauce: In a medium saucepan over medium heat, melt the granulated sugar, stirring constantly until it turns into a smooth amber-colored liquid. Add the butter and stir until melted and combined.
Slowly pour in the heavy cream while stirring, being cautious of any splatters. Allow the mixture to boil for about 1 minute. Remove from heat and stir in the sea salt. Let it cool before using.
6. Assemble the Cake: Place one cake layer on a serving plate. Spread a thin layer of salted caramel sauce over it. Place the second cake layer on top and drizzle the remaining salted caramel sauce over the top, allowing it to drip down the sides.
Extra Tips:
To guarantee a smooth caramel sauce, keep stirring the sugar consistently as it melts to prevent burning. If the caramel seizes up when you add the cream, simply return it to low heat and stir until smooth again.
For an added touch, garnish the cake with a sprinkle of sea salt or a few caramel candies for presentation. When cutting the cake, use a warm knife for clean slices. Enjoy your Salted Caramel Temptation with a scoop of vanilla ice cream for the ultimate dessert experience.