

Every Christmas, it feels like I’m balancing the joy of the season with the whirlwind of hosting. That’s why make-ahead recipes have become my go-to solution. Picture a spread featuring classic deviled eggs, colorful antipasto skewers, and the comforting scent of honey-glazed ham sliders. These dishes bring ease and happiness to holiday gatherings. Ready to simplify your festive preparations? Let’s discover these wonderful recipes together.
Classic Deviled Eggs With a Twist

Deviled eggs are a beloved classic at any gathering, especially during the festive Christmas season. This version adds an unexpected twist to the traditional recipe, making them a standout favorite at any potluck. By incorporating a hint of smoky chipotle and a sprinkle of crispy bacon, these deviled eggs become not only a creamy and tangy delight but also a savory and spicy surprise.
They’re perfect for preparing ahead of time, guaranteeing you have one less thing to worry about on the day of your potluck event. This recipe is designed to serve 4-6 people, making it an ideal size for a small gathering or as part of a larger spread.
These deviled eggs can be made a day in advance and stored in the refrigerator until it’s time to serve, allowing the flavors to meld together beautifully. With their vibrant filling and garnished tops, they’re sure to add a festive touch to your table.
Ingredients:
- 6 large eggs
- 3 tablespoons mayonnaise
- 1 teaspoon Dijon mustard
- 1 teaspoon white vinegar
- 1/4 teaspoon salt
- 1/4 teaspoon black pepper
- 1/2 teaspoon chipotle chili powder
- 2 strips of crispy bacon, crumbled
- Chopped chives or parsley for garnish
Instructions:
- Boil the Eggs: Place the eggs in a single layer in a saucepan and cover them with water. Bring the water to a rolling boil over medium-high heat. Once boiling, cover the saucepan, remove it from heat, and let the eggs sit for 10-12 minutes.
- Cool and Peel the Eggs: After the eggs have cooked, transfer them to a bowl of ice water to cool for about 5 minutes. Gently tap each egg on a hard surface to crack the shell, then peel it off.
- Prepare the Filling: Slice each egg in half lengthwise. Carefully remove the yolks and place them in a medium-sized bowl. Mash the yolks with a fork until they reach a fine crumb-like consistency.
- Mix the Ingredients: Add mayonnaise, Dijon mustard, white vinegar, salt, black pepper, and chipotle chili powder to the mashed yolks. Mix thoroughly until the mixture is smooth and creamy.
- Fill the Egg Whites: Use a small spoon or a piping bag to fill each egg white half with the yolk mixture. Confirm the filling is evenly distributed among all the egg halves.
- Garnish and Serve: Top each deviled egg with a sprinkle of crumbled bacon and a few chopped chives or parsley. Serve immediately or refrigerate until ready to serve.
Extra Tips:
To guarantee your deviled eggs are visually appealing, try using a piping bag with a star tip to fill the egg whites for a decorative touch. If you don’t have chipotle chili powder, smoked paprika can be a good substitute for a milder smoky flavor.
When boiling the eggs, adding a pinch of salt to the water can help prevent cracking and make peeling easier. Finally, if you’re making these ahead of time, it’s best to add the bacon and garnish just before serving to keep them crisp and fresh.
Easy Antipasto Skewers
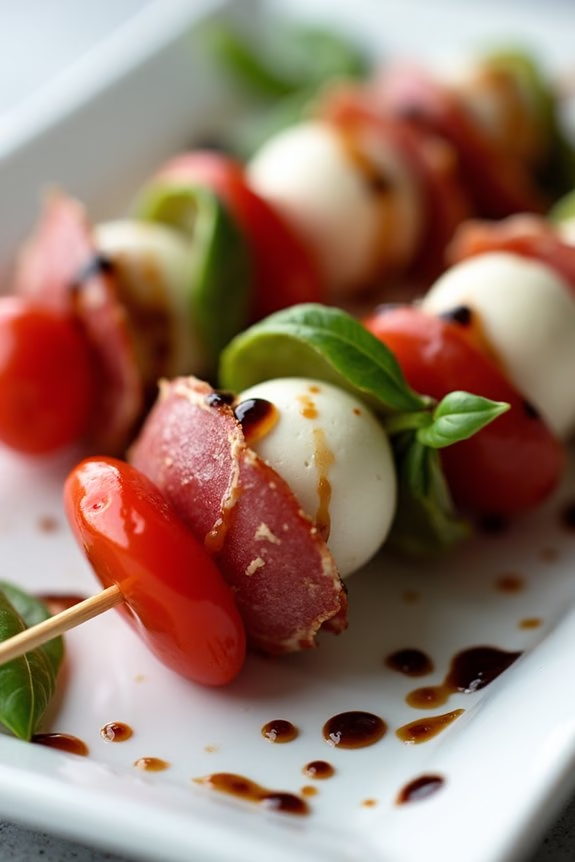
Easy Antipasto Skewers are the perfect make-ahead dish for your Christmas potluck, bringing a delightful combination of vibrant colors and flavors to your holiday table.
These skewers are a no-cook appetizer that can be assembled quickly and easily, making them ideal for busy holiday preparations. The combination of cured meats, cheeses, olives, and vegetables offers a variety of tastes and textures that will please any crowd. Not only are they visually appealing, but they also allow guests to enjoy a hearty, satisfying bite without the need for utensils.
The beauty of Easy Antipasto Skewers lies in their simplicity and versatility. You can customize them according to your personal preferences or dietary needs, guaranteeing that everyone at your gathering has something to enjoy.
They can be prepared ahead of time and stored in the refrigerator until party time, giving you one less thing to worry about on the day of your event. Plus, they travel well, making them a convenient option if you’re bringing a dish to someone else’s home.
Ingredients for 4-6 servings:
- 12 cherry tomatoes
- 12 mozzarella balls (bocconcini)
- 12 slices of salami
- 12 slices of prosciutto
- 12 marinated artichoke hearts
- 12 pitted olives (green or black)
- 12 basil leaves
- 12 wooden skewers (6-8 inches long)
Cooking Instructions:
1. Prepare Ingredients: Begin by draining the mozzarella balls and marinated artichoke hearts to remove excess liquid. Pat them dry with a paper towel to confirm they don’t make the skewers soggy. Rinse and dry the cherry tomatoes and fresh basil leaves.
2. Assemble Skewers: Take one wooden skewer and begin by sliding on one cherry tomato, followed by a mozzarella ball. Next, fold a slice of salami in half and thread it onto the skewer. Add an olive, followed by a folded slice of prosciutto, and then a marinated artichoke heart. Finish with a fresh basil leaf.
Repeat this process for each skewer until all ingredients are used.
3. Arrange and Store: Once all the skewers are assembled, arrange them on a serving platter. If you’re not serving immediately, cover the platter with plastic wrap and refrigerate until ready to serve. These skewers can be made up to 24 hours in advance.
4. Serve: Just before serving, drizzle a light balsamic glaze over the skewers for an extra burst of flavor, if desired. Allow them to sit at room temperature for about 10 minutes before serving to let the flavors meld together.
Extra Tips:
When choosing ingredients, opt for high-quality deli meats and fresh produce for the best flavor. If you prefer a vegetarian version, you can substitute the meats with roasted vegetables like bell peppers or zucchini.
Wooden skewers can sometimes have rough edges, so it’s a good idea to inspect them before use and sand down any splinters. If you’re transporting the skewers, secure them in a container to prevent them from moving around and becoming disassembled.
Enjoy experimenting with different ingredients and make this recipe your own!
Creamy Spinach Artichoke Dip

Creamy Spinach Artichoke Dip is a classic and crowd-pleasing appetizer that’s perfect for any Christmas potluck. This rich and flavorful dip combines the earthy taste of spinach with the zesty tang of artichokes, all enveloped in a creamy cheese blend.
It’s easy to prepare ahead of time, making it a convenient choice for holiday gatherings. Serve it with crispy baguette slices, tortilla chips, or an assortment of fresh veggies for a delightful starter that your guests will love.
To make this delicious dip, you’ll want to use a combination of cream cheese, sour cream, and Parmesan cheese for that perfect creamy texture and umami flavor. The artichoke hearts provide a hearty consistency, while the spinach adds a pop of color and nutrients.
This recipe yields enough for 4-6 people, making it ideal for a small gathering or as part of a larger spread.
Ingredients (serving size: 4-6 people):
- 1 cup frozen chopped spinach, thawed and drained
- 1 cup marinated artichoke hearts, drained and chopped
- 8 oz cream cheese, softened
- 1/2 cup sour cream
- 1/2 cup mayonnaise
- 1 cup grated Parmesan cheese
- 1 cup shredded mozzarella cheese
- 2 cloves garlic, minced
- 1/2 teaspoon salt
- 1/4 teaspoon black pepper
- 1/4 teaspoon red pepper flakes (optional)
Instructions:
- Preheat Oven: Preheat your oven to 350°F (175°C) to guarantee it’s ready for baking the dip.
- Prepare the Spinach: Squeeze the thawed spinach using a clean cloth or paper towels to remove excess water. This prevents the dip from becoming too watery.
- Mix Base Ingredients: In a large mixing bowl, combine the softened cream cheese, sour cream, and mayonnaise. Stir until smooth and well-blended.
- Add Vegetables: Fold in the chopped artichoke hearts, drained spinach, minced garlic, and half of the Parmesan and mozzarella cheeses. Mix well to guarantee an even distribution of ingredients.
- Season: Add salt, black pepper, and red pepper flakes to the mixture. Adjust the seasoning to taste, keeping in mind the saltiness of the cheese.
- Transfer to Baking Dish: Spoon the mixture into a greased baking dish, smoothing out the top with a spatula.
- Top with Cheese: Sprinkle the remaining Parmesan and mozzarella cheeses evenly over the top of the dip.
- Bake: Place the baking dish in the preheated oven and bake for 25-30 minutes, or until the top is golden brown and bubbly.
- Cool Slightly: Allow the dip to cool for a few minutes before serving to enhance the flavors and prevent burning.
Extra Tips:
For a make-ahead option, prepare the dip up to the point of baking, then cover and refrigerate for up to 24 hours. When ready to serve, bake as directed, but add an extra 5-10 minutes to the baking time if the dip is cold from the fridge.
Additionally, for a smoky flavor, consider adding a few dashes of smoked paprika or substituting some of the mozzarella with smoked gouda. This dish can also be made gluten-free by guaranteeing all ingredients are certified gluten-free.
Honey Glazed Ham Sliders

Honey Glazed Ham Sliders are a delightful and easy-to-make dish that’s perfect for a Christmas potluck. These sliders combine the rich, savory flavor of honey-glazed ham with the soft, pillowy texture of slider buns, making them an irresistible addition to any festive gathering.
The sweetness of the honey glaze perfectly complements the saltiness of the ham, creating a balanced and flavorful bite that will have your guests coming back for more. Moreover, these sliders can be prepared ahead of time, allowing you to enjoy the holiday festivities without the stress of last-minute cooking.
Ideal for serving a crowd, this recipe yields enough sliders to satisfy 4-6 people. These sliders aren’t only delicious but also versatile, as you can customize them with your favorite condiments and toppings.
Whether you’re hosting a large gathering or attending a potluck, Honey Glazed Ham Sliders are sure to be a hit. The preparation is straightforward, which makes this dish an excellent choice for both novice and experienced cooks alike.
Ingredients (Serves 4-6):
- 1 pound of honey glazed ham, thinly sliced
- 12 slider buns
- 6 tablespoons of honey
- 4 tablespoons of Dijon mustard
- 8 slices of Swiss cheese
- 4 tablespoons of unsalted butter, melted
- 2 tablespoons of mayonnaise
- 1 tablespoon of poppy seeds
- 1 teaspoon of garlic powder
- 1 teaspoon of onion powder
- Salt and pepper to taste
Cooking Instructions:
- Preheat the Oven: Begin by preheating your oven to 350°F (175°C) to make sure it’s ready for baking once the sliders are assembled.
- Prepare the Slider Buns: Slice the slider buns in half horizontally and place the bottom halves in a 9×13-inch baking dish. Set the tops aside.
- Assemble the Sliders: Spread a thin layer of mayonnaise on the bottom half of each bun. Layer the ham slices evenly over the mayonnaise. Follow with a slice of Swiss cheese on each slider.
- Mix the Honey Mustard Glaze: In a small bowl, combine the honey and Dijon mustard. Stir until well mixed. Drizzle half of this mixture over the ham and cheese layers.
- Top the Sliders: Place the top halves of the slider buns over the ham and cheese layers, pressing down gently to secure them.
- Prepare the Butter Mixture: In another bowl, mix the melted butter, poppy seeds, garlic powder, onion powder, salt, and pepper. Stir until the ingredients are well combined.
- Apply the Butter Mixture: Brush the tops of the slider buns generously with the butter mixture. This will enhance the flavor and help the buns achieve a golden, crispy finish.
- Bake the Sliders: Cover the baking dish with aluminum foil and bake in the preheated oven for 15 minutes. Then, remove the foil and bake for an additional 10 minutes, or until the cheese is melted and the tops of the buns are golden brown.
- Serve: Once baked, remove the sliders from the oven and let them cool slightly before serving. They can be served warm or at room temperature.
Extra Tips: If you want to add an extra layer of flavor, consider incorporating a thin slice of apple or a spoonful of cranberry sauce into each slider. This will add a touch of freshness and acidity that complements the richness of the ham and cheese.
Additionally, these sliders can be prepared a day in advance and stored in the refrigerator. When you’re ready to serve, simply reheat them in the oven at 350°F (175°C) until warmed through. This make-ahead option makes Honey Glazed Ham Sliders an excellent choice for stress-free holiday entertaining.
Savory Sausage and Cheese Balls

Savory Sausage and Cheese Balls are a delightful addition to any Christmas potluck, combining the rich flavors of sausage and cheese into one irresistible bite-sized treat.
These make-ahead wonders are perfect for busy holiday hosts, as they can be prepared and frozen in advance, then baked fresh on the day of the event. The combination of juicy sausage, sharp cheddar cheese, and a hint of spice offers a satisfying and savory snack that’s sure to satisfy a crowd.
The key to these delicious bites is using quality ingredients and a well-balanced spice mix to bring out the best flavors. Perfect as an appetizer or a party snack, these sausage and cheese balls are easy to make and require minimal preparation.
Once baked to golden perfection, they can be served hot or at room temperature, making them a versatile choice for any festive gathering. Here’s how to create these savory treats for a serving size of 4-6 people:
Ingredients:
- 1 pound ground sausage (mild or spicy, depending on preference)
- 2 cups shredded sharp cheddar cheese
- 1 1/2 cups all-purpose flour
- 1 teaspoon baking powder
- 1/2 teaspoon salt
- 1/4 teaspoon garlic powder
- 1/4 teaspoon onion powder
- 1/4 teaspoon black pepper
- 1/4 cup milk
Cooking Instructions:
- Preheat the oven: Start by preheating your oven to 350°F (175°C). This guarantees that your sausage and cheese balls will cook evenly.
- Mix dry ingredients: In a large mixing bowl, whisk together the all-purpose flour, baking powder, salt, garlic powder, onion powder, and black pepper until well combined.
- Combine sausage and cheese: In another bowl, mix the ground sausage and shredded cheddar cheese until evenly distributed. It’s important to make sure the sausage is broken up and mixed thoroughly with the cheese.
- Form the dough: Gradually add the dry ingredient mixture to the sausage and cheese, mixing well with your hands or a sturdy spatula. Slowly pour in the milk as you mix, until the mixture comes together into a dough that holds its shape.
- Shape the balls: Using your hands, roll the mixture into 1-inch balls and place them on a baking sheet lined with parchment paper. Space them about 1 inch apart to allow for even cooking.
- Bake: Place the baking sheet in the preheated oven and bake for 20-25 minutes, or until the sausage balls are golden brown and cooked through. Check for doneness by cutting into one to confirm the sausage is no longer pink.
- Cool and serve: Allow the sausage balls to cool for a few minutes on the baking sheet before transferring them to a serving platter. Serve warm or at room temperature.
Extra Tips: For an extra flavor boost, consider adding a pinch of cayenne pepper or a teaspoon of Worcestershire sauce to the mixture.
If you’re planning to make these ahead of time, shape the sausage balls and freeze them on the baking sheet. Once frozen, transfer them to an airtight container. When ready to bake, no need to thaw; simply add a few extra minutes to the baking time.
Enjoy the ease and delight of these savory sausage and cheese balls at your next holiday gathering!
Festive Cranberry Brie Bites
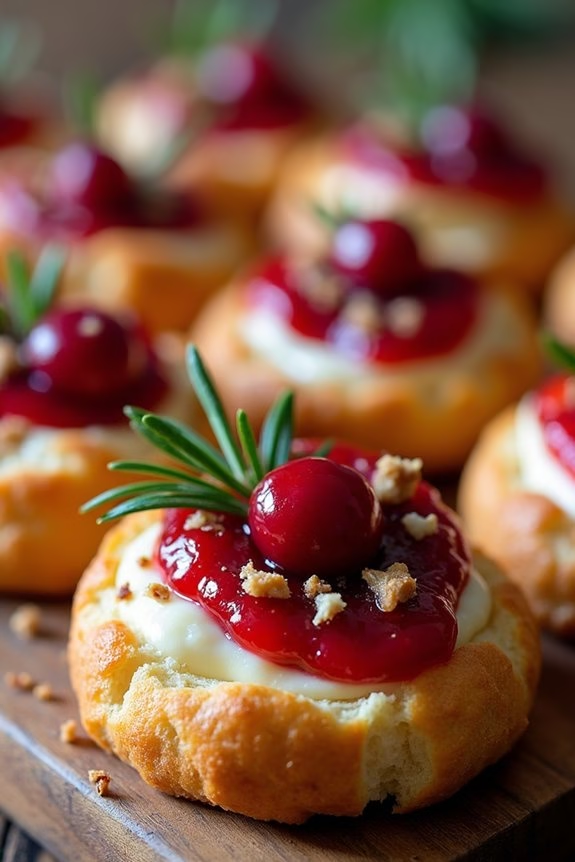
The holiday season is a time for celebration and coming together with friends and family. Whether you’re hosting a Christmas potluck or attending one, having a dish that’s both delicious and easy to prepare is key. Festive Cranberry Brie Bites are the perfect solution, offering a delightful combination of sweet and savory flavors in a bite-sized package.
These little treats are sure to impress your guests with their elegant appearance and delectable taste, making them a must-have addition to your holiday menu.
These bites aren’t only visually appealing with their vibrant cranberry topping but also incredibly simple to prepare ahead of time. The creamy brie cheese pairs beautifully with the tartness of the cranberries, all encased in crisp, flaky puff pastry. This recipe is designed to serve 4-6 people, making it an ideal choice for a small gathering or as part of a larger spread.
The best part? You can prepare them in advance and just pop them into the oven when you’re ready to serve, allowing you to enjoy the festivities without spending too much time in the kitchen.
Ingredients (Serves 4-6):
- 1 sheet of puff pastry, thawed
- 8 ounces of brie cheese
- 1/2 cup cranberry sauce (store-bought or homemade)
- 1/4 cup chopped pecans
- 1 tablespoon fresh rosemary, finely chopped
- 1 egg (for egg wash)
Instructions:
- Preheat the Oven: Start by preheating your oven to 375°F (190°C) to guarantee it’s hot and ready to bake the bites to perfection.
- Prepare the Puff Pastry: Roll out the thawed puff pastry on a lightly floured surface. Cut the pastry into squares approximately 2×2 inches in size. This should yield around 12 squares, perfect for a small gathering.
- Prepare the Brie: Cut the brie cheese into small cubes, roughly 1/2 inch each. This allows the cheese to melt evenly within the pastry.
- Assemble the Bites: Place each puff pastry square into the cups of a mini muffin tin, gently pressing them to fit. Add a cube of brie cheese into each pastry cup.
- Add the Toppings: Spoon about a teaspoon of cranberry sauce on top of the brie in each cup. Sprinkle a few chopped pecans and a pinch of rosemary over the cranberry sauce for added flavor and crunch.
- Egg Wash: Beat the egg in a small bowl and brush the edges of the puff pastry with the egg wash. This helps the pastry achieve a beautiful golden-brown color as it bakes.
- Bake: Place the muffin tin in the preheated oven and bake for 15-20 minutes, or until the pastry is golden and puffed, and the cheese is melted and bubbly.
- Cool and Serve: Allow the bites to cool for a few minutes before removing them from the tin. Serve warm for the best texture and flavor.
Extra Tips: For an extra touch of sweetness, consider drizzling a bit of honey over the cranberry topping before baking.
Additionally, if you’re preparing these bites ahead of time, you can assemble them and store them in the refrigerator until you’re ready to bake. Just make certain they’re brought to room temperature before placing them in the oven. This will help the puff pastry rise evenly and achieve its signature flakiness.
Make-Ahead Mashed Potato Casserole

Make-Ahead Mashed Potato Casserole is a delightful and comforting dish that’s perfect for your Christmas potluck. This creamy, cheesy casserole can be prepared in advance, making it a stress-free option for your holiday gathering. The rich flavors of butter, cream cheese, and cheddar combine with the fluffy texture of mashed potatoes to create a dish that’s both satisfying and crowd-pleasing.
This casserole not only saves you time on the day of the event but also guarantees that your potatoes are perfectly seasoned and delicious. Ideal for serving 4-6 people, this dish can be made a day or two ahead and simply baked before serving. The casserole is topped with a crisp, golden layer of cheese that adds a delightful contrast to the creamy potatoes beneath.
Whether served as a side dish or a main vegetarian option, this Make-Ahead Mashed Potato Casserole is sure to impress your guests and leave everyone asking for seconds.
Ingredients for 4-6 servings:
- 3 pounds russet potatoes, peeled and cubed
- 1/2 cup unsalted butter, softened
- 8 ounces cream cheese, softened
- 1/2 cup sour cream
- 1/2 cup whole milk
- 1 teaspoon garlic powder
- 1 teaspoon onion powder
- Salt and pepper to taste
- 1 1/2 cups shredded cheddar cheese, divided
- 2 tablespoons chopped fresh chives (optional)
Cooking Instructions:
- Prepare the Potatoes: In a large pot, add the cubed potatoes and cover them with cold water. Add a pinch of salt and bring to a boil over medium-high heat. Cook the potatoes for 15-20 minutes, or until they’re fork-tender.
- Mash the Potatoes: Drain the potatoes thoroughly and return them to the pot. Add the softened butter, cream cheese, and sour cream. Use a potato masher or electric mixer to mash the potatoes until smooth and creamy.
- Season and Mix: Stir in the milk, garlic powder, onion powder, salt, and pepper. Mix until all the ingredients are well combined and the mixture is creamy. Adjust seasoning to taste.
- Assemble the Casserole: Preheat your oven to 350°F (175°C). Transfer the mashed potatoes into a greased 9×13-inch baking dish. Spread the mixture evenly, smoothing the top with a spatula.
- Add Cheese Topping: Sprinkle 1 cup of shredded cheddar cheese evenly over the top of the mashed potatoes. Reserve the remaining 1/2 cup for later.
- Bake the Casserole: Cover the dish with aluminum foil and bake in the preheated oven for 25 minutes. Remove the foil and sprinkle the remaining 1/2 cup of cheddar cheese on top. Bake for an additional 10-15 minutes, or until the cheese is melted and slightly golden.
- Serve and Garnish: Remove from the oven and let the casserole cool for a few minutes before serving. Garnish with chopped fresh chives, if desired, for added color and flavor.
Extra Tips:
To make this dish even more flavorful, consider adding a pinch of nutmeg or a dash of cayenne pepper for a slight kick. If preparing ahead, assemble the casserole and store it in the refrigerator for up to two days before baking.
Simply increase the baking time by 10-15 minutes if baking directly from the fridge. For a crispier topping, you can broil the casserole for a few minutes after baking. Be certain you keep an eye on it to prevent burning.
This dish pairs well with roasted meats and other holiday sides, making it a versatile addition to any festive table.
Herb-Roasted Vegetables
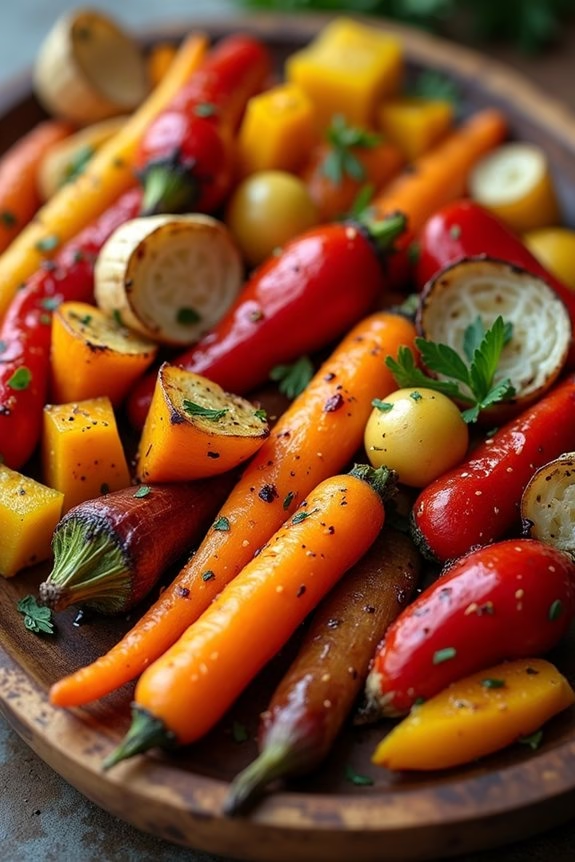
Herb-roasted vegetables are a classic side dish that not only complements your Christmas potluck spread but also adds a burst of color and flavor to the table. This dish is perfect for making ahead of time, guaranteeing that you can focus on other preparations during the big day. The combination of earthy root vegetables and fragrant herbs creates a delightful harmony, offering a warm and comforting experience with every bite.
Whether you’re serving turkey, ham, or a vegetarian main course, these herb-roasted vegetables will seamlessly blend with your other holiday dishes. Preparing this recipe is a breeze and requires minimal effort, making it an ideal choice for busy holiday gatherings. The key to achieving perfectly roasted vegetables is selecting a variety of colorful root vegetables and cutting them into uniform pieces for even cooking.
The herbs infuse the vegetables with a rich aroma, while the roasting process brings out their natural sweetness. This recipe serves 4-6 people, making it just right for a medium-sized gathering. You can easily double the quantities if you’re expecting more guests or want leftovers for the next day.
Ingredients:
- 2 large carrots, peeled and cut into 1-inch pieces
- 2 parsnips, peeled and cut into 1-inch pieces
- 1 red bell pepper, cut into 1-inch pieces
- 1 yellow bell pepper, cut into 1-inch pieces
- 1 red onion, cut into wedges
- 1 small butternut squash, peeled and cubed
- 3 tablespoons olive oil
- 1 tablespoon balsamic vinegar
- 2 teaspoons dried thyme
- 2 teaspoons dried rosemary
- Salt and pepper, to taste
- Fresh parsley, chopped, for garnish
Cooking Instructions:
- Preheat the Oven: Begin by preheating your oven to 400°F (200°C). This guarantees that it’s at the right temperature to crisp the edges of the vegetables while keeping the insides tender.
- Prepare the Vegetables: Place the chopped carrots, parsnips, bell peppers, red onion wedges, and butternut squash cubes into a large mixing bowl. Make sure all pieces are uniformly sized to guarantee even cooking.
- Season the Vegetables: Drizzle the olive oil and balsamic vinegar over the vegetables. Sprinkle the dried thyme, rosemary, salt, and pepper over the top. Toss the vegetables well to guarantee they’re evenly coated with the oil and herbs.
- Arrange on a Baking Sheet: Spread the seasoned vegetables in a single layer on a large baking sheet. Avoid overcrowding, as this can cause the vegetables to steam rather than roast.
- Roast the Vegetables: Place the baking sheet in the preheated oven and roast for 30-35 minutes. Stir halfway through the cooking time to guarantee even roasting. The vegetables should be tender and have a slight caramelization on the edges.
- Garnish and Serve: Once roasted, remove from the oven and let them cool slightly. Transfer the vegetables to a serving platter. Garnish with freshly chopped parsley before serving.
Extra Tips:
To make this dish ahead of time, you can roast the vegetables up to one day in advance. After roasting, let them cool completely, then store them in an airtight container in the refrigerator.
When you’re ready to serve, spread the vegetables on a baking sheet and reheat in a 350°F (175°C) oven for about 10-15 minutes, or until warmed through. You can also experiment with different herbs and vegetables depending on your preference or what’s available. Adding a sprinkle of grated parmesan or a squeeze of lemon juice can enhance the flavors even further.
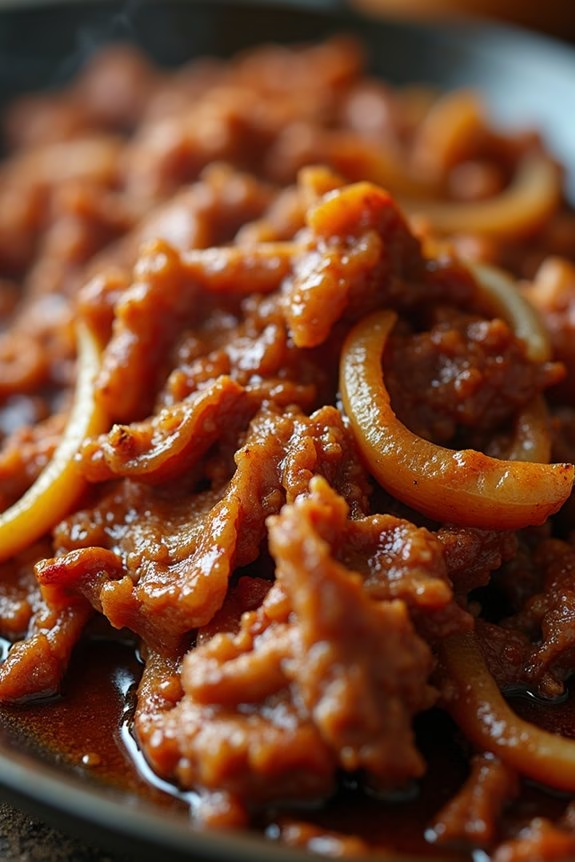
Slow Cooker Pulled Pork
Pulled pork is a wonderfully versatile dish that’s perfect for a Christmas potluck, as it can be made ahead of time and easily transported to the gathering. The slow cooker method guarantees that the pork is tender, juicy, and flavorful without requiring constant attention.
With a balance of sweet, smoky, and tangy flavors, this pulled pork recipe is sure to be a hit with family and friends. It pairs beautifully with a variety of sides, making it a standout choice for any holiday feast.
Ideal for serving 4-6 people, this slow cooker pulled pork recipe is simple to prepare. Once the initial preparation is complete, the slow cooker does all the work, allowing you to focus on other holiday tasks.
The pork is seasoned with a robust dry rub, then cooked low and slow to achieve the perfect texture. When ready, it’s pulled apart and mixed with a homemade barbecue sauce that elevates the dish to new heights. Whether served on buns, alongside mashed potatoes, or as part of a larger spread, this pulled pork will be a festive favorite.
Ingredients:
- 3 pounds pork shoulder (also known as pork butt)
- 1 tablespoon olive oil
- 1 tablespoon paprika
- 1 tablespoon brown sugar
- 1 teaspoon garlic powder
- 1 teaspoon onion powder
- 1 teaspoon salt
- 1 teaspoon black pepper
- 1/2 teaspoon cayenne pepper (optional for heat)
- 1 cup barbecue sauce
- 1/2 cup apple cider vinegar
- 1/2 cup chicken broth
- 1 onion, sliced
Cooking Instructions:
- Prepare the Pork: Start by patting the pork shoulder dry with paper towels. This helps the seasoning stick better. In a small bowl, combine the paprika, brown sugar, garlic powder, onion powder, salt, black pepper, and cayenne pepper. Rub this mixture all over the pork shoulder, making sure it’s well-coated on all sides.
- Sear the Pork: Heat the olive oil in a large skillet over medium-high heat. Add the pork shoulder and sear on all sides until a golden-brown crust forms, about 4-5 minutes per side. This step locks in flavor and adds depth to the dish.
- Prepare the Slow Cooker: Place the sliced onion at the bottom of the slow cooker. This acts as a bed for the pork and adds additional flavor to the dish. Place the seared pork shoulder on top of the onions.
- Add Liquid Ingredients: In a mixing bowl, combine the barbecue sauce, apple cider vinegar, and chicken broth. Pour this mixture over the pork in the slow cooker, making sure the pork is well-coated.
- Cook the Pork: Cover the slow cooker with its lid and cook on low for 8-10 hours, or on high for 4-5 hours, until the pork is tender and easily pulled apart with a fork.
- Pull the Pork: Once cooked, remove the pork from the slow cooker and place it on a large cutting board. Use two forks to shred the pork into bite-sized pieces. Discard any excess fat.
- Mix with Sauce: Return the shredded pork to the slow cooker and mix it with the juices and onions. Let it cook on low for an additional 30 minutes to absorb the flavors.
Extra Tips:
For best results, choose a pork shoulder with a good amount of marbling, as this fat will render down during cooking and keep the meat moist.
If you like your pulled pork with a bit of a kick, don’t shy away from the cayenne pepper in the rub or add a splash of hot sauce to the barbecue mixture.
Feel free to customize the barbecue sauce to your liking by adding more sugar for sweetness or more vinegar for tanginess.
Finally, this dish can be made a day ahead, refrigerated, and then gently reheated for serving, making it a stress-free option for holiday entertaining.
Holiday Cheese Ball

The Holiday Cheese Ball is a delightful and festive appetizer that’s perfect for Christmas potlucks. This creamy and savory dish is the ideal way to start any holiday gathering. It’s a blend of rich cheeses, crunchy nuts, and festive cranberries, all rolled into a perfect sphere. The cheese ball can be made ahead of time, allowing the flavors to meld together beautifully, making it a stress-free addition to your holiday menu.
Its vibrant appearance and delicious taste are sure to be a hit with your family and friends. The cheese ball is versatile and can be served with a variety of crackers, breads, or fresh vegetables. The best part is that it’s easy to prepare, making it a great option for both novice and experienced cooks. By following this simple recipe, you can create a crowd-pleasing dish that will leave your guests wanting more.
Ingredients (Serving Size: 4-6 people):
- 8 oz cream cheese, softened
- 1 cup sharp cheddar cheese, shredded
- 1/4 cup blue cheese, crumbled
- 1 teaspoon Worcestershire sauce
- 1/2 teaspoon garlic powder
- 1/2 teaspoon onion powder
- 1/4 cup dried cranberries, chopped
- 1/4 cup pecans, toasted and chopped
- 2 tablespoons fresh parsley, chopped
- Assorted crackers or vegetables for serving
Instructions:
- Prepare the Base: In a large mixing bowl, combine the softened cream cheese, shredded cheddar cheese, and crumbled blue cheese. Use a spatula or an electric mixer on low speed to blend the cheeses until smooth and well combined.
- Add Flavorings: Add the Worcestershire sauce, garlic powder, and onion powder to the cheese mixture. Mix thoroughly to guarantee the spices are evenly distributed throughout the cheese.
- Incorporate the Add-ins: Gently fold in the chopped dried cranberries and toasted pecans. Mix until the cranberries and pecans are evenly dispersed in the cheese mixture.
- Shape the Cheese Ball: Lay a piece of plastic wrap on a clean surface. Transfer the cheese mixture onto the plastic wrap and form it into a ball shape using your hands. Wrap the cheese ball tightly with the plastic wrap to hold its shape.
- Chill: Place the wrapped cheese ball in the refrigerator for at least 2 hours, or until firm. This chilling time allows the flavors to meld and the cheese ball to set.
- Coat with Parsley: Once the cheese ball is firm, remove it from the refrigerator. Unwrap it and roll it in the chopped fresh parsley until fully coated. This will add a fresh, vibrant look to your cheese ball.
- Serve: Transfer the cheese ball to a serving platter and arrange assorted crackers or vegetables around it. Serve immediately or refrigerate until ready to serve.
Extra Tips:
For the best flavor, prepare the cheese ball a day in advance and let it chill overnight in the refrigerator. This will allow the ingredients to meld together perfectly.
Feel free to experiment with different types of cheeses or nuts based on your preferences or availability. If you find the mixture too soft to shape, refrigerate it for 15-20 minutes before forming the ball.
To add a festive touch, consider incorporating red and green ingredients like diced bell peppers or chives. Enjoy the Holiday Cheese Ball with a variety of dippers to suit all taste preferences.
Peppermint Chocolate Bark

Peppermint Chocolate Bark is a delightful and festive treat that’s perfect for the holiday season. This make-ahead Christmas potluck recipe isn’t only easy to prepare but also a crowd-pleaser with its beautiful marbled layers of white and dark chocolate, topped with crunchy peppermint candy pieces.
It’s a sweet and invigorating dessert that captures the essence of Christmas with every bite. The bark can be broken into pieces and served as a standalone treat or used to decorate other desserts.
This recipe serves 4-6 people, making it an ideal choice for small gatherings or as a part of a larger dessert spread. The combination of rich chocolate and cool peppermint is both satisfying and revitalizing, offering a perfect balance of flavors.
The best part about Peppermint Chocolate Bark is that it requires minimal ingredients and can be prepared ahead of time, allowing you to focus on other holiday preparations.
Ingredients:
- 8 oz of high-quality dark chocolate, chopped
- 8 oz of high-quality white chocolate, chopped
- 1 teaspoon of peppermint extract
- 1/2 cup of crushed peppermint candies or candy canes
- Parchment paper
Cooking Instructions:
- Prepare the Baking Sheet: Line a baking sheet with parchment paper to prevent the chocolate from sticking and to make it easier to remove the bark later.
- Melt the Dark Chocolate: Place the dark chocolate in a microwave-safe bowl. Microwave on medium power in 30-second intervals, stirring between each interval, until the chocolate is completely melted and smooth.
- Spread the Dark Chocolate: Pour the melted dark chocolate onto the prepared baking sheet. Use a spatula to spread it into an even layer, about 1/4-inch thick.
- Melt the White Chocolate: Repeat the melting process with the white chocolate in a separate bowl. Once melted, stir in the peppermint extract until fully combined.
- Layer the White Chocolate: Pour the melted white chocolate over the dark chocolate layer. Use a fork or toothpick to gently swirl the two chocolates together, creating a marbled effect.
- Add the Peppermint Topping: Immediately sprinkle the crushed peppermint candies evenly over the swirled chocolate before it sets, pressing them in gently with your hands to make sure they stick.
- Set the Bark: Place the baking sheet in the refrigerator for about 30 minutes or until the chocolate is fully set and firm.
- Break into Pieces: Once set, remove the bark from the refrigerator and break it into irregular pieces. Serve immediately or store in an airtight container until ready to serve.
Extra Tips:
When making Peppermint Chocolate Bark, it’s essential to use high-quality chocolate for the best taste and texture. Melting the chocolate slowly and stirring frequently helps prevent it from seizing.
If the chocolate starts to harden while you’re working, you can briefly microwave it again to soften it. For a more uniform appearance, you can use a knife to cut the bark into even squares instead of breaking it by hand.
Additionally, if you prefer a stronger peppermint flavor, you can increase the peppermint extract slightly, but be cautious as too much can become overpowering. Enjoy this festive treat with a warm cup of cocoa or as a sweet end to your holiday meal!