
Get ready to sprinkle some magic into your holiday mornings with these 14 delightful Christmas sweet breakfast recipes that kids are sure to love.
From the irresistible aroma of gingerbread pancakes to the fun of Santa Claus shaped pancakes, these ideas are perfect for creating joyful memories.
You’ll find everything from candy cane waffles to cinnamon roll wreaths, each adding a touch of whimsy to your festive table.
These recipes are sure to turn your holiday breakfasts into cherished moments.
Let’s make your mornings merry and bright!
Gingerbread Pancakes: A Festive Start
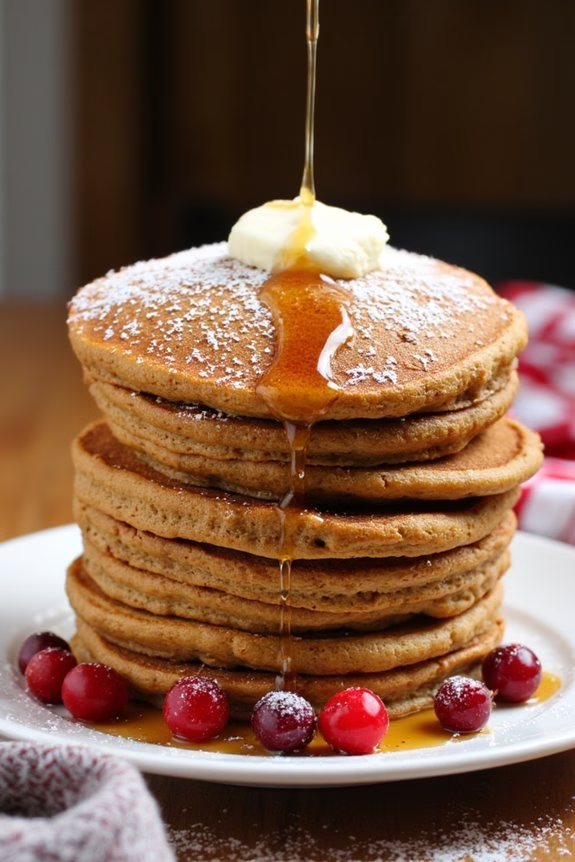
Gingerbread pancakes are a delightful way to bring the festive spirit to your breakfast table. These warmly spiced pancakes are inspired by the flavors of traditional gingerbread cookies, featuring a blend of ginger, cinnamon, and molasses that fill the kitchen with a cozy aroma. Perfectly fluffy and lightly sweetened, they serve as an ideal treat for kids during the Christmas season.
Paired with a drizzle of maple syrup or a dusting of powdered sugar, these pancakes can turn any morning into a holiday celebration. Not only are gingerbread pancakes delicious, but they’re also simple to prepare, making them a great activity to involve kids in the kitchen.
Whether you’re serving them on Christmas morning or as a special weekend breakfast, these pancakes are sure to be a hit with the whole family. This recipe makes enough to serve 4-6 people, guaranteeing there’s enough to go around and maybe even have some leftovers for the next day.
Ingredients (Serves 4-6):
- 2 cups all-purpose flour
- 2 teaspoons baking powder
- 1/2 teaspoon baking soda
- 1/2 teaspoon salt
- 1 teaspoon ground ginger
- 1 teaspoon ground cinnamon
- 1/4 teaspoon ground cloves
- 1/4 teaspoon ground nutmeg
- 3 tablespoons brown sugar
- 2 eggs
- 1 3/4 cups milk
- 1/4 cup molasses
- 1 teaspoon vanilla extract
- 4 tablespoons unsalted butter, melted
- Cooking spray or additional butter for the pan
Cooking Instructions:
- Mix Dry Ingredients: In a large bowl, whisk together the all-purpose flour, baking powder, baking soda, salt, ginger, cinnamon, cloves, and nutmeg. This guarantees the spices are evenly distributed in the batter.
- Combine Wet Ingredients: In another bowl, beat the eggs and then add the milk, molasses, vanilla extract, and melted butter. Stir until well combined. The molasses is key to achieving that classic gingerbread flavor.
- Make the Batter: Gradually pour the wet ingredients into the dry ingredients, stirring gently with a spatula or wooden spoon until just combined. Be careful not to overmix; some lumps are okay, as this will keep the pancakes light and fluffy.
- Prepare the Pan: Heat a non-stick skillet or griddle over medium heat. Lightly coat the surface with cooking spray or a small amount of butter to prevent sticking and add flavor.
- Cook the Pancakes: Pour about 1/4 cup of batter per pancake onto the skillet. Cook until bubbles form on the surface and the edges look set, approximately 2-3 minutes. Flip the pancakes and cook for an additional 2 minutes until golden brown. Repeat with the remaining batter.
- Serve and Enjoy: Serve the pancakes warm, topped with maple syrup, powdered sugar, or whipped cream. You can also add festive touches like a sprinkle of cinnamon or a few red berries for color.
Extra Tips:
To make your gingerbread pancakes even more special, consider adding mix-ins like chocolate chips or chopped nuts to the batter. If you’re looking for a dairy-free version, substitute the milk with almond or oat milk and use a plant-based butter.
For an easier flip and even cooking, confirm your skillet is thoroughly preheated before adding the batter. Finally, if you’re cooking for a larger group, you can keep the pancakes warm in a low oven (around 200°F) while you finish cooking the entire batch.
Candy Cane Waffles: Sweet and Minty
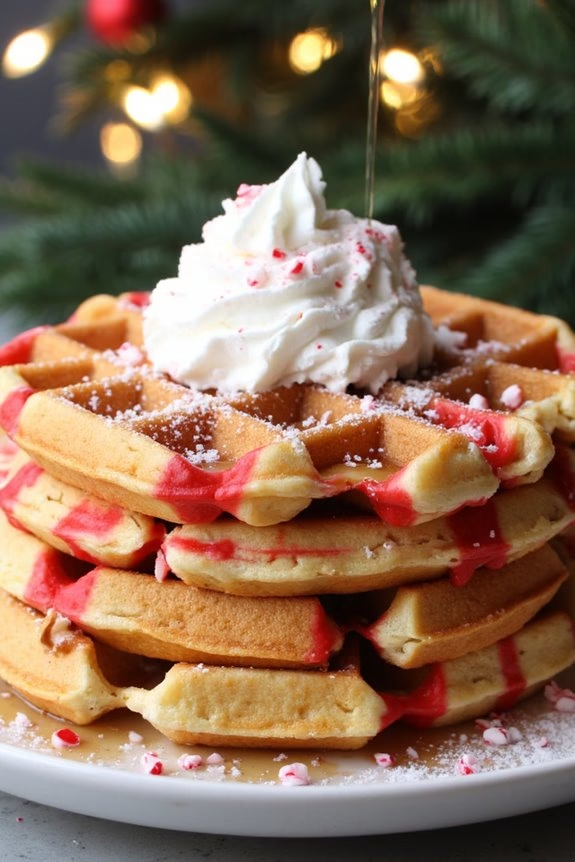
Nothing says Christmas morning like the sweet and festive aroma of candy cane waffles wafting through the house. These delightful waffles bring the joy of the season to your breakfast table with their unique blend of sweet vanilla and invigorating mint. Perfect for kids, these waffles are a fun twist on the classic breakfast staple, featuring a light, fluffy texture and a hint of candy cane crunch. The red and white swirl design not only mimics the iconic holiday treat but adds a touch of holiday cheer to your morning meal.
Candy cane waffles are easy to make and require simple ingredients that you likely already have in your pantry. The addition of crushed candy canes gives them a playful minty flavor that pairs wonderfully with a dollop of whipped cream or a drizzle of maple syrup. Whether you’re serving them up as a special treat for breakfast or a festive addition to your holiday brunch, candy cane waffles are sure to be a hit with kids and adults alike.
Ingredients (Serves 4-6 people):
- 2 cups all-purpose flour
- 2 tablespoons granulated sugar
- 1 tablespoon baking powder
- 1/2 teaspoon salt
- 2 large eggs
- 1 and 3/4 cups milk
- 1/2 cup vegetable oil
- 1 teaspoon vanilla extract
- 1/2 teaspoon peppermint extract
- 1/2 cup crushed candy canes
- Red food coloring (optional)
Instructions:
- Preheat the Waffle Maker: Begin by preheating your waffle maker according to the manufacturer’s instructions. This guarantees that your waffles cook evenly and have a nice crispy exterior.
- Prepare Dry Ingredients: In a large mixing bowl, whisk together the flour, sugar, baking powder, and salt until well combined. This forms the base of your waffle batter.
- Mix Wet Ingredients: In another bowl, beat the eggs and then add the milk, vegetable oil, vanilla extract, and peppermint extract. Stir these ingredients together until they’re fully mixed.
- Combine Ingredients: Pour the wet ingredients into the bowl with the dry ingredients. Stir until just combined; it’s okay if the batter is a little lumpy.
- Add Candy Canes: Gently fold in the crushed candy canes into the batter. If you want to create a red and white swirl effect, separate a small portion of the batter and mix in a few drops of red food coloring.
- Cook the Waffles: Pour the batter onto the hot waffle iron, using about 1/2 cup of batter per waffle or as recommended by your waffle maker’s instructions. Close the lid and cook until the waffles are golden brown and cooked through.
- Serve and Enjoy: Carefully remove the waffles and serve them immediately with a topping of your choice, such as whipped cream, maple syrup, or additional crushed candy canes for extra crunch.
Extra Tips: For the best results, make sure your waffle maker is fully heated before adding the batter; this helps achieve the perfect crispy texture. If you’re making a large batch, keep cooked waffles warm by placing them in a preheated oven at 200°F while you finish cooking the rest. To crush candy canes easily, place them in a zip-top bag and use a rolling pin to break them into small pieces. Adjust the amount of peppermint extract to suit your taste, keeping in mind that a little goes a long way. Enjoy the sweet and minty flavors of these festive waffles as a delightful start to your holiday celebrations.
Cinnamon Roll Wreaths for the Holidays
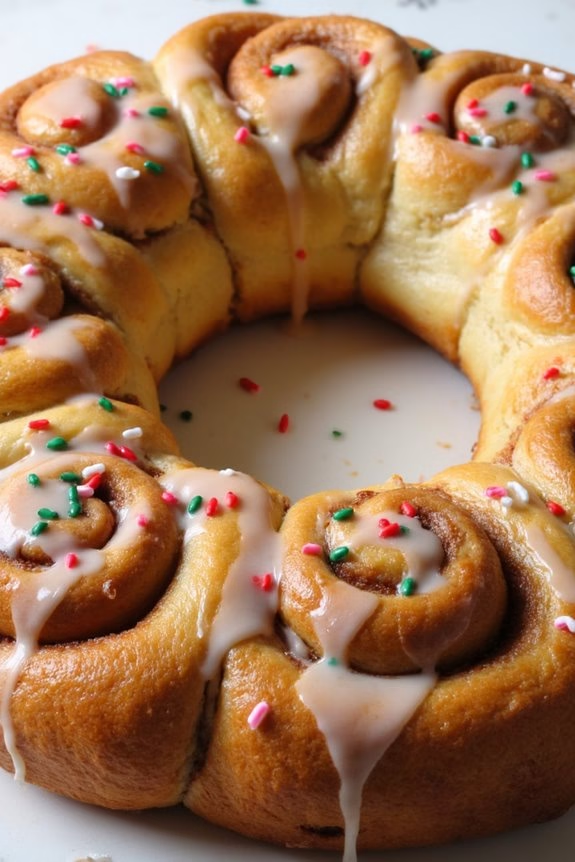
Cinnamon Roll Wreaths are a festive and delightful way to start Christmas morning, especially for families with children. These wreaths not only make a beautiful centerpiece for your holiday breakfast table but are also easy for kids to help prepare. The sweet cinnamon aroma fills the house, creating a warm and inviting atmosphere that sets the tone for a joyous day.
Plus, the fun shape of the wreaths adds a special holiday touch that both kids and adults will appreciate.
Creating these Cinnamon Roll Wreaths is a simple process that combines the classic flavors of cinnamon, sugar, and soft dough, resulting in a fluffy, gooey treat that’s perfect for a holiday breakfast. These wreaths are made by arranging rolls of dough into a ring shape, and once baked, drizzling them with a sweet glaze.
With just a few ingredients and some creative shaping, you can have a delicious and visually appealing dish that will surely become a Christmas morning tradition.
Ingredients for Cinnamon Roll Wreaths (Serves 4-6):
- 2 cans (8 oz each) refrigerated cinnamon roll dough
- 1/4 cup unsalted butter, melted
- 1/2 cup brown sugar
- 1 tablespoon ground cinnamon
- 1/2 cup powdered sugar
- 1-2 tablespoons milk
- 1 teaspoon vanilla extract
- Red and green sprinkles (optional)
Cooking Instructions:
- Preheat and Prepare: Preheat your oven to 375°F (190°C). Line a baking sheet with parchment paper or a silicone baking mat to prevent sticking.
- Prepare the Dough: Open the cans of cinnamon roll dough and separate the rolls. Unroll each cinnamon roll into a long strip of dough.
- Add Filling: In a small bowl, mix the melted butter, brown sugar, and ground cinnamon. Spread this mixture evenly over each strip of unrolled dough.
- Shape the Wreath: Take each strip of dough and roll it back up into a spiral. Arrange the spirals in a circle on the prepared baking sheet, with the edges slightly overlapping to form a wreath shape. Press the ends of the dough strips together to connect them.
- Bake the Wreath: Place the wreath in the preheated oven and bake for 15-20 minutes or until golden brown and cooked through.
- Make the Glaze: While the wreath is baking, prepare the glaze by mixing powdered sugar, milk, and vanilla extract in a small bowl until smooth. Adjust the milk quantity to achieve the desired consistency.
- Decorate: Once the wreath is done baking, remove it from the oven and let it cool slightly. Drizzle the glaze over the top and, if desired, sprinkle with red and green sprinkles for a festive touch.
- Serve: Carefully transfer the Cinnamon Roll Wreath to a serving platter and serve warm. Enjoy the festive treat with a glass of milk or hot cocoa.
Extra Tips:
For an extra burst of flavor, consider adding chopped nuts or dried fruit to the cinnamon-sugar filling before rolling up the dough.
If you have younger children, let them sprinkle the cinnamon-sugar mixture or add sprinkles to the glaze. This can be a fun and interactive way to involve them in the cooking process.
Additionally, you can prepare the wreath the night before and store it in the refrigerator. In the morning, just bake and glaze for a quick and easy breakfast.
If you prefer a more traditional look, use a bundt pan to maintain a perfect circular shape.
Santa Claus Shaped Pancakes
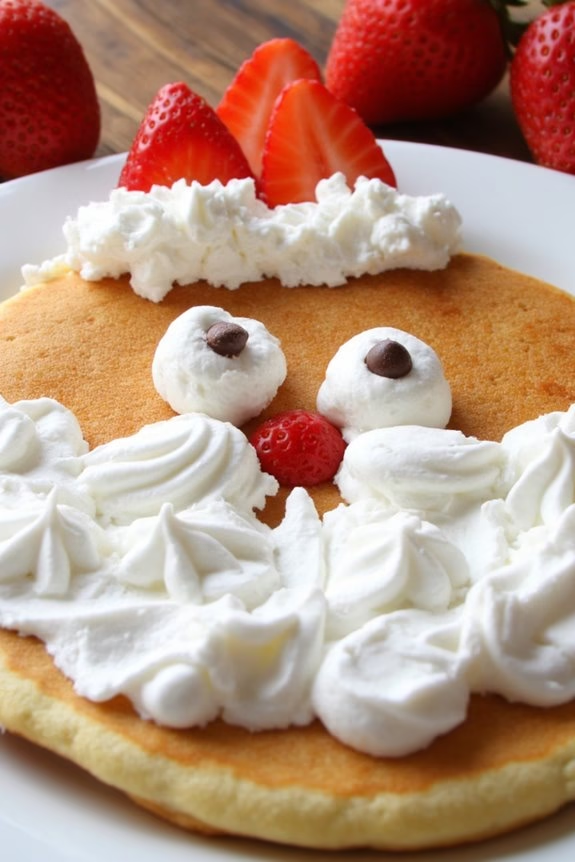
Santa Claus Shaped Pancakes are a delightful and festive treat that will bring joy to your children’s holiday breakfast. These pancakes aren’t only delicious but also fun to make and decorate, creating a perfect opportunity for some quality family time in the kitchen. Shaped like Santa Claus, complete with a whipped cream beard and strawberry hat, these pancakes will certainly become a holiday favorite for both kids and adults.
The key to these pancakes is in the decoration, as the pancake itself is a classic fluffy buttermilk pancake. Once cooked, the pancakes are transformed into jolly Santas with the help of fresh fruits and whipped cream. These pancakes serve as a wonderful breakfast option, offering a creative and tasty way to celebrate the festive season. The following recipe serves 4-6 people, making it an excellent choice for a family breakfast or brunch.
Ingredients:
- 2 cups all-purpose flour
- 2 tablespoons sugar
- 2 teaspoons baking powder
- 1/2 teaspoon baking soda
- 1/2 teaspoon salt
- 2 cups buttermilk
- 2 large eggs
- 1/4 cup melted butter
- 1 teaspoon vanilla extract
- Cooking spray or additional butter for the pan
- Fresh strawberries (about 12-15 berries)
- Whipped cream (homemade or store-bought)
- Mini chocolate chips or chocolate sprinkles for eyes
Instructions:
- Prepare the Pancake Batter: In a large mixing bowl, combine the all-purpose flour, sugar, baking powder, baking soda, and salt. In a separate bowl, whisk together the buttermilk, eggs, melted butter, and vanilla extract until well combined. Gradually pour the wet ingredients into the dry ingredients, stirring gently until just combined. Don’t overmix; a few lumps are okay.
- Heat the Pan: Preheat a non-stick skillet or griddle over medium heat. Lightly grease it with cooking spray or a small amount of butter to prevent the pancakes from sticking.
- Cook the Pancakes: Pour about 1/4 cup of the pancake batter onto the skillet for each pancake. Cook until bubbles form on the surface and the edges look set, about 2-3 minutes. Flip the pancakes and cook for another 1-2 minutes until golden brown. Remove from the skillet and keep warm.
- Decorate the Pancakes: Slice the strawberries in half lengthwise. Place one pancake on a plate and strategically arrange the strawberry slices around the top edge of the pancake to form Santa’s hat. Use whipped cream to create Santa’s beard by piping or spooning it in a shape that covers the lower half of the pancake. Add two dollops of whipped cream for the eyes and place a mini chocolate chip or sprinkle in the center of each dollop.
- Serve and Enjoy: Serve the Santa Claus Shaped Pancakes immediately while they’re still warm, allowing your children to admire their festive breakfast before digging in.
Extra Tips:
For the best fluffy pancakes, make sure not to overmix the batter as this can lead to tough pancakes. If the batter is too thick, you can add a little more buttermilk to reach the desired consistency.
Additionally, to save time on a busy morning, you can prepare the dry ingredients the night before. If you’re making these pancakes ahead of time, keep them warm in an oven set to a low temperature.
Always supervise young children when they’re helping to decorate the pancakes to guarantee safe use of kitchen tools and proper handling of ingredients.
Decorating Tips for Santa Pancakes
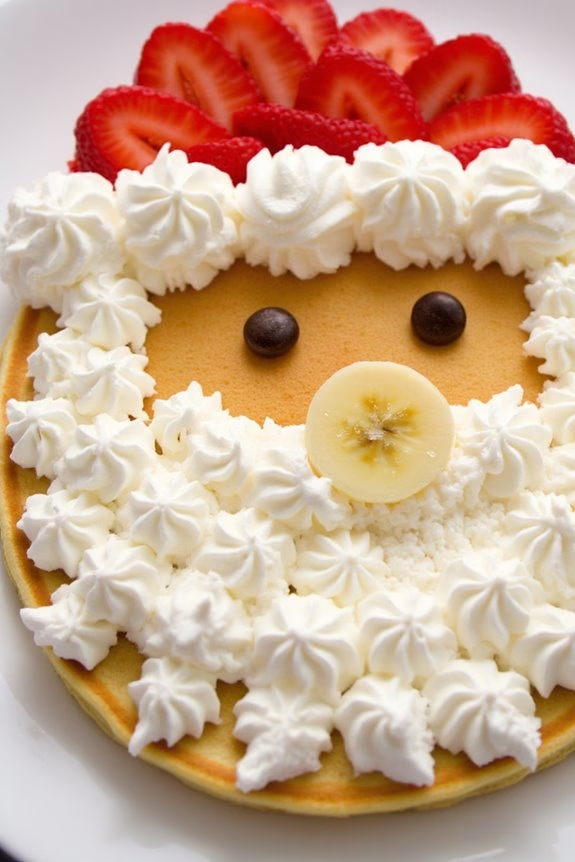
Create a magical Christmas morning for your kids with these delightful Santa Pancakes. Perfect for a holiday breakfast, these fluffy pancakes aren’t only delicious but also a fun way to engage your kids in the kitchen. They’ll love decorating their pancakes to resemble Santa Claus, making breakfast a festive and interactive experience.
These pancakes are sure to bring joy and excitement to your Christmas morning, ensuring both a tasty and memorable start to your holiday celebrations.
Designed to serve 4-6 people, this Santa Pancake recipe is easy to follow and requires minimal ingredients. The pancakes form the base of your Santa design, while a few simple toppings transform them into a jolly depiction of Santa’s face. Encourage your kids to get creative with their decorating, using a variety of fruits and other toppings to bring Santa to life on their plates.
Ingredients (Serves 4-6):
- 2 cups all-purpose flour
- 2 tablespoons sugar
- 2 teaspoons baking powder
- 1/2 teaspoon baking soda
- 1/2 teaspoon salt
- 2 cups buttermilk
- 2 large eggs
- 1/4 cup unsalted butter, melted
- 1 teaspoon vanilla extract
- Sliced strawberries (for Santa’s hat)
- Whipped cream (for Santa’s beard and hat trim)
- Mini chocolate chips or raisins (for eyes)
- Banana slices (for the nose)
Cooking Instructions:
1. Prepare the Batter: In a large mixing bowl, combine the flour, sugar, baking powder, baking soda, and salt. In another bowl, whisk together the buttermilk, eggs, melted butter, and vanilla extract.
Pour the wet ingredients into the dry ingredients and stir until just combined. Be careful not to overmix.
2. Cook the Pancakes: Heat a non-stick skillet or griddle over medium heat. Lightly grease with butter or cooking spray. Pour about 1/4 cup of batter onto the skillet for each pancake.
Cook until bubbles form on the surface and the edges are set, about 2-3 minutes. Flip and cook the other side until golden brown, another 2-3 minutes. Repeat with the remaining batter.
3. Decorate the Pancakes: Once the pancakes are cooked, place one on each plate as the base for Santa’s face. Arrange sliced strawberries in a curve at the top of the pancake to form Santa’s hat.
Use whipped cream to create the trim of the hat and the beard. Place two mini chocolate chips or raisins for Santa’s eyes and a banana slice for the nose.
4. Serve and Enjoy: Serve immediately so the whipped cream stays fresh and fluffy. Allow the kids to add additional toppings if they desire, such as extra fruit or syrup.
Extra Tips:
For extra fluffy pancakes, make sure your baking powder and baking soda are fresh and not expired. You can also let the batter rest for about 5 minutes before cooking to allow the ingredients to blend well and thicken slightly.
To make the experience even more festive, consider playing some Christmas music while cooking and decorating the pancakes. Encourage your kids to use their imaginations with different toppings, such as blueberries for eyes or a cherry for Santa’s nose, to create their unique Santa designs.
Christmas Reindeer Chocolate Chip Muffins
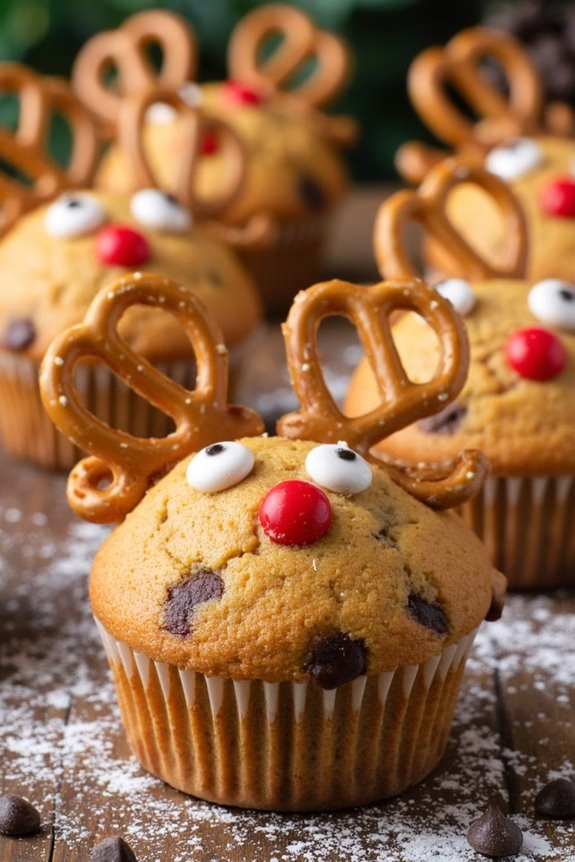
Bring the magic of Christmas morning to your breakfast table with these delightful Christmas Reindeer Chocolate Chip Muffins. Perfect for kids, these muffins aren’t only delicious but also incredibly fun to make and decorate. The muffins are soft, moist, and loaded with chocolate chips, all topped with adorable reindeer faces that are sure to bring a smile to everyone’s face.
Whether you’re planning a special holiday breakfast or a fun activity for the kids during the festive season, these muffins are a perfect choice.
These Christmas Reindeer Chocolate Chip Muffins aren’t just a feast for the taste buds but also for the eyes. Imagine the excitement on your little ones’ faces as they help you decorate these muffins into charming reindeer with pretzel antlers, candy eyes, and a bright red candy nose.
This recipe serves 4-6 people, making it ideal for a family breakfast or a small holiday gathering. Gather your ingredients and prepare for a joyful baking session that combines the flavors of rich chocolate and the spirit of Christmas.
Ingredients (Serves 4-6):
- 1 and 1/2 cups all-purpose flour
- 1/2 cup granulated sugar
- 1/4 cup brown sugar
- 1/2 teaspoon baking soda
- 1/2 teaspoon baking powder
- 1/4 teaspoon salt
- 1/2 cup unsalted butter, melted
- 1/2 cup milk
- 1 large egg
- 1 teaspoon vanilla extract
- 1 cup chocolate chips
- Mini pretzels
- Candy eyes
- Red candy-coated chocolates (like M&Ms)
Cooking Instructions:
- Preheat the Oven: Start by preheating your oven to 350°F (175°C). Prepare a muffin tin by lining it with paper liners or greasing it lightly with cooking spray.
- Mix Dry Ingredients: In a large mixing bowl, whisk together the all-purpose flour, granulated sugar, brown sugar, baking soda, baking powder, and salt until well combined.
- Combine Wet Ingredients: In another bowl, mix the melted butter, milk, egg, and vanilla extract until smooth.
- Create the Batter: Pour the wet ingredients into the dry ingredients and gently stir until just combined. Be careful not to overmix, as this can make the muffins dense. Fold in the chocolate chips gently.
- Fill the Muffin Cups: Divide the batter evenly among the prepared muffin cups, filling each about two-thirds full.
- Bake the Muffins: Place the muffin tin in the preheated oven and bake for 18-20 minutes, or until a toothpick inserted into the center of a muffin comes out clean. Remove from the oven and allow them to cool in the pan for a few minutes before transferring to a wire rack.
- Decorate the Muffins: Once the muffins have cooled completely, it’s time to decorate! Insert two mini pretzels into the top of each muffin to create antlers. Use a dab of frosting or melted chocolate to attach candy eyes and a red candy-coated chocolate for the nose, completing the reindeer face.
Extra Tips:
For an extra festive touch, you can add a pinch of cinnamon or nutmeg to the batter to infuse the muffins with warm, holiday spices.
If you want to involve kids in the decorating process, set up a decorating station with all the toppings ready to go. You can also use different colored candy-coated chocolates for the noses to create a colorful batch of reindeer muffins.
Snowflake Sugar Donuts: A Wintry Delight
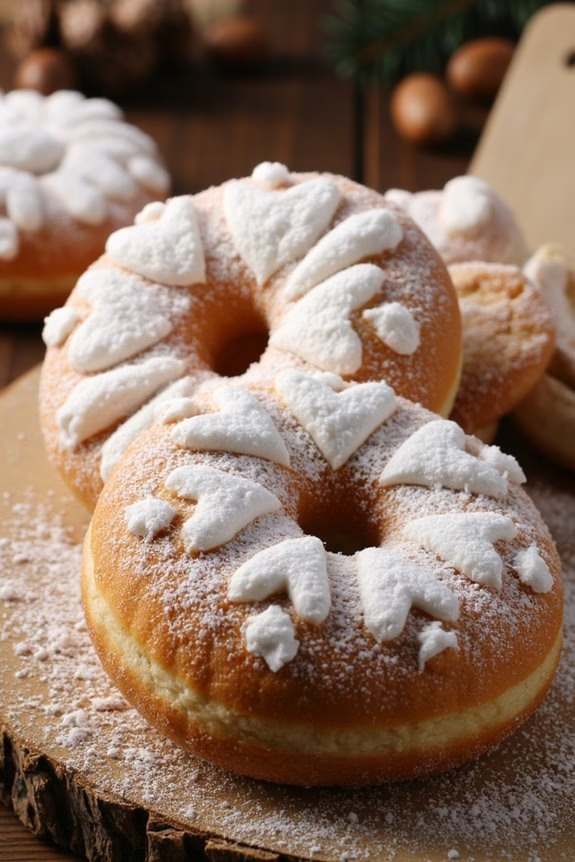
Snowflake Sugar Donuts are a magical treat that brings the enchantment of winter into your kitchen. These delightful donuts are perfect for a cozy Christmas morning breakfast, especially for kids who’ll be thrilled by the intricate snowflake patterns dusted with sugar. Soft, fluffy, and lightly sweetened, these donuts are a festive way to start the holiday.
As they bake, the house fills with a warm, inviting aroma that feels like a hug in the heart of a cold winter day. Not only are these donuts delicious, but they also offer a creative activity for little hands. Kids can help mix the batter, cut out the snowflake shapes, and dust them with sugar, making it a fun family project.
With a few simple ingredients that you likely already have in your pantry, these Snowflake Sugar Donuts are both an easy and delightful way to make the holidays even more special. Create memories and satisfy sweet cravings with this wintry breakfast treat that will surely become a holiday tradition.
Ingredients (for 4-6 people):
- 2 cups all-purpose flour
- 1/2 cup granulated sugar
- 2 teaspoons baking powder
- 1/2 teaspoon salt
- 1/2 teaspoon nutmeg
- 1/2 cup milk
- 1/4 cup unsalted butter, melted
- 1 teaspoon vanilla extract
- 2 large eggs
- Powdered sugar, for dusting
Cooking Instructions:
- Preheat the Oven: Start by preheating your oven to 375°F (190°C). This guarantees that the donuts bake evenly once placed inside.
- Mix Dry Ingredients: In a large mixing bowl, whisk together the flour, granulated sugar, baking powder, salt, and nutmeg until they’re well combined.
- Prepare Wet Ingredients: In a separate bowl, combine the milk, melted butter, vanilla extract, and eggs. Whisk the mixture until it’s smooth and uniform in texture.
- Combine Wet and Dry Ingredients: Gradually add the wet mixture to the dry ingredients, stirring gently with a spatula or wooden spoon until the batter is smooth. Be careful not to overmix, as this can make the donuts tough.
- Shape the Donuts: Lightly flour a clean surface and roll out the dough to about 1/2-inch thickness. Use a snowflake-shaped cookie cutter to cut out the donuts and place them on a baking sheet lined with parchment paper.
- Bake: Place the baking sheet in the preheated oven and bake the donuts for about 10-12 minutes, or until they’re lightly golden and spring back when touched.
- Cool and Dust: Remove the donuts from the oven and allow them to cool slightly on a wire rack. Once cooled, generously dust the tops with powdered sugar to create the snowflake effect.
Extra Tips:
For an extra festive touch, consider using colored sugar or edible glitter to sprinkle over the donuts after dusting with powdered sugar. If you don’t have a snowflake cutter, you can use any festive shape or simply make round donuts.
To guarantee even baking, make sure the dough is rolled out evenly and the oven is fully preheated. Finally, involve the kids in the decoration process to make it a fun and engaging holiday activity that everyone can enjoy together.
Christmas Tree French Toast Sticks
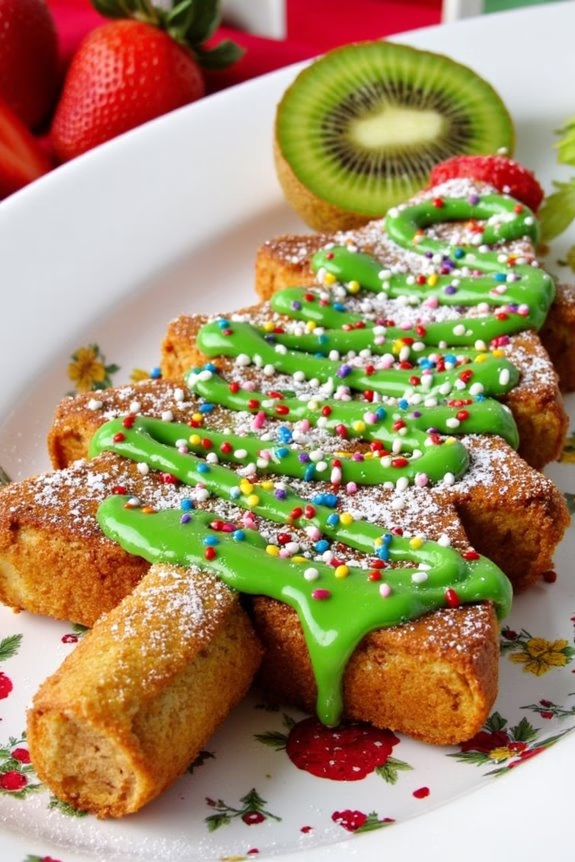
Christmas is a time for celebration, joy, and creating memorable moments with family, especially the little ones. What better way to start a festive day than with a breakfast that delights the eyes and taste buds alike? Christmas Tree French Toast Sticks are the perfect festive treat to kick off your holiday morning. This playful take on classic French toast not only looks adorable but also adds a bit of whimsy to your breakfast table.
It’s a simple and fun recipe that kids can help with, making it a perfect activity for the family. These Christmas Tree French Toast Sticks are designed to resemble small, edible Christmas trees, complete with green-tinted syrup and colorful sprinkles as ornaments. The preparation is straightforward, making it an ideal recipe to involve kids, who’ll enjoy dipping, decorating, and, of course, eating their creations.
The aroma of French toast cooking in the kitchen will fill your home with the inviting scents of cinnamon and vanilla, setting the stage for a cozy and delightful holiday morning.
Ingredients (Serves 4-6):
- 6 slices of thick-cut bread (brioche or challah recommended)
- 4 large eggs
- 1 cup of milk
- 1 teaspoon of vanilla extract
- 1 teaspoon of ground cinnamon
- 2 tablespoons of sugar
- Pinch of salt
- 1 tablespoon of unsalted butter
- Green food coloring
- Maple syrup
- Assorted colorful sprinkles
- Powdered sugar (optional, for dusting)
- Fresh fruit for garnish (optional)
Instructions:
- Prepare the Bread: Begin by slicing each piece of thick-cut bread into four sticks. This will create the base of your Christmas tree shapes.
- Make the Batter: In a large mixing bowl, whisk together the eggs, milk, vanilla extract, cinnamon, sugar, and a pinch of salt until well combined. This mixture will serve as your French toast batter.
- Dip the Bread: Heat a large skillet or griddle over medium heat and add a tablespoon of butter, allowing it to melt and coat the surface. Dip each bread stick into the batter, making sure it’s fully soaked but not overly soggy.
- Cook the French Toast: Place the soaked bread sticks onto the heated skillet. Cook for 2-3 minutes on each side or until golden brown. Remove them from the skillet and set aside on a plate lined with paper towels to absorb excess oil.
- Prepare the Syrup: In a small bowl, mix maple syrup with a few drops of green food coloring until you achieve a desired shade of green. This will be used to drizzle over the French toast sticks to mimic Christmas tree foliage.
- Assemble the Trees: Arrange the French toast sticks on a serving platter in a tree-like pattern. Drizzle the green syrup over the top and sprinkle with colorful sprinkles to resemble ornaments. If desired, dust lightly with powdered sugar for a snowy effect.
- Garnish and Serve: For an extra festive touch, garnish the plate with fresh fruit such as strawberries or kiwi to add a pop of color. Serve immediately with additional syrup on the side.
Extra Tips: When choosing bread for this recipe, opt for a sturdy, thick-cut variety like brioche or challah, as they hold up well during soaking and cooking. If you’re planning to get the kids involved, consider preparing the batter ahead of time to simplify the process.
Additionally, using a non-stick skillet will help prevent sticking and guarantee even cooking. Adjust the amount of green food coloring to your preference, and don’t hesitate to get creative with sprinkles and garnishes to make each “tree” unique. Enjoy watching your kids’ faces light up as they dig into this delightful holiday breakfast!
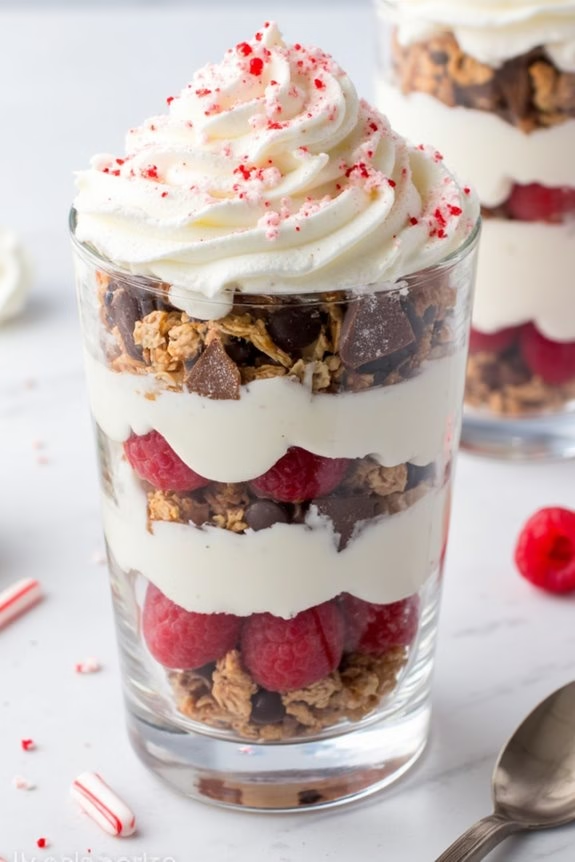
Peppermint Bark Yogurt Parfaits
The holiday season is a time of joy, wonder, and deliciously themed breakfasts that bring the whole family together. Peppermint Bark Yogurt Parfaits are the perfect festive treat to kickstart Christmas morning for your little ones.
Combining the creamy richness of yogurt with the minty freshness of peppermint bark and the satisfying crunch of granola, these parfaits aren’t only a delight to the taste buds but also a feast for the eyes. The layers of colorful ingredients make this breakfast both fun and nutritious, giving kids the energy they need for a day full of holiday activities.
These parfaits are easy to prepare and can be customized to suit your family’s tastes. You can involve the kids in the preparation process, allowing them to create their own parfaits with their favorite toppings. This interactive element adds an extra layer of enjoyment and makes breakfast an exciting start to Christmas Day.
Serve these parfaits in clear glasses or jars to showcase the beautiful layers and add a touch of elegance to your breakfast table.
Ingredients (Serves 4-6):
- 3 cups vanilla yogurt
- 1 cup granola
- 1 cup crushed peppermint bark
- 1/2 cup mini chocolate chips
- 1/2 cup fresh raspberries
- Whipped cream (for topping, optional)
- Crushed candy canes (for garnish, optional)
Instructions:
- Prepare the Ingredients: Start by gathering all your ingredients and placing them on the kitchen counter. Crush the peppermint bark into small pieces and set aside. If you’re using candy canes for garnish, crush them too and set aside.
- Layer the Yogurt: In each glass or jar, add about 1/2 cup of vanilla yogurt as the first layer. Use a spoon to spread it evenly across the bottom.
- Add Crunch and Flavor: Sprinkle a layer of granola over the yogurt. Aim for about 2 tablespoons per serving. This will add a delightful crunch to your parfait.
- Add Peppermint Bark: Next, sprinkle a generous layer of crushed peppermint bark. This will give the parfait a sweet, minty flavor that screams Christmas.
- More Layers of Goodness: Add a few fresh raspberries on top of the peppermint bark, followed by a tablespoon of mini chocolate chips for an extra burst of chocolatey delight.
- Repeat the Layers: Depending on the size of your glass or jar, repeat the layers of yogurt, granola, peppermint bark, raspberries, and chocolate chips until you reach the top.
- Top it Off: Finish with a dollop of whipped cream on top, if desired. For an added festive touch, sprinkle some crushed candy cane pieces over the whipped cream.
- Serve and Enjoy: Serve the parfaits immediately to enjoy the fresh flavors and textures.
Extra Tips:
When making Peppermint Bark Yogurt Parfaits, you can substitute plain yogurt for vanilla if you prefer a less sweet option. Additionally, try using Greek yogurt for a thicker consistency.
Feel free to experiment with different types of granola to find your favorite flavor combination. If making these parfaits in advance, keep the granola separate and add it just before serving to maintain its crunch.
Finally, if you want to control the sugar content, consider using dark chocolate peppermint bark and reduce the amount of chocolate chips. These small adjustments can make the parfaits just as enjoyable while catering to your family’s dietary preferences.
Frosty Smoothie Bowls for a Chilly Morning
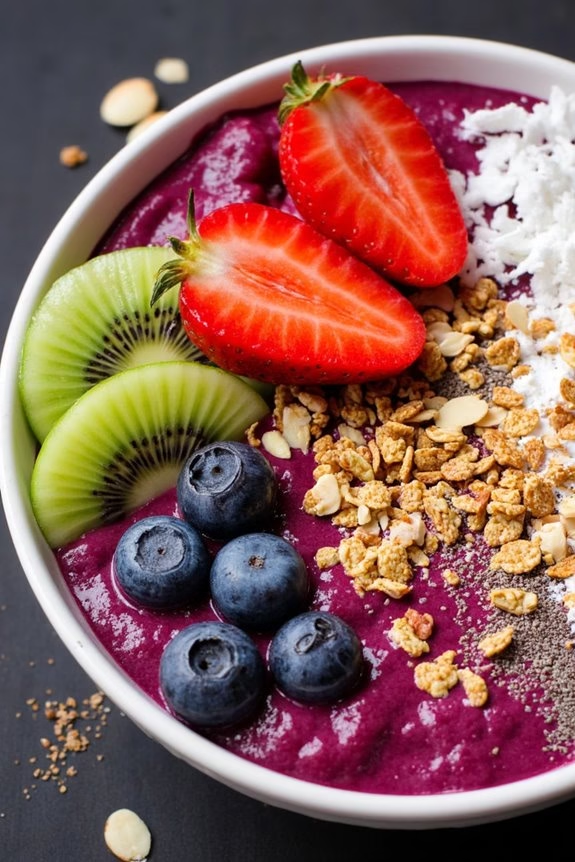
On a chilly Christmas morning, there’s nothing like starting the day with a fun and nutritious breakfast that delights both kids and adults alike. Frosty Berry Smoothie Bowls are the perfect festive treat, combining the icy coolness of a smoothie with the comforting crunch of granola and the vibrant colors of fresh fruit.
This recipe isn’t only visually appealing but also packed with vitamins, fiber, and antioxidants, setting a healthy tone for the rest of the holiday festivities. The smoothie bowls are easy to customize, allowing you to use your family’s favorite fruits and toppings, making breakfast both interactive and enjoyable.
This recipe serves 4-6 people and can be easily adjusted to suit personal preferences. The key to a great smoothie bowl is achieving the right consistency, which should be thick enough to hold the toppings without sinking. The combination of frozen berries, banana, and yogurt creates a creamy base that’s naturally sweet and satisfying. Topped with a variety of fruits, seeds, and nuts, this dish isn’t only delicious but also provides a great source of energy to keep everyone fueled for the day’s activities.
Ingredients:
- 2 cups frozen mixed berries
- 2 ripe bananas
- 1 cup Greek yogurt
- 1 cup almond milk (or any milk of choice)
- 2 tablespoons honey or maple syrup
- 1 teaspoon vanilla extract
- 1 cup granola
- 1/2 cup fresh strawberries, sliced
- 1/2 cup fresh blueberries
- 1/2 cup kiwi, peeled and sliced
- 1/4 cup shredded coconut
- 1/4 cup chia seeds
- 1/4 cup slivered almonds
Instructions:
- Prepare the Smoothie Base: In a high-speed blender, combine the frozen mixed berries, bananas, Greek yogurt, almond milk, honey or maple syrup, and vanilla extract. Blend on high until the mixture is smooth and creamy, ensuring there are no chunks of fruit. The consistency should be thick like ice cream.
- Adjust Consistency: If the smoothie is too thick, add a little more almond milk, a tablespoon at a time, and blend until you reach the desired consistency. If it’s too thin, add a few more frozen berries or banana slices to thicken it up.
- Serve the Smoothie: Pour the smoothie base evenly into 4-6 bowls. Use the back of a spoon to smooth out the surface, creating a flat base for the toppings.
- Add Toppings: Arrange the granola, fresh strawberries, blueberries, kiwi slices, shredded coconut, chia seeds, and slivered almonds on top of the smoothie. Get creative with your patterns or let the kids design their own bowls.
- Final Touches: Drizzle a little extra honey or maple syrup over the top if desired for added sweetness, and serve immediately to enjoy the invigorating chill.
Extra Tips:
For an even thicker smoothie bowl, consider freezing the bananas before blending. This will help achieve an ice cream-like texture.
If you’re preparing this breakfast for a crowd, you can set up a topping bar where everyone can choose their own toppings, making it a fun and interactive breakfast activity.
To save time in the morning, you can pre-portion the frozen ingredients into individual bags and store them in the freezer, allowing for quick assembly.
Remember that the key to a visually appealing smoothie bowl is the contrast of colors, so try to use a variety of brightly colored fruits and toppings.
Elf Hat Crescent Rolls: A Festive Twist
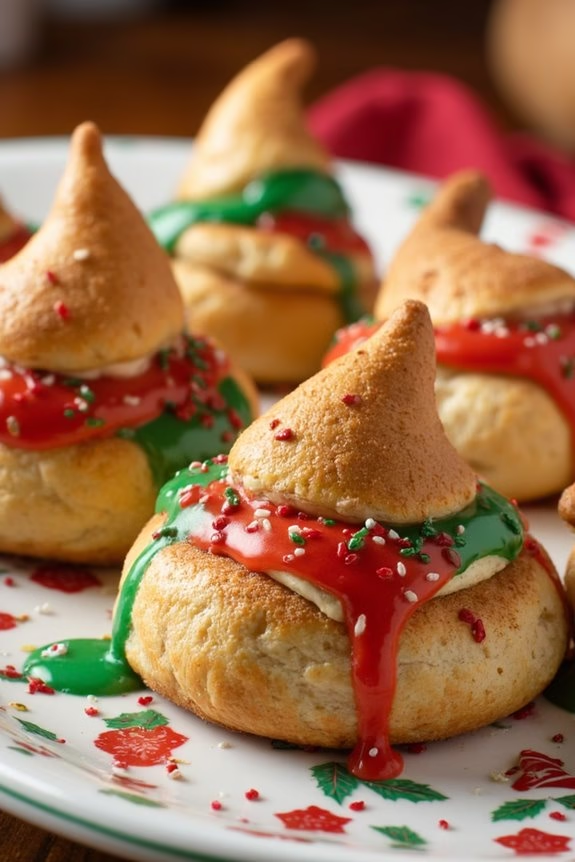
Create a magical Christmas morning with these Elf Hat Crescent Rolls, a delightful and whimsical addition to your holiday breakfast table. These crescent rolls aren’t only incredibly easy to make but also add a splash of color and joy to the meal, capturing the festive spirit of the season. Each roll is topped with a sweet glaze and decorated with vibrant sprinkles, making it a fun and inviting treat for kids and adults alike.
Perfect for a serving size of 4-6 people, these crescent rolls are ideal for a cozy family breakfast or a cheerful Christmas brunch. The combination of buttery crescent roll dough and a sweet, colorful topping makes this dish a surefire hit with children. The ease of preparation means you can spend less time in the kitchen and more time enjoying the holiday festivities with your loved ones.
Ingredients (Serves 4-6):
- 1 can (8 ounces) refrigerated crescent roll dough
- 1/4 cup butter, melted
- 1/4 cup granulated sugar
- 1 teaspoon ground cinnamon
- 1/2 cup powdered sugar
- 1-2 tablespoons milk
- Red and green food coloring
- Assorted holiday sprinkles
Cooking Instructions:
- Preheat the Oven: Start by preheating your oven to 375°F (190°C). Line a baking sheet with parchment paper or a silicone baking mat for easy cleanup.
- Prepare the Dough: Open the can of crescent roll dough and carefully unroll it. Separate the dough into triangles along the perforated lines, placing them on the prepared baking sheet.
- Add Sweetness: In a small bowl, mix the granulated sugar with the ground cinnamon. Brush each triangle of dough with melted butter, then sprinkle generously with the cinnamon-sugar mixture. This will add a sweet and flavorful layer to your rolls.
- Shape the Elf Hats: Starting from the wide end, roll up each dough triangle towards the pointed end to form a crescent shape. Bend each roll slightly to create the curve of an elf hat.
- Bake: Place the baking sheet in the preheated oven and bake for 10-12 minutes or until the crescent rolls are golden brown. Keep an eye on them to prevent over-baking.
- Prepare the Glaze: While the rolls are baking, prepare the glaze by mixing the powdered sugar with 1 tablespoon of milk in a small bowl. If the glaze is too thick, add more milk, a little at a time, until you achieve a smooth, pourable consistency.
- Color the Glaze: Divide the glaze into two bowls. Add a few drops of red food coloring to one bowl and green food coloring to the other. Stir until the colors are well combined.
- Decorate: Once the crescent rolls are baked and slightly cooled, drizzle the red and green glazes over the top of each roll. Finish by sprinkling holiday sprinkles on top for a festive touch.
Extra Tips:
For an extra festive flair, you can add a drop of vanilla or almond extract to the glaze for additional flavor. If you want to involve the kids, let them help with the glazing and decorating steps – it’s a fun way for them to participate in holiday preparations.
Remember to use parchment paper or a silicone mat to prevent the rolls from sticking to the baking sheet. If you prefer, you can also fill the crescent rolls with a spoonful of chocolate spread or jam before rolling them up for an extra sweet surprise inside.
Red Velvet Breakfast Cupcakes
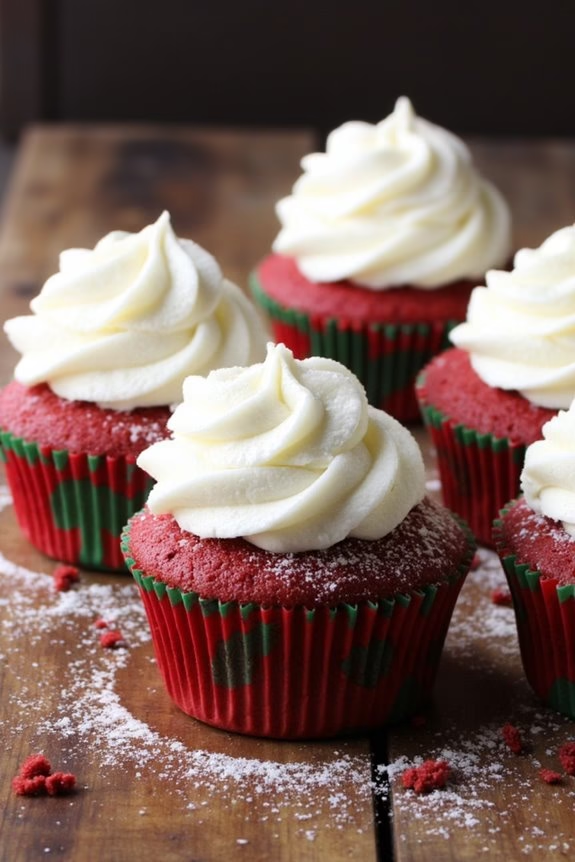
Make your holiday morning a little more magical with these delightful Red Velvet Breakfast Cupcakes. Perfectly festive and irresistibly fluffy, these cupcakes combine the classic red velvet flavor with a breakfast twist, providing a sweet start to your Christmas day. With their rich cocoa flavor and vibrant color, these cupcakes are sure to be a hit with kids and adults alike.
These breakfast cupcakes aren’t just delicious, but they’re also easy to make, allowing you to spend more time with your loved ones rather than in the kitchen. Serve them warm with a dollop of cream cheese frosting or a sprinkle of powdered sugar for a truly indulgent holiday treat. Here’s how you can make this delightful dish for a serving size of 4-6 people.
Ingredients:
- 1 ½ cups all-purpose flour
- 2 tablespoons unsweetened cocoa powder
- 1 teaspoon baking powder
- ½ teaspoon baking soda
- ¼ teaspoon salt
- ½ cup unsalted butter, softened
- 1 cup granulated sugar
- 2 large eggs
- 1 teaspoon vanilla extract
- 1 tablespoon red food coloring
- ½ cup buttermilk
- 1 teaspoon apple cider vinegar
- Cream cheese frosting or powdered sugar for topping
Instructions:
- Preheat the Oven: Begin by preheating your oven to 350°F (175°C). Line a muffin tin with cupcake liners to prepare for the batter.
- Combine Dry Ingredients: In a medium-sized bowl, sift together the flour, cocoa powder, baking powder, baking soda, and salt. This facilitates the dry ingredients being well mixed and any lumps are removed.
- Cream Butter and Sugar: In a large bowl, beat the softened butter and granulated sugar together until light and fluffy. This should take about 3-4 minutes using an electric mixer on medium speed.
- Add Eggs and Vanilla: Add the eggs one at a time to the butter and sugar mixture, beating well after each addition. Then, mix in the vanilla extract and red food coloring until fully incorporated.
- Mix in Buttermilk and Dry Ingredients: Gradually add the dry ingredients to the wet mixture, alternating with the buttermilk, beginning and ending with the dry ingredients. Mix until just combined, being careful not to overmix the batter.
- Add Vinegar: Stir in the apple cider vinegar, which will react with the baking soda to help the cupcakes rise and become fluffy.
- Fill and Bake: Divide the batter evenly among the prepared cupcake liners, filling each about 2/3 full. Bake in the preheated oven for 18-20 minutes, or until a toothpick inserted into the center of a cupcake comes out clean.
- Cool and Frost: Allow the cupcakes to cool in the pan for about 5 minutes before transferring them to a wire rack to cool completely. Once cool, top with cream cheese frosting or dust with powdered sugar.
Extra Tips:
For an even richer flavor, consider adding a teaspoon of espresso powder to the dry ingredients to enhance the cocoa flavor. If you want to make these cupcakes in advance, they can be stored in an airtight container for up to two days.
For a fun twist, you can use holiday-themed cupcake liners to add an extra festive touch. Remember to let the cupcakes cool completely before frosting to prevent the frosting from melting. Enjoy your festive breakfast delight!
Nutcracker Nutella Crepes
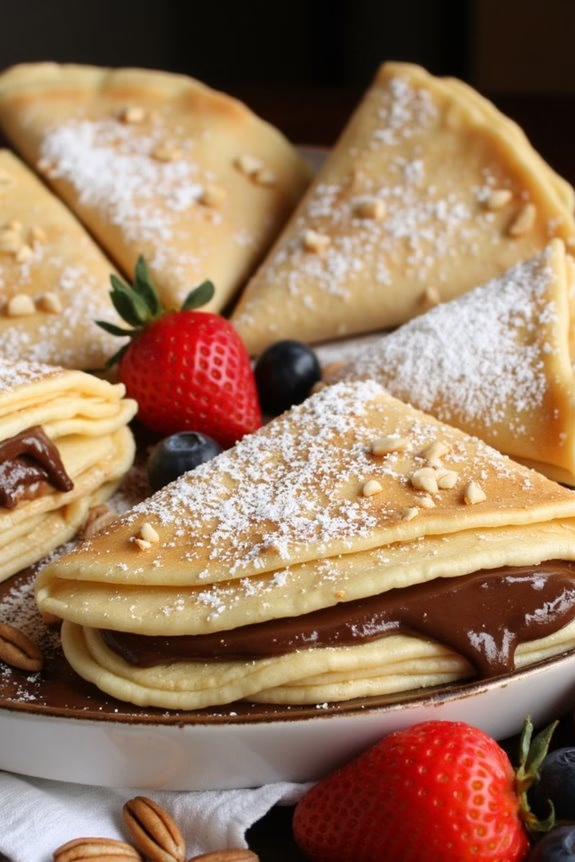
Nutcracker Nutella Crepes are a delightful and festive breakfast treat that will bring joy to your holiday mornings. These crepes are inspired by the classic Nutcracker ballet, with their rich, decadent filling of Nutella and a sprinkle of finely chopped nuts to add a bit of crunch. Perfect for kids and adults alike, these crepes are sure to become a family favorite during the Christmas season.
They aren’t only delicious but also visually appealing, making them an ideal option for holiday breakfast gatherings. The beauty of Nutcracker Nutella Crepes lies in their simplicity, allowing you to whip up a batch in no time while still delivering an impressive and satisfying meal.
The light and fluffy crepes are the perfect vehicle for the creamy Nutella and nut mixture, creating a harmonious blend of flavors and textures. Whether served with a dusting of powdered sugar, a dollop of whipped cream, or fresh fruit, these crepes are versatile and can be tailored to suit any palate.
Gather your ingredients, fire up the stove, and get ready to create a magical breakfast experience for 4-6 people.
Ingredients:
- 1 cup all-purpose flour
- 2 large eggs
- 1 1/2 cups milk
- 2 tablespoons melted butter
- 1 tablespoon granulated sugar
- 1/2 teaspoon vanilla extract
- Pinch of salt
- 1 cup Nutella
- 1/2 cup finely chopped mixed nuts (such as almonds, hazelnuts, or walnuts)
- Optional toppings: powdered sugar, whipped cream, fresh berries
Instructions:
- Prepare the Crepe Batter: In a large mixing bowl, whisk together the flour, sugar, and salt. In another bowl, whisk the eggs, then add the milk, melted butter, and vanilla extract. Gradually add the wet ingredients to the dry ingredients, whisking until smooth and free of lumps. Let the batter rest for at least 15-30 minutes.
- Heat the Pan: Preheat a non-stick skillet or crepe pan over medium heat. Lightly grease the pan with a little butter or oil to guarantee the crepes don’t stick.
- Cook the Crepes: Pour about 1/4 cup of batter into the pan, tilting it in a circular motion so the batter evenly coats the surface. Cook for about 1-2 minutes, or until the edges begin to lift and the underside is golden brown. Flip the crepe carefully and cook the other side for another 30 seconds to 1 minute. Transfer the cooked crepe to a plate and cover to keep warm. Repeat with the remaining batter.
- Prepare the Filling: While the crepes are cooking, gently warm the Nutella in a microwave-safe bowl or on the stovetop until it becomes spreadable.
- Assemble the Crepes: Spread a generous amount of Nutella over half of each crepe, then sprinkle with the chopped nuts. Fold the crepe in half, then fold in half again to form a triangle.
- Serve the Crepes: Arrange the crepes on a serving platter. Optionally, dust with powdered sugar, add a dollop of whipped cream, or garnish with fresh berries before serving.
Extra Tips:
For the best results, verify your crepe batter is smooth and lump-free by sieving the dry ingredients before mixing. Letting the batter rest allows the flour to fully absorb the liquids, resulting in more tender crepes.
If you prefer a thinner consistency, you can add a bit more milk to the batter. Be sure not to overfill the crepes with Nutella to avoid them from becoming too heavy, which can make folding difficult.
Finally, keep the crepes warm by covering them with aluminum foil or placing them in a warm oven until ready to serve. Enjoy your festive Nutcracker Nutella Crepes!
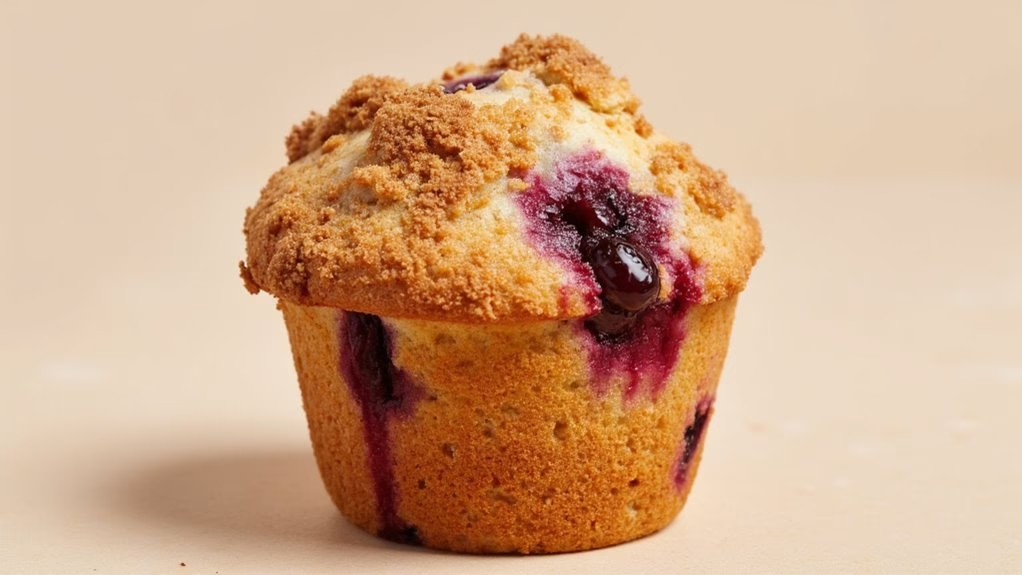
Jingle Bell Berry Muffins
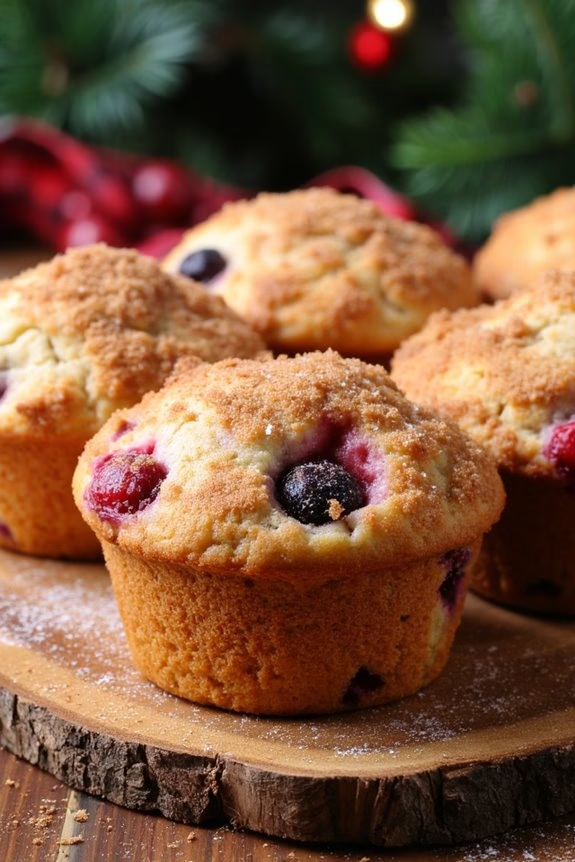
Jingle Bell Berry Muffins are the perfect festive treat to kickstart your Christmas morning. These delightful muffins are bursting with the flavors of fresh berries, offering a sweet and slightly tangy taste that kids will love. The muffins aren’t only delicious but also visually appealing with their vibrant berry colors, making them a fun addition to your holiday breakfast table.
They’re easy to make, allowing you to involve your children in the process and create some joyful Christmas memories together. These muffins are made from a moist and tender batter that’s enriched with the goodness of berries, bringing an invigorating burst of flavor in every bite. Whether you use fresh or frozen berries, the results are equally delightful.
Serve these muffins warm, straight from the oven, or prepare them in advance so you can focus on other holiday festivities. With a serving size of 4-6 people, this recipe guarantees there are enough muffins to go around, leaving everyone satisfied.
Ingredients (Serving Size: 4-6 people):
- 1 1/2 cups all-purpose flour
- 1/2 cup granulated sugar
- 2 teaspoons baking powder
- 1/2 teaspoon salt
- 1/3 cup vegetable oil
- 1 large egg
- 1/3 cup milk
- 1 teaspoon vanilla extract
- 1 cup mixed berries (fresh or frozen)
- 1/4 cup brown sugar
- 1 teaspoon ground cinnamon
Cooking Instructions:
- Preheat the Oven: Begin by preheating your oven to 375°F (190°C). Line a muffin tin with paper liners or lightly grease it to prevent sticking.
- Mix Dry Ingredients: In a large mixing bowl, combine the all-purpose flour, granulated sugar, baking powder, and salt. Whisk these ingredients together until they’re well combined.
- Prepare Wet Mixture: In a separate bowl, whisk together the vegetable oil, egg, milk, and vanilla extract until smooth. Confirm that the egg is fully incorporated into the mixture.
- Combine Mixtures: Gradually add the wet ingredients to the dry ingredients, stirring gently until just combined. Be careful not to over-mix the batter as this may result in dense muffins.
- Fold in Berries: Gently fold the mixed berries into the batter, ensuring they’re evenly distributed. If using frozen berries, don’t thaw them to prevent the batter from becoming too wet.
- Fill Muffin Tin: Evenly distribute the batter into the prepared muffin tin, filling each cup about 3/4 full. This allows room for the muffins to rise without overflowing.
- Prepare Topping: In a small bowl, mix together the brown sugar and ground cinnamon. Sprinkle this mixture evenly over the top of each muffin for a sweet, crunchy topping.
- Bake: Place the muffin tin in the preheated oven and bake for 20-25 minutes, or until a toothpick inserted into the center of a muffin comes out clean.
- Cool and Serve: Once baked, remove the muffins from the oven and allow them to cool in the tin for about 5 minutes before transferring to a wire rack. Serve warm or at room temperature.
Extra Tips:
For the best results, use a mix of your favorite berries such as blueberries, raspberries, and chopped strawberries. If you prefer a sweeter muffin, increase the sugar slightly or drizzle with a light glaze made from powdered sugar and milk.
To enhance the festive feel, you can also sprinkle some powdered sugar over the cooled muffins for a snowy effect. If preparing ahead of time, these muffins can be stored in an airtight container for up to two days or frozen for longer storage.