

Looking for fresh ideas to brighten up your mornings with some delicious low-carb breakfast options? Start your day with a creamy avocado and egg breakfast bowl or enjoy the light and satisfying almond flour pancakes. These recipes are all about keeping things simple and joyful. Mornings shouldn’t be a hassle, and these options make it easy. Let’s explore these delightful breakfast ideas together.
Avocado and Egg Breakfast Bowl

Avocado and Egg Breakfast Bowl is a delightful, low-carb dish that combines the creamy richness of avocados with the protein-packed goodness of eggs. This breakfast bowl isn’t only nutritious but also incredibly satisfying, making it a perfect start to your day.
The combination of fresh ingredients and simple preparation guarantees that you can enjoy a wholesome meal without spending too much time in the kitchen. Whether you’re following a low-carb diet or just looking for a delicious breakfast option, this recipe is sure to become a favorite.
Designed to serve 4-6 people, this Avocado and Egg Breakfast Bowl is versatile and can be tailored to meet individual taste preferences. It incorporates a variety of textures and flavors, from the smooth avocado to the crispy bacon and the soft-boiled eggs.
With just a few ingredients, you can whip up a breakfast that will keep you full and energized throughout the morning. Let’s plunge into the recipe and see how easy it’s to create this delightful dish.
Ingredients (for 4-6 servings):
- 4 ripe avocados
- 6 large eggs
- 6 strips of bacon
- 2 cups cherry tomatoes, halved
- 1 lemon, juiced
- Salt and black pepper to taste
- Fresh parsley, chopped (for garnish)
Cooking Instructions:
1. Prepare the Ingredients: Start by slicing the avocados in half, removing the pits, and scooping the flesh into a bowl. Lightly mash the avocado with a fork, then add lemon juice, salt, and pepper to taste. Set aside.
2. Cook the Bacon: In a large skillet, cook the bacon strips over medium heat until crispy. Once cooked, transfer the bacon to a paper towel-lined plate to drain excess fat. Once cooled, crumble the bacon into small pieces.
3. Boil the Eggs: Fill a pot with water and bring it to a boil. Gently lower the eggs into the boiling water and let them cook for about 7 minutes for a soft-boiled consistency. Adjust the time if you prefer harder yolks.
Once done, transfer the eggs to an ice bath to cool, then peel and slice them.
4. Assemble the Bowl: Divide the mashed avocado evenly among serving bowls. Arrange the sliced eggs and cherry tomatoes on top of the avocado. Sprinkle the crumbled bacon over the top.
5. Garnish and Serve: Finish by garnishing each bowl with freshly chopped parsley. Serve immediately.
Extra Tips:
When mashing the avocado, be careful not to over-mash to retain some texture. For added flavor, consider adding a pinch of smoked paprika or garlic powder to the avocado mixture.
If you prefer, you can substitute turkey bacon for a leaner option. This dish is best enjoyed fresh, but you can prepare the individual components ahead of time and assemble them just before serving for convenience.
Spinach and Feta Omelet

Start your day with a delicious and nutritious Spinach and Feta Omelet. This low-carb breakfast recipe is perfect for those who are looking to cut down on carbohydrates without sacrificing flavor. The combination of fresh spinach and creamy feta cheese creates a delightful balance of flavors that’s both satisfying and energizing.
This dish isn’t only quick to make but also packed with essential nutrients, making it an excellent choice for a healthy breakfast. Preparing a Spinach and Feta Omelet for a group of 4-6 people allows you to share this delightful meal with family or friends.
This recipe is designed to provide a wholesome start to your day, guaranteeing you have the energy you need to tackle whatever comes your way. Whether you’re hosting a brunch or just want to enjoy a leisurely morning meal, this omelet is sure to impress with its vibrant colors and rich taste.
Ingredients (Serves 4-6)
- 12 large eggs
- 1 cup fresh spinach leaves, roughly chopped
- 1 cup feta cheese, crumbled
- 1/2 cup cherry tomatoes, halved
- 1 small onion, finely chopped
- 2 tablespoons olive oil
- Salt and pepper to taste
Cooking Instructions
- Prepare the Ingredients: Crack the eggs into a large mixing bowl, add a pinch of salt and pepper, and whisk until fully combined. Chop the spinach, halve the cherry tomatoes, and crumble the feta cheese. Set these aside to add into the omelet later.
- Cook the Vegetables: In a large non-stick skillet, heat the olive oil over medium heat. Add the chopped onion and sauté for about 2-3 minutes until it becomes translucent. Add the cherry tomatoes and cook for another 2 minutes. Finally, stir in the chopped spinach and cook until it wilts, which should take about 1 minute.
- Form the Omelet Base: Pour the beaten eggs into the skillet over the vegetables, guaranteeing the mixture is spread evenly. Allow the eggs to cook undisturbed for about 3-4 minutes, or until the edges start to set.
- Add the Cheese: Evenly sprinkle the crumbled feta cheese over one half of the omelet. Use a spatula to gently lift the other half of the omelet and fold it over the cheese-covered side.
- Finish Cooking: Reduce the heat to low, cover the skillet, and cook for an additional 2-3 minutes until the eggs are fully set and the cheese is melted.
- Serve: Carefully slide the omelet onto a large serving platter or cutting board. Slice into portions and serve hot.
Extra Tips
To guarantee your omelet is light and fluffy, make sure not to overbeat the eggs as this can cause them to become dense. If you prefer a bit of spice, consider adding a pinch of red chili flakes or a dash of hot sauce to the egg mixture before cooking.
For added texture, toss in some chopped bell peppers or mushrooms along with the spinach. Remember to use a non-stick skillet for easy flipping and to prevent the omelet from sticking. Enjoy your breakfast with a side of fresh avocado or a small green salad for a complete low-carb meal.
Greek Yogurt With Berries and Nuts
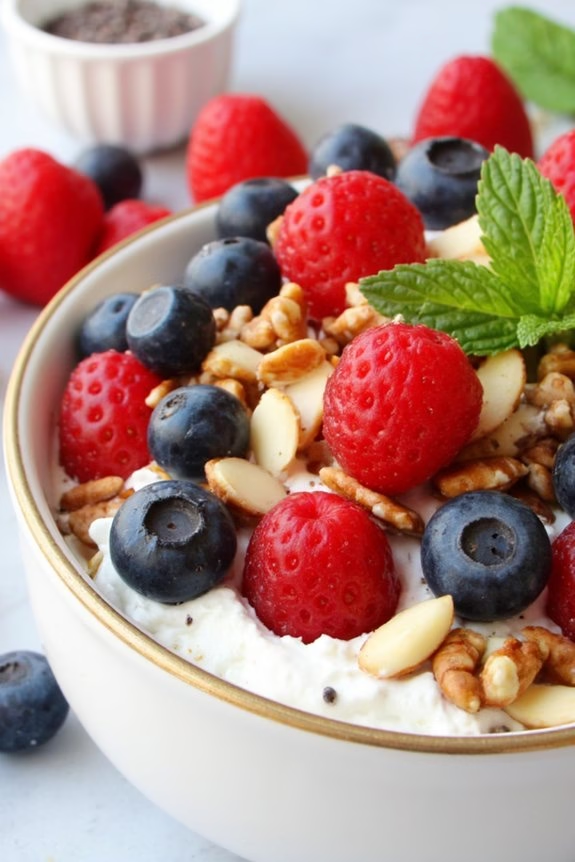
Greek Yogurt With Berries and Nuts is a delicious and nutritious low carb breakfast option that’s both satisfying and easy to prepare. This dish combines the creamy texture of Greek yogurt with the natural sweetness of fresh berries and the crunchiness of nuts, resulting in a delightful mix of flavors and textures.
It’s perfect for those who are looking for a quick and healthy breakfast that doesn’t compromise on taste. Whether you’re rushing to start your day or planning a laid-back morning, this recipe can be whipped up in a matter of minutes.
Rich in protein, antioxidants, and healthy fats, this breakfast will keep you energized and full throughout the morning. The combination of yogurt, berries, and nuts not only provides essential nutrients but also supports digestive health and aids in weight management.
Plus, it’s a versatile dish that you can customize based on your preferences and seasonal availability of fruits. Here’s how to make Greek Yogurt With Berries and Nuts for a serving size of 4-6 people:
Ingredients:
- 4 cups plain Greek yogurt
- 2 cups mixed fresh berries (such as strawberries, blueberries, and raspberries)
- 1 cup mixed nuts (such as almonds, walnuts, and pecans)
- 2 tablespoons chia seeds
- 2 tablespoons honey or sugar-free sweetener (optional)
- 1 teaspoon vanilla extract
- Fresh mint leaves for garnish (optional)
Instructions:
- Prepare the Ingredients: Start by washing the fresh berries thoroughly and pat them dry with a paper towel. Roughly chop the larger nuts if desired, leaving some whole for added texture.
- Mix the Yogurt Base: In a large mixing bowl, combine the Greek yogurt, vanilla extract, and honey or sweetener if using. Stir well until the yogurt is smooth and the ingredients are fully incorporated.
- Assemble the Dish: Divide the yogurt mixture evenly into serving bowls or glasses. Top each serving with an equal amount of mixed berries, distributing them evenly across the top.
- Add the Crunch: Sprinkle the chopped and whole nuts over the berries, ensuring each serving gets a mix of different nuts. This will add a satisfying crunch to every bite.
- Finish with Toppings: Sprinkle chia seeds over each serving for an extra boost of omega-3 fatty acids and fiber. If desired, garnish with a few fresh mint leaves for an added pop of color and freshness.
- Serve: Serve immediately to enjoy the freshness and vibrant flavors of the dish.
Extra Tips: To elevate the flavors of this breakfast dish, consider toasting the nuts lightly in a dry skillet before using them. This will enhance their natural oils and bring out a richer flavor.
You can also experiment by adding a sprinkle of cinnamon or a dash of lemon zest to the yogurt mixture for an extra layer of taste. If you’re preparing this dish in advance, keep the components separate until serving to maintain the crunchiness of the nuts.
Smoked Salmon and Cream Cheese Roll-Ups

Smoked Salmon and Cream Cheese Roll-Ups are a delightful low-carb breakfast option that combines the rich, savory flavors of smoked salmon with the creamy texture of cream cheese. This recipe is quick to prepare and offers a revitalizing start to your day.
With its simple ingredients and elegant presentation, these roll-ups are perfect for a family breakfast or a brunch gathering with friends. The combination of smoked salmon and cream cheese is a classic pairing that’s further enhanced by the freshness of herbs and a hint of lemon zest, making it a flavorful and satisfying dish.
These roll-ups aren’t only delicious but also healthy, providing a good source of protein and healthy fats while keeping carbohydrate intake low. They’re perfect for those who are following a low-carb diet or simply looking for a nutritious breakfast option.
The preparation is straightforward, requiring minimal cooking skills, and the results are both visually appealing and appetizing. Whether you’re a seasoned cook or a beginner, you’ll find this recipe easy to follow and rewarding to make.
Ingredients (serving size: 4-6 people):
- 8 ounces of smoked salmon
- 8 ounces of cream cheese, softened
- 2 tablespoons of fresh dill, chopped
- 1 tablespoon of capers, drained and chopped
- Zest of 1 lemon
- 1 tablespoon of lemon juice
- 1 teaspoon of freshly ground black pepper
- 1 cucumber, thinly sliced
- 1 tablespoon of olive oil (optional, for drizzling)
- 8 large lettuce leaves (e.g., Romaine or Bibb lettuce)
Cooking Instructions:
- Prepare the Cream Cheese Mixture: In a medium-sized bowl, combine the softened cream cheese, chopped dill, capers, lemon zest, lemon juice, and black pepper. Mix thoroughly until all ingredients are well combined and smooth.
- Lay Out the Salmon: On a clean surface or cutting board, lay out the smoked salmon slices flat. Confirm the slices are as thin as possible for easy rolling.
- Spread the Mixture: Using a butter knife or a small spatula, evenly spread the cream cheese mixture over each slice of smoked salmon. Be careful not to apply too much pressure, as the salmon can be delicate and may tear.
- Assemble the Roll-Ups: Place one or two cucumber slices at one end of each salmon slice. Carefully roll the salmon slice starting from the cucumber end, creating a tight roll-up. Repeat this process for all the salmon slices.
- Wrap with Lettuce: Take each salmon roll-up and wrap it in a large lettuce leaf. This adds a crunchy texture and makes the roll-up easier to handle.
- Presentation and Serving: Arrange the roll-ups on a serving platter. If desired, drizzle lightly with olive oil for added flavor and shine. Serve immediately or refrigerate until ready to serve.
Extra Tips:
For the best results, choose high-quality smoked salmon, as it’s the star ingredient of this dish. Feel free to experiment with different herbs, such as chives or parsley, for a variation in flavor.
If you prefer a spicier kick, you can add a dash of hot sauce to the cream cheese mixture. Additionally, using a sharp knife will help in slicing the cucumber thinly and evenly, ensuring a consistent texture throughout the roll-ups.
These roll-ups can be prepared a few hours in advance, making them a convenient option for entertaining guests. Enjoy your Smoked Salmon and Cream Cheese Roll-Ups as a deliciously light and satisfying breakfast treat!
Chia Seed Pudding With Almond Milk
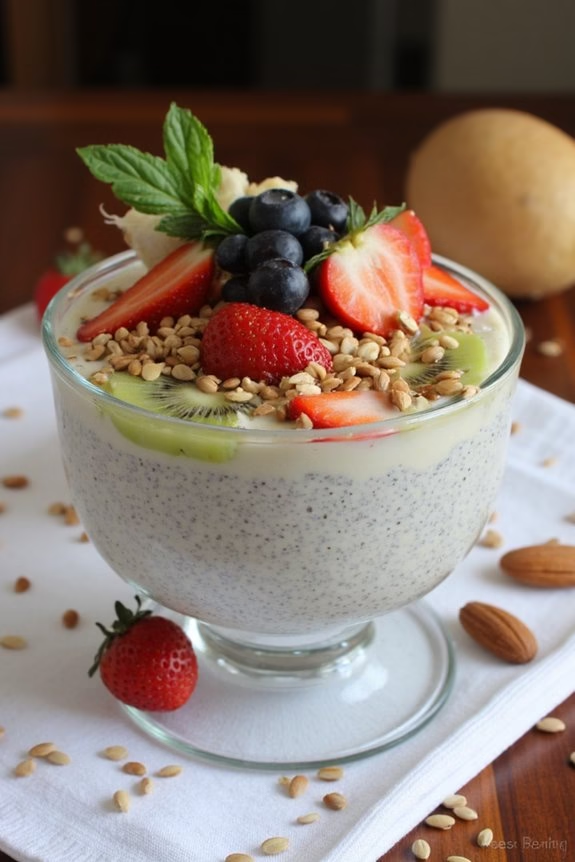
Chia Seed Pudding with Almond Milk is a delicious, nutritious, and easy-to-make breakfast option that fits perfectly into a low-carb diet. This creamy and satisfying dish is made by soaking chia seeds in almond milk until they swell and create a pudding-like consistency.
Not only is this breakfast recipe effortless to prepare, but it’s also packed with fiber, protein, and healthy fats, making it an excellent choice for those looking to start their day with a boost of energy and nutrients.
This versatile dish can be customized with various toppings and flavors, allowing you to tailor it to your taste preferences. You can add fresh fruits, nuts, or a drizzle of honey to enhance the flavor and texture.
This recipe is perfect for meal prep, as it can be made ahead of time and stored in the refrigerator for a quick grab-and-go breakfast. Let’s plunge into the recipe for making Chia Seed Pudding with Almond Milk for 4-6 people.
Ingredients:
- 1 cup chia seeds
- 4 cups unsweetened almond milk
- 2 teaspoons vanilla extract
- 2 tablespoons maple syrup or a low-carb sweetener
- A pinch of salt
- Fresh fruits for topping (optional)
- Nuts and seeds for topping (optional)
Cooking Instructions:
- Combine Ingredients: In a large mixing bowl, combine the chia seeds, almond milk, vanilla extract, maple syrup, and salt. Stir well to make sure that the chia seeds are evenly distributed throughout the liquid.
- Mix Thoroughly: Use a whisk to mix the ingredients thoroughly. This will help prevent the chia seeds from clumping together and ascertain a smooth consistency.
- Let It Sit: Cover the bowl with plastic wrap or a lid and place it in the refrigerator. Allow it to sit for at least 4 hours, or overnight, to let the chia seeds absorb the liquid and thicken into a pudding-like texture.
- Stir Again: After the pudding has set, remove it from the refrigerator and give it a good stir to combine any seeds that may have settled at the bottom.
- Serve and Enjoy: Divide the pudding into individual serving bowls. Top with fresh fruits, nuts, or seeds of your choice for added flavor and texture. Serve chilled.
Extra Tips:
When making Chia Seed Pudding with Almond Milk, feel free to experiment with different flavors and toppings. For a chocolate version, add a couple of tablespoons of cocoa powder to the mixture.
If you prefer a sweeter pudding, adjust the amount of sweetener to your taste. Additionally, remember to stir the mixture well before refrigerating to prevent the seeds from clumping.
This recipe can be stored in the refrigerator for up to 5 days, making it an excellent option for meal prep and busy mornings.
Bacon and Egg Muffins

Bacon and Egg Muffins are a delicious and convenient low-carb breakfast option that combines the classic breakfast flavors of bacon and eggs in a portable, muffin-sized portion.
Perfect for those on the go, these savory muffins aren’t only easy to make but also packed with protein and healthy fats. Whether you’re meal prepping for the week or feeding a crowd, Bacon and Egg Muffins are certain to become a breakfast staple in your home.
These muffins are versatile, allowing you to customize them with your favorite ingredients. Add some cheese for extra creaminess or toss in some vegetables for added nutrition. The base recipe is simple, making it a great starting point for experimentation.
Plus, they can be made ahead of time and stored in the fridge or freezer, making breakfast a breeze on busy mornings.
Ingredients (serving size: 4-6 people):
- 12 large eggs
- 12 slices of bacon
- 1/4 cup heavy cream
- 1/2 teaspoon salt
- 1/4 teaspoon black pepper
- 1/2 cup shredded cheddar cheese
- 1/4 cup chopped green onions
- Non-stick cooking spray
Cooking Instructions:
- Preheat the Oven: Begin by preheating your oven to 375°F (190°C). This guarantees that the muffins cook evenly once placed in the oven.
- Prepare the Bacon: In a skillet over medium heat, cook the bacon slices until they’re partially cooked but still pliable. They shouldn’t be crispy, as they’ll finish cooking in the oven. Once done, remove from the skillet and drain on paper towels.
- Grease the Muffin Tin: Spray a 12-cup muffin tin with non-stick cooking spray to prevent the muffins from sticking to the pan.
- Line the Muffin Cups: Line each muffin cup with a slice of bacon, forming a circle. The bacon should line the sides of the cup, creating a “nest” for the egg mixture.
- Prepare the Egg Mixture: In a large mixing bowl, whisk together the eggs, heavy cream, salt, and pepper until well combined. Stir in the shredded cheddar cheese and chopped green onions.
- Fill the Muffin Cups: Carefully pour the egg mixture into each bacon-lined muffin cup, filling them about 3/4 full to allow room for the muffins to expand as they bake.
- Bake the Muffins: Place the muffin tin in the preheated oven and bake for 20-25 minutes, or until the egg muffins are set and the tops are golden brown.
- Cool and Serve: Once baked, remove the muffins from the oven and let them cool in the pan for a few minutes before gently removing them. Serve warm, or allow them to cool completely before storing.
Extra Tips:
For added flavor, try incorporating different types of cheese, such as feta or mozzarella, into the egg mixture. You can also add a variety of vegetables like spinach, bell peppers, or mushrooms for a nutritional boost.
If you prefer a spicier kick, consider adding a dash of hot sauce or a sprinkle of red pepper flakes to the egg mixture.
These muffins can be stored in an airtight container in the refrigerator for up to 4 days or frozen for up to 1 month. Reheat them in the microwave or oven before serving to maintain their delicious flavor and texture.
Zucchini and Cheese Fritters

Zucchini and Cheese Fritters are a delightful low-carb breakfast option that’s both delicious and easy to prepare. These fritters combine the mild, slightly sweet flavor of zucchini with the rich taste of cheese, creating a satisfying dish that’s sure to please everyone at the breakfast table. Perfect for those following a low-carb diet, these fritters aren’t only packed with flavor but also offer a great way to start your day with a nutritious meal.
The key to making these fritters lies in balancing the texture and flavors, guaranteeing that the zucchini remains tender while the edges of the fritters achieve a delightful crispiness. With the addition of some basic pantry ingredients, you can whip up these fritters in no time, making them an ideal choice for busy mornings. Serve them with a dollop of sour cream or a sprinkle of fresh herbs for an added burst of flavor.
Ingredients (serves 4-6 people):
- 2 large zucchinis
- 1 teaspoon salt
- 2 large eggs
- 1 cup shredded cheese (such as cheddar or mozzarella)
- 1/2 cup almond flour
- 1/4 cup grated Parmesan cheese
- 2 cloves garlic, minced
- 1/4 teaspoon black pepper
- 1/4 cup chopped fresh parsley
- Olive oil, for frying
Instructions:
- Prepare the Zucchini: Start by grating the zucchinis using a box grater or food processor. Place the grated zucchini into a bowl and sprinkle with 1 teaspoon of salt. Let it sit for about 10 minutes to draw out excess moisture.
- Drain the Zucchini: After 10 minutes, use a clean kitchen towel or a cheesecloth to squeeze out as much liquid as possible from the grated zucchini. This step is essential to guarantee the fritters hold together and cook properly.
- Mix the Ingredients: In a large mixing bowl, combine the drained zucchini, eggs, shredded cheese, almond flour, Parmesan cheese, minced garlic, black pepper, and chopped parsley. Mix well until all ingredients are thoroughly combined.
- Form the Fritters: Take a heaping tablespoon of the mixture and form it into a patty. Repeat this process until all the mixture is used up.
- Cook the Fritters: Heat a tablespoon of olive oil in a large non-stick skillet over medium heat. Place the fritters in the skillet, being careful not to overcrowd them. Cook for about 3-4 minutes on each side, or until they’re golden brown and crispy.
- Serve: Once cooked, remove the fritters from the skillet and place them on a plate lined with paper towels to absorb any excess oil. Serve warm with your choice of toppings.
Extra Tips: To guarantee the fritters are crispy, make sure to squeeze out as much water as possible from the zucchini before mixing it with other ingredients. Additionally, avoid flipping the fritters too early; let them develop a nice golden crust before turning. If you prefer a different flavor profile, you can experiment with different cheeses or add herbs like dill or chives for a fresh twist.
Almond Flour Pancakes

Almond Flour Pancakes are a delightful low-carb breakfast option that’s both delicious and easy to make. These pancakes are light, fluffy, and have a slightly nutty flavor, making them a perfect breakfast treat for those looking to reduce their carb intake without sacrificing taste. Almond flour is a great alternative to traditional wheat flour, providing a nutrient-rich base that’s higher in protein and healthy fats.
When combined with a few other simple ingredients, you can whip up a stack of pancakes that are sure to satisfy. This recipe is perfect for a weekend brunch or a special breakfast gathering, as it serves 4-6 people. The almond flour pancakes aren’t only low in carbs but also gluten-free, making them a versatile choice for anyone following a gluten-free diet.
With a few pantry staples, you can create a breakfast that everyone will love, whether they’re following a low-carb diet or simply enjoying a delicious morning meal.
Ingredients (Serves 4-6):
- 2 cups almond flour
- 1 teaspoon baking powder
- 1/4 teaspoon salt
- 4 large eggs
- 1/4 cup unsweetened almond milk
- 2 tablespoons melted coconut oil
- 1 tablespoon vanilla extract
- 1 tablespoon maple syrup or low-carb sweetener
- Butter or coconut oil for cooking
Cooking Instructions:
- Prepare the Batter: In a large mixing bowl, combine the almond flour, baking powder, and salt. Mix well to guarantee there are no lumps. In a separate bowl, whisk together the eggs, almond milk, melted coconut oil, vanilla extract, and maple syrup or sweetener until well combined.
- Combine Ingredients: Gradually pour the wet ingredients into the dry ingredients, stirring continuously until you achieve a smooth batter. The consistency should be similar to traditional pancake batter, but slightly thicker.
- Heat the Pan: Preheat a non-stick skillet or griddle over medium heat. Add a small amount of butter or coconut oil to the pan to prevent sticking.
- Cook the Pancakes: Using a ladle or measuring cup, pour about 1/4 cup of batter onto the heated skillet for each pancake. Cook for 2-3 minutes until bubbles start to form on the surface, and the edges look set. Carefully flip the pancake and cook for another 2-3 minutes on the other side until golden brown.
- Serve Warm: Transfer the cooked pancakes to a plate and keep them warm while you repeat the process with the remaining batter. Serve with your choice of toppings such as fresh berries, sugar-free syrup, or a sprinkle of powdered sweetener.
Extra Tips:
For best results, verify that the almond flour is finely ground as this will produce a smoother batter and fluffier pancakes. If the batter is too thick, you can add a little more almond milk to reach the desired consistency.
Adjust the heat as necessary to prevent burning; lower heat will ensure the pancakes cook through without browning too quickly. Additionally, these pancakes freeze well, so you can make a larger batch and store them for future quick breakfasts. Just reheat in a toaster or oven, and they’re ready to enjoy!
Coconut Flour Waffles

Coconut Flour Waffles are a delightful option for those seeking a low-carb breakfast that doesn’t skimp on flavor or satisfaction. These waffles are light, fluffy, and have a subtle sweetness, making them a perfect canvas for your favorite toppings.
Made with coconut flour, which is both gluten-free and low in carbohydrates, these waffles are an excellent choice for anyone following a low-carb lifestyle or those with dietary restrictions. The coconut flour lends a mildly nutty flavor, and when paired with vanilla extract and a touch of sweetness, it creates a delicious breakfast treat that everyone will enjoy.
This recipe is designed to serve 4-6 people, making it ideal for a family breakfast or brunch gathering. Each waffle is packed with fiber and protein, thanks to the combination of coconut flour and eggs, providing a hearty and filling meal.
Whether you prefer to top them with fresh berries, sugar-free syrup, or a dollop of whipped cream, these coconut flour waffles are sure to become a staple in your low-carb breakfast repertoire.
Ingredients:
- 1 cup coconut flour
- 1 teaspoon baking powder
- 1/4 teaspoon salt
- 6 large eggs
- 1/2 cup unsweetened almond milk
- 1/4 cup melted coconut oil
- 2 tablespoons sweetener of choice (like erythritol or stevia)
- 1 teaspoon vanilla extract
- Cooking spray or additional coconut oil for the waffle iron
Cooking Instructions:
- Preheat the Waffle Iron: Before starting the batter, preheat your waffle iron according to the manufacturer’s instructions. This guarantees a crispy exterior for your waffles.
- Mix Dry Ingredients: In a large mixing bowl, combine the coconut flour, baking powder, and salt. Whisk these ingredients together to guarantee even distribution and prevent clumps in the batter.
- Prepare Wet Ingredients: In a separate bowl, beat the eggs thoroughly. Add the almond milk, melted coconut oil, sweetener of choice, and vanilla extract. Whisk the mixture until all components are well combined and smooth.
- Combine Wet and Dry Ingredients: Gradually add the wet ingredients to the dry ingredients, stirring continuously to form a smooth batter. The batter will be thicker than traditional waffle batter due to the coconut flour’s absorbent nature.
- Cook the Waffles: Lightly grease the waffle iron with cooking spray or a small amount of coconut oil. Pour the batter onto the preheated waffle iron, spreading it evenly. Close the lid and cook according to your waffle iron’s instructions, typically 3-5 minutes, or until the waffles are golden brown and cooked through.
- Serve and Enjoy: Carefully remove the waffles from the iron and serve immediately. Top with your choice of low-carb toppings like berries, sugar-free syrup, or whipped cream.
Extra Tips:
When making Coconut Flour Waffles, it’s important to remember that coconut flour absorbs liquid more than other flours, so the batter will be thicker than what you might be used to.
Don’t be tempted to thin it out too much, as this could affect the texture of the waffles. Additionally, if your waffle iron has a non-stick surface, be cautious about using too much cooking spray or oil, as it can create a greasy finish.
Finally, let the waffles rest for a minute or two after cooking to help them set and become even more flavorful. Adjust the sweetness to your liking with your preferred sweetener, and experiment with different toppings to find your favorite combination.
Mushroom and Cheese Scramble

Searching for a delicious, low-carb breakfast option that’s both satisfying and easy to prepare? Search no more than the Mushroom and Cheese Scramble. This dish combines the earthy flavors of mushrooms with the creamy texture of cheese, creating a delightful breakfast that will keep you full and energized throughout your morning.
Perfect for those busy mornings or leisurely brunches, this scramble is packed with nutrients and flavor without the added carbs. Whether you’re following a low-carb lifestyle or simply seeking to switch up your breakfast routine, this recipe is sure to become a favorite.
The Mushroom and Cheese Scramble isn’t only quick to whip up but also versatile, allowing you to customize it with your favorite herbs and spices. The key to a perfect scramble lies in gently cooking the eggs until they achieve the right creamy consistency and ensuring the mushrooms are sautéed to perfection.
Pair this scramble with a side of fresh greens or a low-carb toast for a complete meal. Below, you’ll find the ingredients needed to serve 4-6 people, along with step-by-step instructions to help you create this mouthwatering breakfast dish.
Ingredients for 4-6 servings:
- 12 large eggs
- 1 cup of sliced mushrooms (button or cremini)
- 1 cup of shredded cheddar cheese
- 1/4 cup of milk or cream
- 2 tablespoons of butter
- Salt and pepper to taste
- Fresh chives or parsley for garnish (optional)
Cooking Instructions:
- Prepare the Ingredients: Begin by cracking the eggs into a large bowl. Add the milk or cream, and season with salt and pepper. Whisk until well combined and slightly frothy.
- Sauté the Mushrooms: In a large non-stick skillet, melt the butter over medium heat. Add the sliced mushrooms and sauté until they’re golden brown and any released moisture has evaporated, about 5-7 minutes.
- Cook the Eggs: Reduce the heat to low, and pour the egg mixture into the skillet with the mushrooms. Allow the eggs to cook undisturbed for a minute or until they start to set around the edges.
- Scramble the Eggs: Gently stir the eggs with a spatula, folding them over themselves every few minutes. Continue to cook until the eggs are cooked to your desired consistency, but remember to keep them soft and creamy.
- Add the Cheese: Once the eggs are nearly done, sprinkle the shredded cheddar cheese evenly over the top. Fold the eggs gently to incorporate the cheese, allowing it to melt into the scramble.
- Serve: Once the cheese is melted and the eggs are cooked, remove the skillet from the heat. Garnish with freshly chopped chives or parsley if desired, and serve immediately.
Extra Tips:
When preparing the Mushroom and Cheese Scramble, it’s important to cook the eggs over low heat to maintain their creamy texture. Stirring the eggs too frequently can result in a rubbery texture, so be sure to fold them gently.
Feel free to experiment with different types of cheese or add a sprinkle of your favorite herbs for an added flavor punch. Additionally, if you want to add more protein, consider incorporating cooked bacon or sausage into the scramble. Enjoy your low-carb breakfast with a rejuvenating side of greens or a light salad to balance out the meal.