

If you’re living the keto lifestyle and want to enjoy a holiday feast without straying from your goals, you’re in the right place. Picture a Christmas dinner that’s both delicious and low-carb, with a beautiful cheese and charcuterie board and a mouthwatering herb-crusted prime rib roast. Delight in creamy garlic butter shrimp and finish your meal with a rich, sugar-free chocolate mousse. Ready to make your holiday table keto-friendly? Let’s explore these tasty options together.
Keto-Friendly Cheese and Charcuterie Board
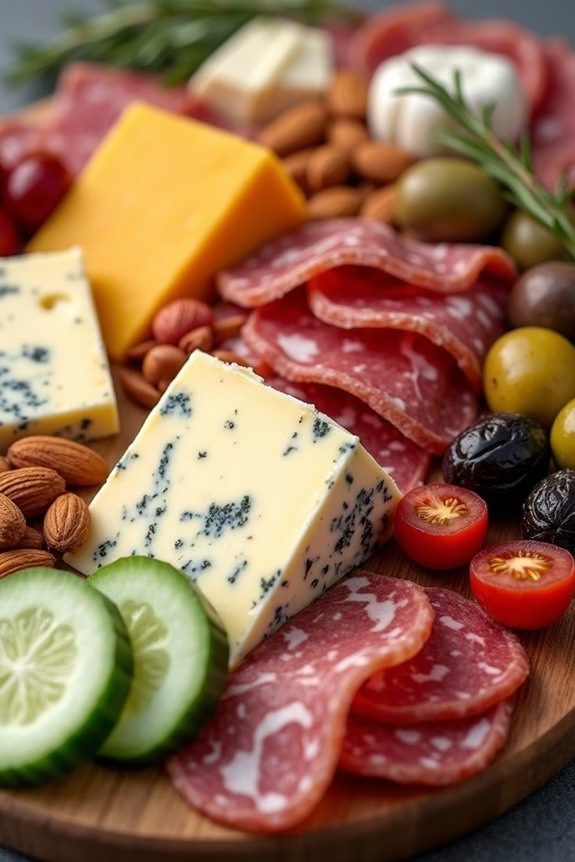
A Keto-Friendly Cheese and Charcuterie Board is an elegant and delicious addition to your Christmas dinner. This board not only serves as a beautiful centerpiece, but it’s also packed with a delightful assortment of flavors and textures that cater to the keto lifestyle. Perfect for a gathering of 4-6 people, it features a variety of cheeses, cured meats, and low-carb accompaniments that will impress your guests without disrupting your ketogenic diet.
Creating a charcuterie board involves a balance of flavors, colors, and textures. You’ll want to select a range of items that complement each other while keeping within the guidelines of a keto diet. Choose high-quality meats and cheeses, fresh vegetables, and keto-friendly nuts and dips to craft a board that’s both visually appealing and satisfying to the taste buds. With a little planning, you can create a board that not only tastes great but also helps keep your carb count in check.
Ingredients (Serves 4-6):
- 8 ounces of aged cheddar cheese
- 8 ounces of brie cheese
- 8 ounces of gouda cheese
- 4 ounces of prosciutto
- 4 ounces of salami
- 4 ounces of chorizo
- 1 cup of mixed olives (green and black)
- 1 cup of roasted almonds
- 1 cup of sliced cucumber
- 1 cup of cherry tomatoes
- 1/2 cup of keto-friendly pickles
- 1/2 cup of grainy mustard
- Fresh rosemary sprigs for garnish
Instructions:
- Prepare the Board: Start by selecting a large cutting board or serving platter as your base. Arrange the cheeses first, spacing them out evenly across the board. Slice the cheddar and gouda into bite-sized pieces, and leave the brie whole or in wedges for a softer presentation.
- Arrange the Meats: Next, fold the prosciutto, salami, and chorizo into small, easy-to-pick-up portions. Place them adjacent to the cheeses, ensuring a mix of colors and textures around the board.
- Add the Accompaniments: Fill in the gaps with the mixed olives, roasted almonds, sliced cucumber, and cherry tomatoes. Stack or scatter them in small piles for a visually appealing layout.
- Include Pickles and Mustard: Place the keto-friendly pickles in a small bowl and position it on the board. Similarly, add the grainy mustard to a separate small dish and place it nearby for easy access.
- Garnish and Serve: Finally, garnish the board with fresh rosemary sprigs for an aromatic and festive touch. Serve immediately, allowing guests to mix and match flavors as they please.
Extra Tips:
When assembling your Keto-Friendly Cheese and Charcuterie Board, consider the dietary preferences and potential allergies of your guests. Feel free to substitute or add items like smoked salmon, nuts, or fresh berries to cater to different tastes.
Remember that the key to a successful board is variety; aim for a harmonious combination of flavors and textures. Keep the board chilled until serving to guarantee the cheeses and meats remain fresh and appetizing.
Creamy Garlic Butter Shrimp
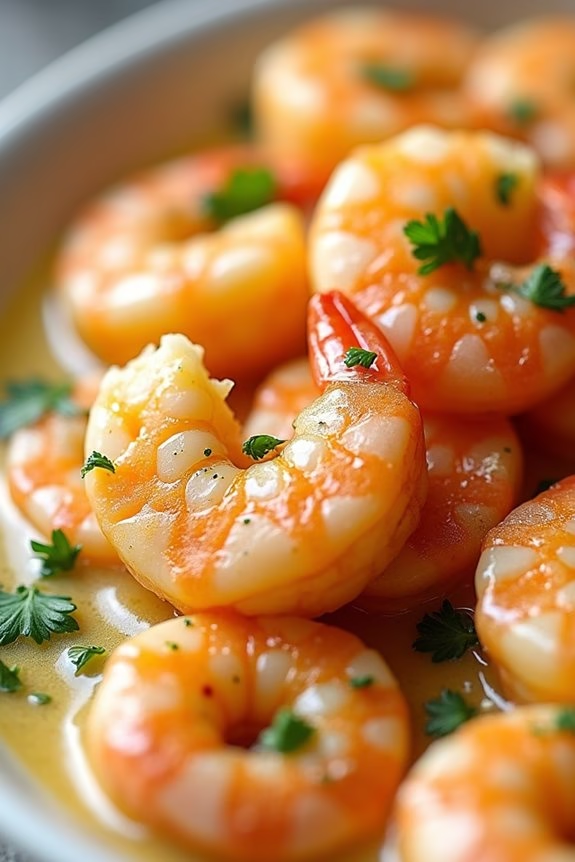
Indulge in a luxurious holiday meal with this Keto-friendly Creamy Garlic Butter Shrimp recipe, perfect for adding a touch of elegance to your Christmas dinner. This dish combines succulent shrimp with a rich, buttery sauce, enhanced by the aromatic flavors of garlic and herbs. Ideal for those following a ketogenic diet, this recipe is low in carbohydrates but high in flavor, making it a standout dish that will impress your guests.
The creamy garlic butter sauce is the star of this dish, coating each shrimp with a velvety richness that complements the natural sweetness of the seafood. Paired with fresh herbs and a hint of lemon, the sauce not only enhances the shrimp but also adds a revitalizing balance to the richness. Whether served as a main course or a delightful appetizer, this Creamy Garlic Butter Shrimp is sure to be a hit at your festive table, offering a gourmet touch to your holiday celebrations.
Ingredients for 4-6 servings:
- 2 pounds large shrimp, peeled and deveined
- 6 tablespoons unsalted butter
- 5 garlic cloves, minced
- 1 cup heavy cream
- 1/2 cup chicken broth
- 1/2 cup grated Parmesan cheese
- 2 tablespoons lemon juice
- 1 teaspoon Italian seasoning
- Salt and pepper to taste
- 2 tablespoons fresh parsley, chopped
- 1 tablespoon olive oil
Cooking Instructions:
- Prepare the Shrimp: Start by thoroughly rinsing the peeled and deveined shrimp under cold water. Pat them dry with a paper towel to remove excess moisture. Season the shrimp with salt and pepper to taste.
- Sauté the Shrimp: In a large skillet, heat 1 tablespoon of olive oil over medium-high heat. Add the shrimp in a single layer and cook for about 2-3 minutes on each side, or until they turn pink and opaque. Remove the shrimp from the skillet and set them aside.
- Make the Garlic Butter Sauce: In the same skillet, melt 6 tablespoons of butter over medium heat. Add the minced garlic and sauté for about 1 minute until fragrant, being careful not to burn the garlic.
- Add Liquids and Cheese: Pour in the chicken broth and lemon juice, stirring to combine with the garlic and butter. Reduce the heat to low and stir in the heavy cream and Parmesan cheese. Continue stirring until the cheese is melted and the sauce is smooth.
- Season the Sauce: Sprinkle in the Italian seasoning and adjust the seasoning with more salt and pepper if needed. Let the sauce simmer gently for about 3 minutes to thicken slightly.
- Combine Shrimp and Sauce: Return the cooked shrimp to the skillet, tossing them in the creamy sauce until they’re well-coated and heated through, about 2 minutes.
- Garnish and Serve: Remove the skillet from heat and sprinkle the chopped fresh parsley over the dish. Serve immediately, either on its own or over a bed of zucchini noodles or cauliflower rice for a complete Keto meal.
Extra Tips:
To guarantee the shrimp remain tender and juicy, avoid overcooking them during the initial sautéing step. They should just turn pink and opaque.
For added flavor complexity, consider adding a pinch of red pepper flakes to the sauce for a subtle kick. If the sauce becomes too thick, you can thin it out with a little more chicken broth or cream, adjusting to your preferred consistency.
Additionally, this dish can be prepared in advance; simply reheat gently over low heat before serving to maintain the creamy texture of the sauce.
Herb-Crusted Prime Rib Roast
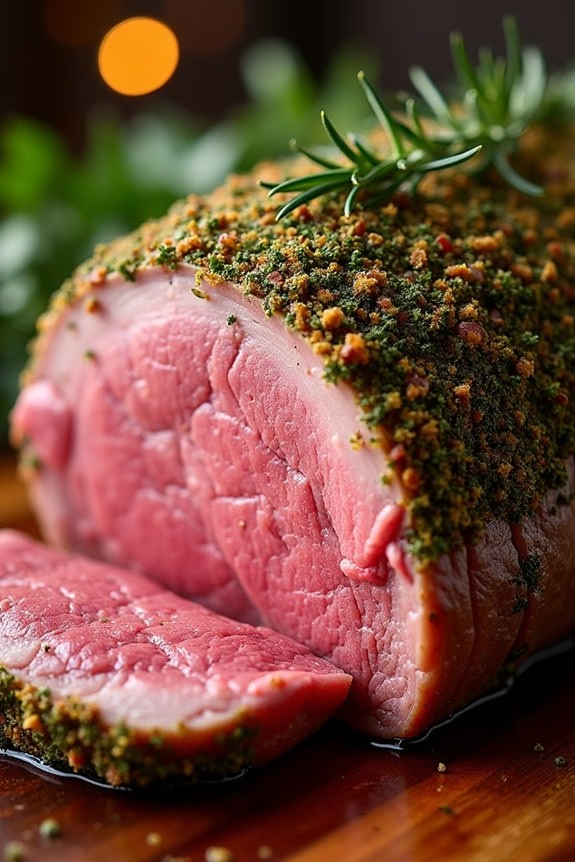
Herb-Crusted Prime Rib Roast is a perfect centerpiece for your Keto Christmas dinner, combining elegance and flavor with low-carb ingredients. This dish features a succulent prime rib roast generously coated with a blend of fresh herbs and spices. The result is a beautifully crusted exterior that seals in the juices and flavor of the meat, making it a festive and satisfying choice for your holiday meal.
This recipe not only caters to keto enthusiasts but also impresses guests with its rich flavors and delightful presentation. The herb crust enhances the natural taste of the beef, while the roasting process guarantees a tender and juicy bite. When served with keto-friendly sides, this prime rib roast becomes an unforgettable dining experience that celebrates the holiday spirit.
Ingredients (serves 4-6):
- 1 (4-5 pound) prime rib roast, bone-in
- 2 tablespoons olive oil
- 4 cloves garlic, minced
- 2 tablespoons fresh rosemary, chopped
- 2 tablespoons fresh thyme, chopped
- 2 tablespoons fresh parsley, chopped
- 1 tablespoon kosher salt
- 1 teaspoon black pepper
Instructions:
- Preparation: Remove the prime rib roast from the refrigerator and let it sit at room temperature for about 1 hour. This helps guarantee even cooking.
- Preheat the Oven: Preheat your oven to 450°F (232°C). Position the oven rack in the lower third of the oven to accommodate the height of the roast.
- Prepare the Herb Mixture: In a small bowl, mix together the olive oil, minced garlic, rosemary, thyme, parsley, salt, and pepper to form a paste. This herb mixture will create the flavorful crust on the roast.
- Apply the Herb Crust: Pat the roast dry with paper towels to remove any excess moisture. Rub the entire surface of the roast with the herb mixture, ensuring it’s well-coated on all sides.
- Roast the Beef: Place the roast on a rack in a roasting pan, fat side up. Insert a meat thermometer into the thickest part of the roast, avoiding the bone. Roast for 20 minutes at 450°F (232°C) to create a crust, then reduce the oven temperature to 325°F (163°C).
- Continue Roasting: Roast until the thermometer registers 120°F (49°C) for rare, 130°F (54°C) for medium-rare, or 140°F (60°C) for medium. This typically takes about 1.5 to 2 hours, depending on the size of the roast and desired doneness.
- Rest the Roast: Once the desired temperature is reached, remove the roast from the oven and tent it loosely with aluminum foil. Let it rest for 20-30 minutes. This allows the juices to redistribute, guaranteeing a tender and flavorful result.
- Carve and Serve: Remove the bones from the roast by cutting along them, then slice the roast into thick slices. Serve hot, garnished with additional fresh herbs if desired.
Extra Tips:
When cooking Herb-Crusted Prime Rib Roast, it’s important to use a meat thermometer to avoid overcooking, as prime rib can quickly go from perfectly cooked to overdone.
Resting the meat is essential for maintaining juiciness, so resist the temptation to cut into it immediately after roasting. If you prefer a deeper crust, consider searing the roast in a hot pan before applying the herb mixture and roasting it.
Adjust the amount of salt and herbs to your personal taste, keeping in mind that fresh herbs bring the best flavor to this dish.
Low-Carb Cauliflower Mash
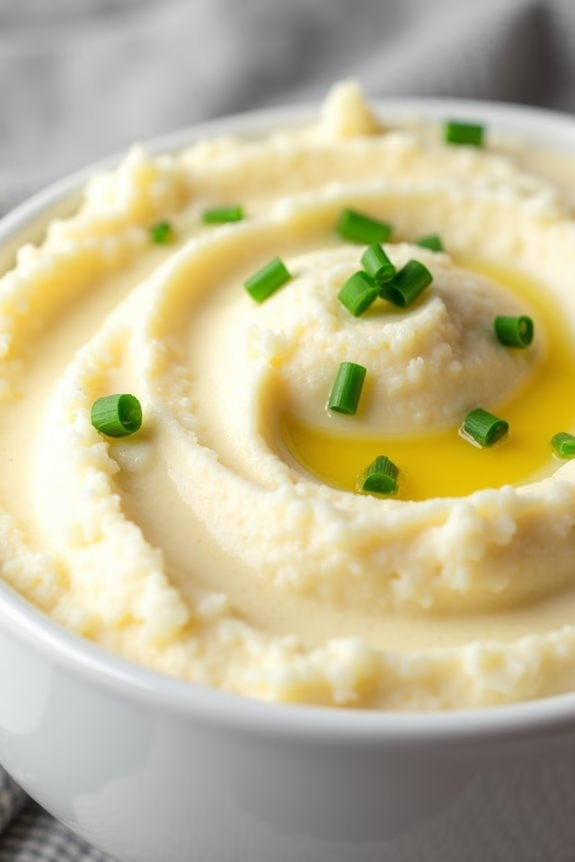
As the holiday season approaches, savor the warmth of a festive Keto Christmas Dinner with a delightful side dish of Low-Carb Cauliflower Mash. This creamy alternative to traditional mashed potatoes isn’t only keto-friendly but also deliciously satisfying.
Perfect for those looking to enjoy a wholesome meal without straying from their dietary preferences, this cauliflower mash pairs beautifully with any main dish, adding both texture and flavor to your Christmas feast.
Transforming cauliflower into a velvety mash is surprisingly simple and requires just a few ingredients. Its mild flavor is enhanced with the richness of cream cheese and butter, creating a smooth and decadent side that everyone at the table will enjoy. This recipe serves 4-6 people, making it a great option for family gatherings or intimate dinner parties.
Ingredients (for 4-6 servings):
- 2 large heads of cauliflower
- 4 tablespoons unsalted butter
- 4 ounces cream cheese, softened
- 1/4 cup heavy cream
- 1/4 cup grated Parmesan cheese
- Salt and pepper to taste
- 1 tablespoon chopped fresh chives (optional)
Cooking Instructions:
1. Prepare the Cauliflower:
Begin by washing the cauliflower heads thoroughly. Remove the leaves and trim the stems, then cut the cauliflower into evenly sized florets to guarantee uniform cooking.
2. Cook the Cauliflower:
In a large pot, bring water to a boil. Add a pinch of salt, then add the cauliflower florets. Boil them for about 10-15 minutes, or until tender when pierced with a fork. Drain the cauliflower and let it sit for a minute to remove excess moisture.
3. Blend the Ingredients:
Transfer the cooked cauliflower to a food processor or blender. Add the butter, cream cheese, and heavy cream. Blend until smooth and creamy, scraping down the sides as needed to achieve even consistency.
4. Incorporate Additional Flavors:
Stir in the Parmesan cheese, then season with salt and pepper to taste. Blend again briefly to mix the ingredients thoroughly.
5. Heat and Serve:
Transfer the cauliflower mash back to the pot over low heat. Stir occasionally until heated through. Serve warm, garnished with chopped fresh chives if desired.
Extra Tips:
For a smoother texture, make sure to dry the cauliflower well after boiling to avoid a watery mash. If you prefer a chunkier texture, mash the cauliflower with a potato masher instead of a blender.
Feel free to experiment with additional herbs and spices, such as garlic powder or thyme, to complement your main dish. Additionally, this cauliflower mash can be made a day ahead and reheated, making it a convenient option for stress-free holiday prep.
Keto-Friendly Green Bean Casserole
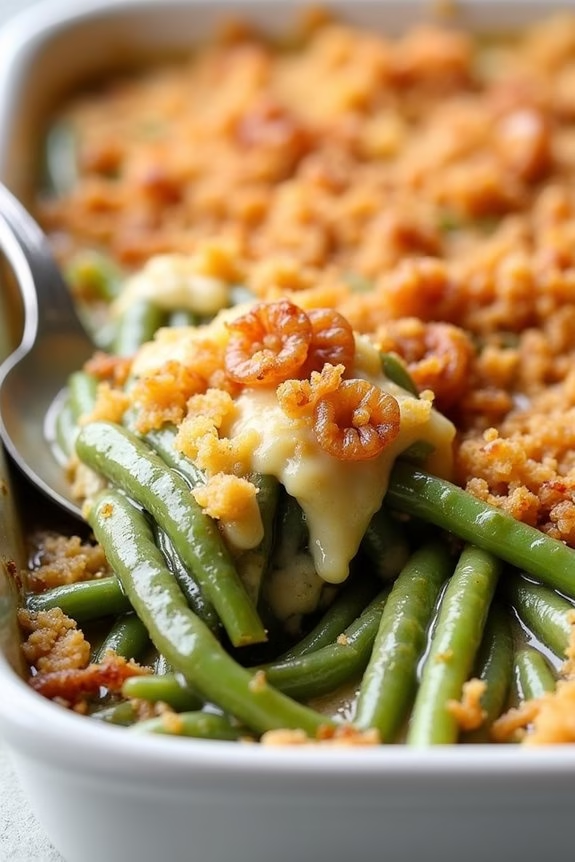
The Keto-Friendly Green Bean Casserole is an innovative take on the traditional holiday side dish. By eliminating the usual high-carb ingredients and replacing them with low-carb alternatives, this recipe is perfect for those following a ketogenic diet. This dish is creamy, savory, and satisfying, making it a delightful addition to your Christmas dinner table.
The use of fresh green beans guarantees a crisp texture, while the homemade mushroom sauce and crunchy topping provide the comforting flavors you crave during the holiday season. Designed to serve 4-6 people, this dish is both easy to prepare and a crowd-pleaser.
The casserole features a rich sauce made from heavy cream and cream cheese, which is seasoned with garlic, fresh herbs, and a hint of nutmeg to enhance the natural flavors of the green beans and mushrooms. Topped with a mix of almond flour and crispy fried onions, it delivers a delightful crunch in every bite.
Whether you’re hosting a holiday feast or attending a potluck, this Keto-Friendly Green Bean Casserole will bring festive cheer to your meal without compromising your dietary goals.
Ingredients (Serves 4-6):
- 1 ½ pounds fresh green beans, trimmed and halved
- 8 ounces mushrooms, sliced
- 2 tablespoons butter
- 2 cloves garlic, minced
- 1 cup heavy cream
- 4 ounces cream cheese, softened
- 1 teaspoon soy sauce or coconut aminos
- 1 teaspoon onion powder
- ½ teaspoon ground nutmeg
- Salt and pepper to taste
- ½ cup almond flour
- ½ cup crispy fried onions (keto-friendly, optional)
- 2 tablespoons grated Parmesan cheese
- 1 tablespoon olive oil
Instructions:
- Preheat & Prepare Green Beans: Preheat your oven to 375°F (190°C). In a large pot of boiling salted water, blanch the green beans for about 3-4 minutes until they’re bright green and tender-crisp. Drain and immediately transfer them to a bowl of ice water to stop the cooking process. Drain again and set aside.
- Sauté Mushrooms: In a large skillet, melt butter over medium heat. Add sliced mushrooms and cook until they’re browned and tender, about 5-7 minutes. Stir in the minced garlic and cook for an additional 1 minute until fragrant.
- Make the Sauce: Lower the heat and pour in the heavy cream, allowing it to simmer gently. Add the cream cheese, soy sauce, onion powder, nutmeg, salt, and pepper. Stir continuously until the cream cheese has melted and the sauce is smooth and well-combined.
- Combine with Green Beans: Add the blanched green beans to the skillet with the mushroom sauce. Toss everything together until the green beans are well-coated with the creamy sauce.
- Prepare Casserole Topping: In a separate bowl, mix almond flour, Parmesan cheese, and olive oil until the mixture resembles coarse crumbs. Stir in the crispy fried onions if using.
- Assemble and Bake: Transfer the green bean mixture to a greased 9×13-inch baking dish. Evenly sprinkle the almond flour mixture over the top. Place in the preheated oven and bake for 20-25 minutes, or until the topping is golden brown and the casserole is bubbly.
Extra Tips:
To enhance the flavor of your Keto-Friendly Green Bean Casserole, consider adding a pinch of cayenne pepper or smoked paprika to the sauce for a slight kick.
You can also prepare the casserole a day in advance; just assemble it without the topping and store it in the refrigerator. When you’re ready to serve, add the topping and bake.
For a vegetarian version, verify the crispy fried onions are plant-based or opt for a homemade version using shallots or onions fried in olive oil. Enjoy this delicious dish as part of your festive keto menu!
Garlic Herb Roasted Brussels Sprouts
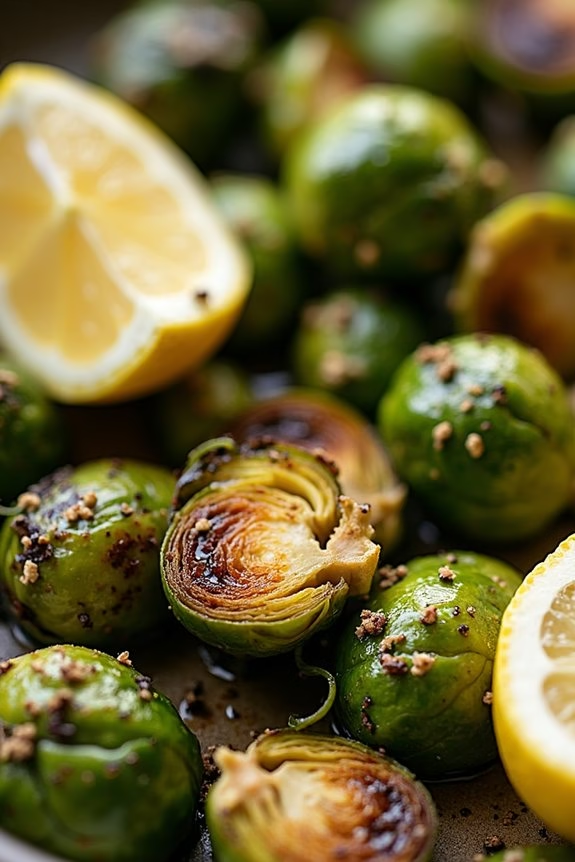
Embrace the holiday spirit with a delightful keto-friendly side dish that’s sure to impress your guests: Garlic Herb Roasted Brussels Sprouts. This dish offers a perfect blend of flavors with the earthy taste of Brussels sprouts enhanced by the aromatic notes of garlic and herbs.
Ideal for a Christmas dinner, these roasted Brussels sprouts not only complement your keto lifestyle but also add a vibrant pop of green to your festive table. Roasting Brussels sprouts intensifies their natural sweetness, and when combined with garlic and herbs, it creates a savory yet fresh dish that pairs beautifully with a variety of main courses.
The simplicity of this recipe highlights the ingredients’ natural flavors, making it both a healthy and delectable choice for your holiday gathering. This recipe serves 4-6 people, making it perfect for a family dinner or small holiday party.
Ingredients (Serves 4-6):
- 2 pounds Brussels sprouts, trimmed and halved
- 3 tablespoons olive oil
- 4 cloves garlic, minced
- 1 teaspoon dried thyme
- 1 teaspoon dried rosemary
- 1 teaspoon dried oregano
- Salt and pepper to taste
- 1 lemon, cut into wedges for serving
Cooking Instructions:
- Preheat the Oven: Begin by preheating your oven to 400°F (200°C). This guarantees that the Brussels sprouts will roast evenly and develop a golden, crispy exterior.
- Prepare the Brussels Sprouts: Trim the ends of the Brussels sprouts and peel away any yellow or damaged outer leaves. Cut each Brussels sprout in half to allow for even roasting.
- Season the Brussels Sprouts: In a large mixing bowl, combine the halved Brussels sprouts with olive oil, minced garlic, dried thyme, rosemary, oregano, salt, and pepper. Toss until the Brussels sprouts are well-coated with the seasoning mixture.
- Roast: Arrange the seasoned Brussels sprouts in a single layer on a baking sheet. Confirm that they’re spread out evenly for maximum roasting. Place the baking sheet in the preheated oven and roast for 25-30 minutes, or until the Brussels sprouts are tender and have a slight char on the edges. Stir halfway through the cooking time for even browning.
- Serve: Once roasted, remove the Brussels sprouts from the oven and transfer them to a serving bowl. Serve them hot with lemon wedges on the side. Squeezing fresh lemon juice over the top before serving adds a bright, zesty flavor that complements the herbs.
Extra Tips:
To achieve the best results, make sure your Brussels sprouts are similar in size for even cooking. If you prefer a bit of spice, consider adding a pinch of red pepper flakes to the seasoning mix.
Additionally, using fresh herbs in place of dried ones can enhance the flavor even more, although dried herbs are more convenient and still delicious. For an added touch, you can sprinkle some freshly grated Parmesan cheese over the roasted sprouts just before serving for a cheesy twist that pairs well with the garlic and herbs.
Zucchini Noodles With Pesto
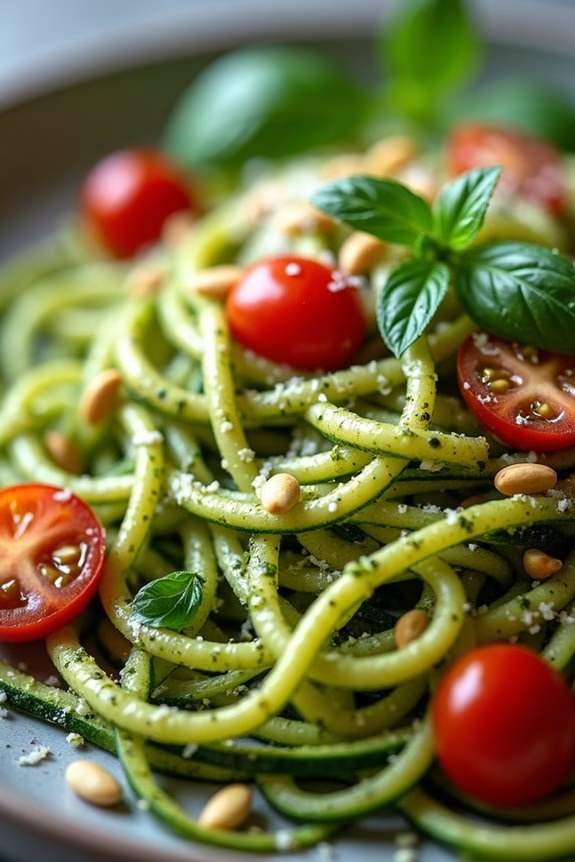
Zucchini Noodles With Pesto is a delightful and healthy alternative to traditional pasta, perfect for those following a keto diet. This dish combines fresh zucchini noodles, commonly referred to as “zoodles,” with a rich and flavorful homemade pesto sauce. The vibrant green pesto, made with basil, garlic, Parmesan cheese, and pine nuts, clings beautifully to the zoodles, creating a dish that’s both satisfying and delicious.
Whether you’re hosting a Keto Christmas dinner or simply want a lighter meal option, this recipe will certainly impress your guests with its fresh taste and beautiful presentation.
The key to this dish is in the preparation of the zucchini noodles. Using a spiralizer, you can transform fresh zucchini into noodle-like strands that mimic the texture and appearance of spaghetti. The pesto sauce, on the other hand, is a quick and easy blend of fresh ingredients that can be made in minutes.
The combination of zoodles and pesto not only guarantees a low-carb meal but also provides a burst of nutrients and flavors. This dish serves 4-6 people, making it an ideal choice for a small gathering or family meal.
Ingredients:
- 4 medium zucchinis
- 2 cups fresh basil leaves
- 1/2 cup grated Parmesan cheese
- 1/2 cup pine nuts
- 2 cloves garlic
- 1/2 cup extra-virgin olive oil
- Salt and pepper to taste
- Optional: Cherry tomatoes and grated Parmesan for garnish
Instructions:
- Prepare the Zucchini Noodles: Wash and dry the zucchinis. Using a spiralizer, create noodles from the zucchinis. If you don’t have a spiralizer, you can use a julienne peeler or a regular vegetable peeler to create thin strips.
- Make the Pesto Sauce: In a food processor or blender, combine the basil leaves, grated Parmesan cheese, pine nuts, and garlic cloves. Pulse the mixture until finely chopped.
- Add Olive Oil: With the food processor running, slowly add the olive oil until the mixture is smooth and well combined. Season the pesto with salt and pepper to taste.
- Cook the Zoodles: In a large pan over medium heat, add a drizzle of olive oil. Add the zucchini noodles and sauté for about 2-3 minutes until they’re slightly tender. Be careful not to overcook them to maintain their texture.
- Combine and Serve: Add the pesto sauce to the pan with the zoodles and toss until the noodles are evenly coated. Serve immediately, optionally garnishing with cherry tomatoes and extra grated Parmesan.
Extra Tips:
For a more intense flavor, you can lightly toast the pine nuts before adding them to the pesto. This will bring out their natural oils and enhance the overall taste of the sauce.
If you find the zucchini noodles releasing too much water, you can sprinkle them with a little salt and let them sit for about 10 minutes before cooking, then pat dry with paper towels. This step will prevent the dish from becoming watery.
Finally, feel free to adjust the garlic in the pesto to your liking, depending on how strong a garlic flavor you prefer.
Bacon-Wrapped Asparagus Bundles
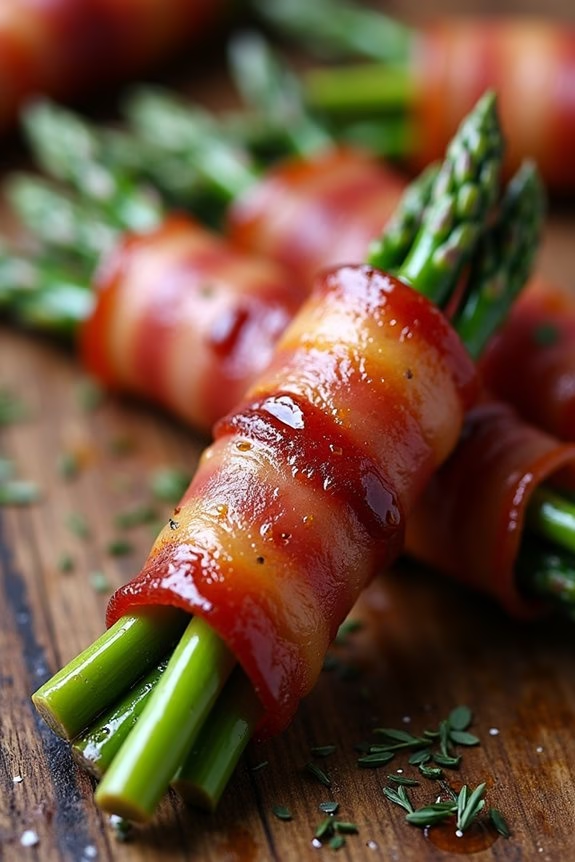
- 1 pound of asparagus (approximately 24-30 spears)
- 12 slices of bacon
- 2 tablespoons of olive oil
- 1 teaspoon of garlic powder
- 1 teaspoon of onion powder
- Salt to taste
- Freshly ground black pepper to taste
- 1 tablespoon of balsamic vinegar (optional)
Cooking Instructions:
- Preheat the Oven: Start by preheating your oven to 400°F (200°C). This temperature will guarantee the bacon cooks evenly and crisps up nicely.
- Prepare the Asparagus: Wash the asparagus spears thoroughly and trim the woody ends. You can do this by gently bending each spear until it snaps, which will naturally break off the tough part.
- Season the Asparagus: In a large bowl, toss the asparagus with olive oil, garlic powder, onion powder, salt, and pepper to make sure they’re evenly coated with the seasoning.
- Wrap the Bundles: Take 3-4 asparagus spears and wrap them tightly with a slice of bacon, starting from the bottom and working your way up. Secure the end of the bacon with a toothpick if necessary to keep it from unraveling.
- Place on Baking Sheet: Arrange the bacon-wrapped asparagus bundles on a baking sheet lined with parchment paper or aluminum foil. Make sure they’re evenly spaced to allow the heat to circulate around them.
- Bake: Place the baking sheet in the preheated oven and bake for 20-25 minutes or until the bacon is crispy and the asparagus is tender.
- Finish with Balsamic Vinegar (Optional): If using, drizzle the balsamic vinegar over the bundles for a touch of sweetness that complements the salty bacon.
Extra Tips:
To get the crispiest bacon, consider using a wire rack placed over your baking sheet. This allows the fat to drip away from the bacon, preventing it from becoming soggy.
If you prefer a spicier kick, sprinkle a pinch of cayenne pepper over the asparagus before wrapping them in bacon.
Additionally, watch the bundles closely in the last few minutes of baking to avoid overcooking, as bacon can quickly go from perfectly crispy to burnt.
Enjoy your delicious Keto Christmas dinner!
Keto Stuffed Mushrooms
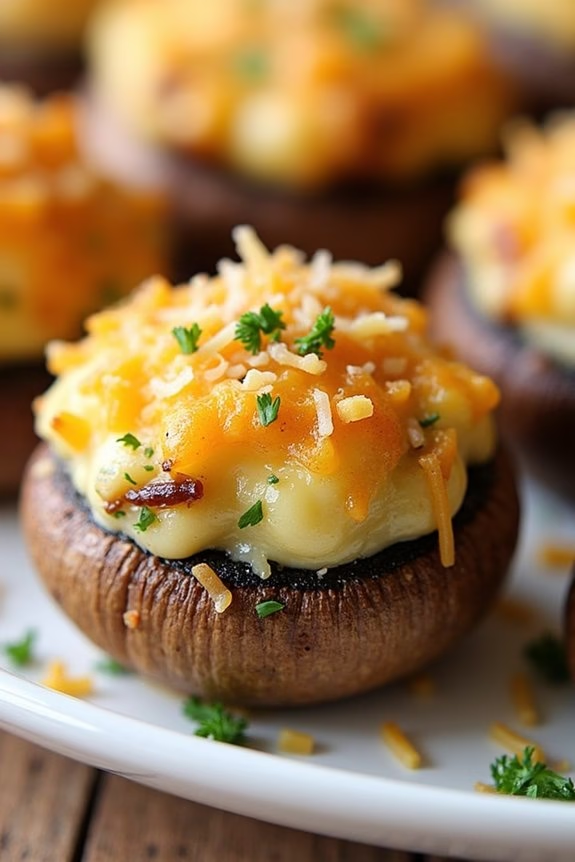
Keto Stuffed Mushrooms are a delightful appetizer that perfectly complements any festive Keto Christmas dinner. With a rich filling of cream cheese, savory sausage, and aromatic herbs, these mushrooms aren’t only delicious but also adhere to a low-carb lifestyle. The earthy flavor of the mushrooms pairs beautifully with the creamy, cheesy filling, making them an irresistible treat for your holiday gathering.
This recipe is designed to serve 4-6 people, making it ideal for a small family gathering or an intimate holiday dinner. These stuffed mushrooms are simple to prepare and can be made ahead of time, allowing you to spend more time with your guests and less time in the kitchen. Below is a thorough list of ingredients and detailed step-by-step instructions to guide you through the process of making this delectable Keto dish.
Ingredients (serving size: 4-6 people):
- 16 large button or cremini mushrooms
- 1 tablespoon olive oil
- 1/2 pound ground sausage
- 4 ounces cream cheese, softened
- 1/2 cup grated Parmesan cheese
- 1/4 cup chopped fresh parsley
- 2 cloves garlic, minced
- 1/4 teaspoon black pepper
- 1/4 teaspoon salt
- 1/2 teaspoon Italian seasoning
Cooking Instructions:
- Prepare the Mushrooms: Begin by preheating your oven to 375°F (190°C). Gently clean the mushrooms with a damp cloth and remove the stems. Set the mushroom caps aside and finely chop the stems.
- Cook the Sausage: Heat the olive oil in a large skillet over medium heat. Add the ground sausage and cook until browned, breaking it into small pieces with a spatula. Remove the cooked sausage from the skillet and transfer to a mixing bowl.
- Sauté the Mushroom Stems: In the same skillet, add the chopped mushroom stems and minced garlic. Sauté for about 2-3 minutes until the stems are soft and the garlic is fragrant.
- Combine the Filling: Add the sautéed mushroom stems and garlic to the bowl with the cooked sausage. Stir in the softened cream cheese, grated Parmesan cheese, parsley, black pepper, salt, and Italian seasoning. Mix until all ingredients are well combined and the filling is creamy.
- Stuff the Mushrooms: Arrange the mushroom caps on a baking sheet lined with parchment paper. Spoon generous amounts of the sausage mixture into each mushroom cap, pressing gently to fill.
- Bake the Mushrooms: Place the stuffed mushrooms in the preheated oven and bake for 20-25 minutes, or until the tops are golden brown and the mushrooms are tender.
- Serve: Once baked, remove the mushrooms from the oven and allow them to cool slightly before serving. They can be served warm or at room temperature.
Extra Tips: For an added burst of flavor, you can sprinkle a bit of extra Parmesan cheese on top of the mushrooms before baking. If you prefer a spicier filling, consider adding a pinch of red pepper flakes to the sausage mixture. These stuffed mushrooms can be prepared a day in advance and stored in the refrigerator; simply reheat them in the oven before serving to guarantee they’re warm and flavorful. Enjoy these Keto Stuffed Mushrooms as a delicious and satisfying part of your Christmas festivities!
Almond Flour Bread Rolls
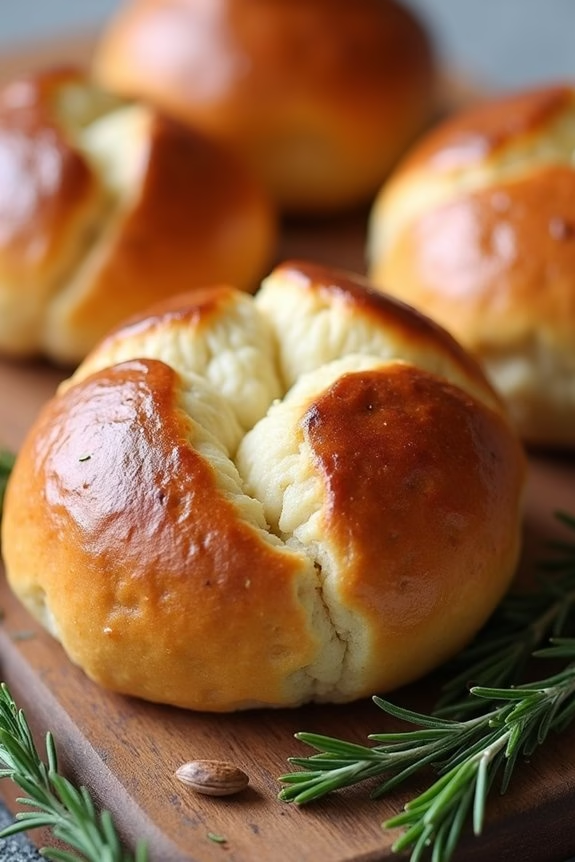
Almond Flour Bread Rolls are a delightful addition to any Keto Christmas dinner, offering a low-carb alternative to traditional bread rolls without sacrificing flavor or texture.
These rolls are fluffy, slightly nutty, and perfectly soft, making them a perfect companion for a festive meal. Whether you’re serving them with a spread of butter or using them to soak up savory holiday gravies, these rolls are sure to be a hit among both keto and non-keto guests alike.
Not only are these almond flour rolls gluten-free, but they’re also incredibly easy to prepare. With just a few ingredients, you can whip up a batch in no time, allowing you to focus on other elements of your holiday feast.
The combination of almond flour and psyllium husk powder gives these rolls their distinctive texture, while the addition of cheese and butter guarantees they remain moist and flavorful. Perfect for a serving size of 4-6 people, these rolls are both practical and delicious.
Ingredients:
- 2 cups almond flour
- 2 tablespoons psyllium husk powder
- 1 tablespoon baking powder
- 1 teaspoon salt
- 2 eggs
- 1/4 cup melted butter
- 1/2 cup shredded mozzarella cheese
- 1/2 cup boiling water
Cooking Instructions:
- Preheat the Oven: Start by preheating your oven to 350°F (175°C). Line a baking sheet with parchment paper or a silicone baking mat to prevent sticking.
- Mix Dry Ingredients: In a large mixing bowl, combine the almond flour, psyllium husk powder, baking powder, and salt. Stir well to make sure that all the dry ingredients are evenly distributed.
- Combine Wet Ingredients: In a separate bowl, beat the eggs, then add in the melted butter and shredded mozzarella cheese. Mix until the ingredients are fully incorporated.
- Form the Dough: Gradually mix the wet ingredients into the dry ingredients. Once combined, slowly add the boiling water, stirring continuously until a dough forms. The dough will be sticky but should hold together well.
- Shape the Rolls: Divide the dough into 8-10 equal portions. Roll each portion into a ball and place onto the prepared baking sheet. Make sure to leave some space between each roll as they’ll expand slightly during baking.
- Bake the Rolls: Place the baking sheet in the preheated oven and bake for 20-25 minutes, or until the rolls are golden brown and firm to the touch. Remove from the oven and let cool slightly before serving.
Extra Tips:
When making these almond flour bread rolls, it’s crucial to recognize that the psyllium husk powder is key to achieving the right texture, so don’t omit it.
If you find the dough too sticky to handle, wet your hands slightly to make shaping the rolls easier. Additionally, if you prefer a more pronounced cheesy flavor, you can add a bit more shredded cheese to the dough.
These rolls can also be made ahead of time and reheated gently in the oven before serving. Enjoy your delicious keto-friendly bread rolls as part of a festive and low-carb holiday meal!
Sugar-Free Chocolate Mousse

Indulging in a rich, creamy dessert doesn’t have to mean sacrificing your keto lifestyle. This Sugar-Free Chocolate Mousse is the perfect ending to a festive Keto Christmas Dinner.
Made with simple, wholesome ingredients, this dessert isn’t only delicious but also aligns perfectly with low-carb, sugar-free dietary restrictions. Its light, airy texture and deep chocolate flavor will satisfy any sweet tooth without the added sugars.
This recipe serves 4-6 people, making it an ideal dessert for family gatherings or small holiday dinners. With only a few steps, you can whip up this decadent treat in no time, allowing you more time to enjoy the holiday festivities with your loved ones.
So, let’s explore the ingredients and process to create this delightful sugar-free dessert.
Ingredients:
- 1 cup heavy cream
- 2 tablespoons unsweetened cocoa powder
- 2 tablespoons powdered erythritol or your preferred keto-friendly sweetener
- 1 teaspoon vanilla extract
- A pinch of salt
- 2 ounces sugar-free dark chocolate, melted and cooled
- Optional: whipped cream and grated sugar-free chocolate for garnish
Instructions:
- Prepare Ingredients: Start by gathering all your ingredients. Confirm the heavy cream is cold and the sugar-free dark chocolate is melted and cooled to room temperature.
- Mix Dry Ingredients: In a small mixing bowl, sift together the unsweetened cocoa powder and powdered erythritol. Add a pinch of salt and stir until well combined.
- Whip the Cream: In a large mixing bowl, pour the cold heavy cream and add the vanilla extract. Using an electric mixer, whip the cream until soft peaks form. Be careful not to over-whip, as this can turn the cream into butter.
- Fold in Chocolate: Gently fold the cooled, melted chocolate into the whipped cream using a spatula. Be sure to incorporate it fully without deflating the cream.
- Add Dry Ingredients: Gradually add the cocoa mixture to the chocolate cream, folding gently until everything is well combined and smooth.
- Chill: Transfer the mousse into serving dishes and refrigerate for at least 1 hour to set.
- Serve: Before serving, optionally top with a dollop of whipped cream and a sprinkle of grated sugar-free chocolate for an elegant touch.
Extra Tips:
For the best results, confirm all your mixing bowls and utensils are completely dry and cold. This helps the cream whip up more efficiently.
When folding the ingredients, use a gentle hand to maintain the mousse’s airy texture. If you prefer a sweeter mousse, adjust the quantity of the sweetener to your taste.
Additionally, remember to chill the mousse thoroughly to allow the flavors to meld and the texture to firm up perfectly. Enjoy your sugar-free delight as part of your festive keto feast!