
I’m excited to share some irresistible low carb sweet breakfast ideas that are not only delicious but also packed with nutrition. Picture waking up to fluffy pancakes or indulgent almond flour waffles without any guilt. Whether you’re in the mood for a refreshing berry smoothie or a decadent muffin, these recipes have you covered. Start your day in a delightful way with these vibrant and satisfying options. There’s so much to explore!
Fluffy Low Carb Pancakes for a Perfect Start
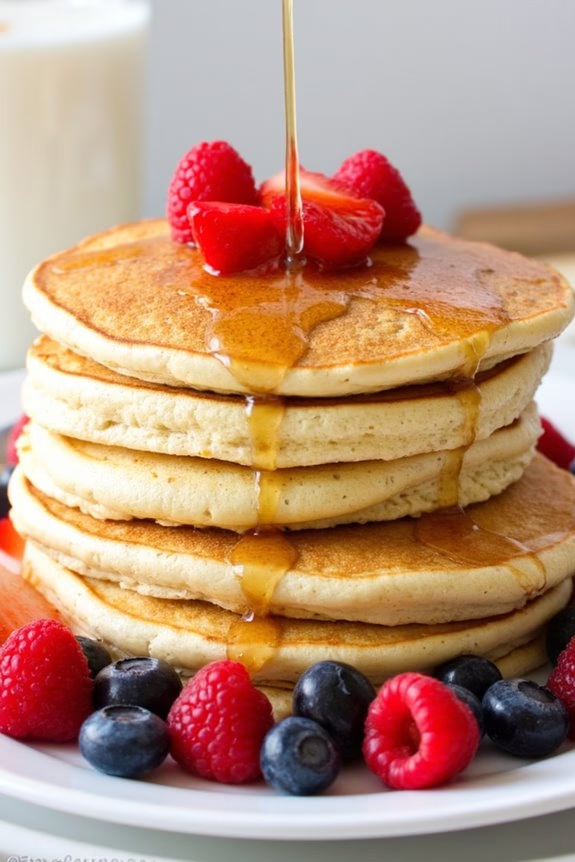
Indulge in a guilt-free breakfast with these Fluffy Low Carb Pancakes that make a delightful morning treat without the extra carbs. These pancakes are perfect for anyone following a low-carb or keto diet, as they’re made using almond flour and coconut flour, which are excellent substitutes for traditional wheat flour.
The result is a stack of pancakes that aren’t only fluffy and satisfying but also packed with flavor and nutrition. Perfectly golden brown on the outside and soft on the inside, these pancakes will become a staple in your breakfast routine.
This recipe is designed to serve 4-6 people, making it a great choice for a family breakfast or brunch gathering. The combination of almond flour and coconut flour provides a deliciously nutty flavor that’s complemented by the sweetness of vanilla and a hint of cinnamon.
The pancakes are simple to prepare and cook quickly, guaranteeing you can enjoy a warm breakfast without spending too much time in the kitchen. Top with your favorite low-carb syrup or fresh berries for an extra touch of sweetness.
Ingredients (Serves 4-6):
- 1 cup almond flour
- 1/4 cup coconut flour
- 1 teaspoon baking powder
- 1/4 teaspoon salt
- 1/2 teaspoon cinnamon
- 3 large eggs
- 1/4 cup unsweetened almond milk
- 2 tablespoons melted butter (plus more for cooking)
- 1 teaspoon vanilla extract
- 1 tablespoon sweetener (such as erythritol or stevia)
Cooking Instructions:
- Prepare the Dry Ingredients: In a large mixing bowl, combine the almond flour, coconut flour, baking powder, salt, and cinnamon. Whisk together until well blended to guarantee even distribution of the ingredients.
- Mix the Wet Ingredients: In a separate bowl, whisk together the eggs, almond milk, melted butter, vanilla extract, and sweetener until smooth. This mixture should be uniform with no visible egg streaks.
- Combine Wet and Dry Ingredients: Gradually pour the wet ingredient mixture into the bowl of dry ingredients. Use a spatula or a whisk to gently fold the mixture together until just combined. Be careful not to overmix, as this can affect the texture of the pancakes.
- Preheat the Pan: Heat a non-stick skillet or a griddle over medium-low heat. Add a small amount of butter to the pan to prevent sticking and to add flavor.
- Cook the Pancakes: Once the pan is hot, pour about 1/4 cup of the pancake batter onto the skillet for each pancake. Cook for about 2-3 minutes, or until bubbles form on the surface and the edges appear set. Carefully flip the pancakes using a spatula and cook for an additional 2-3 minutes on the other side until golden brown.
- Serve and Enjoy: Remove the pancakes from the pan and place them on a plate. Continue cooking the remaining batter, adding more butter to the skillet as needed. Serve the pancakes warm with your choice of toppings, such as fresh berries or low-carb syrup.
Extra Tips:
To guarantee your pancakes turn out perfectly fluffy, be sure not to overmix the batter as this can lead to a dense texture. If the batter is too thick, you can add a little more almond milk, one tablespoon at a time, until you reach your desired consistency.
Additionally, make sure to keep the heat on medium-low to prevent the pancakes from burning before they cook through. If you’re cooking for a crowd, you can keep the pancakes warm in a low oven (around 200°F) while you finish cooking the rest of the batch.
Enjoy Guilt-Free Almond Flour Waffles
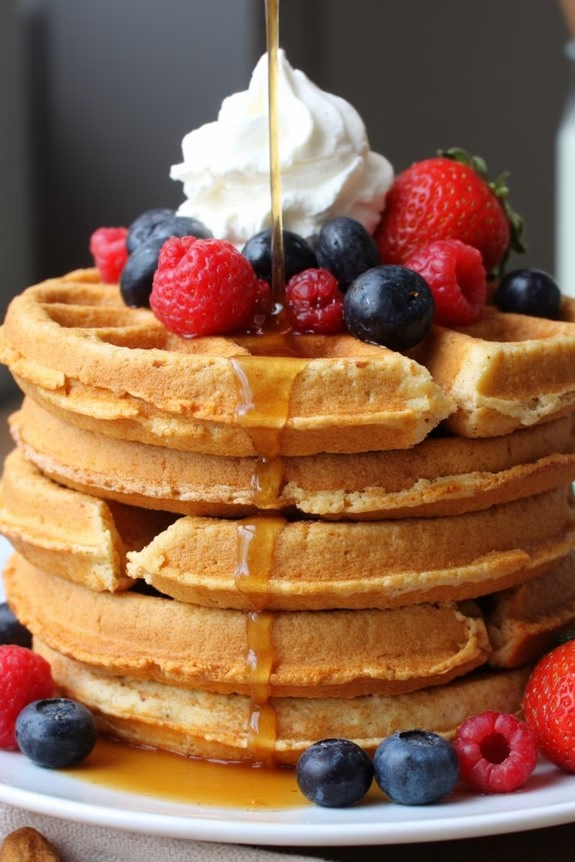
Start your morning off right with a delicious and healthy breakfast option: almond flour waffles. These waffles are perfect for those who are looking to maintain a low-carb diet while still satisfying their sweet tooth. Almond flour provides a nutty flavor and a fluffy texture, making these waffles a delightful and guilt-free treat.
Whether you’re enjoying them with fresh berries, a drizzle of sugar-free syrup, or a dollop of whipped cream, these waffles are sure to become a breakfast staple in your home.
In addition to being low in carbs, this recipe is also gluten-free, making it an excellent choice for those with dietary restrictions. The use of almond flour instead of traditional flour not only cuts down on carbohydrates but also boosts the nutritional value, providing healthy fats and protein.
These waffles are easy to make and can be customized with various add-ins like nuts or spices to suit your taste preferences. Let’s explore the recipe for a serving size of 4-6 people.
Ingredients:
- 2 cups almond flour
- 1 teaspoon baking powder
- 1/4 teaspoon salt
- 3 large eggs
- 1/4 cup unsweetened almond milk
- 2 tablespoons melted coconut oil or butter
- 1 tablespoon vanilla extract
- 1 tablespoon erythritol or sweetener of choice
- Optional toppings: fresh berries, sugar-free syrup, whipped cream
Cooking Instructions:
- Preheat the Waffle Iron: Begin by preheating your waffle iron according to the manufacturer’s instructions. This guarantees that your waffles cook evenly and come out perfectly golden brown.
- Mix Dry Ingredients: In a large mixing bowl, combine the almond flour, baking powder, and salt. Whisk these ingredients together to make sure they’re thoroughly mixed and free of lumps.
- Whisk Wet Ingredients: In a separate bowl, whisk together the eggs, almond milk, melted coconut oil or butter, vanilla extract, and erythritol. Make sure the mixture is smooth and well combined.
- Combine Mixtures: Gradually add the wet ingredients to the dry ingredients, stirring gently with a spatula or whisk until a smooth batter forms. Be careful not to overmix, as this can affect the texture of your waffles.
- Cook Waffles: Lightly grease the preheated waffle iron with a small amount of coconut oil or butter. Pour an appropriate amount of batter onto the center of the waffle iron, spreading it out slightly. Close the lid and cook according to the waffle iron’s instructions, usually about 3-5 minutes, or until the waffles are golden brown and set.
- Serve and Enjoy: Carefully remove the waffles from the waffle iron and serve immediately with your choice of toppings like fresh berries, sugar-free syrup, or whipped cream.
Extra Tips:
For a crispier texture, allow the waffles to cook a little longer in the waffle iron. If you’re making a large batch, keep the cooked waffles warm in an oven set to a low temperature until ready to serve.
Experiment with different flavors by adding a pinch of cinnamon or nutmeg to the batter, or try mixing in some chopped nuts for added crunch. These waffles also freeze well, making them a great make-ahead breakfast option. Simply reheat in a toaster or oven when needed.
Satisfy Your Sweet Tooth With Low Carb Smoothies
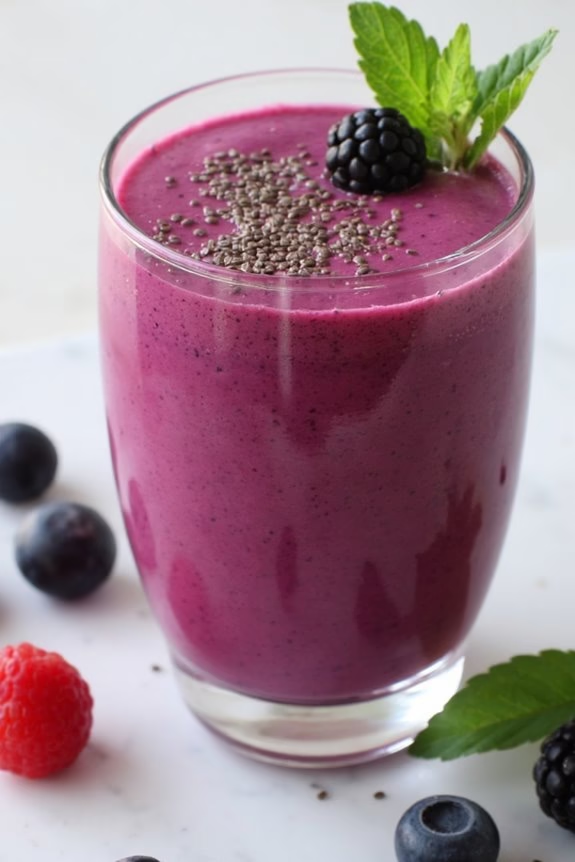
Indulge in a revitalizing and delicious low carb berry smoothie that caters to your sweet cravings without the added sugar. This smoothie combines the natural sweetness of berries with the creamy texture of Greek yogurt, offering a nutritious and satisfying start to your day.
Perfect for those looking to maintain a low carb lifestyle, this smoothie is packed with antioxidants, vitamins, and a boost of protein to keep you energized throughout the morning.
This recipe isn’t only quick to prepare but also versatile, allowing you to experiment with your favorite berry combinations. Whether you prefer the tartness of raspberries or the sweetness of strawberries, this smoothie can be easily customized.
Enjoy it as a quick breakfast or a revitalizing afternoon snack. With its vibrant color and rich flavor, this low carb berry smoothie is sure to become a favorite in your breakfast rotation.
Ingredients (Serves 4-6):
- 2 cups of mixed berries (strawberries, blueberries, raspberries)
- 1 cup of unsweetened almond milk
- 1 cup of Greek yogurt
- 1 tablespoon of chia seeds
- 1 teaspoon of vanilla extract
- 1 tablespoon of sweetener (such as erythritol or stevia)
- Ice cubes (optional for texture)
Cooking Instructions:
1. Prepare the Ingredients:
Rinse the mixed berries thoroughly under cold water. If you’re using strawberries, remove the stems and cut them into halves for easier blending.
2. Blend the Base:
In a blender, combine the unsweetened almond milk and Greek yogurt. Blend for a few seconds until smooth, creating a creamy base for your smoothie.
3. Add the Berries:
Add the mixed berries to the blender along with the chia seeds. The chia seeds will help thicken the smoothie and add a nutritional boost.
4. Flavor the Smoothie:
Pour in the vanilla extract and add the sweetener of your choice. Adjust the amount of sweetener based on your taste preference.
5. Blend Until Smooth:
Blend all the ingredients together on high speed until the mixture is smooth and creamy. If you prefer a thicker consistency, add a handful of ice cubes and blend again.
6. Serve:
Pour the smoothie into glasses and serve immediately. You can garnish with a few whole berries or a sprinkle of chia seeds on top for added texture and visual appeal.
Extra Tips:
For a creamier texture, you can substitute Greek yogurt with coconut yogurt, especially if you’re following a dairy-free diet.
Additionally, if fresh berries are out of season, frozen berries work just as well and can make the smoothie thicker without the need for ice.
Adjust the sweetness according to your preference, keeping in mind that some berries may be naturally sweeter than others. Enjoy experimenting with different berry combinations to find your perfect blend!
Berry-Loaded Low Carb Muffins
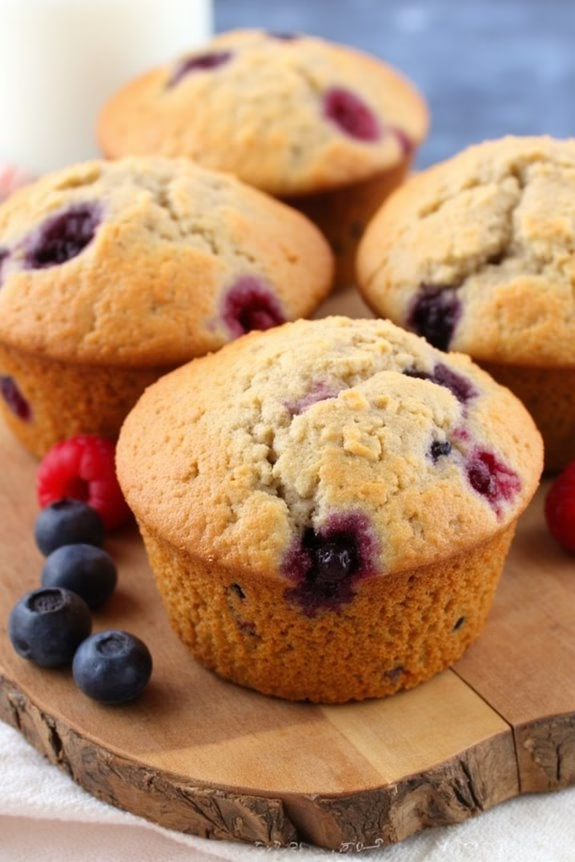
Berry-Loaded Low Carb Muffins are the perfect way to start your day with a burst of flavor and energy, all while keeping your carbohydrate intake in check.
These muffins combine the natural sweetness of berries with the nutty flavor of almond flour, creating a delicious and satisfying breakfast treat. Whether you’re following a low-carb diet or just looking for a healthier breakfast option, these muffins are guaranteed to become a staple in your morning routine.
This recipe is designed to serve 4-6 people, making it ideal for a family breakfast or a small gathering with friends. The combination of fresh berries and almond flour not only enhances the flavor but also boosts the nutritional value of the muffins, providing you with essential vitamins, minerals, and fiber.
These muffins are quick to prepare, and you can also make them in advance for a grab-and-go breakfast option during busy mornings.
Ingredients (serves 4-6):
- 2 cups almond flour
- 1/2 cup coconut flour
- 1 teaspoon baking powder
- 1/2 teaspoon baking soda
- 1/4 teaspoon salt
- 1/2 cup unsweetened almond milk
- 1/3 cup melted coconut oil
- 3 large eggs
- 1 teaspoon vanilla extract
- 1/2 cup erythritol or preferred low-carb sweetener
- 1 cup mixed fresh berries (e.g., blueberries, raspberries, strawberries)
Cooking Instructions:
- Preheat the Oven: Begin by preheating your oven to 350°F (175°C). This guarantees that the oven is at the right temperature by the time you’re ready to bake the muffins.
- Prepare the Muffin Tin: Line a 12-cup muffin tin with paper liners or lightly grease each cup with coconut oil to prevent the muffins from sticking.
- Mix the Dry Ingredients: In a large mixing bowl, combine the almond flour, coconut flour, baking powder, baking soda, and salt. Stir until all dry ingredients are well combined.
- Combine Wet Ingredients: In a separate bowl, whisk together the unsweetened almond milk, melted coconut oil, eggs, vanilla extract, and erythritol until well blended.
- Combine Wet and Dry Mixtures: Gradually add the wet ingredients to the dry ingredients, stirring gently until just combined. Be careful not to overmix, as this can affect the texture of the muffins.
- Fold in the Berries: Gently fold the mixed berries into the batter, ensuring they’re evenly distributed without crushing them.
- Fill the Muffin Cups: Divide the batter evenly among the prepared muffin cups, filling each about three-quarters full to allow room for rising.
- Bake the Muffins: Place the muffin tin in the preheated oven and bake for 20-25 minutes, or until a toothpick inserted into the center of a muffin comes out clean.
- Cool and Serve: Once baked, remove the muffins from the oven and let them cool in the tin for about 5 minutes. Transfer the muffins to a wire rack to cool completely before serving.
Extra Tips:
For the best results, use fresh berries when in season. If using frozen berries, don’t thaw them before adding to the batter to prevent them from releasing too much moisture.
Feel free to customize the recipe by adding nuts, seeds, or a dash of cinnamon for extra flavor. Store any leftover muffins in an airtight container at room temperature for up to three days, or freeze them for longer storage.
When ready to enjoy, simply reheat in the oven or microwave for a warm and delicious breakfast treat.
Keto Crepes to Kickstart Your Day
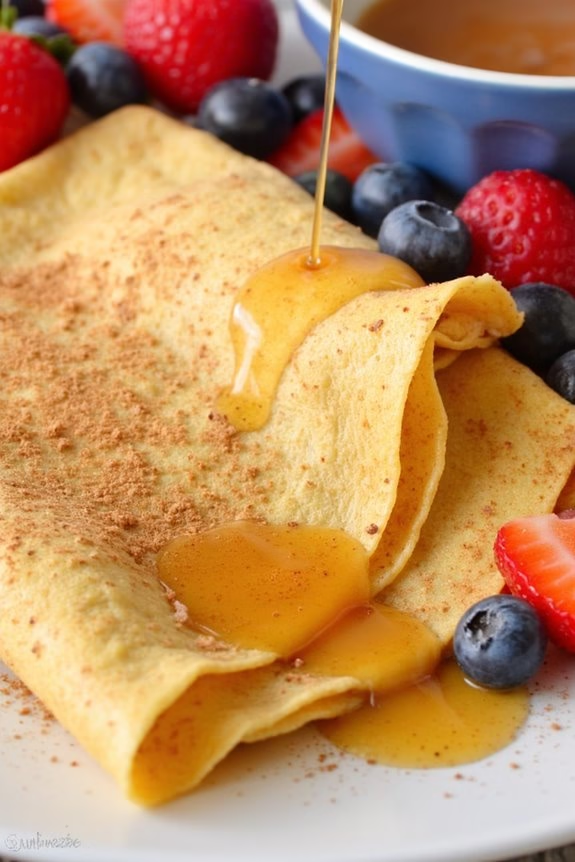
Start your morning with a delightful twist on a classic breakfast favorite with these Keto Crepes. Perfectly thin and tender, these crepes are crafted to fit a low-carb lifestyle, all while delivering rich flavor and satisfying texture.
Whether you’re in the mood for a sweet or savory filling, these versatile crepes make an excellent base for a variety of toppings. With almond flour as the primary ingredient, these crepes aren’t only keto-friendly but also gluten-free, making them ideal for anyone following a low-carb or gluten-free diet.
These Keto Crepes are quick and simple to prepare, guaranteeing you can enjoy a luxurious breakfast without spending too much time in the kitchen. The recipe yields 4-6 servings, making it perfect for a family breakfast or brunch gathering.
Pair them with your favorite low-carb syrup, fresh berries, or even a sprinkle of cinnamon for a satisfying start to your day.
Ingredients (Serves 4-6)
- 1 cup almond flour
- 4 large eggs
- 1/2 cup heavy cream
- 1/2 cup water
- 2 tablespoons melted butter (plus more for cooking)
- 1 tablespoon erythritol or preferred sweetener
- 1 teaspoon vanilla extract
- A pinch of salt
Cooking Instructions
1. Prepare the Batter: In a large mixing bowl, combine the almond flour, eggs, heavy cream, water, melted butter, erythritol, vanilla extract, and salt. Whisk the ingredients together until you achieve a smooth and slightly runny batter.
Let the mixture rest for about 5-10 minutes to guarantee the flour absorbs the liquid properly.
2. Heat the Pan: Place a non-stick frying pan over medium heat. Add a small amount of butter to the pan and allow it to melt, coating the surface evenly.
3. Cook the Crepes: Pour about 1/4 cup of the batter into the pan, swirling it around to form a thin layer that covers the entire bottom of the pan.
Cook the crepe for approximately 2-3 minutes until the edges start to lift and the bottom turns golden brown.
4. Flip and Finish Cooking: Carefully flip the crepe using a spatula and cook for another minute on the other side until lightly browned.
Remove the crepe from the pan and place it on a plate.
5. Repeat: Repeat the process with the remaining batter, adding more butter to the pan as needed, until all the crepes are cooked.
6. Serve: Serve the crepes warm with your choice of fillings and toppings. Popular options include sugar-free whipped cream, low-carb fruit compote, or a sprinkle of cinnamon and erythritol.
Extra Tips
To guarantee your crepes are perfectly thin and evenly cooked, it’s crucial to swirl the batter immediately after pouring it into the pan.
If the batter appears too thick, add a bit more water to achieve the right consistency. Cooking crepes requires a gentle touch when flipping, so using a non-stick pan and a flexible spatula can help avoid tearing.
Feel free to experiment with different sweeteners or add a pinch of cinnamon to the batter for a hint of extra flavor. Enjoy the versatility of this dish by trying out various fillings and toppings to suit your taste preferences.
Enjoy Low Carb, Sugar-Free Parfaits
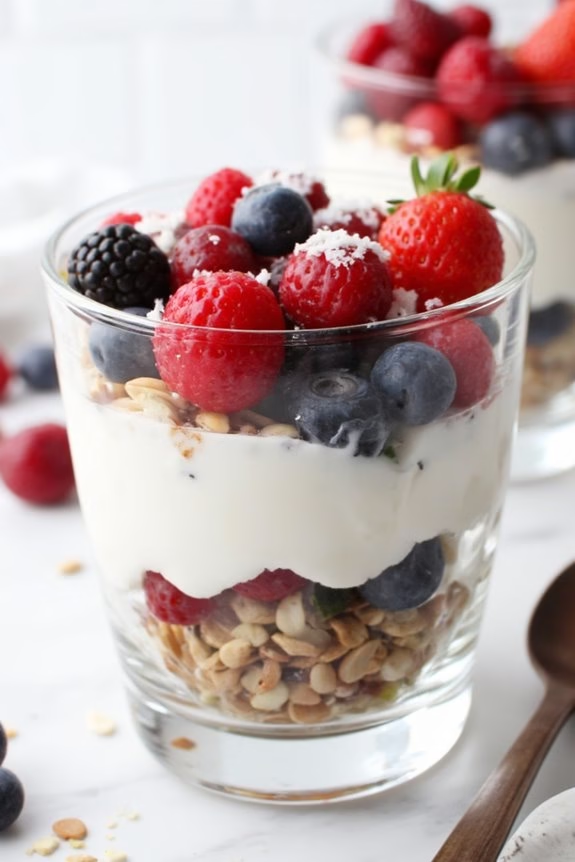
Start your morning with a revitalizing Low Carb Sugar-Free Berry Parfait that’s both delicious and satisfying. This parfait combines the natural sweetness of berries with a creamy, sugar-free yogurt base, topped with a crunchy layer of nuts and seeds. It’s perfect for those who want a sweet breakfast without the guilt, making it ideal for anyone following a low-carb lifestyle.
This parfait isn’t only quick to prepare but also rich in nutrients, providing a balanced start to your day. This recipe yields a serving size suitable for 4-6 people, making it perfect for a family breakfast or a weekend brunch with friends. The combination of different textures and flavors makes this parfait a delight to savor.
Plus, it’s easily customizable with your choice of toppings, allowing you to tailor it to your preference or dietary needs.
Ingredients (Serves 4-6):
- 2 cups of plain Greek yogurt (sugar-free)
- 1 cup of mixed berries (such as strawberries, blueberries, and raspberries)
- 1/4 cup of chopped nuts (such as almonds, walnuts, or pecans)
- 1/4 cup of seeds (such as chia seeds or flaxseeds)
- 2 tablespoons of unsweetened shredded coconut
- 1 teaspoon of vanilla extract
- Optional: Stevia or erythritol for added sweetness
Cooking Instructions:
- Prepare the Ingredients: Wash the berries thoroughly and pat them dry. Chop the larger berries like strawberries into bite-sized pieces.
- Mix the Yogurt: In a medium-sized bowl, combine the plain Greek yogurt with the vanilla extract. If you prefer a sweeter parfait, add your choice of sweetener like stevia or erythritol, and mix well until fully combined.
- Layer the Parfait: In individual serving glasses or bowls, start by adding a spoonful of the yogurt mixture at the bottom. Follow with a layer of mixed berries, then sprinkle a layer of chopped nuts and seeds. Repeat the layers until all the ingredients are used up, ending with a layer of berries on the top.
- Add the Finishing Touches: Sprinkle the unsweetened shredded coconut over the top layer of berries for added texture and flavor.
- Chill and Serve: Let the parfaits sit in the refrigerator for about 10 minutes to allow the flavors to meld together. Serve chilled and enjoy!
Extra Tips:
For added variety, consider incorporating different types of berries or adding a spoonful of sugar-free jam between the layers for an extra burst of flavor. If you’re preparing the parfaits in advance, store them in airtight containers to keep them fresh.
Additionally, feel free to experiment with different types of nuts and seeds to suit your taste preferences and nutritional needs. Remember, a little preparation goes a long way in creating a delightful and nourishing breakfast experience.
No-Bake Low Carb Breakfast Bars
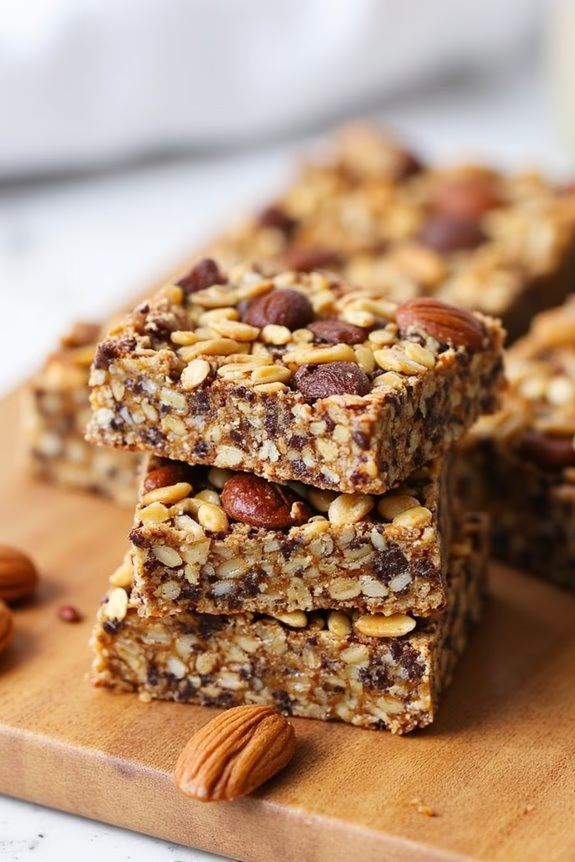
Start your morning with these delicious and nutritious No-Bake Low Carb Breakfast Bars. Perfect for those who want to maintain a low-carb diet, these bars are packed with healthy fats, protein, and fiber, giving you sustained energy throughout the day.
They make an excellent grab-and-go breakfast option, especially on busy mornings when you don’t have time to prepare a full meal. Plus, with no baking required, these bars are simple and quick to make, saving you time without compromising on flavor or nutrition.
These breakfast bars are made from a blend of nuts, seeds, and a touch of natural sweetness, making them both satisfying and guilt-free. They’re also highly customizable, allowing you to swap in your favorite low-carb ingredients to suit your taste preferences.
Whether you enjoy them with a cup of coffee or as a post-workout snack, these No-Bake Low Carb Breakfast Bars are sure to become a staple in your meal planning routine.
Ingredients (Serves 4-6):
- 1 cup almonds
- 1 cup walnuts
- 1/2 cup unsweetened shredded coconut
- 1/4 cup chia seeds
- 1/4 cup sunflower seeds
- 1/2 cup almond butter
- 1/4 cup coconut oil
- 1/4 cup sugar-free maple syrup
- 1 teaspoon vanilla extract
- 1/4 teaspoon salt
Instructions:
- Prepare Ingredients: Begin by gathering all your ingredients and verifying your nuts and seeds are fresh. If your almond butter is stiff, give it a good stir to verify it’s smooth and creamy.
- Mix Dry Ingredients: In a large mixing bowl, combine the almonds, walnuts, shredded coconut, chia seeds, and sunflower seeds. Stir them together until evenly distributed.
- Melt and Mix Wet Ingredients: In a small saucepan over low heat, melt the coconut oil. Once melted, add the almond butter, sugar-free maple syrup, vanilla extract, and salt. Stir until the mixture is well combined and smooth.
- Combine Mixtures: Pour the wet ingredients into the bowl with the dry ingredients. Use a spatula or your hands to mix everything together until all the dry ingredients are coated with the wet mixture.
- Set the Bars: Line an 8-inch square baking dish with parchment paper. Transfer the mixture into the dish, pressing it down firmly with the back of a spoon or your hands to verify it’s packed tightly and evenly.
- Chill: Place the dish in the refrigerator for at least 2 hours to allow the bars to set. For quicker results, you can place them in the freezer for about 30 minutes.
- Cut and Serve: Once set, remove the mixture from the dish by lifting the parchment paper. Use a sharp knife to cut into bars of your desired size. Serve immediately or store in an airtight container in the fridge for up to one week.
Extra Tips:
For a more varied texture, consider roughly chopping half of the nuts before mixing them with the other ingredients. This will add a delightful crunch to the bars.
Feel free to substitute or add other nuts or seeds based on your preference, just keep the overall quantity consistent. If you prefer a sweeter taste, adjust the amount of sugar-free maple syrup to your liking.
Low Carb Yogurt Bowls With Toppings
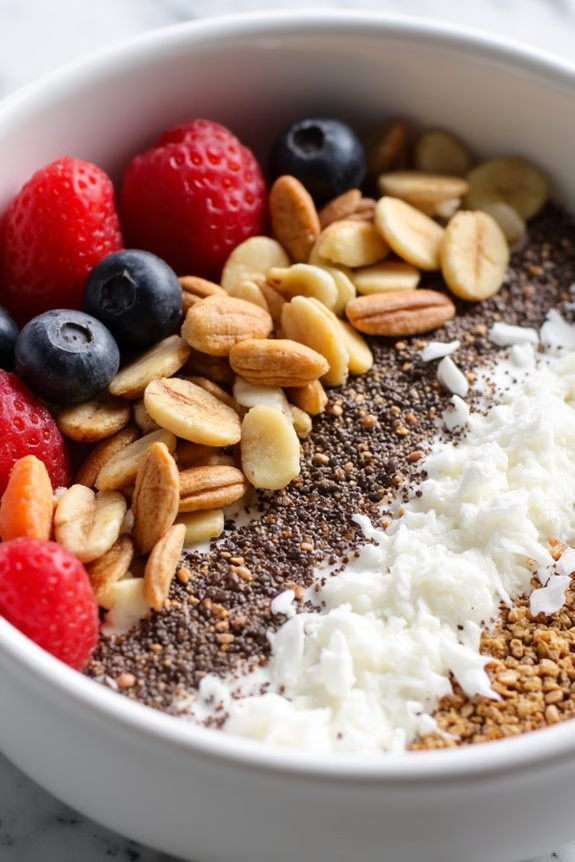
Low Carb Yogurt Bowls with Toppings are a delightful way to start your day with a nutritious and satisfying breakfast. These bowls aren’t only easy to prepare but also allow for a great deal of customization to suit your taste preferences. By using low-carb yogurt as a base and a variety of toppings, you can create a breakfast that’s both filling and delicious without the extra carbs that often come with traditional breakfast options.
This recipe makes a serving size for 4-6 people, making it perfect for a family breakfast or a small gathering. With the right combination of toppings, you can add texture, flavor, and nutrition to your yogurt bowls. Whether you prefer fresh fruits, nuts, seeds, or a drizzle of low-carb sweetener, these yogurt bowls are versatile enough to cater to everyone’s taste.
Ingredients:
- 4 cups of low-carb plain Greek yogurt
- 1 cup of fresh berries (such as strawberries, blueberries, or raspberries)
- 1/2 cup of chopped nuts (such as almonds, walnuts, or pecans)
- 1/4 cup of unsweetened coconut flakes
- 2 tablespoons of chia seeds
- 2 tablespoons of flaxseeds
- 1/4 cup of sugar-free granola
- 2 tablespoons of low-carb sweetener (such as stevia or monk fruit)
- 1 teaspoon of vanilla extract
Cooking Instructions:
- Prepare the Yogurt Base: In a large mixing bowl, combine the low-carb plain Greek yogurt with the vanilla extract and low-carb sweetener. Stir until the sweetener is fully dissolved and the yogurt is smooth.
- Chill the Yogurt: Place the yogurt mixture in the refrigerator to chill for about 15-20 minutes. This helps enhance the flavors and gives a revitalizing start to your morning.
- Prepare Toppings: While the yogurt is chilling, rinse the fresh berries and pat them dry. Chop the nuts into smaller pieces if necessary. Gather all the toppings and have them ready for assembling the bowls.
- Assemble the Yogurt Bowls: Once the yogurt is chilled, divide it evenly among 4-6 serving bowls. Top each bowl with a generous portion of fresh berries, chopped nuts, unsweetened coconut flakes, chia seeds, and flaxseeds.
- Garnish and Serve: Sprinkle sugar-free granola over each bowl for added crunch. You may add a final drizzle of low-carb sweetener if you like your yogurt bowls sweeter. Serve immediately, and enjoy this low-carb breakfast treat.
Extra Tips:
When making Low Carb Yogurt Bowls with Toppings, feel free to experiment with different toppings to find your favorite combination.
If you prefer a more tropical flavor, consider adding a few slices of kiwi or a sprinkle of cinnamon for warmth.
Always opt for fresh, seasonal berries for the best flavor and nutritional value.
If preparing in advance, keep the toppings separate from the yogurt until just before serving to maintain their texture.
Sugar-Free Breakfast Cookies for a Morning Treat
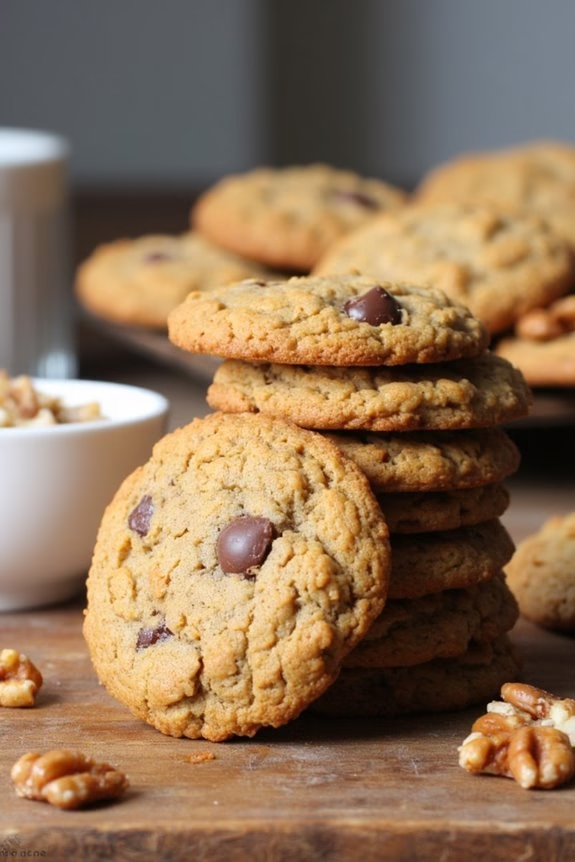
Start your day on a sweet note without the sugar rush with these delightful Sugar-Free Breakfast Cookies. Perfect for those who are following a low-carb lifestyle, these cookies offer a nutritious and delicious start to your morning. Packed with wholesome ingredients, they provide a satisfying crunch and a touch of natural sweetness, making them an excellent companion to your morning coffee or tea.
These breakfast cookies aren’t only easy to make but also versatile, allowing you to enjoy them fresh out of the oven or as a quick on-the-go breakfast option. This recipe yields a batch sufficient for 4-6 people, guaranteeing everyone in the family can enjoy a healthy morning treat. Made with almond flour and sweetened naturally with ripe bananas and a hint of vanilla, these cookies are both gluten-free and sugar-free, making them a guilt-free indulgence.
Ingredients (Serves 4-6):
- 2 cups almond flour
- 1/2 teaspoon baking soda
- 1/4 teaspoon salt
- 1 teaspoon ground cinnamon
- 2 ripe bananas, mashed
- 1/4 cup unsalted butter, melted
- 1 teaspoon vanilla extract
- 1/2 cup chopped walnuts
- 1/4 cup unsweetened shredded coconut
- 1/4 cup sugar-free chocolate chips (optional)
Cooking Instructions:
- Preheat the Oven: Begin by preheating your oven to 350°F (175°C). Line a baking sheet with parchment paper to prevent the cookies from sticking.
- Mix Dry Ingredients: In a medium-sized bowl, combine the almond flour, baking soda, salt, and ground cinnamon. Stir well to guarantee the baking soda and cinnamon are evenly distributed throughout the almond flour.
- Prepare Wet Ingredients: In a separate large mixing bowl, mash the ripe bananas until smooth. Add the melted butter and vanilla extract to the mashed bananas and mix until well combined.
- Combine Ingredients: Gradually add the dry ingredients to the wet mixture, stirring continuously until a dough forms. The dough should be slightly sticky but hold together well.
- Add Mix-Ins: Fold in the chopped walnuts, unsweetened shredded coconut, and sugar-free chocolate chips (if using). Confirm that the mix-ins are evenly distributed throughout the cookie dough.
- Shape the Cookies: Scoop tablespoons of dough onto the prepared baking sheet, spacing them about 2 inches apart. Flatten each scoop gently with the back of a spoon to form cookie shapes.
- Bake: Place the baking sheet in the preheated oven and bake for 12-15 minutes, or until the edges of the cookies are golden brown. Keep an eye on them to prevent over-baking.
- Cool: Once baked, remove the cookies from the oven and allow them to cool on the baking sheet for 5 minutes. Transfer them to a wire rack to cool completely before serving.
Extra Tips:
To guarantee the best texture and flavor, use ripe bananas as they provide natural sweetness and moisture to the cookies. If the dough feels too wet or sticky, you can add a tablespoon of almond flour to help it bind better.
For those who enjoy a bit more sweetness, a splash of sugar-free maple syrup can be added to the wet ingredients. Additionally, these cookies can be stored in an airtight container for up to a week, making them an ideal make-ahead breakfast option. Enjoy them with a cup of coffee or as a healthy snack throughout the day!
Transform French Toast With Low Carb Ingredients
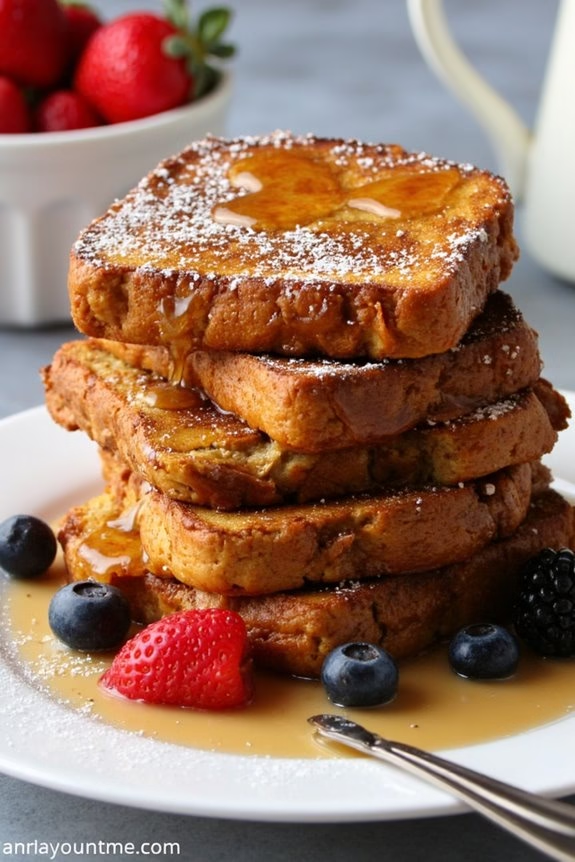
For those who love a sweet start to their morning but want to maintain a low-carb lifestyle, transforming traditional French toast into a low-carb delight is an excellent choice. This recipe retains all the delicious flavors of classic French toast but swaps out high-carb ingredients for keto-friendly alternatives.
With this Low Carb French Toast Delight, you can enjoy a comforting breakfast favorite without the guilt. This recipe cleverly substitutes regular bread with low-carb bread options available at most grocery stores, or you can make your own using almond flour or coconut flour. Topped with sugar-free syrup or a sprinkle of cinnamon, this dish will satisfy your craving for something sweet while keeping your carb intake in check.
This recipe makes enough for 4-6 people, making it perfect for a family breakfast or brunch with friends.
Ingredients:
- 6 slices low-carb bread
- 4 large eggs
- 1/2 cup unsweetened almond milk
- 1 teaspoon vanilla extract
- 1 teaspoon ground cinnamon
- 1 tablespoon erythritol or another low-carb sweetener
- 2 tablespoons butter
- Sugar-free syrup or powdered erythritol, for serving
- Fresh berries, optional for garnish
Instructions:
- Prepare the Mixture: In a large mixing bowl, whisk together the eggs, unsweetened almond milk, vanilla extract, ground cinnamon, and erythritol until well combined. Make certain the mixture is smooth and the eggs are fully incorporated.
- Soak the Bread: Dip each slice of low-carb bread into the egg mixture, ensuring both sides are evenly coated. Allow the bread to soak for about 30 seconds to absorb the mixture, but be careful not to let it get too soggy.
- Heat the Pan: Place a non-stick skillet or griddle over medium heat and add the butter. Swirl the butter around the pan until fully melted and the pan is evenly coated.
- Cook the French Toast: Once the butter is sizzling, place the soaked bread slices onto the skillet. Cook for 3-4 minutes on each side, or until golden brown. Be sure to adjust the heat if necessary to prevent burning.
- Serve: Remove the French toast from the skillet and serve immediately. Top with sugar-free syrup or a sprinkle of powdered erythritol. Garnish with fresh berries if desired.
Extra Tips:
For an extra flavor boost, consider adding a pinch of nutmeg to the egg mixture. If you prefer a different type of low-carb bread, such as one made with almond or coconut flour, feel free to substitute.
Confirm the bread slices aren’t too thick, as this can prevent them from cooking evenly. Always keep an eye on the heat setting; adjusting it as necessary will help achieve the perfect golden-brown color without burning. Enjoy your Low Carb French Toast Delight with a side of crispy bacon or scrambled eggs for a complete low-carb breakfast.
Try These Flavorful Sweet Omelets

Looking for a delightful low carb breakfast choice to start your day on a sweet note? Try these Vanilla Berry Sweet Omelets. This dish combines the fluffy texture of a classic omelet with the sweet and tangy flavors of fresh berries and vanilla.
It’s a revitalizing twist on traditional breakfast offerings and is perfect for those following a low carb lifestyle. The combination of eggs, cream cheese, and vanilla extract creates a creamy and flavorful base that pairs perfectly with the natural sweetness of berries.
Vanilla Berry Sweet Omelets aren’t only delicious but also quick and easy to prepare. They make a perfect weekend treat or a special breakfast for guests. Each bite is filled with a burst of flavor, thanks to the fresh berries used in the recipe.
Whether you choose strawberries, blueberries, or raspberries, these berries add a pop of color and a nutritious punch. For a serving size of 4-6 people, follow the ingredients and instructions below to create this delightful dish.
Ingredients for Serving Size of 4-6 People:
- 8 large eggs
- 4 oz cream cheese, softened
- 2 tablespoons heavy cream
- 1 teaspoon vanilla extract
- 2 tablespoons granulated sweetener (e.g., erythritol or stevia)
- 1 cup mixed fresh berries (strawberries, blueberries, raspberries)
- 2 tablespoons butter
- Optional: powdered sweetener for dusting
- Optional: fresh mint leaves for garnish
Cooking Instructions:
- Prepare the Egg Mixture: In a large mixing bowl, whisk together the eggs, softened cream cheese, heavy cream, vanilla extract, and granulated sweetener. Confirm the cream cheese is fully incorporated and the mixture is smooth.
- Preheat the Pan: Heat a non-stick skillet over medium heat and add 1 tablespoon of butter, allowing it to melt and coat the pan evenly.
- Cook the Omelet: Pour half of the egg mixture into the skillet, tilting the pan slightly to spread the mixture evenly. Cook for about 3-4 minutes until the edges begin to set but the center is still slightly runny.
- Add the Berries: Evenly distribute half of the mixed berries over one half of the omelet. Carefully fold the other half of the omelet over the berries using a spatula.
- Finish Cooking: Continue to cook for an additional 2-3 minutes until the omelet is fully set and the berries are warmed through. Slide the omelet onto a plate and repeat the process with the remaining egg mixture and berries.
- Serve and Garnish: Dust the omelets with optional powdered sweetener and garnish with fresh mint leaves before serving.
Extra Tips:
For a perfect sweet omelet, confirm that the cream cheese is at room temperature before mixing, which will help it blend smoothly with the eggs. If you prefer a sweeter taste, adjust the amount of sweetener to your liking.
When cooking the omelet, avoid high heat to prevent the eggs from browning too much, which could alter the flavor. Feel free to mix and match different berries based on your preference, and for a nutty twist, consider adding a sprinkle of sliced almonds before folding the omelet.
Enjoy your delightful low carb breakfast!
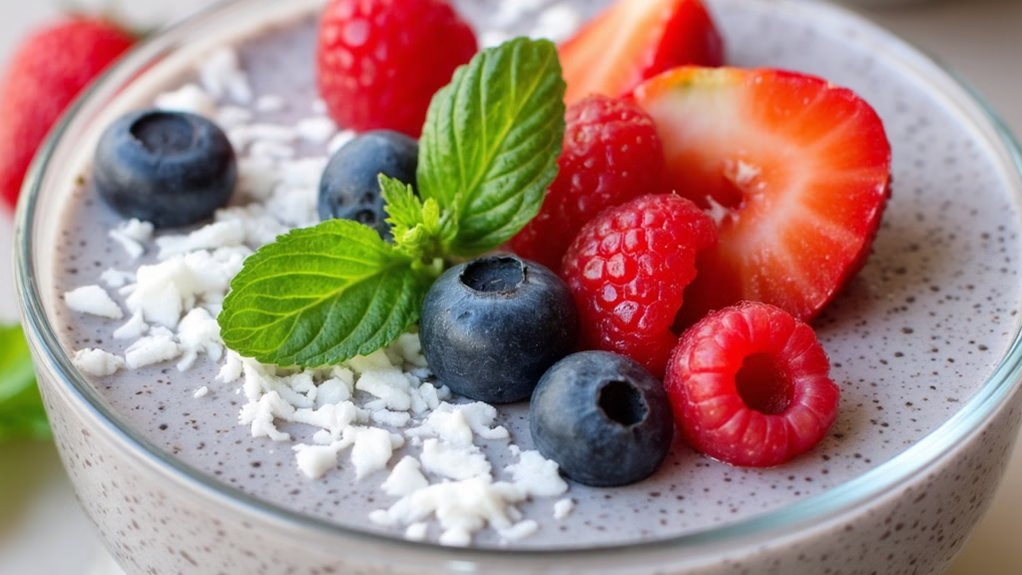
Top Your Chia Pudding With Low Carb Fruits
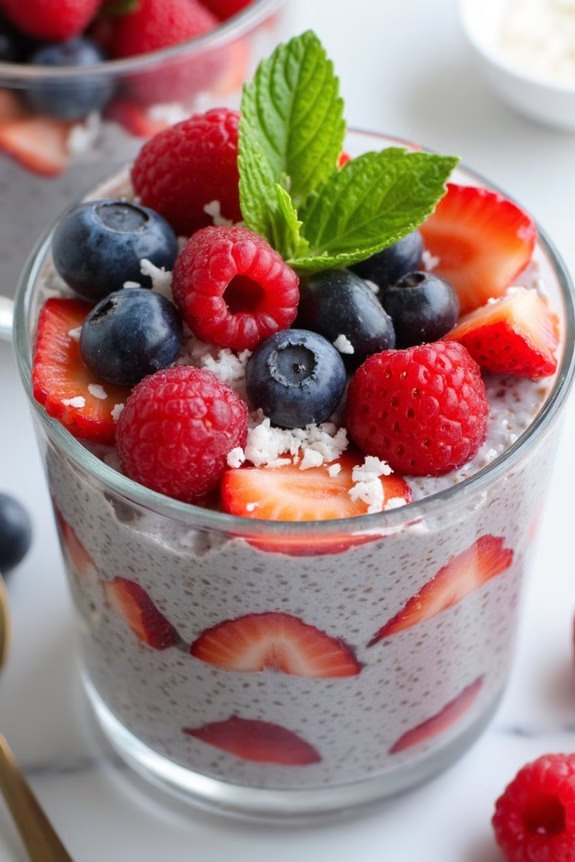
Chia pudding is a delicious and nutritious way to start your day, especially if you’re following a low-carb diet. This versatile dish can be customized to suit your taste preferences by choosing the right type of milk and toppings. Chia seeds are packed with omega-3 fatty acids, fiber, and protein, making them a powerful addition to your breakfast routine.
When combined with low-carb fruits, this pudding becomes a delightful, guilt-free treat that’s both satisfying and energy-boosting. The key to making the perfect chia pudding lies in the ratio of chia seeds to liquid and the time allowed for the seeds to swell and absorb the liquid. The result is a creamy, pudding-like texture that’s perfect for layering with your favorite low-carb fruits.
Some great fruit options include berries such as strawberries, blueberries, and raspberries, as they’re naturally low in carbohydrates and add a burst of flavor and color to your breakfast. Let’s explore the recipe and discover how you can create this delicious low-carb breakfast for 4-6 people.
Ingredients:
- 1 cup chia seeds
- 4 cups unsweetened almond milk (or any low-carb milk alternative)
- 2 teaspoons vanilla extract
- 2 tablespoons erythritol or any low-carb sweetener of choice
- 1 cup strawberries, sliced
- 1 cup blueberries
- 1 cup raspberries
- 1/4 cup unsweetened coconut flakes (optional)
- Fresh mint leaves for garnish (optional)
Instructions:
- Prepare the Chia Pudding Base: In a large mixing bowl, combine the chia seeds, unsweetened almond milk, vanilla extract, and erythritol. Stir the mixture thoroughly to guarantee the chia seeds are evenly distributed and not clumped together.
- Refrigerate the Mixture: Cover the bowl with plastic wrap or a lid and place it in the refrigerator. Allow the chia seeds to soak and expand for at least 4 hours, or overnight for best results. This resting period is essential for achieving the desired pudding-like consistency.
- Prepare the Fruit Toppings: While the chia pudding is setting, wash the strawberries, blueberries, and raspberries thoroughly. Pat them dry with a clean towel. Slice the strawberries for easier layering.
- Assemble the Chia Pudding: Once the chia pudding has set, give it a good stir to guarantee a smooth consistency. Divide the pudding equally into serving bowls or cups.
- Add the Low Carb Fruits: Top each serving with a generous portion of sliced strawberries, blueberries, and raspberries. Sprinkle with unsweetened coconut flakes if desired.
- Garnish and Serve: Finish by adding a few fresh mint leaves as a garnish for added freshness and aroma. Serve the chia pudding immediately or store in the refrigerator for up to 3 days.
Extra Tips:
For an extra creamy chia pudding, consider blending a portion of the almond milk with a small amount of coconut cream before mixing it with the chia seeds. This will enhance the texture and flavor of the pudding.
Additionally, be sure to adjust the sweetness to your liking by experimenting with different low-carb sweeteners. Remember, the longer the chia pudding sits, the thicker it becomes, so feel free to add more liquid if you prefer a looser consistency.
Finally, always use fresh, ripe fruits for the toppings to guarantee the best taste and nutritional value.