
As the festive season draws near, I’m thrilled to share some scrumptious recipes that’ll make your Christmas potluck both healthy and indulgent. Imagine a table filled with herb-roasted turkey breast, colorful quinoa-stuffed bell peppers, and sweet potato and kale salad. These dishes promise a feast that’s just as nutritious as it is flavorful. Curious to see the rest of the menu? These tantalizing options come together to create a celebration to remember!
Herb-Roasted Turkey Breast
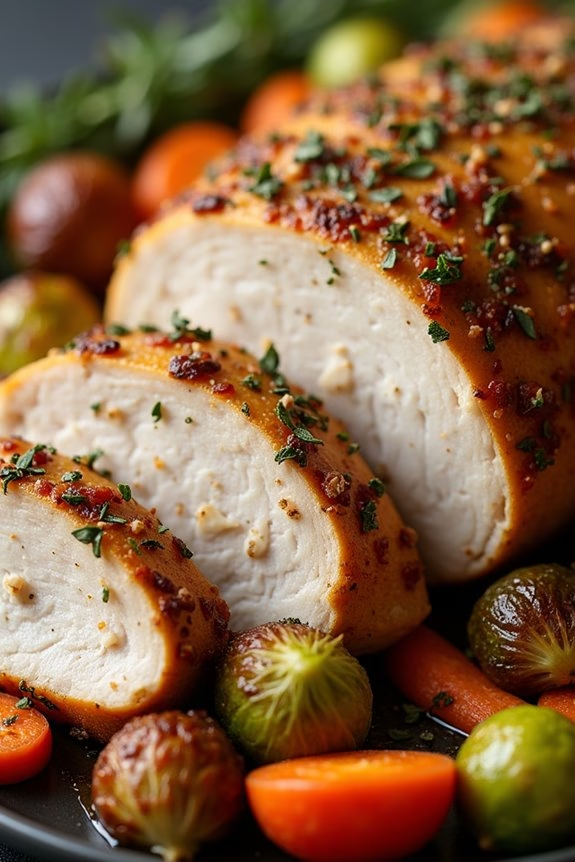
Herb-Roasted Turkey Breast is a delicious and healthier alternative to the traditional whole turkey, perfect for a Christmas potluck. This recipe focuses on using fresh herbs and simple seasonings to enhance the natural flavors of the turkey. The result is a juicy and aromatic dish that’s sure to impress your family and friends at any holiday gathering.
Not only is it a lighter option, but it also cuts down on cooking time, allowing you more freedom to enjoy the festivities.
This dish is designed to serve 4-6 people, making it an ideal choice for small gatherings. The combination of herbs such as rosemary, thyme, and sage creates a fragrant crust that seals in the moisture, guaranteeing every bite is as succulent as the last. Paired with a side of seasonal vegetables or a fresh salad, Herb-Roasted Turkey Breast is sure to be a hit at your Christmas potluck.
Ingredients:
- 1 (4-5 pound) boneless turkey breast, skin-on
- 3 tablespoons olive oil
- 2 teaspoons salt
- 1 teaspoon black pepper
- 2 tablespoons fresh rosemary, chopped
- 2 tablespoons fresh thyme, chopped
- 1 tablespoon fresh sage, chopped
- 4 cloves garlic, minced
- 1 lemon, zested and juiced
Instructions:
- Preheat the Oven: Preheat your oven to 375°F (190°C). This temperature allows the turkey to cook evenly, achieving a golden-brown crust without drying out.
- Prepare the Herb Mixture: In a small bowl, combine the olive oil, salt, pepper, rosemary, thyme, sage, garlic, lemon zest, and lemon juice. Stir well to create a fragrant herb paste.
- Season the Turkey: Place the turkey breast on a baking sheet lined with foil or parchment paper. Gently loosen the skin from the turkey breast using your fingers, being careful not to tear it. Spread half of the herb mixture under the skin and rub the remaining mixture over the top of the skin.
- Roast the Turkey: Place the prepared turkey breast in the preheated oven. Roast for approximately 1.5 to 2 hours, or until the internal temperature reaches 165°F (74°C) when measured with a meat thermometer. Baste the turkey with its juices every 30 minutes to guarantee it remains moist and flavorful.
- Rest and Serve: Once the turkey is cooked, remove it from the oven and cover it loosely with aluminum foil. Allow it to rest for 15-20 minutes before slicing. This resting period allows the juices to redistribute throughout the meat, guaranteeing each slice is tender and juicy.
Extra Tips:
To maximize flavor, try marinating the turkey breast with the herb mixture for a few hours or overnight before roasting. If you prefer a crispier skin, increase the oven temperature to 400°F (204°C) for the last 15 minutes of cooking.
Always use a meat thermometer to check doneness to prevent overcooking. For a beautiful presentation, garnish the turkey slices with extra sprigs of fresh herbs and lemon wedges.
Quinoa-Stuffed Bell Peppers
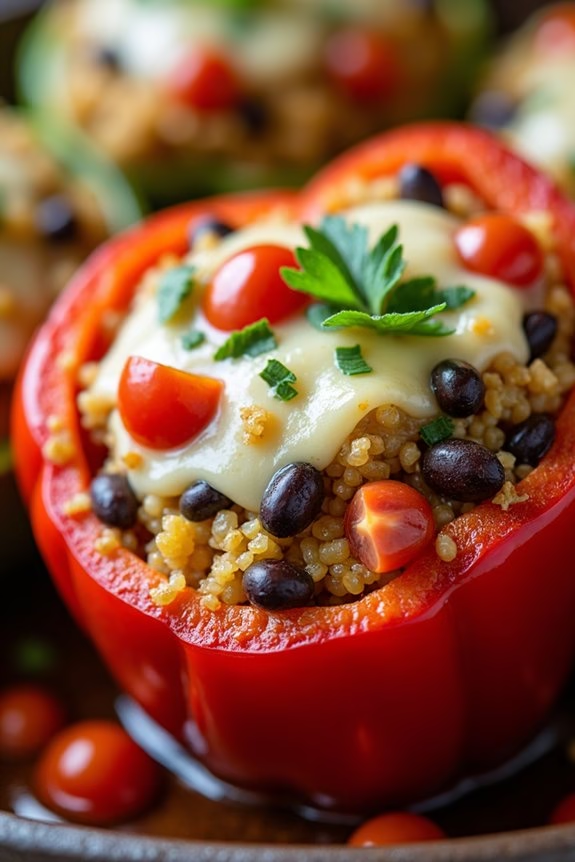
Christmas is a time for family, friends, and of course, delicious food. Hosting or attending a Christmas potluck can be a wonderful opportunity to share a healthy and flavorful dish that everyone will enjoy.
Quinoa-Stuffed Bell Peppers are a festive, colorful, and nutritious choice that can stand out on any holiday table. This dish isn’t only visually appealing with its vibrant hues but also packed with protein and fiber, making it a wholesome addition to the holiday meal.
The Quinoa-Stuffed Bell Peppers are easy to prepare and can be made ahead of time, allowing you to enjoy the festivities without last-minute stress. Each bell pepper is filled with a savory mixture of quinoa, vegetables, and spices, then baked to perfection.
It’s a versatile dish that caters to various dietary preferences, including vegetarian and gluten-free options, without sacrificing flavor. This recipe serves 4-6 people, making it ideal for a small gathering or as a side dish at a larger event.
Ingredients:
- 6 large bell peppers (any color)
- 1 cup quinoa
- 2 cups vegetable broth or water
- 1 tablespoon olive oil
- 1 medium onion, chopped
- 2 cloves garlic, minced
- 1 cup cherry tomatoes, halved
- 1 cup black beans, rinsed and drained
- 1 teaspoon ground cumin
- 1 teaspoon smoked paprika
- Salt and pepper to taste
- 1 cup shredded mozzarella cheese (optional)
- Fresh cilantro or parsley for garnish
Instructions:
- Preheat and Prepare Peppers: Preheat your oven to 375°F (190°C). Cut the tops off the bell peppers and remove the seeds and membranes. Lightly brush the outside of each pepper with olive oil and place them upright in a baking dish.
- Cook Quinoa: Rinse the quinoa under cold water. In a medium saucepan, bring the vegetable broth or water to a boil. Add the quinoa, reduce the heat to low, cover, and let it simmer for about 15 minutes or until the liquid is absorbed and the quinoa is fluffy. Remove from heat and set aside.
- Sauté Vegetables: In a large skillet, heat olive oil over medium heat. Add the chopped onion and minced garlic, sautéing until the onion becomes translucent. Stir in the cherry tomatoes, black beans, ground cumin, smoked paprika, salt, and pepper. Cook for another 5 minutes, allowing the flavors to meld.
- Mix Filling: Combine the cooked quinoa with the sautéed vegetable mixture, stirring until everything is evenly mixed. Taste and adjust seasoning if necessary.
- Stuff Peppers: Spoon the quinoa mixture into each bell pepper, packing it tightly. If using, sprinkle shredded mozzarella cheese on top of each pepper.
- Bake: Cover the baking dish with foil and bake in the preheated oven for 25 minutes. Remove the foil and bake for an additional 10 minutes, or until the peppers are tender and the cheese is melted and golden.
- Garnish and Serve: Remove from the oven and let the peppers cool slightly. Garnish with fresh cilantro or parsley before serving.
Extra Tips:
When selecting bell peppers, choose ones that are firm and have a good balance so they can stand upright in the baking dish.
If you want to add a spicy kick to the dish, consider including diced jalapeños in the filling or adding a pinch of cayenne pepper. You can also swap the mozzarella for feta or goat cheese for a different flavor profile.
These peppers can be stored in the refrigerator for up to three days and reheated in the oven, making them a great make-ahead option for busy holiday schedules.
Sweet Potato and Kale Salad
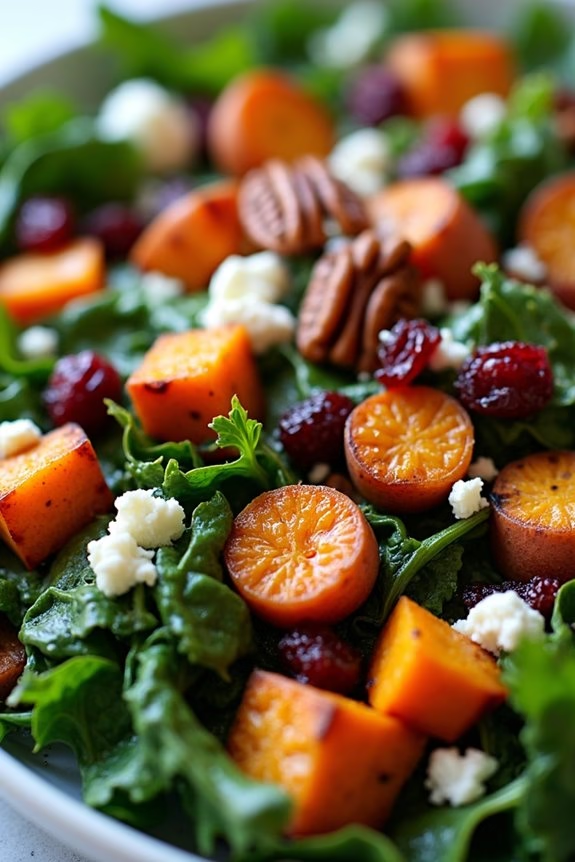
Looking for a healthy and delicious dish to bring to your Christmas potluck? This Sweet Potato and Kale Salad is a perfect choice! It’s a vibrant and nutritious dish that combines the natural sweetness of roasted sweet potatoes with the earthy flavors of kale. The addition of crunchy pecans and a tangy vinaigrette dressing makes this salad not only visually appealing but also incredibly satisfying.
It’s a great way to get your greens in and impress your friends and family with a healthy, festive option. This salad serves 4-6 people, making it an ideal side dish for a group gathering. The combination of textures and flavors guarantees that it will be a hit with guests of all ages.
Plus, it’s easy to prepare, so you can focus on enjoying the holiday festivities without spending too much time in the kitchen. Follow this simple recipe to create a dish that will become a staple at your holiday gatherings.
Ingredients:
- 3 medium sweet potatoes, peeled and diced
- 2 tablespoons olive oil
- 1 teaspoon salt
- 1/2 teaspoon black pepper
- 1 bunch kale, stems removed and leaves chopped
- 1/2 cup pecans, roughly chopped
- 1/4 cup dried cranberries
- 1/4 cup crumbled feta cheese
For the vinaigrette:
- 1/4 cup olive oil
- 2 tablespoons apple cider vinegar
- 1 tablespoon honey
- 1 teaspoon Dijon mustard
- Salt and pepper to taste
Instructions:
- Preheat the Oven: Start by preheating your oven to 400°F (200°C). This will guarantee that it’s hot enough to roast the sweet potatoes to perfection.
- Prepare the Sweet Potatoes: In a large mixing bowl, combine the diced sweet potatoes with 2 tablespoons of olive oil, 1 teaspoon of salt, and 1/2 teaspoon of black pepper. Toss until the sweet potatoes are evenly coated.
- Roast the Sweet Potatoes: Spread the seasoned sweet potatoes in a single layer on a baking sheet. Roast them in the preheated oven for about 25-30 minutes, or until they’re tender and lightly browned, flipping them halfway through the cooking time for even roasting.
- Prepare the Kale: While the sweet potatoes are roasting, place the chopped kale in a large salad bowl. Add a pinch of salt and massage the kale leaves with your hands for about 2-3 minutes. This will help to soften the leaves and enhance their flavor.
- Make the Vinaigrette: In a small bowl, whisk together the olive oil, apple cider vinegar, honey, Dijon mustard, salt, and pepper until well combined. Adjust the seasoning to taste.
- Assemble the Salad: Once the sweet potatoes are done roasting, add them to the bowl with the massaged kale. Add the chopped pecans, dried cranberries, and crumbled feta cheese.
- Dress the Salad: Drizzle the vinaigrette over the salad and toss everything together until well combined. Confirm that all the ingredients are evenly coated with the dressing.
- Serve: Transfer the salad to a serving platter or bowl and serve it immediately, or refrigerate it for up to an hour before serving to let the flavors meld together.
Extra Tips:
To enhance the flavors of this Sweet Potato and Kale Salad, consider toasting the pecans in a dry skillet over medium heat for a few minutes until they’re fragrant. This step will add a deeper, nutty flavor to the salad.
Feel free to customize the salad by adding other ingredients like sliced avocado, quinoa, or goat cheese for added texture and taste. If you’re preparing this salad ahead of time, keep the dressing separate and toss it with the salad just before serving to prevent the kale from becoming soggy.
Enjoy this delicious and healthy dish at your holiday potluck!
Baked Salmon With Herb-Crust
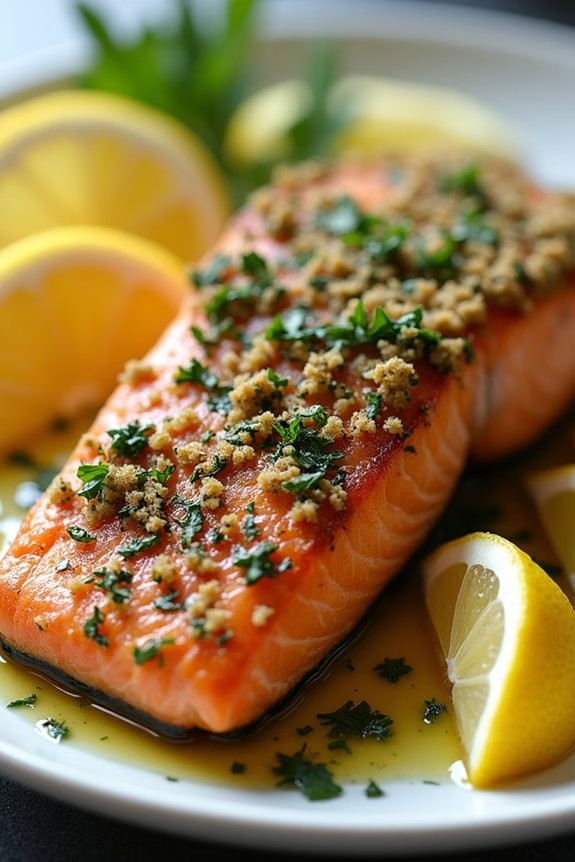
Baked Salmon With Herb-Crust is a delightful and healthy dish that perfectly suits a Christmas potluck. This dish combines the rich flavor of salmon with a revitalizing herb crust, creating a meal that’s both nutritious and festive. The herb crust adds a lovely texture and enhances the flavor of the salmon, making it a standout dish at any gathering.
Plus, it’s easy to prepare and cook, allowing you to spend more time enjoying the festivities with friends and family. This recipe serves 4-6 people, making it ideal for a small potluck or family dinner. The combination of fresh herbs, lemon zest, and breadcrumbs creates a crust that’s both crunchy and aromatic, sealing in the moisture of the salmon and guaranteeing every bite is deliciously flavorful.
This dish pairs well with a variety of sides, such as roasted vegetables or a fresh salad, making it a versatile addition to any holiday spread.
Ingredients:
- 2 lbs (about 4-6 fillets) salmon fillets, skinless
- 1 cup breadcrumbs
- 1/4 cup fresh parsley, chopped
- 1/4 cup fresh dill, chopped
- 1 tablespoon lemon zest
- 2 tablespoons olive oil
- Salt and pepper to taste
- Lemon wedges for serving
Instructions:
- Preheat the Oven: Preheat your oven to 400°F (200°C). This guarantees that the oven is hot enough to cook the salmon evenly.
- Prepare the Herb Crust: In a medium-sized bowl, combine the breadcrumbs, parsley, dill, lemon zest, salt, and pepper. Mix well to make sure all ingredients are evenly distributed.
- Coat the Salmon: Place the salmon fillets on a baking sheet lined with parchment paper. Brush each fillet with olive oil to help the crust adhere. Gently press the herb mixture onto the top of each fillet, ensuring a generous and even coating.
- Bake the Salmon: Place the baking sheet in the preheated oven and bake for 12-15 minutes, or until the salmon is cooked through and the herb crust is golden brown. The salmon should flake easily with a fork when done.
- Serve: Remove the salmon from the oven and let it rest for a few minutes. Serve with lemon wedges on the side for an extra zesty flavor.
Extra Tips: When choosing salmon, opt for fresh, high-quality fillets for the best flavor and texture. If fresh herbs aren’t available, dried herbs can be used, but reduce the quantity by half as dried herbs are more concentrated in flavor.
To prevent the salmon from sticking, guarantee the baking sheet is well-lined with parchment paper or lightly greased. Avoid overcooking the salmon by checking it a few minutes before the suggested time, as oven temperatures can vary.
Cauliflower Mashed Potatoes
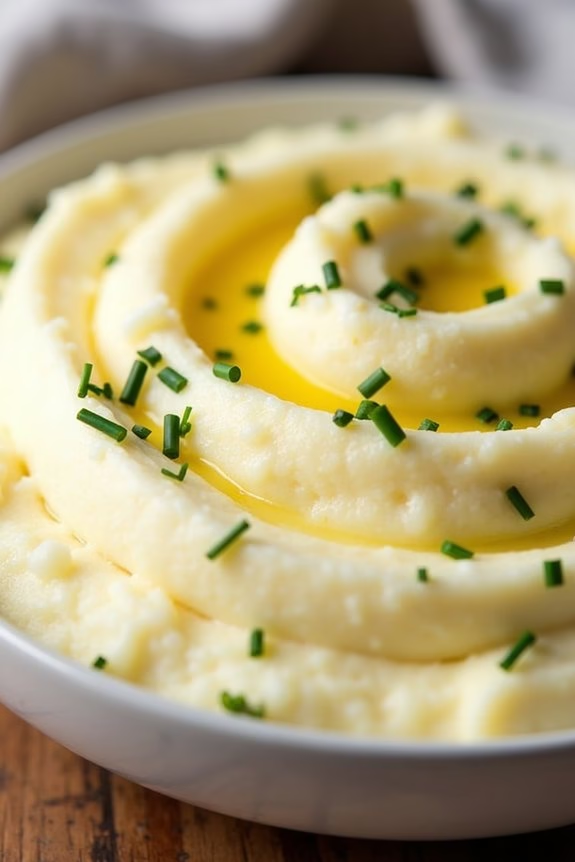
Cauliflower Mashed Potatoes is a delightful and healthier alternative to traditional mashed potatoes, perfect for any Christmas potluck. This dish retains the creamy and rich texture of classic mashed potatoes while considerably cutting down on carbs and calories, making it an excellent choice for those looking to maintain healthy eating habits during the festive season.
By incorporating cauliflower, you also benefit from the additional nutrients it provides, such as vitamin C, vitamin K, and fiber.
This recipe is designed to serve 4-6 people and is both easy to prepare and deliciously satisfying. The subtle flavor of cauliflower is enhanced with garlic, butter, and a hint of Parmesan cheese, creating a dish that’s both comforting and sophisticated. It’s a crowd-pleaser that will surely become a staple at your holiday gatherings.
Ingredients:
- 1 large head of cauliflower
- 3 cloves of garlic, minced
- 3 tablespoons unsalted butter
- 1/4 cup grated Parmesan cheese
- 1/4 cup Greek yogurt or sour cream
- Salt and pepper to taste
- Fresh chives or parsley for garnish (optional)
Cooking Instructions:
- Prepare the Cauliflower: Begin by removing the leaves and cutting the cauliflower into florets. Rinse them thoroughly under cold water to remove any dirt or debris.
- Cook the Cauliflower: Fill a large pot with water and bring it to a boil. Add the cauliflower florets and a pinch of salt to the boiling water. Cook for about 10-15 minutes or until the cauliflower is tender and can be easily pierced with a fork.
- Drain and Dry: Once cooked, drain the cauliflower thoroughly and let it sit in the colander for a few minutes to make sure all excess water is removed. You can also pat the florets dry with a clean kitchen towel to prevent the mashed cauliflower from becoming watery.
- Sauté the Garlic: In a small saucepan over medium heat, melt the butter. Add the minced garlic and sauté for about 2 minutes until fragrant. Be careful not to let it burn.
- Blend the Cauliflower: Transfer the drained cauliflower to a food processor or blender. Add the sautéed garlic and butter, Parmesan cheese, Greek yogurt, salt, and pepper. Blend until the mixture reaches your desired creamy consistency. Taste and adjust seasoning if necessary.
- Serve and Garnish: Transfer the mashed cauliflower to a serving bowl. If desired, sprinkle with freshly chopped chives or parsley for an added touch of color and flavor.
Extra Tips:
For an even creamier texture, consider adding a splash of milk or cream while blending the cauliflower. If you prefer a chunkier texture, mash the cauliflower by hand using a potato masher instead of a blender.
Feel free to customize the flavor by adding herbs such as rosemary or thyme, or for a bit of heat, a pinch of cayenne pepper. This dish pairs wonderfully with roasted meats and can be made ahead of time and reheated just before serving. Enjoy this guilt-free indulgence at your next holiday gathering!
Zucchini Noodles With Pesto
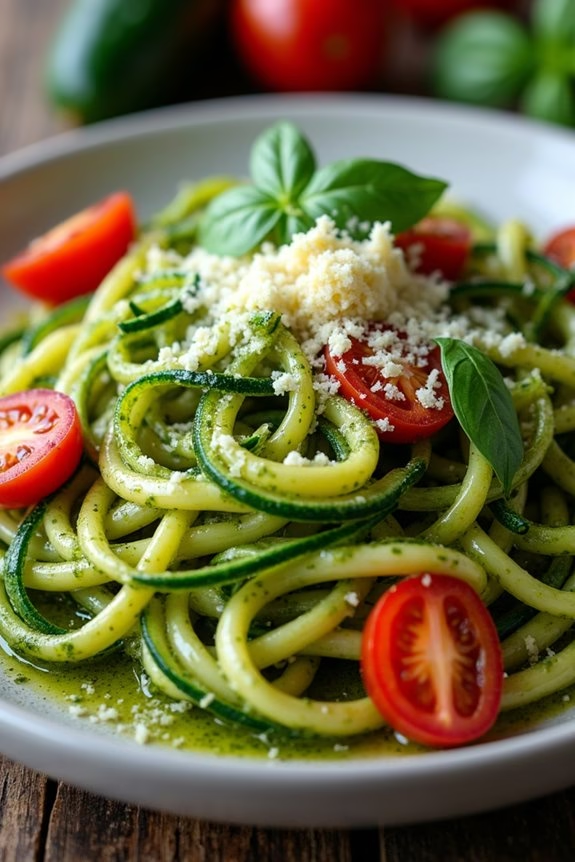
Zucchini Noodles with Pesto is a delightful and healthy dish that’s perfect for a Christmas potluck. This recipe isn’t only delicious but also light, making it an ideal addition to the typically heavy holiday fare. The zucchini noodles, also known as ‘zoodles’, provide a gluten-free alternative to traditional pasta, while the homemade pesto adds a burst of fresh flavor and vibrant color. The dish is simple to prepare and is sure to impress guests with its taste and presentation.
The homemade pesto sauce is the star of this dish, combining fresh basil, garlic, pine nuts, Parmesan cheese, and olive oil to create a rich and creamy dressing for the zucchini noodles. This meal is both nutritious and satisfying, featuring a variety of textures and flavors. It’s a great way to incorporate more vegetables into your holiday spread without compromising on taste. The recipe serves 4-6 people, making it an ideal choice for sharing with friends and family during your festive gatherings.
Ingredients for Zucchini Noodles with Pesto (serving size: 4-6 people):
- 4 medium zucchinis
- 2 cups fresh basil leaves
- 1/2 cup grated Parmesan cheese
- 1/2 cup pine nuts
- 2 cloves garlic
- 1/2 cup extra-virgin olive oil
- Salt and pepper to taste
- Optional: cherry tomatoes and grated Parmesan for garnish
Cooking Instructions:
- Prepare the Zucchini Noodles:
- Wash and dry the zucchinis. Using a spiralizer, create noodles from the zucchinis. If you don’t have a spiralizer, you can use a julienne peeler or a mandolin slicer. Set the noodles aside.
- Make the Pesto:
- In a food processor, combine the basil leaves, Parmesan cheese, pine nuts, and garlic. Pulse until the ingredients are finely chopped.
- While the processor is running, slowly add the olive oil in a steady stream until the pesto is smooth and emulsified. Season with salt and pepper to taste.
- Combine the Ingredients:
- In a large bowl, toss the zucchini noodles with the pesto until they’re well coated. If desired, add halved cherry tomatoes for extra flavor and color.
- Serve:
- Transfer the zucchini noodles with pesto to a serving dish. Garnish with extra grated Parmesan cheese and a few basil leaves if desired. Serve immediately for the best taste and texture.
Extra Tips:
When making zucchini noodles, it’s important to use fresh, firm zucchinis to guarantee that the noodles hold their shape and don’t become soggy. If you have time, lightly salt the zucchini noodles and let them sit for about 10 minutes, then pat them dry before tossing with the pesto. This step helps draw out excess moisture, keeping the dish from becoming watery.
Additionally, for a creamier pesto, you can add a little more Parmesan or a splash of lemon juice for a touch of brightness. Enjoy this healthy and festive dish at your Christmas potluck!
Roasted Brussels Sprouts With Cranberries
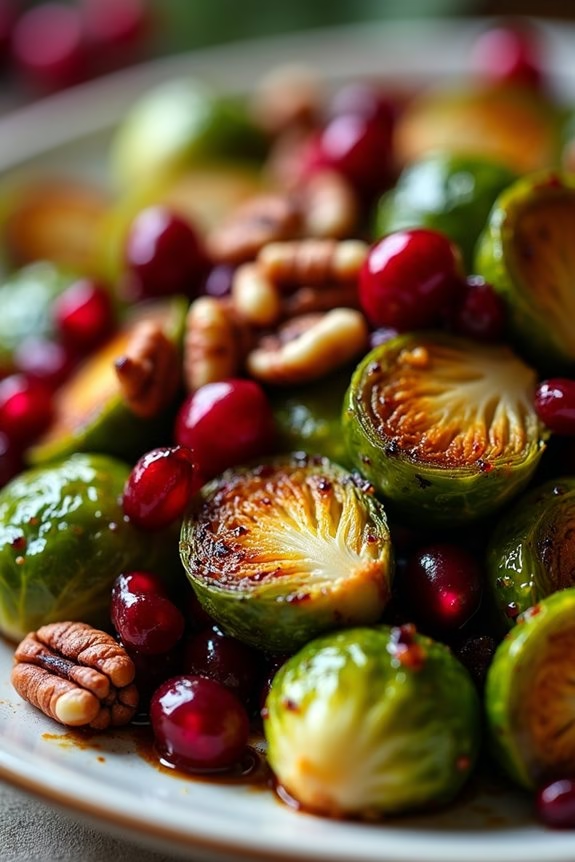
Roasted Brussels Sprouts With Cranberries is a delicious and festive dish perfect for a Christmas potluck. This recipe combines the earthy flavors of Brussels sprouts with the tartness of cranberries to create a side dish that’s both healthy and full of holiday spirit.
The caramelization from roasting brings out the natural sweetness of the Brussels sprouts, while the cranberries add a burst of color and flavor that makes the dish visually appealing and appetizing. This is an excellent choice for those looking to maintain a balanced diet without compromising taste during the holiday season.
Ideal for serving 4-6 people, this dish is a great addition to any Christmas gathering. It’s simple to prepare, allowing you to spend more time with your loved ones and less time in the kitchen. The ingredients are easy to find and can be adjusted to suit your taste preferences.
Whether you’re a seasoned cook or a beginner, this recipe is straightforward and sure to impress your guests with its vibrant flavors and festive presentation.
Ingredients:
- 1.5 pounds Brussels sprouts, trimmed and halved
- 1 cup fresh cranberries
- 3 tablespoons olive oil
- 2 tablespoons balsamic vinegar
- 1 tablespoon maple syrup
- Salt and pepper to taste
- 1/2 cup chopped pecans (optional)
- 1/4 cup pomegranate seeds (optional garnish)
Instructions:
- Preheat and Prepare: Preheat your oven to 400°F (200°C). Line a large baking sheet with parchment paper or foil for easy cleanup.
- Mix Brussels Sprouts: In a large bowl, combine the halved Brussels sprouts with olive oil, balsamic vinegar, and maple syrup. Season with salt and pepper to taste. Toss everything together until the Brussels sprouts are evenly coated.
- Arrange on Baking Sheet: Spread the Brussels sprouts in a single layer on the prepared baking sheet. Make sure they aren’t overcrowded, as this will prevent proper roasting.
- Roast: Place the baking sheet in the preheated oven and roast for 20-25 minutes, stirring halfway through, until the Brussels sprouts are tender and caramelized.
- Add Cranberries: Five minutes before the Brussels sprouts finish roasting, sprinkle the fresh cranberries over the baking sheet. Return to the oven to allow the cranberries to soften and release their juices.
- Finish with Pecans: If using, add the chopped pecans to the baking sheet during the last 2-3 minutes of roasting for a nice crunch.
- Serve: Once done, remove from the oven and transfer to a serving platter. Garnish with pomegranate seeds for an extra festive touch, if desired.
Tips: For the best results, make certain that your Brussels sprouts are all roughly the same size to promote even cooking. If they’re large, consider cutting them into quarters.
The addition of pecans is optional but highly recommended for added texture. If you prefer a sweeter dish, you can increase the amount of maple syrup. This dish is best served immediately after roasting but can be reheated gently in the oven if needed.
Garlic and Herb Roasted Carrots
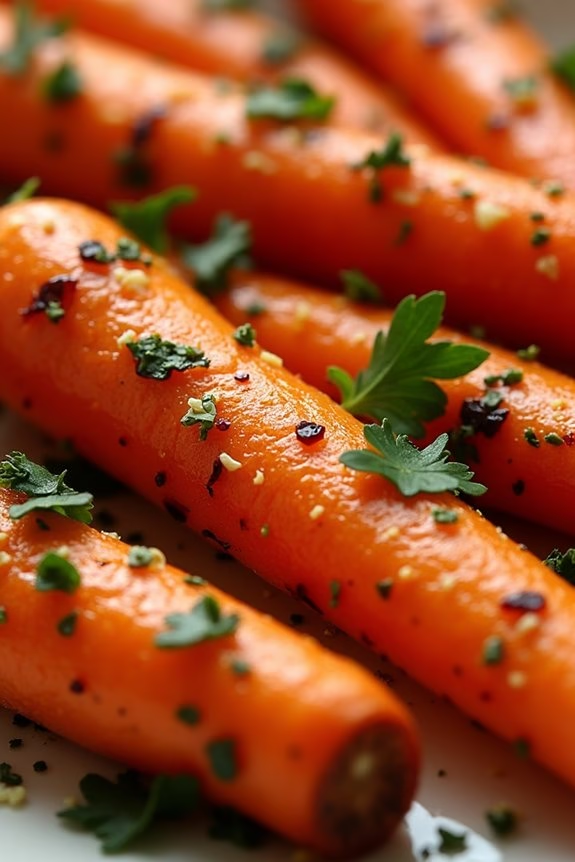
Looking for a healthy and delicious dish to bring to your Christmas potluck? These Garlic and Herb Roasted Carrots are the perfect option! Not only are they vibrant and festive, but they also offer a burst of flavors that are sure to impress your friends and family.
The combination of garlic and herbs enhances the natural sweetness of the carrots, creating a dish that’s both nutritious and tasty. Roasting the carrots brings out their natural caramelized sweetness, while the infusion of garlic and herbs adds a depth of flavor that makes these carrots irresistible.
This dish is simple to prepare, requiring minimal ingredients and effort, yet delivers maximum taste and presentation. With this recipe, you’ll have a healthy side dish ready in no time, perfect for complementing any holiday spread.
Ingredients for 4-6 servings:
- 2 lbs carrots, peeled and cut into sticks
- 3 tablespoons olive oil
- 4 cloves garlic, minced
- 1 tablespoon fresh thyme leaves
- 1 tablespoon fresh rosemary, chopped
- Salt, to taste
- Black pepper, to taste
- 1 tablespoon fresh parsley, chopped (for garnish)
Instructions:
- Preheat the Oven: Preheat your oven to 400°F (200°C). This temperature is ideal for roasting carrots, allowing them to cook through while developing a nice caramelized exterior.
- Prepare the Carrots: Wash and peel the carrots. Cut them into uniform sticks to guarantee even cooking. Place the carrot sticks in a large mixing bowl.
- Season the Carrots: Add the olive oil, minced garlic, thyme, rosemary, salt, and pepper to the bowl with the carrots. Toss everything together until the carrots are well coated with the oil and seasoning. This will make certain the flavors are evenly distributed.
- Arrange on Baking Sheet: Spread the seasoned carrots in a single layer on a baking sheet. Make sure they aren’t overcrowded, as this will help them roast evenly and develop a nice exterior.
- Roast the Carrots: Place the baking sheet in the preheated oven and roast for 25-30 minutes, or until the carrots are tender and edges are lightly browned. Halfway through cooking, toss the carrots to promote even roasting.
- Garnish and Serve: Once the carrots are done roasting, remove them from the oven and sprinkle with fresh parsley for a pop of color and extra flavor. Serve warm as a delightful side dish at your Christmas potluck.
Extra Tips:
To achieve perfectly roasted carrots, make sure to cut them into uniform sizes for even cooking. If you want to add a touch of sweetness, consider drizzling a bit of honey or maple syrup over the carrots before roasting.
Feel free to experiment with other herbs like dill or sage for a different flavor profile. Finally, if you’re short on time, you can use pre-cut baby carrots, but be mindful that they may cook faster, so adjust the roasting time accordingly.
Spinach and Feta Stuffed Mushrooms
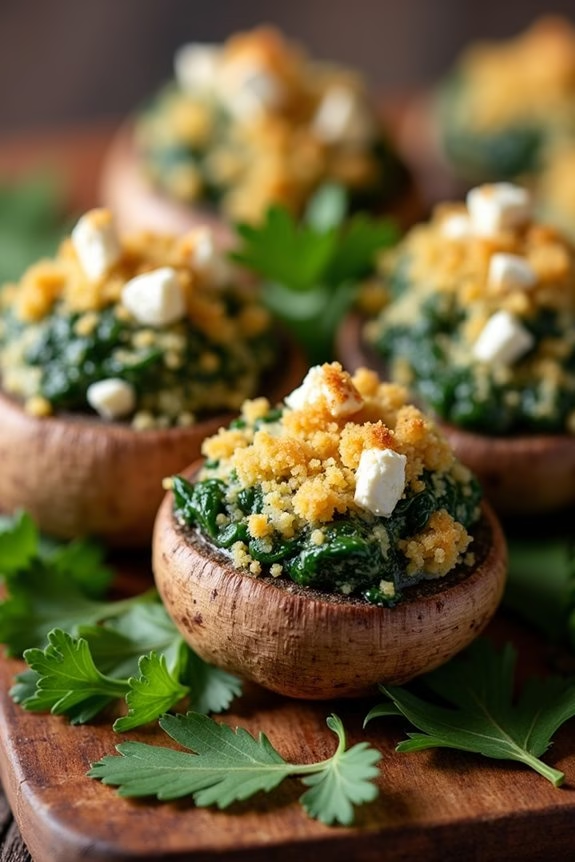
If you’re seeking a delicious and healthy appetizer for your Christmas potluck, search no further than Spinach and Feta Stuffed Mushrooms. These bite-sized savory treats are packed with flavor and are sure to be a hit among your guests. The combination of earthy mushrooms, creamy feta cheese, and nutritious spinach creates a perfect harmony that’s both satisfying and festive.
Not only are these stuffed mushrooms delicious, but they’re also quick and easy to prepare, making them an ideal choice for busy holiday gatherings. The beauty of this dish lies in its simplicity and versatility. You can prepare the stuffing in advance and fill the mushrooms just before baking, allowing you to spend more time enjoying the festivities with your loved ones.
Additionally, these mushrooms are baked rather than fried, making them a healthier option for those seeking to indulge without the guilt. Perfect for vegetarians and meat-lovers alike, these Spinach and Feta Stuffed Mushrooms will add a touch of elegance to your Christmas table.
Ingredients (Serves 4-6):
- 24 large white or cremini mushrooms
- 2 tablespoons olive oil
- 3 cloves garlic, minced
- 4 cups fresh spinach, chopped
- 1/2 cup crumbled feta cheese
- 1/4 cup grated Parmesan cheese
- 1/2 teaspoon dried oregano
- Salt and pepper to taste
- 1/4 cup breadcrumbs
- 2 tablespoons freshly chopped parsley
Cooking Instructions:
- Preheat the Oven: Preheat your oven to 375°F (190°C). This will guarantee it’s hot enough to properly bake the stuffed mushrooms.
- Prepare the Mushrooms: Clean the mushrooms with a damp cloth. Remove the stems and scoop out a little of the inside to create space for the filling. Set the mushroom caps aside.
- Cook the Spinach: In a large skillet, heat the olive oil over medium heat. Add the minced garlic and sauté for about a minute until fragrant. Add the chopped spinach and cook until wilted, about 2-3 minutes.
- Mix the Filling: In a mixing bowl, combine the cooked spinach, crumbled feta cheese, grated Parmesan cheese, dried oregano, salt, and pepper. Stir until the ingredients are well combined.
- Stuff the Mushrooms: Spoon the filling mixture into each mushroom cap, pressing gently to pack the filling in.
- Top with Breadcrumbs: Sprinkle a little bit of breadcrumbs over each stuffed mushroom for a crispy topping.
- Bake the Mushrooms: Place the stuffed mushrooms on a baking sheet lined with parchment paper. Bake in the preheated oven for 20-25 minutes, until the mushrooms are tender and the tops are golden brown.
- Garnish and Serve: Remove from the oven and let cool slightly. Sprinkle with freshly chopped parsley before serving for a burst of color and freshness.
Extra Tips:
To enhance the flavor of the stuffing, consider adding a pinch of crushed red pepper flakes for a slight kick or a squeeze of lemon juice for brightness. If you prefer a creamier filling, you can mix a little cream cheese with the feta.
For a gluten-free version, substitute regular breadcrumbs with gluten-free breadcrumbs. These stuffed mushrooms are best served warm, but they can also be enjoyed at room temperature, making them convenient for any potluck or party setting.
Dark Chocolate Avocado Mousse

Dark Chocolate Avocado Mousse is a delightful and healthy dessert option that combines the rich, creamy texture of ripe avocados with the decadent taste of dark chocolate. This mousse is perfect for a Christmas potluck, offering a guilt-free treat that will impress your friends and family. The natural sweetness from the avocados and the intense flavor of high-quality dark chocolate make this dessert a hit, while still maintaining its health-conscious edge.
The use of avocados not only gives the mousse its smooth and silky consistency but also packs it with healthy fats and nutrients. This recipe is dairy-free and can easily be made vegan-friendly by choosing plant-based chocolate. It’s a quick and easy dish to prepare, requiring minimal ingredients and effort, yet delivering maximum flavor and satisfaction.
Ingredients (serves 4-6):
- 3 ripe avocados
- 1/2 cup unsweetened cocoa powder
- 1/2 cup dark chocolate chips, melted
- 1/2 cup almond milk (or other non-dairy milk)
- 1/4 cup honey or maple syrup
- 1 teaspoon vanilla extract
- A pinch of salt
- Fresh berries or mint leaves for garnish (optional)
Instructions:
- Prepare the Avocados: Begin by slicing the avocados in half, removing the pits, and scooping the flesh into a blender or food processor. Confirm the avocados are ripe to achieve the best texture.
- Add the Dry Ingredients: Add the unsweetened cocoa powder and a pinch of salt to the blender with the avocados. The cocoa will give the mousse its deep chocolate flavor.
- Melt the Chocolate: In a microwave-safe bowl, melt the dark chocolate chips in 20-second intervals, stirring in between until smooth. Be careful not to overheat the chocolate.
- Combine Wet Ingredients: Pour the melted chocolate, almond milk, honey, and vanilla extract into the blender. These ingredients will add sweetness and enhance the creamy texture of the mousse.
- Blend Until Smooth: Blend all the ingredients together until the mixture is completely smooth and no chunks of avocado remain. This may take a few minutes, depending on your blender’s power.
- Chill the Mousse: Transfer the mousse into individual serving dishes or a single large bowl and refrigerate for at least an hour to let it set and enhance the flavors.
- Serve and Garnish: Before serving, you can garnish the mousse with fresh berries or a sprig of mint for a festive touch.
Extra Tips:
For a more intense chocolate flavor, you can increase the amount of cocoa powder or use a higher percentage dark chocolate. If you prefer a sweeter mousse, adjust the honey or maple syrup to taste.
Make sure to use ripe avocados for the best creamy texture; if they’re not fully ripe, the mousse may end up with a slightly grainy consistency. Finally, this dessert can be made a day in advance, making it a convenient option for holiday gatherings.
Almond Flour Christmas Cookies

Almond Flour Christmas Cookies are a delightful treat that brings a touch of festive spirit to any holiday gathering. Made with nutrient-rich almond flour, these cookies aren’t only delicious but also a healthier alternative to traditional wheat-based cookies. They boast a rich, nutty flavor and a soft, chewy texture that’s sure to please everyone at your Christmas potluck.
Whether you’re catering to gluten-free guests or simply looking for a scrumptious holiday treat, these cookies are a perfect choice.
These cookies are easy to make and require just a handful of ingredients, making them a convenient option for busy holiday schedules. The almond flour gives them a naturally sweet flavor, so you won’t need much sugar, and they can be enjoyed plain or decorated with your favorite holiday-themed toppings.
With just a little effort, you’ll have a batch of beautifully golden, aromatic cookies that are sure to become a holiday favorite in your household.
Ingredients (Serves 4-6):
- 2 cups almond flour
- 1/4 cup coconut oil, melted
- 1/4 cup maple syrup
- 1 teaspoon vanilla extract
- 1/2 teaspoon baking soda
- 1/4 teaspoon salt
- 1/4 cup dark chocolate chips (optional)
- 1/4 cup crushed nuts or sprinkles for decoration (optional)
Cooking Instructions:
- Preheat the Oven: Begin by preheating your oven to 350°F (175°C). Line a baking sheet with parchment paper to prevent the cookies from sticking and to guarantee an even bake.
- Mix Dry Ingredients: In a large mixing bowl, combine the almond flour, baking soda, and salt. Stir the ingredients together until they’re well incorporated.
- Combine Wet Ingredients: In a separate bowl, whisk together the melted coconut oil, maple syrup, and vanilla extract. Confirm the mixture is smooth and fully combined.
- Form the Dough: Gradually add the wet ingredients into the bowl with the dry ingredients. Stir until a dough forms. If you’re adding chocolate chips, fold them into the dough at this stage.
- Shape the Cookies: Using a tablespoon, scoop the dough onto the prepared baking sheet. Flatten each scoop slightly with the back of the spoon to form a cookie shape. Leave some space between each cookie to allow for spreading.
- Bake the Cookies: Place the baking sheet in the preheated oven and bake for 10-12 minutes, or until the edges of the cookies are golden brown. Keep an eye on them to avoid over-baking.
- Cool and Decorate: Once baked, remove the cookies from the oven and let them cool on the baking sheet for a few minutes before transferring them to a wire rack to cool completely. If desired, decorate with crushed nuts or sprinkles while they’re still warm.
Extra Tips:
When making Almond Flour Christmas Cookies, verify that all your ingredients are at room temperature to help them mix together more easily.
If you find the dough too sticky to handle, refrigerate it for about 15 minutes before shaping the cookies. For an extra festive touch, consider adding a dash of cinnamon or nutmeg to the dough.
These cookies store well in an airtight container for up to a week, making them a wonderful make-ahead option for your holiday gatherings. Enjoy your homemade holiday treat!
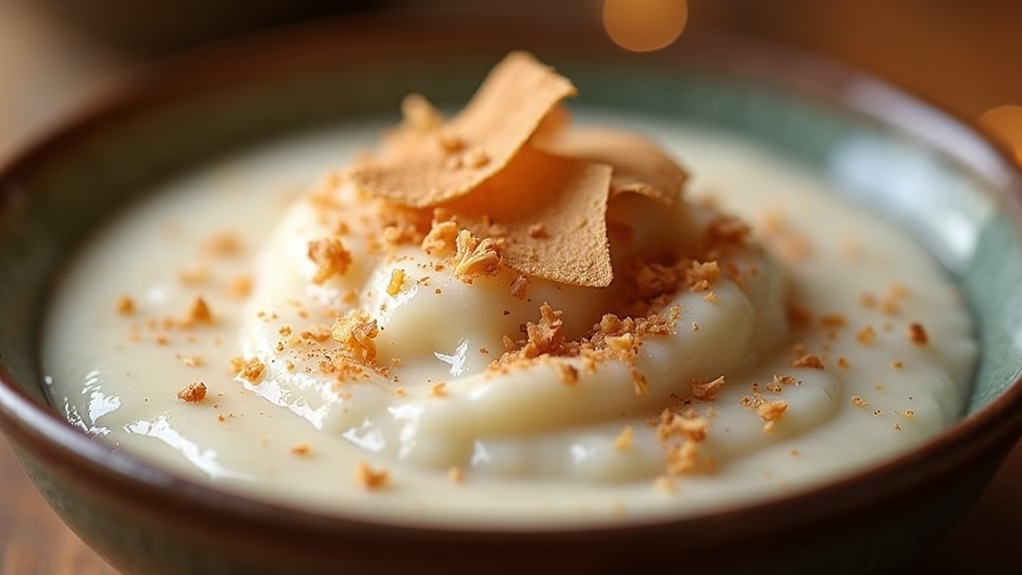
Coconut Milk Rice Pudding
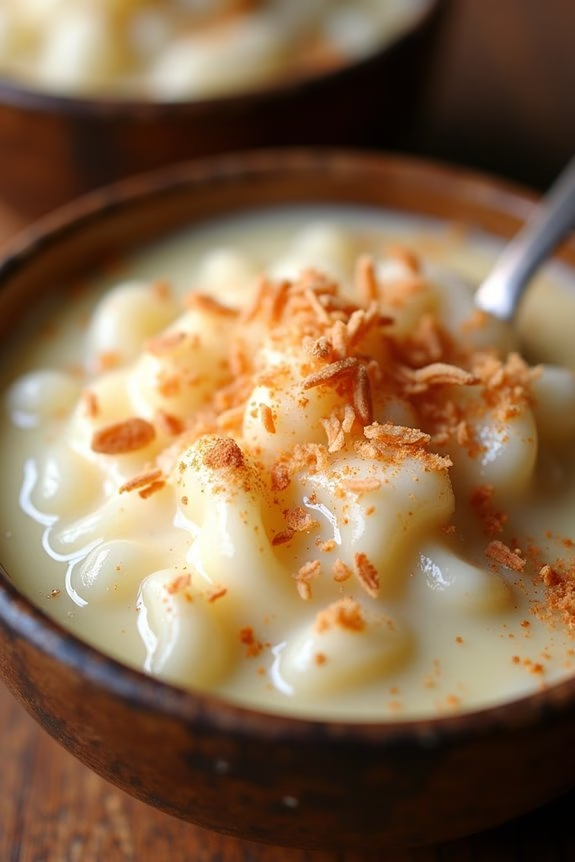
Coconut Milk Rice Pudding is a delightful and creamy dessert that brings a tropical twist to the traditional rice pudding. It’s an excellent addition to any Christmas potluck, offering a comforting sweetness that pairs beautifully with the holiday spirit.
Made with rich coconut milk, this rice pudding is both dairy-free and naturally gluten-free, making it a perfect option for guests with dietary restrictions. The subtle coconut flavor combined with the warm spices of cinnamon and nutmeg creates a festive aroma that fills your kitchen with holiday cheer.
This recipe is perfect for serving 4-6 people, making it an ideal choice for small gatherings or as a cozy treat for your family. The pudding is sweetened with natural sweeteners like maple syrup or honey, ensuring that it remains a healthier option compared to traditional versions loaded with sugar.
Serve it warm or chilled, topped with toasted coconut flakes or a sprinkle of cinnamon, for a delightful end to your Christmas meal.
Ingredients:
- 1 cup Arborio rice
- 2 cups water
- 2 cups coconut milk
- 1/3 cup maple syrup or honey
- 1 teaspoon vanilla extract
- 1/2 teaspoon ground cinnamon
- 1/4 teaspoon ground nutmeg
- 1/4 teaspoon salt
- Toasted coconut flakes (optional, for garnish)
Cooking Instructions:
- Rinse the Rice: Start by rinsing the Arborio rice under cold water until the water runs clear. This helps remove excess starch, ensuring a creamier pudding.
- Cook the Rice: In a medium saucepan, combine the rinsed rice and 2 cups of water. Bring to a boil over medium heat, then reduce the heat to low, cover, and simmer for about 10-15 minutes or until the water is mostly absorbed.
- Add Coconut Milk: Stir in the coconut milk, maple syrup (or honey), vanilla extract, cinnamon, nutmeg, and salt. Increase the heat to medium and bring the mixture to a gentle simmer.
- Simmer and Stir: Reduce the heat to low and continue to simmer the pudding, stirring frequently to prevent sticking, for about 20-25 minutes. The mixture should thicken and the rice should be tender.
- Adjust Consistency: If the pudding becomes too thick, you can add more coconut milk or water, a little at a time, until you reach your desired consistency.
- Serve and Garnish: Once the pudding is cooked to your liking, remove it from the heat. Allow it to cool slightly before serving. Garnish with toasted coconut flakes or an extra sprinkle of cinnamon if desired.
Extra Tips:
For an even richer flavor, consider using full-fat coconut milk, which enhances the creaminess of the pudding. If you prefer a less sweet dessert, adjust the amount of maple syrup or honey to taste.
This pudding can be made a day in advance and stored in the refrigerator; simply reheat it gently on the stove before serving. Additionally, you can experiment by adding raisins or chopped nuts for added texture and flavor.
Enjoy your Coconut Milk Rice Pudding as part of a festive and healthy Christmas potluck!