
‘Tis the season to celebrate with delicious and healthy treats. As someone passionate about festive gatherings and mindful eating, I’ve put together a list of 13 guilt-free Christmas appetizers. Picture yourself enjoying smoked salmon cucumber bites or a vibrant rainbow veggie platter. These recipes balance taste and health beautifully. Let’s explore these delightful creations together!
Rainbow Veggie Platter With Hummus
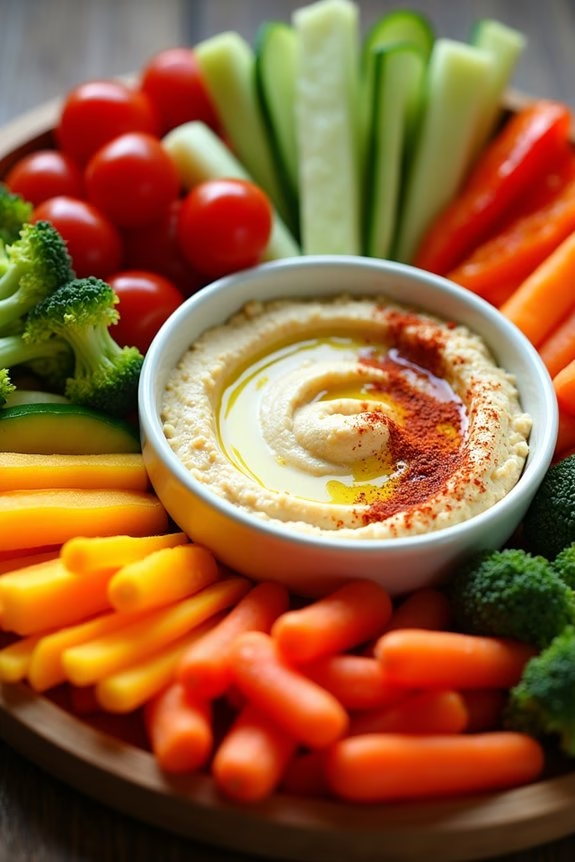
The holiday season is a perfect time to serve up a colorful and healthy appetizer that will delight your guests. A Rainbow Veggie Platter With Hummus isn’t only visually stunning but also packed with nutrients, making it an ideal choice for those who want to indulge without the guilt.
This vibrant platter showcases an array of fresh vegetables arranged in a spectrum of colors, paired with a creamy and flavorful hummus that’s sure to please even the pickiest eaters. Whether you’re hosting a festive party or simply want to add more veggies to your holiday spread, this dish is a crowd-pleaser that’s quick and easy to prepare.
The key to creating a stunning Rainbow Veggie Platter With Hummus is to select a variety of fresh vegetables that offer a range of colors and textures. From crisp bell peppers to juicy cherry tomatoes, this appetizer not only looks appealing but also delivers a satisfying crunch with every bite.
The hummus, rich with tahini and garlic, complements the vegetables perfectly, providing a creamy dip that ties the whole dish together. Perfect for serving 4-6 people, this appetizer is sure to become a staple at your holiday gatherings.
Ingredients (Serving Size: 4-6 people):
- 1 cup cherry tomatoes
- 1 red bell pepper
- 1 yellow bell pepper
- 1 orange bell pepper
- 1 green bell pepper
- 1 cup broccoli florets
- 1 cup cucumber slices
- 1 cup baby carrots
- 1 cup hummus (store-bought or homemade)
- 1 tablespoon olive oil
- 1 teaspoon paprika
- Fresh parsley for garnish (optional)
Instructions:
- Prepare the Vegetables: Wash all the vegetables thoroughly under cold water. Pat them dry with a clean kitchen towel to remove excess moisture.
- Slice and Arrange: Slice the bell peppers into thin strips, and cut the cucumber into rounds. Arrange the cherry tomatoes, bell pepper strips, broccoli florets, cucumber slices, and baby carrots on a large platter in a colorful, rainbow-like order.
- Prepare the Hummus: If using store-bought hummus, transfer it to a serving bowl and smooth the top with the back of a spoon. If making homemade hummus, blend chickpeas, tahini, olive oil, garlic, lemon juice, and a pinch of salt until smooth. Add water to adjust the consistency if necessary.
- Add Finishing Touches: Drizzle a tablespoon of olive oil over the hummus and sprinkle with paprika to enhance the flavor. Garnish with fresh parsley if desired.
- Serve: Place the bowl of hummus in the center of the vegetable arrangement on the platter. Serve immediately, or cover with plastic wrap and refrigerate until ready to serve.
Extra Tips:
When preparing the Rainbow Veggie Platter With Hummus, feel free to customize the vegetable selection based on your preference or availability. You can add other colorful veggies like radishes, snap peas, or purple cauliflower for even more variety.
To keep the vegetables crisp, cut them just before serving. If you prepare them in advance, store them in an airtight container in the fridge to maintain freshness. For a more flavorful hummus, consider adding roasted garlic or a squeeze of lemon juice. Enjoy the vibrant and healthy addition to your holiday table!
Smoked Salmon Cucumber Bites
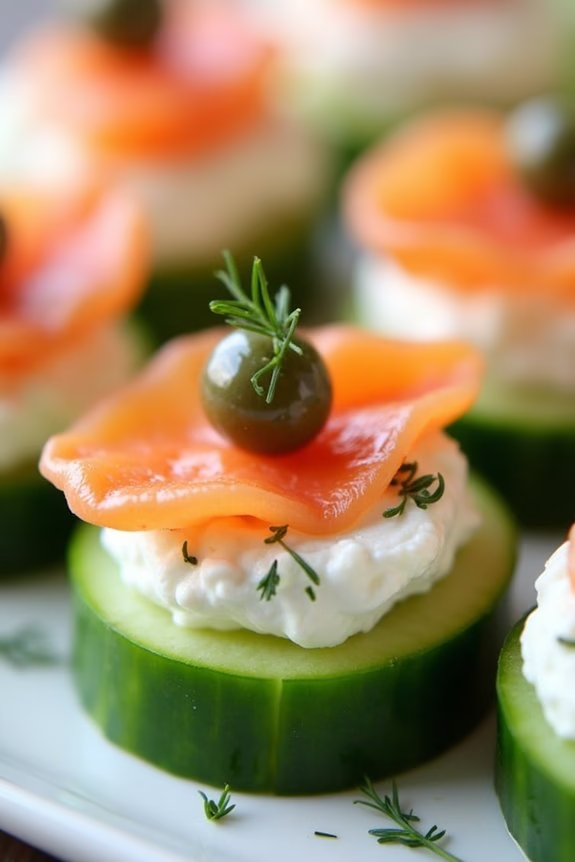
Smoked Salmon Cucumber Bites are a delightful and healthy appetizer option that brings a touch of elegance to any holiday gathering. These little bites aren’t only visually appealing but also pack a punch of fresh flavors and textures. The combination of cool cucumber, creamy cheese, and rich smoked salmon creates a perfect harmony that’s both satisfying and guilt-free.
They’re easy to assemble and make for a great make-ahead option, allowing you to spend more time enjoying the festivities with your loved ones. This recipe is perfect for a serving size of 4-6 people, making it a great choice for smaller gatherings or as part of a larger appetizer spread.
The fresh and light nature of these bites will be an invigorating change from the usual heavy holiday fare, guaranteeing your guests can indulge without the worry of overindulgence. They’re also versatile, allowing for easy customization to suit various dietary preferences or flavor profiles.
Ingredients:
- 2 large cucumbers
- 8 ounces smoked salmon
- 8 ounces cream cheese, softened
- 2 tablespoons fresh dill, chopped
- 1 tablespoon lemon juice
- 1 teaspoon lemon zest
- Salt and pepper to taste
- 1-2 tablespoons capers (optional)
- Fresh dill sprigs for garnish
Instructions:
- Prepare the Cucumbers: Wash the cucumbers thoroughly and peel them if desired. Using a sharp knife, slice the cucumbers into rounds about 1/4 inch thick. Arrange them on a serving platter.
- Make the Cheese Mixture: In a medium bowl, combine the softened cream cheese, chopped fresh dill, lemon juice, lemon zest, salt, and pepper. Mix well until the ingredients are fully incorporated and the mixture is smooth and creamy.
- Assemble the Bites: Spread a small dollop of the cream cheese mixture onto each cucumber slice. The amount should be enough to cover the surface but not too much that it overshadows the other flavors.
- Add the Smoked Salmon: Tear the smoked salmon into small pieces and place a piece on top of the cream cheese on each cucumber slice. The salmon should sit neatly on the cheese without overlapping the edges of the cucumber.
- Garnish: If using, place a caper on top of the salmon for an extra burst of flavor. Finish with a small sprig of fresh dill for a beautiful presentation.
- Serve: Arrange the cucumber bites neatly on a serving platter and refrigerate until ready to serve. These bites are best enjoyed chilled.
Extra Tips:
To guarantee the best flavor, allow the cream cheese to soften at room temperature before mixing, as this will make it easier to blend with the other ingredients.
Consider using a piping bag with a star tip to add the cheese mixture to the cucumber slices for a decorative touch. If you’re preparing these in advance, keep them refrigerated to maintain freshness, but wait to garnish with dill and capers until just before serving to ensure they remain vibrant and crisp.
Experiment with different herbs or add a touch of horseradish to the cheese mixture for an added kick.
Baked Sweet Potato Rounds With Avocado
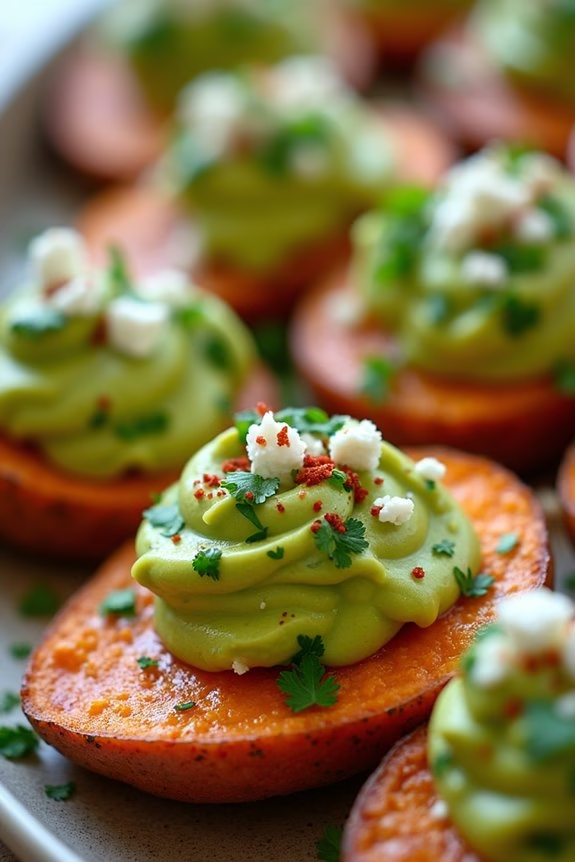
Baked Sweet Potato Rounds With Avocado are a delightful and healthy appetizer perfect for any festive gathering, especially during the Christmas season. This dish combines the natural sweetness of baked sweet potatoes with the creamy texture of avocado, creating a satisfying blend of flavors that’s both nutritious and delicious.
The rounds can be served warm or at room temperature, making them a versatile choice for any holiday table. Not only do they look visually appealing with their vibrant colors, but they’re also packed with vitamins and healthy fats, making them a guilt-free indulgence.
These sweet potato rounds are simple to prepare and require minimal ingredients, making them ideal for those who want to spend more time with family and less time in the kitchen. The avocado topping can be customized to your liking, whether you prefer it chunky or smooth. A sprinkle of fresh herbs or a dash of lime juice can elevate the flavors even further.
This recipe serves 4-6 people, guaranteeing there’s enough to go around while still leaving room for other festive treats.
Ingredients:
- 3 medium sweet potatoes
- 2 ripe avocados
- 1 tablespoon olive oil
- Salt, to taste
- Black pepper, to taste
- 1 teaspoon garlic powder
- 1 tablespoon lime juice
- 2 tablespoons fresh cilantro, chopped
- Optional toppings: crumbled feta cheese, red chili flakes
Cooking Instructions:
- Prepare the Sweet Potatoes: Preheat your oven to 400°F (200°C). Wash the sweet potatoes thoroughly and slice them into 1/4 inch thick rounds. Try to keep the slices uniform for even cooking.
- Season and Bake: Place the sweet potato slices in a single layer on a baking sheet lined with parchment paper. Drizzle the olive oil over the slices and sprinkle with salt, black pepper, and garlic powder. Toss the slices gently to make sure they’re evenly coated. Bake in the preheated oven for 20-25 minutes, or until they’re tender and slightly golden around the edges. Flip them halfway through for even baking.
- Prepare the Avocado Topping: While the sweet potatoes are baking, cut the avocados in half, remove the pits, and scoop the flesh into a bowl. Add lime juice, a pinch of salt, and mash with a fork until you reach your desired consistency. Stir in the chopped cilantro for added freshness.
- Assemble the Rounds: Once the sweet potato rounds are done, remove them from the oven and let them cool slightly. Top each round with a spoonful of the avocado mixture. If desired, sprinkle with optional toppings such as crumbled feta cheese or red chili flakes for an extra kick.
- Serve: Arrange the topped sweet potato rounds on a serving platter. They can be served warm or allowed to cool to room temperature.
Extra Tips:
For a more robust flavor, consider adding a pinch of smoked paprika to the sweet potatoes before baking. If you’re making these ahead of time, prepare the sweet potato rounds and avocado topping separately. Assemble them just before serving to prevent the avocado from browning.
Additionally, using a melon baller can help create uniform avocado scoops for a more polished presentation. Enjoy these Baked Sweet Potato Rounds With Avocado as a healthy addition to your Christmas feast!
Stuffed Mini Bell Peppers

Stuffed Mini Bell Peppers are a delightful and colorful appetizer perfect for any holiday gathering, especially during the festive Christmas season. These bite-sized treats aren’t only visually appealing but also packed with flavor and nutrition. The sweet and mild taste of the mini bell peppers pairs beautifully with a savory filling, making them an irresistible addition to your holiday spread.
Plus, they’re easy to prepare and can be made ahead of time, allowing you more time to enjoy the festivities with family and friends.
This recipe features a filling of creamy cheese, fresh herbs, and a hint of garlic, creating a delicious contrast to the crunchy texture of the peppers. For a healthier twist, we’ve incorporated ingredients like Greek yogurt and lean ground turkey, providing a protein boost without compromising on taste.
These Stuffed Mini Bell Peppers are perfect for serving 4-6 people, making them a convenient option for small to medium-sized gatherings.
Ingredients (serving size: 4-6 people):
- 12 mini bell peppers
- 1 cup lean ground turkey
- 1/2 cup Greek yogurt
- 1/2 cup shredded mozzarella cheese
- 1/4 cup grated Parmesan cheese
- 2 cloves garlic, minced
- 1 tablespoon chopped fresh parsley
- 1 tablespoon chopped fresh basil
- 1 teaspoon olive oil
- Salt and pepper to taste
Cooking Instructions:
- Preheat the Oven: Start by preheating your oven to 375°F (190°C). This guarantees that your stuffed peppers will cook evenly and develop a nice, slightly crispy exterior.
- Prepare the Peppers: Carefully wash the mini bell peppers and cut them in half lengthwise. Remove the seeds and membranes to create a hollow space for the filling. Set the prepared peppers aside on a baking sheet lined with parchment paper.
- Cook the Turkey: In a skillet over medium heat, add the olive oil and minced garlic. Sauté for about 1 minute until fragrant. Add the ground turkey, cooking until it’s browned and fully cooked. Season with salt and pepper to taste. Remove from heat and allow it to cool slightly.
- Prepare the Filling: In a mixing bowl, combine the cooked turkey, Greek yogurt, mozzarella cheese, Parmesan cheese, chopped parsley, and basil. Mix well until all ingredients are evenly incorporated.
- Stuff the Peppers: Using a spoon, fill each half of the mini bell peppers with the turkey and cheese mixture, pressing down gently to confirm the filling is compact.
- Bake the Peppers: Place the baking sheet with the stuffed peppers into the preheated oven. Bake for about 15-20 minutes, or until the peppers are tender and the cheese is melted and slightly golden.
- Serve: Remove the peppers from the oven and let them cool slightly before serving. Garnish with additional fresh herbs if desired.
Extra Tips:
To make these Stuffed Mini Bell Peppers even more festive, consider adding a sprinkle of red pepper flakes for a hint of spice or a touch of smoked paprika for a smoky flavor.
If you prefer a vegetarian version, you can easily substitute the ground turkey with cooked quinoa or black beans. These peppers can be prepared a day in advance and stored in the refrigerator; just reheat them in the oven before serving to maintain their crispiness and flavor.
Caprese Skewers With Balsamic Glaze
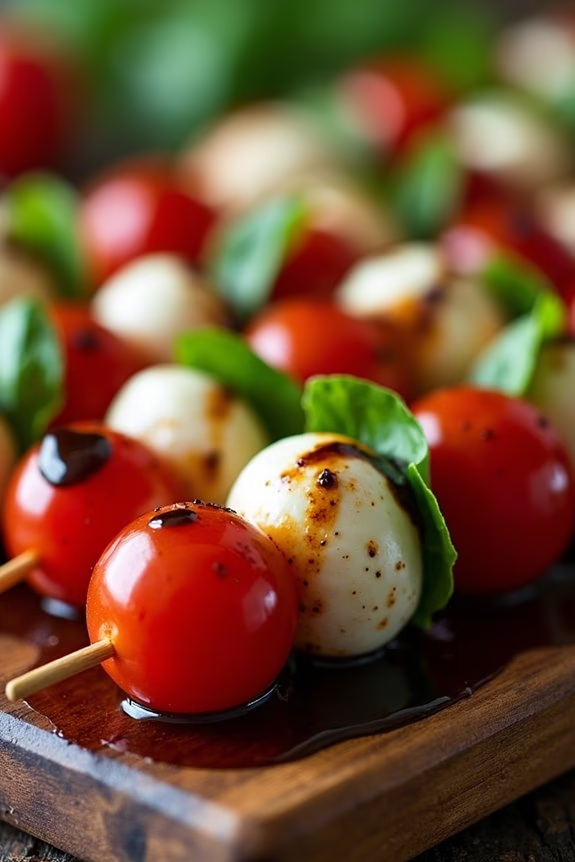
Caprese Skewers With Balsamic Glaze are a delightful and healthy appetizer option that brings a touch of Italian flair to your Christmas gatherings.
These skewers are a vibrant combination of juicy cherry tomatoes, fresh basil leaves, and creamy mozzarella balls, all drizzled with a sweet and tangy balsamic glaze. They aren’t only visually appealing but also packed with flavor, making them perfect for a festive appetizer that will impress your guests without the guilt of overindulgent holiday fare.
The simplicity of the ingredients allows the fresh flavors to shine, while the balsamic glaze adds a sophisticated finish.
These skewers are quick and easy to prepare, making them an ideal choice for busy holiday hosts who want to offer something delicious and elegant without spending hours in the kitchen.
Perfect for serving a group of 4-6 people, the Caprese Skewers can be assembled in advance, giving you more time to enjoy the festivities. Whether you’re hosting a large Christmas party or a small family gathering, these skewers are sure to be a hit.
Ingredients for 4-6 servings:
- 24 cherry tomatoes
- 24 fresh basil leaves
- 24 mini mozzarella balls (bocconcini)
- 1/2 cup balsamic vinegar
- 2 tablespoons honey
- Salt and pepper to taste
- 24 wooden skewers (6 inches long)
Cooking Instructions:
- Prepare the Balsamic Glaze: In a small saucepan, combine the balsamic vinegar and honey. Heat over medium heat until the mixture begins to simmer. Reduce the heat to low and let the mixture simmer gently for about 10-15 minutes, stirring occasionally, until it has reduced by half and has a syrupy consistency. Remove from heat and let it cool.
- Assemble the Skewers: Begin by threading a cherry tomato onto a wooden skewer, followed by a fresh basil leaf and a mini mozzarella ball. Repeat this pattern (cherry tomato, basil, mozzarella) twice more on the same skewer. Continue this process until all skewers are assembled.
- Season the Skewers: Lightly sprinkle the assembled skewers with salt and pepper to taste. This will enhance the flavors of the fresh ingredients.
- Drizzle with Balsamic Glaze: Once the balsamic glaze has cooled down, use a spoon or a small squeeze bottle to drizzle the glaze over the skewers. Be generous with the glaze for an added burst of flavor.
- Serve: Arrange the skewers on a serving platter and serve immediately, or cover and refrigerate for up to 2 hours before serving. If refrigerated, allow the skewers to come to room temperature before serving for the best flavor.
Extra Tips: When making the balsamic glaze, keep an eye on the reduction process to avoid burning. The glaze should be thick enough to coat the back of a spoon when ready.
If you prefer a richer glaze, consider adding a pinch of salt to the mixture before simmering. For a more colorful presentation, consider using a mix of red and yellow cherry tomatoes.
If you can’t find mini mozzarella balls, you can slice a larger mozzarella ball into bite-sized pieces. Enjoy these skewers as a revitalizing appetizer that sets the tone for a joyful and healthy holiday feast.
Spinach and Feta Stuffed Mushrooms

Spinach and Feta Stuffed Mushrooms are a delightful and healthy appetizer that can elevate your Christmas festivities. These bite-sized morsels are packed with flavor, combining the earthiness of mushrooms with the creamy tang of feta cheese and the fresh, vibrant taste of spinach.
Perfect for those looking to maintain a balanced diet during the holiday season, these stuffed mushrooms aren’t only delicious but also simple to prepare, making them an ideal addition to any holiday menu.
This recipe yields a serving size fit for 4-6 people, making it perfect for a small gathering or as part of a larger spread. The combination of ingredients guarantees a rich and satisfying taste, while the preparation method keeps things light and nutritious.
Whether you’re a seasoned cook or just looking to try something new, this Spinach and Feta Stuffed Mushrooms recipe is sure to impress your guests and keep your holiday celebrations merry and bright.
Ingredients:
- 24 large cremini or button mushrooms
- 2 tablespoons olive oil
- 1 small onion, finely chopped
- 2 cloves garlic, minced
- 4 cups fresh spinach, chopped
- 1/2 teaspoon salt
- 1/4 teaspoon black pepper
- 1/2 cup feta cheese, crumbled
- 1/4 cup breadcrumbs
- 1/4 cup grated Parmesan cheese
- 1 tablespoon fresh parsley, chopped
- Non-stick cooking spray
Instructions:
- Prepare the Mushrooms: Preheat your oven to 375°F (190°C). Carefully remove the stems from the mushrooms and set the caps aside. Finely chop the stems.
- Cook the Filling: Heat olive oil in a skillet over medium heat. Add the chopped onion and garlic, sautéing until they become translucent. Stir in the chopped mushroom stems and cook for about 3 minutes. Add the spinach, salt, and pepper, cooking until the spinach wilts and any excess moisture evaporates.
- Mix the Stuffing: Transfer the spinach mixture to a bowl. Add crumbled feta, breadcrumbs, and Parmesan cheese, mixing well until all ingredients are combined.
- Stuff the Mushrooms: Arrange the mushroom caps on a baking sheet lined with parchment paper or sprayed with non-stick spray. Spoon the spinach and feta mixture into each mushroom cap, pressing down gently to confirm they’re well-filled.
- Bake the Mushrooms: Place the stuffed mushrooms in the oven and bake for 20-25 minutes, or until the tops are golden brown and the mushrooms are tender.
- Garnish and Serve: Remove from the oven and let them cool slightly. Garnish with fresh parsley before serving.
Extra Tips:
For the best results, choose mushrooms that are firm and fresh, as they’ll hold their shape better during baking. If you prefer a creamier filling, you can add a couple of tablespoons of cream cheese to the mixture.
Additionally, feel free to experiment with herbs like thyme or oregano to add an extra layer of flavor. To make this dish gluten-free, substitute the breadcrumbs with gluten-free breadcrumbs or ground nuts. Enjoy your healthy and festive appetizer!
Roasted Red Pepper and Goat Cheese Crostini
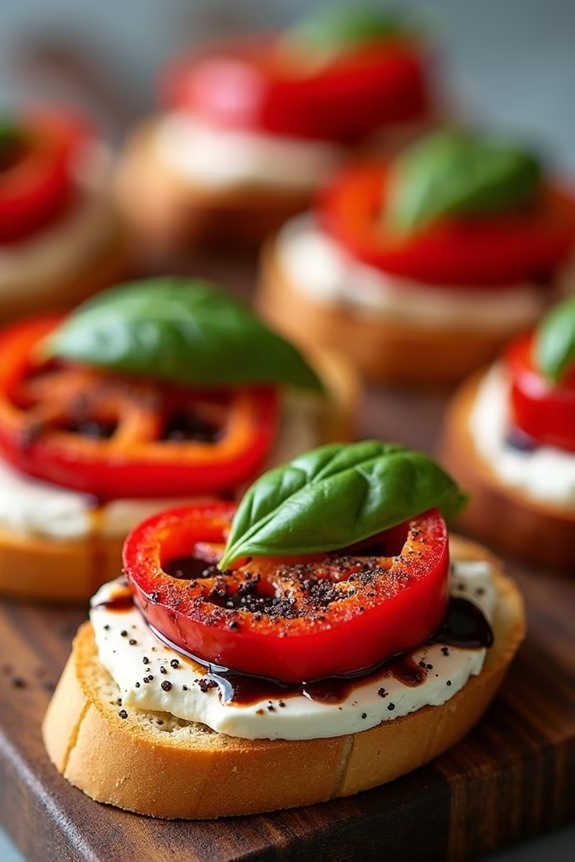
Roasted Red Pepper and Goat Cheese Crostini is a delightful and healthy appetizer that’s perfect for your Christmas gatherings. This dish combines the rich, tangy flavor of goat cheese with the sweet, smoky taste of roasted red peppers, all atop a wonderfully toasted baguette slice. It’s an appetizer that’s not only easy to prepare but also visually appealing and packed with flavor. Suitable for serving 4-6 people, this dish will surely impress your guests and add a gourmet touch to your holiday spread.
The beauty of this recipe lies in its simplicity and the vibrant flavors that come together with minimal effort. The creamy goat cheese pairs beautifully with the roasted red peppers, while a touch of balsamic glaze adds a hint of sweetness and depth. Topped with fresh basil and a sprinkle of cracked black pepper, each bite of this crostini is a delightful experience for the palate. Whether you’re hosting a large party or a small family gathering, these crostinis are sure to be a hit.
Ingredients:
- 1 French baguette
- 4 ounces goat cheese
- 2 large red peppers, roasted and sliced
- 2 tablespoons olive oil
- 1 tablespoon balsamic glaze
- Fresh basil leaves, for garnish
- Salt and freshly ground black pepper, to taste
Instructions:
- Prepare the Baguette: Preheat your oven to 375°F (190°C). Slice the baguette into 1/4-inch thick rounds. Arrange the slices on a baking sheet and brush each side lightly with olive oil. Bake in the preheated oven for about 8-10 minutes or until the slices are lightly golden and crisp.
- Roast the Red Peppers: If you haven’t already roasted your red peppers, you can do so by placing them directly over the flame of a gas stove or under a broiler, turning occasionally, until the skin is charred all over. Place the peppers in a bowl and cover with plastic wrap to steam for about 10 minutes. Once cooled, peel off the charred skin, remove the seeds, and slice into strips.
- Assemble the Crostini: Spread a generous amount of goat cheese onto each toasted baguette slice. Top with a few strips of roasted red pepper.
- Drizzle and Garnish: Lightly drizzle balsamic glaze over the red peppers. Season with salt and freshly ground black pepper to taste. Garnish with fresh basil leaves to add a pop of color and freshness.
- Serve: Arrange the crostini on a serving platter and enjoy them warm or at room temperature.
Extra Tips:
For an added layer of flavor, consider using herbed goat cheese or adding a sprinkle of crushed red pepper flakes for a bit of heat. If you’re short on time, jarred roasted red peppers can be used as a convenient alternative. Be sure to pat them dry with a paper towel to remove excess moisture.
Additionally, if you prefer a creamier texture, you can whip the goat cheese with a little bit of cream or milk before spreading it on the baguette slices. These crostinis are best enjoyed on the day they’re made for maximum freshness and crunch.
Zucchini Roll-Ups With Herbed Cream Cheese
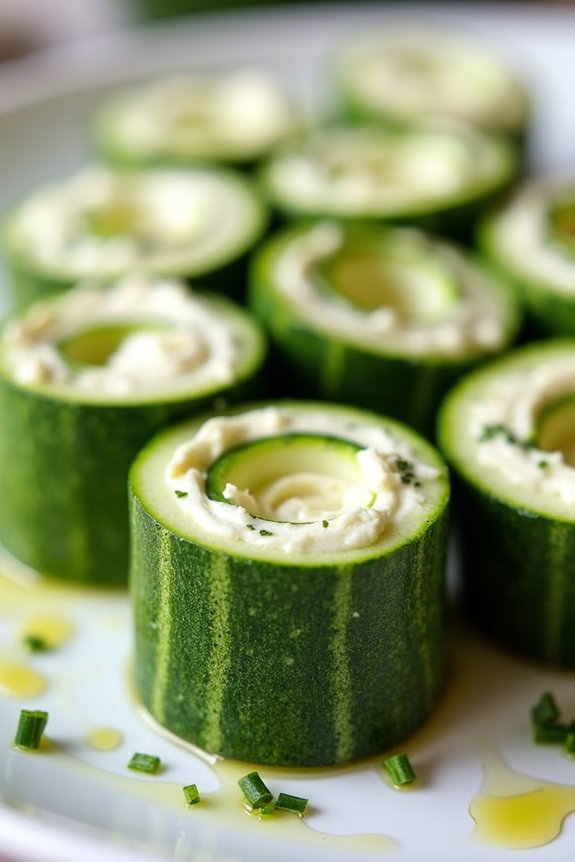
Zucchini Roll-Ups with Herbed Cream Cheese are a delightful and healthy appetizer perfect for any festive gathering. These bite-sized treats combine the fresh, crisp taste of zucchini with a creamy, flavorful filling, making them a great choice for those seeking lighter fare during the holiday season. Not only are they visually appealing, but they also offer a revitalizing alternative to heavier, more traditional appetizers.
This dish is simple to prepare yet elegant enough to impress your guests. The zucchini slices are thinly sliced and serve as a low-carb alternative to bread or crackers, while the herbed cream cheese filling adds a burst of flavor thanks to a mix of aromatic herbs and spices. Whether you’re hosting a holiday party or looking for a nutritious snack, these Zucchini Roll-Ups with Herbed Cream Cheese are sure to be a hit.
Ingredients (Serves 4-6):
- 3 medium zucchini
- 8 ounces cream cheese, softened
- 1 tablespoon fresh dill, chopped
- 1 tablespoon fresh chives, chopped
- 1 tablespoon fresh parsley, chopped
- 1 garlic clove, minced
- 1 teaspoon lemon juice
- Salt and pepper to taste
- Olive oil for brushing
Cooking Instructions:
- Prepare the Zucchini: Wash the zucchini and trim the ends. Using a mandoline or a sharp knife, slice the zucchini lengthwise into thin strips, about 1/8 inch thick. Lay the slices on a paper towel and sprinkle with a little salt. Let them sit for about 10 minutes to draw out excess moisture, then pat dry with another paper towel.
- Make the Herbed Cream Cheese Filling: In a mixing bowl, combine the softened cream cheese, fresh dill, chives, parsley, minced garlic, and lemon juice. Mix well until the ingredients are fully incorporated. Season with salt and pepper to taste.
- Assemble the Roll-Ups: Take a zucchini slice and spread a thin layer of the herbed cream cheese mixture over it. Start at one end and carefully roll the zucchini slice into a tight spiral. Repeat this process with the remaining zucchini slices and cream cheese mixture.
- Chill the Roll-Ups: Place the roll-ups on a serving platter, seam side down. Cover the platter with plastic wrap and refrigerate for at least 30 minutes to allow the flavors to meld together and the roll-ups to firm up.
- Serve: Just before serving, lightly brush the zucchini roll-ups with a little olive oil to give them a slight sheen and prevent them from drying out. Arrange them neatly on the platter and garnish with additional chopped herbs if desired.
Extra Tips:
When preparing the zucchini slices, try to keep them as uniform in thickness as possible for even rolling and a more consistent appearance. If you find that the zucchini slices are too thick to roll easily, gently flatten them with the back of a knife.
Additionally, if you’re making these ahead of time, keep them chilled until ready to serve to maintain their firmness and freshness. Feel free to experiment with different herbs to suit your taste or what you have on hand.
Turkey and Cranberry Meatballs

As the festive season rolls around, many of us are looking for delicious yet healthy appetizers to serve at holiday gatherings. Turkey and Cranberry Meatballs are a perfect choice, combining lean protein with the tangy sweetness of cranberries to create a dish that’s both satisfying and nutritious.
These meatballs aren’t only a healthier alternative to traditional beef meatballs, but they also capture the spirit of the holidays with their festive flavors.
These meatballs are easy to prepare and can be served as an appetizer or as part of a main course. They’re ideal for those who want to indulge in the flavors of the season without compromising on health. Whether you’re hosting a Christmas party or simply enjoying a cozy meal at home, these Turkey and Cranberry Meatballs will be a hit with your family and friends.
Ingredients (Serves 4-6):
- 1 pound ground turkey
- 1/2 cup dried cranberries, chopped
- 1/2 cup breadcrumbs
- 1/4 cup fresh parsley, chopped
- 1/4 cup onion, finely chopped
- 2 cloves garlic, minced
- 1 large egg
- 1 teaspoon salt
- 1/2 teaspoon black pepper
- 1/2 teaspoon dried sage
- 1/4 teaspoon ground nutmeg
- 2 tablespoons olive oil
Instructions:
- Preheat the Oven: Begin by preheating your oven to 375°F (190°C). This guarantees that the meatballs will cook evenly and develop a nice, golden-brown exterior.
- Prepare the Mixture: In a large mixing bowl, combine the ground turkey, chopped cranberries, breadcrumbs, parsley, onion, garlic, and egg. Add salt, pepper, sage, and nutmeg. Mix thoroughly until all ingredients are evenly distributed. This will guarantee that each meatball is packed with flavor.
- Form the Meatballs: Using your hands, form the mixture into small balls, about 1 inch in diameter. This size is perfect for appetizers, allowing for easy eating with a toothpick or fork.
- Cook the Meatballs: Heat the olive oil in a large skillet over medium heat. Add the meatballs and cook for about 5 minutes, turning occasionally, until they’re browned on all sides. This step helps to seal in the juices and adds a lovely caramelized flavor.
- Bake in the Oven: Transfer the browned meatballs to a baking sheet lined with parchment paper. Bake in the preheated oven for 15-20 minutes, or until the meatballs are cooked through and reach an internal temperature of 165°F (74°C).
- Serve: Once done, remove the meatballs from the oven and let them cool slightly. Serve warm with your choice of dipping sauce, such as a cranberry sauce or a tangy yogurt dip.
Extra Tips:
To make these meatballs even more festive, consider adding a touch of orange zest to the mixture for a citrusy brightness that complements the cranberries.
If you prefer a bit of heat, a pinch of cayenne pepper can be added to the mix. These meatballs can also be made ahead of time and frozen for convenience, just make sure they’re fully thawed before cooking.
Enjoy these delightful bites as they bring a taste of the holiday season to your table!
Quinoa and Black Bean Mini Tacos
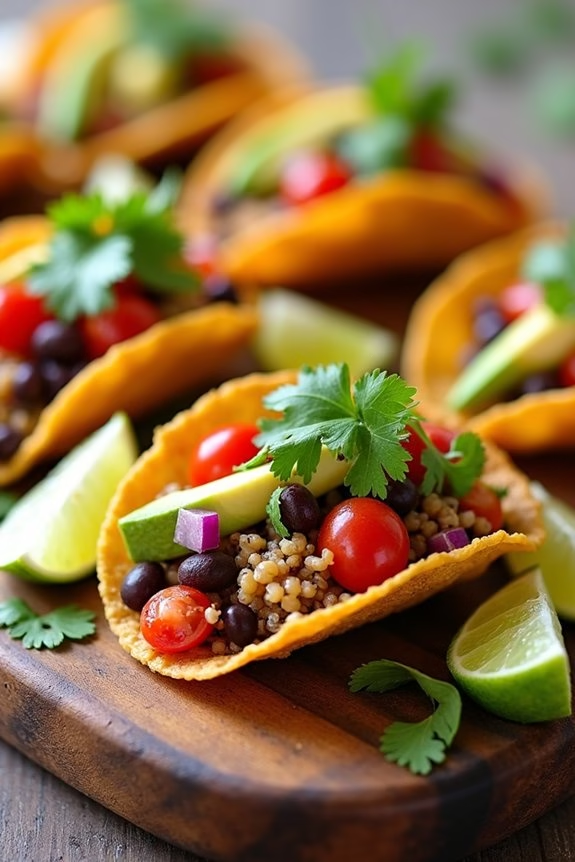
Quinoa and Black Bean Mini Tacos are a delightful and healthy appetizer perfect for your Christmas gatherings. These mini tacos aren’t only vibrant in color but also packed with nutrients, making them a guilt-free indulgence.
The combination of quinoa and black beans provides a hearty, plant-based protein source, while fresh toppings add a burst of flavor to each bite. These mini tacos are a crowd-pleaser for both vegetarians and meat-lovers alike, offering a satisfying crunch with every munch.
The preparation of Quinoa and Black Bean Mini Tacos is simple and straightforward, allowing you to focus on enjoying the festivities rather than spending too much time in the kitchen. By using mini taco shells, you can create perfectly portioned appetizers that are easy to handle and enjoy.
They can be made ahead of time and assembled just before serving, ensuring that you can entertain your guests without any last-minute stress. Let’s explore the ingredients and cooking instructions for this festive treat, designed to serve 4-6 people.
Ingredients:
- 1 cup quinoa, rinsed
- 2 cups vegetable broth
- 1 can (15 oz) black beans, drained and rinsed
- 1 tablespoon olive oil
- 1 teaspoon cumin powder
- 1 teaspoon chili powder
- Salt and pepper to taste
- 12 mini taco shells
- 1 cup cherry tomatoes, diced
- 1 avocado, diced
- 1/4 red onion, finely chopped
- 1/4 cup fresh cilantro, chopped
- Lime wedges for garnish
Cooking Instructions:
1. Cook the Quinoa: In a medium-sized pot, combine the rinsed quinoa and vegetable broth. Bring to a boil over medium-high heat. Once boiling, reduce the heat to low, cover, and let it simmer for about 15 minutes or until the quinoa is cooked and fluffy.
Remove from heat and let it cool slightly.
2. Prepare the Black Bean Mixture: In a large skillet, heat the olive oil over medium heat. Add the drained black beans, cumin powder, chili powder, salt, and pepper. Stir well and cook for about 5 minutes until the beans are heated through and well-coated with spices.
3. Combine Quinoa and Beans: Add the cooked quinoa to the skillet with the black beans. Mix well to combine, ensuring the spices are evenly distributed throughout the mixture.
Cook for an additional 2-3 minutes to meld the flavors together.
4. Assemble the Mini Tacos: Lay out the mini taco shells on a serving platter. Fill each shell with a spoonful of the quinoa and black bean mixture. Top with diced cherry tomatoes, avocado, red onion, and cilantro.
5. Garnish and Serve: Arrange lime wedges around the platter for guests to squeeze over their tacos for an extra zing. Serve immediately and enjoy your festive and nutritious appetizer.
Extra Tips:
For an even more flavorful experience, consider adding a splash of lime juice or a sprinkle of smoked paprika to the quinoa and black bean mixture while cooking.
If you prefer a little heat, you can include some finely chopped jalapeños or a drizzle of hot sauce as a topping. The mini taco shells can also be lightly toasted in the oven for a few minutes before filling, adding an extra layer of crispiness.
Remember to prepare all toppings in advance and assemble the tacos just before serving to maintain the freshness and texture of the ingredients.
Prosciutto-Wrapped Asparagus
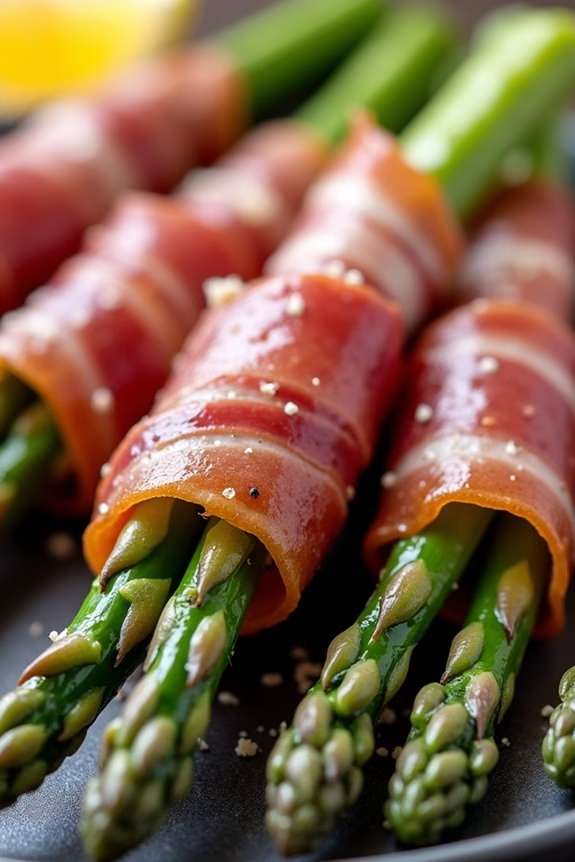
Prosciutto-Wrapped Asparagus is a delightful and elegant appetizer that brings together the savory flavors of prosciutto and the fresh, crisp taste of asparagus. This dish isn’t only visually appealing but also incredibly easy to prepare, making it a perfect choice for your Christmas celebration.
Whether you’re hosting a festive dinner or attending a holiday potluck, this appetizer will surely impress your guests with its simple yet sophisticated flavor profile. The combination of salty prosciutto and tender asparagus provides a harmonious balance that makes each bite irresistibly delicious.
The asparagus spears are wrapped with thin slices of prosciutto, which crisp up beautifully in the oven. This creates a wonderful contrast in textures, with the crunchy asparagus and the crispy, salty prosciutto. The dish can be served warm or at room temperature, adding to its versatility as a holiday appetizer.
Ingredients for 4-6 people:
- 1 pound fresh asparagus spears
- 8-12 thin slices of prosciutto
- 1 tablespoon olive oil
- Salt and pepper to taste
- Optional: grated Parmesan cheese for garnish
- Optional: lemon wedges for serving
Cooking Instructions:
- Preheat the Oven: Begin by preheating your oven to 400°F (200°C). This will guarantee that your asparagus and prosciutto cook evenly and become perfectly crispy.
- Prepare the Asparagus: Wash and trim the asparagus spears. Cut or snap off the woody ends, leaving the tender green stalks. Pat them dry with a paper towel to remove excess moisture.
- Wrap with Prosciutto: Lay a slice of prosciutto on a flat surface. Place an asparagus spear at one end of the prosciutto slice and roll it up tightly. Repeat this process for each asparagus spear. Depending on the size of your asparagus, you may use half or a full slice of prosciutto per spear.
- Season and Arrange: Place the wrapped asparagus on a baking sheet lined with parchment paper. Drizzle with olive oil and season lightly with salt and pepper. Remember, prosciutto is already salty, so use salt sparingly.
- Bake: Transfer the baking sheet to the preheated oven and bake for 15-20 minutes. The prosciutto should be crispy, and the asparagus should be tender but still slightly crunchy.
- Serve: Remove from the oven and let them cool slightly before serving. If desired, sprinkle with grated Parmesan cheese and serve with lemon wedges for added flavor.
Extra Tips:
To make this appetizer even more festive, consider adding a sprinkle of lemon zest or a drizzle of balsamic glaze over the finished dish for a touch of acidity that complements the saltiness of the prosciutto.
If you want to prepare this dish in advance, wrap the asparagus with the prosciutto and store them in the refrigerator for up to a day before baking. This way, you can simply pop them in the oven when it’s time to serve.
Remember to keep an eye on them in the oven to prevent overcooking, as asparagus can become mushy if left too long. Enjoy this delightful appetizer that’s both healthy and indulgent!
Pomegranate and Walnut Cheese Ball
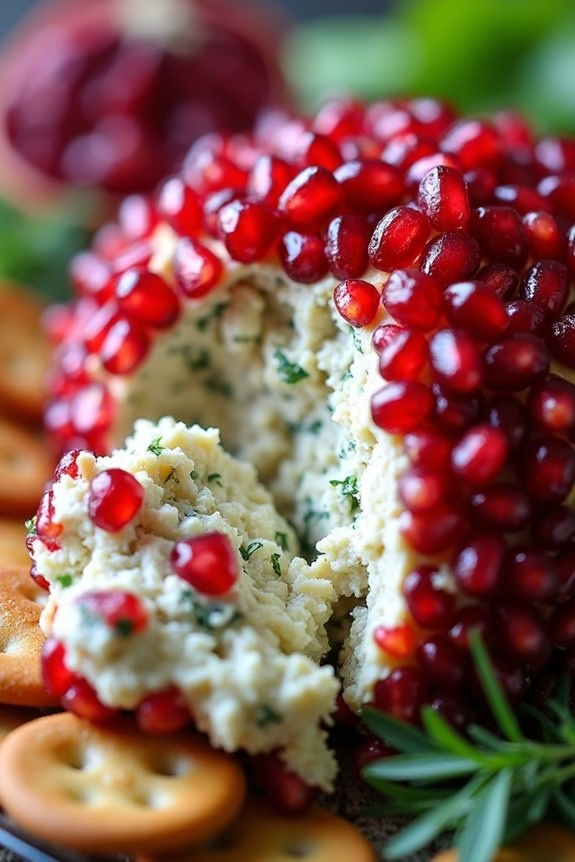
Elevate your holiday gatherings with a festive Pomegranate and Walnut Cheese Ball. This delightful appetizer not only brings a burst of color to your Christmas spread but also combines the creamy richness of cheese with the nutty crunch of walnuts and the juicy sweetness of pomegranate seeds. Perfect for serving 4-6 people, this cheese ball is a delicious and healthy way to start your holiday feast on the right note.
With its visually striking presentation and a balance of flavors that will please every palate, this cheese ball is sure to become a holiday favorite for years to come.
The Pomegranate and Walnut Cheese Ball is a versatile dish that can be prepared in advance, allowing you to focus on other holiday preparations. This recipe calls for a blend of cream cheese and goat cheese, which provides a smooth, tangy base that pairs beautifully with the tartness of pomegranate seeds and the earthy flavor of walnuts.
The addition of fresh herbs adds a touch of brightness, making this appetizer as invigorating as it’s satisfying. Serve it with an assortment of crackers, bread slices, or fresh veggies for a healthy and delectable treat that highlights the season’s best ingredients.
Ingredients (Serves 4-6):
- 8 oz cream cheese, softened
- 4 oz goat cheese, softened
- 1 cup pomegranate seeds
- 1 cup walnuts, finely chopped
- 2 tablespoons fresh parsley, chopped
- 2 tablespoons fresh chives, chopped
- 1 teaspoon garlic powder
- Salt and pepper to taste
- Crackers or bread slices for serving
Cooking Instructions:
- Prepare the Cheese Mixture:
- In a large mixing bowl, combine the softened cream cheese and goat cheese. Use a hand mixer or a spatula to blend them together until smooth and creamy.
- Add garlic powder, salt, and pepper to the cheese mixture, and mix well to incorporate the spices evenly.
- Incorporate Fresh Ingredients:
- Gently fold in the chopped walnuts, parsley, and chives into the cheese mixture, ensuring they’re evenly distributed throughout.
- Carefully fold in half of the pomegranate seeds, reserving the other half for coating the outside of the cheese ball.
- Form the Cheese Ball:
- Transfer the cheese mixture onto a large piece of plastic wrap. Gather the edges of the plastic wrap around the mixture and gently shape it into a ball.
- Once shaped, tightly wrap the cheese ball in plastic wrap and refrigerate for at least 1 hour, or until firm.
- Coat the Cheese Ball:
- After the cheese ball has chilled and firmed up, remove it from the refrigerator and unwrap it.
- Spread the reserved pomegranate seeds on a flat surface or plate. Roll the cheese ball over the seeds, pressing gently to adhere them to the surface until the entire ball is covered.
- Serve:
- Place the cheese ball on a serving platter and surround it with an assortment of crackers, bread slices, or fresh veggies.
- Serve immediately, or if preparing in advance, keep it chilled until ready to serve.
Extra Tips:
For an added depth of flavor, consider toasting the walnuts before chopping and incorporating them into the cheese mixture. Toasting enhances their nutty aroma and gives a pleasant crunch to the cheese ball.
Additionally, if you prefer a slightly sweeter profile, drizzle a touch of honey over the cheese ball before serving. This appetizer can be made a day in advance, ensuring you have one less task on the day of the event.
Just remember to wait until closer to serving time to coat with pomegranate seeds to maintain their freshness and vibrant color.
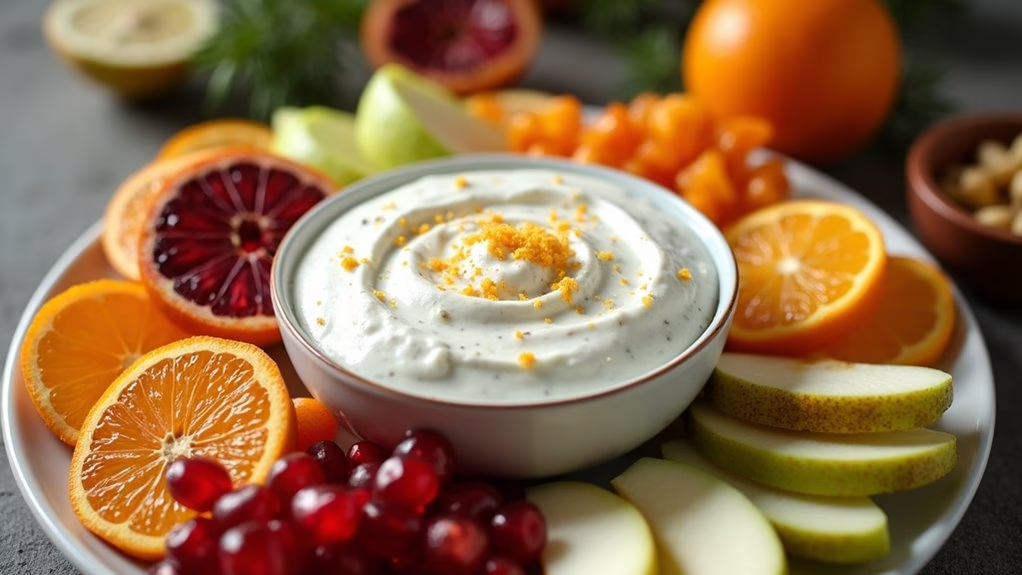
Greek Yogurt Fruit Dip With Seasonal Fruits

Greek Yogurt Fruit Dip with Seasonal Fruits is a delicious and healthy appetizer perfect for your Christmas celebrations. This dish combines the creamy tanginess of Greek yogurt with the natural sweetness of seasonal fruits, creating a revitalizing and colorful starter that’s sure to impress your guests.
Not only is it simple to prepare, but it also adds a festive touch to your holiday table with its vibrant colors and flavors. By using Greek yogurt as the base, this fruit dip becomes a nutritious option packed with protein and probiotics.
Pair it with a selection of seasonal fruits like apples, pears, pomegranate seeds, and citrus slices to make the most of the winter harvest. This appetizer isn’t only visually appealing but also caters to a variety of dietary preferences, making it an inclusive choice for any gathering.
Ingredients (Serves 4-6):
- 2 cups plain Greek yogurt
- 2 tablespoons honey
- 1 teaspoon vanilla extract
- Zest of 1 orange
- A pinch of cinnamon
- 1 cup apple slices
- 1 cup pear slices
- 1/2 cup pomegranate seeds
- 1 cup citrus slices (such as clementines or mandarins)
Instructions:
- Prepare the Yogurt Dip: In a medium-sized mixing bowl, combine the Greek yogurt, honey, vanilla extract, orange zest, and a pinch of cinnamon. Stir until all ingredients are well incorporated and the mixture is smooth and creamy.
- Chill the Dip: Cover the bowl with plastic wrap or a lid and refrigerate for at least 30 minutes. This allows the flavors to meld together, enhancing the overall taste of the dip.
- Prepare the Fruits: While the dip is chilling, wash and slice the apples and pears. Separate the pomegranate seeds from the fruit. Peel and segment the citrus fruits. Arrange all the fruits on a large serving platter.
- Serve: Once the yogurt dip is chilled, transfer it to a serving bowl and place it in the center of the fruit platter. Serve immediately for the best texture and flavor.
Extra Tips:
When preparing the fruit, you can prevent the apple and pear slices from browning by dipping them in a mixture of water and lemon juice. This will keep them looking fresh and appealing.
Additionally, you can customize the fruit selection based on personal preference or availability. Feel free to include other seasonal fruits like kiwi or grapes for added variety. If preparing the dish ahead of time, keep the fruits and dip refrigerated separately and assemble just before serving to maintain ideal freshness.