
When Halloween rolls around, creating treats that are both adorable and delicious is my favorite way to celebrate. Picture spider sandwiches crawling onto plates or monster apples with gnarly grins. These fun and festive snacks are perfect for even the pickiest little goblins. Each bite offers a whimsical blend of fun and nutrition. Ready to explore some spooky snacks that will delight their taste buds?
Spooky Spider Sandwiches
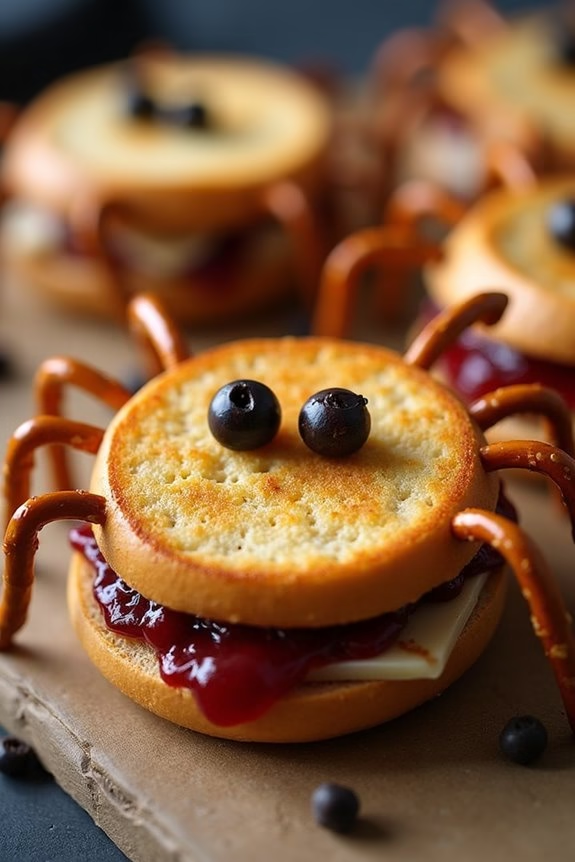
Halloween is a time for creativity and fun, and what better way to celebrate than with Spooky Spider Sandwiches? These delightful treats are perfect for kids and add a dash of excitement to any Halloween gathering. Not only are they simple to make, but they also provide a nutritious option amidst the candy overload.
With just a few ingredients, you can transform ordinary sandwiches into creepy crawly spiders that are sure to impress. Ideal for a lunchbox surprise or a party platter, Spooky Spider Sandwiches are both whimsical and delicious. Made with whole-grain bread, a protein-rich filling, and some innovative decoration, these sandwiches are as practical as they’re playful.
Suitable for a serving size of 4-6 people, this recipe guarantees that everyone can indulge in a healthy yet festive Halloween snack.
Ingredients:
- 8 slices of whole-grain bread
- 1 cup of creamy peanut butter or your preferred sandwich spread
- 1/2 cup of grape or strawberry jelly
- 24 pretzel sticks (for spider legs)
- 12 raisins or chocolate chips (for spider eyes)
- 1 tablespoon of butter or margarine (optional, for toasting)
Instructions:
- Prepare the Bread: Take 8 slices of whole-grain bread and use a round cookie cutter or a drinking glass to cut each slice into a circle. If you prefer your spiders toasted, lightly butter one side of each circle.
- Make the Filling: Spread a layer of creamy peanut butter or your chosen sandwich spread evenly onto half of the bread circles. On the other half, spread a generous layer of grape or strawberry jelly.
- Assemble the Sandwiches: Place the jelly-covered circles on top of the peanut butter-covered ones to form a complete sandwich.
- Create the Spider Legs: Insert three pretzel sticks into each side of the sandwich to create the spider legs. Make sure they’re evenly spaced to give the appearance of a spider.
- Add the Eyes: Using a small amount of peanut butter or jelly as “glue,” attach two raisins or chocolate chips onto the top of each sandwich as eyes.
- Optional Toasting: If you prefer a toasted texture, place the assembled sandwiches on a skillet over medium heat, buttered side down, and toast until golden brown.
Extra Tips:
For a fun twist, consider using different spreads like almond butter or sunflower seed butter to cater to dietary needs or allergies. You can also experiment with different types of jelly for more variety in flavor.
If you’re making these sandwiches with young kids, let them help with the assembly and decoration to make it a fun and interactive activity. To maintain freshness, assemble the sandwiches close to serving time, especially if using jelly or spreads that might make the bread soggy.
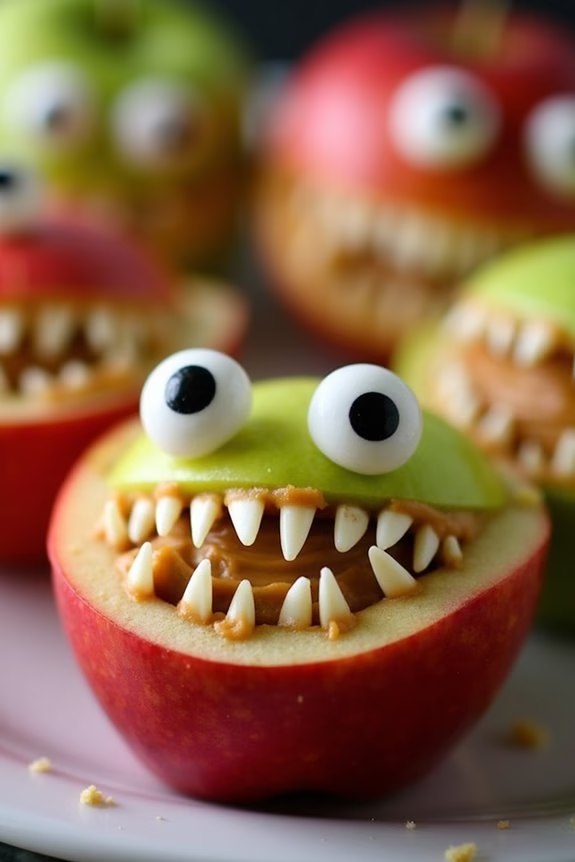
Monster Apple Bites
Monster Apple Bites are a fun and spooky treat that’s perfect for Halloween festivities. These delightful snacks aren’t only visually appealing but also a nutritious option for kids. With just a few simple ingredients, you can create a delicious and healthy treat that will add a touch of frightful fun to any Halloween party.
The combination of sweet apples, nutty peanut butter, and creepy candy eyes makes these Monster Apple Bites a hit with children and adults alike. These treats are easy to make and require no cooking or baking, making them a perfect activity to involve kids in the kitchen.
Each bite-sized apple slice is transformed into a monster with a wide-open mouth filled with nut butter and jagged teeth made from almonds. The addition of candy eyes gives each monster a unique personality, making them a perfect centerpiece for your Halloween snack table. Whether you’re hosting a Halloween party or looking for a festive snack, Monster Apple Bites are sure to delight.
Ingredients (serving size: 4-6 people)
- 3 medium-sized apples (any variety)
- 1 cup creamy peanut butter (or any nut butter of choice)
- 1/4 cup slivered almonds
- 1/4 cup candy eyes (available at most baking supply stores)
- Lemon juice (optional, to prevent apple browning)
Instructions
- Prepare the Apples: Wash and dry the apples thoroughly. Cut each apple into quarters, removing the core. Then, cut a wedge out of the skin side of each apple quarter to create a mouth-like opening. If desired, brush the cut sides of the apples with lemon juice to prevent browning.
- Assemble the Monster Mouths: Use a butter knife or small spoon to spread a generous amount of peanut butter inside the mouth opening of each apple slice. This will act as the “gums” for the monster’s teeth.
- Create the Teeth: Insert slivered almonds into the peanut butter along the top and bottom edges of the mouth to resemble sharp teeth. You can vary the number and position of almonds to give each monster a unique look.
- Add the Eyes: Place two candy eyes above the mouth on the apple skin. Press them gently into the peanut butter to secure them in place.
- Serve and Enjoy: Arrange the Monster Apple Bites on a serving platter and let the kids enjoy their creepy creations! These are best served fresh, but can be stored in the refrigerator for a few hours if needed.
Extra Tips
For a nut-free version, you can substitute the peanut butter with sunflower seed butter or any other seed-based spread. If you don’t have candy eyes, you can use small chocolate chips or raisins to create eyes.
To make the activity more engaging for kids, set up an assembly line with all the ingredients and let them create their own monster designs. This not only makes the process more fun but also encourages creativity and teamwork.
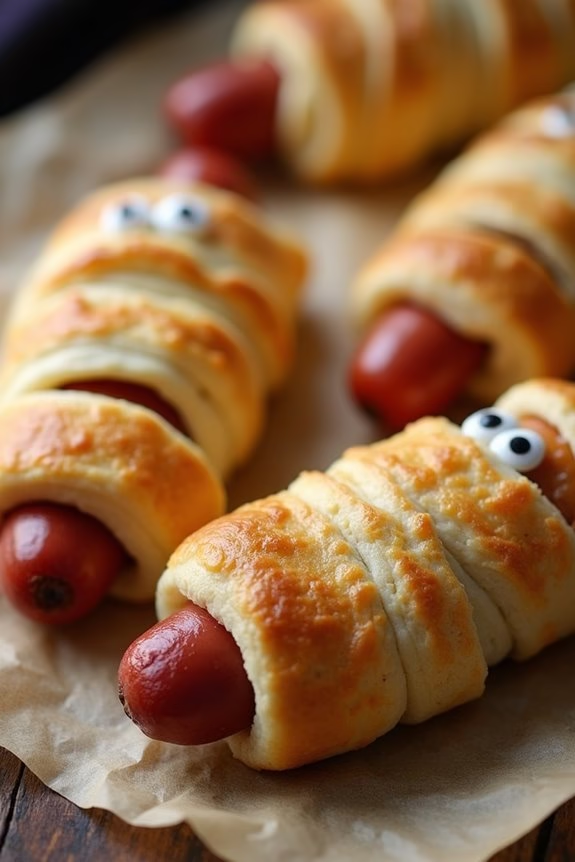
Mummy Hot Dogs
Mummy Hot Dogs are a fun and spooky treat that’s perfect for Halloween celebrations, especially for kids. These whimsical snacks aren’t only easy to make but also delicious, combining the classic flavors of hot dogs and crescent rolls with a playful twist. Wrapped to resemble mummies, these hot dogs are sure to be a hit at any Halloween party or gathering.
They’re quick to prepare, require minimal ingredients, and can be made in under 30 minutes, making them a convenient choice for busy parents looking to serve up something festive and fun.
The concept behind Mummy Hot Dogs is simple: hot dogs are wrapped in strips of crescent roll dough to resemble bandaged mummies, complete with dot eyes made from mustard or ketchup. This playful presentation transforms ordinary hot dogs into a themed treat that kids will love to eat and make.
Whether served as a main dish or a hearty snack, Mummy Hot Dogs are versatile, easy to customize, and a delightful way to celebrate Halloween with a touch of creativity and humor.
Ingredients (for 4-6 servings)
- 1 can (8 oz) refrigerated crescent roll dough
- 8 hot dogs
- Mustard or ketchup, for decoration
Cooking Instructions
- Preheat the Oven: Start by preheating your oven to 375°F (190°C) to guarantee it’s hot enough to bake the crescent dough to a golden brown.
- Prepare the Dough: Open the can of crescent roll dough and unroll the sheet on a clean surface. Using a pizza cutter or a sharp knife, slice the dough into thin strips, approximately 1/4 inch wide.
- Wrap the Hot Dogs: Take each hot dog and wrap it with the dough strips, leaving a small gap for the face. Start at one end and wrap diagonally, slightly overlapping the dough to create the appearance of mummy bandages.
- Arrange on Baking Sheet: Place the wrapped hot dogs on a baking sheet lined with parchment paper or a silicone mat to prevent sticking.
- Bake the Mummies: Bake in the preheated oven for 12-15 minutes, or until the dough is golden brown and cooked through.
- Decorate the Mummies: Once baked, remove the hot dogs from the oven and let them cool slightly. Use a small amount of mustard or ketchup to dot eyes onto the mummies for a finishing touch.
Extra Tips
For added flavor, you can brush the dough with melted butter and sprinkle with garlic powder or poppy seeds before baking.
If you prefer, you can also use cheese-stuffed hot dogs or add a thin slice of cheese before wrapping them in the dough for extra cheesiness.
If you’re serving these at a party, provide small bowls of dipping sauces like ketchup, mustard, or barbecue sauce to enhance the experience.
Be sure to let the Mummy Hot Dogs cool for a few minutes before serving, as the interiors can be quite hot right out of the oven.
Ghostly Banana Pops
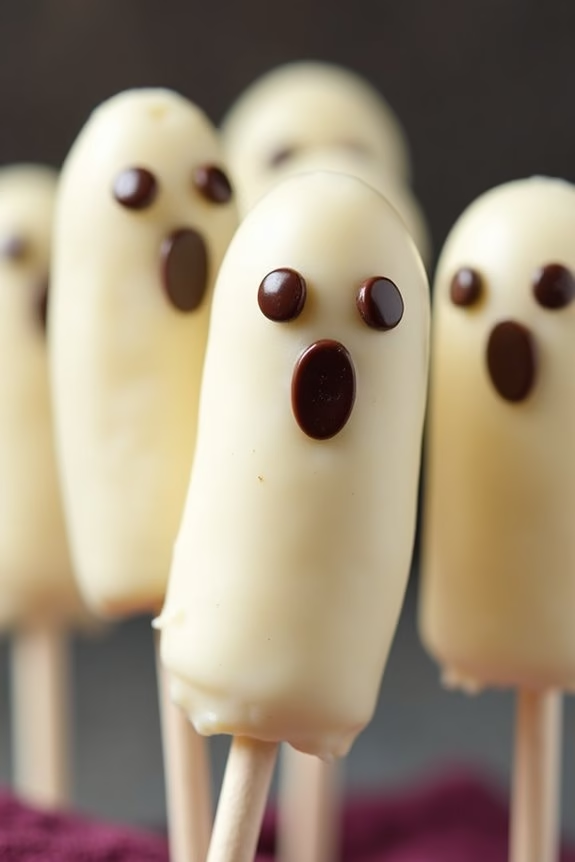
Ghostly Banana Pops are a fun and healthy treat perfect for Halloween festivities. These spooky snacks aren’t only easy to make but also offer a delightful combination of sweet bananas and rich chocolate. The playful ghostly appearance adds a whimsical touch to any Halloween celebration, making them a hit among kids and adults alike.
These treats are a great way to sneak some fruit into the Halloween treat table while keeping the spooky spirit alive. This recipe is designed to serve 4-6 people, making it ideal for small gatherings or family celebrations. The preparation involves simple ingredients and minimal effort, allowing even the youngest chefs to participate in the fun.
With just a few steps, you can transform ordinary bananas into an eye-catching and delicious treat that everyone will enjoy.
Ingredients (Serving size: 4-6 people)
- 3 large bananas
- 1 cup white chocolate chips
- 1 tablespoon coconut oil
- 12 mini chocolate chips
- 6 popsicle sticks or skewers
- Wax paper
Cooking Instructions
- Prepare the Bananas: Peel the bananas and slice each one in half. Insert a popsicle stick or skewer into the cut end of each banana half to create a handle for the popsicle.
- Melt the Chocolate: In a microwave-safe bowl, combine the white chocolate chips and coconut oil. Microwave in 30-second intervals, stirring between each interval, until the chocolate is fully melted and smooth. Be careful not to overheat the chocolate.
- Coat the Bananas: Line a baking sheet with wax paper. Dip each banana half into the melted white chocolate, guaranteeing it’s fully coated. Allow any excess chocolate to drip off before placing the banana on the wax paper.
- Create the Ghost Faces: While the chocolate is still wet, press two mini chocolate chips onto each banana to form the eyes. You can add a third mini chocolate chip to make a mouth for added character.
- Chill the Pops: Place the baking sheet in the refrigerator for about 30 minutes, or until the chocolate is set and firm.
- Serve and Enjoy: Once the chocolate has hardened, your Ghostly Banana Pops are ready to be enjoyed. Serve them chilled for the best taste and texture.
Extra Tips
For a smoother chocolate coating, verify the bananas are dry before dipping them into the melted chocolate, as moisture can cause the chocolate to seize or not adhere properly.
If you prefer a darker ghost, substitute the white chocolate with dark or milk chocolate. Additionally, for a nut-free alternative, consider using allergy-friendly chocolate chips.
Remember to store any leftovers in the refrigerator to keep the bananas fresh and the chocolate firm. Enjoy these spooky treats and have a happy Halloween!
Witch’s Broomsticks

Halloween is the perfect time to get creative in the kitchen and delight kids with spooky treats that are fun to make and delicious to eat. Witch’s Broomsticks are a whimsical and easy-to-make snack that will surely be a hit at any Halloween gathering.
These savory treats aren’t only visually appealing but also offer a delightful combination of flavors and textures that will make them a favorite among children and adults alike.
Witch’s Broomsticks are crafted using simple ingredients and require minimal preparation time, making them an ideal choice for busy parents or those new to cooking. With a serving size of 4-6 people, this recipe is perfect for parties or family gatherings, allowing everyone to enjoy a magical Halloween experience.
The key components of this dish include pretzel sticks for the broomstick handle and cheese strings for the broom bristles, making it a savory snack that’s both fun and satisfying.
Ingredients for Witch’s Broomsticks (Serves 4-6):
- 16 pretzel sticks
- 8 string cheese sticks
- 8 fresh chives
Cooking Instructions:
1. Prepare the Cheese Strings:
Start by unwrapping each string cheese stick and cut them in half horizontally, so you have a total of 16 pieces. This will serve as the base of the broom’s bristles.
2. Create the Broom Bristles:
Take each half of the string cheese and gently use your fingers to pull apart one end into thin strips, resembling the bristles of a broom. Be careful not to pull too far up the cheese stick, leaving about one-third of it intact to hold the shape.
3. Assemble the Broomsticks:
Insert a pretzel stick into the intact end of each cheese stick, pressing gently but firmly to confirm it stays in place. The pretzel serves as the broom handle, while the cheese represents the broom’s bristles.
4. Secure with Chives:
Wrap a fresh chive around the top of the cheese where the pretzel meets the cheese stick. This acts like a tie, adding a touch of green to the broomstick and helping to keep the pretzel and cheese together. Tie the chive in a small knot or bow for added security.
5. Repeat and Serve:
Repeat the above steps with the remaining cheese sticks and pretzels until all Witch’s Broomsticks are assembled. Arrange them on a platter and serve immediately to enjoy their freshness and flavor.
Extra Tips:
For an added twist, consider using different types of cheese such as mozzarella or cheddar for a varied flavor profile.
If chives aren’t available, you can substitute with thin strips of green onion for a similar effect.
To keep the cheese from drying out, store the prepared broomsticks in an airtight container in the refrigerator until ready to serve.
For a sweet variation, you can use chocolate-covered pretzel sticks and licorice strings for a dessert version of Witch’s Broomsticks. Enjoy the creativity and fun of making this delightful Halloween treat!
Pumpkin Patch Dirt Cups

Pumpkin Patch Dirt Cups are a delightful and festive treat perfect for Halloween celebrations with kids. These individual-sized desserts aren’t only fun to make but also a visual delight that mimics a tiny pumpkin patch. The combination of creamy pudding, crushed cookies, and candy pumpkins creates a delicious and engaging experience for young ones.
The best part is that this no-bake treat is simple to prepare and assemble, making it an ideal activity to involve the kids in the kitchen. This recipe serves 4-6 people, making it perfect for small gatherings or a family Halloween party. The ingredients are easily accessible, and the steps are straightforward, ensuring a stress-free preparation.
With the right balance of textures and flavors, these Pumpkin Patch Dirt Cups are sure to become a Halloween favorite.
Ingredients:
- 1 package (3.9 oz) instant chocolate pudding mix
- 2 cups cold milk
- 1 package (14 oz) chocolate sandwich cookies
- 1 cup whipped topping (such as Cool Whip)
- 12-18 candy pumpkins (such as mellowcreme pumpkins)
- 1/4 cup chocolate sprinkles (optional)
- Small paper or plastic cups (4-6 cups)
Instructions:
1. Prepare the Pudding:
In a medium-sized mixing bowl, combine the instant chocolate pudding mix with cold milk. Whisk for about 2 minutes until the pudding is smooth and begins to thicken. Set aside in the refrigerator to set for approximately 5 minutes.
2. Crush the Cookies:
Place the chocolate sandwich cookies in a large resealable plastic bag. Using a rolling pin or a heavy object, crush the cookies into fine crumbs. Alternatively, pulse the cookies in a food processor until they resemble dirt.
3. Assemble the Dirt Cups:
Take your small cups and fill each with a layer of chocolate pudding, about halfway up the cup. Add a generous layer of crushed cookies on top of the pudding. Gently press down to create a firm “dirt” layer.
4. Add Whipped Topping:
Spoon a dollop of whipped topping over the cookie layer in each cup, then spread it out evenly to create a smooth surface.
5. Decorate the Pumpkin Patch:
Arrange 2-3 candy pumpkins on top of the whipped topping in each cup to resemble a pumpkin patch. Sprinkle a few chocolate sprinkles over the top for added texture and visual appeal.
6. Chill Before Serving:
Place the assembled cups in the refrigerator for at least 30 minutes to allow everything to set and meld together before serving.
Extra Tips:
For an added touch of creativity, consider using edible green candies or frosting to create vines or leaves around the candy pumpkins. If you want to make this treat a little more nutritious, you can incorporate layers of fresh berries or sliced bananas within the pudding layers.
Remember to involve the kids in the decoration process; it’s a fun way for them to express their creativity and enjoy the Halloween spirit. Enjoy your Pumpkin Patch Dirt Cups with a spooky flair!
Frankenstein Rice Krispie Treats
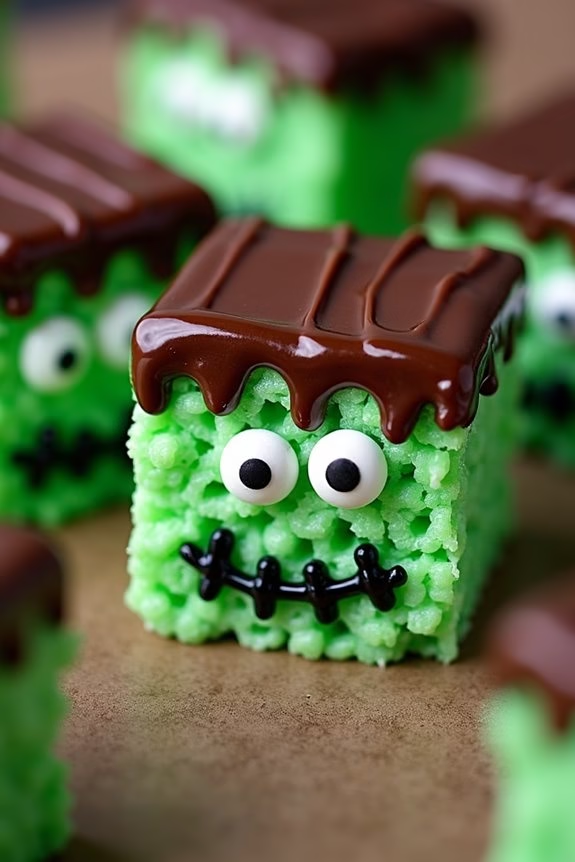
Frankenstein Rice Krispie Treats are a spooktacular addition to any Halloween party, delighting kids and adults alike with their monstrous appearance and delicious taste. These treats combine the classic, chewy goodness of Rice Krispie Treats with a ghoulish twist, perfect for the spooky season. By transforming simple ingredients into a whimsical dessert, you can engage children in the kitchen and let their creativity shine.
With their vibrant green color and chocolatey embellishments, these treats are certain to become a Halloween favorite. Making Frankenstein Rice Krispie Treats isn’t only fun but also incredibly easy, requiring just a few ingredients and minimal preparation time. This recipe can be prepared in advance, allowing you to focus on other Halloween festivities.
Whether you’re hosting a party or simply enjoying a cozy night in with the family, these treats will bring a smile to everyone’s face. Serve them as a snack or dessert, and watch the kids’ eyes light up with delight at these Frankenstein-inspired creations.
Ingredients for 4-6 servings:
- 6 cups Rice Krispies cereal
- 3 tablespoons unsalted butter
- 1 package (10 oz) mini marshmallows
- Green food coloring
- 1 cup chocolate chips or melting chocolate
- Black gel icing or edible marker
- Candy eyes
Cooking Instructions:
- Prepare the Baking Dish: Lightly grease a 9×13 inch baking dish with butter or non-stick spray. Set it aside for later use.
- Melt the Butter and Marshmallows: In a large saucepan, melt the butter over low heat. Once the butter is melted, add the mini marshmallows to the saucepan. Stir continuously until the marshmallows are completely melted and smooth.
- Add Food Coloring: Once the marshmallows are melted, remove the pan from heat. Add a few drops of green food coloring to the melted marshmallow mixture, stirring well until you achieve your desired shade of green.
- Add Cereal: Gradually add the Rice Krispies cereal to the saucepan, stirring gently until the cereal is fully coated with the green marshmallow mixture.
- Transfer to Baking Dish: Pour the coated cereal mixture into the prepared baking dish. With greased hands or a spatula, gently press the mixture evenly into the dish. Allow it to cool and set for about 30 minutes.
- Cut into Squares: Once the mixture is set, cut it into rectangles or squares to form the base of your Frankenstein treats.
- Decorate the Faces: Melt the chocolate chips in a microwave-safe bowl, microwaving in 30-second intervals and stirring in between until smooth. Dip the top portion of each Rice Krispie square into the melted chocolate to create Frankenstein’s hair. Place candy eyes just below the chocolate hairline. Use black gel icing or an edible marker to draw scars, a mouth, and add any other facial features.
- Set and Serve: Allow the chocolate and icing to set completely before serving. Enjoy your adorable and delicious Frankenstein Rice Krispie Treats!
Extra Tips:
For best results, make sure that the marshmallows are fresh, as stale marshmallows won’t melt as smoothly. If you’re having trouble getting the green color just right, add food coloring gradually to avoid overpowering the marshmallow mixture.
When pressing the mixture into the baking dish, use wax paper or a buttered spatula to prevent sticking. Feel free to customize the decorations by adding different candies or using various colors and designs for the faces. These treats can be stored in an airtight container for up to three days – if they last that long!
Batty Brownie Bites
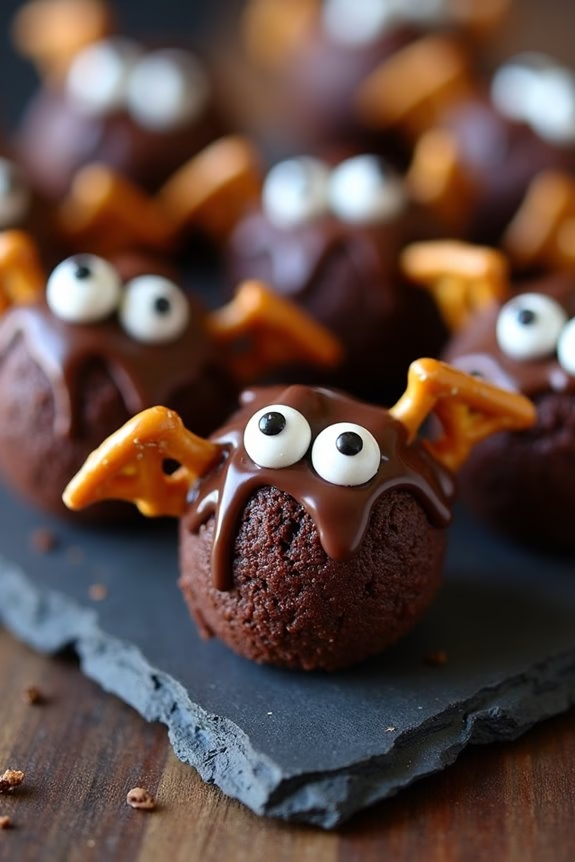
Halloween is the perfect time to indulge in spooky treats that excite and delight children. One such treat that brings a fun twist to the classic brownie is the Batty Brownie Bites. These delicious morsels not only satisfy a sweet tooth but also add a touch of Halloween spirit with their bat-like appearance. Perfect for a Halloween party or a family gathering, these little bites are sure to be a hit with kids and adults alike.
Batty Brownie Bites are simple to make and don’t require any fancy ingredients. The recipe involves creating fudgy brownie bites, which are then transformed into adorable bats using a few additional decorations. This recipe yields enough to serve 4-6 people, making it an ideal choice for a small group of children. Whether it’s the rich, chocolaty flavor or the fun, batty design that draws you in, these brownie bites are bound to become a Halloween favorite.
Ingredients (Serves 4-6)
- 1/2 cup unsalted butter
- 1 cup granulated sugar
- 2 large eggs
- 1 teaspoon vanilla extract
- 1/3 cup unsweetened cocoa powder
- 1/2 cup all-purpose flour
- 1/4 teaspoon salt
- 1/4 teaspoon baking powder
- 24 mini pretzels
- 1/2 cup chocolate chips
- 24 candy eyes
- 1/4 cup melted chocolate (for decoration)
Cooking Instructions
- Preheat the Oven: Start by preheating your oven to 350°F (175°C). Line a mini muffin tin with paper liners or grease it lightly to prevent sticking.
- Prepare the Brownie Batter: In a medium saucepan, melt the butter over low heat. Once melted, remove from heat and stir in the sugar, eggs, and vanilla extract until well combined.
- Mix Dry Ingredients: In a separate bowl, whisk together the cocoa powder, flour, salt, and baking powder. Gradually add this mixture to the saucepan, stirring until smooth and well mixed.
- Fill the Muffin Tin: Spoon the brownie batter into the prepared mini muffin tin, filling each cup about two-thirds full.
- Bake the Brownies: Place the tin in the oven and bake for 12-15 minutes or until a toothpick inserted into the center of a brownie bite comes out mostly clean. Allow them to cool in the pan for a few minutes before transferring to a wire rack to cool completely.
- Create Bat Wings: Break the mini pretzels in half to create bat wings. You’ll need two halves per brownie bite.
- Decorate the Brownie Bites: Once the brownie bites are cool, use a small amount of melted chocolate to attach two pretzel halves to the sides of each brownie, forming bat wings. Place a dot of melted chocolate on each brownie bite and attach two candy eyes to the top.
- Finalize the Decoration: Drizzle additional melted chocolate over the top to add extra design elements or to help secure the wings and eyes more firmly.
Extra Tips
For an even fudgier texture, consider underbaking the brownie bites slightly, as they’ll continue to set as they cool. Confirm your pretzels aren’t too thick, as this might make the wings look oversized compared to the brownie bites.
If you’re preparing this treat ahead of time, store the decorated brownie bites in an airtight container at room temperature to maintain their freshness. For a fun twist, you can experiment with different colors of candy eyes or sprinkle edible glitter over the bats for a magical touch!
Creepy Crawly Cupcakes

Creepy Crawly Cupcakes are a fun and festive treat perfect for any Halloween gathering. These spooky delights not only capture the essence of the holiday with their eerie appearance, but they also satisfy the sweet tooth of young trick-or-treaters. With a soft, moist base and creepy decorations, these cupcakes are guaranteed to be a hit.
Whether you’re hosting a Halloween party or simply wanting to surprise your kids with a themed dessert, Creepy Crawly Cupcakes are an easy and delightful way to celebrate. The recipe is designed to serve 4-6 people, making it ideal for small gatherings or family treats.
The cupcakes are made using a simple chocolate base, topped with rich buttercream frosting, and accessorized with gummy worms and candy spiders to complete the creepy theme. The preparation is straightforward, and with a little creativity, you can customize the decorations to make your cupcakes uniquely terrifying.
Ingredients:
- 1 cup all-purpose flour
- 1/2 cup unsweetened cocoa powder
- 1 cup granulated sugar
- 1/2 teaspoon baking soda
- 1/4 teaspoon salt
- 1/2 cup unsalted butter, melted
- 2 large eggs
- 1 teaspoon vanilla extract
- 1/2 cup buttermilk
- 1 cup unsalted butter, softened (for frosting)
- 4 cups powdered sugar (for frosting)
- 1/4 cup heavy cream (for frosting)
- 1 teaspoon vanilla extract (for frosting)
- Gummy worms
- Candy spiders
- Black food coloring
Instructions:
- Preheat and Prepare Pans: Preheat your oven to 350°F (175°C). Line a standard muffin tin with cupcake liners to facilitate easy removal and clean-up.
- Mix Dry Ingredients: In a large mixing bowl, combine the flour, cocoa powder, sugar, baking soda, and salt. Whisk these dry ingredients together until they’re evenly distributed.
- Incorporate Wet Ingredients: Add the melted butter, eggs, vanilla extract, and buttermilk to the dry mixture. Stir until the batter is smooth and all ingredients are well incorporated.
- Fill and Bake: Divide the batter evenly among the prepared cupcake liners. Fill each liner about two-thirds full to allow room for rising. Bake in the preheated oven for 18-20 minutes, or until a toothpick inserted into the center of a cupcake comes out clean.
- Prepare Frosting: In a separate bowl, beat the softened butter until creamy. Gradually add the powdered sugar, heavy cream, and vanilla extract. Beat until smooth. Add black food coloring, a few drops at a time, mixing until you reach the desired shade of black.
- Decorate Cupcakes: Once the cupcakes have cooled completely, use a piping bag to frost them with the black buttercream. Place gummy worms and candy spiders on top of each cupcake for a creepy crawly effect.
Extra Tips:
For an extra touch of Halloween flair, consider using edible glitter or colored sprinkles to enhance the spooky appearance of your Creepy Crawly Cupcakes.
If you don’t have buttermilk on hand, you can make a substitute by mixing 1/2 cup of milk with 1/2 tablespoon of lemon juice or white vinegar and letting it sit for 5 minutes.
When adding the black food coloring, start with a small amount and gradually increase to avoid making the frosting too dark or altering its consistency.
Finally, if you’re preparing these cupcakes in advance, store them in an airtight container to keep them fresh until you’re ready to serve.
Vampire Veggie Platter
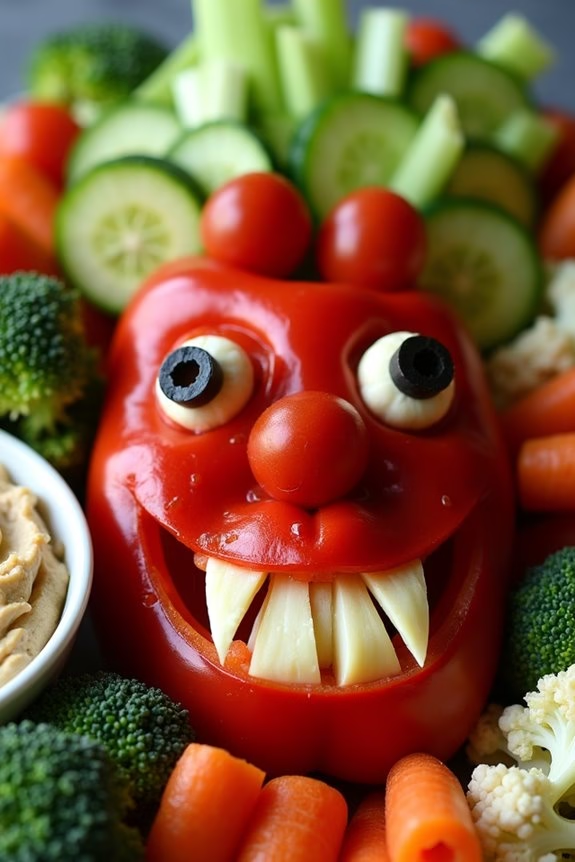
Halloween is a time for spooky fun and sweet treats, but it doesn’t mean we’ve to skip out on healthy options. The Vampire Veggie Platter is the perfect addition to your Halloween celebrations, providing a colorful and nutritious snack that kids will find both delicious and entertaining.
This platter isn’t only visually appealing with its vampire-themed design, but it also promotes children to enjoy a variety of fresh vegetables, making it a great way to balance out the sugary indulgences of the season.
Creating a Vampire Veggie Platter is simple and requires minimal preparation, making it an ideal dish for busy parents looking to incorporate healthier options into their Halloween festivities. With a mix of vibrant vegetables and a flavorful dip, this platter serves 4-6 people and can be customized based on your kids’ favorite veggies. It’s a fun and creative way to get everyone excited about eating their greens, all while keeping in the spirit of the holiday.
Ingredients (Serves 4-6):
- 1 large red bell pepper
- 1 bunch of celery
- 1 large cucumber
- 1 pint of cherry tomatoes
- 1 bag of baby carrots
- 1 small head of broccoli
- 1 small head of cauliflower
- 2 black olives
- 1 cup of hummus or ranch dressing (for dipping)
- 1 tablespoon of cream cheese
Instructions:
- Prepare the Vegetables: Wash all the vegetables thoroughly under running water. Pat them dry with a clean towel or paper towels to remove any excess moisture.
- Create the Vampire Face: Cut the red bell pepper in half, removing the seeds and stem. Use one half to create the vampire’s mouth by cutting it into a jagged shape resembling fangs. Set this aside.
- Assemble the Platter: Arrange the celery sticks and cucumber slices at the top of a large platter to resemble hair. Position the cherry tomatoes and baby carrots in a row below them to form the vampire’s eyes and nose.
- Add the Vampire Mouth: Place the prepared red bell pepper ‘fangs’ below the tomatoes and carrots to complete the vampire’s face.
- Broccoli and Cauliflower: Break the broccoli and cauliflower into bite-sized florets. Arrange them around the edges of the platter to fill any empty spaces and add texture.
- Create Eyes: Slice the black olives in half. Use a small amount of cream cheese to attach an olive half to each cherry tomato to resemble pupils.
- Serve with Dip: Place the hummus or ranch dressing in a small bowl and position it on the platter for easy dipping.
Extra Tips:
For a more creative presentation, consider using cookie cutters to shape the vegetables into fun Halloween-themed designs, such as bats or pumpkins.
You can also substitute any of the vegetables with your kids’ favorites to guarantee the platter is enjoyed by all. If you’re looking to add a bit more flavor, sprinkle some herbs or spices over the vegetables before serving.
This platter can be prepared a few hours in advance and stored in the refrigerator until ready to serve, making it a convenient and healthy option for your Halloween party.
Eyeball Pretzel Bites
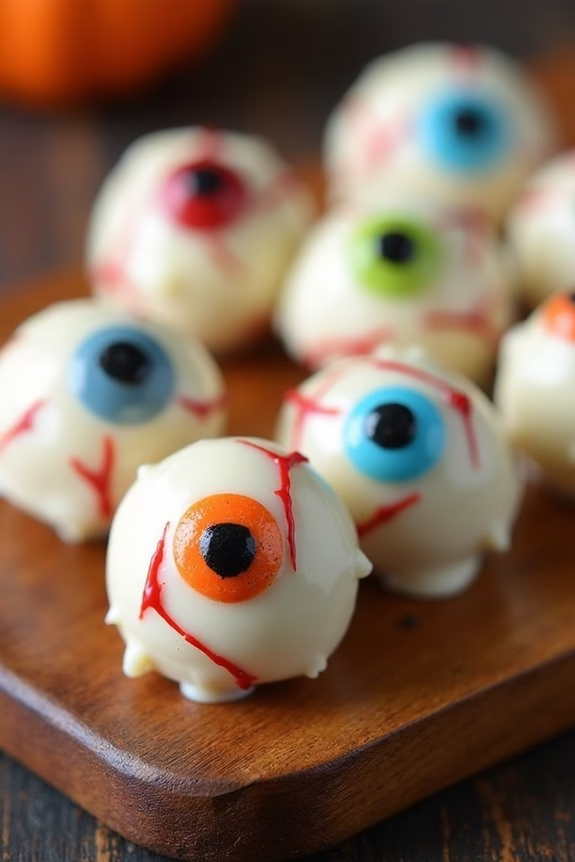
Eyeball Pretzel Bites are a spooktacular Halloween treat that will delight kids and adults alike. These ghoulishly fun snacks combine the salty crunch of pretzels with the sweet creaminess of white chocolate, topped off with a colorful candy eyeball for an eerie effect. They’re not only delicious but also incredibly easy to make, making them a perfect option for Halloween parties or a fun family activity.
The combination of flavors and textures in each bite is sure to make these treats a hit at any festive gathering. Making Eyeball Pretzel Bites is a simple process that requires minimal ingredients and effort. The recipe yields enough to serve 4-6 people, making it perfect for a small group or family setting. With just a few basic steps, you’ll have a tray of creepy yet cute treats ready to impress your guests.
These edible eyeballs are great for adding a touch of Halloween spirit to your snack table, and they can be prepared in advance to save time on the day of your event.
Ingredients for 4-6 servings:
- 1 cup white chocolate chips
- 24 mini pretzel twists
- 24 candy eyeballs
- Red and/or black gel icing
Instructions:
- Prepare the Ingredients: Start by gathering all your ingredients and line a baking sheet with parchment paper. This will make it easier to assemble the pretzel bites and guarantee they don’t stick to the surface.
- Melt the White Chocolate: Place the white chocolate chips in a microwave-safe bowl. Microwave them in 20-second intervals, stirring in between, until fully melted and smooth. Be careful not to overheat, as white chocolate can scorch easily.
- Assemble the Pretzel Bites: Dip each mini pretzel twist halfway into the melted white chocolate, allowing the excess to drip back into the bowl. Place the chocolate-dipped pretzels onto the prepared baking sheet.
- Add the Eyeballs: While the chocolate is still soft, press a candy eyeball onto the center of the white chocolate coating on each pretzel. Confirm they’re firmly in place so they don’t fall off once the chocolate sets.
- Decorate with Gel Icing: Use the red and/or black gel icing to add spooky details around the candy eyeballs, such as veins or a creepy outline. This step is optional but adds a fun and festive touch to the treats.
- Let Them Set: Allow the pretzel bites to sit at room temperature or place them in the refrigerator for about 15-20 minutes until the chocolate has completely set.
- Serve and Enjoy: Once the chocolate is firm, your Eyeball Pretzel Bites are ready to serve. Arrange them on a platter and enjoy the spooky fun!
Extra Tips: To guarantee the best results, make sure to work quickly when dipping the pretzels and adding the candy eyeballs, as the chocolate can harden fast. If you find the chocolate starting to set before you’ve finished, simply reheat it in the microwave for a few more seconds.
For added variety, you can use different types of pretzels or experiment with colored chocolate melts to match your Halloween theme. These treats store well in an airtight container for up to a week, making them a great make-ahead option.
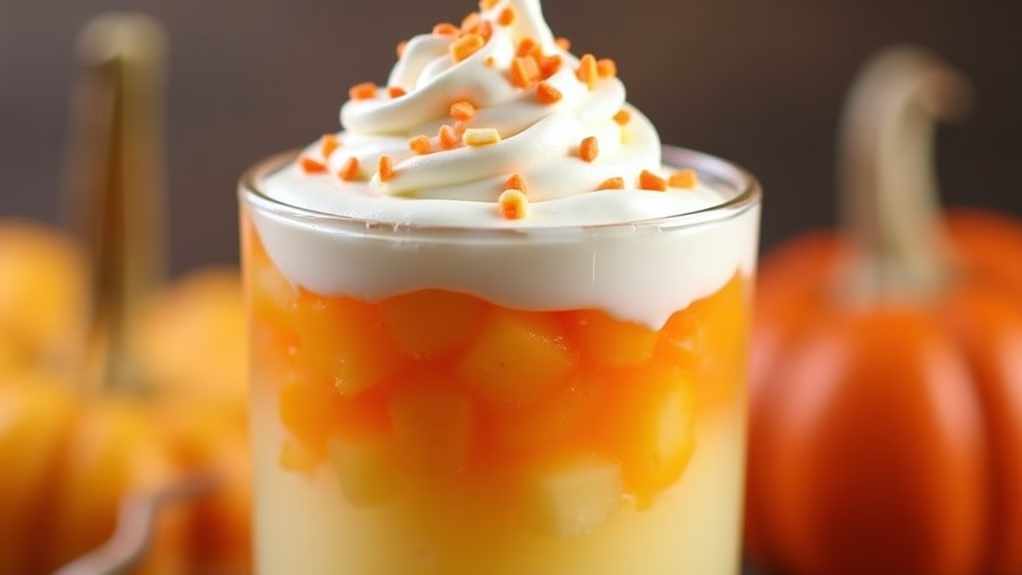
Candy Corn Fruit Parfaits
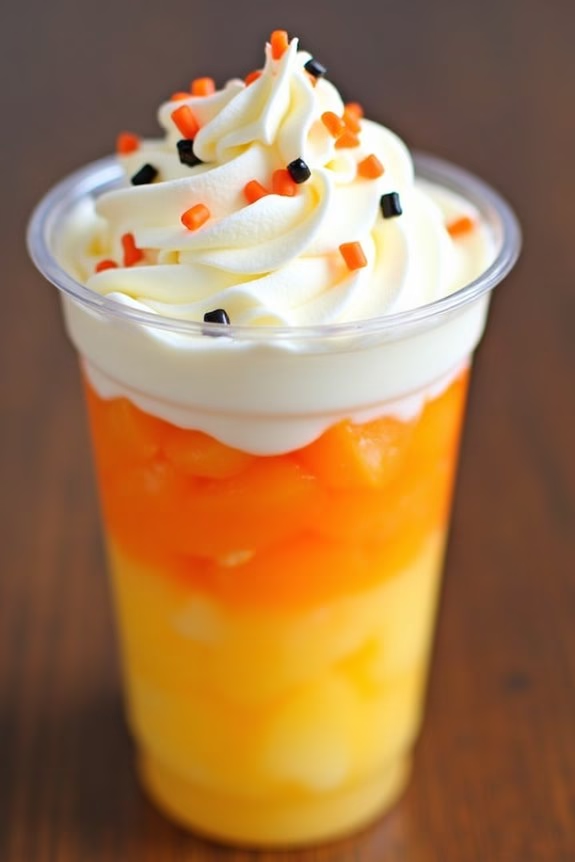
These Candy Corn Fruit Parfaits are quick to assemble and require no cooking, making them a great choice for busy parents or anyone looking to involve kids in the kitchen. With just a few simple ingredients, you can create a visually appealing and tasty dish that will surely impress your little ghosts and goblins.
The layered presentation in clear cups adds a touch of elegance and fun to any Halloween celebration.
Ingredients for 4-6 Servings:
- 2 cups of fresh pineapple chunks
- 2 cups of mandarin orange segments (canned or fresh)
- 2 cups of vanilla yogurt
- 1 cup of whipped cream
- 1 tablespoon of honey (optional, for added sweetness)
- Halloween-themed sprinkles (optional)
- Clear plastic cups or parfait glasses
Cooking Instructions:
- Prepare the Ingredients: Start by washing and cutting the pineapple into small chunks if using fresh pineapple. For the mandarins, peel and separate the segments if using fresh, or drain the canned mandarins well.
- Assemble the Parfaits: Take your clear plastic cups or parfait glasses and begin by adding a layer of pineapple chunks to fill about one-third of the cup.
- Add the Next Layer: On top of the pineapple layer, add a layer of mandarin orange segments, filling the next one-third of the cup.
- Top with Yogurt: Spoon vanilla yogurt over the mandarin layer, filling the remaining space in the cup. Smooth out the top with the back of a spoon to guarantee an even layer.
- Add Whipped Cream: Top each parfait with a generous dollop of whipped cream. You can pipe it on for a more decorative look if desired.
- Garnish: For a festive touch, sprinkle Halloween-themed sprinkles on top of the whipped cream. You can also drizzle a little honey over the whipped cream for added sweetness if desired.
- Serve: Serve the parfaits immediately or refrigerate them for up to an hour before serving to let the flavors meld together.
Extra Tips:
To make these Candy Corn Fruit Parfaits even more fun, consider using different types of fruits that match the candy corn color theme, such as mango for the orange layer or banana slices for the yellow layer.
If you prefer a vegan version, substitute the yogurt and whipped cream with plant-based alternatives like coconut yogurt and coconut whipped cream.
For an extra special touch, you can chill the glasses before assembling the parfaits, which will keep the dessert invigorating and guarantee the layers hold their shape better.