
Halloween is creeping up, and I’ve brewed up a bewitching selection of treats that will make your gathering unforgettable. Picture Spooky Spider Deviled Eggs making their entrance on your table, with Mummy Hot Dogs cozied up right beside them. For a delightful surprise, Vampire Bite Cupcakes will add a sweet twist to the mix. There’s a cauldron of other eerie delights just waiting to enchant your guests. Let’s conjure up some deliciously frightful fun in the kitchen!
Spooky Spider Deviled Eggs

Celebrate Halloween with a spooky twist on a classic appetizer: Spooky Spider Deviled Eggs. These creepy crawly eggs are sure to be a hit at any Halloween gathering, delighting both kids and adults alike. The traditional deviled egg recipe gets a fun makeover with the addition of black olives, which are creatively arranged to resemble tiny spiders sitting atop each egg half. Not only are these deviled eggs easy to make, but they’re also a visually striking addition to your Halloween table.
The creamy yolk mixture is enhanced with tangy mayonnaise, a hint of mustard, and a dash of paprika for a little extra kick. The black olives are the star of the show, cut and shaped to mimic the body and legs of a spider, creating a delightfully eerie effect. This dish serves 4-6 people, making it perfect for small gatherings or as part of a larger Halloween spread. So, gather your ingredients, channel your inner artist, and prepare to impress your guests with these Spooky Spider Deviled Eggs.
Ingredients (for 4-6 people):
- 6 large eggs
- 3 tablespoons mayonnaise
- 1 teaspoon Dijon mustard
- Salt and pepper to taste
- Paprika for garnish
- 1 can of pitted black olives
Cooking Instructions:
- Boil the Eggs: Place the eggs in a single layer in a saucepan. Cover them with water, about an inch above the eggs. Bring the water to a boil over medium-high heat. Once boiling, remove the pan from heat, cover it with a lid, and let the eggs sit in the hot water for 10-12 minutes.
- Cool and Peel the Eggs: After the eggs have sat for the required time, drain the hot water and transfer the eggs to a bowl of ice water to cool for about 5 minutes. Once cooled, gently tap each egg on a hard surface to crack the shell, then peel carefully.
- Prepare the Yolk Mixture: Slice each egg in half lengthwise and gently remove the yolks, placing them in a mixing bowl. Add mayonnaise, Dijon mustard, salt, and pepper to the yolks. Mash and mix until smooth and creamy.
- Fill the Egg Whites: Spoon the yolk mixture back into the egg white halves or use a piping bag for a neater presentation. Fill each egg white generously.
- Create the Olive Spiders: For each egg half, slice a black olive in half to create the spider’s body. Place one half on top of the yolk mixture. Slice additional olives into thin strips to form the spider legs. Arrange 4 “legs” on each side of the olive “body.”
- Garnish and Serve: Lightly sprinkle paprika over the deviled eggs for a touch of color and flavor. Arrange the finished Spooky Spider Deviled Eggs on a serving platter.
Extra Tips:
For a more flavorful twist, consider adding a dash of hot sauce or a sprinkle of garlic powder to the yolk mixture for added depth. If you’re prepping these deviled eggs in advance, store them in an airtight container in the refrigerator, but add the olive spiders just before serving to make sure they stay fresh and intact.
For an even spookier presentation, you can place the deviled eggs on a bed of leafy greens or shredded lettuce to mimic a webbed effect.
Mummy Hot Dogs

Mummy Hot Dogs are a fun and spooky treat perfect for your Halloween festivities. These adorable and delicious appetizers are sure to be a hit with both kids and adults alike. The concept is simple: hot dogs are wrapped in crescent roll dough to resemble mummies, and then baked until golden brown. A couple of dots of mustard or ketchup can be added for eyes to give them a playful and cute appearance. The combination of the savory hot dogs and the soft, flaky pastry makes for a delightful snack that’s both easy to prepare and enjoy.
Serving these Mummy Hot Dogs at your Halloween party will add a festive touch to your menu. They aren’t only visually appealing but also incredibly easy to make, requiring minimal ingredients and effort. This recipe serves 4-6 people, making it perfect for small gatherings or as a part of a larger spread of Halloween-themed treats. Whether you’re hosting a party or looking for a fun activity to do with the family, these Mummy Hot Dogs are bound to please.
Ingredients:
- 1 can (8 oz) refrigerated crescent roll dough
- 8 hot dogs
- Mustard or ketchup (for eyes)
- Cooking spray or parchment paper
Cooking Instructions:
- Preheat the Oven: Start by preheating your oven to 375°F (190°C). This will guarantee that the crescent roll dough bakes evenly and turns a nice golden brown.
- Prepare the Baking Sheet: Line a baking sheet with parchment paper or lightly spray it with cooking spray. This will prevent the Mummy Hot Dogs from sticking to the pan and make cleanup easier.
- Unroll the Dough: Open the can of crescent roll dough and unroll it onto a clean surface. Separate the dough into triangles as indicated by the perforations.
- Cut the Dough: Using a knife or a pizza cutter, cut each triangle into thin strips, about 1/4 inch wide. These strips will be used to wrap around the hot dogs to create the mummy effect.
- Wrap the Hot Dogs: Take one hot dog and wrap it with the dough strips, leaving a small gap near the top for the “face.” Overlap the strips slightly to give the appearance of mummy bandages. Repeat this process with all the hot dogs.
- Bake the Mummy Hot Dogs: Place the wrapped hot dogs on the prepared baking sheet. Bake in the preheated oven for 12-15 minutes, or until the dough is golden brown and cooked through.
- Add the Eyes: Remove the hot dogs from the oven and let them cool slightly. Then, using a toothpick or the tip of a small spoon, apply small dots of mustard or ketchup to create eyes on the exposed part of the hot dog.
Extra Tips:
When wrapping the hot dogs with dough, try not to stretch the dough too thin, as it may tear during baking. If you have extra dough strips, you can add more layers to give the mummies a fuller look.
For added flavor, you can sprinkle a little garlic powder or sesame seeds on the dough before baking. If you’re serving these to a larger crowd, consider doubling the recipe. Mummy Hot Dogs are best served warm, so if you prepare them in advance, reheat them in the oven for a few minutes before serving.
Ghostly Pizza Bagels
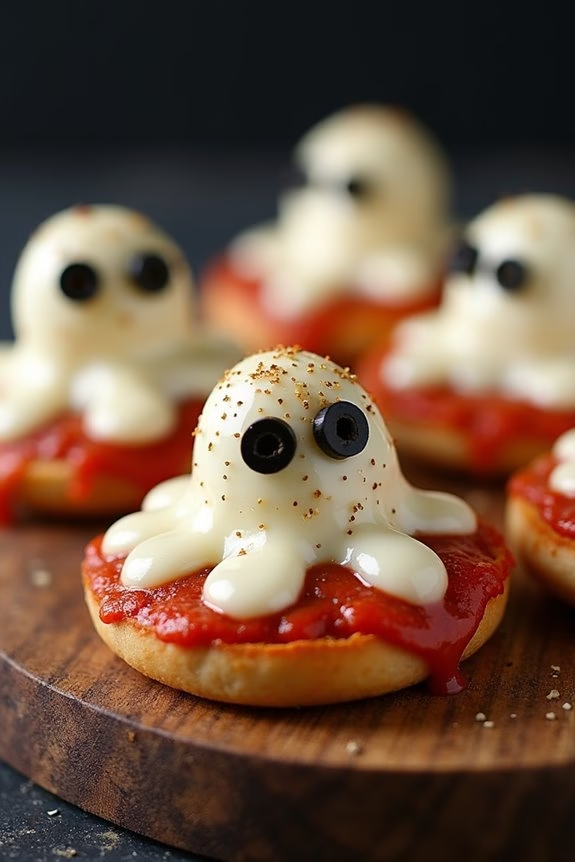
Halloween is the perfect time to get creative in the kitchen, and what better way to spook up your appetizers than with Ghostly Pizza Bagels? These delightful treats aren’t only fun to make but also delicious to eat. Perfect for a Halloween gathering, these mini pizzas come alive with ghostly shapes that are sure to be a hit with kids and adults alike.
The bagel base provides a satisfying crunch, while the gooey cheese and tangy tomato sauce offer classic pizza flavors with a haunting twist. Creating these Ghostly Pizza Bagels is simple and requires minimal ingredients, making it an ideal recipe for a quick Halloween-themed snack.
The ghostly shapes are made using slices of mozzarella cheese, which melt perfectly on top of the mini bagels, creating a spooky yet adorable effect. With just a few other toppings, you’ll have a tray of ghostly delights ready to serve in no time. Let’s plunge into the recipe and bring these ghosts to life!
Ingredients (Serves 4-6):
- 12 mini bagels (split in half)
- 1 cup pizza or marinara sauce
- 12 slices mozzarella cheese
- 24 black olives (sliced for eyes)
- 1 tablespoon olive oil
- 1 teaspoon Italian seasoning
- 1/2 teaspoon garlic powder
Cooking Instructions:
- Preheat the Oven: Begin by preheating your oven to 375°F (190°C). This will guarantee your bagels cook evenly and achieve a nice, crispy texture.
- Prepare the Bagels: Place the split mini bagels cut side up on a baking sheet. Lightly brush each bagel half with olive oil to help them crisp up when baked.
- Add the Sauce: Spread about a tablespoon of pizza or marinara sauce on each bagel half. Make sure the sauce covers the entire surface for a flavorful base.
- Create Ghost Shapes: Using a ghost-shaped cookie cutter, cut out ghost shapes from the mozzarella cheese slices. If you don’t have a ghost cutter, use a knife to shape the cheese into ghostly forms.
- Assemble the Pizza Bagels: Place a cheese ghost on top of each sauced bagel half. Position the black olive slices as eyes on each ghost to give them a spooky look.
- Season the Bagels: Sprinkle a pinch of Italian seasoning and garlic powder over the top of each bagel for added flavor.
- Bake: Place the baking sheet in the preheated oven and bake for about 10-12 minutes, or until the cheese is melted and bubbly, and the bagels are golden brown.
- Serve: Once baked, remove the bagels from the oven and let them cool slightly. Serve warm for the best taste and texture.
Extra Tips:
For an even spookier presentation, consider adding a few drops of green food coloring to the pizza sauce for a ghoulish effect. You can also experiment with different toppings like pepperoni or mushrooms to create different facial expressions on your ghostly figures.
If you prefer a spicier version, sprinkle some crushed red pepper flakes before baking. These Ghostly Pizza Bagels are versatile, so feel free to adjust the toppings to suit your taste preferences.
Witch’s Broomstick Snacks
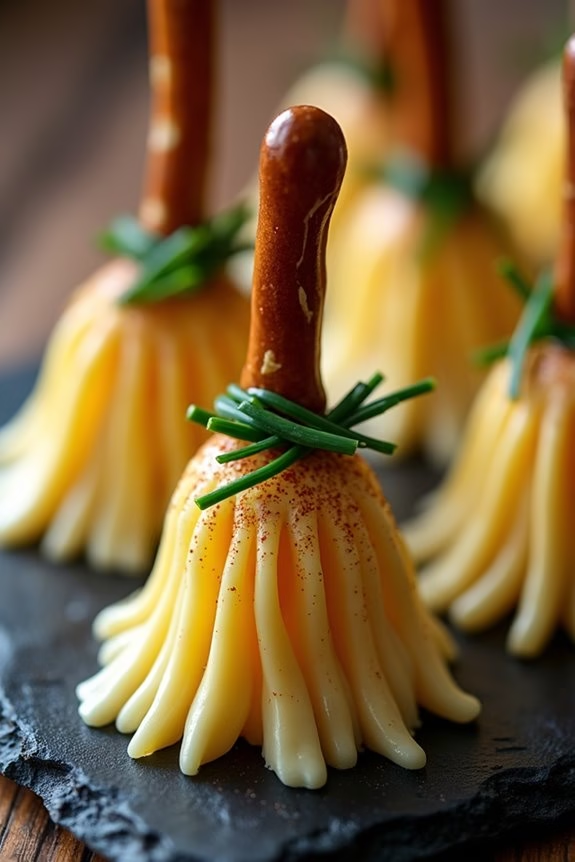
Create a spooky yet delicious treat with these Witch’s Broomstick Snacks, perfect for any Halloween gathering. These whimsical appetizers combine savory flavors and fun presentation to delight guests of all ages. Perfect as a party snack or a unique addition to a Halloween-themed dinner, these broomsticks are easy to prepare and certain to impress.
Crafted using simple ingredients, this recipe transforms everyday items into a playful and thematic snack. The combination of crispy pretzel sticks and creamy cheese creates a delectable treat that’s not just a visual delight but also a culinary one. With just a few steps, you can whip up these snacks for a serving size of 4-6 people.
Ingredients:
- 12 Pretzel sticks
- 6 Mozzarella string cheese sticks
- Fresh chives (about 12 strands)
- Optional: paprika or garlic powder for seasoning
Cooking Instructions:
- Prepare the Cheese: Start by taking each mozzarella string cheese stick and cut them in half to create two shorter sticks. This will make 12 pieces in total.
- Shape the Broom Bristles: On one end of each cheese piece, use a small knife to make lengthwise cuts around the diameter, about 3 to 4 cuts per stick. This will create the appearance of broom bristles.
- Attach the Pretzel Stick: Carefully insert a pretzel stick into the uncut end of the cheese, pushing gently to secure it without breaking the cheese.
- Secure with Chives: Wrap a chive strand around the upper part of the cheese, just below where the pretzel stick is inserted. Tie the chive into a small knot to hold the cheese firmly against the pretzel, resembling the binding of a broom. Trim any excess chive for a neat look.
- Add Optional Seasoning: If desired, lightly sprinkle paprika or garlic powder over the cheese bristles for extra flavor and a touch of color.
Extra Tips:
To guarantee your Witch’s Broomstick Snacks hold together well, allow the cheese to come to room temperature before inserting the pretzel sticks. This prevents cracking and ensures a smooth assembly.
Additionally, for a more festive appearance, consider using colored string cheese available in some stores, or add a few drops of food coloring to plain cheese.
Serve these fun snacks on a platter lined with parchment paper to prevent sticking and enhance the presentation. Enjoy these delightful treats at your Halloween party and watch them vanish as quickly as a witch on her broomstick!
Pumpkin Patch Dirt Cups
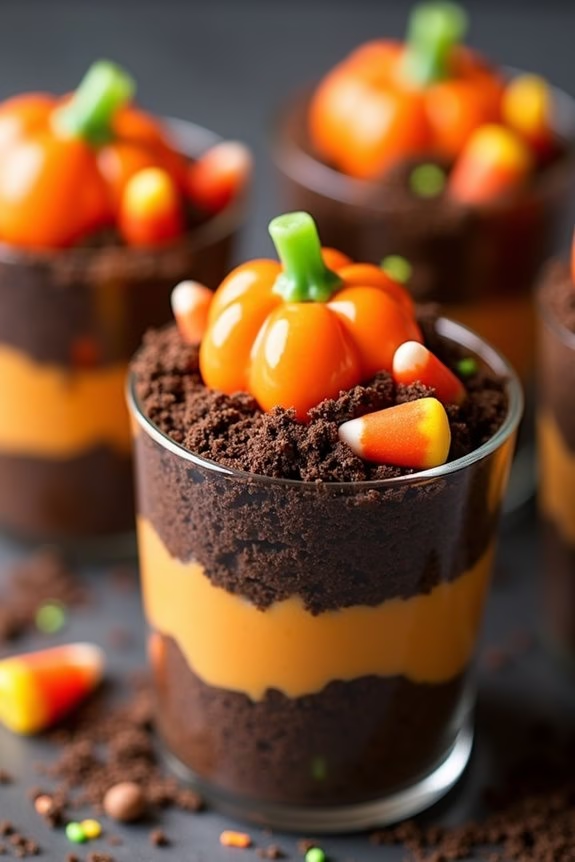
Pumpkin Patch Dirt Cups are a delightful and festive treat, perfect for Halloween gatherings or any autumn celebration. These whimsical desserts are inspired by the classic dirt cup recipe but with a seasonal twist that incorporates the rich flavors of pumpkin spice. Think of them as a fun and playful way to enjoy the earthy crunch of cookie “dirt” combined with a creamy, spiced pumpkin layer, all brought to life with the illusion of a miniature pumpkin patch.
Whether you’re hosting a party or just want to surprise your family with a unique dessert, these Pumpkin Patch Dirt Cups are sure to be a hit.
The beauty of these dirt cups lies in their simplicity and ease of preparation, making them an excellent choice for both novice and experienced cooks. They can be assembled quickly and require no baking, which is perfect for those busy holiday schedules.
With just a few ingredients and a little creativity, you’ll have a dessert that’s as fun to make as it’s to eat. The combination of textures and flavors—smooth pumpkin pudding, crunchy cookie crumbs, and colorful candies—creates a delightful experience with every bite.
Ingredients for 4-6 servings:
- 1 package (3.4 oz) instant vanilla pudding mix
- 2 cups cold milk
- 1 cup canned pumpkin puree
- 1 teaspoon pumpkin pie spice
- 8 ounces whipped topping, thawed
- 15 chocolate sandwich cookies
- 12 candy corn pumpkins
- 1 cup gummy worms
- Green sprinkles (optional)
Instructions:
- Prepare the Pudding Layer: In a large mixing bowl, whisk together the instant vanilla pudding mix and cold milk until the mixture begins to thicken. This should take about 2 minutes.
- Incorporate Pumpkin Flavor: Add the canned pumpkin puree and pumpkin pie spice to the pudding mixture. Stir until fully combined and smooth, then gently fold in half of the whipped topping. This will create a light and airy texture with a rich pumpkin flavor.
- Make the Cookie “Dirt”: Place the chocolate sandwich cookies in a food processor and pulse until they resemble fine crumbs. If you don’t have a food processor, you can place the cookies in a resealable plastic bag and crush them with a rolling pin.
- Assemble the Dirt Cups: In clear cups or small jars, layer the pumpkin pudding mixture and cookie crumbs, starting with a layer of pudding, followed by a layer of cookie crumbs. Repeat the layers until the cups are almost full, ending with a generous layer of cookie crumbs on top.
- Decorate the Cups: To create your pumpkin patch scene, press a few candy corn pumpkins into the top layer of cookie crumbs in each cup. Add gummy worms peeking out from the “dirt” for a fun touch. If desired, sprinkle some green sprinkles to mimic grass.
- Chill and Serve: Refrigerate the assembled cups for at least 1 hour to allow the flavors to meld and the pudding to set. Serve chilled and enjoy!
Extra Tips:
For an added touch of realism, you can use pretzel sticks as “fences” around your pumpkin patch or add edible flowers for decoration. If you want to involve kids in the preparation, let them be in charge of decorating the top with candies and gummy worms.
You can also customize the flavor by using different pudding mixes or adding a layer of cream cheese for a tangy twist. Remember to assemble these cups close to serving time if you want to maintain the crispy texture of the cookie crumbs.
Monster Eyeball Tacos

Monster Eyeball Tacos are the perfect spooky treat to serve at your Halloween party. These tacos not only look frightfully fun but also taste delicious, making them a hit with both kids and adults alike. The recipe involves crafting monster eyes using olives and sour cream, which add a creepy yet tasty element to your tacos.
This dish combines the festive spirit of Halloween with the classic flavors of a taco, creating a monstrously good meal that will leave your guests raving about your culinary creativity.
These tacos are easy to prepare and can be made in advance, saving you time during your Halloween festivities. The key to this recipe is in the presentation – the monster eyes are arranged artfully on top of the taco filling, transforming ordinary tacos into a ghoulish feast.
Whether you’re hosting a Halloween party or simply want to surprise your family with a themed dinner, these Monster Eyeball Tacos are sure to impress. The following recipe serves 4-6 people, making it ideal for a small gathering or family meal.
Ingredients for Monster Eyeball Tacos (Serving Size: 4-6 people):
- 1 pound ground beef
- 1 packet taco seasoning
- 1/4 cup water
- 12 taco shells
- 1 cup shredded lettuce
- 1 cup diced tomatoes
- 1 cup shredded cheddar cheese
- 1/2 cup sour cream
- 12 large black olives
- 24 small round slices of mozzarella cheese
- 1 tablespoon olive oil
- 1 tablespoon chopped cilantro (optional for garnish)
Cooking Instructions:
- Prepare the Ground Beef: In a large skillet, heat the olive oil over medium-high heat. Add the ground beef and cook until browned, breaking it up with a spatula as it cooks, about 7-10 minutes.
- Season the Beef: Drain any excess fat from the skillet. Add the taco seasoning and water to the beef, stirring well to combine. Simmer for 5 minutes, allowing the flavors to meld together.
- Prepare the Monster Eyes: While the beef simmers, slice the black olives in half. Place a small slice of mozzarella cheese on top of each olive half to create the “eyeball.”
- Assemble the Tacos: Lay out the taco shells on a serving platter. Fill each shell with a layer of shredded lettuce, followed by a spoonful of the seasoned beef mixture. Top with diced tomatoes and shredded cheddar cheese.
- Decorate with Monster Eyes: Carefully place two olive “eyeballs” on top of each taco, gently pressing them into the cheese to hold them in place. Add a dollop of sour cream behind each eyeball to help them stick.
- Garnish and Serve: Optionally, garnish with chopped cilantro for a pop of color. Serve immediately, and watch your guests delight in these spooky creations.
Extra Tips:
To make your Monster Eyeball Tacos even more flavorful, consider adding additional toppings such as sliced jalapeños for heat, or avocado slices for a creamy texture.
If you’re preparing this dish in advance, store the components separately and assemble the tacos just before serving to keep the taco shells crisp.
Experiment with different cheeses or use red olives for a bloodshot effect for the “eyeballs.” These small variations can add an extra layer of frightful fun to your Halloween meal!
Frankenstein Rice Krispie Treats
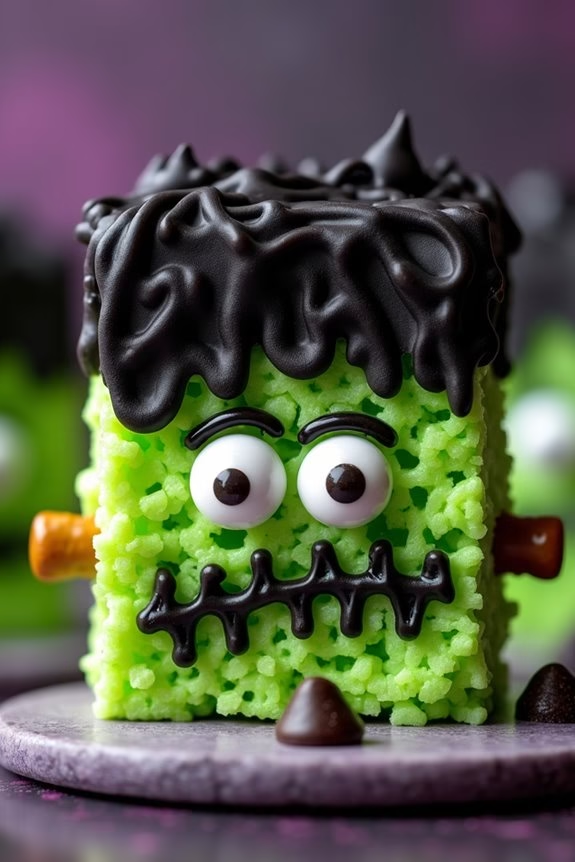
Frankenstein Rice Krispie Treats are a delightfully spooky addition to any Halloween party or gathering. These treats aren’t only fun to make but also a deliciously sweet indulgence that both kids and adults will love.
Shaped and decorated to resemble everyone’s favorite misunderstood monster, these treats add a creative and festive touch to your Halloween spread. Perfectly chewy and crispy, they capture the classic flavor of Rice Krispie treats but with a ghoulishly enchanting twist.
Making these treats is a fantastic activity to do with the family as it involves easy-to-follow steps that can engage even the youngest of helping hands. Creating the Frankenstein faces allows for a little artistic expression while enjoying the Halloween spirit.
With a serving size that caters to 4-6 people, you’ll have plenty of treats to go around. Whether you’re hosting a party or simply looking to bring something unique to a potluck, these Frankenstein Rice Krispie Treats are certain to be a hit.
Ingredients (for 4-6 servings):
- 6 cups Rice Krispies cereal
- 4 cups mini marshmallows
- 3 tablespoons unsalted butter
- Green food coloring
- 1/2 cup mini chocolate chips
- 1/2 cup black decorating gel
- 1/2 cup candy eyes
- 1/4 cup pretzel sticks
Instructions:
- Prepare the Base: Begin by melting the butter in a large saucepan over low heat. Once melted, add the mini marshmallows and stir continuously until they’re completely melted and smooth.
- Add Color: Remove the saucepan from heat and add several drops of green food coloring to the melted marshmallow mixture. Stir until the color is evenly distributed. Adjust the amount of food coloring until you achieve the desired shade of green.
- Mix in Cereal: Gradually add the Rice Krispies cereal to the saucepan, stirring until the cereal is well-coated with the green marshmallow mixture.
- Shape the Treats: Prepare a baking sheet by lining it with parchment paper. Spread the mixture evenly onto the parchment paper, pressing down gently with a spatula to create a smooth surface.
- Cut and Shape: Allow the mixture to cool slightly, then cut it into rectangles to form the base of your Frankenstein treats.
- Decorate: Use the black decorating gel to draw hair, a mouth, and stitches on each rectangle. Place two candy eyes on each treat. Insert pretzel sticks into the sides of each rectangle to resemble Frankenstein’s bolts.
- Add Details: Press mini chocolate chips into the top for additional hair texture. Let the decorated treats set for at least 10 minutes before serving.
Extra Tips: To make your Frankenstein Rice Krispie Treats even more festive, consider using different colors of candy melts to add additional details or using a variety of candy decorations like gummy worms for extra spooky effects.
If you find the marshmallow mixture is sticking to your hands or utensils, a light spray of non-stick cooking spray can help. Keep the treats stored in an airtight container to maintain their freshness, and make sure they’re kept away from direct sunlight to prevent the colors from fading.
Bloody Finger Pretzels

Get ready to spook your friends and family with these fun and frightful Bloody Finger Pretzels! Perfect for a Halloween party, these creepy snacks are deliciously salty and sweet, offering a perfect blend of flavors in a spooky presentation. The pretzels are shaped like fingers with almond slices for fingernails, and a red icing or gel serves as the “blood,” creating a gory yet delightful treat that fits right in with the Halloween theme.
These Bloody Finger Pretzels are bound to be a hit with both kids and adults. The best part is that they’re quite simple to make, requiring minimal ingredients and time. Whether you’re hosting a Halloween bash or just looking for something festive to munch on while watching scary movies, these pretzels will add a perfect touch of horror to your celebrations.
Ingredients (Serves 4-6):
- 1 package of refrigerated breadstick dough
- 24 whole almonds
- 1 egg, beaten
- Red icing or gel (for the blood effect)
- Salt (optional, for sprinkling)
Cooking Instructions:
- Preheat the Oven: Begin by preheating your oven to 375°F (190°C). This guarantees that your pretzels cook evenly and achieve the perfect texture.
- Prepare the Dough: Unroll the breadstick dough and separate it into strips. Take each strip and gently mold it into the shape of a finger, making sure to add a slight bulge where the knuckle would be.
- Add the Fingernails: Press a whole almond into the tip of each dough finger to create the fingernail. Make sure it’s secured well so it stays in place during baking.
- Create Knuckle Marks: Use a knife to make small indents or slits on the dough to mimic the appearance of knuckles and joints, adding a realistic touch to your spooky fingers.
- Brush with Egg Wash: Lightly brush each “finger” with the beaten egg. This will help them turn golden brown and give them a nice sheen when baked.
- Bake the Pretzels: Place the prepared pretzel fingers on a baking sheet lined with parchment paper. Bake in the preheated oven for about 15-20 minutes, or until they’re golden brown.
- Add the Bloody Effect: Once the pretzels are out of the oven and have cooled slightly, use the red icing or gel to add a blood-like effect around the almond fingernails and at the base of the fingers. This creates the signature “bloody” look.
Extra Tips:
To make these Bloody Finger Pretzels even more realistic, you can use a small amount of food coloring mixed with water and a pastry brush to add some shading to the fingers before baking.
Additionally, if you prefer a saltier snack, sprinkle a little salt over the fingers before baking. For a more intense blood effect, try using a combination of red and black gel to vary the color.
And remember, these pretzels are best enjoyed fresh, so try to serve them shortly after baking for maximum flavor and texture.
Vampire Bite Cupcakes

As Halloween approaches, it’s the perfect time to infuse some spooky fun into your baking with these delightful Vampire Bite Cupcakes. These eerie treats aren’t only visually striking but also deliciously filled with a surprise “blood” center that will thrill both kids and adults at your Halloween gathering.
The cupcakes feature a classic vanilla base, topped with a creamy frosting, and a secret raspberry filling that oozes out to create the illusion of vampire bites. Whether you’re hosting a Halloween party or simply want to surprise your family with a festive dessert, these cupcakes are a surefire way to get everyone in the spirit of the season.
To make these Vampire Bite Cupcakes, you’ll begin by baking a batch of vanilla cupcakes as the foundation. Once cooled, the cupcakes are filled with raspberry jam to mimic the look of blood. A smooth vanilla frosting adds a sweet contrast to the tart raspberry filling. Ultimately, you can add some finishing touches, like fangs made from fondant or red gel to enhance the “bite” effect.
With this recipe, you’ll have a batch of 12-15 cupcakes, perfect for serving 4-6 people. Let’s plunge into the ingredients and steps needed to create these spooktacular treats.
Ingredients for Vampire Bite Cupcakes (Serving size: 4-6 people):
- 1 1/2 cups all-purpose flour
- 1 cup granulated sugar
- 1/2 cup unsalted butter, softened
- 2 large eggs
- 1/2 cup milk
- 1 1/2 teaspoons baking powder
- 1 teaspoon vanilla extract
- 1/4 teaspoon salt
- 1/2 cup raspberry jam
- 1 cup unsalted butter, softened (for frosting)
- 4 cups powdered sugar (for frosting)
- 2 tablespoons heavy cream (for frosting)
- Red food coloring (optional, for frosting)
- Fondant or edible gel for decoration (optional)
Cooking Instructions:
- Prepare the Cupcake Batter:
- Preheat your oven to 350°F (175°C) and line a cupcake pan with paper liners.
- In a large mixing bowl, cream together the softened butter and granulated sugar until light and fluffy.
- Add the eggs one at a time, beating well after each addition, then mix in the vanilla extract.
- In a separate bowl, whisk together the flour, baking powder, and salt.
- Gradually add the dry ingredients to the butter mixture, alternating with the milk, starting and ending with the dry ingredients. Mix until just combined.
- Bake the Cupcakes:
- Divide the batter evenly among the cupcake liners, filling each about two-thirds full.
- Bake in the preheated oven for 18-20 minutes or until a toothpick inserted into the center of a cupcake comes out clean.
- Allow the cupcakes to cool in the pan for 5 minutes, then transfer them to a wire rack to cool completely.
- Prepare the Raspberry Filling:
- Once the cupcakes are cooled, use a small paring knife to cut a small circle from the top of each cupcake, about 1 inch deep.
- Fill each hole with approximately one teaspoon of raspberry jam.
- Make the Frosting:
- In a large bowl, beat the softened butter until creamy.
- Gradually add the powdered sugar, one cup at a time, beating well after each addition.
- Add the heavy cream and a few drops of red food coloring if desired, and continue to beat until the frosting is smooth and fluffy.
- Decorate the Cupcakes:
- Use a piping bag fitted with your desired tip to frost the cupcakes.
- For added effect, use fondant or edible gel to create vampire fangs or drizzle a bit of raspberry jam on top to enhance the “bite” effect.
Extra Tips:
To make the Vampire Bite Cupcakes even more festive, consider using dark cupcake liners to add to the spooky theme. If you want a more intense “blood” effect, mix a bit of red food coloring into the raspberry jam before filling the cupcakes.
Confirm the cupcakes are completely cooled before filling and frosting to prevent the frosting from melting. If you’re short on time, you can use store-bought vanilla frosting and modify it with food coloring or flavoring as needed.
Finally, for a more dramatic presentation, serve the cupcakes on a dark or Halloween-themed platter. Enjoy your hauntingly delicious creation!
Skeleton Veggie Platter
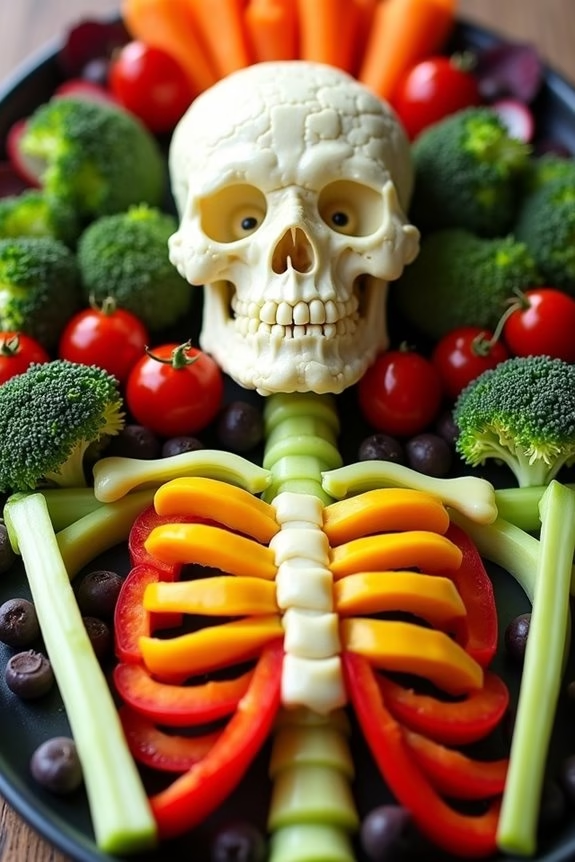
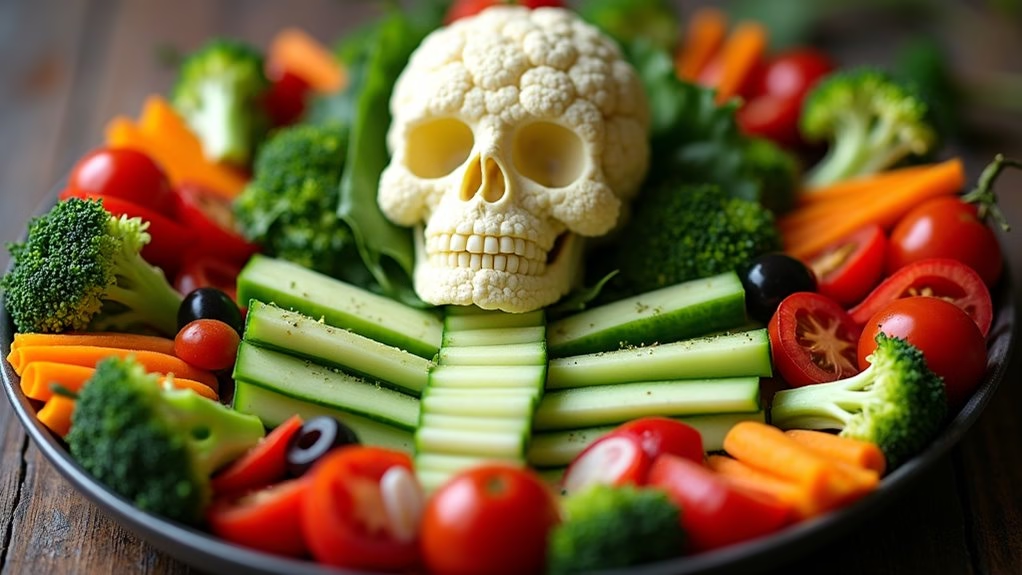
If you’re looking to add a spooky yet healthy touch to your Halloween party, a Skeleton Veggie Platter is the perfect choice. This creative and colorful dish not only serves as a delightful centerpiece but also encourages guests to snack on nutritious vegetables. It’s an easy-to-make, fun, and interactive way to get everyone in the Halloween spirit.
With a selection of crisp vegetables and a creamy dip forming the skeleton’s face, body, and limbs, this platter is sure to be a hit among party-goers of all ages.
Creating a Skeleton Veggie Platter is a great way to incorporate a variety of fresh vegetables into your Halloween spread. You can customize it with your favorite vegetables and dips, making it a versatile snack option for both kids and adults. This dish serves 4-6 people, providing a good amount of veggies for everyone to enjoy.
The key is to arrange the vegetables in a way that resembles a skeleton, adding a touch of creativity and fun to your Halloween table.
Ingredients for a Skeleton Veggie Platter (serves 4-6):
- 1 head of cauliflower
- 1 cucumber
- 1 red bell pepper
- 1 yellow bell pepper
- 1 bunch of celery
- 1 cup cherry tomatoes
- 1 bunch of radishes
- 1 small bunch of broccoli
- 1 cup baby carrots
- 1 cup black olives
- 1 cup ranch or hummus dip
Cooking Instructions:
- Prepare the Vegetables:
- Wash all the vegetables thoroughly under cold water and pat them dry with a clean kitchen towel.
- Cut the cauliflower into florets for the skull and bones.
- Slice the cucumber into thin rounds for the spine.
- Cut the red and yellow bell peppers into strips for the ribs and arms.
- Chop the celery into stick-sized pieces for the limbs.
- Halve the cherry tomatoes for decoration.
- Slice the radishes thinly for added skeletal detail.
- Break the broccoli into small florets for the feet, hands, or any additional skeletal features.
- Assemble the Skeleton:
- On a large platter, start by placing a bowl of ranch or hummus at the top center; this will be the head.
- Use cauliflower florets to create the skull shape around the dip.
- Arrange cucumber slices vertically down the center to form the spine.
- Add bell pepper strips on each side of the spine to represent the ribs.
- Place celery sticks as arms and legs extending from the spine.
- Position broccoli florets at the ends of the limbs as hands and feet.
- Scatter cherry tomato halves along the ribs and limbs for extra detail.
- Use radish slices to add facial features or additional skeletal details.
- Finally, surround the skeleton with baby carrots and black olives as a border or additional garnish.
Extra Tips:
For an even more festive touch, consider using a small knife to carve spooky faces into the radishes or to create jack-o’-lantern designs on bell pepper pieces.
You can also serve this platter with a variety of dips, such as guacamole or a spicy salsa, to cater to different taste preferences. If you’re making this platter in advance, cover it with plastic wrap and refrigerate to keep the vegetables fresh and crisp.