

When planning a Halloween gathering, crafting a menu that’s both spooky and scrumptious is a must. Serve up some Witch’s Broomstick Pretzels alongside Mummy Jalapeño Poppers for a bewitching spread. As the party unfolds, guests will love discovering Monster Eyeball Donuts and Bloody Finger Hot Dogs. It’s a hauntingly fun culinary adventure. Ready to uncover more spine-tingling treats? Let’s explore this spooky lineup together!
Witch’s Broomstick Pretzels
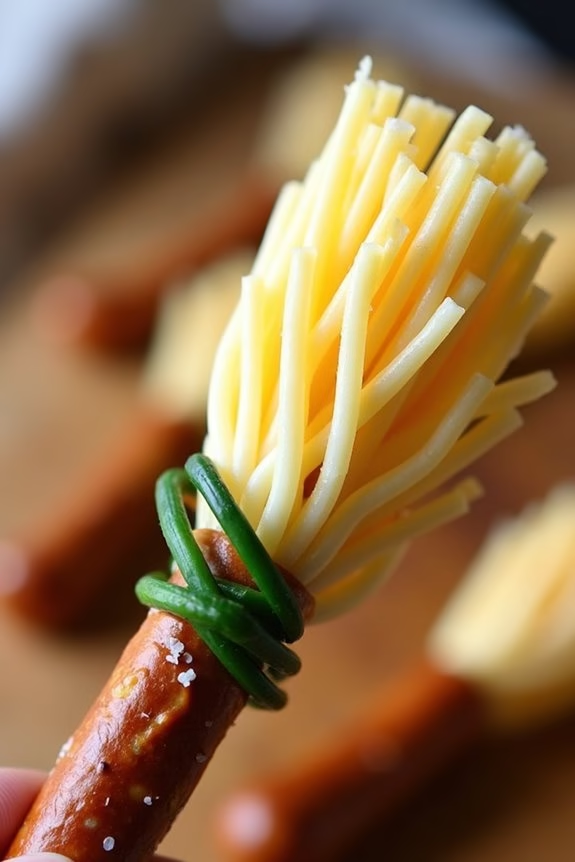
Witch’s Broomstick Pretzels are a fun and festive treat perfect for any Halloween party. These delightful snacks aren’t only easy to make but also add a spooky touch to your table. With just a few ingredients, you can create these edible broomsticks that both kids and adults will enjoy. The combination of salty pretzels and creamy cheese is sure to be a hit, and the presentation will leave your guests enchanted.
The process of making Witch’s Broomstick Pretzels is straightforward, making it a great activity to involve children in the kitchen. The pretzel sticks serve as the broom handles, while string cheese creates the broom bristles, all held together with a chive ribbon. This recipe serves 4-6 people, providing enough broomsticks for everyone to enjoy. These treats aren’t only visually appealing but also delicious and nutritious, making them an ideal addition to your Halloween spread.
Ingredients:
- 12 pretzel sticks
- 6 string cheese sticks
- 12 fresh chives
Cooking Instructions:
- Prepare the Cheese: Start by unwrapping the string cheese sticks. With a knife, cut each stick in half to have 12 pieces. This will form the bristles of the broomstick.
- Shape the Broom Bristles: Take each half of the string cheese and carefully peel the bottom half into thin strips to create the appearance of broom bristles. Be gentle to avoid breaking the cheese.
- Attach the Broom Handle: Insert a pretzel stick into the uncut end of each string cheese half. Push gently to confirm it holds without splitting the cheese.
- Tie the Chive Ribbon: Take a fresh chive and wrap it around the junction where the pretzel meets the cheese. Tie it in a simple knot or bow to secure the cheese to the pretzel. Trim any excess chive with scissors for a neat appearance.
- Serve: Arrange the Witch’s Broomstick Pretzels on a platter and serve immediately. They can be enjoyed as is or paired with a dip of your choice.
Extra Tips:
When making Witch’s Broomstick Pretzels, make sure that the cheese is cold as it will be easier to peel into strips. If the chives are too brittle to tie, briefly soak them in warm water to make them more pliable.
For an extra touch, consider using flavored pretzel sticks or adding a sprinkle of paprika for color. These snacks are best served fresh, but can be prepared a few hours in advance and stored in the refrigerator. Just be certain to bring them to room temperature before serving to enhance the flavors.
Mummy Jalapeño Poppers
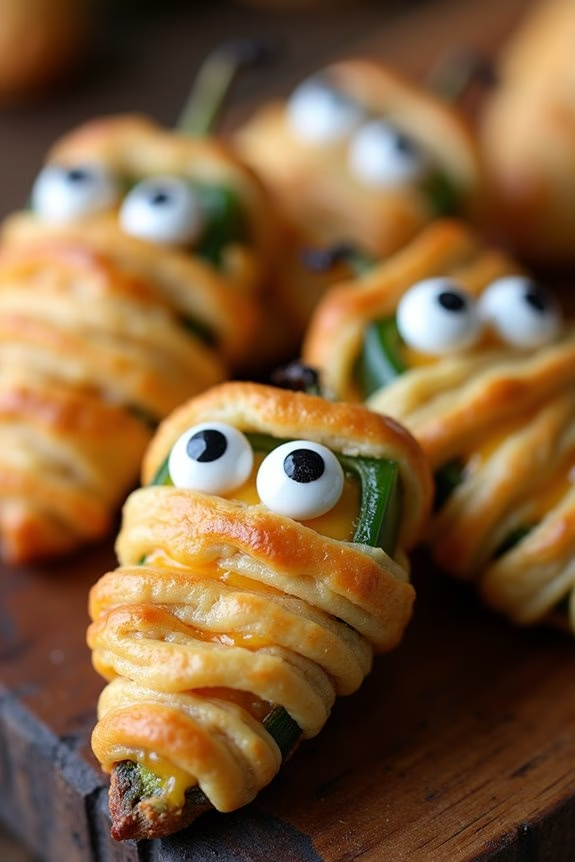
Get ready to spice up your Halloween party with a fun and delicious appetizer that will surely be a hit with your guests: Mummy Jalapeño Poppers. These little bites aren’t only spooky but also packed with flavor, combining the heat of jalapeños with creamy cheese and a crispy pastry wrap.
Perfect for a Halloween-themed gathering, these Mummy Jalapeño Poppers are easy to make and can be prepared ahead of time, allowing you to enjoy the festivities without being stuck in the kitchen.
The key to these poppers is the balance of flavors and textures. The jalapeños provide a nice heat that’s mellowed by the creamy cheese filling, while the crescent roll dough gives a delightful buttery crunch. The addition of candy eyes adds a whimsical touch, transforming these tasty treats into cute little mummies.
Whether you’re hosting a party or just want to add a touch of Halloween fun to your meals, these Mummy Jalapeño Poppers are a must-try.
Ingredients (Serving Size: 4-6 people)
- 12 fresh jalapeño peppers
- 8 oz cream cheese, softened
- 1 cup shredded cheddar cheese
- 1/2 teaspoon garlic powder
- 1/2 teaspoon onion powder
- Salt, to taste
- Pepper, to taste
- 1 can (8 oz) refrigerated crescent roll dough
- 24 candy eyeballs
Cooking Instructions
- Preheat Oven: Start by preheating your oven to 400°F (200°C) to make sure it’s hot enough to cook the poppers evenly.
- Prepare Jalapeños: Slice each jalapeño in half lengthwise and remove the seeds and membranes using a small spoon. This will create a cavity for the filling and reduce the heat.
- Make Cheese Filling: In a medium bowl, combine the softened cream cheese, shredded cheddar cheese, garlic powder, onion powder, salt, and pepper. Mix until the ingredients are well blended and smooth.
- Stuff Jalapeños: Spoon the cheese mixture into each jalapeño half. Make sure the filling is level with the edges of the jalapeño to allow for even wrapping.
- Wrap with Dough: Unroll the crescent roll dough and cut it into thin strips. Wrap a strip around each stuffed jalapeño, leaving small gaps so the cheese can peek through, resembling a mummy wrap.
- Bake: Place the wrapped jalapeños on a baking sheet lined with parchment paper. Bake in the preheated oven for 15-18 minutes, or until the dough is golden brown and cooked through.
- Decorate: Once baked, remove the poppers from the oven and press two candy eyeballs into the cheese filling of each popper to complete the mummy look.
Extra Tips
When selecting jalapeños, aim for medium-sized peppers that have smooth skin without blemishes to provide the best flavor and texture.
For those who prefer a milder popper, soaking the jalapeños in cold water for about 30 minutes before stuffing can help reduce some of the heat.
Be creative with the dough wrapping; it doesn’t have to be perfect—a little imperfection adds to the mummy charm.
Finally, these poppers can be assembled a day ahead and baked just before serving, making them a convenient option for party planning. Enjoy and have a spooky good time!
Ghostly Deviled Eggs

For a spooky twist on a classic appetizer, try making Ghostly Deviled Eggs this Halloween! These delightful treats aren’t only a fun addition to your Halloween snack table, but they’re also devilishly delicious.
With their ghostly appearance, they’re sure to capture the attention of all your party guests. This recipe not only brings a festive flair but also packs a flavorful punch with a creamy, tangy filling that everyone will enjoy.
Perfect for a serving size of 4-6 people, Ghostly Deviled Eggs are easy to prepare and require just a handful of ingredients. The key to achieving the ghostly look is in the decoration, where a few strategic touches transform ordinary deviled eggs into spooky specters.
Whether you’re hosting a Halloween gathering or simply looking to add some holiday spirit to your meals, these eggs are a must-try.
Ingredients:
- 12 large eggs
- 1/2 cup mayonnaise
- 1 tablespoon Dijon mustard
- 1 tablespoon white vinegar
- Salt and pepper to taste
- Black olives (for decoration)
- Paprika (optional, for garnish)
Instructions:
- Boil the Eggs: Place the eggs in a pot and cover them with cold water. Bring the water to a boil over medium-high heat. Once boiling, turn off the heat, cover the pot, and let the eggs sit for 10-12 minutes.
- Cool and Peel the Eggs: Drain the hot water and transfer the eggs to a bowl of ice water. Allow them to cool for about 5 minutes. Peel the eggs carefully to avoid tearing the whites.
- Prepare the Filling: Slice each egg in half lengthwise and gently remove the yolks. Place the yolks in a mixing bowl. Add mayonnaise, Dijon mustard, and white vinegar to the yolks. Season with salt and pepper. Mix until smooth and creamy.
- Fill the Egg Whites: Spoon or pipe the yolk mixture back into the egg whites. A piping bag with a round tip works well for this, but a zip-top bag with a corner snipped off can also be used.
- Decorate with Ghostly Faces: Slice black olives into small pieces to create eyes and mouths, and place them on the yolk filling to form ghostly faces.
- Optional Garnish: For added flavor and a dash of color, lightly sprinkle paprika over the deviled eggs.
Extra Tips:
To guarantee your eggs peel easily, use slightly older eggs rather than fresh ones. Fresh eggs tend to stick to the shell more.
Also, consider using a fine mesh strainer to achieve a perfectly smooth yolk mixture. If you’re preparing these eggs ahead of time, store them in the refrigerator and add the olive decorations just before serving to maintain their fresh appearance.
For an extra festive touch, you can use a small amount of food coloring in the yolk mixture to create eerie colors.
Monster Eyeball Donuts
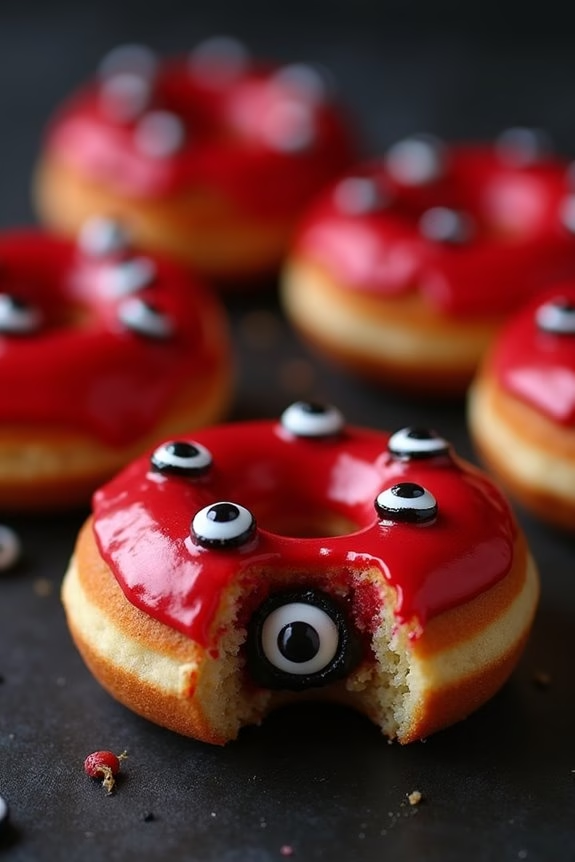
Monster Eyeball Donuts are a fun and spooky treat perfect for Halloween festivities. These donuts aren’t only delicious but also visually striking, making them a hit at any Halloween party. The combination of sweet, fluffy donuts with creepy edible eyes will delight both kids and adults alike.
With a little creativity and some basic ingredients, you can easily whip up a batch of these ghoulish goodies. The essence of Monster Eyeball Donuts lies in their decoration, which transforms ordinary donuts into eerie, eye-catching delights. The process begins with baking or frying the donuts, followed by a creative decorating session that brings the “eyeballs” to life.
These donuts are sure to be the star of your Halloween snack table, enticing everyone to take a bite while admiring your handiwork. Whether you’re hosting a Halloween party or just getting into the festive spirit, these donuts are a must-try.
Ingredients (Serves 4-6)
- 2 cups all-purpose flour
- 1/2 cup granulated sugar
- 2 teaspoons baking powder
- 1/2 teaspoon salt
- 3/4 cup milk
- 2 large eggs
- 1 teaspoon vanilla extract
- 1/4 cup unsalted butter, melted
- 1 cup powdered sugar
- 2 tablespoons milk (for glaze)
- Red and black food coloring
- Edible candy eyeballs
Instructions
- Prepare the Dry Ingredients: In a large mixing bowl, combine the all-purpose flour, granulated sugar, baking powder, and salt. Mix well to verify all ingredients are evenly distributed.
- Combine Wet Ingredients: In a separate bowl, whisk together the milk, eggs, and vanilla extract until smooth. Gradually add in the melted butter, continuing to whisk until fully incorporated.
- Mix the Batter: Pour the wet ingredients into the bowl of dry ingredients. Stir gently until just combined, being careful not to overmix to maintain fluffy donuts.
- Shape the Donuts: Preheat your donut pan or donut maker. Lightly grease the molds with cooking spray or butter. Fill each mold about three-quarters full with the batter.
- Bake the Donuts: Place the donut pan in a preheated oven at 350°F (175°C) for 10-12 minutes, or until the donuts are golden brown and a toothpick inserted into the center comes out clean. If using a donut maker, follow the manufacturer’s instructions for cooking time.
- Prepare the Glaze: While the donuts are cooling, make the glaze by mixing the powdered sugar with 2 tablespoons of milk. Divide the glaze into two bowls. Add red food coloring to one bowl and black to the other, stirring until you achieve the desired shade.
- Decorate the Donuts: Once the donuts are cool, dip the top of each donut into the red glaze, allowing any excess to drip off. Using a small spoon, add a dot of the black glaze in the center to mimic the pupil. Place an edible candy eyeball on top of the black glaze.
- Final Touches: Allow the glaze to set for about 10 minutes before serving. Arrange the Monster Eyeball Donuts on a platter for a spooky, eye-catching display.
Extra Tips
When making Monster Eyeball Donuts, verify the donuts are completely cool before glazing them to prevent the glaze from running. For a more intense color, add a few extra drops of food coloring to the glaze, but be cautious not to add too much liquid.
If you don’t have a donut pan, you can use a muffin tin and shape the centers with aluminum foil balls. Store any leftover donuts in an airtight container to keep them fresh for up to two days.
Spider Web Dip
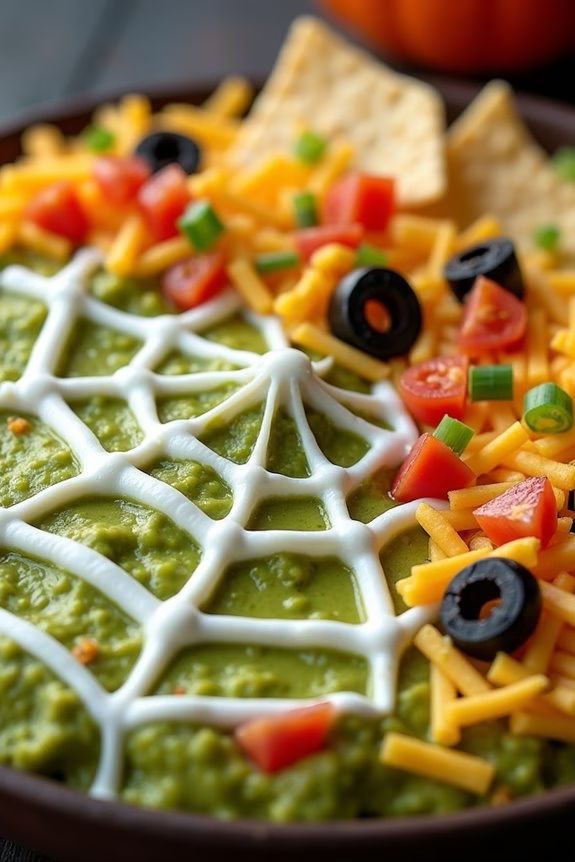
Get ready to spook your guests with the ultimate Halloween treat – the Spider Web Dip! This deliciously eerie appetizer combines layers of flavors to create a hauntingly beautiful display that’s sure to impress at any Halloween gathering. Perfect for a crowd of 4-6 people, this dip features creamy refried beans, zesty guacamole, tangy sour cream, and a sprinkle of cheese, all topped off with a spooky sour cream spider web design. Serve it with your favorite tortilla chips for a dish that’s as tasty as it’s terrifying.
The Spider Web Dip isn’t only a feast for the eyes but also a delight for the taste buds. The combination of creamy, spicy, and tangy ingredients guarantees that each bite is a burst of flavor. Whether you’re hosting a Halloween party or just want to get into the festive spirit, this dip is a must-try. Plus, it’s easy to make, leaving you plenty of time to focus on other Halloween preparations.
Ingredients (Serves 4-6):
- 1 can (16 oz) refried beans
- 1 cup guacamole
- 1 cup sour cream (divided)
- 1 packet taco seasoning
- 1 cup shredded cheddar cheese
- 1/2 cup chopped tomatoes
- 1/4 cup sliced black olives
- 1/4 cup chopped green onions
- Tortilla chips for serving
Cooking Instructions:
- Prepare the Refried Beans: Start by heating the refried beans in a small saucepan over low heat. Stir in the taco seasoning until well combined. Once heated through, spread the seasoned beans evenly in the bottom of a round serving dish or pie plate.
- Layer the Guacamole: Gently spread the guacamole over the layer of refried beans, making sure it covers the beans completely to form the second layer of the dip.
- Create the Sour Cream Spider Web: Take half of the sour cream and place it in a piping bag or a zip-top bag with a small corner snipped off. Pipe a spiral starting from the center of the guacamole layer. Use a toothpick to drag lines from the center to the edge, creating a web-like pattern.
- Add Cheese and Toppings: Sprinkle the shredded cheddar cheese evenly over the top of the guacamole. Then, scatter the chopped tomatoes, sliced black olives, and chopped green onions over the cheese.
- Finish with Sour Cream: Dollop the remaining sour cream around the edges of the dish and lightly spread it to cover the toppings, leaving the spider web design visible in the center.
- Serve and Enjoy: Serve the Spider Web Dip with a side of tortilla chips, and watch it disappear before your eyes!
Extra Tips:
To make your Spider Web Dip even more festive, consider adding edible spiders or Halloween-themed picks as a fun decoration. You can also customize the spice level by adding diced jalapeños or a dash of hot sauce to the refried beans.
If you’re short on time, consider using store-bought guacamole and pre-shredded cheese to speed up the preparation process. Remember, presentation is key, so take your time creating the spider web design for maximum spooky impact!
Pumpkin Patch Dirt Cups
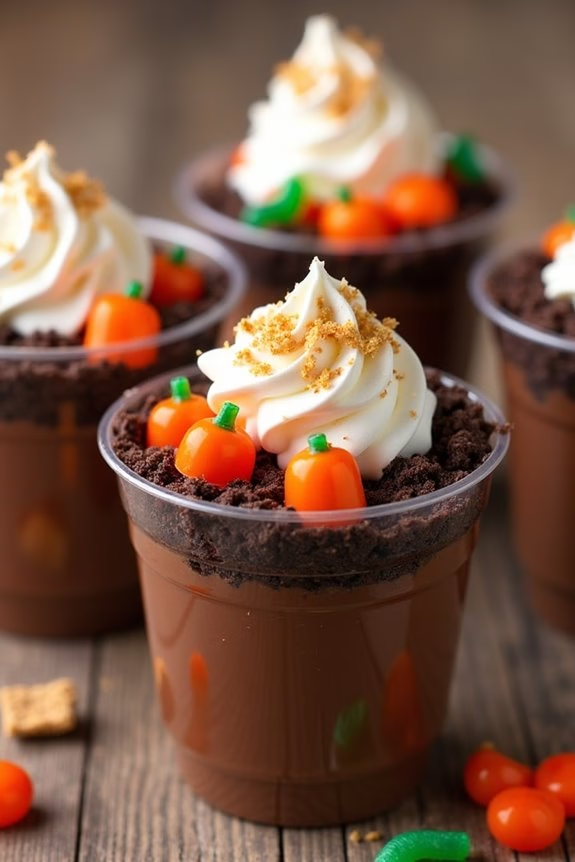
Pumpkin Patch Dirt Cups are a delightful and festive treat that brings a spooky twist to the classic dirt cup dessert, perfect for Halloween celebrations. These cups are layered with creamy chocolate pudding, cookie crumbs, and decorated with candy pumpkins and gummy worms to resemble a mini pumpkin patch. This fun and easy-to-make dessert isn’t only visually appealing but also a hit among both kids and adults.
The versatility of Pumpkin Patch Dirt Cups allows you to get creative with your decorations and flavors, making them an excellent addition to any Halloween party or gathering. The combination of smooth pudding, crunchy cookie crumbs, and chewy candies creates a textural experience that’s both satisfying and fun to eat. Whether you’re making these cups for a family treat or a festive party dessert, they’re sure to be a crowd-pleaser.
Ingredients for 4-6 servings:
- 2 cups chocolate pudding
- 12 chocolate sandwich cookies
- 1 cup whipped topping
- 1 package of candy pumpkins
- 1 package of gummy worms
- 1/2 cup crushed graham crackers
- 6 clear plastic cups
Cooking Instructions:
- Prepare the Cookies: Start by placing the chocolate sandwich cookies into a resealable plastic bag. Use a rolling pin or a food processor to crush the cookies into fine crumbs. These crumbs will serve as the “dirt” layer in your cups.
- Layer the Pudding: Divide the chocolate pudding evenly among the clear plastic cups, filling each one about halfway. Smooth the pudding with a spoon to guarantee an even layer.
- Add the “Dirt”: Sprinkle a generous layer of crushed chocolate cookies over the pudding in each cup. This should cover the pudding completely, giving the appearance of soil.
- Decorate the Cups: Gently press a few candy pumpkins into the cookie layer to create a pumpkin patch look. Add gummy worms on top for a fun and creepy touch.
- Top with Whipped Topping: Spoon a dollop of whipped topping onto each cup. This adds a creamy contrast and enhances the visual appeal.
- Finish with Crushed Graham Crackers: Sprinkle a small amount of crushed graham crackers over the whipped topping to mimic hay or straw in the pumpkin patch.
- Chill and Serve: Place the completed cups in the refrigerator for at least 30 minutes to allow the flavors to meld together. Serve chilled for the best taste and texture.
Extra Tips:
For an extra touch of fun, consider using different colored gummy worms or adding edible eyes to the candy pumpkins for a more whimsical look. If you’re serving these at a party, label each cup with a spooky name to add to the Halloween theme.
You can also experiment with different pudding flavors, such as vanilla or pumpkin spice, to suit your taste preferences. Enjoy your Pumpkin Patch Dirt Cups with a spooky twist!
Bat Wings (Chicken Wings)

Bat Wings (Chicken Wings) are a spooky and delicious addition to any Halloween snack spread. These creatively named wings are perfect for adding a touch of fright to your festive feast while still delivering a mouthwatering flavor profile. The dark, fiery appearance of the wings, achieved through a clever combination of spices and sauces, is sure to delight both kids and adults alike.
Whether you’re hosting a Halloween party or just looking to scare up some fun in the kitchen, these Bat Wings are bound to be a hit. The recipe combines the savory goodness of chicken wings with a special marinade and glaze that give them their eerie, bat-like appearance. The rich flavors are enhanced by a blend of spices, while the dark color is accomplished through the use of soy sauce and balsamic vinegar.
The result is a slightly sweet, tangy, and smoky taste that’s simply irresistible. With a crispy exterior and juicy interior, these Bat Wings aren’t only visually striking but also incredibly flavorful, making them a must-have on your Halloween menu.
Ingredients (Serves 4-6):
- 2 pounds chicken wings
- 1/4 cup soy sauce
- 1/4 cup balsamic vinegar
- 2 tablespoons olive oil
- 2 tablespoons honey
- 1 tablespoon Worcestershire sauce
- 1 teaspoon smoked paprika
- 1 teaspoon garlic powder
- 1 teaspoon onion powder
- 1/2 teaspoon cayenne pepper
- Salt and pepper to taste
- Fresh parsley for garnish (optional)
Instructions:
- Prepare the Marinade: In a large mixing bowl, combine soy sauce, balsamic vinegar, olive oil, honey, Worcestershire sauce, smoked paprika, garlic powder, onion powder, cayenne pepper, salt, and pepper. Whisk the ingredients together until well combined.
- Marinate the Wings: Add the chicken wings to the marinade, guaranteeing they’re fully coated. Cover the bowl with plastic wrap and let the wings marinate in the refrigerator for at least 2 hours, or overnight for best results.
- Preheat the Oven: Preheat your oven to 400°F (200°C). Line a baking sheet with aluminum foil and place a wire rack on top. This allows the wings to cook evenly and crisp up nicely.
- Bake the Wings: Remove the wings from the marinade and place them on the wire rack. Reserve the remaining marinade. Bake the wings in the preheated oven for about 35-40 minutes, turning them halfway through to assure even cooking.
- Glaze the Wings: While the wings are baking, pour the reserved marinade into a small saucepan. Bring it to a boil over medium heat, then reduce the heat and let it simmer until it thickens slightly.
- Finish the Wings: Once the wings are cooked through and crispy, remove them from the oven. Brush the thickened glaze over the wings, ensuring they’re well coated. Optionally, sprinkle with fresh parsley for garnish.
- Serve and Enjoy: Allow the wings to rest for a few minutes before serving to enhance their flavor. Serve them hot as a spooky and delicious Halloween snack.
Extra Tips:
For an even spookier presentation, consider serving the Bat Wings on a dark platter with dried ice for a misty effect. When marinating the wings, be sure to turn them occasionally to guarantee all sides are coated evenly.
If you prefer your wings extra crispy, you can broil them for the last few minutes of cooking, keeping a close eye on them to prevent burning. Don’t be afraid to adjust the spice level to your taste by adding more cayenne pepper or incorporating different spices to suit your palate.
Frankenstein Rice Krispie Treats
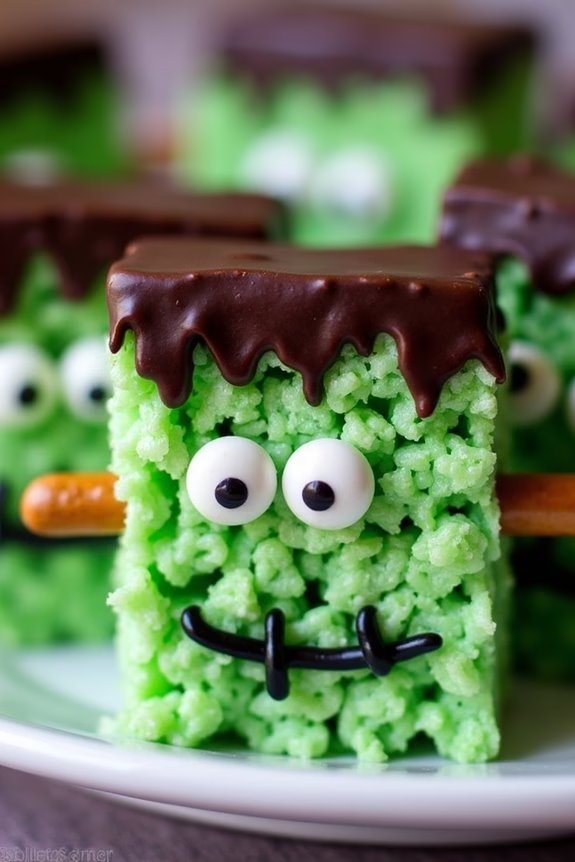
Frankenstein Rice Krispie Treats are a fun and spooky twist on the classic treat, perfect for Halloween celebrations. These green, marshmallowy squares are decorated to resemble the iconic monster, complete with chocolate hair, candy eyes, and a scar or two. Not only are they an eye-catching addition to any Halloween spread, but they’re also easy to make, requiring just a few simple ingredients and a little bit of creativity.
Perfect for a serving size of 4-6 people, these treats are ideal for a small gathering or family snack. Whether you’re hosting a Halloween party or simply looking to enjoy a festive treat with your loved ones, Frankenstein Rice Krispie Treats are sure to be a hit. Let’s explore how you can create these deliciously spooky snacks.
Ingredients:
- 6 cups of Rice Krispies cereal
- 3 tablespoons of unsalted butter
- 10 ounces of mini marshmallows
- Green food coloring
- 1 cup of semisweet chocolate chips
- Candy eyes
- Black gel icing
- Pretzel sticks
- Cooking spray
Instructions:
- Prepare the Pan: Lightly coat a 9×13-inch baking pan with cooking spray. This will help prevent sticking when you’re ready to cut and serve the treats.
- Melt the Butter and Marshmallows: In a large pot over medium heat, melt the unsalted butter. Once melted, add the mini marshmallows and stir continuously until they’re completely melted and smooth.
- Add Food Coloring: Remove the pot from heat and add a few drops of green food coloring to the melted marshmallow mixture. Stir well until the color is evenly distributed and reaches your desired shade of green.
- Mix in Cereal: Quickly add the Rice Krispies cereal to the pot and stir until all the cereal is well-coated with the green marshmallow mixture.
- Transfer to Pan: Pour the mixture into the prepared baking pan. Using a spatula coated with cooking spray, press the mixture evenly into the pan, smoothing the top.
- Let It Set: Allow the Rice Krispies mixture to cool and set completely, which should take about 30 minutes.
- Melt Chocolate for Hair: In a microwave-safe bowl, melt the chocolate chips in 30-second intervals, stirring in between, until fully melted and smooth.
- Decorate the Treats: Once the Rice Krispies have set, cut them into squares. Dip the top edge of each square in the melted chocolate to create Frankenstein’s hair. Place candy eyes just below the hairline and use black gel icing to draw a scar or stitches across the “face.”
- Add Bolts: Break pretzel sticks in half and insert them into the sides of each square to mimic Frankenstein’s neck bolts.
- Serve and Enjoy: Allow the chocolate to set before serving your spooky creations.
Extra Tips: For a more vibrant green color, add additional drops of food coloring to the marshmallow mixture until you reach the desired hue.
Be sure to work quickly when shaping and decorating the treats, as the mixture can harden if left too long. For an added touch, you can use additional black gel icing to draw a mouth or eyebrows on your Frankenstein treats.
Store any leftovers in an airtight container to keep them fresh and chewy.
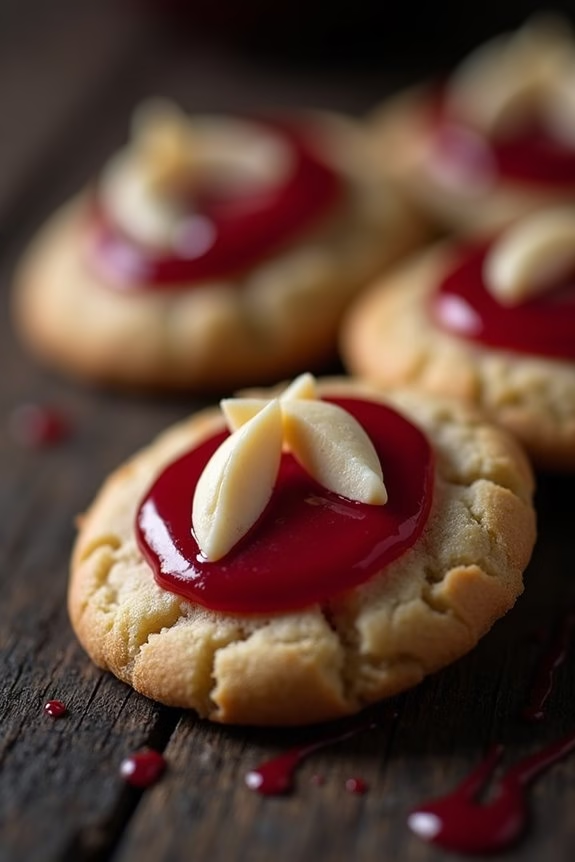
Vampire Fang Cookies
Get ready to sink your teeth into a hauntingly delicious treat this Halloween with Vampire Fang Cookies! These delightfully spooky cookies aren’t only simple to make but are also sure to be a hit at any Halloween gathering. With their eerie appearance, they’re perfect for adding a touch of frightful fun to your festive table.
The best part? They taste as good as they look, combining classic cookie flavors with a hint of creative Halloween flair. Vampire Fang Cookies are designed to resemble the sharp fangs of a vampire, making them an exciting treat for both kids and adults alike.
These cookies are crafted with a soft, chewy base and decorated with almond “fangs” and red icing “blood” to complete the look. Perfect for a serving size of 4-6 people, this recipe will guide you through the process of creating these spooky snacks, making sure your Halloween is both tasty and terrifying.
Ingredients (Serving Size: 4-6 people)
- 2 1/2 cups all-purpose flour
- 1 teaspoon baking soda
- 1/2 teaspoon salt
- 1 cup unsalted butter, softened
- 1 cup granulated sugar
- 1/2 cup brown sugar, packed
- 2 large eggs
- 2 teaspoons vanilla extract
- 1 cup sliced almonds
- Red decorating gel or icing
Cooking Instructions
- Preheat the Oven: Begin by preheating your oven to 350°F (175°C). This guarantees that the oven is at the right temperature when your cookies are ready to bake.
- Mix Dry Ingredients: In a medium-sized bowl, whisk together the flour, baking soda, and salt. This will guarantee that the baking soda is evenly distributed throughout the flour, which is essential for the cookies to rise properly.
- Cream the Butter and Sugars: In a large mixing bowl, use an electric mixer to cream together the softened butter, granulated sugar, and brown sugar until the mixture is light and fluffy. This process typically takes about 2-3 minutes.
- Add Eggs and Vanilla: Beat in the eggs, one at a time, making sure each egg is fully incorporated before adding the next. Stir in the vanilla extract. This step is important for adding moisture and flavor to your cookies.
- Combine Wet and Dry Ingredients: Gradually add the dry ingredients to the wet ingredients, mixing until just combined. Be careful not to overmix, as this can lead to tough cookies.
- Shape the Cookies: Roll the dough into 1-inch balls and place them about 2 inches apart on a baking sheet lined with parchment paper. Press each ball down slightly with your palm to flatten them a bit.
- Decorate with Almonds: Gently press two almond slices into the top of each cookie, positioning them to resemble vampire fangs.
- Bake the Cookies: Place the baking sheet in the preheated oven and bake for 10-12 minutes, or until the edges of the cookies are golden brown.
- Cool and Add Final Touches: Allow the cookies to cool on the baking sheet for about 5 minutes before transferring them to a wire rack to cool completely.
Once cooled, use the red decorating gel or icing to add “blood” around the almonds for a spooky effect.
Extra Tips
For the best results, make sure your butter is at room temperature before you begin, as this will help it cream properly with the sugars. If you don’t have sliced almonds, you can use whole almonds and carefully slice them yourself.
When applying the red decorating gel, you can use a toothpick for more precise application to create the blood effect. Finally, if you want to add a bit more flavor, consider adding a teaspoon of almond extract along with the vanilla extract.
Enjoy your Vampire Fang Cookies and have a fang-tastic Halloween!
Bloody Finger Hot Dogs
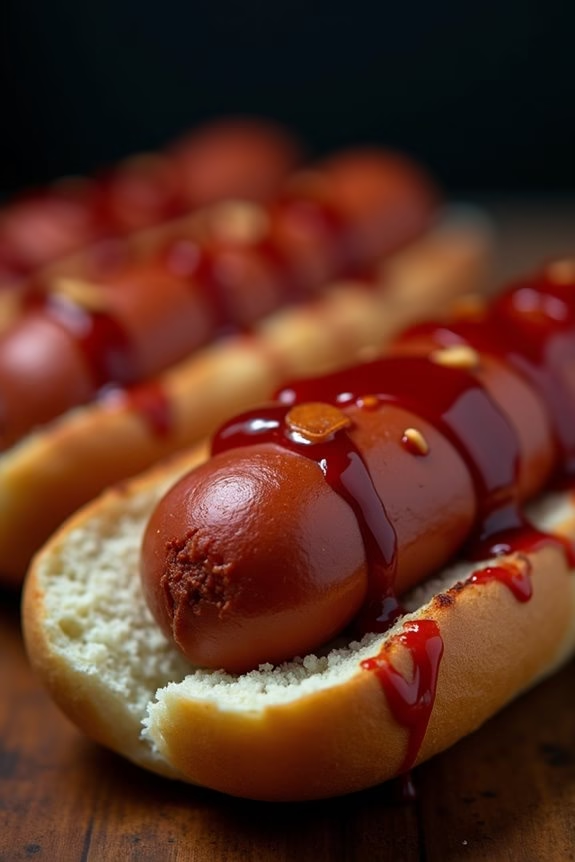
Halloween is the perfect time to get creative in the kitchen with spooky treats that will delight both kids and adults alike. One such treat that’s sure to be a hit at your Halloween party is Bloody Finger Hot Dogs. These fun and eerie snacks resemble severed fingers and are both delicious and easy to make.
Whether you’re hosting a party or just looking for a creepy snack to enjoy while watching scary movies, these hot dogs are sure to provide both a taste and visual thrill.
Bloody Finger Hot Dogs are made by transforming ordinary hot dogs into gruesome-looking fingers, complete with eerie fingernails and a blood-like ketchup topping. The process is simple but effective, making it an ideal recipe for anyone who wants to impress their guests without spending hours in the kitchen.
Follow this recipe to make a serving size of 4-6 people and watch as your Halloween guests marvel at these macabre morsels.
Ingredients:
- 8 hot dogs
- 8 hot dog buns
- 1/2 cup ketchup
- 1 tablespoon Worcestershire sauce
- 8 small slices of onion or almond slivers (for fingernails)
- 1 tablespoon vegetable oil
- Mustard (optional, for decoration)
Cooking Instructions:
- Prepare the Hot Dogs: Begin by taking each hot dog and cut a shallow, horizontal slit about a third of the way down the hot dog to resemble a knuckle. Make two more additional slits further down to create the appearance of joints. This will give the hot dogs a more realistic finger-like appearance.
- Create the Fingernails: At the top of each hot dog, slice a thin, flat section to create a space for the fingernail. Insert either a small slice of onion or an almond sliver into this space to mimic a fingernail.
- Cook the Hot Dogs: Heat a tablespoon of vegetable oil in a large skillet over medium heat. Add the prepared hot dogs and cook them for about 5-7 minutes, turning occasionally, until they’re heated through and slightly browned.
- Prepare the Bloody Sauce: In a small saucepan, combine the ketchup and Worcestershire sauce. Heat the mixture over low heat, stirring occasionally, until it’s warmed through and well-combined. This will serve as the “blood” for the fingers.
- Assemble the Bloody Fingers: Place each cooked hot dog into a hot dog bun. Drizzle the bloody sauce over the top of the hot dogs, letting it run down the sides for a gruesome effect. If desired, use mustard to add extra creepy details, such as knuckle lines or more “blood.”
- Serve and Enjoy: Arrange the Bloody Finger Hot Dogs on a platter and serve them immediately to your guests. Watch as they delight in both the taste and the spooky presentation of this Halloween treat.
For an extra spooky effect, you can serve the Bloody Finger Hot Dogs on a black or Halloween-themed platter.
If you’re using almond slivers for the fingernails, you may want to soak them in a bit of water beforehand to soften them, making them easier to cut and shape. Additionally, feel free to adjust the amount of Worcestershire sauce in the ketchup to suit your taste preferences.
These creepy hot dogs are sure to be a hit with all your Halloween party guests!
Creepy Crawly Cupcakes

Halloween is the perfect time to get creative with your baking, and what better way to do so than with Creepy Crawly Cupcakes? These spooky treats aren’t only fun to make, but they also add a delightful touch of whimsy to any Halloween party. Imagine cupcakes topped with eerie yet edible spiders and worms that will both fascinate and slightly spook your guests.
These cupcakes are a delicious combination of chocolatey goodness and a playful presentation that will surely be a hit among both kids and adults. To make Creepy Crawly Cupcakes, you’ll need to start with a rich chocolate cupcake base, which serves as the perfect canvas for your creepy designs.
The toppings feature gummy worms and candy spiders, creating a realistic yet tasty illusion of critters crawling over your dessert. With ingredients that are easy to find and a process that’s straightforward, these cupcakes will be a highlight of your Halloween spread. This recipe makes about 12 cupcakes, perfect for serving 4-6 people.
Ingredients:
- 1 cup all-purpose flour
- 1 cup granulated sugar
- 1/2 cup unsweetened cocoa powder
- 1 teaspoon baking powder
- 1/2 teaspoon baking soda
- 1/4 teaspoon salt
- 1/2 cup milk
- 1/4 cup vegetable oil
- 1 large egg
- 1 teaspoon vanilla extract
- 1/2 cup boiling water
- 1 cup chocolate frosting
- 12 gummy worms
- 12 candy spiders
Instructions:
1. Preheat the Oven and Prepare the Batter:
Preheat your oven to 350°F (175°C) and line a muffin tin with cupcake liners. In a large bowl, combine the flour, sugar, cocoa powder, baking powder, baking soda, and salt. Stir the dry ingredients until well mixed.
2. Mix Wet Ingredients:
In another bowl, whisk together the milk, vegetable oil, egg, and vanilla extract. Gradually add the wet ingredients to the dry ingredients, stirring constantly to form a smooth batter.
3. Incorporate Boiling Water:
Slowly pour the boiling water into the batter, mixing gently until the batter is thin and smooth. This step helps to create a moist cupcake.
4. Fill and Bake:
Divide the batter evenly among the cupcake liners, filling each one about two-thirds full. Bake in the preheated oven for 18-20 minutes or until a toothpick inserted into the center comes out clean.
5. Cool and Frost:
Allow the cupcakes to cool completely on a wire rack before frosting. Once cooled, spread a generous amount of chocolate frosting over each cupcake.
6. Decorate with Creepy Crawlies:
Place a gummy worm and a candy spider on top of each frosted cupcake, pressing gently to secure them in the frosting.
Extra Tips:
To guarantee your cupcakes are as moist and delicious as possible, be sure not to overmix the batter. Overmixing can cause the cupcakes to become dense.
Additionally, make sure the cupcakes are completely cooled before decorating, as any residual warmth could cause the frosting to melt, making it difficult for the gummy worms and candy spiders to stay in place.
For added creepiness, you can dust the tops of the cupcakes with a little bit of crushed chocolate cookies to mimic dirt. Enjoy your spooktacular creation!
Gory Brain Jello Mold
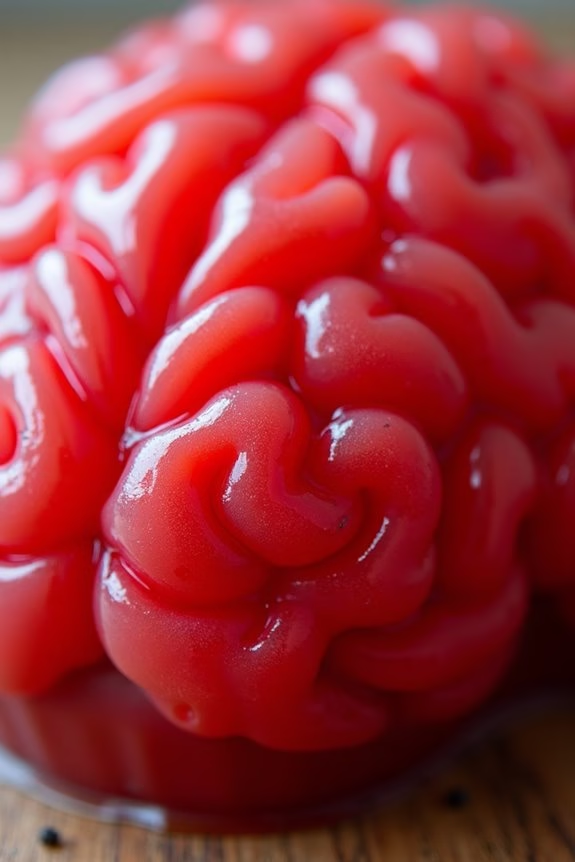
Are you ready to make your Halloween party a little spookier? A Gory Brain Jello Mold is the perfect treat to both impress and unsettle your guests. This eerie dessert combines sweet flavors with a gruesome appearance, creating a fun and delicious centerpiece for your Halloween table. The realistic brain shape and creepy red color will leave everyone talking long after the party is over.
Crafting a Gory Brain Jello Mold requires a bit of patience and attention to detail, but the end result is worth the effort. You’ll start by selecting a brain-shaped mold, easily found online or at specialty stores during the Halloween season. The jello mixture will be prepared using gelatin and a combination of fruit juices to achieve that perfect gory red hue. Once set, the jello will take on the detailed shape of the mold, making it look disturbingly realistic yet delightful to eat.
Ingredients (serves 4-6 people):
- 1 packet (6 oz) strawberry-flavored gelatin
- 1 packet (3 oz) cherry-flavored gelatin
- 2 cups boiling water
- 1 cup cold water
- 1 cup cranberry juice
- 1 cup heavy whipping cream
- Red food coloring (optional)
- Brain-shaped silicone mold
Cooking Instructions:
- Prepare the Mold: Lightly grease the inside of the brain-shaped silicone mold with a neutral oil spray to guarantee easy release of the jello once it has set. Set the mold aside on a stable surface.
- Dissolve Gelatin: In a large mixing bowl, combine strawberry and cherry gelatin powders. Pour in 2 cups of boiling water and stir continuously until the gelatin is completely dissolved, about 2 minutes.
- Add Liquids: Stir in 1 cup of cold water and 1 cup of cranberry juice into the dissolved gelatin mixture. This combination will deepen the red color and enhance the flavor.
- Incorporate Cream: Slowly pour in 1 cup of heavy whipping cream while stirring to create a more opaque appearance, mimicking the brain’s texture. If desired, add a few drops of red food coloring to achieve a more vibrant red hue.
- Pour into Mold: Carefully pour the gelatin mixture into the prepared mold, ensuring that it fills every crevice for a defined shape. If bubbles form, gently tap the mold on the counter to release them.
- Chill and Set: Place the mold in the refrigerator and allow the jello to set for at least 4-6 hours, or overnight for best results.
- Unmold and Serve: Once the jello is fully set, gently pull away the edges of the mold to release the seal, then carefully invert it onto a serving platter. Slowly lift off the mold to reveal the gory brain.
Extra Tips: For an even more realistic effect, use a small brush to apply a thin layer of red food coloring on the surface of the unmolded jello, emphasizing the crevices. To prevent the jello from sticking, guarantee the mold is well-greased and chilled before pouring in the mixture.
If you’re short on time, you can place the mold in the freezer for an hour to speed up the setting process, but be sure not to let it freeze completely. Enjoy this spooky treat as part of your Halloween festivities!