

With Halloween just around the corner, there’s nothing quite like crafting a lineup of spooky snacks that will thrill guests of all ages.
Picture a table adorned with treats like Spooky Spider Web Dip and Monster Mash Cupcakes that taste as incredible as they look.
Whether you’re planning a cozy family gathering or a lively neighborhood bash, these creative snacks are sure to enchant everyone.
Are you ready to explore all the hauntingly delicious details?
Spooky Spider Web Dip
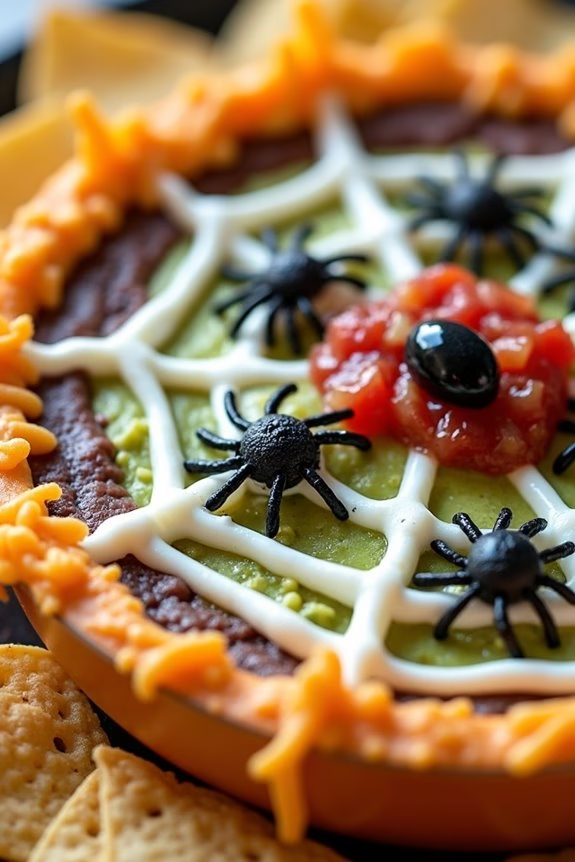
Spooky Spider Web Dip is a delightfully eerie treat perfect for any Halloween gathering. This festive dip not only looks the part but also tantalizes the taste buds with its creamy, zesty flavors. It serves as both a centerpiece and a conversation starter, as guests dip into its web-like design, revealing layers of delicious ingredients.
Whether you’re hosting a grand Halloween bash or a small get-together, this dip will surely impress your guests and satisfy their savory cravings.
At the heart of the Spooky Spider Web Dip is a rich blend of refried beans, guacamole, salsa, and sour cream, topped with a cheese web and olive spiders. The combination of flavors and textures creates a scrumptious snack that will have everyone coming back for more.
With just a bit of creativity and a few simple ingredients, you can whip up this spooky dish in no time. Designed to serve 4-6 people, this dip is perfect for sharing and guarantees that no one leaves the party hungry.
Ingredients (serving size: 4-6 people):
- 1 can (15 oz) refried beans
- 1 cup guacamole
- 1 cup salsa
- 1 cup sour cream
- 1 cup shredded cheddar cheese
- 2 tablespoons sliced black olives
- Tortilla chips for serving
Cooking Instructions:
- Prepare the Base: Spread the refried beans evenly on the bottom of a shallow serving dish. This will be the base layer of your dip.
- Layer the Guacamole: Carefully spread the guacamole over the refried beans, ensuring an even layer.
- Add the Salsa: Gently spoon the salsa over the guacamole layer, spreading it out evenly.
- Create the Web with Sour Cream: Fill a small resealable plastic bag with the sour cream. Cut a small corner off the bag and pipe the sour cream in a spiral pattern over the salsa.
- Draw the Spider Web: Using a toothpick, drag lines from the center of the spiral outwards to the edge of the dish to create a web-like pattern.
- Add the Cheese: Sprinkle the shredded cheddar cheese around the edges of the web to add a cheesy border.
- Decorate with Olive Spiders: Arrange the sliced black olives on the web to create the appearance of spiders. Use whole olives for the body and cut olives for the legs.
- Serve with Chips: Place the tortilla chips around the dip for easy access and serve immediately.
Extra Tips:
For a more flavorful dip, consider adding a layer of finely chopped onions or jalapeños between the guacamole and salsa. If you want to spice things up, use a hot salsa or add a few dashes of hot sauce to the refried beans.
To save time, you can prepare the dip a few hours in advance and store it in the refrigerator. Just make sure to add the spider web decoration right before serving to keep it looking fresh.
Monster Mash Cupcakes

Transform your Halloween party into a spook-tacular event with these delightfully eerie Monster Mash Cupcakes. Perfect for both kids and adults, these cupcakes combine a moist chocolate base with a vibrant, colorful frosting that will have your guests oohing and aahing.
The fun part about these cupcakes is the decoration, which allows you to get creative with candy eyes, sprinkles, and icing to create quirky monster faces. Not only are they visually appealing, but they offer a deliciously rich chocolatey taste that pairs perfectly with the buttery sweetness of the frosting.
These Monster Mash Cupcakes are an ideal treat for a serving size of 4-6 people, making them perfect for a small gathering or as part of a larger dessert spread. Whether you’re a baking novice or a seasoned pro, this recipe is straightforward and fun, guaranteeing you’ll have a blast whipping up these tasty creations.
So grab your mixing bowls and get ready for a monstrously good time in the kitchen!
Ingredients:
For the cupcakes:
- 1 cup all-purpose flour
- 1 cup granulated sugar
- 1/2 cup unsweetened cocoa powder
- 1 tsp baking powder
- 1/2 tsp baking soda
- 1/4 tsp salt
- 1/2 cup buttermilk
- 1/4 cup vegetable oil
- 1 large egg
- 1 tsp vanilla extract
- 1/2 cup boiling water
For the frosting:
- 1/2 cup unsalted butter, softened
- 2 cups powdered sugar
- 1 tsp vanilla extract
- 2 tbsp milk
- Food coloring (green, purple, orange)
- Assorted candy decorations (candy eyes, sprinkles, etc.)
Instructions:
- Preheat and Prepare: Preheat your oven to 350°F (175°C) and line a cupcake pan with paper liners. This guarantees even baking and easy removal of the cupcakes after baking.
- Mix Dry Ingredients: In a large mixing bowl, sift together the flour, sugar, cocoa powder, baking powder, baking soda, and salt. This step helps to evenly distribute the dry ingredients and remove any lumps.
- Combine Wet Ingredients: In a separate bowl, whisk together the buttermilk, vegetable oil, egg, and vanilla extract until well combined.
- Incorporate Dry and Wet Ingredients: Gradually add the wet mixture to the dry ingredients, stirring until just combined. Be careful not to overmix to guarantee your cupcakes remain fluffy.
- Add Boiling Water: Slowly stir in the boiling water until the batter is smooth. The batter will be thin, but this is normal and will result in a moist cupcake.
- Bake the Cupcakes: Pour the batter evenly into the prepared cupcake liners, filling each about two-thirds full. Bake for 18-20 minutes or until a toothpick inserted into the center of a cupcake comes out clean. Allow the cupcakes to cool completely on a wire rack.
- Prepare the Frosting: In a medium bowl, beat the softened butter until creamy. Gradually add the powdered sugar, vanilla extract, and milk, beating until smooth. Divide the frosting into separate bowls and add food coloring to create different colors as desired.
- Decorate: Spread or pipe the colored frosting onto the cooled cupcakes. Use candy eyes, sprinkles, and other decorations to create monster faces. Let your imagination run wild!
Extra Tips:
When making these Monster Mash Cupcakes, make sure all your ingredients are at room temperature before starting, especially the egg and buttermilk. This helps them mix more easily and evenly into the batter.
Additionally, when adding the boiling water, do so slowly to avoid splattering and to help the batter incorporate properly. For the frosting, start with a small amount of food coloring and add more as needed to achieve the desired hue.
Finally, decorating can be a fun group activity, so consider involving your party guests in creating their own monster designs for a memorable Halloween experience!
Ghostly Popcorn Balls
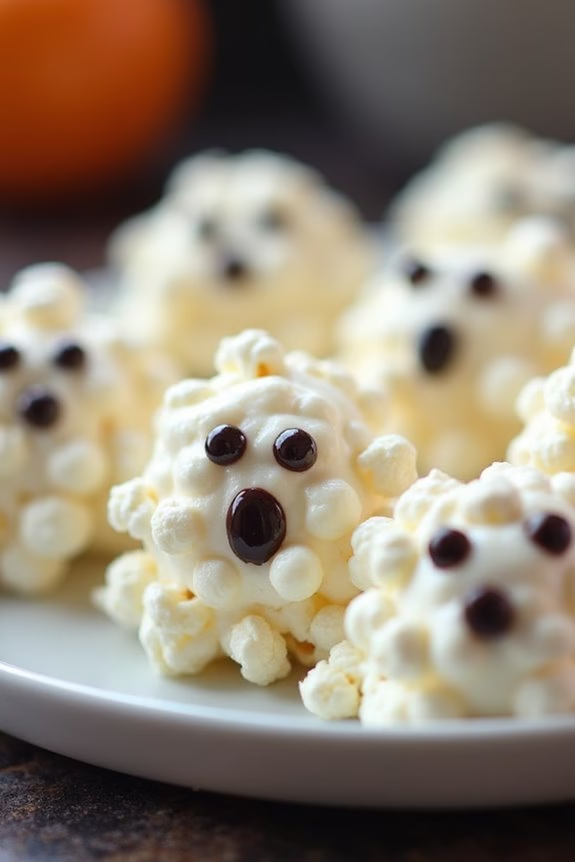
Ghostly Popcorn Balls are the perfect Halloween snacks to spook and delight your party guests. These sweet and salty treats aren’t only easy to make but also fun to serve. Imagine a platter filled with popcorn balls that resemble little ghosts, complete with faces made from edible decorations. The combination of marshmallows, popcorn, and a hint of vanilla creates a delectable taste that will have everyone reaching for more.
These popcorn balls are a great way to get into the festive spirit and are sure to be a hit with both kids and adults alike. Whether you’re hosting a Halloween party or just looking for a fun activity to do with family and friends, making Ghostly Popcorn Balls is a great choice. You can even customize them with different decorations and add-ins, making them as spooky or as silly as you like.
This recipe serves 4-6 people, making it ideal for a small gathering. With a few simple ingredients and easy-to-follow steps, you’ll have a batch of ghostly treats ready in no time. So gather your ingredients and get ready to create some hauntingly delicious snacks!
Ingredients (serves 4-6):
- 10 cups plain popped popcorn
- 1 cup mini marshmallows
- 1/2 cup unsalted butter
- 1/2 cup granulated sugar
- 1/4 cup light corn syrup
- 1 teaspoon vanilla extract
- Pinch of salt
- Edible decorating gel or small candies for eyes and mouth
Cooking Instructions:
- Prepare the Popcorn: Start by popping your popcorn, whether using a popcorn maker or stovetop method. Once popped, place 10 cups of popcorn in a large bowl, ensuring any unpopped kernels are removed.
- Melt the Mixture: In a saucepan over medium heat, melt the butter. Once melted, add the mini marshmallows, sugar, corn syrup, vanilla extract, and a pinch of salt. Stir continuously until the marshmallows are fully melted and the mixture is smooth and creamy.
- Combine: Pour the melted marshmallow mixture over the popcorn. Using a spatula, gently fold the mixture into the popcorn until each kernel is evenly coated. Be careful not to crush the popcorn.
- Shape the Balls: Allow the mixture to cool slightly so it’s easier to handle. Grease your hands with a bit of butter or cooking spray to prevent sticking, and then form the coated popcorn into balls about the size of a tennis ball.
- Decorate: Once the balls are shaped, use edible decorating gel or small candies to create ghostly faces on each popcorn ball. Let your creativity shine as you design spooky or friendly ghost expressions.
- Set and Serve: Place the decorated popcorn balls on a parchment-lined baking sheet to set. Allow them to cool completely before serving.
Extra Tips:
When making Ghostly Popcorn Balls, it’s important to work quickly while the marshmallow mixture is still warm, as it will be easier to shape the popcorn into balls. If the mixture hardens too quickly, you can warm it slightly to make it pliable again.
Additionally, feel free to experiment with different decorations like licorice strings for hair or colored sugar for a fun twist. These popcorn balls can be stored in an airtight container for a couple of days, making them convenient to prepare in advance. Enjoy crafting these spooky treats and have a hauntingly good time!
Witch’s Broomstick Pretzels

The best part about Witch’s Broomstick Pretzels is their simplicity. Using just a few ingredients, you can create an impressive and tasty snack that looks like a witch’s broomstick, complete with a pretzel stick handle and a cheese broom.
They’re a great way to get creative in the kitchen, and they can also be a fun activity to do with kids. Plus, they’re portable and easy to eat, making them ideal for a party setting.
Ingredients (Serving Size: 4-6 People):
- 20 pretzel sticks
- 10 string cheese sticks
- 20 chives or thin strips of green onion
Instructions:
- Prepare the Cheese: Start by unwrapping the string cheese sticks. Take each cheese stick and cut it in half crosswise, resulting in two shorter pieces. These will form the broom part of your broomstick.
- Create the Broom Bristles: With a sharp knife, carefully cut slits into one end of each piece of string cheese to create thin strands that resemble broom bristles. Make certain not to cut all the way through, leaving about a quarter of the cheese piece intact at the top.
- Attach the Pretzel Sticks: Insert a pretzel stick into the uncut end of each string cheese piece. Push it gently to ascertain it’s secure but avoid breaking the pretzel.
- Secure with Chives: To complete the broomstick look, take a chive or a strip of green onion and wrap it around the top of the cheese where it meets the pretzel. Tie it into a loose knot to secure it in place. If the chive is too long, trim the excess with scissors.
- Serve and Enjoy: Arrange your Witch’s Broomstick Pretzels on a platter and serve them to your guests. For added presentation, you might consider placing them in a small jar or cup so they stand upright like brooms.
Extra Tips:
When making Witch’s Broomstick Pretzels, be certain the string cheese is cold, as this helps to cut cleanly without becoming too soft or sticky.
If you don’t have chives or green onions, you can use thin strips of bell pepper or carrot as an alternative for tying the broom.
For a sweeter variation, swap out the pretzels with chocolate-covered pretzel rods and use fruit leather strips for the ties.
These broomsticks can be made a few hours in advance and stored in the refrigerator until ready to serve, making them a convenient option for busy party hosts.
Creepy Crawly Deviled Eggs
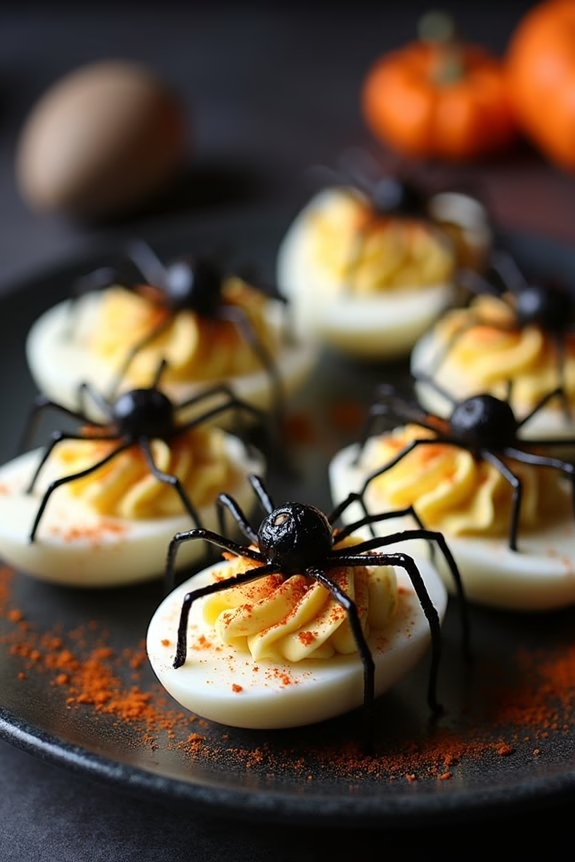
Creepy Crawly Deviled Eggs are the perfect addition to your Halloween party spread. These spooky treats aren’t only delicious but are also visually striking, with their eerie appearance that’s sure to impress your guests. The classic taste of deviled eggs gets a Halloween twist with the addition of black olives that mimic spiders, crawling atop the creamy egg filling.
Whether you’re hosting a party for kids or adults, these deviled eggs will be a hit with everyone.
Start by hard boiling the eggs, then scoop out the yolks to create a smooth, flavorful filling. The filling is a blend of mayonnaise, mustard, and spices, providing the traditional tang and creaminess that deviled eggs are known for. Once the eggs are filled, use sliced black olives to create the legs and bodies of little olive spiders perched on each egg half. This playful presentation will make your Halloween table both festive and frightful.
Ingredients (Serving Size: 4-6 People):
- 6 large eggs
- 1/4 cup mayonnaise
- 1 teaspoon Dijon mustard
- 1 teaspoon white vinegar
- Salt and pepper to taste
- Paprika for garnish
- 1 can whole black olives
Instructions:
- Boil the Eggs: Place the eggs in a single layer in a saucepan and cover them with water. Bring the water to a boil over medium-high heat. Once boiling, cover the saucepan with a lid and remove it from the heat. Let the eggs sit for 10-12 minutes.
- Cool and Peel: After the eggs are cooked, transfer them to a bowl of ice water to cool for at least 5 minutes. This will make peeling easier. Once cooled, gently crack and peel the shell off each egg.
- Prepare the Filling: Carefully slice each egg in half lengthwise. Remove the yolks and place them in a mixing bowl. Mash the yolks with a fork until smooth.
- Mix the Filling: Add mayonnaise, Dijon mustard, white vinegar, salt, and pepper to the mashed yolks. Stir until the mixture is creamy and well combined.
- Fill the Egg Whites: Spoon the yolk mixture back into the egg white halves. You can use a piping bag for a more professional look if desired.
- Create the Spiders: Slice whole black olives in half lengthwise. Use one half for the spider body and cut the other half into thin strips to make the legs. Arrange the olive pieces on the filled eggs to resemble spiders.
- Garnish and Serve: Lightly dust the filled eggs with paprika for added color and flavor. Serve your Creepy Crawly Deviled Eggs on a festive platter.
Extra Tips:
For a more pronounced spooky look, consider dying the egg whites with food coloring before filling them. Simply soak the peeled egg whites in a mixture of water and a few drops of food coloring until they reach the desired hue.
Be cautious with the amount of salt used, as both mayonnaise and mustard can add to the overall saltiness. Additionally, if you want to save time, the deviled eggs can be made a day in advance and stored in the refrigerator until ready to assemble with the olive spiders.
Mummy Hot Dogs

Mummy Hot Dogs are a spooky and delicious treat perfect for any Halloween party. With a fun and festive presentation, these hot dogs are wrapped in crescent roll dough to resemble mini mummies, complete with mustard or ketchup “eyes.” They’re a hit with both kids and adults, making them an ideal choice for any gathering.
Not only are they simple to prepare, but they also add a whimsical touch to your Halloween spread, guaranteeing your guests are both entertained and well-fed. The combination of savory hot dogs and buttery crescent rolls creates a delightful flavor that’s hard to resist.
Whether you’re hosting a large party or a small get-together, these Mummy Hot Dogs are sure to be a crowd-pleaser. Follow this easy recipe to serve 4-6 people, and watch your guests enjoy these adorable and tasty treats.
Ingredients for 4-6 people:
- 8 hot dogs
- 1 can (8 oz) of refrigerated crescent roll dough
- Mustard or ketchup for eyes
- Cooking spray or parchment paper
Cooking Instructions:
1. Preheat the Oven: Start by preheating your oven to 375°F (190°C). This guarantees that the crescent roll dough cooks evenly and becomes golden brown.
2. Prepare the Baking Sheet: Line a baking sheet with parchment paper or lightly coat it with cooking spray to prevent the mummies from sticking during baking.
3. Unroll the Crescent Dough: Open the can of crescent roll dough and unroll it on a clean surface. Use a sharp knife or pizza cutter to cut the dough into thin strips, approximately 1/4 inch wide.
4. Wrap the Hot Dogs: Take a hot dog and wrap the dough strips around it, leaving a small space uncovered at one end for the “face.” Continue wrapping until you reach the other end, then place the wrapped hot dog on the prepared baking sheet.
Repeat with the remaining hot dogs and dough strips.
5. Bake the Mummy Hot Dogs: Place the baking sheet in the preheated oven and bake for 12-15 minutes, or until the dough is golden brown and fully cooked.
6. Add the Eyes: Once baked, remove the hot dogs from the oven and let them cool slightly. Use a small drop of mustard or ketchup to create eyes on the exposed section of each hot dog.
Extra Tips:
For an extra crisp texture, brush the dough lightly with melted butter before baking. If you’re making these ahead of time, consider wrapping the hot dogs in the dough and refrigerating them until you’re ready to bake.
Jack-O’-Lantern Stuffed Peppers
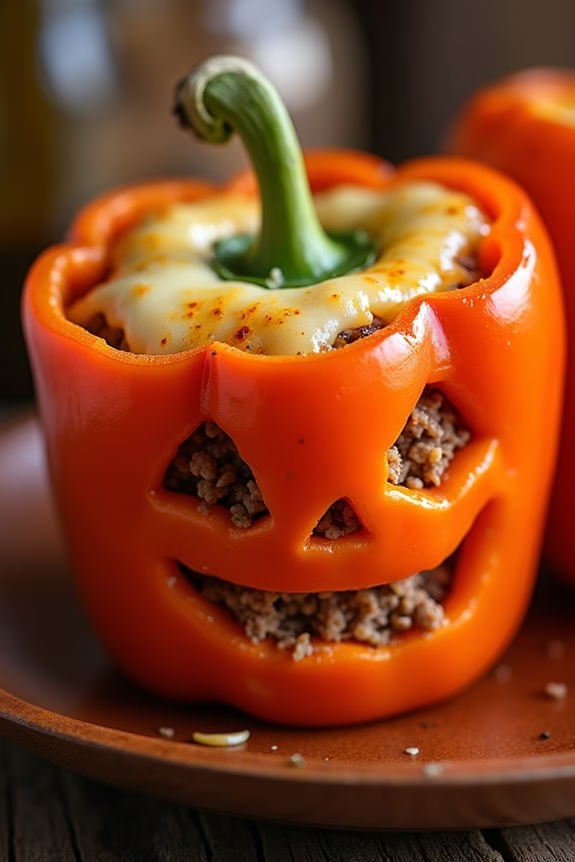
Halloween is the perfect time to get creative in the kitchen, and these Jack-O’-Lantern Stuffed Peppers are a festive treat that will delight your party guests. Not only are they visually appealing with their carved faces, but they also offer a delicious and hearty filling that’s certain to please.
These stuffed peppers are filled with a mixture of seasoned rice, ground beef, and vegetables, making them both a flavorful and satisfying dish. The Jack-O’-Lantern Stuffed Peppers aren’t only a fun addition to your Halloween party spread but also quite simple to prepare.
You’ll need to carve each bell pepper to resemble a Jack-O’-Lantern, which adds an element of fun to the preparation process. Once carved, the peppers are filled with a savory mixture and baked to perfection. This recipe serves 4-6 people, making it an ideal choice for an intimate gathering or as a featured dish among other Halloween-themed snacks.
Ingredients:
- 6 medium orange bell peppers
- 1 tablespoon olive oil
- 1 small onion, diced
- 2 cloves garlic, minced
- 1 pound ground beef
- 1 cup cooked rice
- 1 can (14.5 oz) diced tomatoes, drained
- 1 teaspoon Italian seasoning
- Salt and pepper to taste
- 1 cup shredded mozzarella cheese
Instructions:
- Prepare the Peppers: Preheat your oven to 375°F (190°C). Cut the tops off the bell peppers and remove seeds and membranes. Use a small sharp knife to carve faces into one side of each pepper, resembling a Jack-O’-Lantern. Place the peppers upright in a baking dish.
- Cook the Filling: In a large skillet over medium heat, heat the olive oil. Add the diced onion and minced garlic, and sauté until the onion becomes translucent, about 3-4 minutes. Add the ground beef and cook until browned, breaking it apart with a spoon as it cooks.
- Mix the Ingredients: Once the beef is cooked through, drain any excess fat from the skillet. Add the cooked rice, diced tomatoes, Italian seasoning, salt, and pepper to the skillet. Stir well to combine all the ingredients and heat through for another 2-3 minutes.
- Stuff the Peppers: Spoon the beef and rice mixture into each carved pepper until they’re filled. Press down the filling gently to guarantee each pepper is packed well. Sprinkle the top of each filled pepper with shredded mozzarella cheese.
- Bake: Place the filled peppers into the preheated oven and bake for 25-30 minutes, or until the peppers are tender and the cheese is melted and slightly golden.
- Serve: Once baked, remove the peppers from the oven and let them cool slightly. Serve warm, and enjoy the spooky presentation and delicious flavors with your party guests.
Extra Tips:
To make these Jack-O’-Lantern Stuffed Peppers even more festive, you can use a variety of colored bell peppers such as red or yellow for a more vibrant presentation.
If you’re looking to make the dish vegetarian, you can substitute the ground beef with a plant-based protein or additional vegetables like mushrooms and zucchini. Be sure to choose peppers that can stand upright for the best presentation and make carving easier.
Finally, feel free to adjust the seasoning to fit your taste preferences, adding more spice if desired.
Bloodshot Eyeball Punch
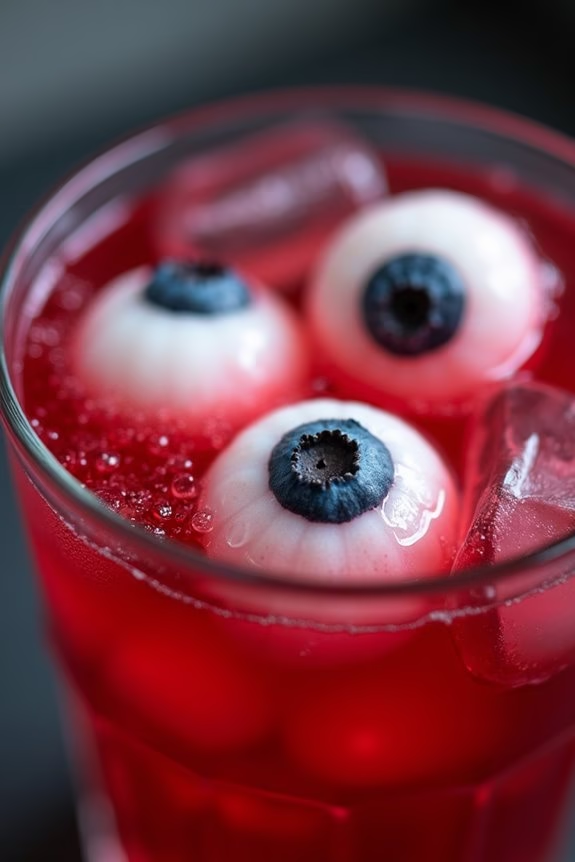
Looking to add a spooky twist to your Halloween party menu? Search no more than Bloodshot Eyeball Punch. This eerie yet delicious concoction is sure to send shivers down your guests’ spines while tantalizing their taste buds. With its vibrant red hue and creepy floating eyeballs, this punch isn’t only a visual treat but also a revitalizing beverage that will keep your party guests coming back for more.
Whether you’re hosting a large gathering or an intimate get-together, Bloodshot Eyeball Punch is the perfect addition to your Halloween festivities.
The secret to the spine-chilling appearance of this punch lies in the use of lychee “eyeballs” filled with blueberries for a realistic effect. Combined with a fruity and fizzy blend of cranberry juice, ginger ale, and a touch of lemonade, this punch strikes the perfect balance between sweet and tangy.
For an added layer of spookiness, serve it in a large bowl with a ladle, allowing guests to serve themselves as they marvel at the floating eyeballs. This recipe serves 4-6 people, making it ideal for a small to medium-sized gathering.
Ingredients:
- 1 can of lychees in syrup, drained
- 1 cup of fresh blueberries
- 3 cups of cranberry juice
- 1 cup of lemonade
- 2 cups of ginger ale
- Ice cubes
- Optional: red food coloring
Instructions:
- Prepare the Eyeballs: Begin by draining the canned lychees and setting them aside. Insert a fresh blueberry into the center of each lychee, making sure that the stem end of the blueberry is facing outward to mimic the appearance of an iris. Place the completed “eyeballs” into a bowl and refrigerate until ready to use.
- Mix the Base: In a large punch bowl or pitcher, combine the cranberry juice and lemonade. Stir well to confirm the flavors are well blended.
- Add Fizz: Slowly pour in the ginger ale, stirring gently to maintain the carbonation. This combination will give the punch a revitalizing fizz, perfect for a festive occasion.
- Adjust the Color (Optional): If you desire a deeper red color for dramatic effect, add a few drops of red food coloring. Stir until the color is evenly distributed throughout the punch.
- Add the Eyeballs: Remove the prepared lychee eyeballs from the refrigerator and carefully add them to the punch. They’ll float on the surface, creating a chilling visual display.
- Serve and Enjoy: Add ice cubes to keep the punch chilled, and serve immediately using a ladle. Encourage guests to scoop up the eyeballs for an extra spooky experience.
Extra Tips:
For a more adult version of Bloodshot Eyeball Punch, consider adding a splash of vodka or rum to the mix for an extra kick.
You can also experiment with different fruit juices to alter the flavor profile to your liking. If you’d like to make the eyeballs even more realistic, use a small knife to carve small lines into the lychee, mimicking the appearance of veins.
Finally, if you prefer a non-alcoholic version with less sugar, opt for diet ginger ale and naturally sweetened cranberry juice. Remember to keep the punch cold, as the flavors are best enjoyed when chilled.
Goblin Grin Guacamole
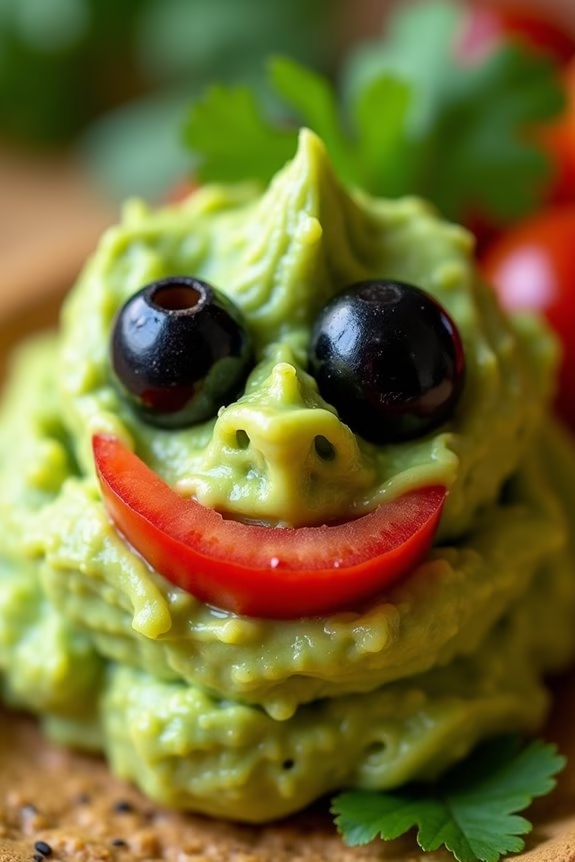
Goblin Grin Guacamole is a spooky twist on the classic guacamole, perfect for delighting your Halloween party guests with a ghoulishly green treat. This dish combines creamy avocados with zesty lime, fresh cilantro, and a hint of spice, all artfully arranged to resemble a goblin’s grin.
The vibrant colors and playful presentation make it an eye-catching addition to your Halloween spread, and its rich flavors guarantee it’s a crowd-pleaser for all ages.
This recipe serves 4-6 people and is both simple to prepare and fun to decorate. The key to creating the perfect Goblin Grin Guacamole is choosing ripe avocados, which lend a velvety texture to the dip.
Add a few creative touches like olive slices for eyes and a tomato-slice smile, and you’ll have a monstrously good appetizer that will keep your guests coming back for more.
Ingredients:
- 4 ripe avocados
- 1 lime, juiced
- 1 teaspoon salt
- 1/2 cup diced onion
- 3 tablespoons chopped fresh cilantro
- 2 roma tomatoes, diced
- 1 teaspoon minced garlic
- 1 pinch ground cayenne pepper
- 4-6 black olives, sliced (for decoration)
- 1 tomato, sliced (for decoration)
Instructions:
- Prepare the Avocados: Cut the avocados in half, remove the pits, and scoop the flesh into a mixing bowl. Use a fork or potato masher to mash the avocados to your desired consistency, leaving some small chunks for texture.
- Mix the Ingredients: Add lime juice and salt to the mashed avocados. Mix thoroughly to confirm the avocado remains vibrant and doesn’t brown. Incorporate the diced onion, chopped cilantro, diced tomatoes, minced garlic, and ground cayenne pepper. Stir until all ingredients are evenly distributed.
- Taste and Adjust: Taste the guacamole and adjust the seasoning if necessary. Add more salt, lime, or cayenne pepper according to your preference.
- Decorate: Transfer the guacamole to a serving platter and shape it into a face with a wide grin. Use olive slices to create eyes and a tomato slice to form a mouth. Get creative with the arrangement to give your goblin some personality.
- Serve Immediately: Serve the Goblin Grin Guacamole immediately with tortilla chips, guaranteeing it stays fresh and vibrant.
Extra Tips:
For the best flavor, use ripe avocados that yield to gentle pressure when squeezed. If your avocados aren’t ripe enough, you can accelerate the process by placing them in a paper bag with a banana for a day.
To prevent browning, always add lime juice to the guacamole and serve it quickly after preparation. If you need to store it, press plastic wrap directly onto the surface of the guacamole to minimize air exposure.
Finally, let your creativity shine through when decorating your goblin face; the more unique, the better!
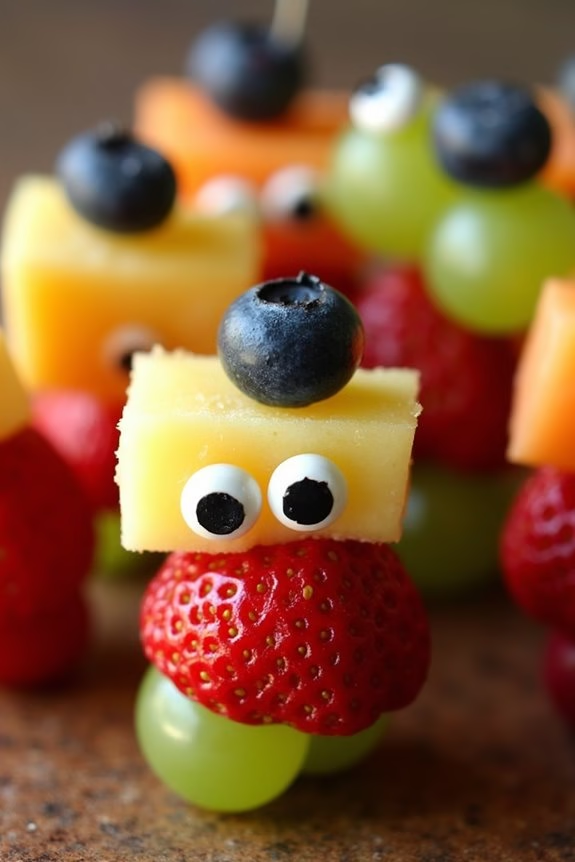
Frightening Fruit Skewers
Halloween is the perfect time to serve up some spooky snacks that are both fun and healthy. Frightening Fruit Skewers are an excellent choice for those looking to add a touch of fright to their Halloween party spread while still providing a nutritious option for guests. These skewers are easy to make and can be customized to suit any theme or taste preference.
Whether you’re hosting a children’s party or an adult gathering, these skewers will surely be a hit with everyone.
The key to creating these eerie treats is to use a variety of colorful fruits and to present them in a way that’s both visually appealing and slightly spooky. By using fruits like grapes, strawberries, and melons, you can create a vibrant display that mimics the colors of the Halloween season.
The addition of edible eyes or other fun decorations can transform ordinary fruit into creepy, crawly critters that will delight your guests. Not only are these skewers a feast for the eyes, but they’re also a guilt-free indulgence packed with vitamins and minerals.
Ingredients for 4-6 servings:
- 1 cup green grapes
- 1 cup red grapes
- 1 cup strawberries, hulled
- 1 cup cantaloupe, cubed
- 1 cup pineapple chunks
- 1/2 cup blueberries
- 12 wooden skewers
- Edible candy eyes (optional)
- 1 tablespoon lemon juice
Cooking Instructions:
- Prepare the Fruits: Start by washing all the fruits thoroughly under cold water. Hull the strawberries and cut the cantaloupe and pineapple into bite-sized cubes. If necessary, remove any seeds.
- Prevent Browning: In a small bowl, toss the cut fruits, except for the grapes and blueberries, with a tablespoon of lemon juice. This will help prevent them from browning and keep them looking fresh.
- Assemble the Skewers: Take a wooden skewer and begin threading the fruits in an alternating pattern. Start with a grape, followed by a strawberry, a cantaloupe cube, a pineapple chunk, and a blueberry. Repeat the pattern until the skewer is nearly full, leaving about an inch of space at the end for handling.
- Add the Spooky Touch: Once all the skewers are assembled, add edible candy eyes to some of the fruits, pressing them gently into the surface. This will create the appearance of little spooky faces peeking out from the skewers.
- Arrange and Serve: Place the completed skewers on a decorative serving platter or stick them upright into a carved-out pumpkin or melon for an added Halloween effect. Serve immediately or cover and refrigerate until ready to serve.
Extra Tips:
To make the most of your Frightening Fruit Skewers, consider using a mix of seasonal fruits that are fresh and ripe for the best flavor.
If you’re short on time, you can prepare the fruits and skewer them a day in advance, just remember to add the candy eyes right before serving to guarantee they stay in place.
For an even more festive touch, you can drizzle the skewers with a bit of melted chocolate or a honey glaze just before serving. This recipe is versatile, so feel free to get creative with the presentation and fruit selection to suit your Halloween theme.
Bone-Chilling Cheese Plate
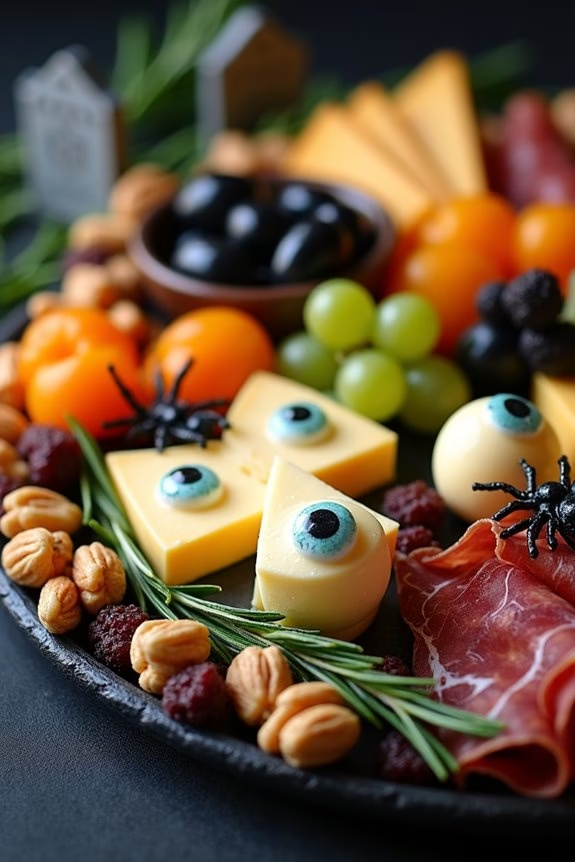
Elevate your Halloween festivities with a Bone-Chilling Cheese Plate that’s equal parts eerie and delicious. This spook-tacular platter combines a variety of cheeses, cured meats, and themed decorations to create a chilling centerpiece for your party table.
Whether you’re hosting a small gathering or a larger bash, this cheese plate is bound to impress your guests with its hauntingly delightful presentation. Serve it as an appetizer or a main attraction to set the mood for a night of thrilling fun.
This cheese plate is designed to serve 4-6 people and includes a selection of cheeses that cater to different palates, from creamy and mild to sharp and robust. Accompanied by a variety of meats, crackers, and haunting garnishes, the Bone-Chilling Cheese Plate is arranged to resemble a spooky graveyard or a macabre Halloween scene.
With a bit of creativity and attention to detail, you can craft a cheese plate that not only satisfies the taste buds but also adds a touch of fright to your Halloween decor.
Ingredients for Bone-Chilling Cheese Plate (serves 4-6):
- 8 oz. sharp cheddar cheese
- 8 oz. brie cheese
- 8 oz. blue cheese
- 4 oz. goat cheese
- 6 oz. prosciutto
- 6 oz. salami
- 1 cup black olives
- 1 cup green grapes
- 1/2 cup dried apricots
- 1/2 cup mixed nuts
- 1 pack of assorted crackers
- Fresh rosemary sprigs
- Edible candy eyeballs
- 1 small Halloween-themed cookie cutter (e.g., bat, ghost, skull)
Cooking Instructions:
1. Prepare the Cheese: Begin by slicing the sharp cheddar and brie cheese into thin pieces. Use a small Halloween-themed cookie cutter to cut out spooky shapes from the cheese slices.
Arrange the shaped cheese on a large platter or wooden board to form the base of your cheese plate.
2. Arrange the Cheese: Crumble the blue cheese into small chunks and place them around the board. Roll the goat cheese into small balls and position them strategically to resemble eerie eyeballs, adding edible candy eyeballs on top for a spooky effect.
3. Add the Meats: Fold the prosciutto and salami into decorative shapes and place them around the cheese. You can create “meat roses” by folding the slices in a circular pattern or simply drape them over the cheese for a rustic look.
4. Garnish the Plate: Scatter black olives, green grapes, dried apricots, and mixed nuts around the cheese and meats. These not only add color and texture to the board but also contribute to the haunting theme with their natural, earthy colors.
5. Finish with Crackers and Herbs: Add assorted crackers to the board, tucking them in wherever there’s space. Use fresh rosemary sprigs to fill in any gaps and add a touch of greenery, enhancing the spooky graveyard appearance.
Extra Tips:
For an even more chilling effect, use a dark-colored platter or board as the base for your cheese plate to create contrast with the lighter-colored foods.
Incorporate small Halloween-themed props, like plastic spiders or mini tombstones, to enhance the eerie atmosphere. Confirm there’s a variety of flavors and textures on the plate to cater to all taste preferences.
Keep the cheese plate refrigerated until just before serving to maintain the freshness of the ingredients.
Vampire Bite Brownies
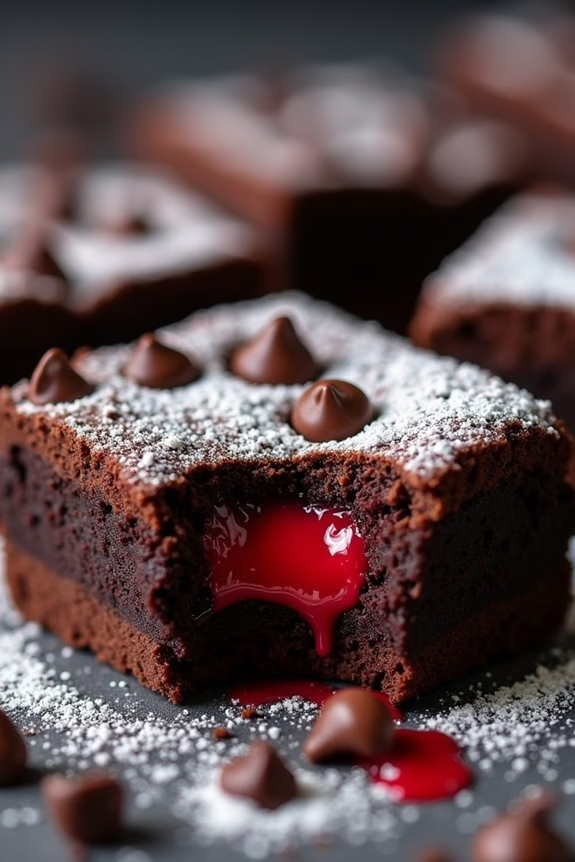
Vampire Bite Brownies are a deliciously spooky treat perfect for your Halloween party guests. These fudgy brownies aren’t only rich and satisfying, but they come with a creepy twist that will intrigue and delight both young and old. Imagine biting into a brownie and revealing a blood-red surprise that will add the perfect eerie touch to your Halloween spread.
These brownies are as fun to make as they’re to eat, making them a great option for those looking to add a little festive flair to their dessert table. The secret to creating Vampire Bite Brownies is all in the presentation. By adding a gooey red filling to the center of each brownie, you can simulate the effect of “bleeding” when they’re bitten into.
The combination of the rich chocolate base with the sweet and slightly tart filling creates a harmonious balance that will leave your guests reaching for more. This recipe is designed to serve 4-6 people, making it ideal for small gatherings or as a contribution to a larger potluck-style party.
Ingredients
- 1 cup (2 sticks) unsalted butter
- 2 cups granulated sugar
- 4 large eggs
- 1 teaspoon vanilla extract
- 1 cup all-purpose flour
- 1 cup unsweetened cocoa powder
- 1/2 teaspoon salt
- 1 cup semisweet chocolate chips
- 1/2 cup raspberry jam or red gel food coloring mixed with corn syrup
- Red gel food coloring (optional, for raspberry jam)
- 1/4 cup powdered sugar (for dusting, optional)
Instructions
1. Preheat the Oven:
Preheat your oven to 350°F (175°C). Line a 9×13 inch baking pan with parchment paper, leaving some overhang on the sides to easily lift the brownies out later.
2. Melt the Butter:
In a medium saucepan over low heat, melt the butter. Once melted, remove from heat and pour it into a large mixing bowl.
3. Mix Wet Ingredients:
Add the sugar, eggs, and vanilla extract to the melted butter. Use a whisk to blend until well combined and smooth.
4. Combine Dry Ingredients:
In a separate bowl, sift together the flour, cocoa powder, and salt. Gradually add these dry ingredients to the wet mixture, stirring gently until just combined.
5. Add Chocolate Chips:
Fold in the chocolate chips using a spatula, making certain they’re evenly distributed throughout the batter.
6. Prepare the Filling:
If using raspberry jam, mix it with a few drops of red gel food coloring until you achieve a blood-red color. Alternatively, mix red gel food coloring with corn syrup until you reach the desired consistency and color.
7. Assemble the Brownies:
Pour half of the brownie batter into the prepared pan, spreading it evenly. Using a spoon, drop small dollops of the red filling across the surface of the batter. Carefully spread the remaining brownie batter over the top, ensuring the filling is concealed.
8. Bake:
Place the pan in the preheated oven and bake for 25-30 minutes, or until a toothpick inserted into the center comes out with a few moist crumbs attached.
9. Cool and Serve:
Allow the brownies to cool in the pan for about 10 minutes, then lift them out using the parchment paper overhang. Once completely cool, cut into squares and dust with powdered sugar if desired.
Extra Tips
For the best results, verify that your brownies don’t overbake; they should remain moist and fudgy in the center. If you prefer a more intense red filling, feel free to adjust the amount of food coloring to suit your visual preferences.
Additionally, you can use other berry jams that pair well with chocolate, such as strawberry or cherry, for a unique twist. Finally, these brownies can be made a day in advance and stored in an airtight container, making them a convenient and no-stress option for your Halloween festivities.
Zombie Fingers Breadsticks

If you’re looking for a bone-chilling treat to serve at your Halloween party, Zombie Fingers Breadsticks are the perfect choice. These spooky snacks aren’t only delicious but also fun to make, adding a festive touch to your Halloween spread. Shaped to resemble eerie zombie fingers, these breadsticks are sure to delight and perhaps even slightly spook your guests. Their golden-brown exteriors are complemented by a hint of garlic and herbs, making them a savory addition to your Halloween menu.
Zombie Fingers Breadsticks are a great way to get creative in the kitchen, and they can be made quickly with minimal ingredients. Designed to serve 4-6 people, this recipe is perfect for small gatherings, or it can be easily doubled for larger parties. Whether you’re hosting a haunted house party or a cozy family get-together, these breadsticks will add a ghoulishly good element to your celebration.
Ingredients (serves 4-6):
- 1 package of refrigerated pizza dough
- 1/4 cup of unsalted butter, melted
- 2 cloves of garlic, minced
- 1/2 cup of grated Parmesan cheese
- 1 teaspoon of dried Italian herbs (oregano, basil, thyme mix)
- 12 whole blanched almonds
- Red food coloring (optional)
- Salt to taste
Cooking Instructions:
- Preheat the Oven: Start by preheating your oven to 375°F (190°C). Line a baking sheet with parchment paper to prevent sticking and guarantee even baking.
- Prepare the Dough: Roll out the refrigerated pizza dough on a lightly floured surface to about 1/4 inch thickness. Using a sharp knife, cut the dough into strips approximately 1 inch wide and 4-5 inches long.
- Shape the Fingers: Gently shape each strip into a finger by tapering one end to form a fingertip and using your fingers to create knuckle-like indentations along the length of the dough. Be creative with the shapes to give each “finger” a unique look.
- Add the Almond “Nails”: Press a blanched almond onto the tapered end of each breadstick to resemble a fingernail. For a bloodied effect, you can brush a bit of red food coloring around the base of the almond.
- Season the Breadsticks: In a small bowl, mix the melted butter with minced garlic, Parmesan cheese, and Italian herbs. Brush this mixture generously over each breadstick, making sure they’re well-coated.
- Bake the Breadsticks: Place the shaped breadsticks on the prepared baking sheet, ensuring they’re spaced evenly apart. Bake in the preheated oven for 15-20 minutes, or until they’re golden brown and cooked through.
- Finish and Serve: Remove the breadsticks from the oven and let them cool slightly before serving. Sprinkle with a pinch of salt if desired, and arrange them on a platter for your guests to enjoy.
Extra Tips:
For an extra spooky touch, consider using green food coloring in the dough to give the fingers a more ghoulish appearance. You can also serve them with a side of marinara sauce or a cheese dip, labeled as “blood” or “zombie goo” for added thematic flair.
If you want a softer breadstick, avoid over-baking; the dough should be cooked but still slightly soft to the touch. Enjoy creating these fun and creepy treats, and watch as your guests delight in the playful Halloween spirit they bring to your party!
Haunted House Gingerbread Cookies
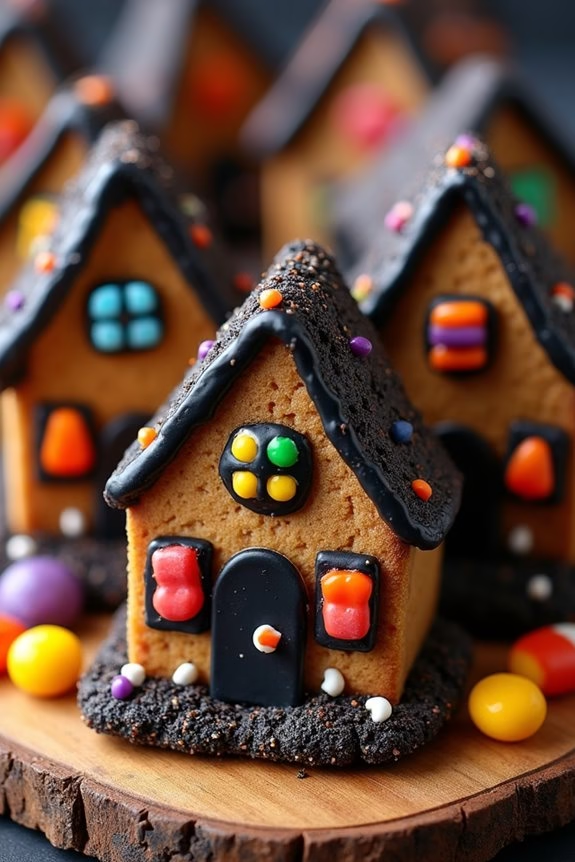
Transform your kitchen into a spook-tacular bakery with these Haunted House Gingerbread Cookies, the perfect treat for your Halloween party guests. These cookies combine the rich, warm flavors of gingerbread with the spooky fun of Halloween.
Whether you’re hosting a haunted house party or just looking for a festive holiday activity, these cookies are bound to delight both kids and adults alike. The combination of fragrant spices and playful decorations make these a standout treat that won’t only look amazing but taste delicious too.
The key to making these cookies truly haunted lies in the creative decorations. Think of these cookies as little edible canvases where you can bring your haunted house visions to life. Use black icing for spooky silhouettes, vibrant candies for windows and doors, and maybe even some edible glitter for an extra magical touch.
Gather your friends or family, and let everyone join in on the decorating fun. Not only will you end up with a delicious treat, but you’ll also create fun, lasting memories while doing so.
Ingredients (Serving Size: 4-6 people)
- 3 cups all-purpose flour
- 1 teaspoon baking soda
- 1/4 teaspoon baking powder
- 1 tablespoon ground ginger
- 1 tablespoon ground cinnamon
- 1/2 teaspoon ground cloves
- 1/2 teaspoon salt
- 3/4 cup unsalted butter, softened
- 3/4 cup dark brown sugar
- 1 egg
- 1/2 cup molasses
- 1 teaspoon vanilla extract
- Black icing
- Assorted candies for decoration (e.g., candy corn, licorice, gumdrops)
- Edible glitter (optional)
Cooking Instructions
- Prepare the Dough: In a large bowl, whisk together the flour, baking soda, baking powder, ginger, cinnamon, cloves, and salt. In a separate bowl, beat together the softened butter and dark brown sugar until light and fluffy. Add in the egg, molasses, and vanilla extract, mixing until fully combined.
- Combine Ingredients: Gradually add the dry ingredients to the wet ingredients, mixing until a dough forms. Divide the dough in half, flatten each half into a disk, wrap in plastic wrap, and refrigerate for at least 2 hours or until firm.
- Preheat the Oven: Preheat your oven to 350°F (175°C) and line two baking sheets with parchment paper.
- Roll and Cut the Dough: On a lightly floured surface, roll out one half of the dough to about 1/4-inch thickness. Use Halloween-themed cookie cutters to cut out desired shapes and place them on the prepared baking sheets, leaving some space between each cookie.
- Bake the Cookies: Bake for 8-10 minutes, or until the edges are firm and the centers are set. Allow the cookies to cool on the baking sheets for 5 minutes before transferring them to a wire rack to cool completely.
- Decorate: Once cooled, use black icing to outline and draw details on the cookies. Add candies for windows, doors, or other spooky elements to your haunted house designs. Dust with edible glitter if you wish for an extra sparkle.
Extra Tips
When rolling out the dough, make sure it’s evenly thick to guarantee even baking. If the dough becomes too sticky, return it to the refrigerator for a few minutes.
For a more vibrant decoration, use gel food coloring in your icing for extra vivid details. If you’re planning to hang these cookies as decorations, use a straw to create a hole near the top before baking.
Enjoy the creative process, and don’t worry about perfection—each cookie is a unique piece of edible art!
Cauldron of Caramel Corn

This Halloween, delight your party guests with a tantalizing treat that’s sure to be a hit: the Cauldron of Caramel Corn. This sweet, crunchy snack combines the classic flavors of caramel and popcorn in a festive and fun way. Perfect for the spooky season, this recipe transforms a simple treat into a bewitching centerpiece for your Halloween gathering. With its golden caramel coating and irresistible crunch, Cauldron of Caramel Corn is a guaranteed way to enchant your guests.
Making caramel corn from scratch may sound intimidating, but fear not! This recipe is straightforward and requires only a few simple ingredients. The secret is in the preparation and timing, making sure that each kernel is perfectly coated in the gooey, sugary caramel.
Whether you’re hosting a haunted house party or a cozy movie night, this recipe for 4-6 servings is the perfect addition to your Halloween spread. Gather your ingredients and let’s get cooking!
Ingredients (4-6 servings):
- 10 cups popped popcorn
- 1 cup unsalted butter
- 2 cups packed brown sugar
- 1/2 cup light corn syrup
- 1 teaspoon salt
- 1/2 teaspoon baking soda
- 1 teaspoon vanilla extract
Cooking Instructions:
- Preheat and Prepare: Preheat your oven to 250°F (120°C). Line a large baking sheet with parchment paper or a silicone baking mat. Spread the popped popcorn evenly across the prepared baking sheet.
- Melt the Butter: In a medium saucepan over medium heat, melt the butter. Once melted, stir in the brown sugar, corn syrup, and salt. Stir continuously until the mixture comes to a gentle boil.
- Boil the Caramel: Allow the mixture to boil for about 5 minutes without stirring, just until it reaches a deep amber color. Remove the saucepan from heat and quickly stir in the baking soda and vanilla extract. The mixture will bubble up, so stir cautiously.
- Coat the Popcorn: Immediately pour the caramel over the popcorn on the baking sheet. Use a spatula or wooden spoon to gently toss and coat the popcorn evenly with the caramel.
- Bake for Crispness: Place the baking sheet in the preheated oven and bake for 45 minutes, stirring every 15 minutes to make sure of even coating and crispness.
- Cool and Serve: After baking, remove the caramel corn from the oven and let it cool completely on the baking sheet. Once cooled, break it into clusters and serve in a decorative bowl or cauldron for a fun Halloween presentation.
Extra Tips:
To make sure your caramel corn is perfectly crispy, make sure the caramel is evenly distributed over the popcorn before baking.
If you prefer a saltier snack, sprinkle a little sea salt over the caramel corn before baking. For an extra festive touch, consider adding Halloween-themed sprinkles or candy corn to the mix once the caramel corn has cooled.
Store any leftovers in an airtight container to maintain freshness. Enjoy your Cauldron of Caramel Corn as a delightful treat that captures the spirit of Halloween!