

Halloween is just around the corner, and it’s the perfect time to whip up some magical potluck dishes that will dazzle your friends. Think creepy crawly deviled eggs, mummy jalapeño poppers, and other spooktacular treats that are both eerie and delicious. These creative delights promise to bring festive fun and enchanting flavors to your gathering. Ready to add a touch of culinary magic to your Halloween celebration? Let’s make it a frightful yet delightful affair!
Creepy Crawly Deviled Eggs
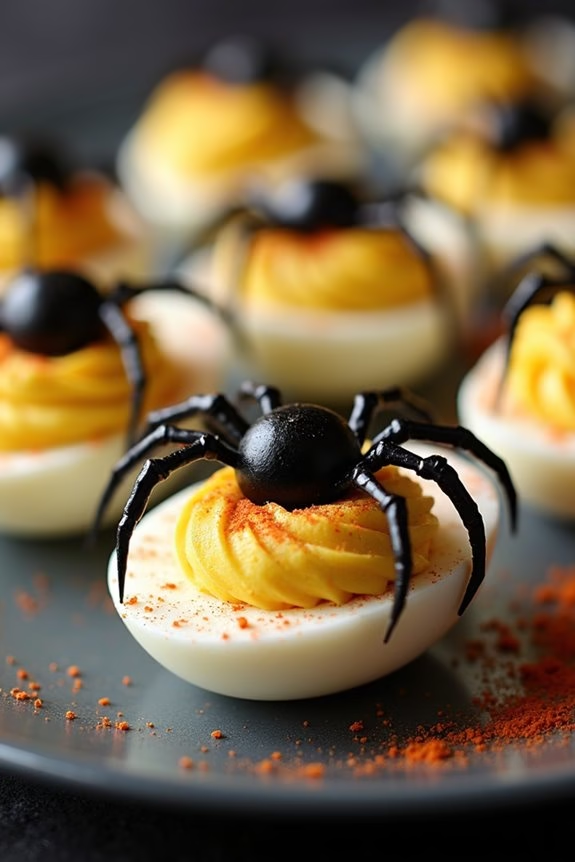
Get ready to spook your guests with these Creepy Crawly Deviled Eggs, a perfect addition to your Halloween potluck spread. These devilishly delightful appetizers aren’t only visually appealing but also rich in flavor, making them a surefire hit for both kids and adults.
With a unique twist to the classic deviled eggs, this recipe combines the smoothness of the filling with a touch of creepiness from edible decorations that resemble creepy crawly creatures. The key to making these deviled eggs truly eerie lies in the creative use of black olives and paprika to create spider-like toppings.
The filling is creamy and tangy, thanks to a combination of mayonnaise, mustard, and a hint of vinegar. These deviled eggs are easy to prepare and can be made ahead of time, allowing you to focus on other aspects of your Halloween party. Let’s plunge into the recipe and get ready to impress your guests with these spooky treats!
Ingredients (serving size: 4-6 people):
- 6 large eggs
- 3 tablespoons mayonnaise
- 1 teaspoon Dijon mustard
- 1 teaspoon white vinegar
- Salt and pepper to taste
- 12 black olives
- Paprika for garnish
Cooking Instructions:
- Boil the Eggs: Place the eggs in a saucepan and cover them with cold water. Bring the water to a boil over medium-high heat. Once boiling, reduce the heat to low and let the eggs simmer for about 10 minutes.
- Cool and Peel the Eggs: After boiling, transfer the eggs to a bowl of ice water to cool for at least 5 minutes. Once cooled, gently peel the shells off the eggs, being careful not to damage the whites.
- Prepare the Filling: Cut each egg in half lengthwise and carefully remove the yolks, placing them in a separate bowl. Add mayonnaise, Dijon mustard, white vinegar, salt, and pepper to the yolks. Mash everything together with a fork until the mixture is smooth and creamy.
- Fill the Egg Whites: Spoon the yolk mixture back into the egg white halves, evenly distributing the filling among them. You can also use a piping bag for a more polished look.
- Create the Spiders: Slice the black olives in half. Use one half for the spider’s body and cut the other half into thin slices to make legs. Arrange the olive pieces on top of each filled egg to resemble spiders.
- Garnish and Serve: Lightly sprinkle paprika over the filled eggs for added color and flavor. Arrange the Creepy Crawly Deviled Eggs on a serving platter and refrigerate until ready to serve.
Extra Tips:
For a more dramatic effect, consider using food coloring to dye the egg whites a spooky shade, like green or purple. If you’re preparing these deviled eggs in advance, keep them covered in the refrigerator to maintain freshness.
The spider decorations can be added just before serving to guarantee they stay intact. Don’t forget to taste the filling before stuffing the eggs, adjusting the seasoning as needed to suit your preference. Enjoy these eerie yet delicious appetizers at your Halloween gathering!
Mummy Jalapeño Poppers

Mummy Jalapeño Poppers are a fun and spooky appetizer perfect for any Halloween potluck. These delightful snacks combine the spicy kick of jalapeños with a creamy cheese filling, all wrapped up in a flaky crescent roll “mummy” shell.
They’re not only delicious but also visually appealing, making them a hit with both kids and adults. Whether you’re hosting a Halloween party or joining a potluck, these jalapeño poppers will be a festive addition to your spread.
The recipe for Mummy Jalapeño Poppers is simple and requires minimal ingredients, most of which you might already have in your pantry. The jalapeños are cut in half and filled with a creamy mixture of cream cheese and cheddar, then wrapped with strips of crescent roll dough to create the mummy effect.
When baked, these poppers turn golden and crispy, with the cheese melting into the jalapeños, creating a delicious balance of flavors and textures.
Ingredients (serving size: 4-6 people):
- 8 large jalapeños
- 8 oz cream cheese, softened
- 1 cup shredded cheddar cheese
- 1 tsp garlic powder
- 1/2 tsp onion powder
- 1/2 tsp smoked paprika
- 1 can (8 oz) refrigerated crescent roll dough
- 16 candy eyes (optional, for decoration)
Cooking Instructions:
- Prepare the Jalapeños: Preheat your oven to 375°F (190°C). Slice the jalapeños in half lengthwise and remove the seeds and membranes. This will reduce the heat and create space for the filling.
- Make the Filling: In a mixing bowl, combine the softened cream cheese, shredded cheddar cheese, garlic powder, onion powder, and smoked paprika. Mix until smooth and well combined.
- Fill the Jalapeños: Spoon the cheese mixture into each jalapeño half, filling them generously.
- Wrap the Jalapeños: Unroll the crescent roll dough and cut it into thin strips. Wrap each filled jalapeño half with the dough strips, leaving small gaps to create a mummy effect.
- Bake the Poppers: Place the wrapped jalapeños on a baking sheet lined with parchment paper. Bake in the preheated oven for 15-18 minutes, or until the dough is golden brown and the cheese is bubbling.
- Decorate: If using candy eyes, gently press two eyes into the top of each jalapeño popper while they’re still warm.
- Serve: Allow the poppers to cool for a few minutes before serving.
Extra Tips:
When selecting jalapeños, try to pick ones that are straight and uniform in size, as they’re easier to fill and wrap. If you or your guests prefer less spice, consider using smaller or milder jalapeños.
Additionally, you can prepare the cheese filling ahead of time and store it in the refrigerator until you’re ready to assemble the poppers. To make the mummies even more festive, you can use different types of cheese or add other seasonings to the filling.
Enjoy your Mummy Jalapeño Poppers warm for the best flavor and texture!
Witch’s Brew Cheese Dip

Witch’s Brew Cheese Dip is a bewitching addition to any Halloween potluck or party, guaranteed to enchant your taste buds and those of your guests. This gooey, savory dip is a crowd-pleaser, combining the rich flavors of cheddar and cream cheese with a touch of spice and smoky bacon. The presentation of this dish is just as spellbinding as the taste; served bubbling in a cauldron-like pot, it brings a touch of spooky magic to the table.
Perfect for dipping with bread, crackers, or vegetables, Witch’s Brew Cheese Dip can be easily whipped up in less than an hour, making it a convenient choice for any last-minute gatherings or planned festivities. The combination of cheese, bacon, and jalapeños creates a delightful mix of creamy, crispy, and spicy flavors that will keep your guests coming back for more.
Here’s how to make this delightful dish for 4-6 people:
Ingredients:
- 2 cups shredded sharp cheddar cheese
- 8 oz cream cheese, softened
- 1/2 cup sour cream
- 4 slices bacon, cooked and crumbled
- 1/4 cup chopped green onions
- 2 jalapeños, seeded and finely chopped
- 1/2 teaspoon garlic powder
- 1/4 teaspoon smoked paprika
- Salt and pepper to taste
- Sliced bread, crackers, or vegetables for dipping
Instructions:
- Preheat and Prepare: Preheat your oven to 350°F (175°C). This will guarantee that the cheese dip cooks evenly and achieves a deliciously gooey consistency.
- Mix the Base: In a large mixing bowl, combine the softened cream cheese, sour cream, and shredded cheddar cheese. Mix until the ingredients are thoroughly blended and smooth.
- Add Flavors: Stir in the cooked bacon, chopped green onions, jalapeños, garlic powder, and smoked paprika. Mix well to guarantee the flavors are evenly distributed throughout the dip.
- Season and Adjust: Add salt and pepper to taste, keeping in mind the saltiness of the bacon and cheddar cheese. Adjust the seasoning as needed to achieve your desired flavor profile.
- Transfer and Bake: Transfer the cheese mixture into an oven-safe dish or small cauldron-like pot. Place it in the preheated oven and bake for 20-25 minutes, or until the top is bubbly and golden brown.
- Serve Hot: Once baked, remove the dish from the oven carefully. Allow it to cool for a few minutes before serving. Pair with sliced bread, crackers, or vegetables for dipping.
Extra Tips:
For an extra smoky flavor, consider using smoked bacon and adding a dash of chipotle powder to the mix. If you prefer a milder dip, reduce the amount of jalapeños or substitute them with milder peppers. This dip can also be prepared ahead of time; simply assemble the ingredients, cover, and refrigerate for up to a day before baking. This can help save time on the day of your event.
Spider Web Taco Dip
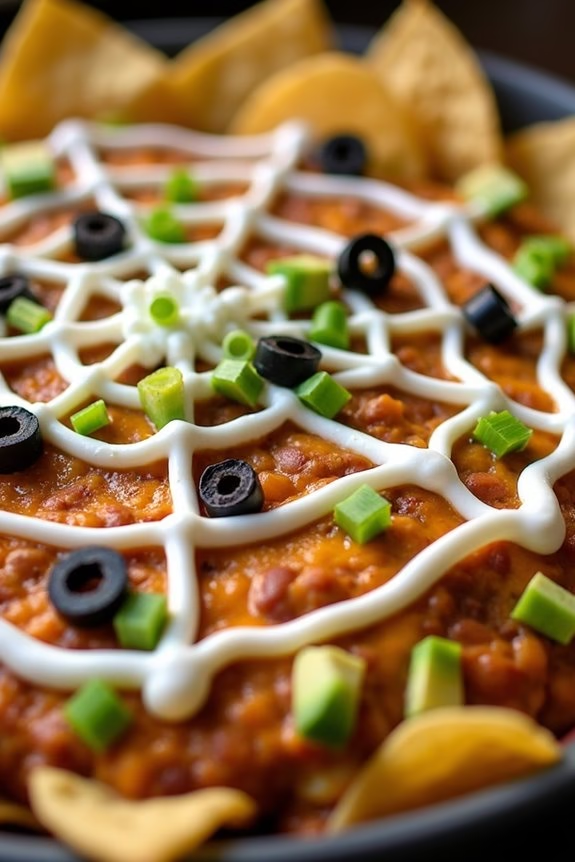
Searching for a fun and festive dish to bring to your Halloween potluck? Seek no further than Spider Web Taco Dip! This delicious and visually enchanting appetizer is sure to be a hit at any gathering. Combining the rich flavors of seasoned taco meat with creamy refried beans, smooth sour cream, and gooey cheese, this dip is topped with a clever sour cream spider web design that makes it perfect for the spooky season.
Not only is it tasty, but it’s also easy to prepare and assemble, making it an excellent choice for both experienced cooks and kitchen novices.
The Spider Web Taco Dip layers a medley of flavorful ingredients, starting with a seasoned ground beef base that provides a hearty and satisfying texture. Refried beans add a creamy, earthy layer, while a blend of cheeses offers the perfect gooey topping. The secret to achieving the spider web effect involves a simple technique with sour cream, which creates an eerie yet festive design on top.
Served with crispy tortilla chips or fresh veggies, this appetizer will have guests coming back for more, making it a must-have on your Halloween potluck table.
Ingredients (Serves 4-6 people):
- 1 pound ground beef
- 1 packet taco seasoning
- 1 can (16 oz) refried beans
- 1 cup sour cream (plus additional for spider web design)
- 1 cup shredded cheddar cheese
- 1 cup shredded Monterey Jack cheese
- 1 cup salsa
- 3 green onions, chopped
- 1 small can of sliced black olives
- 1 ripe avocado, diced
- Tortilla chips, for serving
Cooking Instructions:
- Prepare the Meat: In a large skillet over medium heat, cook the ground beef until browned, breaking it apart with a spoon as it cooks. Drain any excess fat, then add the taco seasoning and follow the package instructions, typically adding about 2/3 cup of water. Cook until the mixture thickens.
- Layer the Dip: Spread the refried beans evenly in the bottom of a 9×13-inch baking dish. Next, layer the seasoned ground beef over the beans.
- Add Cheese: Sprinkle the shredded cheddar and Monterey Jack cheeses over the beef layer.
- Create the Spider Web: Spoon the sour cream into a small plastic bag and snip off a tiny corner. Pipe the sour cream in concentric circles on top of the cheese. Use a toothpick or knife to draw lines from the center to the edges to create a web effect.
- Garnish: Top with a layer of salsa, then sprinkle the chopped green onions, black olives, and diced avocado over the salsa.
- Chill and Serve: Cover the dish with plastic wrap and refrigerate for at least 30 minutes to allow the flavors to meld. Serve with tortilla chips.
Extra Tips:
For an added layer of flavor, consider using a spicy salsa or adding a layer of guacamole before the cheese layer. If you want to make the dip ahead of time, prepare all the components but hold off on the sour cream spider web until just before serving to guarantee it looks fresh.
You can also customize this dip by adding other toppings like jalapeños or diced tomatoes to suit your taste. Enjoy your Halloween potluck with this spooktacular dish!
Monster Meatball Eyeballs

Monster Meatball Eyeballs are a delightful and spooky addition to any Halloween potluck. These creepy yet delicious treats are sure to impress guests with their fun presentation and savory taste. Perfectly seasoned meatballs are transformed into eerie eyeballs with the help of a few strategic garnishes, making them both a visual and flavorful hit for any themed gathering. Not only do they look the part, but their rich flavors and juicy texture guarantee that they’re also a hit with the taste buds.
Crafting these Monster Meatball Eyeballs is easier than one might think, and they provide a great opportunity to get creative in the kitchen. By using simple ingredients, you can whip up a batch of these spooky snacks that serve 4-6 people. Whether you’re hosting a Halloween party or attending a potluck, these meatball eyeballs are bound to be a standout dish that both kids and adults will enjoy.
Ingredients:
- 1 pound ground beef
- 1/2 cup breadcrumbs
- 1/4 cup grated Parmesan cheese
- 1 egg
- 1/4 cup milk
- 1 teaspoon garlic powder
- 1 teaspoon onion powder
- Salt and pepper to taste
- 1 cup marinara sauce
- 12 small mozzarella balls (bocconcini)
- 12 black olives, pitted and halved
- Fresh parsley for garnish
Cooking Instructions:
- Prepare the Meatball Mixture: In a large bowl, combine ground beef, breadcrumbs, Parmesan cheese, egg, milk, garlic powder, onion powder, salt, and pepper. Mix thoroughly until all ingredients are well-incorporated.
- Form the Meatballs: Using your hands, shape the mixture into approximately 12 meatballs, about the size of a golf ball. Place them on a baking sheet lined with parchment paper.
- Cook the Meatballs: Preheat your oven to 375°F (190°C). Bake the meatballs for 20-25 minutes, or until they’re fully cooked and browned on the outside.
- Prepare the Eyeballs: While the meatballs are baking, warm the marinara sauce in a saucepan over low heat. Once the meatballs are cooked, remove them from the oven and allow them to cool slightly.
- Assemble the Eyeballs: Place a cooked meatball on a serving plate, spoon a little marinara sauce over the top, and position a mozzarella ball on top of each meatball. Press a halved black olive into the center of the mozzarella ball to create the “pupil” of the eyeball.
- Garnish and Serve: Garnish with fresh parsley for a touch of color. Serve warm, accompanied by extra marinara sauce for dipping if desired.
Extra Tips:
For an enhanced flavor, you can mix some finely chopped fresh herbs like basil or oregano into the meatball mixture. Additionally, if you want the mozzarella balls to melt slightly, you can place the assembled eyeballs back into the oven for a couple of minutes.
Be sure to serve the dish while warm for the best taste and presentation. If you’re making these in advance, keep the components separate until you’re ready to assemble and serve, guaranteeing they maintain their spooky appearance.
Pumpkin Patch Brownies
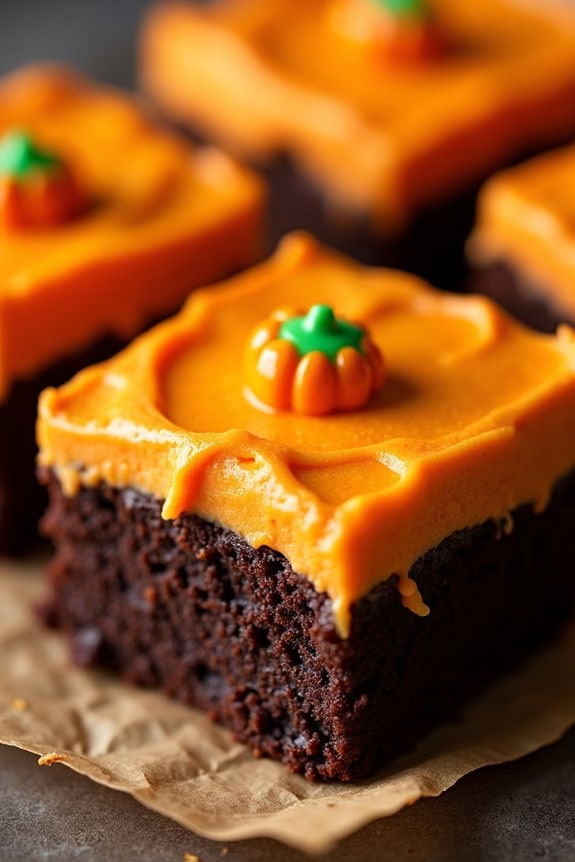
Get ready to wow your Halloween potluck guests with these delightful Pumpkin Patch Brownies. These brownies are a perfect blend of rich chocolate goodness and the festive charm of Halloween. The base of this dessert is a fudgy brownie, topped with a creamy pumpkin frosting, and adorned with cute candy pumpkins to create a mini pumpkin patch effect. Not only are these brownies delicious, but they also bring an extra touch of fun to your Halloween table.
Whether you’re hosting a Halloween party or attending one, these Pumpkin Patch Brownies are sure to be a hit. The recipe is straightforward, and the end result is as visually appealing as it’s tasty. The combination of chocolate and pumpkin flavors makes for a delightful autumnal treat that both kids and adults will adore. Let’s explore the ingredients and instructions to create this spooky yet sweet dessert for 4-6 people.
Ingredients:
- 1 cup unsalted butter
- 2 cups granulated sugar
- 4 large eggs
- 1 cup all-purpose flour
- 1 cup unsweetened cocoa powder
- 1/2 teaspoon baking powder
- 1/4 teaspoon salt
- 1 teaspoon vanilla extract
- 1 can (15 ounces) pumpkin puree
- 1 teaspoon ground cinnamon
- 1/2 teaspoon ground nutmeg
- 1/2 cup powdered sugar
- 1/4 cup cream cheese, softened
- Mini candy pumpkins for decoration
Instructions:
- Preheat and Prep: Preheat your oven to 350°F (175°C). Grease a 9×13-inch baking pan or line it with parchment paper for easy removal.
- Make the Brownie Batter: In a large saucepan, melt the butter over medium heat. Once melted, remove from heat and stir in the granulated sugar. After the mixture cools slightly, add the eggs one at a time, stirring well after each addition. Mix in the vanilla extract.
- Combine Dry Ingredients: In a separate bowl, sift together the flour, cocoa powder, baking powder, and salt. Gradually add the dry ingredients to the butter mixture, stirring until just combined.
- Bake the Brownies: Pour the brownie batter into the prepared pan, spreading it evenly. Bake in the preheated oven for 25-30 minutes or until a toothpick inserted into the center comes out with a few moist crumbs. Allow the brownies to cool completely in the pan on a wire rack.
- Prepare the Pumpkin Frosting: In a mixing bowl, beat together the pumpkin puree, cream cheese, powdered sugar, cinnamon, and nutmeg until smooth and creamy.
- Assemble the Pumpkin Patch Brownies: Once the brownies are completely cool, spread the pumpkin frosting evenly over the top. Gently press the candy pumpkins into the frosting to create your pumpkin patch design.
- Chill Before Serving: Place the assembled brownies in the refrigerator for at least 30 minutes to firm up the frosting before serving.
Extra Tips:
To guarantee your brownies are extra fudgy, be careful not to overbake them. The toothpick test should show moist crumbs, not a clean toothpick.
If you want a more intense pumpkin flavor, consider adding a pinch of pumpkin spice along with the cinnamon and nutmeg.
When decorating with the candy pumpkins, feel free to get creative—add some candy corn or edible grass for an extra festive touch.
Enjoy these Pumpkin Patch Brownies with a tall glass of milk or a warm cup of cocoa for the ultimate Halloween treat!
Ghostly White Chocolate Bark
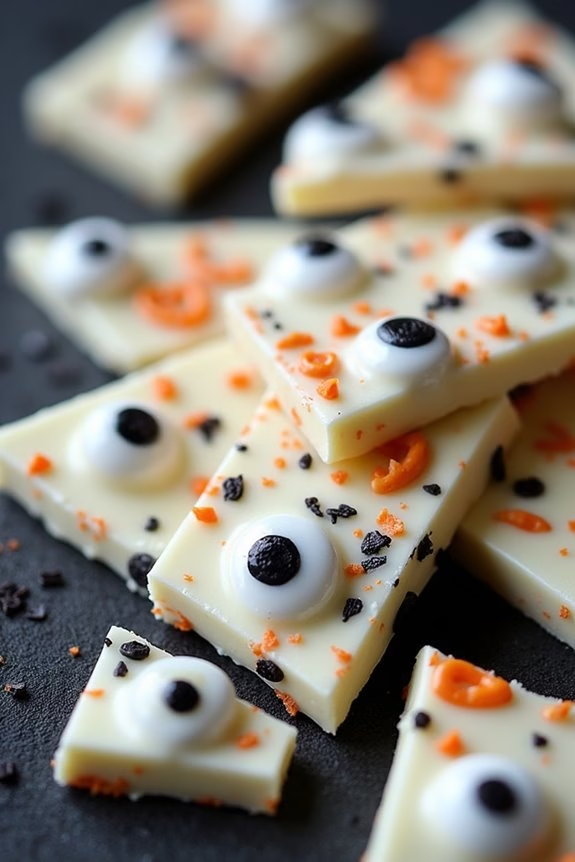
Ghostly White Chocolate Bark is a delightful and spooky treat that’s perfect for adding a touch of Halloween spirit to your potluck gathering. This sweet and eerie confection resembles a ghostly apparition with its smooth, white chocolate base and hauntingly fun toppings. It’s a quick and easy recipe that doesn’t require any baking, making it a great option for those looking to whip up a last-minute dessert.
Plus, it’s a versatile dish that can be customized with various toppings to suit your taste preferences or to match other Halloween-themed treats. The key to creating this spooky bark lies in the combination of creamy white chocolate and a medley of ghoulish toppings, such as candy eyes, edible glitter, and sprinkles. Not only does this treat look impressive, but it also offers a satisfying crunch with every bite, thanks to the addition of nuts or pretzels.
This recipe serves 4-6 people, making it an ideal choice for a small gathering or as part of a larger dessert spread. Let’s explore the ingredients you’ll need to bring this ghostly treat to life.
Ingredients for Ghostly White Chocolate Bark (Serving Size: 4-6 people):
- 16 oz white chocolate chips or white chocolate bars
- 1/2 cup candy eyeballs
- 1/4 cup edible glitter or sanding sugar
- 1/4 cup black and orange Halloween-themed sprinkles
- 1/4 cup chopped nuts or pretzels (optional)
- Parchment paper
Cooking Instructions:
- Prepare the Baking Sheet: Line a baking sheet with parchment paper. This will prevent the chocolate from sticking and make it easier to remove once set.
- Melt the White Chocolate: Place the white chocolate chips or broken chocolate bars into a microwave-safe bowl. Heat in the microwave on medium power for 30-second intervals, stirring between each interval until completely melted and smooth. Be cautious not to overheat to prevent the chocolate from seizing.
- Spread the Chocolate: Pour the melted white chocolate onto the prepared parchment-lined baking sheet. Use a spatula to spread it into an even layer, about 1/4-inch thick. Work quickly to guarantee the chocolate remains smooth and pliable.
- Add the Toppings: While the chocolate is still warm, sprinkle the candy eyeballs, edible glitter, Halloween-themed sprinkles, and optional nuts or pretzels evenly over the surface. Press gently to make sure the toppings adhere to the chocolate.
- Set the Chocolate Bark: Allow the chocolate bark to cool and set completely. You can place the baking sheet in the refrigerator for about 15-20 minutes to speed up this process.
- Break into Pieces: Once the chocolate has hardened, break it into irregular pieces using your hands or a sharp knife. Serve on a festive platter or store in an airtight container until ready to serve.
Extra Tips: When melting the chocolate, make sure to stir frequently as this helps distribute the heat evenly and prevents scorching. If you prefer a smoother texture, use high-quality chocolate bars instead of chips.
Feel free to get creative with the toppings—add crushed cookies, mini marshmallows, or dried fruits for added texture and flavor. If you want to make the bark even more ghostly, consider using a touch of black food coloring to create swirling patterns in the white chocolate before adding the toppings.
Enjoy your hauntingly delicious Ghostly White Chocolate Bark!
Bloodshot Eyeball Punch
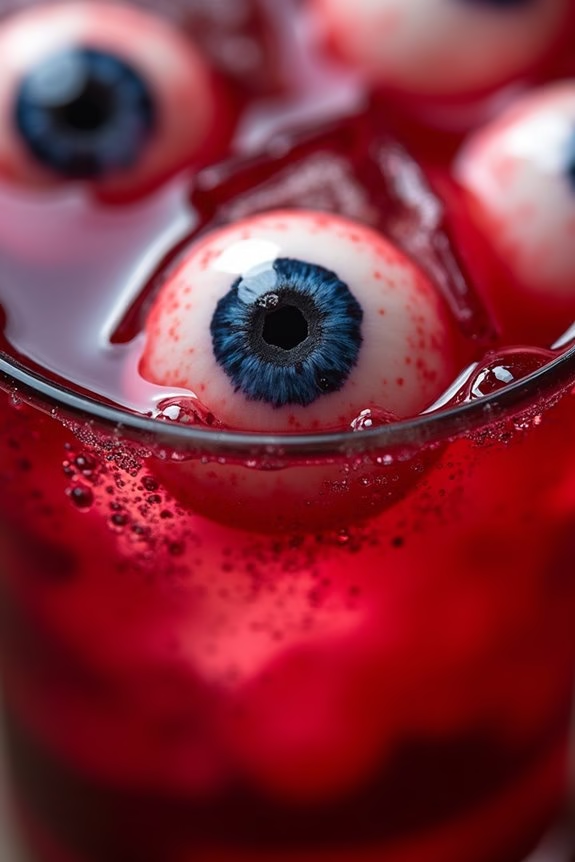
With Halloween just around the corner, there’s no better way to spook your guests than by serving a chillingly creative bloodshot eyeball punch. This eerie concoction not only looks the part with its floating “eyeballs,” but it also tastes deliciously invigorating. Ideal for a Halloween potluck, this punch is sure to be the star of the party, mesmerizing both kids and adults alike with its gory yet fun appearance.
The punch combines a mix of fruity flavors with a hint of fizz, creating a delightful drink that everyone will enjoy. The bloodshot eyeballs, made from lychees and blueberries, add a creepy yet tasty touch. The punch is easy to prepare, allowing you to spend more time enjoying the festivities. Serve it in a large punch bowl to let the eyeballs float freely, enhancing the spooky effect. This recipe serves 4-6 people, making it perfect for small gatherings.
Ingredients:
- 1 can (20 oz) lychees in syrup
- 1 pint blueberries
- 4 cups cranberry juice
- 2 cups orange juice
- 1 liter lemon-lime soda (such as Sprite or 7-Up)
- 1/2 cup grenadine syrup
- Ice cubes
Instructions:
- Prepare the Eyeballs: Drain the lychees from the syrup and set aside. Insert a blueberry into the center of each lychee to create the appearance of an eyeball. Once all the eyeballs are prepared, place them in the freezer for about 30 minutes to firm up.
- Mix the Juices: In a large punch bowl, combine the cranberry juice and orange juice. Stir well to verify they’re fully mixed.
- Add the Grenadine: Carefully pour the grenadine syrup into the juice mixture to add a layer of “blood” at the bottom of the bowl. Don’t stir after adding the grenadine to maintain the distinct layers.
- Add the Soda: Slowly pour in the lemon-lime soda to add a fizzy element to the punch. Stir gently to combine without disturbing the grenadine layer too much.
- Chill the Punch: Add ice cubes to the punch bowl to keep the punch cool. The ice also helps to keep the eyeballs afloat.
- Add the Eyeballs: Remove the prepared lychee eyeballs from the freezer and gently place them into the punch. They’ll float and add a creepy effect to your Halloween punch.
Extra Tips:
For an added layer of spookiness, consider serving the punch in a bowl placed over a larger bowl filled with dry ice to create a foggy, mysterious effect. Verify the dry ice doesn’t come into direct contact with the punch or any drinkable contents.
Additionally, if you have time, chilling the juices and soda beforehand will help keep the punch cold longer without diluting it with too much ice. Feel free to adjust the fruit juices and soda to suit your taste preferences, and enjoy this frightfully fun beverage!
Graveyard Layered Dip
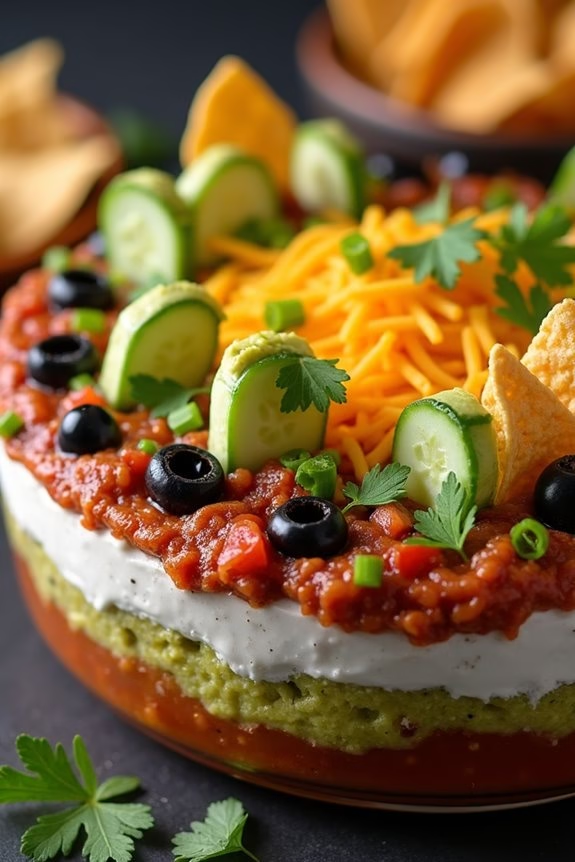
Impress your guests at the Halloween potluck with a terrifyingly tasty Graveyard Layered Dip. This spooktacular dish combines classic layered dip ingredients with a haunting twist, perfect for setting a festive mood at your party.
Not only is it visually striking with its graveyard theme, but it also offers a delightful mix of flavors and textures that will keep everyone coming back for more. The best part? It’s as easy to make as it’s fun to eat, guaranteeing you spend less time in the kitchen and more time enjoying the festivities.
Creating this dip involves crafting layers of creamy, spicy, and fresh ingredients, topped with a ghastly graveyard scene made from tortilla chips and vegetables. This recipe serves 4-6 people, making it ideal for smaller gatherings or as a contribution to a larger spread of Halloween treats.
Get ready to dig in and enjoy the deliciously eerie experience!
Ingredients:
- 1 can (16 oz) refried beans
- 1 cup guacamole
- 1 cup sour cream
- 1 packet taco seasoning
- 1 cup salsa
- 1 cup shredded cheddar cheese
- 1/2 cup sliced black olives
- 1/2 cup chopped tomatoes
- 1/4 cup chopped green onions
- 6-8 large tortilla chips (for gravestones)
- 1 small cucumber (for trees)
- 1 small bunch cilantro (for grass)
Instructions:
- Prepare the Base Layer: Spread the refried beans evenly on the bottom of a shallow serving dish. This will form the base layer of your dip.
- Add Guacamole: Gently layer the guacamole on top of the refried beans, spreading it evenly to cover the entire surface.
- Create the Spicy Cream Layer: In a small bowl, mix the sour cream with the taco seasoning until well combined. Spread this mixture over the guacamole layer.
- Salsa Layer: Pour the salsa over the sour cream mixture and spread it carefully, making sure to have an even coat.
- Cheese and Vegetables: Sprinkle the shredded cheddar cheese over the salsa. Follow with an even distribution of sliced black olives, chopped tomatoes, and green onions.
- Decorate with Gravestones and Trees: Break the tortilla chips into gravestone shapes and stick them into the dip. Use a peeler or knife to cut the cucumber into tree shapes and place them strategically around the dish.
- Add Finishing Touches: For a final touch, sprinkle chopped cilantro around the gravestones and trees to simulate grass in the graveyard.
Extra Tips:
- To make the gravestones more realistic, you can use an edible marker to write spooky messages like “RIP” on the tortilla chips.
- If you prefer a spicier dip, you can add a layer of jalapeños along with the black olives.
- For a smooth layering process, make sure each layer is spread evenly and carefully, using a spatula for best results.
- Assemble the dip a few hours before serving and keep it refrigerated to allow the flavors to meld together for an even tastier experience.
Haunted House Cookie Platter

Create a spooky and delightful centerpiece for your Halloween potluck with this Haunted House Cookie Platter. This dish combines the creativity of cookie decorating with the fun of building a gingerbread house. Perfect for a serving size of 4-6 people, this platter will be the talk of your Halloween party. The cookie house isn’t only a fun family activity but also a delicious treat for all ages. You can customize the decorations with your favorite Halloween-themed candies and icing colors to make it as eerie or as whimsical as you like.
This project requires a bit of time and patience, but the end result is well worth the effort. You’ll be baking cookie pieces to construct the house, then assembling and decorating them to create a haunted masterpiece. Use your imagination to add ghosts, bats, and pumpkins to the scene, making it a perfect addition to any Halloween gathering. Gather your ingredients and get ready for a spooky and scrumptious adventure!
Ingredients (serving size: 4-6 people):
- 3 cups all-purpose flour
- 1 teaspoon baking powder
- 1/2 teaspoon baking soda
- 1/2 teaspoon salt
- 1 teaspoon ground cinnamon
- 1 teaspoon ground ginger
- 1/2 teaspoon ground cloves
- 1 cup unsalted butter, softened
- 1 cup granulated sugar
- 1 large egg
- 1 teaspoon vanilla extract
- 1/4 cup molasses
- Royal icing (for assembly and decoration)
- Assorted Halloween-themed candies (e.g., candy corn, mini chocolate chips, gummy bats)
- Food coloring (optional, for icing)
Instructions:
- Prepare the Dough: In a large mixing bowl, whisk together the flour, baking powder, baking soda, salt, cinnamon, ginger, and cloves. In another bowl, cream the softened butter and granulated sugar until light and fluffy. Beat in the egg, vanilla extract, and molasses until well combined.
- Combine Ingredients: Gradually add the dry ingredients to the wet mixture, mixing until a soft dough forms. Divide the dough in half, wrap each half in plastic wrap, and refrigerate for at least 1 hour or until firm.
- Preheat and Roll Out: Preheat your oven to 350°F (175°C). On a floured surface, roll out one portion of dough to about 1/4-inch thickness. Use cookie cutters or a template to cut out house pieces (walls, roof, door, etc.). Transfer pieces to a baking sheet lined with parchment paper.
- Bake the Cookies: Bake the cookies in preheated oven for 10-12 minutes or until the edges are golden brown. Allow them to cool completely on a wire rack.
- Prepare the Royal Icing: While the cookies are cooling, prepare the royal icing according to your preferred recipe. Divide the icing into small bowls and add food coloring as desired for decorating.
- Assemble the House: Once the cookies are completely cool, use royal icing to “glue” the house pieces together. Allow the structure to set for at least 30 minutes before decorating.
- Decorate: Use colored royal icing, candies, and your imagination to decorate the haunted house. Create spooky details like icing spider webs, candy corn fences, and gummy bat decorations.
- Final Touches: Let the decorations set for at least 1 hour before serving to confirm everything stays in place.
Extra Tips:
When constructing your Haunted House Cookie Platter, make sure the cookie pieces are completely cool before assembling, as warm cookies can cause the structure to collapse. If you’re short on time, prepare the cookie dough a day in advance and refrigerate overnight.
For more stability, consider using thicker royal icing for assembly and let each joint dry completely before adding more pieces. Get creative with your decorations, and don’t be afraid to experiment with different candies and icing designs. Enjoy your deliciously spooky creation!