
When it comes to Halloween potlucks, I have some bewitching desserts that disappear faster than you can say “trick or treat.” Think Ghostly Meringue Kisses floating on the table and Spooky Spider Brownies ready to pounce. There are also Pumpkin Patch Cupcakes and a Witch’s Brew Trifle casting their festive spell. These treats, like Monster Mash Fudge and Black Cat Oreo Truffles, are both eye-catching and delicious. Ready to uncover the magic behind these creations?
Ghostly Meringue Kisses
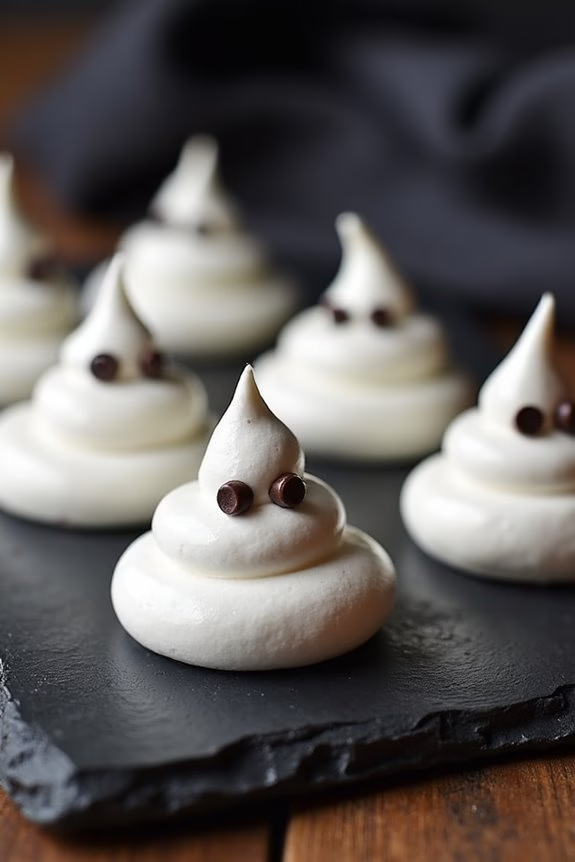
Halloween is the perfect time to let your creativity shine in the kitchen, and these Ghostly Meringue Kisses are sure to be a showstopper at your potluck dessert table. These delightful little treats aren’t only adorable but also light and airy, making them an ideal sweet snack amidst the abundance of heavier Halloween goodies.
Their crisp exterior and melt-in-your-mouth interior are irresistible, and their spooky ghostly appearance will add a playful touch to your Halloween spread. Crafted from a simple meringue base, Ghostly Meringue Kisses are made by whipping egg whites and sugar to stiff peaks, then piping them into ghost shapes before baking them to perfection. The addition of a few chocolate chips for eyes brings these edible spirits to life.
Perfect for serving to a group of 4-6 people, these meringues aren’t only fun to make but also a hit with both kids and adults alike.
Ingredients:
- 4 large egg whites, at room temperature
- 1 cup granulated sugar
- 1/4 teaspoon cream of tartar
- 1/2 teaspoon vanilla extract
- Mini chocolate chips for eyes
Instructions:
- Preheat the Oven: Begin by preheating your oven to 225°F (110°C). Line two baking sheets with parchment paper to prevent the meringues from sticking.
- Whip the Egg Whites: In a clean, dry mixing bowl, use an electric mixer to beat the egg whites on medium speed until foamy. Add the cream of tartar and continue to beat until soft peaks form.
- Add Sugar Gradually: Increase the mixer speed to high and gradually add the granulated sugar, one tablespoon at a time. Beat until the mixture forms stiff, glossy peaks and the sugar is fully dissolved. This may take about 5-7 minutes.
- Incorporate Vanilla: Gently fold in the vanilla extract with a spatula, being careful not to deflate the meringue.
- Pipe the Ghost Shapes: Transfer the meringue mixture to a piping bag fitted with a large round tip. Pipe the meringue onto the prepared baking sheets in ghost shapes, about 2 inches apart. Create a small peak at the top for the ghostly head.
- Add Eyes: Place two mini chocolate chips on each ghost to form the eyes.
- Bake: Bake the meringues in the preheated oven for 1 1/2 to 2 hours, or until they’re dry and easily lift off the parchment paper. Turn off the oven, crack the oven door open slightly, and let the meringues cool completely in the oven.
- Serve: Once cooled, carefully remove the Ghostly Meringue Kisses from the parchment paper and serve them as a light, spooky treat.
Extra Tips:
To guarantee success with your Ghostly Meringue Kisses, it’s essential to make certain that your mixing bowl and beaters are completely clean and dry before starting, as any grease or moisture can prevent the egg whites from whipping properly.
If you prefer a sweeter meringue, you can increase the sugar amount slightly, but be cautious not to add too much to avoid weighing down the meringue. Keep an eye on the baking time and adjust if necessary based on your oven’s performance, as meringues are sensitive to humidity and temperature changes.
Store any leftovers in an airtight container to maintain their crispiness.
Spooky Spider Brownies

Spooky Spider Brownies are the perfect addition to your Halloween potluck dessert table. These brownies bring a fun and eerie twist to a classic favorite, making them an instant hit with both kids and adults. The rich, chocolatey brownies serve as the base, while the creative spider design on top adds a spooky flair. These brownies aren’t only delicious but also visually enchanting, making them an ideal treat for the spooky season.
The beauty of Spooky Spider Brownies lies in their simplicity and creativity. You can use your favorite brownie recipe or even a store-bought mix as the base, which saves time and guarantees consistency. The fun begins as you transform these simple brownies into creepy crawly desserts using melted chocolate, candy eyes, and pretzels to mimic spider legs. With a little bit of creativity, these brownies will be the talk of your Halloween potluck.
Ingredients for 4-6 servings:
- 1 box of brownie mix (or ingredients for homemade brownies)
- 2 large eggs
- 1/2 cup vegetable oil
- 1/4 cup water
- 1 cup semisweet chocolate chips
- 12-16 candy eyes
- 12-16 small pretzels
- 1 tablespoon butter
Instructions:
- Prepare the Brownie Batter: Preheat your oven to 350°F (175°C). In a large bowl, combine the brownie mix, eggs, vegetable oil, and water. Stir until the mixture is smooth and all ingredients are well incorporated.
- Bake the Brownies: Pour the brownie batter into a greased 9×13 inch baking pan, spreading it evenly. Bake in the preheated oven for 20-25 minutes, or until a toothpick inserted into the center comes out clean. Allow the brownies to cool completely in the pan.
- Melt the Chocolate: In a small saucepan, melt the semisweet chocolate chips and butter over low heat, stirring constantly until smooth. Alternatively, you can melt the chocolate in a microwave-safe bowl, heating in 30-second increments and stirring between each until fully melted.
- Create the Spider Design: Once the brownies are cool, cut them into squares. Using a spoon or piping bag, drizzle the melted chocolate over each brownie square to create a web-like pattern. Attach two candy eyes to each brownie using a small dollop of melted chocolate as glue.
- Add the Spider Legs: Break the small pretzels into curved pieces to resemble spider legs. Insert three pretzel pieces into each side of the brownie square, using the melted chocolate to secure them if necessary.
- Set the Design: Allow the melted chocolate to set completely at room temperature or place it in the refrigerator for a few minutes to speed up the process.
Extra Tips:
For the best results, make sure the brownies are completely cool before decorating to prevent the chocolate from melting and not setting properly. If you want to add an extra layer of flavor, consider adding a pinch of cinnamon or a teaspoon of vanilla extract to the brownie batter.
Additionally, you can use different types of candy eyes or pretzels to customize your spider brownies further. Store any leftovers in an airtight container to maintain freshness and enjoy these spooky treats for several days!
Pumpkin Patch Cupcakes
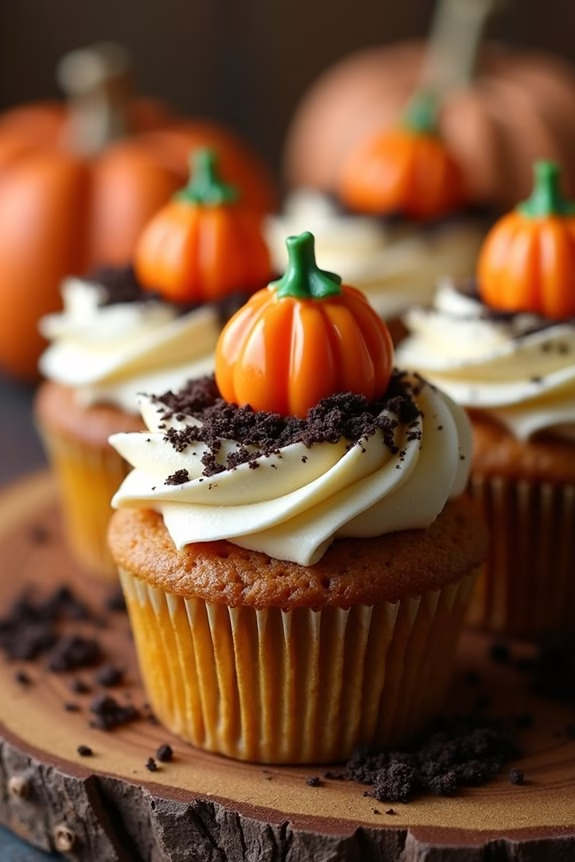
Pumpkin Patch Cupcakes are the perfect Halloween potluck dessert, bringing together the festive spirit of the season with a delicious treat that’s both fun and easy to make.
These cupcakes are moist, filled with the flavors of pumpkin and spice, and topped with a charming decoration that resembles a miniature pumpkin patch. Ideal for serving at Halloween parties, they offer a delightful surprise for guests with their creative design and scrumptious taste.
The combination of pumpkin, cinnamon, nutmeg, and cloves in the cupcake batter gives these treats a warm, comforting flavor reminiscent of autumn. The cream cheese frosting adds a creamy, tangy balance to the sweetness, while the decorative elements – tiny candy pumpkins and crushed cookie “dirt” – complete the look.
Perfect for a serving size of 4-6 people, Pumpkin Patch Cupcakes are sure to be a hit at your next Halloween gathering.
Ingredients (Serves 4-6)
- 1 cup all-purpose flour
- 1 teaspoon baking powder
- 1/2 teaspoon baking soda
- 1/2 teaspoon ground cinnamon
- 1/4 teaspoon ground nutmeg
- 1/4 teaspoon ground cloves
- 1/4 teaspoon salt
- 1/2 cup canned pumpkin puree
- 1/2 cup granulated sugar
- 1/4 cup brown sugar
- 1/2 cup vegetable oil
- 2 large eggs
- 1 teaspoon vanilla extract
- 1 cup cream cheese frosting
- 12 candy pumpkins
- 6 crushed chocolate cookies (e.g., Oreos) for “dirt”
Cooking Instructions
- Preheat and Prepare Baking Tools: Preheat your oven to 350°F (175°C). Line a 12-cup muffin tin with cupcake liners.
- Mix Dry Ingredients: In a medium bowl, whisk together the flour, baking powder, baking soda, cinnamon, nutmeg, cloves, and salt until well combined.
- Blend Wet Ingredients: In a large bowl, mix the pumpkin puree, granulated sugar, brown sugar, vegetable oil, eggs, and vanilla extract. Beat until the mixture is smooth and uniform.
- Combine Wet and Dry Ingredients: Gradually add the dry ingredients to the wet ingredients, mixing until just combined. Be careful not to overmix to guarantee the cupcakes remain light and fluffy.
- Fill and Bake Cupcakes: Divide the batter evenly among the 12 cupcake liners, filling each about two-thirds full. Bake in the preheated oven for 18-20 minutes, or until a toothpick inserted into the center of a cupcake comes out clean.
- Cool and Frost Cupcakes: Allow the cupcakes to cool in the tin for 5 minutes before transferring them to a wire rack to cool completely. Once cooled, spread or pipe the cream cheese frosting on top of each cupcake.
- Decorate: Sprinkle the crushed chocolate cookies over the frosting to create the appearance of dirt. Place a candy pumpkin on top of each cupcake to complete the pumpkin patch look.
Extra Tips
When making Pumpkin Patch Cupcakes, confirm your ingredients, especially the eggs, are at room temperature to achieve a smoother batter.
If you want a more intense pumpkin flavor, consider adding a bit more pumpkin puree or a dash of pumpkin spice. For a healthier twist, substitute half of the oil with unsweetened applesauce.
If you don’t have candy pumpkins, you can use orange M&M’s or gumdrops shaped into small pumpkins. Finally, store any leftover cupcakes in an airtight container in the refrigerator to keep the frosting fresh.
Witch’s Brew Trifle
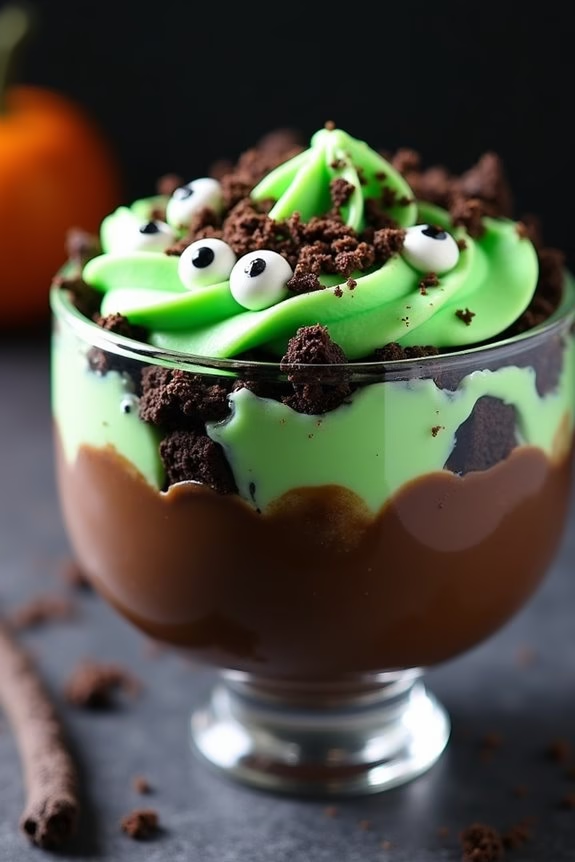
Celebrate Halloween with a spooky and delicious dessert that will charm your guests—Witch’s Brew Trifle. This layered dessert isn’t only visually striking with its vibrant colors, but it also offers a delightful mix of flavors and textures. The trifle combines layers of moist chocolate cake, rich chocolate pudding, and eerie green whipped cream. Topped with a sprinkle of cookie crumbs and candy eyes, this dessert is both a treat for the taste buds and a feast for the eyes.
This Witch’s Brew Trifle is perfect for a Halloween potluck, serving 4-6 people. It can be prepared ahead of time, allowing you to focus on other party preparations. The combination of homemade and store-bought ingredients makes this recipe both simple and sophisticated, ensuring that even the busiest hosts can create a memorable dessert.
Ingredients:
- 1 box chocolate cake mix
- 1 pack instant chocolate pudding mix
- 3 cups milk
- 2 cups heavy whipping cream
- 1/3 cup powdered sugar
- Green food coloring
- 1 cup crushed chocolate cookies
- Candy eyes for decoration
Cooking Instructions:
- Bake the Cake: Prepare the chocolate cake mix according to the package instructions. Once baked, let it cool completely, then cut it into small cubes.
- Make the Pudding: In a medium-sized bowl, whisk together the instant chocolate pudding mix and milk until smooth. Allow it to set in the refrigerator for at least 5 minutes until thickened.
- Prepare the Whipped Cream: In a mixing bowl, whip the heavy cream and powdered sugar with an electric mixer on medium-high speed until soft peaks form. Add a few drops of green food coloring and gently fold until the color is evenly distributed.
- Assemble the Trifle: In a large glass bowl or individual serving glasses, layer the ingredients starting with a layer of chocolate cake cubes, followed by a layer of chocolate pudding, and a layer of green whipped cream. Repeat the layers until all ingredients are used, finishing with the whipped cream on top.
- Add the Toppings: Sprinkle the top layer with crushed chocolate cookies and place candy eyes randomly to create a spooky effect.
- Chill: Place the trifle in the refrigerator for at least an hour before serving to allow the flavors to meld together.
Extra Tips:
For an extra touch of Halloween magic, consider adding a layer of gummy worms or other themed candies between the layers.
You can also customize the green whipped cream with different shades by adjusting the amount of food coloring. If you’re short on time, you can use store-bought chocolate cake or brownies.
Make sure the cake is completely cooled before assembling the trifle to prevent the whipped cream from melting. Enjoy your Witch’s Brew Trifle as a fun and festive addition to your Halloween celebration!
Monster Mash Fudge

Halloween is the perfect time to indulge in spooky, sweet treats, and Monster Mash Fudge is a delightful addition to any potluck spread. This vibrant dessert isn’t only visually striking but also incredibly easy to make, requiring minimal effort for maximum flavor impact.
The colorful layers of fudge can be customized with your favorite mix-ins and decorations, making it a fun and creative project for the whole family. Whether you’re hosting a Halloween party or attending one, this fudge is sure to be a crowd-pleaser.
Monster Mash Fudge combines rich, creamy chocolate with a playful twist of Halloween-themed candies and colors. With a smooth texture and a hint of vanilla, this fudge melts in your mouth, leaving behind a delightful sweetness that both kids and adults will love.
The recipe yields enough to serve 4-6 people, making it an excellent choice for sharing at gatherings. Gather your ingredients, and let’s get started on crafting this spooky confection!
Ingredients:
- 2 cups white chocolate chips
- 1 can (14 oz) sweetened condensed milk
- 1 teaspoon vanilla extract
- Green, purple, and orange gel food coloring
- 1 cup mini marshmallows
- 1/2 cup Halloween-themed sprinkles
- 1/2 cup candy eyeballs
- 1 tablespoon unsalted butter, for greasing
Instructions:
- Prepare the Pan: Lightly grease an 8×8 inch square baking dish with unsalted butter. Line the dish with parchment paper, leaving excess paper hanging over the sides for easy removal later.
- Melt the Chocolate: In a medium saucepan, combine the white chocolate chips and sweetened condensed milk. Place over low heat, stirring continuously until the chocolate is fully melted and the mixture is smooth. Remove from heat and stir in the vanilla extract.
- Divide and Color: Divide the melted chocolate mixture into three separate bowls. Add a few drops of green gel food coloring to one bowl, purple to the second, and orange to the third. Stir each bowl until the color is evenly distributed.
- Layer the Fudge: Pour the green fudge mixture into the prepared baking dish and spread it evenly with a spatula. Sprinkle a layer of mini marshmallows, then pour the purple fudge over the marshmallows, spreading it evenly. Finally, pour the orange fudge on top, smoothing it out.
- Decorate: Immediately sprinkle the Halloween-themed sprinkles and candy eyeballs over the top layer of fudge. Press them gently into the surface to confirm they stick.
- Chill: Cover the dish with plastic wrap and refrigerate for at least 2 hours, or until the fudge is firm and set.
- Slice and Serve: Once set, lift the fudge out of the dish using the parchment paper overhang. Cut into small squares and arrange them on a platter for serving.
Extra Tips: For the best results, make sure to use high-quality white chocolate chips, as this will affect the overall texture and flavor of the fudge.
If you want to add more texture, consider mixing in crushed cookies or nuts along with the sprinkles and candy eyeballs. When coloring the fudge, start with a small amount of gel food coloring and gradually add more until you achieve the desired hue.
This method helps prevent the colors from becoming too intense. Finally, keep the fudge refrigerated until you’re ready to serve, as it will soften at room temperature. Enjoy your Monster Mash Fudge and have a spooktacular Halloween!
Creepy Crawly Cake Pops
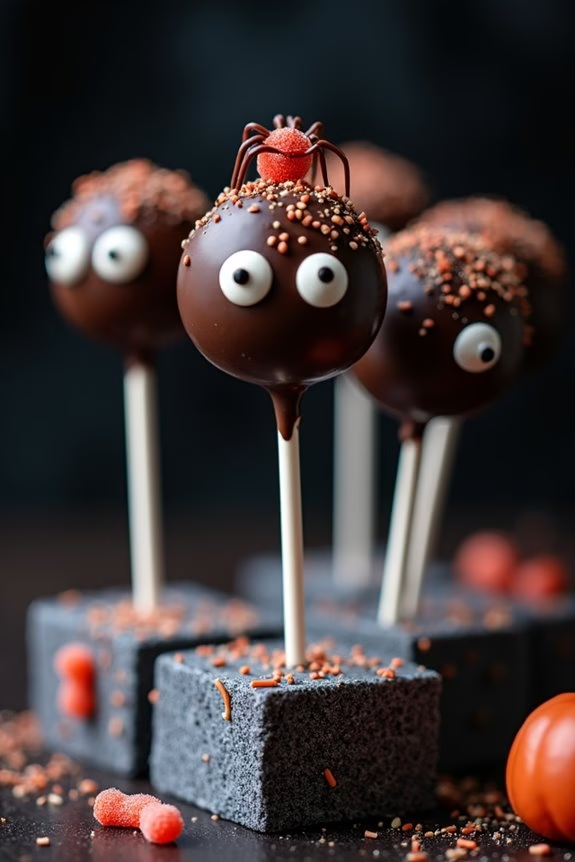
Halloween is the perfect time to release your culinary creativity, and Creepy Crawly Cake Pops are an excellent treat to add a spooky touch to your potluck dessert table. These delightful cake pops aren’t only fun to make but are also a hit with both kids and adults.
With their eerie decorations resembling creepy crawlies like spiders and worms, they bring a playful yet spine-chilling element to your Halloween festivities. Crafting these cake pops involves creating moist cake balls, coating them with chocolate, and adding decorative touches to mimic creepy crawlers.
They’re a wonderful combination of flavor and fright, making your potluck contribution memorable. Get ready to enjoy this ghoulish treat that perfectly complements the eerie ambiance of a Halloween gathering. Here’s how to make Creepy Crawly Cake Pops for a serving size of 4-6 people:
Ingredients:
- 1 box of chocolate cake mix
- Ingredients necessary for cake mix (usually eggs, oil, and water)
- 1 cup of chocolate frosting
- 2 cups of semi-sweet chocolate chips
- 24 lollipop sticks
- Assorted candy decorations (like gummy worms, edible eyes, licorice strings)
- Sprinkles (optional)
- Wax paper
- Styrofoam block or cake pop stand
Instructions:
- Prepare the Cake: Follow the instructions on the chocolate cake mix box to bake the cake. Once baked, allow it to cool completely. This is vital to avoid melting the frosting in the next step.
- Crumble the Cake: Once the cake has cooled, crumble it into a large mixing bowl. Confirm there are no large chunks left, as this will affect the texture of your cake pops.
- Mix with Frosting: Add the chocolate frosting to the crumbled cake. Mix thoroughly using your hands or a spatula until the mixture holds together and you can form it into balls.
- Form Cake Balls: Roll the cake mixture into small balls, approximately 1 inch in diameter. Place them on a baking sheet lined with wax paper. This size works well for the lollipop sticks and makes them easy to eat.
- Chill: Place the cake balls in the refrigerator for about 1 hour to firm them up. This step is essential for preventing them from falling apart during the dipping process.
- Melt Chocolate: In a microwave-safe bowl, melt the chocolate chips in 30-second intervals, stirring in between, until smooth and completely melted.
- Insert Sticks: Remove the cake balls from the refrigerator. Dip the tip of each lollipop stick into the melted chocolate, then insert it halfway into a cake ball. This helps secure the stick in place.
- Coat Cake Pops: Dip each cake pop into the melted chocolate, ensuring it’s fully coated. Gently tap the stick on the edge of the bowl to remove any excess chocolate.
- Decorate: Before the chocolate sets, add your creepy crawly decorations. Use gummy worms, edible eyes, and licorice strings to create spooky designs. You can also add sprinkles for extra flair.
- Set: Place the decorated cake pops into a Styrofoam block or cake pop stand to dry completely at room temperature.
Extra Tips:
When making Creepy Crawly Cake Pops, patience is key. Confirm that the cake balls are well chilled before dipping them in chocolate to prevent them from falling apart.
If the chocolate coating seems too thick, add a small amount of vegetable oil to thin it out for smoother dipping. Have fun with the decorations, and let your imagination run wild to create the spookiest designs possible.
These cake pops aren’t only a delicious treat but also a delightful centerpiece for your Halloween celebration!
Vampire Bite Cheesecake Bites
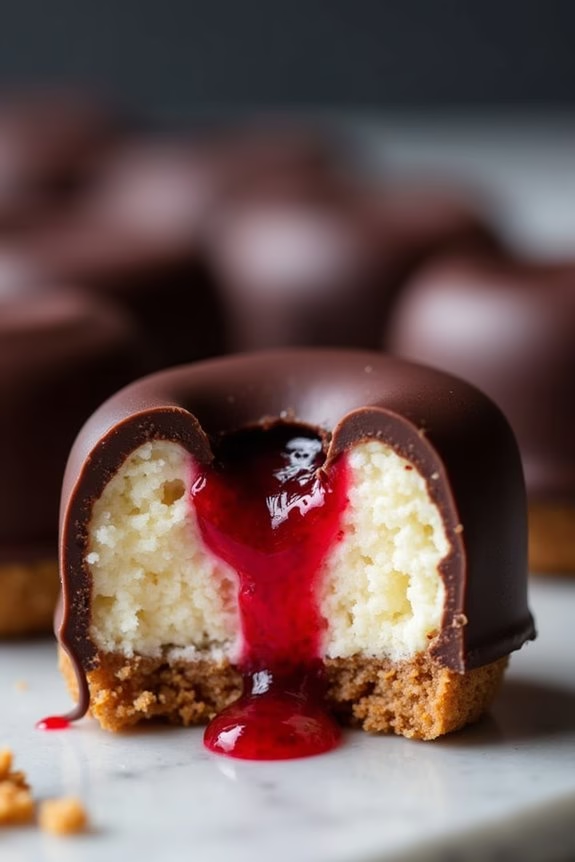
Indulge in the spooky spirit of Halloween with these delightfully eerie Vampire Bite Cheesecake Bites. Perfect for a festive potluck, these decadent treats feature a creamy cheesecake filling encased in a crunchy chocolate shell, with a surprise “bloody” raspberry sauce center that will thrill your guests. The contrast of textures and the playful presentation make these bites a fun and delicious addition to your Halloween dessert spread.
Imagine the delight on your guests’ faces as they take a bite into these seemingly innocent cheesecake bites, only to discover the “vampire bite” surprise hidden within. These bites aren’t only visually striking but also incredibly tasty, with the rich sweetness of the cheesecake perfectly complemented by the tartness of the raspberry sauce. Designed to serve 4-6 people, this recipe is a chillingly perfect way to bring a touch of drama and a whole lot of flavor to your Halloween festivities.
Ingredients (Serves 4-6):
- 1 cup graham cracker crumbs
- 2 tablespoons unsalted butter, melted
- 1/4 cup granulated sugar
- 8 oz cream cheese, softened
- 1/4 cup sour cream
- 1 teaspoon vanilla extract
- 1/2 cup powdered sugar
- 1/2 cup raspberry jam
- 1/4 cup fresh raspberries
- 1 cup dark chocolate chips
- 1 tablespoon coconut oil
- Red food coloring (optional)
Instructions:
- Prepare the Crust: In a bowl, combine the graham cracker crumbs, melted butter, and granulated sugar. Mix until the crumbs are well coated and resemble wet sand. Line a mini muffin tin with paper liners and press about a tablespoon of the crumb mixture into the bottom of each liner. Use your fingers or the back of a spoon to compact it firmly. Set aside.
- Make the Cheesecake Filling: In a separate bowl, beat the softened cream cheese until smooth. Add the sour cream, vanilla extract, and powdered sugar, mixing until fully incorporated and creamy. Spoon the cheesecake mixture over the graham cracker crusts in the muffin tin, filling each liner almost to the top.
- Create the Raspberry Sauce: In a small saucepan over low heat, combine the raspberry jam and fresh raspberries. Stir occasionally until the mixture is smooth and slightly thickened. For a more dramatic effect, add a few drops of red food coloring to enhance the “bloody” appearance.
- Assemble the Bites: Using a small spoon or a piping bag, insert a small amount of raspberry sauce into the center of each cheesecake bite by gently poking a hole into the filling. Confirm the sauce is well hidden beneath the surface.
- Melt the Chocolate: In a microwave-safe bowl, combine the dark chocolate chips and coconut oil. Microwave in 30-second intervals, stirring in between, until the chocolate is completely melted and smooth.
- Coat the Cheesecake Bites: Carefully spoon the melted chocolate over each cheesecake bite, covering the surface completely. Gently tap the muffin tin on the counter to smooth the chocolate layer. Allow the bites to set in the refrigerator for at least 1 hour before serving.
Extra Tips:
For an added touch of Halloween flair, consider adding some edible decorations on top of the chocolate coating, like candy bats or sugar eyes, to enhance the spooky theme. Confirm the cheesecake filling is well chilled before adding the chocolate layer to prevent it from melting into the cheesecake.
These bites can be made a day in advance, allowing the flavors to meld and the chocolate to fully harden, making them an easy and impressive treat to serve at your Halloween gathering.
Haunted Haystack Treats
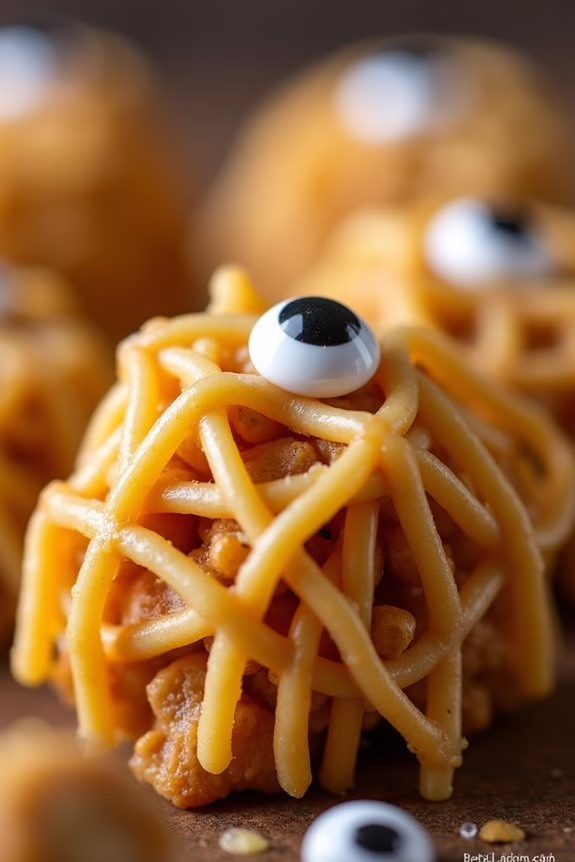
With Halloween right around the corner, it’s the perfect time to whip up some spooky snacks that will wow your guests. Haunted Haystack Treats aren’t only delicious but also fun to make – they’re the ultimate addition to any Halloween potluck.
These delightful treats combine the crunchiness of chow mein noodles with the sweet creaminess of butterscotch and peanut butter, creating a unique texture that’s both satisfying and addictive. The addition of candy eyes gives them a playful and eerie appearance, making them an instant hit with both kids and adults.
This recipe is designed to serve 4-6 people and can be easily doubled or tripled for larger gatherings. Whether you’re hosting a Halloween party or looking for a quick treat to bring to your office potluck, these Haunted Haystacks are sure to be a crowd-pleaser.
The best part is that they require no baking, making them an easy and convenient option for those who mightn’t have much time to spend in the kitchen. So, gather your ingredients and get ready to create a spooky and scrumptious treat that will leave everyone asking for more!
Ingredients (Serves 4-6):
- 1 cup butterscotch chips
- 1/2 cup creamy peanut butter
- 2 cups chow mein noodles
- 1/2 cup salted peanuts
- Candy eyes (about 24-30 pieces)
Cooking Instructions:
- Melt the Butterscotch and Peanut Butter: In a microwave-safe bowl, combine the butterscotch chips and creamy peanut butter. Heat in the microwave in 30-second intervals, stirring after each interval, until the mixture is smooth and fully melted. Be careful not to overheat, as the butterscotch can burn easily.
- Mix in the Dry Ingredients: Once the butterscotch and peanut butter are melted and well-blended, add the chow mein noodles and salted peanuts to the bowl. Gently fold the ingredients together until the noodles and peanuts are evenly coated with the butterscotch mixture.
- Form the Haystacks: Line a baking sheet with parchment paper. Using a spoon or your hands, scoop small mounds of the noodle mixture onto the prepared baking sheet, forming haystack shapes. Make sure to work quickly, as the mixture will begin to set as it cools.
- Decorate with Candy Eyes: While the haystacks are still soft, press two candy eyes onto each haystack to create a spooky face. Adjust the eyes as needed to make sure they stick well to the surface.
- Let the Haystacks Set: Allow the haystacks to cool and set completely at room temperature, or place them in the refrigerator for about 15-20 minutes if you’re in a hurry. Once set, they’re ready to serve.
Extra Tips:
For a festive twist, consider adding a few drops of food coloring to the butterscotch and peanut butter mixture to give your haystacks a more vibrant appearance.
You can also experiment with different toppings, such as sprinkles or mini marshmallows, to add more texture and flair. If you prefer a nuttier flavor, substitute the butterscotch chips with white chocolate chips or almond bark.
Black Cat Oreo Truffles
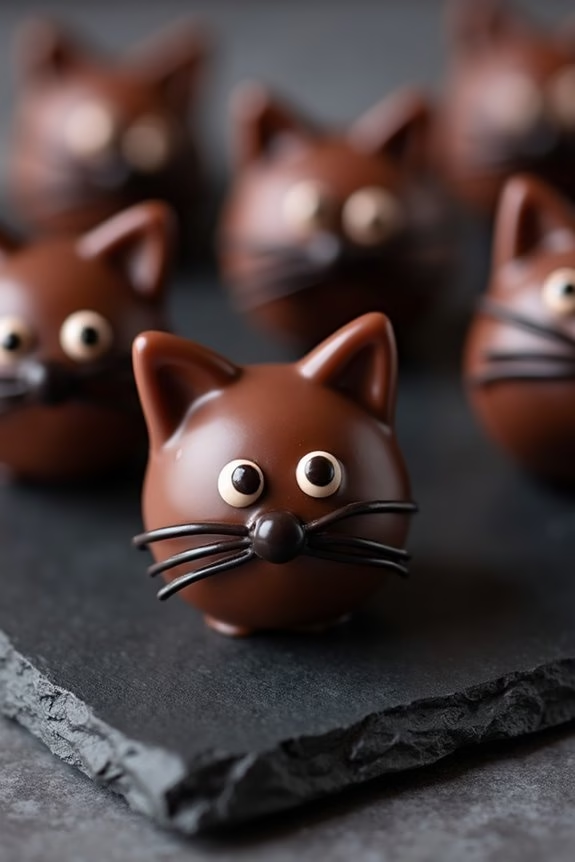
Indulge in the spooky spirit of Halloween with these delightful Black Cat Oreo Truffles. Perfect for a Halloween potluck, these truffles aren’t only delicious but also charmingly decorated to resemble cute black cats. With their creamy Oreo center and rich chocolate coating, they’re bound to be a hit with both kids and adults alike.
These truffles are easy to make, require no baking, and are a fantastic way to get creative in the kitchen during the festive season. Making Black Cat Oreo Truffles is a fun and engaging activity that can be enjoyed by the whole family.
The process involves blending classic Oreo cookies into a fine crumb and mixing them with cream cheese to form a smooth, moldable dough. Once shaped into little balls, these truffles are dipped in melted chocolate and decorated with candy to give them their adorable feline features.
With a serving size of 4-6 people, this recipe guarantees everyone at your Halloween gathering gets a taste of these charming treats.
Ingredients:
- 36 Oreo cookies
- 8 oz cream cheese, softened
- 16 oz semi-sweet chocolate chips
- 1 tablespoon vegetable oil
- Candy eyes
- Mini chocolate chips or candy-coated chocolates for ears
- Black licorice or black icing for whiskers
Instructions:
- Prepare the Oreos: Begin by crushing the Oreo cookies into fine crumbs. You can use a food processor for this to guarantee an even consistency. If a food processor isn’t available, place the cookies in a large ziplock bag and crush them with a rolling pin.
- Mix with Cream Cheese: In a large mixing bowl, combine the Oreo crumbs with softened cream cheese. Mix thoroughly until you have a smooth, homogeneous dough. This mixture should be pliable enough to shape into balls.
- Shape the Truffles: Line a baking sheet with parchment paper. Scoop out small portions of the Oreo mixture and roll them into 1-inch balls using your hands. Place each ball onto the prepared baking sheet. Once all the balls are formed, refrigerate them for about 30 minutes, or until firm.
- Melt the Chocolate: In a microwave-safe bowl, combine the semi-sweet chocolate chips and vegetable oil. Microwave in 30-second intervals, stirring in between, until the chocolate is fully melted and smooth.
- Coat the Truffles: Using a fork or a toothpick, dip each Oreo ball into the melted chocolate, guaranteeing it’s completely covered. Let any excess chocolate drip off before placing the truffle back onto the parchment-lined baking sheet.
- Decorate: While the chocolate coating is still wet, quickly place two mini chocolate chips or candy-coated chocolates on top of each truffle to form the cat ears. Add candy eyes and use small strips of black licorice or black icing to create whiskers.
- Set the Truffles: Allow the decorated truffles to sit at room temperature or in the refrigerator until the chocolate has completely set.
Extra Tips:
To guarantee the best results, make sure the cream cheese is at room temperature before mixing it with the Oreo crumbs, as this will make it easier to blend.
If you find the chocolate coating becoming too thick as it cools, simply rewarm it in the microwave for a few seconds. When decorating, work quickly before the chocolate sets to guarantee that the candy pieces stick.
For an extra festive touch, you can use colored icing to add additional details to your black cat truffles. Enjoy your spooky and delicious creations!
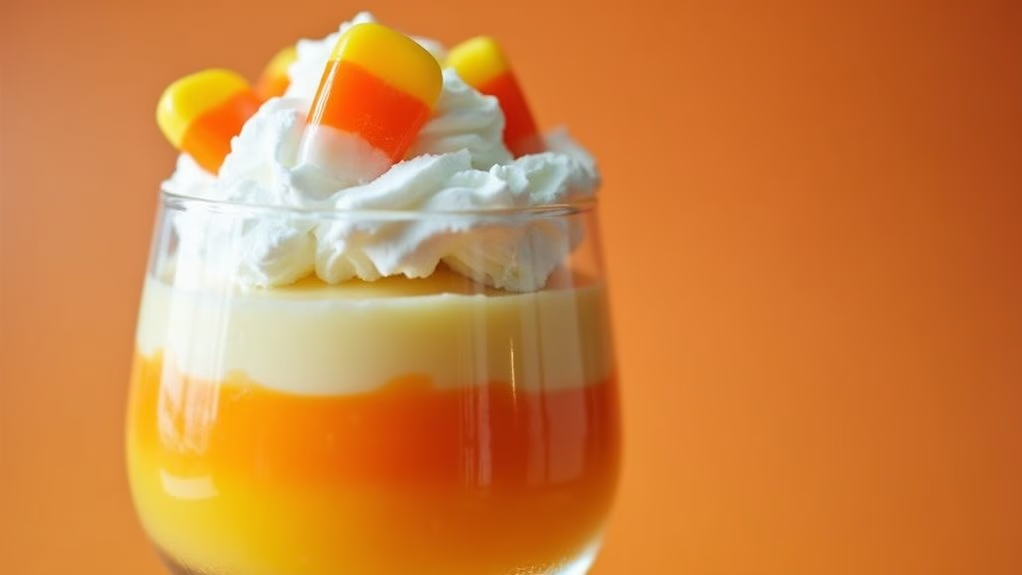
Candy Corn Parfait Cups
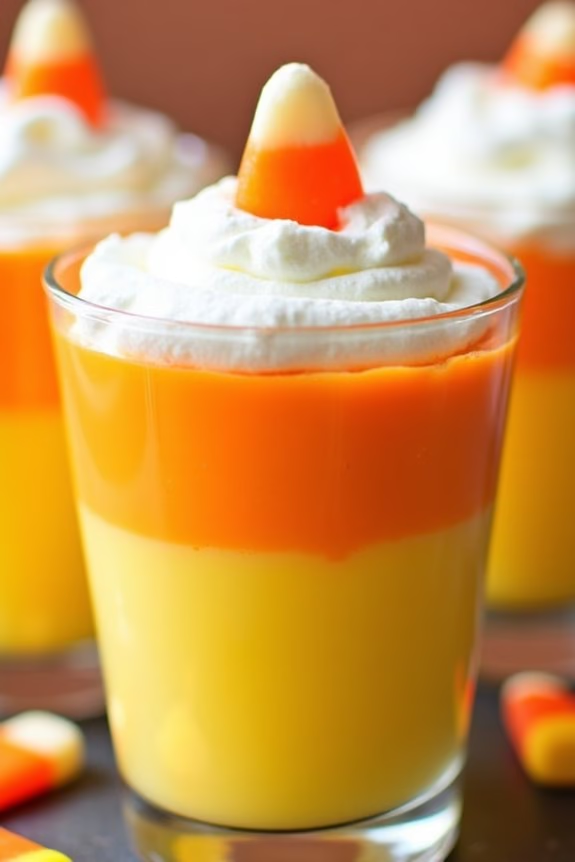
Candy Corn Parfait Cups are a whimsical and delicious addition to any Halloween potluck. These layered desserts aren’t only visually stunning with their vibrant hues that mimic the iconic Halloween candy, but they also offer a delightful combination of flavors and textures. Perfect for parties, these parfait cups are a crowd-pleaser that will satisfy both kids and adults alike.
With layers of sweetened whipped cream, creamy pudding, and crunchy candy corn, these cups come together effortlessly and can be prepared ahead of time, making them a stress-free choice for your Halloween gathering.
The beauty of Candy Corn Parfait Cups lies in their simplicity and versatility. You can customize them with different flavors of pudding or add your favorite Halloween-themed candies for an extra festive touch. Serve them in clear cups or glasses to showcase the distinct layers, and don’t forget to add a few extra candy corn pieces on top for decoration.
Whether you’re hosting a Halloween bash or attending a potluck, these parfait cups are sure to impress with both their appearance and taste.
Ingredients (serving size: 4-6 people):
- 1 cup heavy whipping cream
- 2 tablespoons powdered sugar
- 1 teaspoon vanilla extract
- 1 package (3.4 oz) instant vanilla pudding mix
- 2 cups milk
- Yellow food coloring
- Orange food coloring
- 1 cup candy corn
- Clear cups or glasses for serving
Instructions:
- Prepare the Whipped Cream: In a chilled mixing bowl, combine the heavy whipping cream, powdered sugar, and vanilla extract. Using an electric mixer, beat the mixture on medium-high speed until stiff peaks form. This will create a sweetened whipped cream to use for the top layer of the parfait.
- Make the Pudding: In a separate bowl, prepare the instant vanilla pudding mix by whisking it together with 2 cups of cold milk. Whisk for about 2 minutes until the pudding thickens. Divide the pudding into two equal portions.
- Color the Pudding: Add several drops of yellow food coloring to one portion of the pudding and mix until the color is evenly distributed. Do the same with the second portion, adding orange food coloring until you reach the desired shade.
- Assemble the Parfaits: In each clear cup or glass, start by adding a layer of yellow pudding, filling about one-third of the cup. Follow with a layer of orange pudding, filling another third of the cup. Finally, top each cup with a generous dollop of the prepared whipped cream.
- Garnish and Serve: Sprinkle a handful of candy corn on top of the whipped cream for garnish. You can also add a few candy corn pieces around the sides of the cup for a more festive look. Serve immediately or chill until ready to serve.
Extra Tips:
For an added twist, consider layering in some crushed cookies or graham crackers between the pudding layers for extra texture. If you want to make these parfait cups ahead of time, prepare the pudding and whipped cream layers in advance, but wait to add the candy corn topping until just before serving to maintain its crunch.
Adjust the food coloring to achieve the perfect hue, keeping in mind that a little goes a long way. Enjoy these Candy Corn Parfait Cups as a fantastic festive treat for your Halloween celebration!