
Halloween is almost here, and I’ve brewed up a cauldron of fun party treats that will surely captivate your little goblins and ghouls. From Monster Mash Popcorn Balls to Ghostly Fruit Skewers, these playful delights are as scrumptious as they are visually enchanting. Whether you’re serving a bubbling Witch’s Brew Punch or spooky Mummy Hot Dogs, there’s a delightful treat for every taste. Ready to whip up some spooky snacks? Let’s uncover the magic together!
Monster Mash Popcorn Balls
The vibrant colors and playful appearance of Monster Mash Popcorn Balls make them a standout treat on any party table. These popcorn balls aren’t only visually appealing but also a hit with kids due to their sweet and slightly salty flavor.
Whether you’re hosting a Halloween bash or just looking to surprise your little ones with a special treat, these popcorn balls are sure to delight. Here’s how you can whip up a batch for 4-6 people:
Ingredients (Serving Size: 4-6 people):
- 8 cups plain popped popcorn
- 1/2 cup unsalted butter
- 1 package (10 oz) mini marshmallows
- 1/4 teaspoon salt
- Food coloring (green, purple, and orange)
- 1 cup candy corn
- 1 cup mini chocolate chips
- 1 cup Halloween sprinkles
- Cooking spray or extra butter for greasing hands
Instructions:
- Prepare the Popcorn: Start by popping 8 cups of plain popcorn. Remove any unpopped kernels. Place the popped popcorn in a large mixing bowl and set aside.
- Make the Marshmallow Mixture: In a large saucepan, melt 1/2 cup unsalted butter over low heat. Add the package of mini marshmallows and stir continuously until the marshmallows are completely melted and the mixture is smooth. Add 1/4 teaspoon salt to enhance the flavor.
- Color the Mixture: Divide the melted marshmallow mixture into three separate bowls. Add a few drops of green food coloring to the first bowl, purple to the second, and orange to the third. Stir each until the color is evenly distributed.
- Mix with Popcorn: Divide the popcorn equally into three portions. Pour each colored marshmallow mixture over one portion of popcorn. Use a spatula to gently fold the mixture into the popcorn until it’s evenly coated.
- Add Fun Add-ins: Once the popcorn is well-coated, mix in the candy corn, mini chocolate chips, and Halloween sprinkles. This adds both texture and a festive look to your popcorn balls.
- Form the Popcorn Balls: Lightly grease your hands with cooking spray or extra butter. Take a handful of the popcorn mixture and gently press it together to form balls, about the size of a tennis ball. Set the balls on a parchment-lined baking sheet to cool and set.
- Cool and Serve: Allow the popcorn balls to sit at room temperature for about 30 minutes to firm up. Once set, they’re ready to be served at your Halloween party.
Extra Tips:
When shaping the popcorn balls, it helps to have slightly damp hands to prevent the mixture from sticking too much.
If you’re making these with kids, let them get creative with the decorations, perhaps adding gummy worms or edible eyes for extra spookiness.
If you prefer a less sweet version, reduce the amount of candy or use dark chocolate chips to balance the flavors. Enjoy this festive treat while spending quality time with your little monsters!
Spider Web Pizza
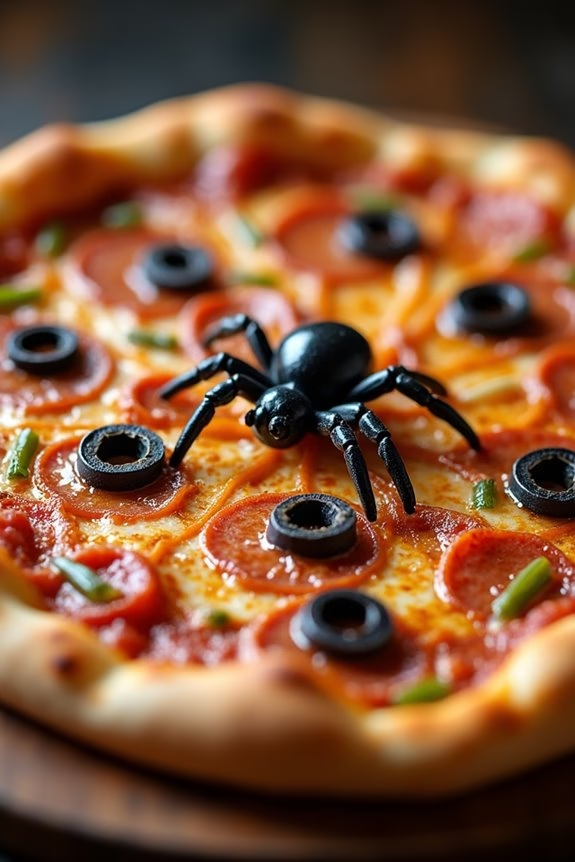
Are you looking for a spooky yet delicious treat for your next Halloween party? Spider Web Pizza is the perfect dish that combines fun and flavor, making it a hit with kids and adults alike. This creative twist on the classic pizza involves spinning a web of gooey cheese and arranging toppings to create a creepy, crawly effect.
The best part? It’s simple to make, allowing you to spend more time enjoying your Halloween festivities.
Spider Web Pizza isn’t only a visual delight but also a tasty treat that will have your little ghouls and goblins coming back for more. Perfectly portioned for 4-6 people, this recipe guarantees everyone gets a slice of the action.
Whether you’re hosting a Halloween bash or simply enjoying a themed dinner night, this dish is sure to be a crowd-pleaser. So, gather your ingredients and get ready to create a pizza that’s both spooky and scrumptious!
Ingredients (Serves 4-6)
- 1 pound pizza dough
- 1 cup pizza sauce
- 2 cups shredded mozzarella cheese
- 1 cup black olives, sliced
- 1 cup pepperoni slices
- 1 green bell pepper, sliced into thin strips
- 1 small onion, thinly sliced
- Cooking spray or olive oil for greasing
Cooking Instructions
1. Preheat the Oven: Start by preheating your oven to 475°F (245°C). This guarantees your pizza cooks evenly and develops a crispy crust.
2. Prepare the Dough: Lightly grease a pizza pan or baking sheet with cooking spray or olive oil. Roll out the pizza dough to fit your pan, spreading it evenly to create a thin base.
3. Add the Sauce: Spread the pizza sauce evenly over the dough, leaving a small border around the edges for the crust.
4. Create the Web: Sprinkle the mozzarella cheese over the sauce. Using the sliced olives, create a spider web pattern by placing them in concentric circles from the center to the edge of the pizza.
Use thin strips of bell pepper to connect the circles, forming the web design.
5. Add Toppings: Decorate with pepperoni slices and sliced onions, arranging them as desired. You can also create small “spiders” using olives by placing one whole olive for the body and thin strips of olive for legs.
6. Bake the Pizza: Place the prepared pizza in the preheated oven and bake for 12-15 minutes or until the crust is golden brown and the cheese is bubbly and slightly browned.
7. Cool and Serve: Remove the pizza from the oven and let it cool for a few minutes. Slice and serve your spooky Spider Web Pizza to your thrilled guests.
Extra Tips
For an even spookier effect, consider using different colored bell peppers to add some vibrant hues to your spider web.
If you want a crispier crust, prebake the pizza dough for 5 minutes before adding the sauce and toppings.
Remember to have fun with the decoration and involve your kids in the process—they’ll love helping out and getting creative with the toppings!
Ghostly Fruit Skewers

Halloween is a fantastic time for kids to enjoy spooky-themed foods that are both fun and healthy. Ghostly Fruit Skewers are a delightful treat that combines the playful spirit of Halloween with the nutritional benefits of fresh fruits. Perfect for a Halloween party or a festive snack, these skewers are easy to prepare and are sure to be a hit with children and adults alike.
They’re visually appealing with a combination of vibrant fruit colors and whimsical ghost shapes.
To create these Ghostly Fruit Skewers, you’ll need a selection of fruits that are easy to cut and skewer. Bananas serve as the main attraction, transformed into cute little ghosts with the help of chocolate chips for eyes. Complement these with juicy strawberries, grapes, and melon balls to add a splash of color and flavor.
With this simple recipe, you can prepare a serving size of 4-6 people, making sure there are plenty of skewers to go around.
Ingredients (for 4-6 people):
- 3 bananas
- 1 cup strawberries
- 1 cup green grapes
- 1 cup cantaloupe or honeydew melon balls
- 24 mini chocolate chips
- 8 wooden skewers
Cooking Instructions:
- Prepare the Bananas: Peel the bananas and cut each into thirds. Stand each piece upright and gently press two mini chocolate chips into each to create ghostly eyes.
- Wash and Prepare Other Fruits: Rinse the strawberries and grapes thoroughly. Hull the strawberries and cut them in half if they’re large. Use a melon baller to scoop out melon balls from the cantaloupe or honeydew.
- Assemble the Skewers: Start by threading a grape onto the skewer, followed by a piece of banana ghost, a melon ball, and a strawberry. Repeat this pattern until the skewer is filled, leaving some space at the bottom for handling.
- Finalize the Skewers: Confirm each skewer has a balanced mix of fruits and at least one banana ghost. This will make each skewer visually appealing and delicious.
- Presentation: Arrange the skewers on a platter, standing them in a fun pattern, or lay them flat for easy grabbing by little hands.
Extra Tips:
When making Ghostly Fruit Skewers, it’s important to use ripe but firm bananas to guarantee they hold their shape. If preparing these skewers in advance, lightly brush the banana pieces with lemon juice to prevent browning, keeping them fresh and appealing.
For an added Halloween touch, consider serving the skewers with a small bowl of yogurt or chocolate sauce for dipping. This not only enhances the flavor but also adds an element of fun for kids to enjoy.
Witch’s Brew Punch
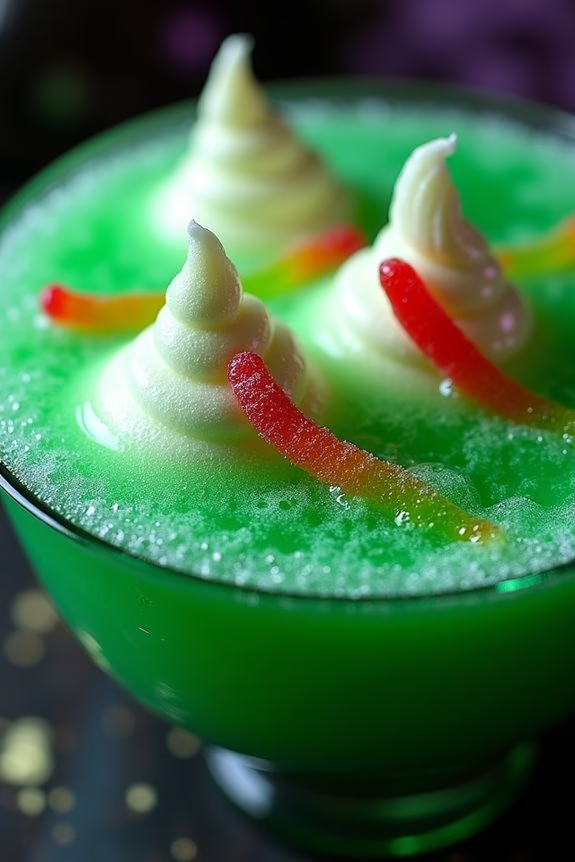
Witch’s Brew Punch is a fun, spooky, and delicious beverage perfect for any Halloween party, especially when children are involved. This eerie-looking punch isn’t only easy to prepare but also a delight for the senses with its fizzy texture and vibrant color. The punch can be served in a cauldron-like bowl for added effect, making it a centerpiece that will surely enchant your little ghouls and goblins.
The punch combines a mix of fruit juices, soda, and a few special ingredients to give it that magical, witchy feel. With the right balance of sweetness and tang, Witch’s Brew Punch is sure to keep the kids refreshed and entertained all evening. The recipe below is designed to serve 4-6 people, making it perfect for a small gathering or a larger party when scaled up.
Ingredients:
- 3 cups of pineapple juice
- 2 cups of orange juice
- 2 cups of lemon-lime soda
- 1 cup of grape juice
- 1 cup of ginger ale
- 1 cup of sherbet (lime or orange)
- 1-2 drops of green food coloring (optional)
- Gummy worms or other spooky candies for garnish
- Ice cubes
Instructions:
- Prepare the Base: In a large punch bowl or cauldron, pour in the pineapple juice, orange juice, and grape juice. Stir them together until well combined. These juices create the fruity base of the punch, offering a mix of sweet and tangy flavors.
- Add the Fizz: Slowly add the lemon-lime soda and ginger ale to the punch. Stir gently to avoid losing the carbonation. The soda adds a delightful fizz, making the punch bubbly and exciting for the kids.
- Create the Witchy Effect: If you wish to enhance the punch’s color, add 1-2 drops of green food coloring. Stir until the color is evenly distributed, giving the punch a mystical, eerie hue perfect for Halloween.
- Add the Sherbet: Scoop the sherbet into the punch. As it melts, it will create a frothy, bubbling effect, adding to the witchy brew appearance. The sherbet also adds a creamy texture and a burst of flavor.
- Chill and Garnish: Add ice cubes to keep the punch cool. For an extra spooky touch, garnish with gummy worms or other Halloween-themed candies. Serve immediately to enjoy the punch at its fizziest.
Extra Tips:
To make your Witch’s Brew Punch even more fun, consider serving it in clear cups so the children can see the bubbling and swirling colors. You can also prepare ice cubes with embedded gummy candies to add a surprise element when they melt.
If you’re preparing the punch ahead of time, add the soda and sherbet just before serving to maintain the fizz and frothiness. This punch is easily adjustable, so feel free to experiment with different juice combinations or use sugar-free options if desired.
Mummy Hot Dogs
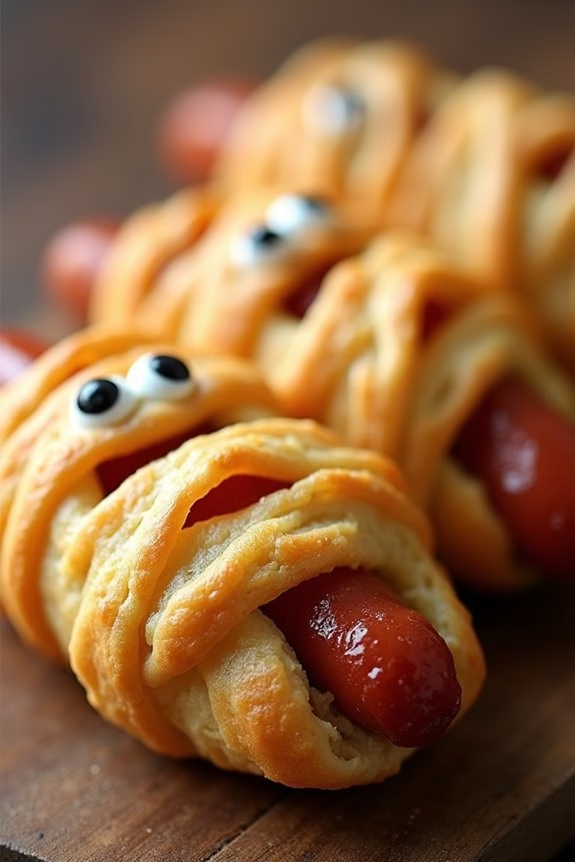
Mummy Hot Dogs are a spooky and fun treat that’s perfect for a Halloween party. These adorable snacks are a creative twist on the classic pigs in a blanket, featuring hot dogs wrapped in crescent roll dough to resemble mummies. Kids will love the whimsical presentation, and they’re simple enough to involve the little ones in the kitchen. The best part is that they’re quick to prepare and can be customized with dips or toppings to suit everyone’s tastes.
This recipe serves 4-6 people, making it ideal for a small gathering or as one of several options at a larger Halloween bash. The crisp, golden-brown dough contrasts delightfully with the savory hot dog inside, creating a delicious bite-sized treat that’s sure to be a hit with children and adults alike. Whether served as an appetizer or a main dish, Mummy Hot Dogs are sure to add a festive touch to your Halloween celebration.
Ingredients:
- 1 package of 8 hot dogs
- 1 can of refrigerated crescent roll dough
- Mustard or ketchup for decorating
- Cooking spray or parchment paper
Instructions:
- Preheat the Oven: Begin by preheating your oven to 375°F (190°C). This guarantees that the oven is hot and ready to evenly cook the mummy hot dogs.
- Prepare the Dough: Unroll the crescent roll dough on a clean surface. Using a sharp knife or a pizza cutter, slice the dough into thin strips about ¼ inch wide. These will be used to wrap around the hot dogs to create the mummy effect.
- Wrap the Hot Dogs: Take each hot dog and start wrapping the dough strips around it, leaving a small gap near the top for the mummy’s face. Overlap the strips and crisscross them to give the appearance of mummy bandages. Leave some space between the bandages for a more authentic look.
- Arrange on Baking Sheet: Place the wrapped hot dogs on a baking sheet lined with parchment paper or lightly sprayed with cooking spray. Make sure the mummies are evenly spaced to guarantee they cook evenly.
- Bake: Put the baking sheet in the preheated oven and bake for about 12-15 minutes, or until the dough is golden brown and cooked through.
- Decorate the Mummies: Once baked, remove the mummies from the oven and let them cool for a few minutes. Use mustard or ketchup to dot eyes onto each mummy in the open area near the top. This will complete the mummy look and add a bit of flavor.
Extra Tips: For a healthier option, consider using whole wheat crescent roll dough or turkey hot dogs. You can also experiment with adding cheese slices under the dough for a cheesy surprise.
If you’re preparing these in advance, they can be assembled and refrigerated a few hours before baking, saving you time on the day of the party. Finally, serve them with a variety of dipping sauces like honey mustard, barbecue sauce, or spicy ketchup to cater to different taste preferences.
Creepy Carrot Fingers
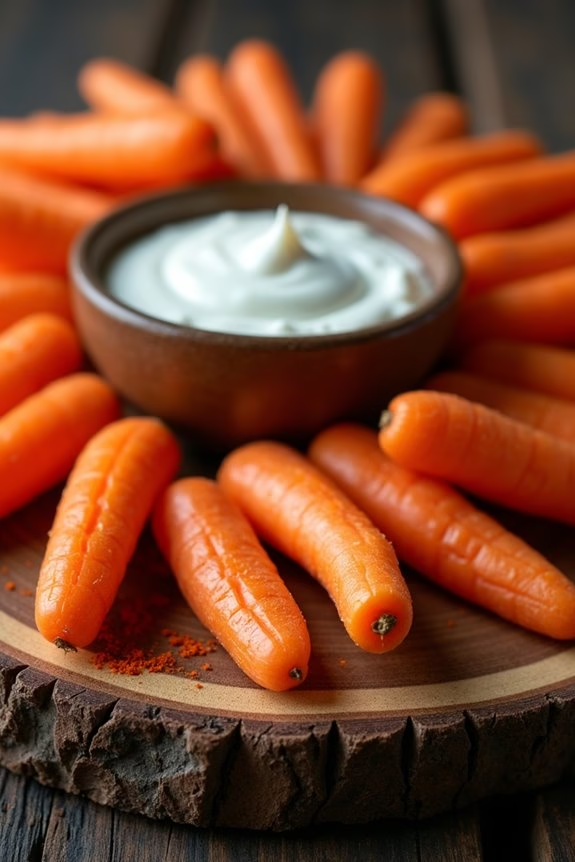
Creepy Carrot Fingers are a fun and spooky addition to any Halloween party, perfect for delighting young trick-or-treaters with a healthy twist. These ghoulish snacks aren’t only easy to make but also provide a nutritious option amidst the sugary treats commonly found at Halloween gatherings.
With their eerie appearance and simple preparation, Creepy Carrot Fingers are sure to be a hit with both kids and parents alike. This recipe transforms ordinary carrots into spine-chilling finger-like snacks with the help of a few clever touches. The crunchy texture and vibrant orange color make these carrot fingers an eye-catching and tasty treat.
Whether you’re hosting a Halloween bash or just looking for some festive fun in the kitchen, these Creepy Carrot Fingers are an excellent choice. Serve them with a side of your favorite dip, such as hummus or ranch dressing, for extra flavor.
Ingredients (serving size: 4-6 people):
- 6 large carrots
- 12 almond slivers
- 1 tablespoon cream cheese or hummus
- 1 teaspoon paprika or cayenne pepper (optional, for a spicy kick)
- 1/2 teaspoon salt
- 1/2 teaspoon black pepper
- 1 tablespoon olive oil (optional, for roasting)
Cooking Instructions:
- Prepare the Carrots: Start by washing and peeling the carrots thoroughly. Cut each carrot into halves or thirds, depending on the size, to create finger-like shapes approximately 3-4 inches long.
- Shape the Carrot Fingers: Use a paring knife to carve out a small, shallow area at the tip of each carrot segment to create a nail bed. Try to make the cut as realistic as possible for a more eerie effect.
- Attach the Almond Nails: Take almond slivers and, using a small amount of cream cheese or hummus, attach one sliver to the top of each carrot segment where the nail bed is carved. Press gently to make sure the almond sliver adheres well.
- Season the Carrots: Lightly sprinkle the carrot fingers with salt, pepper, and paprika or cayenne pepper if desired. This will add a bit of flavor and enhance the spooky appearance with a slight reddish tint.
- Cook the Carrots: Preheat your oven to 350°F (175°C). Place the carrot fingers on a baking sheet lined with parchment paper. Drizzle with a bit of olive oil if you prefer roasted carrots, then bake for 15-20 minutes until they’re just tender but still firm enough to hold their shape.
- Serve: Remove the carrot fingers from the oven and let them cool slightly. Arrange them on a serving platter with your choice of dip in the center, and watch as kids reach for these spooky snacks.
Extra Tips:
For a more realistic look, consider using a vegetable peeler to create knuckle marks on the carrots by slightly shaving off thin strips. If you want to make them ahead of time, prepare the carrots and attach the almond nails, then store in an airtight container in the fridge until ready to season and bake.
Additionally, if you prefer raw carrots, simply skip the baking step and serve them chilled for a crunchy treat.
Bat Wing Chips With Salsa
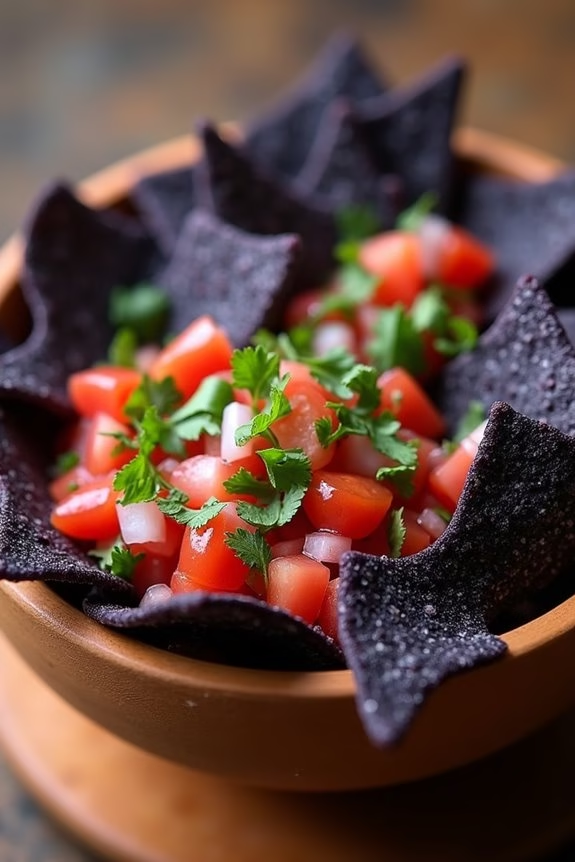
Halloween is the perfect time to get creative with party foods that are both spooky and delicious! Kids love themed treats, and Bat Wing Chips With Salsa are sure to be a hit. These crispy, dark-hued tortilla chips paired with a vibrant, tangy salsa won’t only satisfy hungry little ghosts and goblins but also add a festive touch to your Halloween table.
Made with blue corn tortillas shaped like bat wings, this dish is as fun to make as it’s to eat. The accompanying salsa is a mix of fresh tomatoes, onions, and zesty lime, offering a revitalizing balance to the savory chips. The recipe is simple enough to involve your kids in the preparation, making it a great family activity before the Halloween festivities kick off.
These Bat Wing Chips With Salsa are perfect for a serving size of 4-6 people, guaranteeing there’s plenty to go around for your little monsters and their friends.
Ingredients:
- 12 blue corn tortillas
- 2 tablespoons olive oil
- 1 teaspoon sea salt
- 4 medium tomatoes, diced
- 1 small red onion, finely chopped
- 1 jalapeño pepper, seeded and minced
- 1/4 cup fresh cilantro, chopped
- 1 lime, juiced
- Salt and pepper to taste
Instructions:
- Preheat the Oven: Begin by preheating your oven to 350°F (175°C). This will guarantee that the chips bake evenly once they go in.
- Prepare the Tortillas: Cut each blue corn tortilla into quarters, and then trim the edges to create a batwing shape. This can be done freehand or by using a bat-shaped cookie cutter for more precision.
- Season the Chips: Place the tortilla pieces in a large bowl. Drizzle with olive oil and sprinkle with sea salt, tossing to guarantee each piece is well coated.
- Bake the Chips: Arrange the seasoned tortilla pieces in a single layer on a baking sheet. Bake them in the preheated oven for about 8-10 minutes, or until they’re crispy and slightly golden. Keep an eye on them to prevent burning.
- Prepare the Salsa: While the chips are baking, combine the diced tomatoes, chopped red onion, minced jalapeño, and chopped cilantro in a medium-sized bowl.
- Add Lime and Season: Squeeze the lime juice over the salsa mixture and season with salt and pepper to taste. Stir well to guarantee all the ingredients are evenly mixed.
- Serve: Once the chips are done, remove them from the oven and let them cool slightly. Serve the bat wing chips alongside the fresh salsa in a decorative bowl or platter.
Extra Tips:
For extra flavor, you can add a pinch of smoked paprika or cumin to the olive oil before tossing the tortillas. If you want to make the salsa ahead of time, prepare it a few hours in advance and store it in the refrigerator to enhance the flavors.
Additionally, you can experiment with adding other ingredients like corn or black beans to the salsa for variety. When baking the chips, it’s important to check them frequently after the 8-minute mark to prevent them from over-browning. Enjoy your spooky snack!
Eyeball Deviled Eggs
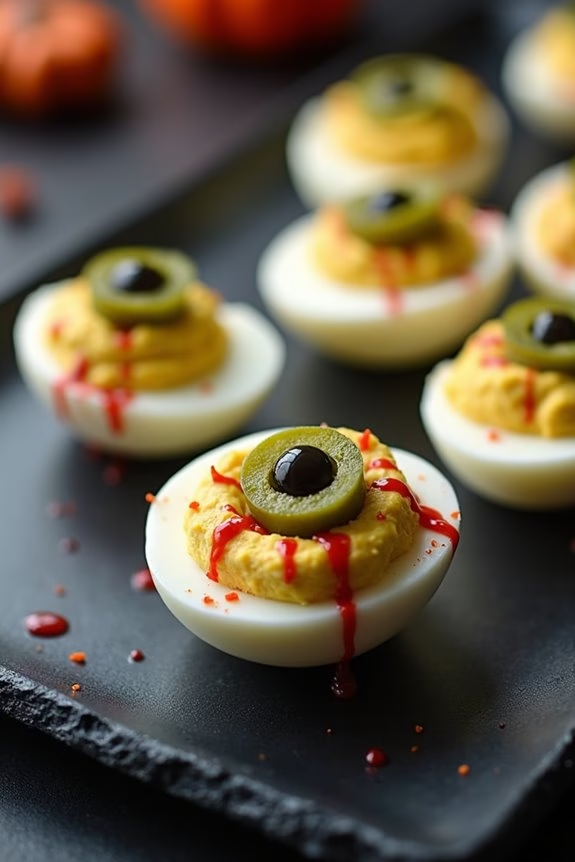
Eyeball Deviled Eggs are a spooky yet delicious addition to any Halloween party menu for kids. These creepy creations are sure to catch the attention of little ones and entice them to try something fun and flavorful. With a few simple ingredients, you can transform ordinary deviled eggs into eerie eyeballs that will have your guests both intrigued and delighted.
This recipe is perfect for a serving size of 4-6 people, making it ideal for small gatherings or as part of a larger spread. The creamy yolk filling, spiced with mustard and mayonnaise, is piped into hard-boiled egg whites and accented with an olive slice to complete the eye-catching effect. The result is a playful and tasty treat that balances visual appeal with classic deviled egg flavors.
Ingredients:
- 6 large eggs
- 1/4 cup mayonnaise
- 1 teaspoon yellow mustard
- Salt and pepper to taste
- Green or black olives, pitted and sliced
- Red food coloring (optional)
- 1 teaspoon white vinegar (for boiling eggs)
Cooking Instructions:
- Prepare the Eggs: Place the eggs in a single layer in a saucepan and cover them with water. Add the white vinegar to the water, which helps with peeling the shells. Bring the water to a boil over medium-high heat. Once it reaches a rolling boil, turn off the heat, cover the pan, and let the eggs sit for 10-12 minutes.
- Cool and Peel the Eggs: After the eggs have cooked, carefully transfer them to a bowl of ice water to cool for about 5 minutes. This stops the cooking process and makes peeling easier. Once cooled, gently tap each egg on a hard surface and peel off the shell.
- Cut and Remove Yolks: Slice each egg in half lengthwise and carefully remove the yolks, placing them in a separate bowl. Set the egg whites aside on a serving platter.
- Prepare the Filling: Mash the yolks with a fork until crumbly. Add mayonnaise, mustard, and a pinch of salt and pepper. Mix until smooth and creamy. Adjust the seasoning as needed.
- Assemble the Eyeballs: Spoon or pipe the yolk mixture back into the egg whites, filling the cavities generously. If using a piping bag, it can create a neater presentation.
- Decorate the Eggs: Place an olive slice on top of each yolk-filled egg, pressing gently to adhere. For an extra spooky touch, use a toothpick dipped in red food coloring to draw thin lines radiating from the olive, mimicking bloodshot veins.
Extra Tips: For a more striking appearance, consider using different colored olives or even a piece of red bell pepper in the center of each olive slice to create a “pupil” effect. If you find it challenging to peel the eggs, try using slightly older eggs, as fresh eggs are harder to peel.
Additionally, you can prepare the eggs and filling a day ahead and store them separately in the refrigerator; just assemble them shortly before serving to guarantee freshness.
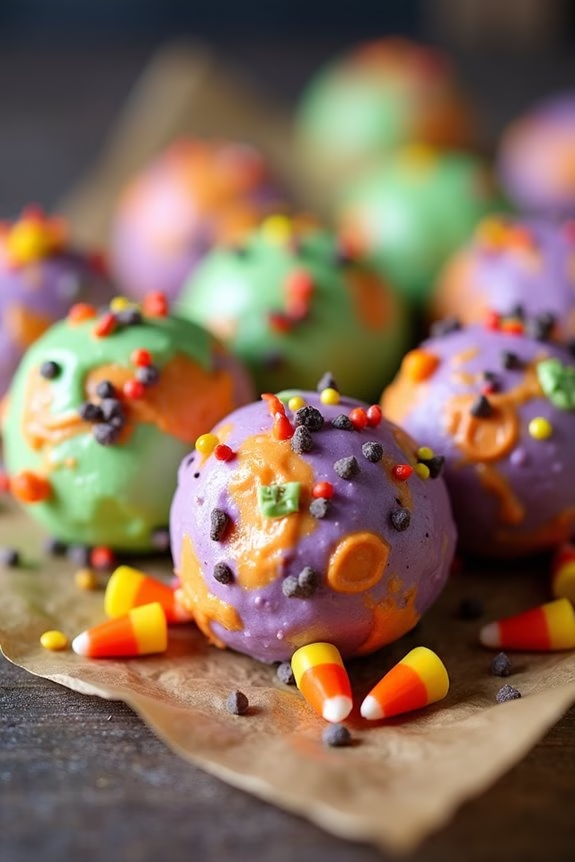
Frankenstein Rice Krispie Treats
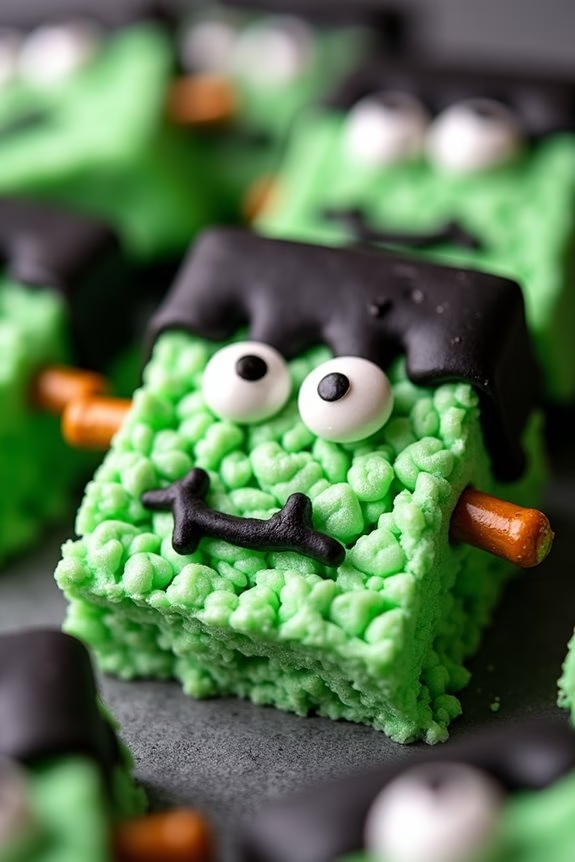
Frankenstein Rice Krispie Treats are the perfect Halloween snack for kids that combine the classic taste of Rice Krispie Treats with a spooky twist.
These treats are vibrant, fun, and easy to make, making them an ideal addition to any Halloween party menu. With their green marshmallow coating and decorations that mimic the iconic Frankenstein monster, these treats are sure to be a hit with both children and adults alike. Not only are they visually appealing, but they also retain that delicious, gooey texture that everyone loves.
Creating Frankenstein Rice Krispie Treats is a fun and engaging activity that can involve the whole family. The process is simple enough for kids to participate in, especially when it comes to decorating the treats.
This dish requires minimal ingredients and can be whipped up in no time, making it a convenient option for busy parents. Whether you’re looking to impress at a Halloween party or simply want to enjoy a festive snack at home, these treats are a delightful choice.
Ingredients (serving size: 4-6 people):
- 6 cups Rice Krispies cereal
- 4 cups mini marshmallows
- 3 tablespoons butter
- Green food coloring
- Black decorating gel
- Candy eyes
- Pretzel sticks
- Chocolate chips
Cooking Instructions:
- Prepare the Pan: Line a 9×13 inch baking pan with parchment paper, leaving some overhang on the sides to easily lift the treats out later. This will prevent the treats from sticking to the pan.
- Melt the Butter and Marshmallows: In a large saucepan over medium heat, melt the butter. Once the butter is melted, add the mini marshmallows and stir continuously until they’re completely melted and smooth.
- Add Food Coloring: Remove the melted marshmallow mixture from the heat and quickly stir in the green food coloring until you achieve your desired Frankenstein shade of green.
- Mix in Cereal: Gently fold in the Rice Krispies cereal, ensuring each piece is coated with the green marshmallow mixture.
- Shape the Treats: Transfer the mixture into the prepared baking pan. Use a buttered spatula or wax paper to press it evenly into the pan. Allow it to cool and set for about 30 minutes.
- Cut and Decorate: Once set, lift the Rice Krispie block out of the pan using the parchment overhang. Cut into rectangles or squares for the Frankenstein faces. Use black decorating gel to draw hair and a mouth on each piece. Attach candy eyes with a small dab of melted chocolate.
- Add Bolts: Insert pretzel sticks into the sides of each treat to represent Frankenstein’s neck bolts. Secure with a little melted chocolate if necessary.
Extra Tips:
For an extra festive touch, consider using different colored candy eyes or adding a small amount of purple or orange food coloring to the marshmallow mixture for a multi-colored effect.
If you don’t have pretzel sticks, you can substitute with small chocolate-covered wafer sticks for the bolts. When cutting the treats, use a sharp knife for clean edges, and if the mixture becomes too sticky, lightly coat your hands or utensils with butter or non-stick spray.
These treats are best enjoyed fresh but can be stored in an airtight container for up to two days.
Pumpkin Patch Cupcakes
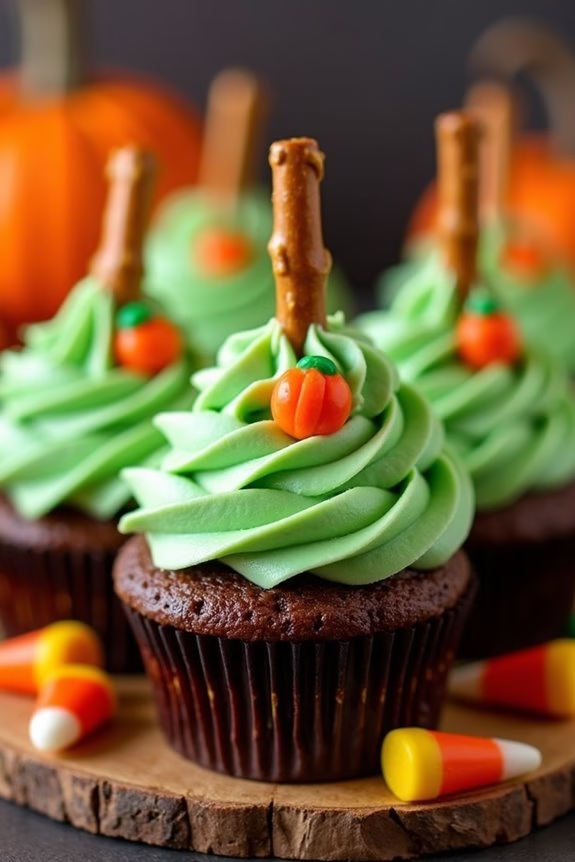
Pumpkin Patch Cupcakes are the perfect treat to add a touch of spookiness and a lot of fun to any Halloween party for kids. These delightful cupcakes not only taste amazing with their rich, moist texture but also capture the essence of Halloween with their charming pumpkin patch decorations. The combination of chocolate and pumpkin flavors creates a deliciously sweet and slightly spiced cupcake that’s sure to be a hit with children and adults alike.
Creating these cupcakes is a fun and engaging activity that you can enjoy with kids, allowing them to express their creativity as they decorate each cupcake to resemble a mini pumpkin patch. With the right ingredients and a little bit of imagination, you can create a festive array of cupcakes that will stand out at any Halloween gathering. The recipe below serves 4-6 people, making it perfect for a small party or a family treat.
Ingredients:
- 1 1/2 cups all-purpose flour
- 1 teaspoon baking powder
- 1/2 teaspoon baking soda
- 1/4 teaspoon salt
- 1 teaspoon ground cinnamon
- 1/2 teaspoon ground nutmeg
- 1/2 cup unsalted butter, softened
- 1 cup granulated sugar
- 2 large eggs
- 1 teaspoon vanilla extract
- 1 cup canned pumpkin puree
- 1/4 cup whole milk
- 1/2 cup semi-sweet chocolate chips
- 1 can of vanilla frosting
- Green food coloring
- Mini pretzel sticks
- Candy corn or pumpkin-shaped candies
Cooking Instructions:
- Preheat the Oven: Begin by preheating your oven to 350°F (175°C) and line a muffin tin with paper liners for approximately 12 cupcakes.
- Mix Dry Ingredients: In a medium-sized bowl, whisk together the flour, baking powder, baking soda, salt, cinnamon, and nutmeg until well combined.
- Cream Butter and Sugar: In a large mixing bowl, beat the softened butter and sugar together with an electric mixer until the mixture is light and fluffy, about 3-4 minutes.
- Add Eggs and Vanilla: Add the eggs one at a time, beating well after each addition. Stir in the vanilla extract until the mixture is smooth.
- Combine with Pumpkin and Milk: Add the pumpkin puree and milk to the mixture, mixing until just combined.
- Incorporate Dry Ingredients: Gradually add the dry ingredient mixture to the wet ingredients, mixing on low speed until just combined. Be careful not to overmix.
- Fold in Chocolate Chips: Gently fold the chocolate chips into the batter with a spatula.
- Fill and Bake Cupcakes: Spoon the batter into the prepared muffin tin, filling each liner about 2/3 full. Bake in the preheated oven for 18-22 minutes, or until a toothpick inserted into the center of a cupcake comes out clean.
- Cool and Frost: Allow the cupcakes to cool in the pan for 5 minutes before transferring them to a wire rack to cool completely. Once cooled, tint the vanilla frosting with green food coloring and frost each cupcake.
- Decorate: Create the pumpkin patch effect by inserting a mini pretzel stick into the center of each frosted cupcake to represent the pumpkin stem. Use candy corn or pumpkin-shaped candies to decorate around the pretzel sticks.
Extra Tips:
For an extra festive touch, try adding edible glitter or sprinkles to the frosting. If you prefer a less sweet cupcake, you can reduce the sugar slightly, or substitute with coconut sugar for a different flavor profile.
When decorating, encourage kids to get creative with their designs, using various candies to personalize each cupcake. Additionally, make sure the cupcakes are completely cooled before frosting to prevent the frosting from melting.
Enjoy these Pumpkin Patch Cupcakes as a fun and delicious addition to your Halloween festivities!
Zombie Jello Brains
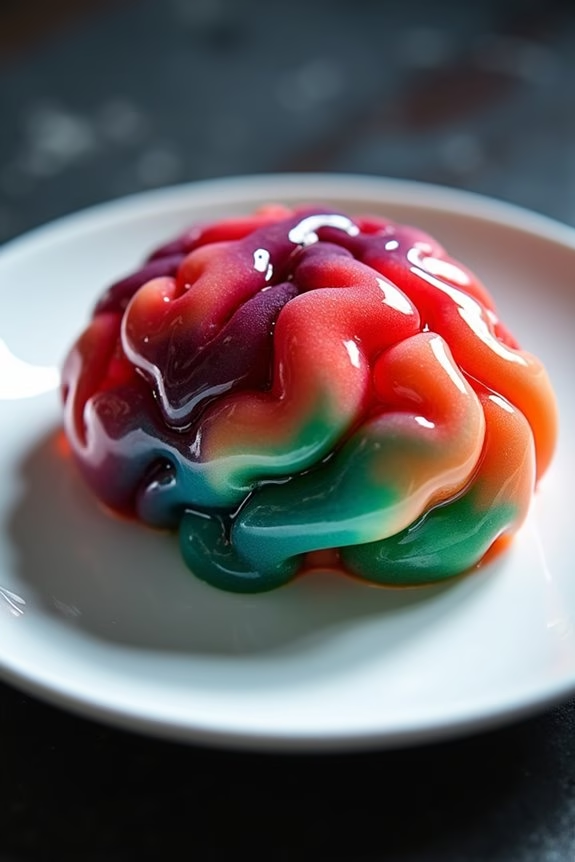
Zombie Jello Brains are the perfect spooky treat to serve at your Halloween party for kids. These wobbly, jiggly desserts aren’t only fun to make but also a delight to eat, adding a touch of creepy to your festive spread. The bright, colorful jello molded into the shape of a brain will captivate the little ones, while the easy preparation will make it a go-to recipe for busy parents.
For an added touch of realism, you can even use a combination of different colored jello to create a marbled effect, mimicking the look of a real brain.
This recipe is designed to serve 4-6 people and can be easily adjusted for larger or smaller gatherings. The ingredients are simple, and the process is straightforward, making it a great activity to involve the kids in. Not only will they’ve a blast creating their edible masterpieces, but they’ll also enjoy the sweet, fruity flavors of the jello.
So, gather your ingredients and get ready to make a Halloween treat that will both delight and spook your young guests.
Ingredients (Serving Size: 4-6 people):
- 2 packages of Jello (any flavor, 6 oz each)
- 3 cups boiling water
- 2 cups cold water
- 1 brain-shaped mold
Cooking Instructions:
- Prepare the Mold: Start by lightly greasing your brain-shaped mold with a non-stick spray or a small amount of vegetable oil. This will help the jello release easily once it’s set.
- Make the Jello Mixture: Boil 3 cups of water. In a large bowl, combine the boiling water with the two packages of jello. Stir until the jello is completely dissolved, which should take about 2 minutes.
- Add Cold Water: Add 2 cups of cold water to the jello mixture. Stir well to combine. This will help the jello set properly and give it the right consistency.
- Pour into Mold: Carefully pour the jello mixture into the prepared brain mold. Be sure to fill the mold completely to get the full effect of the brain shape.
- Chill to Set: Place the mold in the refrigerator. Allow it to chill for at least 4 hours or until the jello is completely set. For best results, you may want to let it sit overnight.
- Unmold the Jello Brain: Once the jello is set, remove the mold from the refrigerator. Gently loosen the edges with a small, flexible spatula. Place a serving plate on top of the mold and carefully invert it to release the jello brain onto the plate.
Extra Tips:
For a more realistic look, consider using a mix of different colored jello to create a marbled effect in the brain. Simply prepare the jello as directed, but pour each color into the mold separately, swirling them together gently with a knife.
To enhance the spooky factor, you could even add gummy worms or candy eyeballs embedded within the jello. Remember, patience is key when unmolding the jello brain—take your time to avoid any breaks or tears in the delicate structure.
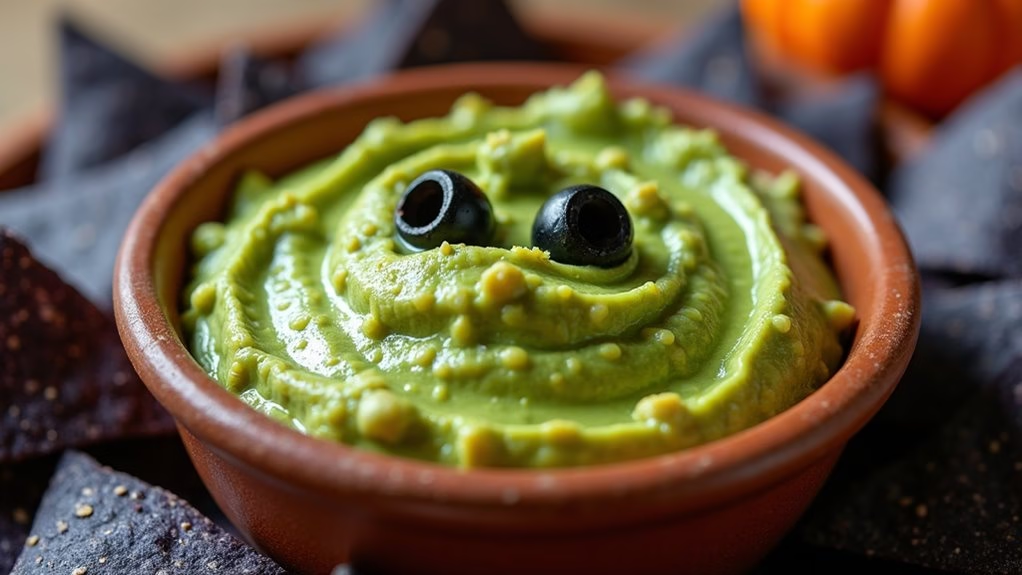
Ghoulish Guacamole Dip
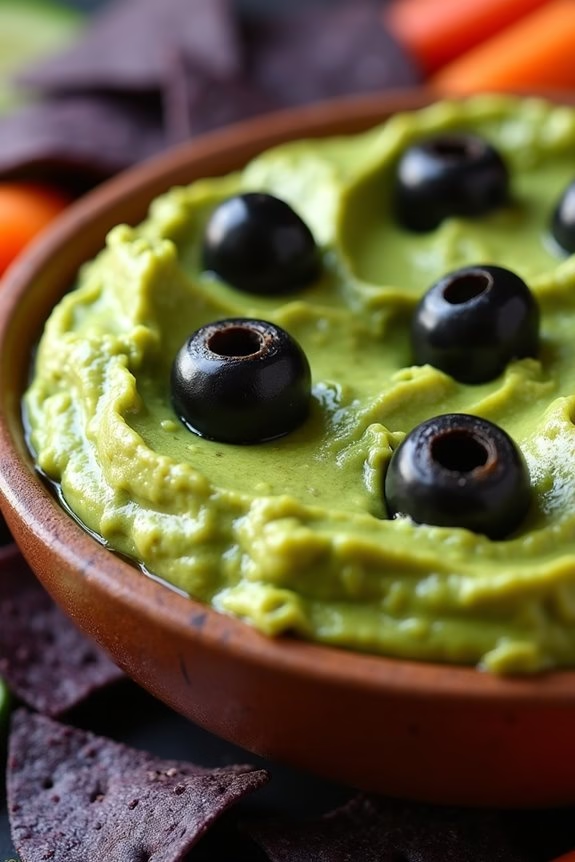
Halloween is the perfect time to get creative in the kitchen, especially when it comes to party foods for kids. One dish that’s sure to be a hit with both children and adults is the Ghoulish Guacamole Dip. This fun and spooky twist on the classic guacamole dip not only looks festive but is packed with flavors that everyone will love. The vibrant green color of the avocado paired with some clever garnishing makes this dish the star of any Halloween spread.
Ghoulish Guacamole Dip isn’t just about aesthetics; it’s also a healthy snack option. Avocados are loaded with healthy fats, fiber, and essential vitamins that are beneficial for growing kids. The addition of lime juice, tomatoes, and spices not only enhances the taste but also adds to the nutritional profile of the dish. Whether you’re hosting a Halloween party or just want to make something special for your little trick-or-treaters, this guacamole dip is a must-try.
Ingredients for 4-6 people:
- 3 ripe avocados, peeled and pitted
- 1 lime, juiced
- 1 teaspoon salt
- 1/2 teaspoon ground cumin
- 1/2 teaspoon cayenne pepper
- 1 medium onion, diced
- 2 Roma tomatoes, diced
- 1 tablespoon chopped cilantro
- 1 clove garlic, minced
- Blue corn tortilla chips or vegetable sticks for serving
- Black olives (for decoration)
- Green food coloring (optional)
Cooking Instructions:
- Prepare the Avocados: Start by scooping the flesh of the avocados into a mixing bowl. Use a fork or a potato masher to mash the avocados until you achieve a smooth consistency, leaving a few chunks for texture.
- Add Flavor: Squeeze the juice of one lime over the mashed avocados to add a tangy flavor and prevent browning. Sprinkle in the salt, cumin, and cayenne pepper, and stir well to combine.
- Mix in Vegetables: Fold in the diced onion, tomatoes, cilantro, and minced garlic. Mix until all the ingredients are evenly distributed.
- Enhance the Color (Optional): If you want the guacamole to have a more vibrant, ghoulish green appearance, add a drop or two of green food coloring. Stir well to guarantee the color is evenly mixed.
- Decorate: Transfer the guacamole to a serving bowl. Use black olives to create creepy eyes or other Halloween-themed decorations on top of the dip.
- Serve: Accompany the Ghoulish Guacamole Dip with blue corn tortilla chips or vegetable sticks for dipping. Arrange them around the bowl to create a spooky and inviting presentation.
Extra Tips:
When selecting avocados, make sure they’re ripe but not overripe for the best texture and flavor. To test for ripeness, gently press the avocado; it should yield slightly to pressure.
If you’re preparing the dip ahead of time, keep it covered with plastic wrap directly on the surface to minimize exposure to air and prevent browning.
For an added twist, consider adding a small amount of jalapeño for a spicy kick, but make sure to adjust according to the kids’ tolerance for heat.