

Hey there, party planners! 🎃 I’m beyond excited to share some spook-tacular treats that will make your Halloween bash truly unforgettable. From Wicked Witch Finger Foods to Mummy Brie Bites, these recipes are both delicious and delightfully eerie. Just picture the look on your guests’ faces when they see Eerie Eyeball Pasta and Bewitching Black Velvet Cake. These indulgent delights will enchant every adult’s palate and transform your party into a culinary haunt.
Wicked Witch Finger Foods
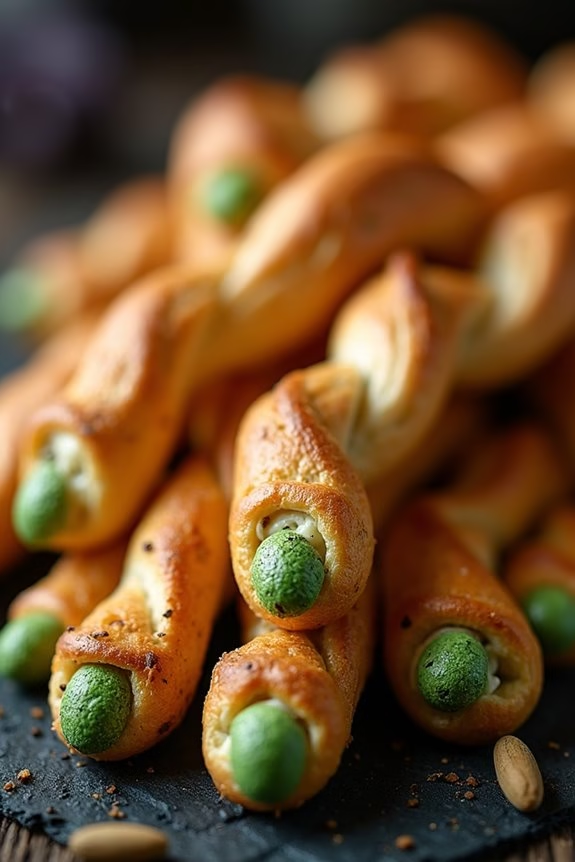
Get ready to cast a spell on your guests with these Wicked Witch Finger Foods, the perfect eerie addition to your Halloween party spread. These creepy yet delicious appetizers aren’t only a visual treat but also tantalize the taste buds with their savory goodness.
Crafted to resemble the gnarly fingers of a wicked witch, these finger foods are made of stuffed breadsticks adorned with almond nails and fresh herbs for an added touch of authenticity.
Perfect for a crowd, this recipe serves 4-6 people, making it ideal for any gathering. The breadsticks are filled with a savory mixture of cheese and herbs, and then shaped to resemble long witch fingers. Topped with almond slices painted with food coloring to mimic nails, these finger foods are sure to be a hit among your adult guests, bringing a fun and deliciously eerie vibe to your Halloween celebrations.
Ingredients (Serving Size: 4-6 people):
- 12 breadsticks
- 1 cup cream cheese, softened
- 1/2 cup shredded mozzarella cheese
- 1/4 cup grated Parmesan cheese
- 2 tablespoons fresh parsley, chopped
- 1 tablespoon fresh basil, chopped
- 24 almond slices
- Green food coloring
- 2 tablespoons olive oil
- Salt and pepper to taste
Cooking Instructions:
- Preheat the Oven: Preheat your oven to 375°F (190°C) to guarantee it’s ready for baking the breadsticks.
- Prepare the Filling: In a medium bowl, combine the softened cream cheese, shredded mozzarella, grated Parmesan, chopped parsley, and basil. Mix thoroughly until the ingredients are well combined and season with salt and pepper to taste.
- Stuff the Breadsticks: Carefully slit each breadstick lengthwise, making sure not to cut all the way through. Spoon a generous amount of the cheese mixture into each slit, pressing the breadstick lightly to close.
- Shape the Fingers: Shape each stuffed breadstick into the form of a gnarly finger by pinching and twisting slightly to create knuckle-like textures.
- Prepare the Almond Nails: Dip each almond slice into green food coloring, ensuring they’re fully coated. Allow them to dry on a piece of parchment paper.
- Attach the Nails: Using a small amount of the cheese mixture as glue, attach a colored almond slice to the tip of each breadstick to act as the witch’s fingernail.
- Bake the Fingers: Place the prepared breadsticks on a lined baking tray. Brush them lightly with olive oil and bake for 12-15 minutes, or until the breadsticks are golden brown and the cheese is bubbly.
- Serve: Once baked, allow the Wicked Witch Finger Foods to cool slightly before serving them to your guests.
Extra Tips:
For an extra eerie effect, consider using food-safe edible markers to add details to the almond nails, such as lines or cracks.
To enhance the flavor of these treats, you can incorporate additional herbs or spices into the cheese filling according to your preference.
If making these ahead of time, prepare them up to the baking step, and refrigerate. When ready to serve, bake and enjoy them fresh out of the oven for the best taste and texture.
Spooky Stuffed Jalapeños
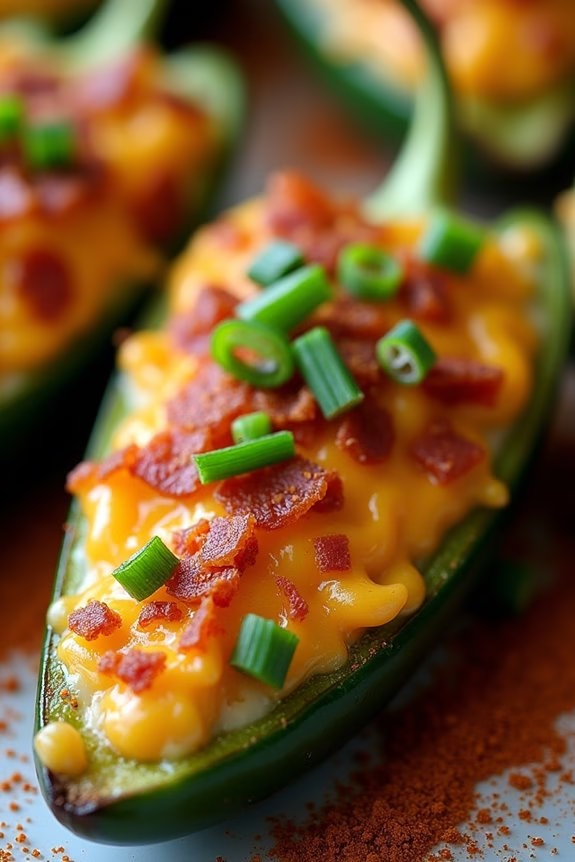
The key to achieving the perfect balance of flavors lies in the filling, which is a savory blend of cheeses, spices, and crispy bacon.
Once stuffed, the jalapeños are baked until the cheese is bubbly and the peppers are just tender enough to bite into without losing their signature crunch. These Spooky Stuffed Jalapeños can be prepared in advance, making them a convenient option for party hosts looking to impress without spending hours in the kitchen.
Ingredients (Serves 4-6):
- 12 large jalapeño peppers
- 8 ounces cream cheese, softened
- 1 cup shredded cheddar cheese
- 1/2 cup cooked and crumbled bacon
- 1/4 cup chopped green onions
- 1 teaspoon garlic powder
- 1/2 teaspoon smoked paprika
- Salt and pepper to taste
- 1 tablespoon olive oil
Cooking Instructions:
- Prepare the Jalapeños: Preheat your oven to 375°F (190°C). Wear gloves to protect your hands from the pepper’s oils. Slice each jalapeño in half lengthwise and remove the seeds and membranes to reduce the heat. Place the halved jalapeños on a baking sheet lined with parchment paper.
- Make the Filling: In a medium bowl, combine the softened cream cheese, shredded cheddar cheese, crumbled bacon, chopped green onions, garlic powder, smoked paprika, salt, and pepper. Mix thoroughly until all ingredients are well incorporated.
- Stuff the Jalapeños: Using a spoon or a piping bag, fill each jalapeño half with the cheese mixture, pressing gently to guarantee the filling is packed in tightly.
- Bake: Drizzle the stuffed jalapeños with olive oil. Bake in the preheated oven for 15-20 minutes or until the cheese is melted and bubbly and the jalapeños are tender but still retain some crunch.
- Serve: Allow the stuffed jalapeños to cool slightly before serving. Arrange them on a platter and garnish with additional green onions or a sprinkle of smoked paprika for an extra festive touch.
Extra Tips:
If you’re worried about the jalapeños being too spicy, you can soak them in cold water for about 30 minutes after deseeding them, which helps to mellow the heat.
For a vegetarian version, simply omit the bacon or replace it with crispy fried onions for added texture. Additionally, if you prefer a smokier flavor, consider grilling the jalapeños instead of baking them.
Finally, these stuffed jalapeños can be prepared a day in advance and stored in the refrigerator; just bake them right before serving for maximum freshness.
Mummy Brie Bites
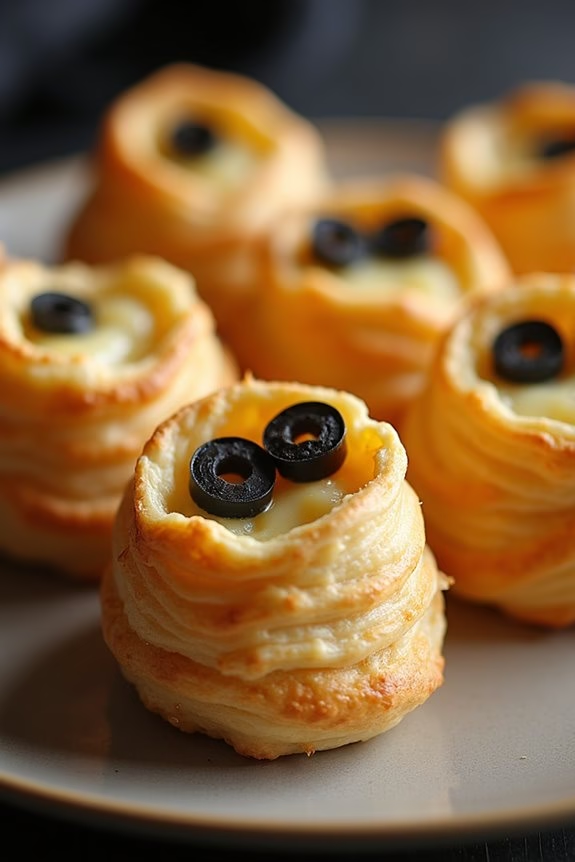
The beauty of this recipe lies in its simplicity and the capacity to prepare it in advance, giving you more time to enjoy the party. When served warm, the Brie becomes gooey and melts in your mouth, creating a perfect contrast with the crisp, golden pastry. This recipe serves 4-6 people, making it ideal for small gatherings.
With just a few ingredients and minimal preparation, you’ll have a show-stopping appetizer that will have your guests raving.
Ingredients (for 4-6 people):
- 1 sheet puff pastry, thawed
- 1 small wheel of Brie cheese (approximately 8 ounces)
- 1 egg, beaten
- 2 black olives, sliced into small rounds
- Flour, for dusting
Cooking Instructions:
- Preheat and Prep: Preheat your oven to 375°F (190°C). Line a baking sheet with parchment paper to prevent sticking.
- Prepare Puff Pastry: On a lightly floured surface, roll out the puff pastry sheet to smooth out any creases. Cut the pastry into thin strips, about 1/2 inch wide.
- Wrap the Brie: Place the Brie wheel in the center of the baking sheet. Gently wrap the puff pastry strips around the Brie, leaving small gaps so the cheese can peek through. Overlap the strips to create a mummy-like effect, guaranteeing the entire wheel is covered.
- Add Eyes: Place two slices of black olives on the top of the wrapped Brie to create the mummy’s eyes. Press them gently into the pastry so they stick.
- Egg Wash: Brush the beaten egg over the puff pastry. This will give it a nice golden brown finish once baked.
- Bake: Place the baking sheet in the preheated oven and bake for about 20-25 minutes, or until the pastry is golden brown and puffed.
- Cool and Serve: Remove from the oven and let cool for a few minutes before serving. This allows the cheese to firm up slightly, making it easier to cut and serve.
Extra Tips:
For an extra touch of flavor, consider adding a spoonful of fig jam or cranberry sauce under the pastry before wrapping the Brie. This adds a sweet contrast to the creamy Brie and savory pastry.
If you prefer a sharper taste, you can use a wheel of Camembert instead of Brie. Remember to work quickly when wrapping the Brie with puff pastry to maintain the pastry’s coldness, which helps it puff up beautifully during baking.
Enjoy your Mummy Brie Bites warm for the best texture and flavor experience!
Vampire Bat Wings
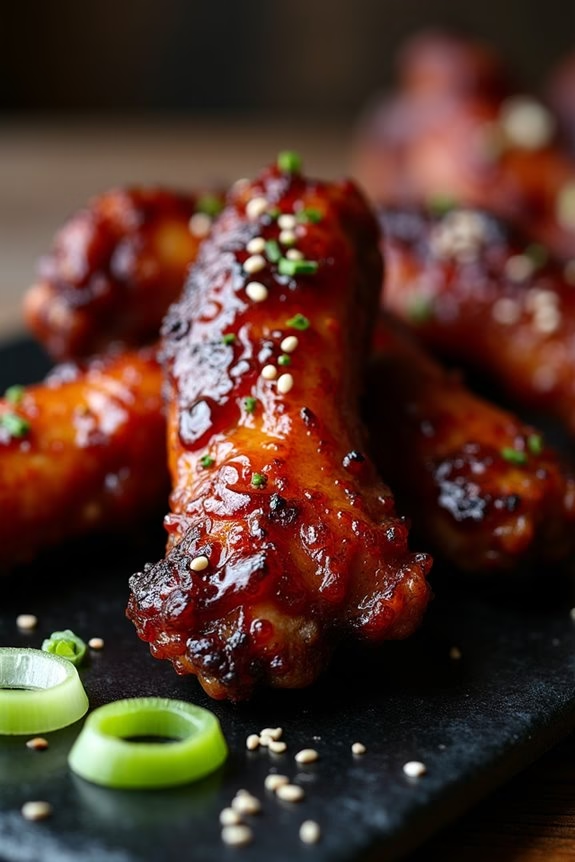
Looking to add a bit of spook to your Halloween party for adults? Try these delicious and eerie Vampire Bat Wings. They’re sure to be a hit among your guests with their deep, rich color and tantalizing flavors. The secret to achieving the deep, dark hue is marinating the wings in a mixture that includes soy sauce and balsamic vinegar. Not only do these ingredients impart a striking appearance, but they also add a savory umami taste that will have everyone reaching for seconds.
These Vampire Bat Wings are perfect for a Halloween gathering, offering a themed twist on the classic buffalo wings. The combination of garlic, ginger, and a touch of honey delivers a perfect balance of sweet and spicy flavors. Serve them with a side of ranch or blue cheese dressing for dipping, and watch them disappear faster than you can say “trick or treat.” Whether you’re hosting a large Halloween bash or a more intimate gathering, these bat wings are sure to impress.
Ingredients (for 4-6 people):
- 3 pounds of chicken wings
- 1/2 cup soy sauce
- 1/2 cup balsamic vinegar
- 1/4 cup honey
- 2 tablespoons olive oil
- 4 cloves garlic, minced
- 1 tablespoon fresh ginger, grated
- 1 teaspoon smoked paprika
- 1/2 teaspoon black pepper
- 1/2 teaspoon salt
- Green onions, chopped (for garnish)
- Sesame seeds (for garnish)
Instructions:
- Prepare the Marinade: In a large mixing bowl, combine the soy sauce, balsamic vinegar, honey, olive oil, minced garlic, grated ginger, smoked paprika, black pepper, and salt. Whisk together until well blended.
- Marinate the Wings: Add the chicken wings to the marinade, making sure they’re well coated. Cover the bowl with plastic wrap and refrigerate for at least 2 hours, or ideally overnight, to allow the flavors to develop fully.
- Preheat the Oven: Preheat your oven to 400°F (200°C). Line a baking sheet with aluminum foil and place a wire rack on top. This will help the wings cook evenly and become crispy.
- Arrange the Wings: Remove the wings from the marinade and arrange them on the wire rack, making sure they’re spaced out evenly. Reserve the marinade for later use.
- Bake the Wings: Place the baking sheet in the preheated oven and bake for 25-30 minutes. Halfway through, flip the wings to guarantee even cooking and crispiness.
- Baste and Finish: After 20 minutes, brush the reserved marinade over the wings to add extra flavor. Continue baking until the wings are fully cooked and have a deep, dark glaze, about 5-10 more minutes.
- Garnish and Serve: Once done, remove the wings from the oven and transfer them to a serving platter. Garnish with chopped green onions and sesame seeds for added color and flavor.
Extra Tips:
To make certain your Vampire Bat Wings are as crispy as possible, it’s essential to pat the wings dry with paper towels before marinating them. This helps the skin to crisp up when baking.
If you prefer a spicier kick, consider adding a pinch of cayenne pepper to the marinade. Additionally, keep an eye on the wings during the final few minutes of baking to prevent them from burning due to the sugar in the honey.
Serve them hot for the best experience, and don’t forget the napkins, as these wings are deliciously sticky!
Ghostly Deviled Eggs
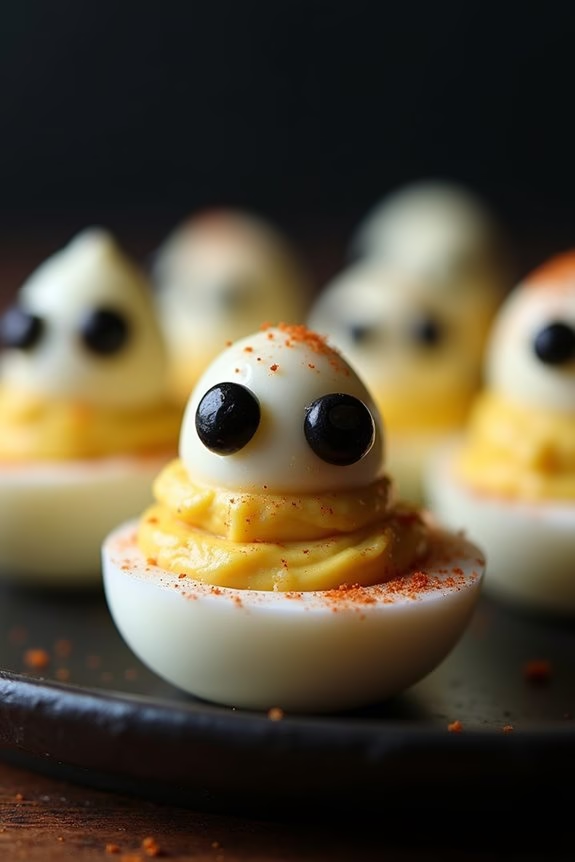
For an unforgettable Halloween party, serve up a platter of Ghostly Deviled Eggs. These spooky appetizers are both fun and flavorful, providing the perfect combination of creamy egg yolks and a hint of tanginess. The ghostly faces are sure to delight your guests and add a festive touch to your gathering. Perfectly portioned, these deviled eggs offer both a classic taste and a playful appearance that fits the Halloween theme.
Creating Ghostly Deviled Eggs is straightforward, and the result is a batch of eerily delicious bites that can be prepared in advance. The addition of black olives for eyes and a touch of paprika adds both character and flavor to these devilish treats. This recipe serves 4-6 people, making it ideal for a small gathering or as part of a larger spread. Invite some culinary creativity into your Halloween celebrations with these fun and easy-to-make appetizers.
Ingredients (serving size: 4-6 people):
- 6 large eggs
- 1/4 cup mayonnaise
- 1 teaspoon Dijon mustard
- 1 teaspoon white vinegar
- Salt and pepper to taste
- Black olives (for eyes)
- Paprika (optional, for garnish)
Instructions:
- Boil the Eggs: Place the eggs in a saucepan and cover them with cold water. Bring the water to a boil over medium-high heat. Once boiling, remove the saucepan from the heat and let the eggs sit in the hot water for 10-12 minutes.
- Cool and Peel: After the eggs have cooked, drain the hot water and transfer the eggs to a bowl of ice water to cool completely. Once cooled, gently peel the shells off the eggs.
- Prepare the Filling: Slice each egg in half lengthwise and carefully scoop out the yolks into a mixing bowl. Set the egg whites aside on a serving platter.
- Mix the Filling: Mash the egg yolks with a fork until they’re crumbled. Add mayonnaise, Dijon mustard, white vinegar, salt, and pepper to the yolks. Mix until smooth and creamy.
- Fill the Egg Whites: Spoon or pipe the yolk mixture back into the hollows of the egg whites, mounding it slightly.
- Decorate: Cut small circles from the black olives to create eyes and place them on the deviled eggs. Use a small piece of olive for the mouth to form a ghostly face on each egg.
- Garnish and Serve: Lightly dust the eggs with paprika if desired, for added color and flavor. Arrange the decorated eggs on a serving platter and refrigerate until ready to serve.
Extra Tips: For a smoother filling, consider using a food processor to blend the yolk mixture, guaranteeing a creamy consistency. If you prefer a little heat, add a dash of hot sauce or a pinch of cayenne pepper to the yolk mixture. Confirm the eggs are completely cooled before peeling for easier removal of the shells. To make the ghostly faces more pronounced, use a toothpick to create small indents before placing the olive pieces.
Bloody Mary Shrimp Shooters

When it comes to Halloween parties, the right appetizers can set the stage for a night filled with fun and flavor. If you’re looking to impress your adult guests with a dish that’s both visually striking and delicious, Bloody Mary Shrimp Shooters are the perfect choice.
This dish combines the classic flavors of a Bloody Mary cocktail with succulent shrimp, creating a sophisticated appetizer that’s sure to be a hit. The vibrant red hue of the tomato-based sauce paired with the plump shrimp makes for a visually appealing presentation, while the spicy and tangy flavors will tantalize your taste buds.
Bloody Mary Shrimp Shooters aren’t only delicious but also relatively easy to prepare. The key to this dish is balancing the flavors of the Bloody Mary mix with the freshness of the shrimp. Whether you’re hosting a large Halloween gathering or an intimate adult-only party, these shooters will add a touch of elegance and spookiness to your menu.
Serve them in shot glasses for a fun and interactive experience that encourages guests to mingle and enjoy the festive spirit.
Ingredients (Serves 4-6):
- 1 pound large shrimp, peeled and deveined
- 2 tablespoons olive oil
- 1 teaspoon Old Bay seasoning
- 2 cups tomato juice
- 1/2 cup vodka
- 2 tablespoons Worcestershire sauce
- 2 tablespoons freshly squeezed lemon juice
- 1 teaspoon hot sauce (adjust to taste)
- 1 teaspoon celery salt
- 1/2 teaspoon freshly ground black pepper
- 1/2 teaspoon horseradish
- Ice cubes
- Celery sticks, for garnish
- Lemon wedges, for garnish
Instructions:
- Prepare the Shrimp:
- Begin by preheating your oven to 400°F (200°C).
- In a bowl, toss the peeled and deveined shrimp with olive oil and Old Bay seasoning.
- Spread the shrimp in a single layer on a baking sheet and roast in the preheated oven for 6-8 minutes, or until they’re opaque and slightly pink. Remove and let them cool.
- Make the Bloody Mary Mix:
- In a large pitcher, combine tomato juice, vodka, Worcestershire sauce, lemon juice, hot sauce, celery salt, black pepper, and horseradish. Stir well until all ingredients are thoroughly mixed.
- Assemble the Shooters:
- Fill each shot glass with ice cubes to keep the drink chilled.
- Pour the Bloody Mary mix into each shot glass, filling about three-quarters full.
- Place one or two roasted shrimp on top of the Bloody Mary mix in each glass.
- Garnish with a celery stick and a lemon wedge on the rim of each glass.
- Serve:
- Arrange the Bloody Mary Shrimp Shooters on a serving tray and serve immediately to maintain the chill and freshness.
Extra Tips:
For an extra burst of flavor, consider marinating the shrimp in the Bloody Mary mix for about 30 minutes before roasting. This will infuse the shrimp with even more of the tangy and spicy flavors.
If you prefer a non-alcoholic version, you can simply omit the vodka and add a splash more of lemon juice or a dash of vinegar for an added kick. Remember to adjust the hot sauce according to your guests’ spice preferences, and don’t hesitate to get creative with additional garnishes like pickled asparagus or olives to customize your shooters.
Creepy Charcuterie Board
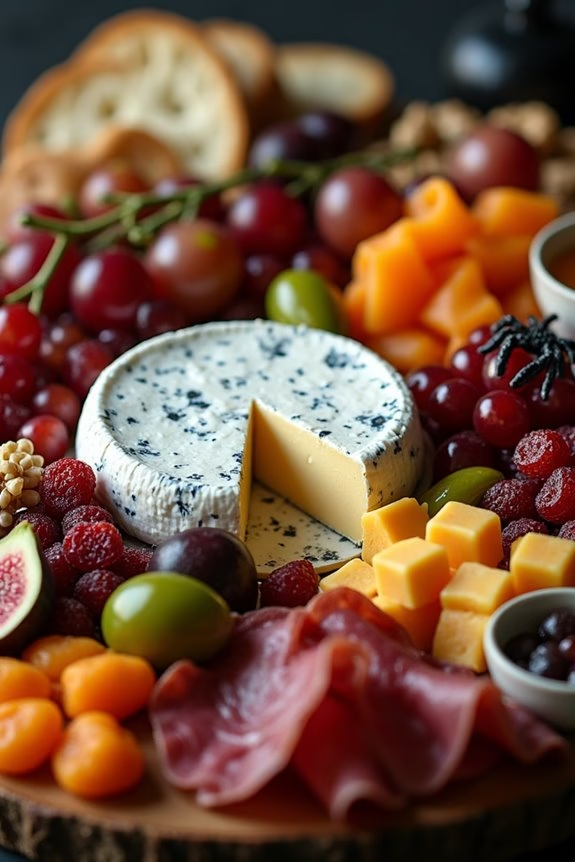
Transform your Halloween party into a thrilling feast with a Creepy Charcuterie Board that will delight and slightly terrify your adult guests. This spooky spread combines a variety of flavors and textures, featuring a selection of cheeses, cured meats, fresh fruits, nuts, and a few ghoulish additions that will make your board the talk of the evening.
The key to a successful charcuterie board lies in the variety and presentation, so let your creativity shine as you assemble this eerie ensemble.
To create an unforgettable Creepy Charcuterie Board, start by selecting a large platter or wooden board as your base. Arrange your components with an eye for aesthetics and accessibility, guaranteeing that every item is within easy reach. The goal is to create a balanced and visually appealing display that encourages your guests to explore and enjoy.
With the right combination of flavors and an imaginative presentation, your Creepy Charcuterie Board will be the highlight of your Halloween festivities.
Ingredients (Serves 4-6)
- 6 ounces of brie or camembert cheese
- 6 ounces of sharp cheddar cheese
- 6 ounces of blue cheese
- 8 ounces of assorted cured meats (salami, prosciutto, or mortadella)
- 1 cup of green and black olives
- 1 cup of assorted nuts (almonds, walnuts, pecans)
- 1 cup of fresh figs, halved
- 1 cup of grapes (red or green)
- 1 small pomegranate, seeded
- 1/2 cup of dried apricots or cranberries
- 4-5 gherkins or cornichons
- Honey or fig jam
- Crackers or slices of baguette
- Halloween-themed props (fake spiders, skeleton hands)
Cooking Instructions
- Cheese Preparation: Begin by slicing the cheddar cheese into cubes and the blue cheese into wedges. Leave the brie or camembert whole for a centerpiece effect. Arrange these cheeses on your board, spacing them apart to allow room for the other ingredients.
- Meat Arrangement: Fold or roll the cured meats and place them around the cheeses. For a creepy effect, consider shaping them into roses or spirals, adding a touch of elegance to the board.
- Fruit and Nuts: Scatter the fresh figs, grapes, and pomegranate seeds around the board. Add clusters of fresh fruit and a variety of nuts for crunch. Confirm these are evenly distributed for balanced flavor and visual appeal.
- Olives and Pickles: Fill small bowls or ramekins with olives and gherkins, and place them strategically around the board. These salty components will balance the sweetness of the fruits and the richness of the cheeses.
- Sweet and Savory Touches: Add small dishes of honey or fig jam to the board, providing a sweet contrast to the savory meats and cheeses. Place dried apricots or cranberries around the board for an added chewy texture.
- Crackers and Bread: Surround your ingredients with crackers or slices of baguette, ensuring there are plenty of options for your guests to build their perfect bite.
- Halloween Props: For a final touch, strategically place Halloween-themed props like fake spiders or skeleton hands around the board. These will enhance the spooky theme and delight your guests.
Extra Tips
When assembling your Creepy Charcuterie Board, consider the flow of flavors and textures to help guide your guests through the tasting experience. Use small bowls or ramekins to contain items like olives and nuts, which can help prevent them from rolling around the board.
Keep a balance between sweet, savory, and tangy elements, and don’t shy away from experimenting with different cheeses and meats to suit your personal taste.
Finally, remember that the presentation is just as important as the selection, so take your time arranging each component for maximum visual impact.
Sinister Stuffed Mushrooms
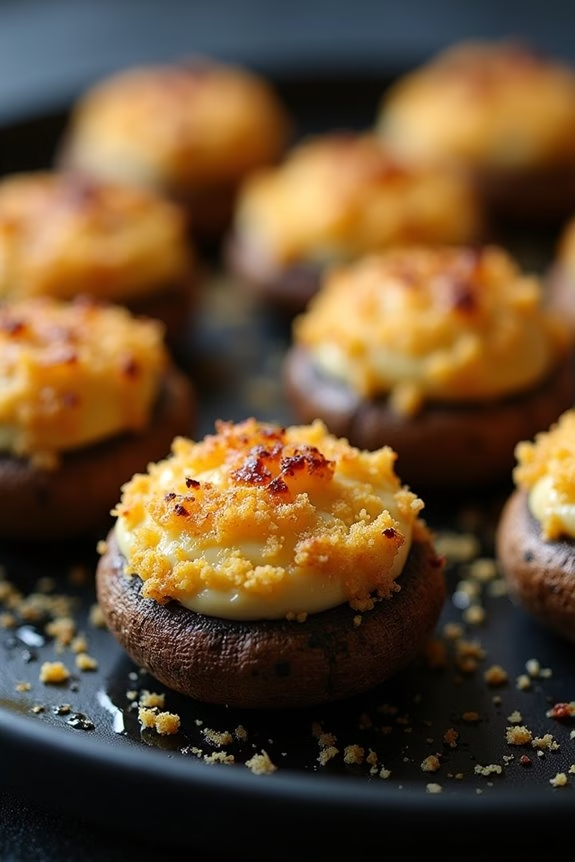
Halloween is the perfect time to let your culinary creativity run wild, and Sinister Stuffed Mushrooms are sure to be a chilling hit at your adult Halloween party. These creepy yet delicious morsels are filled with a savory mixture of cream cheese, garlic, and herbs, topped with a sprinkle of parmesan cheese for a truly ghoulish finish.
The earthy flavor of the mushrooms pairs perfectly with the rich stuffing, making them an irresistible appetizer that will disappear from the platter in no time. To make these mushrooms truly sinister, consider arranging them in an eerie pattern or serving them on a dark platter to enhance the spooky theme.
Whether you’re hosting a vampire soirée or a ghostly gathering, Sinister Stuffed Mushrooms are a versatile dish that can easily complement any Halloween menu. With minimal effort and maximum flavor, this recipe will make your Halloween party a memorable and delicious event.
Ingredients (Serves 4-6):
- 24 large white button mushrooms
- 8 oz cream cheese, softened
- 1/3 cup grated parmesan cheese
- 3 cloves garlic, minced
- 1/4 cup fresh parsley, finely chopped
- 1/4 cup breadcrumbs
- 2 tbsp olive oil
- Salt and pepper to taste
Cooking Instructions:
- Prepare the Mushrooms: Preheat your oven to 375°F (190°C). Begin by cleaning the mushrooms with a damp paper towel to remove any dirt. Carefully remove the stems from the mushrooms and set the caps aside. Finely chop the stems and reserve them for the stuffing mixture.
- Make the Stuffing: In a medium-sized bowl, combine the softened cream cheese, chopped mushroom stems, minced garlic, chopped parsley, and half of the parmesan cheese. Season the mixture with salt and pepper to taste. Mix well until all ingredients are thoroughly combined.
- Stuff the Mushrooms: Using a teaspoon, generously fill each mushroom cap with the cream cheese stuffing. Confirm that the stuffing is slightly mounded above the rim of the mushroom cap for a visually appealing presentation.
- Top with Breadcrumbs: In a small bowl, mix the breadcrumbs with the remaining parmesan cheese. Lightly sprinkle this mixture over the stuffed mushrooms, ensuring each one gets an even coating.
- Bake the Mushrooms: Drizzle the olive oil over the top of the stuffed mushrooms to help achieve a golden-brown crust. Place the mushrooms on a baking sheet lined with parchment paper and bake them in the preheated oven for 20-25 minutes, or until the tops are golden and the mushrooms are tender.
- Serve: Allow the mushrooms to cool slightly before serving. Arrange them on a serving platter in a spooky pattern for added Halloween flair.
Extra Tips:
For an even spookier effect, consider adding a few drops of black food coloring to the stuffing mixture for an eerily dark filling. If you want to add a bit of heat, include a pinch of cayenne pepper or chopped jalapeños in the stuffing mix.
These Sinister Stuffed Mushrooms can also be prepared a day ahead and stored in the refrigerator until ready to bake, making them a convenient and stress-free choice for party planning.
Pumpkin Spice Martini

As Halloween approaches, it’s the perfect time to indulge in festive drinks that capture the essence of the season. The Pumpkin Spice Martini is a delightful cocktail that combines the warm flavors of autumn with a sophisticated twist. This drink is perfect for an adult Halloween party, offering a smooth and creamy texture with a hint of spice that will surely impress your guests.
Whether you’re hosting a spooky gathering or just want to enjoy a seasonal treat, this martini is the ideal choice. Crafting the perfect Pumpkin Spice Martini requires just a few ingredients and a little bit of creativity. The key to this cocktail is balancing the flavors of pumpkin, spice, and cream with the right amount of alcohol.
By following this recipe, you can easily make a batch of Pumpkin Spice Martinis that serve 4-6 people, guaranteeing that everyone at your party can enjoy a taste of the season.
Ingredients (Serves 4-6):
- 1 cup vanilla vodka
- 1 cup Irish cream liqueur
- 1/2 cup pumpkin puree
- 1/4 cup simple syrup
- 1 teaspoon pumpkin pie spice
- 1 teaspoon vanilla extract
- 1/2 cup half-and-half or heavy cream
- Cinnamon sticks and ground cinnamon for garnish
- Ice cubes
Instructions:
- Prepare the Cocktail Shaker: Start by filling a cocktail shaker halfway with ice cubes. This will chill the mixture and help to blend the ingredients smoothly.
- Mix the Ingredients: Add the vanilla vodka, Irish cream liqueur, pumpkin puree, simple syrup, pumpkin pie spice, vanilla extract, and half-and-half or heavy cream into the shaker. Confirm that all ingredients are measured accurately for the best flavor balance.
- Shake Well: Secure the lid on the shaker and shake vigorously for about 20-30 seconds. This guarantees that all the ingredients are well combined and the drink is chilled thoroughly.
- Strain the Mixture: Place a strainer over your martini glasses and pour the mixture evenly into each glass. This step is essential to remove any ice chips or unblended pumpkin puree.
- Garnish the Drinks: For a festive touch, garnish each martini with a cinnamon stick and a light dusting of ground cinnamon. This not only adds visual appeal but also enhances the aroma of the drink.
Extra Tips:
To make your Pumpkin Spice Martini extra special, consider rimming the martini glasses with cinnamon sugar before pouring the drink. Simply dip the rim of each glass in a shallow dish of water, then into a dish of cinnamon sugar.
Additionally, if you prefer a stronger pumpkin flavor, you can adjust the amount of pumpkin puree to suit your taste. Finally, for a non-dairy version, substitute the half-and-half or heavy cream with a non-dairy creamer of your choice.
Enjoy your Halloween gathering with this delightful seasonal cocktail!
Gory Guacamole Dip

Gory Guacamole Dip is the perfect gruesome yet delicious addition to your Halloween party spread. This eerie take on the classic guacamole features a vibrant green hue with a touch of red to mimic a gory, bloody appearance, making it a fun and spooky dish for adults. The creamy texture of avocados combined with the zesty flavors of lime and spices guarantees that this dish isn’t only visually enchanting but also irresistibly tasty.
Serve it with chips or veggie sticks, and watch as your guests plunge into this creepy concoction. The recipe is crafted to serve 4-6 people, making it ideal for small gatherings or as part of a larger Halloween feast. You can easily scale the recipe up or down depending on the size of your party.
The addition of pomegranate seeds or salsa as the “blood” gives this dip a gory flair, while the use of fresh ingredients guarantees a burst of authentic flavor. Follow the steps below to create this spine-chilling yet delightful Gory Guacamole Dip.
Ingredients:
- 3 ripe avocados
- 1 small red onion, finely diced
- 1 clove garlic, minced
- 1 jalapeño, seeded and finely chopped
- 1 lime, juiced
- 1/4 cup fresh cilantro, chopped
- 1 teaspoon salt
- 1/2 teaspoon black pepper
- 1/2 cup pomegranate seeds or chunky red salsa
- Tortilla chips or veggie sticks for serving
Instructions:
- Prepare the Avocados: Cut the avocados in half, remove the pits, and scoop the flesh into a mixing bowl. Use a fork or potato masher to mash the avocados until they reach your desired consistency, whether you prefer it chunky or smooth.
- Mix the Ingredients: Add the finely diced red onion, minced garlic, chopped jalapeño, lime juice, chopped cilantro, salt, and black pepper to the mashed avocados. Stir everything together until well combined. Taste the mixture and adjust the seasoning if necessary.
- Add the Gory Touch: To create the gory effect, gently fold in the pomegranate seeds or drizzle the red salsa over the top of the guacamole. If using salsa, use a toothpick or knife to swirl it slightly into the surface for a blood-like appearance without fully mixing it in.
- Serve: Transfer the Gory Guacamole Dip to a serving bowl and garnish with a few extra pomegranate seeds or a dollop of salsa on top for added effect. Serve immediately with tortilla chips or veggie sticks for dipping.
Extra Tips:
For a more intense gory effect, consider blending some of the pomegranate seeds or salsa into the guacamole itself to create streaks of “blood” throughout the dip.
If you like a spicier kick, you can leave some of the seeds in the jalapeño or use a hotter variety of chili. To prevent the avocados from browning, press a piece of plastic wrap directly onto the surface of the guacamole if you’re preparing it in advance. This simple trick will help maintain its vibrant green color. Enjoy your spooky yet delicious creation!
Poison Apple Sangria

Transform your Halloween party into a mysterious and enchanting evening with this Poison Apple Sangria. This deep red concoction isn’t only a visual treat but also a delightful sip that combines the fruity flavors of autumn with the rich, bold notes of red wine. The addition of apple brandy and spices gives it a warm and cozy feel, perfect for an adult gathering on a chilly October night.
As you serve this potion-like drink, your guests will be enchanted by the taste and the mysterious allure it brings to the table.
The Poison Apple Sangria is a bewitching blend that plays on the classic sangria with a spooky twist. It’s a fantastic choice for a Halloween party, as it can be prepared in advance, allowing you to focus on entertaining your guests instead of mixing drinks.
The deep, blood-red hue of the sangria, combined with floating slices of apples and aromatic spices, makes it a standout centerpiece at any adult Halloween bash. Whether you’re hosting a costume party or a quiet gathering with close friends, this sangria is sure to cast a spell over everyone who takes a sip.
Ingredients (serving size: 4-6 people):
- 1 bottle (750 ml) dry red wine
- 1 cup apple brandy
- 1/2 cup orange juice
- 1/4 cup simple syrup
- 1/4 cup grenadine
- 2 apples, thinly sliced
- 1 orange, thinly sliced
- 1 lemon, thinly sliced
- 4-6 sticks of cinnamon
- 6-8 whole cloves
- 1 liter club soda
Instructions:
- Prepare the Fruit: Start by washing the apples, orange, and lemon thoroughly. Core the apples and slice them thinly, leaving the skins on for color. Slice the orange and lemon into thin rounds.
- Mix the Base: In a large pitcher or punch bowl, combine the red wine, apple brandy, orange juice, simple syrup, and grenadine. Stir well to verify all the liquids are thoroughly mixed.
- Add the Fruit and Spices: Add the apple, orange, and lemon slices to the wine mixture. Drop in the cinnamon sticks and cloves. These will infuse the sangria with a warm, spicy aroma and flavor that complements the fruit.
- Chill: Cover the pitcher or bowl with plastic wrap and refrigerate the sangria for at least 4 hours, or overnight if possible. This allows the flavors to meld together and the fruit to soak up the alcohol.
- Serve: Before serving, give the sangria a good stir and pour in the club soda to add a revitalizing fizz. Serve the sangria in glasses over ice, ensuring each glass gets a good portion of fruit slices.
Extra Tips:
For a more authentic spooky look, consider using a cauldron-like punch bowl for serving. You can also add a few drops of black food coloring to the sangria for an even darker hue without altering the taste.
To keep the sangria cool without watering it down, use frozen apple slices or grapes as ice cubes. Remember, the longer the sangria sits, the better it tastes, so don’t rush the chilling process.
Enjoy this enchanting drink responsibly, and watch your Halloween party come to life with every sip!
Monster Meatballs

Monster Meatballs are a ghoulishly delightful addition to any Halloween party, offering a frightfully fun twist on a classic dish. This spooky recipe transforms traditional meatballs into eerie bites with a creative presentation that will captivate your guests. The combination of hearty flavors and creepy aesthetics guarantees that these meatballs aren’t just a treat for the taste buds but also a memorable centerpiece for your Halloween spread.
Whether you’re hosting a full-fledged costume party or a simple get-together with friends, Monster Meatballs are sure to be a hit. Crafted with a blend of savory ground meat and a medley of spices, these meatballs are baked to perfection and adorned with edible decorations that evoke the monstrous. Think olives for eyes and cheese for teeth, all brought together with a rich and smoky tomato sauce.
The recipe is straightforward, making it an ideal choice for both seasoned cooks and kitchen novices looking to impress their guests with minimal effort. Let’s explore the ingredients and steps needed to bring these monstrously delicious meatballs to life.
Ingredients (Serves 4-6)
- 1 pound ground beef
- 1/2 pound ground pork
- 1/2 cup breadcrumbs
- 1/4 cup grated Parmesan cheese
- 1/4 cup milk
- 1 large egg
- 2 cloves garlic, minced
- 1 teaspoon dried oregano
- 1 teaspoon salt
- 1/2 teaspoon black pepper
- 1/2 teaspoon smoked paprika
- 2 cups marinara sauce
- 1/2 cup mozzarella cheese, shredded
- Black olives, sliced (for eyes)
- Fresh basil leaves (for decoration)
- Olive oil (for greasing the baking sheet)
Cooking Instructions
- Preheat the Oven: Begin by preheating your oven to 375°F (190°C). Prepare a baking sheet by lightly greasing it with olive oil to prevent the meatballs from sticking.
- Mix the Meatball Ingredients: In a large mixing bowl, combine the ground beef, ground pork, breadcrumbs, Parmesan cheese, milk, egg, minced garlic, oregano, salt, black pepper, and smoked paprika. Mix thoroughly using your hands until all ingredients are well integrated.
- Shape the Meatballs: Roll the meat mixture into balls roughly the size of golf balls. You should end up with about 18-24 meatballs, depending on size. Place them evenly spaced on the prepared baking sheet.
- Bake the Meatballs: Place the baking sheet in the preheated oven and bake for 20-25 minutes, or until the meatballs are browned and cooked through. You can check doneness by cutting one open to confirm there’s no pink in the center.
- Prepare the Sauce: While the meatballs are baking, heat the marinara sauce in a large saucepan over medium heat. Once warm, reduce the heat to low and let it simmer.
- Assemble the Monster Meatballs: Once baked, transfer the meatballs into the saucepan with the marinara sauce, making sure they’re fully coated. Sprinkle shredded mozzarella cheese on top and allow it to melt slightly.
- Decorate the Meatballs: Use sliced black olives to create eyes on the meatballs and tuck small basil leaves to resemble monstrous hair. Serve hot with extra sauce on the side.
Extra Tips
For an extra spooky effect, consider using a food coloring pen to add red veins or bloodshot details around the olive eyes. You can also place the meatballs in a shallow grave of spaghetti dyed with food coloring for added Halloween flair.
If you’re looking to make this dish ahead of time, prepare the meatballs and sauce separately, then combine and decorate just before serving. This will guarantee the cheese is freshly melted and the olives maintain their shape.
Eerie Eyeball Pasta
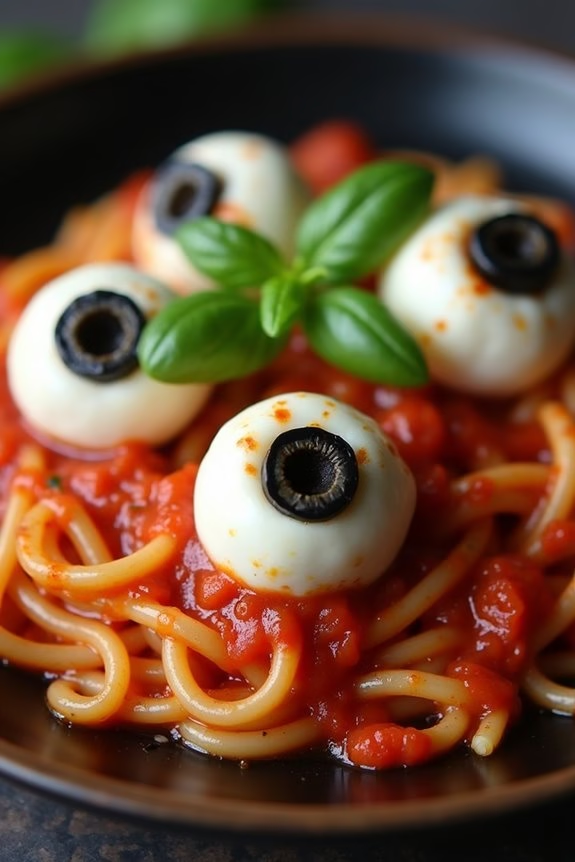
Eerie Eyeball Pasta is the perfect spooky dish to serve at your Halloween party for adults. This chilling creation combines tender pasta with a rich, flavorful tomato sauce, topped with eerily realistic mozzarella eyeballs that will send shivers down your guests’ spines. The dish not only looks frightfully fun but also offers a deliciously satisfying taste that will have everyone coming back for more.
With a few simple ingredients and a touch of creativity, you can turn an ordinary pasta dish into a hauntingly memorable centerpiece for your Halloween celebration. The key to pulling off this ghoulishly delightful dish is in the details. The mozzarella balls are transformed into creepy eyeballs using sliced olives and a bit of creativity, giving the dish an unsettlingly realistic appearance.
Meanwhile, the tomato sauce is infused with garlic, basil, and oregano, providing a rich and comforting base that perfectly complements the pasta and cheese. This recipe is designed to serve 4-6 people, making it ideal for a small gathering or dinner party. Follow the steps below to create your own Eerie Eyeball Pasta and impress your guests with your culinary creativity.
Ingredients (Serving size: 4-6 people):
- 1 pound (450g) spaghetti or your choice of pasta
- 2 tablespoons olive oil
- 4 cloves garlic, minced
- 1 large onion, finely chopped
- 28 ounces (800g) canned crushed tomatoes
- 1 teaspoon dried oregano
- 1 teaspoon dried basil
- Salt and pepper to taste
- 1 teaspoon sugar (optional, to balance acidity)
- 12 small mozzarella balls (bocconcini)
- 12 black olives, sliced into rings
- Fresh basil leaves for garnish
Cooking Instructions:
- Prepare the Pasta: Start by boiling a large pot of salted water. Once the water is at a rolling boil, add the pasta and cook according to the package instructions until al dente. Drain the pasta and set aside.
- Make the Sauce: In a large skillet, heat the olive oil over medium heat. Add the minced garlic and chopped onion, sautéing until the onion is translucent and fragrant, about 5 minutes.
- Add Tomatoes and Seasonings: Pour in the crushed tomatoes, then add the oregano, basil, salt, pepper, and sugar (if using). Stir to combine all ingredients, then let the sauce simmer on low heat for 15-20 minutes, allowing the flavors to meld.
- Assemble the Eyeballs: While the sauce is simmering, prepare the mozzarella eyeballs. Take each mozzarella ball and gently press a sliced olive ring onto the top, resembling an eerie eyeball. Repeat with all the mozzarella balls.
- Combine Pasta and Sauce: Once the sauce has thickened, add the cooked pasta to the skillet, tossing to coat the pasta thoroughly with the sauce.
- Decorate with Eyeballs: Transfer the sauced pasta to a large serving dish or individual plates. Carefully arrange the mozzarella eyeballs on top of the pasta, spacing them out evenly for the best effect.
- Garnish and Serve: Finish by garnishing with fresh basil leaves for a pop of color. Serve immediately, savoring the blend of flavors and the spooky presentation.
Extra Tips:
For an even creepier effect, you can use a small amount of food coloring to add red veins to the mozzarella eyeballs before placing the olive slices. Simply use a toothpick dipped in red food coloring to draw small lines on the mozzarella balls.
Additionally, to save time, you can prepare the sauce a day ahead, storing it in the refrigerator and reheating it when ready to serve. This dish pairs well with a bold red wine, enhancing the rich flavors of the sauce and adding to the overall Halloween ambiance.
Bewitching Black Velvet Cake

Indulge in a spook-tacular treat with our Bewitching Black Velvet Cake, perfect for an adult Halloween party. This decadent dessert not only mesmerizes with its deep, pitch-black hue, but also enchants with an incredibly moist and velvety texture.
The rich, dark cocoa flavor is complemented by a luscious cream cheese frosting, creating a truly bewitching culinary experience that will leave your guests spellbound.
Crafted for a serving size of 4-6 people, this cake makes an ideal centerpiece for your Halloween festivities. Its striking appearance and delicious taste are sure to captivate and delight your guests.
Whether you’re hosting a grand party or a cozy gathering, this Bewitching Black Velvet Cake promises to be the highlight of your spooky soirée.
Ingredients:
- 1 1/4 cups all-purpose flour
- 1 cup granulated sugar
- 1/2 cup unsweetened cocoa powder
- 1 teaspoon baking soda
- 1/2 teaspoon salt
- 1/2 cup buttermilk
- 1/2 cup vegetable oil
- 1 large egg
- 1 teaspoon vanilla extract
- 1 tablespoon black food coloring
- 1/2 cup boiling water
- 8 oz cream cheese, softened
- 1/2 cup unsalted butter, softened
- 2 cups powdered sugar
- 1 teaspoon vanilla extract
Cooking Instructions:
- Preheat and Prepare: Preheat your oven to 350°F (175°C). Grease and flour a 9-inch round cake pan to prevent the cake from sticking.
- Mix Dry Ingredients: In a medium bowl, whisk together the flour, sugar, cocoa powder, baking soda, and salt until well combined.
- Combine Wet Ingredients: In a separate large bowl, mix the buttermilk, vegetable oil, egg, vanilla extract, and black food coloring until the color is evenly distributed.
- Blend Together: Gradually add the dry ingredients to the wet mixture, stirring until just combined. Be careful not to over-mix.
- Add Boiling Water: Slowly pour in the boiling water, stirring constantly to guarantee a smooth batter. The batter will be thin, which is normal for this cake.
- Bake: Pour the batter into the prepared cake pan. Bake for 30-35 minutes, or until a toothpick inserted into the center comes out clean. Allow the cake to cool in the pan for about 10 minutes before transferring it to a wire rack to cool completely.
- Prepare Frosting: While the cake cools, beat the softened cream cheese and butter together in a large bowl until smooth and creamy. Gradually add the powdered sugar, beating until well incorporated. Mix in the vanilla extract.
- Frost the Cake: Once the cake is completely cool, spread the cream cheese frosting evenly over the top. For an extra spooky effect, you can sprinkle black or silver edible glitter on top.
Extra Tips:
For the best results, verify all your ingredients are at room temperature, especially the eggs, cream cheese, and butter. This will help the batter and frosting mix more evenly.
If you’re unable to find black food coloring, you can achieve a similar effect by combining equal parts of blue, green, and red food coloring. Make sure to use gel food coloring for a more intense color.
Finally, if you want to add a bit of texture, consider adding a handful of chocolate chips or chopped nuts to the batter before baking. Enjoy your hauntingly delicious creation!
Dark Chocolate Coffin Cookies
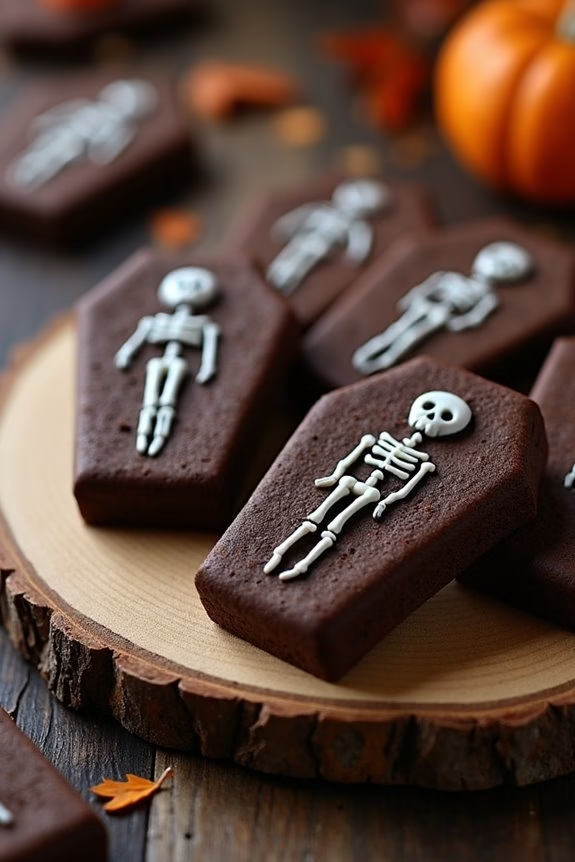
Celebrate Halloween with a spooky and delicious treat that’s certain to impress your adult guests: Dark Chocolate Coffin Cookies. These rich and indulgent cookies are shaped like tiny coffins, adding a fun and eerie twist to your Halloween party spread. The deep, dark chocolate flavor is certain to satisfy even the most discerning chocolate lover, while the decorative icing allows you to get creative with your designs.
Whether you choose to adorn them with intricate webs, spooky skeletons, or simple RIP inscriptions, these cookies are a perfect blend of taste and artistry. Perfect for a party of 4-6 people, these cookies aren’t only visually striking but also incredibly tasty. The combination of buttery dough and high-quality dark cocoa powder creates a cookie that’s both tender and flavorful.
As you prepare these cookies, keep in mind that the decorating possibilities are endless, allowing you to personalize each cookie to suit your Halloween theme. Gather your ingredients and follow the steps below to create a batch of these hauntingly delightful Dark Chocolate Coffin Cookies.
Ingredients (serving size: 4-6 people):
- 1 cup unsalted butter, softened
- 1 cup granulated sugar
- 1 large egg
- 1 teaspoon vanilla extract
- 2 cups all-purpose flour
- 3/4 cup dark cocoa powder
- 1/2 teaspoon baking powder
- 1/4 teaspoon salt
- Black and white royal icing or decorative icing pens
Cooking Instructions:
- Preheat and Prepare: Preheat your oven to 350°F (175°C). Line two baking sheets with parchment paper or silicone baking mats to prevent sticking.
- Mix Wet Ingredients: In a large mixing bowl, cream together the softened butter and granulated sugar until the mixture is light and fluffy. This should take about 3-4 minutes. Add the egg and vanilla extract, mixing until fully incorporated.
- Combine Dry Ingredients: In a separate bowl, whisk together the all-purpose flour, dark cocoa powder, baking powder, and salt. Make sure there are no lumps in the cocoa powder for a smooth dough.
- Form the Dough: Gradually add the dry ingredients to the wet mixture, mixing on low speed until a smooth and uniform dough forms. Be careful not to overmix, as this can toughen the cookies.
- Roll Out Dough: Lightly flour a clean surface and roll out the dough to about 1/4 inch thickness. Use a coffin-shaped cookie cutter to cut out shapes and place them on the prepared baking sheets.
- Bake: Bake the cookies in the preheated oven for 10-12 minutes, or until the edges are set and the centers are slightly soft. Allow the cookies to cool on the baking sheets for a few minutes before transferring them to a wire rack to cool completely.
- Decorate: Once the cookies are completely cooled, use black and white royal icing or decorative icing pens to add your spooky designs. Let the icing set completely before serving.
Extra Tips:
For an extra depth of flavor, consider adding a pinch of espresso powder to the dry ingredients, which enhances the chocolate flavor without adding any coffee taste.
If you don’t have a coffin-shaped cookie cutter, you can create a template from cardboard and cut around it with a knife. When decorating, let your creativity shine—these cookies are a canvas for your Halloween imagination.
Store the decorated cookies in an airtight container at room temperature for up to a week to maintain freshness.