
Hey there, fellow Halloween enthusiasts!
If you’re on the hunt for some spooktacular food ideas that will wow your guests, you’re in the right place.
From creepy-cute spider deviled eggs to the ever-popular mummy hot dogs, I’ve gathered my all-time favorite recipes that bring both thrills and chills to the table.
And let’s not forget the bubbling witch’s brew cheese dip—it’s always a hit.
Stick around for dessert, because my haunted graveyard cupcakes are a real treat!
Spooky Spider Deviled Eggs
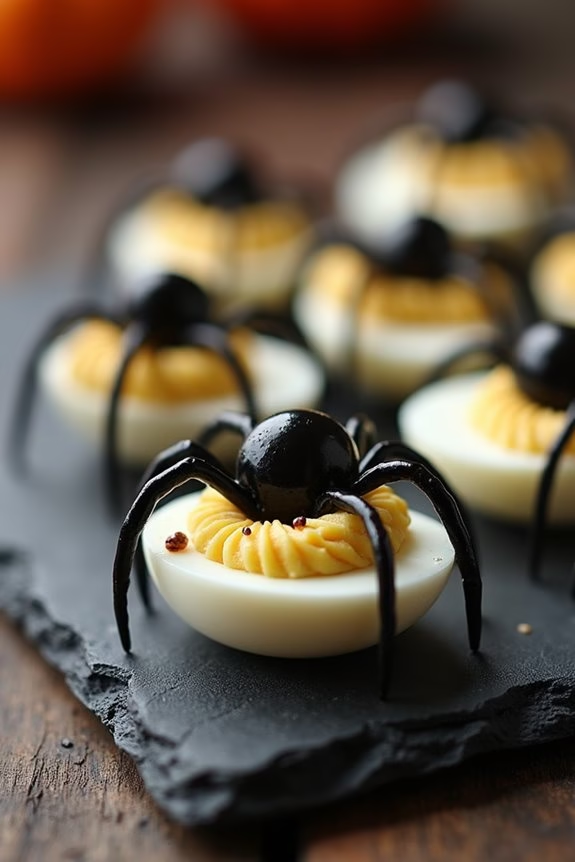
Spooky Spider Deviled Eggs are a fun and eerie addition to any Halloween party spread. This classic appetizer gets a creepy-crawly twist, perfect for both kids and adults who love a bit of fright with their bite. With their creamy yolk filling and decorative olive spiders, these deviled eggs are guaranteed to catch the eye and delight the taste buds of your guests. They not only look festive but are also incredibly easy to prepare, making them an ideal choice for party hosts looking to serve up something special without spending too much time in the kitchen.
Combining the traditional flavors of deviled eggs with a spooky aesthetic, this dish offers a perfect balance of taste and creativity. The rich, savory filling is made with mayonnaise, mustard, and a hint of paprika, while black olives are cleverly arranged to resemble spiders perched atop each egg half.
Whether you’re hosting a Halloween bash or simply want to surprise your family with a themed snack, Spooky Spider Deviled Eggs are guaranteed to be a hit. Here’s how to make them for a serving size of 4-6 people:
Ingredients:
- 6 large eggs
- 3 tablespoons mayonnaise
- 1 teaspoon Dijon mustard
- 1/2 teaspoon white vinegar
- 1/4 teaspoon salt
- 1/4 teaspoon black pepper
- 1/4 teaspoon paprika
- 12 large black olives
Instructions:
- Boil the Eggs: Place the eggs in a single layer in a saucepan and cover with water. Bring the water to a boil over medium-high heat, then reduce the heat and let the eggs simmer for 10 minutes. After boiling, transfer the eggs to an ice bath to cool for about 5 minutes, making them easier to peel.
- Prepare the Egg Halves: Once the eggs are cool, gently peel them and slice each egg in half lengthwise. Carefully remove the yolks and place them in a small mixing bowl. Arrange the egg whites on a serving platter.
- Make the Filling: Mash the egg yolks with a fork until they’re crumbly. Add mayonnaise, Dijon mustard, white vinegar, salt, black pepper, and paprika. Mix until the filling is smooth and creamy. Taste and adjust seasoning if necessary.
- Fill the Eggs: Spoon or pipe the yolk mixture back into the hollowed egg whites, dividing it evenly among all the halves.
- Create the Olive Spiders: Cut the olives in half lengthwise. Use one half for the spider’s body, and slice the other half into thin strips for the legs. Arrange one olive half on top of each filled egg for the spider’s body, and place four olive strips on each side to represent the legs.
- Serve and Enjoy: Once all the eggs are decorated with their olive spiders, serve them immediately or refrigerate until ready to serve.
For extra tips, verify the eggs are fully cooled before peeling to prevent them from sticking to the shell. When making the filling, adjust the level of mayonnaise to achieve your desired creaminess, and feel free to experiment with spices like smoked paprika or cayenne pepper for a more pronounced flavor.
If you’re short on time, you can boil and peel the eggs a day in advance, storing them in the fridge until you’re ready to fill and decorate. Enjoy making these creepy delights for your Halloween festivities!
Mummy Hot Dogs

Mummy Hot Dogs are a fun and spooky treat perfect for a Halloween party. These adorable snacks aren’t only easy to make but also delicious and a hit among both kids and adults. The hot dogs are wrapped in strips of crescent roll dough to resemble mummies, complete with little mustard or ketchup eyes peeking out from the wrappings. This festive dish is as delightful to look at as it’s to eat, making it an excellent addition to your Halloween party menu.
This recipe is ideal for serving 4-6 people, making it a great option for small gatherings. The preparation is simple and doesn’t require many ingredients, so you can whip them up in no time. Mummy Hot Dogs are also customizable; you can use different types of sausages or add cheese for extra flavor. Whether you’re hosting a party or just want to surprise your family with a spooky dinner, these Mummy Hot Dogs are sure to be a hit.
Ingredients (serving size for 4-6 people):
- 1 can (8 ounces) refrigerated crescent roll dough
- 8 hot dogs
- Mustard or ketchup for eyes
- Optional: slices of cheese
Cooking Instructions:
- Preheat the Oven: Start by preheating your oven to 375°F (190°C). This guarantees that it will be at the right temperature when you’re ready to bake the Mummy Hot Dogs.
- Prepare the Dough: Open the can of crescent roll dough and carefully unroll it onto a clean surface. Use a pizza cutter or a sharp knife to cut the dough into thin strips, approximately 1/4 inch wide.
- Wrap the Hot Dogs: Take one hot dog and begin wrapping it with the dough strips, leaving a small space for the “face” of the mummy. It’s okay if the dough overlaps; this adds to the mummy effect. If desired, you can insert a slice of cheese under the dough for a cheesy version.
- Place on Baking Sheet: Once wrapped, place each mummy hot dog on a baking sheet lined with parchment paper. Make sure they’re spaced evenly apart to promote even cooking.
- Bake the Mummies: Put the baking sheet in the preheated oven and bake for 12-15 minutes, or until the dough is golden brown and cooked through.
- Add the Eyes: Remove the Mummy Hot Dogs from the oven and let them cool slightly. Use a small amount of mustard or ketchup to dot two eyes on each mummy, giving them their spooky appearance.
Extra Tips:
For an added twist, consider using different types of sausages, such as turkey or chicken, to cater to various dietary preferences. If you’re adding cheese, make sure to cut it into thin strips so it doesn’t overwhelm the dough wrapping.
Keep an eye on the oven, as baking times may vary slightly depending on your oven’s calibration. Finally, serve the Mummy Hot Dogs with a side of dipping sauces like mustard, ketchup, or even barbecue sauce for extra flavor. Enjoy the spooky fun!
Witch’s Brew Cheese Dip
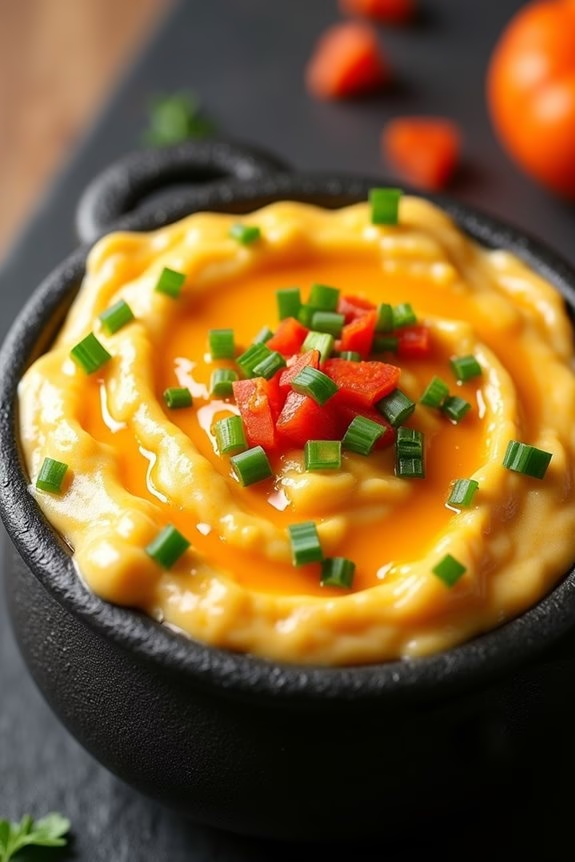
Witch’s Brew Cheese Dip is a deliciously spooky addition to your Halloween party spread, guaranteed to delight both kids and adults alike. This creamy, cheesy dip is infused with a medley of flavors that create a savory potion perfect for dipping veggies, chips, or even spreading on bread.
With its bubbling cauldron-like appearance, this dip not only tastes amazing but also adds a fun and festive touch to your Halloween table.
To create your own Witch’s Brew Cheese Dip, you’ll need a blend of cheeses, spices, and a few secret ingredients to give it that magical touch. The dip is easy to prepare and can be made ahead of time, making it a convenient option for your party planning. Served warm, this dish is sure to be a crowd-pleaser, evoking smiles and satisfied appetites as your guests indulge in its rich flavors.
Ingredients (serves 4-6):
- 2 cups shredded cheddar cheese
- 1 cup cream cheese, softened
- 1 cup sour cream
- 1/2 cup mayonnaise
- 1/4 cup milk
- 2 tablespoons butter
- 1 tablespoon Worcestershire sauce
- 1/2 teaspoon garlic powder
- 1/4 teaspoon onion powder
- 1/4 teaspoon paprika
- Salt and pepper to taste
- 1/4 cup chopped green onions
- 1/4 cup chopped fresh parsley
- 1/2 cup diced pimentos (optional for added color and flavor)
Instructions:
- Prep the Ingredients: Begin by gathering all your ingredients and pre-measuring them for convenience. Make certain the cream cheese is softened to allow for smooth mixing.
- Melt the Butter: In a medium saucepan over low heat, melt the butter. This will be the base for your dip, providing a rich, buttery flavor.
- Combine the Base Ingredients: Add the softened cream cheese, sour cream, mayonnaise, and milk to the saucepan. Stir continuously over low heat until everything is well combined and smooth.
- Add the Cheese: Gradually add the shredded cheddar cheese, stirring constantly until it’s fully melted and integrated into the mixture. This will give the dip its cheesy, gooey texture.
- Season the Dip: Incorporate the Worcestershire sauce, garlic powder, onion powder, paprika, and a pinch of salt and pepper. Stir well to make certain the spices are evenly distributed throughout the dip.
- Introduce Fresh Ingredients: Stir in the chopped green onions, parsley, and pimentos (if using). These ingredients will add fresh flavors and a pop of color to your Witch’s Brew Cheese Dip.
- Simmer and Serve: Allow the dip to simmer gently for about 5 minutes, stirring occasionally. Once it reaches your desired consistency, transfer it to a serving dish and present it warm.
Tips:
For an extra touch of Halloween flair, serve the Witch’s Brew Cheese Dip in a small cauldron-like bowl. You can also garnish the top with additional chopped green onions or parsley for a splash of color.
If you prefer a spicier dip, consider adding a dash of hot sauce or a few diced jalapeños to the mix. This dip pairs perfectly with tortilla chips, crusty bread, or an assortment of fresh vegetables.
Remember to keep the dip warm throughout your party by using a slow cooker or a preheated warming tray.
Monster Eyeball Tacos
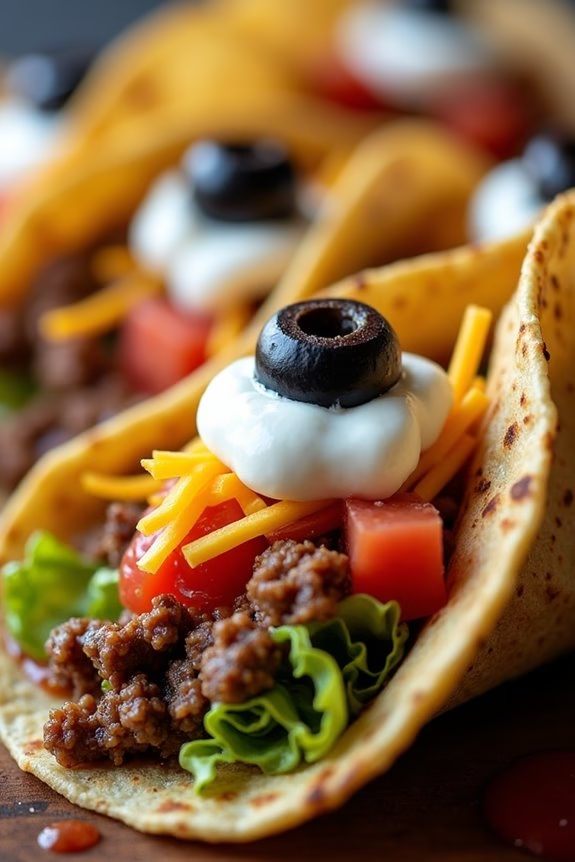
Monster Eyeball Tacos are the perfect spooky treat to serve at your Halloween party. These fun and flavorful tacos are sure to be a hit with both kids and adults. The dish combines seasoned ground beef with a variety of toppings to create a deliciously eerie presentation. By adding some creative flair, you can transform ordinary tacos into a monstrous feast that will delight your guests.
These tacos aren’t only visually appealing but also incredibly tasty. The savory beef filling is complemented by fresh vegetables and creamy toppings, all wrapped in a warm tortilla. The “eyeball” effect is achieved by using olives and cheese, giving each taco a playful and spooky look. Prepare to impress your guests with these delicious and festive Monster Eyeball Tacos.
Ingredients (Serves 4-6):
- 1 pound ground beef
- 1 packet taco seasoning
- 1/4 cup water
- 6-8 small flour tortillas
- 1 cup shredded lettuce
- 1 cup diced tomatoes
- 1 cup shredded cheese
- 1/2 cup sour cream
- 12-18 sliced black olives
- 1 jar of mild salsa
- 1 tablespoon olive oil
Cooking Instructions:
- Prepare the Beef Filling: Heat the olive oil in a large skillet over medium heat. Add the ground beef and cook until browned, breaking it apart with a spoon. Drain excess fat if necessary.
- Season the Beef: Add the taco seasoning and water to the skillet with the cooked beef. Stir well to combine. Let it simmer for about 5 minutes until the mixture thickens slightly. Remove from heat.
- Warm the Tortillas: While the beef is cooking, warm the flour tortillas by placing them in a dry skillet over medium heat for about 30 seconds on each side, or until they’re pliable. You can also wrap them in foil and place them in a warm oven.
- Assemble the Tacos: Lay a tortilla flat and add a scoop of the seasoned beef in the center. Top with shredded lettuce, diced tomatoes, and a sprinkle of shredded cheese.
- Create the Eyeballs: Use a small dollop of sour cream as the base on top of the taco filling. Place a slice of black olive in the center of each dollop to create an “eyeball” effect.
- Serve with Salsa: Serve the Monster Eyeball Tacos with a side of mild salsa for dipping and extra flavor.
Extra Tips:
For the best presentation, use a piping bag or a small plastic bag with the corner cut off to neatly dollop the sour cream “eyeballs” onto the tacos.
If you want to add more color to your tacos, consider using colored tortillas or adding some sliced bell peppers.
Make sure to have extra napkins on hand, as these tacos can be a bit messy to eat, especially for younger guests. Enjoy your spooky and delicious creation!
Ghostly Pizza Bagels
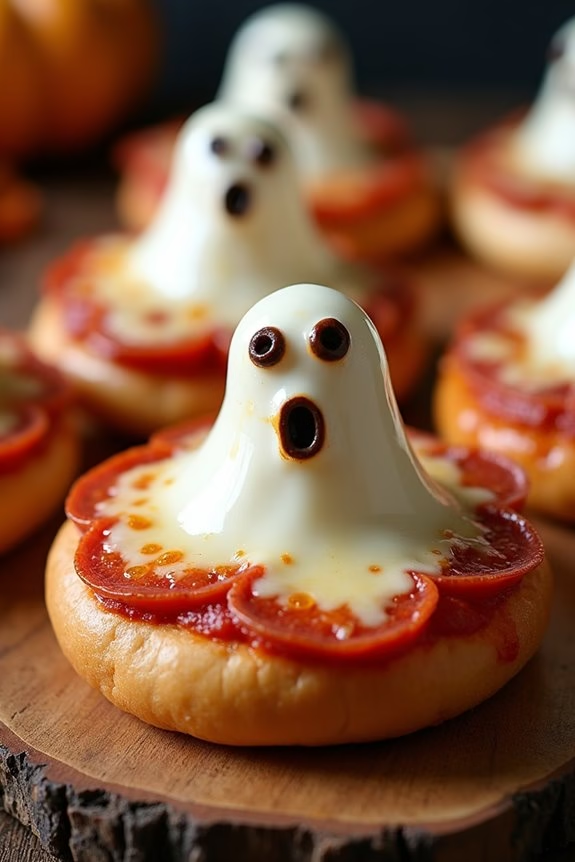
Ghostly Pizza Bagels are a frightfully fun and delicious treat perfect for any Halloween party. These mini pizzas are both spooky and scrumptious, making them a hit among both kids and adults. The combination of gooey cheese, hearty tomato sauce, and the iconic bagel base offers a delightful twist on traditional pizza. The ghostly design adds a festive touch, making them an exciting addition to your Halloween spread.
Creating Ghostly Pizza Bagels isn’t only easy but also an enjoyable activity to do with family or friends. The recipe is versatile, allowing you to customize toppings according to your guests’ preferences. With a serving size of 4-6 people, this recipe guarantees everyone gets a taste of the Halloween spirit. Prepare to amaze your guests with these hauntingly delightful bites that are both visually appealing and deliciously satisfying.
Ingredients for Ghostly Pizza Bagels (Serving Size: 4-6 People):
- 6 plain bagels, sliced in half
- 1 cup pizza sauce
- 2 cups shredded mozzarella cheese
- 12 slices of mozzarella cheese (for ghost shapes)
- 24 black olive slices
- 1/2 cup mini pepperoni slices (optional)
- 1 tablespoon olive oil
- Salt and pepper to taste
Instructions:
- Prepare the Bagels: Preheat your oven to 375°F (190°C). Arrange the bagel halves on a baking sheet lined with parchment paper. Lightly brush the cut sides with olive oil for a crispy base.
- Spread the Sauce: Evenly spread about 1-2 tablespoons of pizza sauce on each bagel half, making sure the entire surface is covered.
- Add Shredded Cheese: Sprinkle a generous amount of shredded mozzarella cheese on top of the sauce. This will be the base layer for your ghostly design.
- Create Ghost Shapes: Cut ghost shapes out of the mozzarella cheese slices using a ghost-shaped cookie cutter or a knife. Place one ghost shape on each bagel half.
- Decorate with Olives: Use the black olive slices to create eyes and mouths on the ghost shapes, giving them a spooky appearance. If desired, add mini pepperoni slices around the ghost for extra flavor.
- Bake: Place the baking sheet in the preheated oven and bake for 10-12 minutes, or until the cheese is melted and bubbly, and the bagels are toasted to your desired crispness.
- Serve: Remove from the oven and let cool slightly before serving. Enjoy your Ghostly Pizza Bagels warm.
Extra Tips:
For an extra crispy bagel base, consider toasting the bagels slightly before adding the toppings. If you’re short on time, use pre-sliced bagels to speed up the preparation process.
To make the ghost shapes even more fun, try using different cheese varieties or adding food coloring for a colorful twist. Customize the toppings to suit dietary preferences, such as using gluten-free bagels or vegan cheese for alternative options.
Vampire Bat Wings
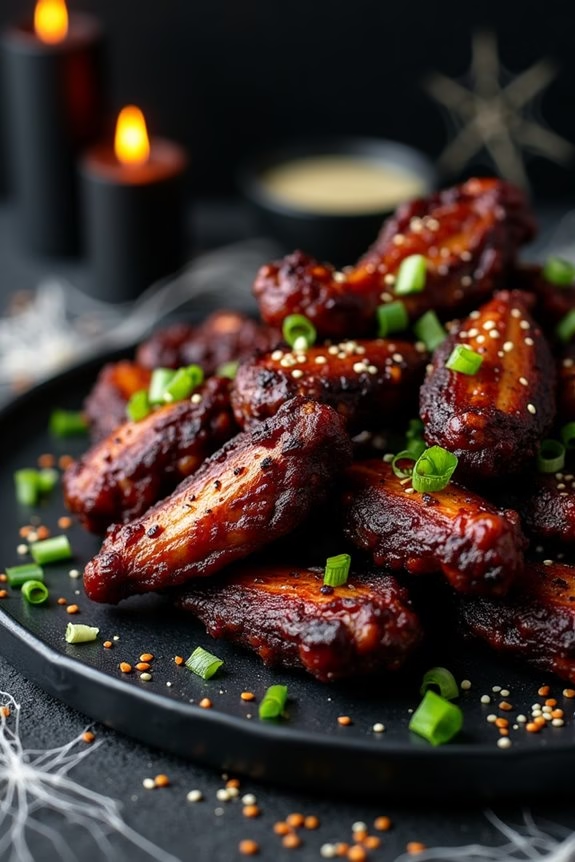
Vampire Bat Wings are a spooky and delicious addition to any Halloween party, sure to thrill guests with their eerie appearance and tantalizing taste. These wings are marinated in a unique blend of spices and sauces that give them a dark, glossy sheen reminiscent of a vampire bat’s wings. Perfect for setting the mood at your Halloween gathering, these wings aren’t only visually intriguing but also packed with flavor, making them a standout dish at your spooky celebration.
The combination of soy sauce, honey, and a touch of dark food coloring gives these wings their signature look, while the garlic, ginger, and cayenne pepper add layers of taste that will have your guests coming back for more. These Vampire Bat Wings aren’t only easy to prepare but also allow you to get creative with your presentation, whether you serve them on a platter surrounded by Halloween decorations or alongside other themed treats.
Here’s how to make this hauntingly tasty dish for 4-6 people:
Ingredients:
- 3 pounds chicken wings
- 1/2 cup soy sauce
- 1/4 cup honey
- 2 tablespoons vegetable oil
- 2 tablespoons apple cider vinegar
- 4 cloves garlic, minced
- 1 tablespoon fresh ginger, grated
- 1 teaspoon cayenne pepper
- 1 teaspoon black pepper
- 1 teaspoon salt
- 1/2 teaspoon dark food coloring (optional, for color)
- Green onions, chopped (for garnish)
- Sesame seeds (for garnish)
Instructions:
- Prepare the Marinade: In a large mixing bowl, combine the soy sauce, honey, vegetable oil, apple cider vinegar, minced garlic, grated ginger, cayenne pepper, black pepper, and salt. Mix well until all ingredients are thoroughly combined. If you want the wings to have a darker color, add the dark food coloring and mix until the marinade is evenly tinted.
- Marinate the Chicken Wings: Place the chicken wings in a large resealable plastic bag or a shallow dish. Pour the marinade over the wings, ensuring they’re evenly coated. Seal the bag or cover the dish with plastic wrap, and refrigerate for at least 2 hours, or overnight for more intense flavor.
- Preheat the Oven: When ready to cook, preheat your oven to 400°F (200°C). Line a baking sheet with aluminum foil and place a wire rack on top. This will allow the wings to cook evenly and become crispy.
- Arrange and Bake: Remove the wings from the marinade and place them on the wire rack, ensuring they’re spaced out evenly. Reserve the marinade for basting. Bake the wings in the preheated oven for 35-40 minutes, turning them halfway through and basting with the reserved marinade for extra flavor and glossiness.
- Check for Doneness: Verify the wings are cooked through by checking that the internal temperature reaches 165°F (74°C) and that they’re crispy and caramelized.
- Garnish and Serve: Once cooked, remove the wings from the oven and let them rest for a few minutes. Garnish with chopped green onions and sesame seeds before serving them on a platter.
Extra Tips: For an even spookier presentation, serve the Vampire Bat Wings on a black or dark-themed platter surrounded by Halloween decorations. If you prefer a less spicy version, you can adjust the cayenne pepper to your taste or omit it altogether. Additionally, you can grill these wings instead of baking for a smokier flavor; just be sure to baste them regularly with the marinade to keep them moist. Enjoy these wings with your favorite dipping sauces for an extra burst of flavor.
Pumpkin Patch Brownies
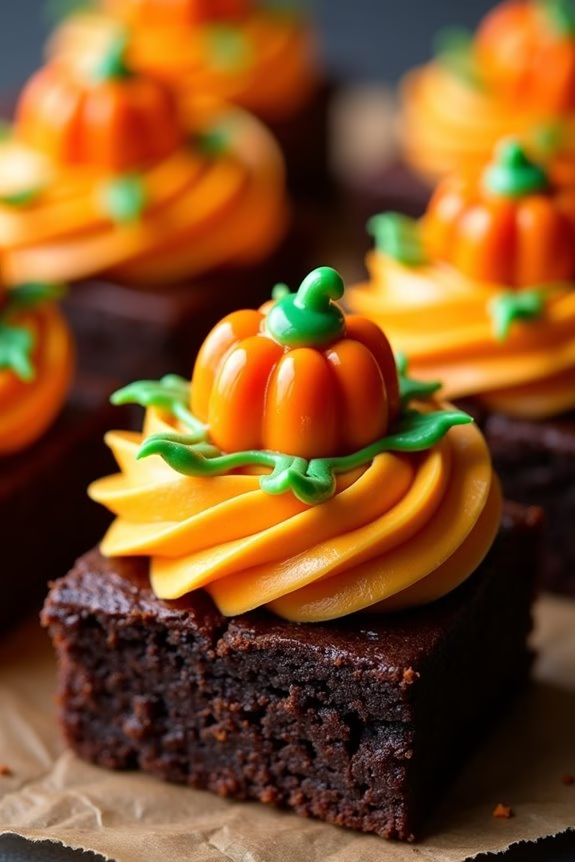
Pumpkin Patch Brownies are a delightful and festive treat perfect for any Halloween gathering. These brownies aren’t only delicious but also visually fun, resembling a miniature pumpkin patch with the help of some creative decorations. The rich, fudgy brownie base pairs perfectly with the sweet and creamy pumpkin-flavored frosting, creating a balance that’s certain to please both kids and adults alike.
These treats aren’t only delicious but also a fun activity to make with family or friends, as you can get creative with your pumpkin decorations.
To make Pumpkin Patch Brownies, you’ll need a standard brownie recipe as the base, which is then topped with a bright orange, pumpkin-flavored frosting. You can decorate them with candy pumpkins or use green frosting to pipe vines and leaves, creating the illusion of a miniature pumpkin patch. This recipe serves 4-6 people, making it perfect for a small Halloween gathering or a family treat.
Ingredients:
- 1 cup unsalted butter
- 2 cups granulated sugar
- 4 large eggs
- 1 teaspoon vanilla extract
- 1 cup all-purpose flour
- 1/2 cup cocoa powder
- 1/2 teaspoon salt
- 1/2 teaspoon baking powder
- 1 cup pumpkin puree
- 1/2 teaspoon pumpkin pie spice
- 3 cups powdered sugar
- Orange food coloring
- Candy pumpkins (for decoration)
- Green frosting (for decoration)
Instructions:
- Prepare the Brownie Batter: Preheat your oven to 350°F (175°C) and grease a 9×13-inch baking pan. Melt the butter in a large saucepan over low heat. Remove from heat and stir in sugar, eggs, and vanilla extract. Beat in flour, cocoa, baking powder, and salt. Spread the batter evenly into the prepared pan.
- Bake the Brownies: Place the pan in the preheated oven and bake for 20-25 minutes or until a toothpick inserted into the center comes out with just a few moist crumbs. Allow the brownies to cool completely in the pan on a wire rack.
- Make the Pumpkin Frosting: In a large mixing bowl, beat together the pumpkin puree, pumpkin pie spice, and powdered sugar until smooth. Add a few drops of orange food coloring and mix until you achieve the desired color.
- Frost the Brownies: Once the brownies have cooled, spread the pumpkin frosting evenly over the top. Use a spatula to guarantee a smooth finish.
- Decorate: Place candy pumpkins on top of the frosted brownies, spacing them out to resemble a pumpkin patch. Use green frosting to pipe vines and leaves around the candy pumpkins for added decoration.
- Serve: Cut into squares and serve your Pumpkin Patch Brownies to delighted guests.
Extra Tips:
When making Pumpkin Patch Brownies, confirm the brownies are completely cooled before frosting to prevent the frosting from melting.
For the best presentation, use a sharp knife to cut the brownies, wiping it clean between cuts to keep the edges neat.
If you can’t find candy pumpkins, you can substitute with orange candy corn or even small, round orange candies.
Feel free to get creative with the decorations; the more personal touches, the more fun your brownies will be!
Creepy Crawly Pudding Cups
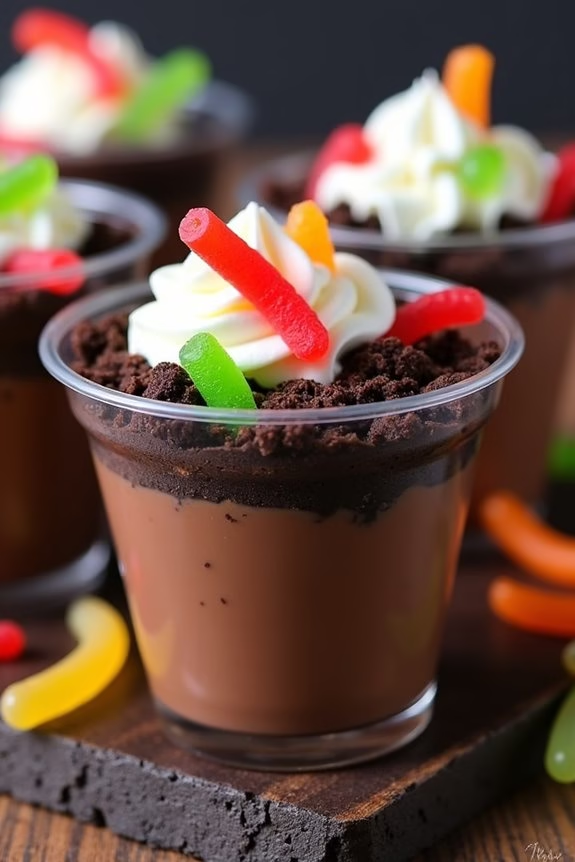
Creepy Crawly Pudding Cups are the perfect spooky treat for your Halloween party. These fun and delicious dessert cups aren’t only easy to make, but they also add a frightfully festive touch to your table. With layers of chocolate pudding, crushed cookies, and gummy worms, they resemble a creepy garden full of mysterious creatures. This recipe is sure to be a hit with both kids and adults, making it an essential addition to your Halloween menu.
The beauty of Creepy Crawly Pudding Cups is in their simplicity and the playful presentation. You can prepare these ahead of time, allowing you to focus on other party details. The combination of creamy pudding and crunchy cookie crumbs creates a delightful texture, while the gummy worms add a whimsical and slightly eerie element. Whether you’re hosting a large gathering or a small get-together, these pudding cups can easily be scaled to suit your needs.
Ingredients (Serves 4-6):
- 2 cups of cold milk
- 1 package (3.9 ounces) of instant chocolate pudding mix
- 1 package of chocolate sandwich cookies
- 1 bag of gummy worms
- 1 cup of whipped topping
- 4-6 clear plastic cups
Instructions:
- Prepare the Pudding: In a medium-sized bowl, whisk together the cold milk and instant chocolate pudding mix. Continue whisking for about 2 minutes until the mixture begins to thicken. Let it sit for about 5 minutes to set properly.
- Crush the Cookies: While the pudding is setting, place the chocolate sandwich cookies in a zip-top bag. Using a rolling pin or a heavy object, crush the cookies until they resemble fine crumbs. These will act as the “dirt” for your pudding cups.
- Layer the Cups: Begin by adding a layer of chocolate pudding to the bottom of each clear plastic cup. Follow with a layer of crushed cookie crumbs. Repeat the layers until the cups are filled, ending with a layer of cookie crumbs on top.
- Add the Gummy Worms: Gently press a few gummy worms into the top layer of cookie crumbs in each cup. Make sure some of the worms are partially visible to give the effect that they’re crawling out of the “dirt.”
- Top with Whipped Cream: Just before serving, add a dollop of whipped topping to each pudding cup for an extra creamy finish.
Extra Tips:
For an even spookier presentation, consider using Halloween-themed gummy candies such as spiders or centipedes. If you want to add a bit of crunch, mix some chopped nuts or candy corn into the cookie layer.
You can also experiment with different flavors of pudding, such as vanilla or butterscotch, to create a variety of “dirt” layers. Remember to keep the pudding cups refrigerated until serving to maintain their freshness and texture. Enjoy your Halloween festivities with these creepy yet delicious treats!
Haunted Graveyard Cupcakes

Get ready to spook your guests with these delightfully eerie Haunted Graveyard Cupcakes. Perfect for a Halloween party, these cupcakes aren’t only delicious but also a fun activity to make with family and friends. The combination of rich, moist chocolate cupcakes topped with a haunting decoration will guarantee they’re the talk of the table.
With a little creativity, you’ll transform a simple dessert into a spooky centerpiece that’s sure to impress. These cupcakes are topped with crushed chocolate cookies to mimic dirt, and decorated with edible tombstones and candy bones to create an eerie graveyard scene.
Whether you’re hosting a small gathering or a larger event, this recipe yields enough for 4-6 people, making it ideal for a cozy Halloween celebration. Let’s plunge into the chilling world of the Haunted Graveyard Cupcakes that will leave your guests enchanted and craving more.
Ingredients (Serves 4-6):
- 1 cup all-purpose flour
- 1/2 cup unsweetened cocoa powder
- 1 teaspoon baking powder
- 1/2 teaspoon baking soda
- 1/4 teaspoon salt
- 1/2 cup granulated sugar
- 1/2 cup brown sugar
- 1/2 cup unsalted butter, softened
- 2 large eggs
- 1 teaspoon vanilla extract
- 1/2 cup buttermilk
- 1 cup crushed chocolate sandwich cookies
- 6-8 rectangle-shaped cookies (e.g., Milano cookies) for tombstones
- Edible marker or icing pen
- Candy bones and pumpkins for decoration
Cooking Instructions:
- Preheat and Prepare: Preheat your oven to 350°F (175°C). Line a standard 12-cup muffin tin with paper liners. This will guarantee your cupcakes bake evenly and are easy to remove from the tray.
- Mix Dry Ingredients: In a medium-sized bowl, whisk together the flour, cocoa powder, baking powder, baking soda, and salt. This will help to evenly distribute the leavening agents and cocoa throughout the flour.
- Cream Butter and Sugars: In a large bowl, use a hand mixer to cream the butter, granulated sugar, and brown sugar together until light and fluffy, about 3-4 minutes. This step is vital for a light texture in your cupcakes.
- Add Eggs and Vanilla: Beat in the eggs one at a time, mixing well after each addition. Stir in the vanilla extract. Confirm the mixture is smooth and well-combined.
- Combine with Buttermilk and Dry Ingredients: Gradually add in the dry ingredients, alternating with the buttermilk, beginning and ending with the dry mixture. Mix until just incorporated, being careful not to overmix.
- Distribute Batter: Divide the batter evenly among the prepared muffin cups, filling each about two-thirds full.
- Bake: Place the tray in the preheated oven and bake for 18-20 minutes, or until a toothpick inserted into the center of a cupcake comes out clean.
- Cool and Decorate: Allow the cupcakes to cool in the tray for 5 minutes before transferring them to a wire rack to cool completely. Once cooled, frost each cupcake lightly and sprinkle with crushed chocolate cookies to mimic dirt.
- Create Tombstones: Use an edible marker or icing pen to write “RIP” or other spooky messages on the rectangle-shaped cookies. Insert one into each cupcake to act as a tombstone.
- Add Final Touches: Decorate with candy bones and pumpkins around the tombstone to complete the graveyard look.
Extra Tips:
For a more dramatic effect, try using different shades of frosting to create a foggy graveyard scene. You can also color the crushed cookies with a little edible black gel to enhance the “dirt” appearance.
Experiment with different candy decorations to personalize each cupcake, like adding gummy worms for an extra creepy touch. Remember, the key is to have fun and let your creativity run wild when designing your haunted graveyard!
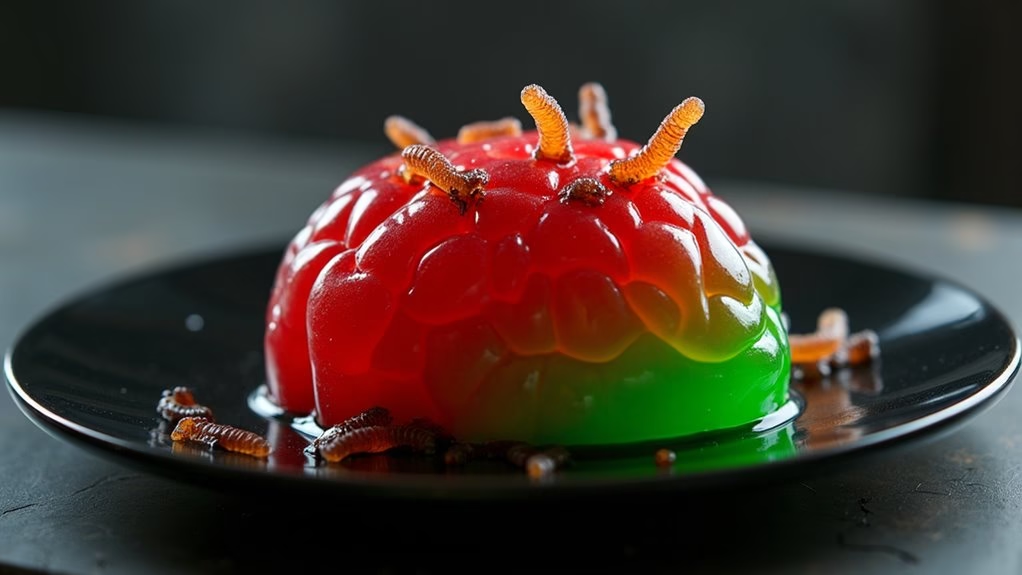
Zombie Brain Jello Mold
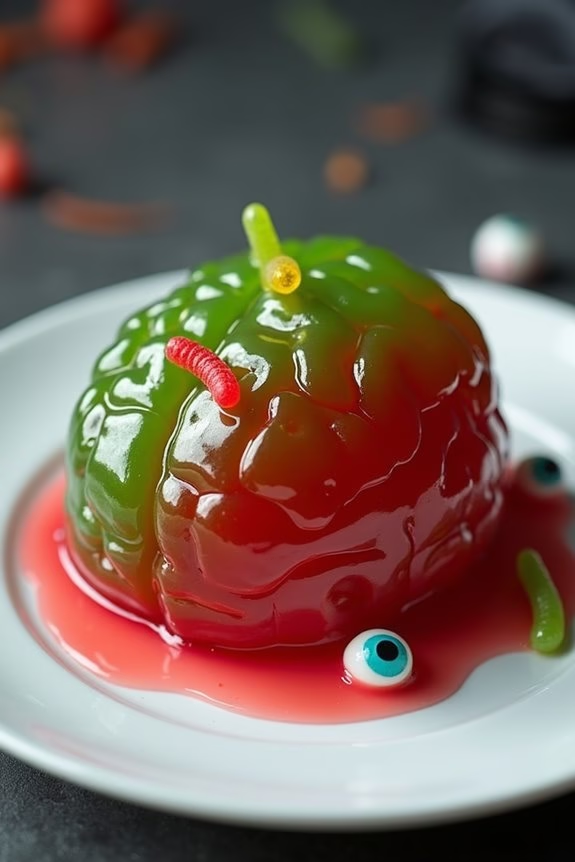
To create the perfect Zombie Brain Jello Mold, you’ll need a brain-shaped mold and your choice of flavored gelatin. The key to success with this dish is selecting a gelatin color that mimics the realistic look of a brain. For a truly ghoulish effect, use a combination of red and green gelatin to produce a sickly, zombie-like hue. The following recipe provides enough servings for 4-6 people, making it ideal for a small Halloween get-together.
Ingredients:
- 2 packets (3 oz each) of strawberry or cherry-flavored gelatin
- 1 packet (3 oz) of lime-flavored gelatin
- 4 cups boiling water
- 2 cups cold water
- 1 cup evaporated milk
- A few drops of green food coloring (optional)
- Non-stick spray for the mold
Cooking Instructions:
- Prepare the Mold: Lightly spray the inside of the brain-shaped mold with non-stick spray. This will guarantee easy removal of the jello once it’s set.
- Mix the Gelatin: In a large mixing bowl, pour the contents of the strawberry or cherry gelatin packets. Add 2 cups of boiling water and stir until the gelatin is completely dissolved.
- Add Lime Gelatin: Stir in the lime-flavored gelatin until it’s also fully dissolved, giving the mixture a slightly sickly hue.
- Incorporate Cold Ingredients: Add 2 cups of cold water to the gelatin mixture, followed by the evaporated milk. Stir until well combined. The evaporated milk will give the jello a more opaque and fleshy appearance.
- Adjust the Color (Optional): If desired, add a few drops of green food coloring to enhance the zombie look. Stir until the color is evenly distributed.
- Pour into Mold: Carefully pour the gelatin mixture into the prepared brain mold. Make sure that the mixture reaches all the crevices for a detailed brain shape.
- Chill: Place the mold in the refrigerator and allow it to set for at least 4-6 hours, or until firm.
- Unmold and Serve: Once set, gently dip the bottom of the mold in warm water for a few seconds to loosen the gelatin. Place a serving plate on top of the mold, invert, and carefully lift the mold away to reveal your Zombie Brain Jello.
Extra Tips:
For an even more realistic effect, consider adding gummy worms or candy eyeballs into the gelatin mixture before it sets, creating a gruesome surprise when the jello is sliced.
Keep refrigerated until serving to maintain the perfect consistency. If you’re serving this outdoors or in a warm area, place the serving plate over a bowl of ice to keep the jello from melting too quickly.