
Hello, lovely friends!
I am so excited to share some spook-tacular Halloween fruit snack ideas that will be a hit at your next party.
Think ghostly grapes, pumpkin-shaped oranges, and apple monster mouths adding a touch of creativity to your table.
These treats are not only eye-catching but also a healthier alternative to the usual sweets.
Ready to sprinkle some frightfully fun and fresh charm into your festive spread?
Ghostly Grapes
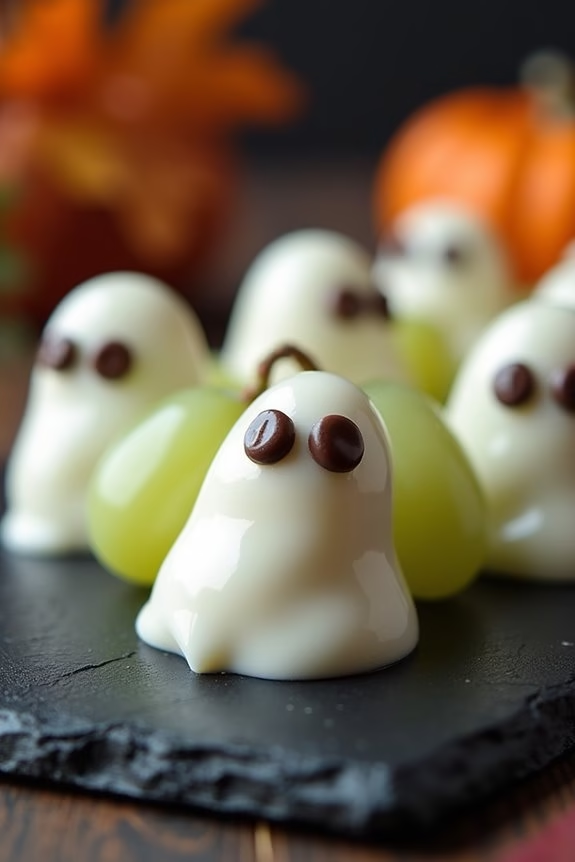
Transform your Halloween party into a spooktacular event with these delightful Ghostly Grapes. Perfect for party guests of all ages, this simple yet creative snack combines the sweetness of grapes with a ghostly visual twist.
These treats not only add a touch of whimsy to your Halloween spread but are also a healthy alternative amidst the sugar overload of the season. Easy to make and fun to display, Ghostly Grapes will be the talk of your Halloween gathering.
To create Ghostly Grapes, you’ll need just a handful of ingredients and a little bit of imagination. The process involves using grapes as the base for your ghostly figures, while a creamy yogurt coating gives them their eerie white appearance. A few well-placed chocolate chips or edible markers complete the transformation, creating tiny ghosts ready to haunt your Halloween festivities.
This dish serves 4-6 people, making it ideal for small to medium-sized gatherings.
Ingredients:
- 2 cups green grapes
- 1 cup vanilla yogurt
- 24 mini chocolate chips
- 12 wooden skewers or toothpicks
Instructions:
- Prepare the Grapes: Wash the grapes thoroughly under cold running water and pat them dry with a clean towel. Verify they’re completely dry to allow the yogurt to adhere properly.
- Skewer the Grapes: Take the wooden skewers or toothpicks and gently insert them into the tops of the grapes. This will make it easier to dip them into the yogurt.
- Dip in Yogurt: Pour the vanilla yogurt into a shallow bowl. Dip each skewered grape into the yogurt, making sure it’s evenly coated. You may need to use a spoon to help cover the grapes completely.
- Create the Ghostly Faces: Carefully press two mini chocolate chips onto each grape to form eyes. Make sure to do this while the yogurt is still wet so that the chocolate chips stick properly.
- Chill the Grapes: Place the yogurt-coated grapes on a parchment-lined baking sheet. Once all the grapes are decorated, transfer the baking sheet to the refrigerator. Chill for at least 30 minutes or until the yogurt coating is set.
- Serve: Arrange the Ghostly Grapes on a platter for a spooky presentation and serve to your guests.
Extra Tips:
For an extra spooky effect, consider using a mix of green and red grapes to create a variety of ghostly figures. If you prefer a thicker coating, you can freeze the yogurt-dipped grapes for about 10 minutes, then dip them a second time in the yogurt.
This will give them a thicker, more pronounced coating. Additionally, if you have dietary restrictions or preferences, try using plant-based yogurt alternatives for a vegan-friendly version.
Remember to handle the grapes gently to prevent the yogurt from smudging and to maintain their ghostly appearance.
Pumpkin-Shaped Oranges

If you’re looking for a festive and healthy treat for your Halloween party, these Pumpkin-Shaped Oranges are sure to be a hit. Not only are they adorable and fun to make, but they also provide a nutritious alternative to sugary snacks.
With a little creativity, these orange pumpkins will add a splash of color and a touch of whimsy to your snack table. Perfect for both kids and adults, these snacks are easy to prepare and don’t require any cooking, making them a quick and delightful choice for your spooky celebrations.
The key to these Pumpkin-Shaped Oranges is in the presentation. By peeling the oranges carefully and using a small piece of celery as a stalk, these fruits quickly transform into charming mini pumpkins. Not only do they look great, but they also pack a punch of vitamin C and fiber, making them a guilt-free treat.
Whether you’re hosting a Halloween party or simply want to surprise your family with a fun snack, these Pumpkin-Shaped Oranges are a simple yet effective way to bring the spirit of Halloween to your dining table.
Ingredients for 4-6 people:
- 6 medium-sized oranges
- 1-2 stalks of celery
Instructions:
- Select and Prep the Oranges: Choose 6 medium-sized, firm oranges that are free of blemishes for the best presentation. Wash them thoroughly under running water to verify they’re clean for handling.
- Peel the Oranges: Using your fingers, carefully peel the oranges, trying to keep the segments intact. The goal is to maintain the round shape of the orange, so be gentle to avoid breaking them apart.
- Create the Pumpkin Look: Once peeled, inspect the oranges for any remaining white pith and gently remove it without disturbing the segments. This will help in giving a smooth pumpkin appearance.
- Prepare the Celery Stalks: Wash the celery stalks and cut them into small pieces approximately 1-2 inches in length. These will serve as the pumpkin’s ‘stems’.
- Assemble the Pumpkins: Insert a piece of celery into the top center of each orange. Push gently until the celery is securely in place and resembles a pumpkin stem.
- Presentation: Arrange your Pumpkin-Shaped Oranges on a serving platter or individual plates for a festive touch. Consider placing them on a bed of lettuce or spinach leaves to enhance the Halloween theme.
Extra Tips:
When preparing the Pumpkin-Shaped Oranges, use oranges that are slightly firm to the touch as they hold their shape better when peeled.
If you’re making these ahead of time for a party, store the peeled oranges in an airtight container in the refrigerator to keep them fresh. You can also get creative with the decoration by using food-safe markers to draw jack-o’-lantern faces directly onto the orange peels before peeling them.
Apple Monster Mouths
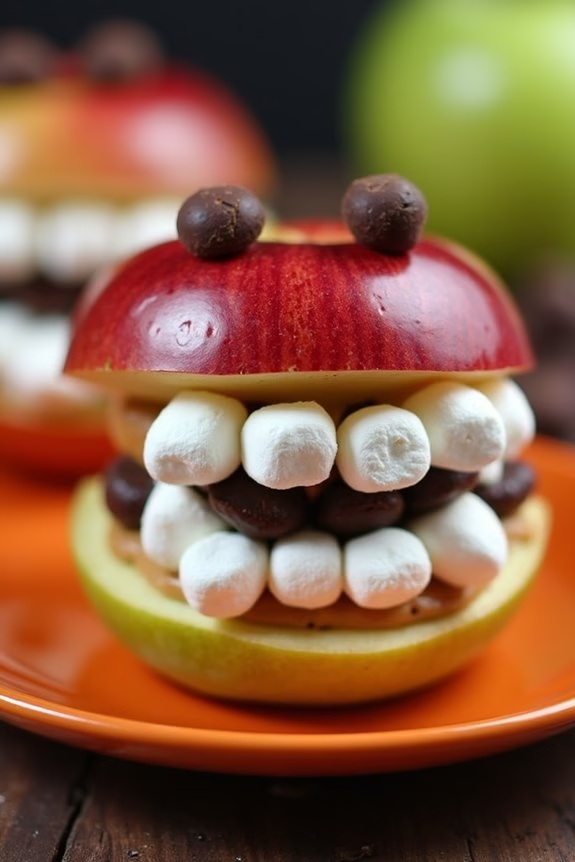
Apple Monster Mouths are a fun and healthy Halloween snack that can be enjoyed by both kids and adults at your spooky party. These delightful treats aren’t only easy to make but also bring a creative twist to the traditional fruit platter. The combination of apples, peanut butter, and a few sweet embellishments makes for a delicious and slightly creepy snack that everyone will love.
Creating Apple Monster Mouths is a fantastic way to engage children in the kitchen while also sneaking in some healthy ingredients. With just a few simple steps, you can prepare these eerie yet adorable snacks that are perfect for any Halloween gathering. Whether you’re hosting a large party or a small family get-together, these monster mouths will surely be a hit.
Ingredients (Serves 4-6 people):
- 3 medium-sized apples (Granny Smith or Red Delicious)
- 1/2 cup creamy peanut butter
- 1/4 cup mini marshmallows
- 1/4 cup slivered almonds
- 1 tablespoon lemon juice (optional)
- 1/4 cup chocolate chips or raisins
Cooking Instructions:
- Prepare the Apples: Start by washing the apples thoroughly. If desired, you can peel the apples, but leaving the skin on adds a nice color contrast. Slice each apple into quarters and remove the core. Then, cut each quarter into two or three slices, depending on the size of the apple. To prevent browning, you can lightly brush the slices with lemon juice.
- Assemble the Mouths: Take two apple slices and spread a layer of creamy peanut butter on one side of each slice. This will act as the “glue” for your monster mouth. Place the peanut butter sides together to form a mouth shape, leaving the skin sides on the outside.
- Add the Teeth: Insert mini marshmallows along the edge of the peanut butter to resemble teeth. You can alternate with slivered almonds for a more toothy grin or use only marshmallows for a softer look. Press gently to guarantee they stick to the peanut butter.
- Create the Eyes: Use a dab of peanut butter to attach chocolate chips or raisins on top of the apple slices to form eyes. You can be creative with the placement to give each mouth a unique expression.
- Serve and Enjoy: Arrange the completed Apple Monster Mouths on a platter or large plate. They’re best enjoyed fresh, so serve them immediately at your Halloween party.
Extra Tips:
To add some variety and cater to different tastes, consider using different nut butters such as almond or cashew butter instead of peanut butter. For a nut-free option, sunflower seed butter works well too.
If you want to make the Apple Monster Mouths more festive, try adding a few drops of food coloring to the peanut butter for a spooky green or purple hue. Remember that the key to a successful monster mouth is having fun and getting creative with the decorations!
Banana Mummies
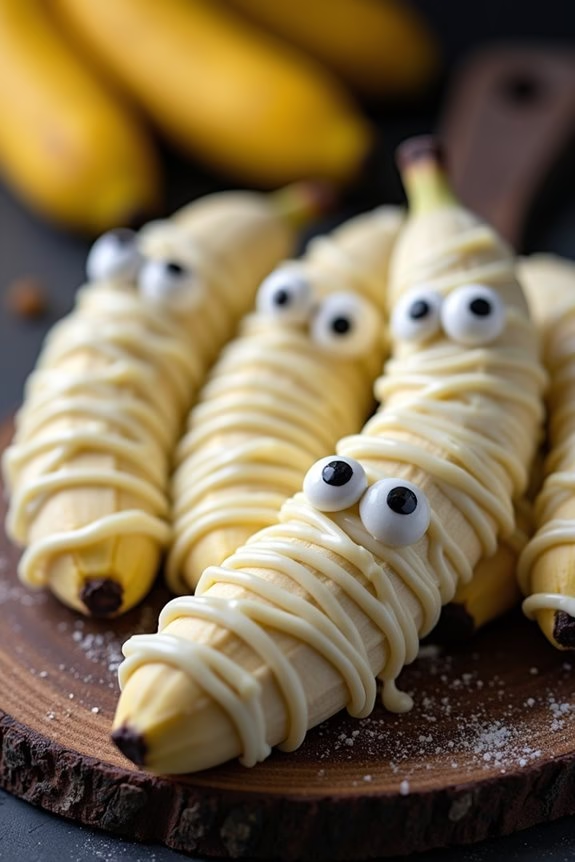
Banana Mummies are a fun and spooky treat perfect for any Halloween party. These little snacks aren’t only festive but also healthy, making them an excellent addition to any party spread. The combination of sweet bananas and creamy white chocolate, with a playful touch of candy eyes, creates a deliciously eerie appearance that will delight both kids and adults.
They’re incredibly easy to make and can be a fun activity to do with children, allowing them to participate in the Halloween festivities by creating their own food art.
The best part about Banana Mummies is that they require minimal ingredients and preparation time. You can whip them up in just a few minutes, and they’re sure to be a hit at any gathering. The mummies are made by wrapping melted white chocolate around banana halves, creating the look of a mummy’s bandages. The addition of candy eyes completes the spooky effect.
These treats are perfect for serving a small crowd of 4-6 people, as they’re both visually appealing and deliciously satisfying.
Ingredients (for 4-6 people):
- 3 ripe bananas
- 1 cup white chocolate chips
- 12-18 candy eyes
- 1 tablespoon coconut oil
- 12-18 small popsicle sticks or skewers
Cooking Instructions:
- Prepare the Bananas: Peel the bananas and cut them in half crosswise. Insert a popsicle stick or skewer into the flat end of each banana half to create a handle for dipping. Place them on a baking sheet lined with parchment paper.
- Melt the White Chocolate: In a microwave-safe bowl, combine the white chocolate chips and coconut oil. Microwave in 30-second intervals, stirring well after each, until the chocolate is fully melted and smooth.
- Coat the Bananas: Dip each banana half into the melted white chocolate, using a spoon to help coat them evenly. Allow any excess chocolate to drip off before placing the bananas back on the parchment-lined baking sheet.
- Create the Mummy Wraps: Using a fork or a piping bag with a small tip, drizzle additional white chocolate over the coated bananas to create a mummy wrap effect. This step can be as creative as you like, adding layers to mimic bandages.
- Add the Candy Eyes: Before the chocolate hardens, press two candy eyes into the top portion of each banana to give your mummy a face.
- Chill the Mummies: Place the baking sheet in the refrigerator for about 15-20 minutes, or until the chocolate is set and firm.
- Serve and Enjoy: Once the chocolate has hardened, your Banana Mummies are ready to be served. Arrange them on a platter for a spooky yet adorable presentation.
Extra Tips:
For an extra spooky touch, consider using dark chocolate chips to drizzle over the white chocolate, creating a more defined mummy wrap look. You can also experiment with different types of candy eyes or use small chocolate chips for a different look.
If you find that your chocolate becomes too thick while dipping, add a little more coconut oil to achieve the desired consistency. Keep in mind that these treats are best served chilled, so prepare them just before your party starts or keep them refrigerated until ready to serve.
Kiwi Frankenstein Faces
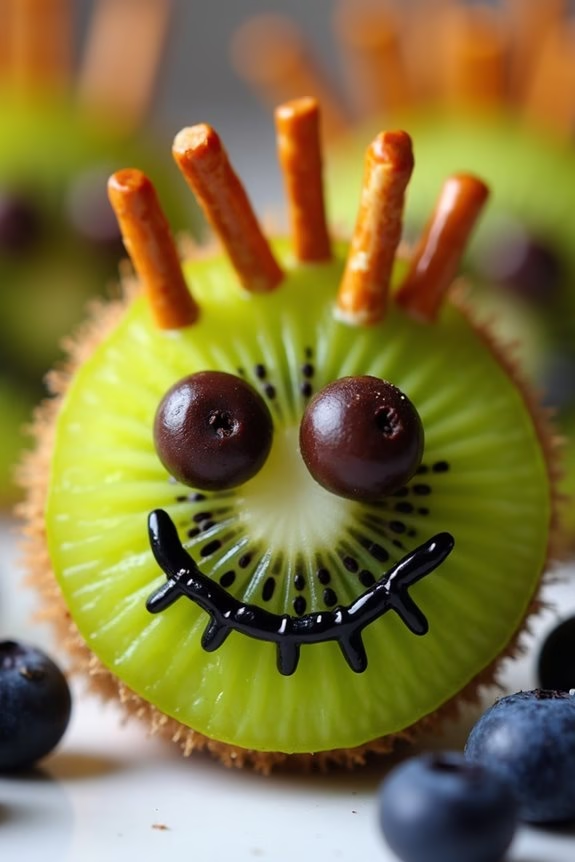
Kiwi Frankenstein Faces are a fun and healthy Halloween treat that will delight both kids and adults at your Halloween party. These adorable fruit snacks aren’t only easy to make but also provide a revitalizing burst of flavor with the natural sweetness of kiwi. By turning simple kiwis into mini Frankenstein monsters, you can add a creative and spooky touch to your party spread.
Perfect for a serving size of 4-6 people, Kiwi Frankenstein Faces require just a few ingredients and can be prepared quickly. The vibrant green hue of the kiwi makes it an ideal choice for creating Frankenstein’s monster, while other simple ingredients are used to add facial features. This recipe is a great way to encourage kids to eat more fruit while enjoying the Halloween festivities.
Ingredients for Kiwi Frankenstein Faces (serves 4-6):
- 6 ripe kiwis
- 1/4 cup mini chocolate chips
- 12 pretzel sticks
- Black decorating gel
- 1/4 cup blueberries
Cooking Instructions:
- Prepare the Kiwis: Peel the kiwis carefully, making sure to remove all the skin without squashing the fruit. Slice each kiwi into 1/2-inch thick rounds. Each person can have about 1 to 2 kiwi rounds for their Frankenstein face.
- Create the Faces: Lay the kiwi rounds flat on a serving plate. Use two mini chocolate chips for the eyes, pressing them gently into the kiwi flesh so they stay in place.
- Add the Hair and Mouth: Break the pretzel sticks into smaller pieces and insert them into the top of the kiwi rounds to create Frankenstein’s spiky hair. Use the black decorating gel to draw a zigzag mouth on each kiwi slice.
- Finish the Look: Place one blueberry on each side of the kiwi round to resemble bolts, completing the Frankenstein look.
- Serve and Enjoy: Arrange the completed Kiwi Frankenstein Faces on a platter and serve them immediately to keep the kiwis fresh and juicy.
Extra Tips:
When preparing Kiwi Frankenstein Faces, make certain that the kiwis are ripe but firm so they maintain their shape well. If you find the chocolate chips or pretzel sticks are slipping off, gently pat the kiwi slices with a paper towel to remove excess moisture.
Additionally, you can get creative with the decorating gel to add scars or different facial expressions to each kiwi Frankenstein, making them even more unique and entertaining for your guests.
Spooky Fruit Skewers
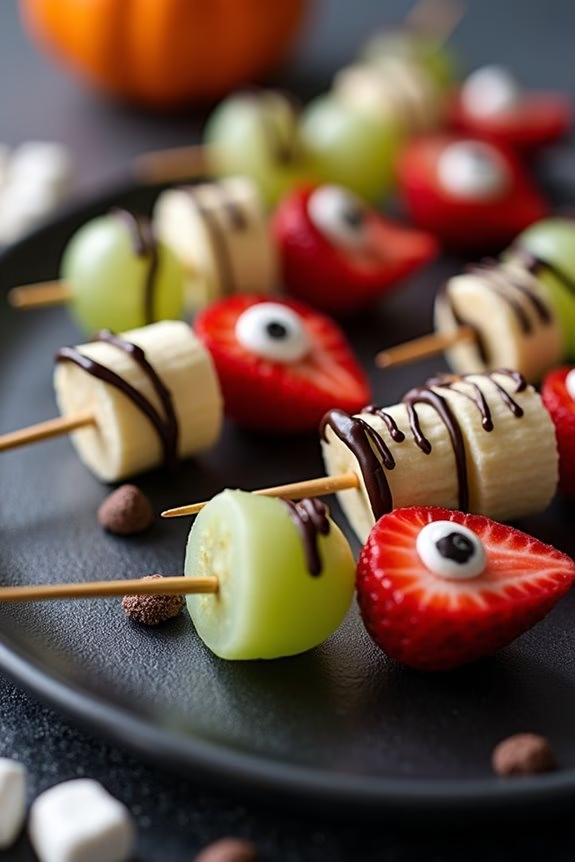
Spooky Fruit Skewers are a delightful and healthy treat that will add a touch of eerie fun to any Halloween party. These skewers combine a variety of fresh fruits to create a visually appealing and delicious snack that both kids and adults will love. The key to these skewers is the creative presentation, making them look like little monsters or ghosts with the help of a few simple decorations.
Whether you’re hosting a Halloween party or just want to surprise your family with a fun snack, these Spooky Fruit Skewers are sure to be a hit. The recipe is perfect for serving 4-6 people and can easily be adjusted depending on the number of guests.
By using fruits like grapes, strawberries, and bananas, you can create vibrant and spooky characters that are also nutritious. The addition of edible eyes and melted chocolate helps bring these fruits to life, turning them into adorable little creatures that will make your Halloween party both festive and healthy.
Let’s plunge into the ingredients and steps needed to make these spooky treats.
Ingredients (serves 4-6):
- 1 cup green grapes
- 1 cup red grapes
- 1 cup strawberries, hulled
- 2 bananas
- 1/4 cup mini marshmallows
- 1/4 cup mini chocolate chips
- 24-30 wooden skewers
- 1/4 cup melted dark chocolate (for decorating)
- Edible candy eyes (optional)
Instructions:
- Prepare the Fruits: Wash all the fruits thoroughly. Hull the strawberries and slice the bananas into 1-inch thick pieces.
- Assemble the Skewers: Start by threading a green grape onto a skewer, followed by a strawberry, a banana piece, and a red grape. Repeat this pattern until the skewer is full, leaving some space at the top for decoration.
- Decorate the Skewers: Melt the dark chocolate in a microwave-safe bowl or using a double boiler. Use a toothpick or a small spoon to dab a little chocolate onto the banana slices and attach mini chocolate chips or candy eyes to create spooky faces. You can also attach mini marshmallows to the top of the skewers for a ghostly effect.
- Chill the Skewers: Once all the skewers are decorated, place them on a tray lined with parchment paper and refrigerate for at least 30 minutes to allow the chocolate to set.
- Serve the Skewers: Arrange the chilled skewers on a platter and serve them as a fun and healthy Halloween snack.
Extra Tips:
When preparing the Spooky Fruit Skewers, be sure to have all your ingredients prepped and ready to go before assembling. This will make the process quicker and more efficient.
If you’re using candy eyes, you can find them in most baking aisles or online. Feel free to experiment with different fruits and decorations to customize your skewers to your liking.
If you’re short on time, you can use pre-melted chocolate or chocolate syrup for decorating. Additionally, try to serve the skewers shortly after chilling to guarantee the fruits remain fresh and the chocolate decorations stay intact.
Enjoy bringing a little spookiness to your Halloween celebrations with these delightful fruit skewers!
Candy Corn Fruit Cups
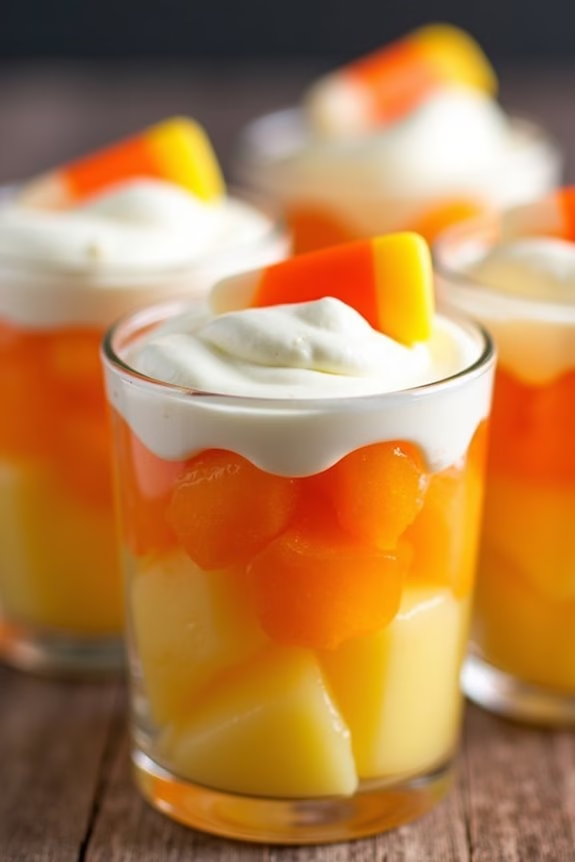
Celebrate Halloween with a healthy twist by creating these vibrant and festive Candy Corn Fruit Cups. Perfect for parties, these fruit cups are a delightful way to incorporate the traditional colors of candy corn into a nutritious snack. Layered with tropical and citrus fruits, these cups not only capture the essence of Halloween but also offer a revitalizing and sweet flavor profile that appeals to both kids and adults alike.
The beauty of Candy Corn Fruit Cups lies in their simplicity and visual appeal. By using just a few ingredients, you can create a stunning and colorful treat that will stand out on any Halloween party table. This recipe serves 4-6 people, making it ideal for small gatherings or as part of a larger spread of Halloween snacks.
Ingredients (Serves 4-6):
- 2 cups pineapple chunks
- 2 cups mandarin orange segments (canned or fresh)
- 2 cups whipped cream or vanilla yogurt
- 1/4 cup candy corn (optional, for garnish)
Cooking Instructions:
- Prepare the Fruit: Start by verifying that your pineapple chunks and mandarin orange segments are ready. If using canned fruit, drain them well to avoid excess liquid in your cups.
- Layer the Pineapple: In clear cups or small glass jars, begin by adding a layer of pineapple chunks at the bottom. This yellow layer will mimic the base color of candy corn.
- Add the Mandarin Oranges: Next, spoon the mandarin orange segments over the pineapple layer. This orange layer represents the middle color of candy corn.
- Top with Whipped Cream or Yogurt: Finish by adding a layer of whipped cream or vanilla yogurt on top. This white layer completes the candy corn color scheme.
- Garnish (Optional): For an extra festive touch, top each cup with a few pieces of candy corn.
Extra Tips:
For an added burst of flavor, consider using fresh pineapple and oranges whenever possible, as they provide a more vibrant taste and texture.
If you prefer a healthier option, opt for vanilla yogurt instead of whipped cream. Additionally, you can prepare these fruit cups a few hours in advance and store them in the refrigerator; just add the whipped cream or yogurt right before serving to verify it stays fresh and fluffy.
Finally, feel free to adjust the fruit quantities to suit your taste or dietary needs, making these cups as sweet or as tart as you desire.
Watermelon Carvings
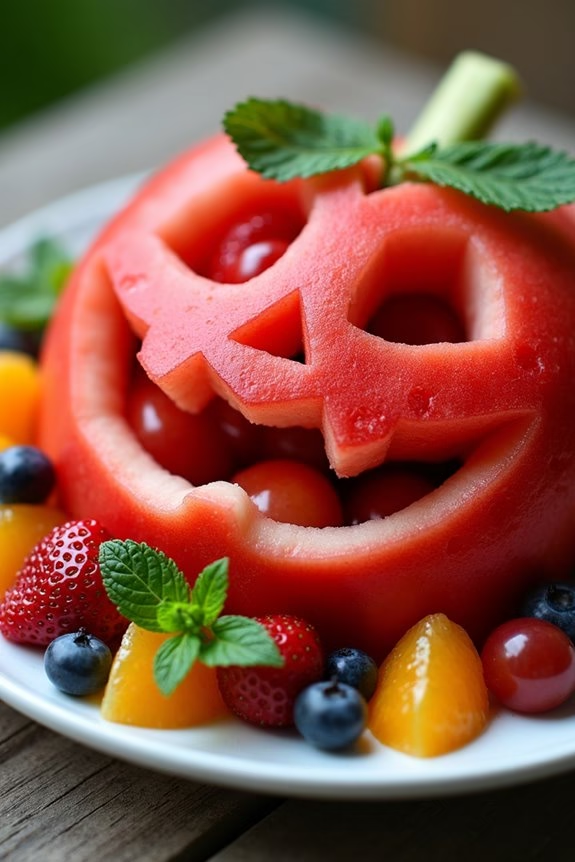
Create a spooky yet healthy Halloween treat with Watermelon Jack-O’-Lanterns. This creative dish combines the thrill of carving and the satisfaction of a revitalizing fruit snack. Perfect for parties, these watermelon carvings will intrigue your guests while offering a nutritious option amidst the traditional sugary Halloween treats.
Just like carving a pumpkin, you’ll hollow out a watermelon and carve a face, but the best part is the juicy watermelon flesh inside that becomes part of your fruit snack spread.
Watermelon Jack-O’-Lanterns aren’t only visually engaging but also versatile. You can fill the carved watermelon with an assortment of fruits like berries, grapes, and orange segments, turning it into a vibrant fruit bowl. The process involves carving, scooping, and assembling, making it an engaging activity for both kids and adults.
Whether you’re hosting a Halloween party or looking to add some festive flair to your dinner table, these Watermelon Jack-O’-Lanterns are sure to delight.
Ingredients for 4-6 people:
- 1 large seedless watermelon
- 1 pint of strawberries
- 1 pint of blueberries
- 2 cups of grapes (red or green)
- 4 oranges
- 1 lemon (optional, for preventing browning)
- Fresh mint leaves (optional, for garnish)
Cooking Instructions:
- Prepare the Watermelon: Begin by cutting a thin slice off the bottom of the watermelon to create a stable base. This will prevent it from rolling while you work. Then, cut the top third off the watermelon, setting it aside for later.
- Hollow Out the Watermelon: Using a large spoon or melon baller, scoop out the watermelon flesh. Be sure to keep the pieces as intact as possible for serving. Place the watermelon chunks in a large bowl. Reserve the hollowed-out shell for the next step.
- Carve the Face: With a dry-erase marker, draw the outline of a face on the watermelon shell. Get creative with the design! Once satisfied, use a sharp paring knife to carefully carve out the features, similar to a pumpkin. Wipe away any marker residue after carving.
- Prepare the Fruit Filling: Wash and chop the strawberries into bite-sized pieces. Peel and segment the oranges, removing any seeds. Combine the strawberries, blueberries, grapes, orange segments, and watermelon chunks in a bowl. Squeeze lemon juice over the fruit to prevent browning, if desired.
- Assemble the Fruit Bowl: Fill the carved watermelon with the mixed fruit. Arrange the fruit attractively, letting some spill out for an overflowing effect. Garnish with fresh mint leaves for an added touch of color and flavor.
- Serve and Enjoy: Place the Watermelon Jack-O’-Lantern on a platter or serving dish. Serve immediately, or refrigerate until ready to serve. This dish is best enjoyed fresh.
Extra Tips:
When carving the watermelon, make certain your knife is sharp and use gentle sawing motions for precision. If you’re making these ahead of time, consider assembling the fruit filling separately and filling the carved watermelon just before serving to keep everything fresh.
Experiment with different fruit combinations to suit your taste and add more color to your presentation. Additionally, if you’re serving outdoors, keep the filled watermelon out of direct sunlight to maintain its freshness.
Pear Witches
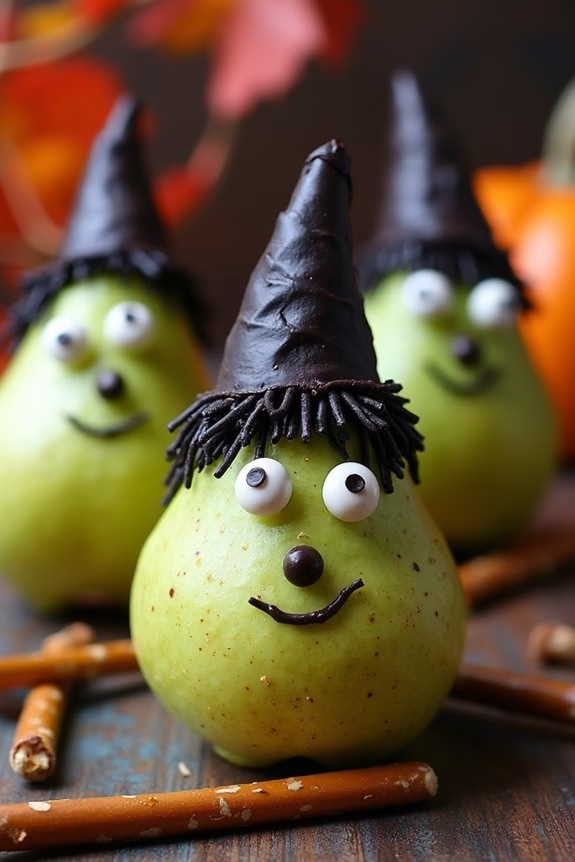
Halloween is a time for spooky, fun, and creative treats, and Pear Witches make the perfect addition to your party snack table. These delightful fruit creations aren’t only healthy but also visually appealing, making them a hit with both kids and adults.
With just a few simple ingredients, you can transform ordinary pears into charming little witches that will enchant your guests. Pear Witches are a great way to incorporate fruit into your Halloween festivities without compromising on the holiday’s playful spirit.
The natural sweetness of the pears, combined with a few decorative touches, creates a snack that’s both nutritious and festive. Whether you’re hosting a Halloween party or simply want to surprise your family with a spooky snack, these Pear Witches are sure to cast a spell on everyone who tries them.
Ingredients (Serves 4-6):
- 4 ripe pears
- 12 whole cloves
- 1 lemon (for juice)
- 6 black licorice strings
- 12 candy eyeballs
- 1 tablespoon honey (optional)
- 6 small sugar cones
- 1 tablespoon melted chocolate or chocolate syrup
- 6 pretzel sticks
Instructions:
- Prepare the Pears: Begin by washing the pears thoroughly to remove any dirt or residues. Pat them dry with a clean towel. Cut the bottom of each pear slightly so they can stand upright without wobbling.
- Prevent Browning: Squeeze the lemon juice into a small bowl and lightly brush it over the exposed cut areas of the pears. This will help prevent browning and keep your Pear Witches looking fresh.
- Create the Faces: Use a small knife to make tiny incisions where the eyes will go, and gently press the candy eyeballs into the pears. For the nose, insert a whole clove just below the eyes.
- Add Hair: Take the black licorice strings and cut them into shorter lengths, about 2-3 inches long. Stick these at the top of the pear to create the witch’s hair, using honey or melted chocolate as an adhesive if needed.
- Make the Hat: Place a sugar cone on top of each pear for the witch’s hat. Secure it with a dab of melted chocolate or chocolate syrup.
- Finish with a Broomstick: Insert a pretzel stick next to each pear to resemble a broomstick. This adds a fun and whimsical touch to your Pear Witches.
Extra Tips:
For an extra touch of creativity, you can use different colored candy eyeballs or even mini marshmallows for additional features. If black licorice isn’t available, you can substitute it with any other stringy candy.
To make the Pear Witches even more stable, consider using a small amount of melted chocolate to “glue” the pears to the serving plate. This will help them stay upright throughout your party. Enjoy these Halloween treats as a unique and healthy alternative to candy!
Creepy Crawly Berries

Get ready to spook your guests with a frightfully fun and delicious Halloween treat – Creepy Crawly Berries. These eerie yet delightful snacks are sure to be a hit at your Halloween party. Imagine juicy strawberries transformed into creepy crawly critters, with chocolate legs and googly eyes that are as tasty as they’re terrifying.
Not only are they a blast to make, but they also provide a healthier alternative to the usual sugary treats, making them perfect for both kids and adults alike.
These Creepy Crawly Berries are perfect for a serving size of 4-6 people, allowing everyone at your gathering to enjoy a few of these ghoulish goodies. Crafted with fresh strawberries, melted chocolate, and candy eyes, they bring together a perfect mix of flavors and textures.
Whether you’re hosting a party or just looking for a unique Halloween snack, these berries are sure to crawl their way into the hearts of your guests.
Ingredients (Serving Size: 4-6 people):
- 16 large fresh strawberries
- 1 cup dark or milk chocolate chips
- 1 tablespoon coconut oil
- 32 small candy eyes
- 32 pretzel sticks
Cooking Instructions:
- Prepare the Strawberries: Wash and dry the strawberries thoroughly. Confirm that they’re completely dry, as any moisture can cause the chocolate to seize.
- Melt the Chocolate: In a microwave-safe bowl, combine the chocolate chips and coconut oil. Microwave in 30-second intervals, stirring in between, until the chocolate is smooth and fully melted.
- Dip the Strawberries: Holding each strawberry by the stem, dip it into the melted chocolate, confirming it’s fully coated. Allow any excess chocolate to drip off.
- Attach the Eyes: Before the chocolate sets, place two candy eyes on each strawberry, positioning them near the pointed end to create a face.
- Create the Legs: Break the pretzel sticks into smaller pieces to resemble legs. Insert four pretzel pieces on each side of the strawberry to create the appearance of spider legs.
- Set the Berries: Place the finished berries on a parchment-lined tray and allow them to sit at room temperature, or refrigerate them for faster setting.
Extra Tips:
To make your Creepy Crawly Berries extra spooky, consider using white chocolate for a ghostly effect. You can also experiment with adding a sprinkle of edible glitter or colored sugar to give them a magical touch.
If you’re serving these at a party, setting them on a platter with some fake spider webs can add to the Halloween ambiance. Remember, the key to this recipe is having fun and letting your creativity run wild!
Tangerine Jack-o-Lanterns
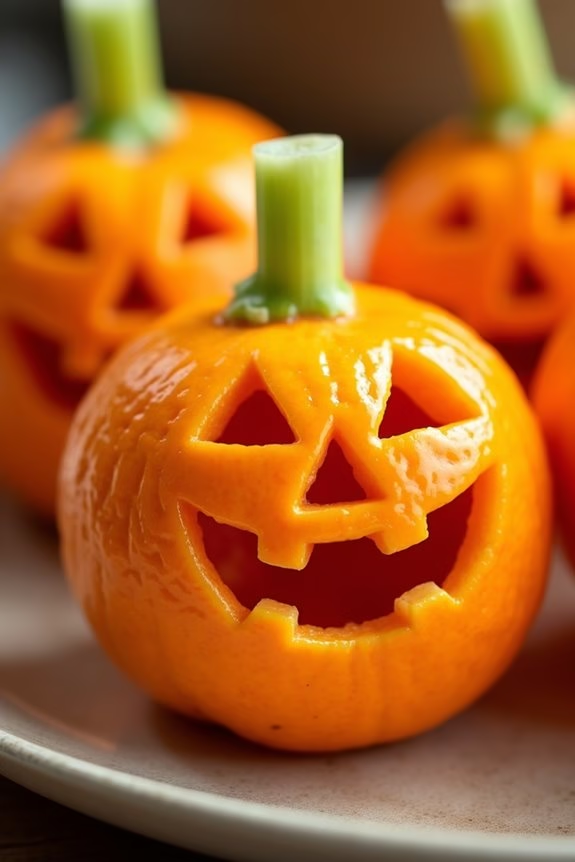
Transform your Halloween party with these delightful Tangerine Jack-o-Lanterns! They’re not only adorable and charming but also a healthier alternative to sugary snacks. These whimsical treats are simple to make and will bring a smile to both children and adults. The sweet, juicy tangerine paired with the creativity of creating mini jack-o-lantern faces makes this snack a festive addition to any Halloween spread.
Perfect for a serving size of 4-6 people, Tangerine Jack-o-Lanterns are a great way to incorporate more fruit into your Halloween festivities. They require minimal ingredients and provide a fun activity for you and your kids. The process involves carving out small, friendly faces on each tangerine and using a celery stick to mimic a pumpkin stem.
Whether you’re hosting a large party or a small gathering, these tangerines will add a playful touch to your table.
Ingredients:
- 6 tangerines
- 1 celery stalk
Instructions:
- Prepare the Tangerines: Begin by peeling the tangerines, making sure that you keep the segments intact. This will help in maintaining the round shape of the tangerines, resembling a pumpkin.
- Carve Faces: Using a small, sharp knife, carefully carve out jack-o-lantern faces on each tangerine. You can create different expressions, such as happy, spooky, or silly. Make sure to carve gently to avoid cutting through the segments.
- Prepare the Celery Stems: Cut the celery stalk into six small sticks, each about 2 inches long. These will serve as the stems for your jack-o-lanterns.
- Assemble the Jack-o-Lanterns: Insert one piece of celery into the top center of each tangerine, giving it the appearance of a pumpkin stem. Confirm it’s securely placed.
- Display and Serve: Arrange the tangerine jack-o-lanterns on a serving platter. They’re now ready to delight your guests!
Extra Tips:
When selecting tangerines, opt for ones that are firm and easy to peel to maintain their shape during the carving process. You can also use a black food-safe marker to draw the faces if carving seems too challenging. This method is safer and quicker for children who want to participate.
Additionally, if you want to add more variety, try using different citrus fruits like small oranges or clementines for a mix of sizes and colors.
Melon Eyeballs

Melon Eyeballs are a spooky and delicious addition to any Halloween party spread. These eerie treats aren’t only fun to look at, but they’re also healthy and revitalizing, making them perfect for party-goers of all ages. The combination of sweet melon balls and tangy fruit accents creates a delightful flavor that’s sure to be a hit at your gathering.
Plus, their eye-catching appearance adds a playful yet creepy touch that fits right in with the Halloween theme.
Crafting Melon Eyeballs is a straightforward process that requires minimal ingredients and effort. This recipe is suitable for a serving size of 4-6 people, making it ideal for small gatherings or as a part of a larger party menu. By following the simple steps outlined below, you can easily prepare these ghoulishly good snacks in advance, allowing you more time to enjoy the festivities.
Ingredients:
- 1 small seedless watermelon
- 1 cantaloupe
- 1 honeydew melon
- 1 cup blueberries
- 1 cup green grapes
- 1/2 cup lime juice
- 1 tablespoon honey
Instructions:
- Prepare the Melons: Start by cutting the watermelon, cantaloupe, and honeydew in half and removing any seeds or rind. Use a melon baller to scoop out round balls from each type of melon. Aim for an even mix of each kind, providing a variety of colors and flavors.
- Create the Eyeballs: Once you have your melon balls, take a small knife or a melon baller to carve a small circular indent in each ball. This will serve as a place to insert the ‘pupil’.
- Add the Pupils: Place a blueberry or a halved green grape into each indent on the melon balls. Press gently to make sure they stay in place. These will resemble the pupils of the eyeballs.
- Prepare the Dressing: In a small bowl, mix the lime juice and honey until well combined. This will serve as a tangy dressing to enhance the sweetness of the melon.
- Assemble the Dish: Arrange the melon eyeballs on a large serving platter or individual plates. Drizzle the lime and honey dressing over the top, ensuring each eyeball is lightly coated.
- Chill: Place the platter in the refrigerator for at least 30 minutes before serving. This will allow the flavors to meld and keep the snack cool and invigorating.
Extra Tips:
To make your Melon Eyeballs even more festive, consider serving them in a hollowed-out pumpkin or a cauldron-shaped bowl.
You can also experiment with different fruits for the pupils, such as raspberries or blackberries, for a more dramatic look. If you prefer a sweeter snack, add a sprinkle of powdered sugar on top before serving.
Remember to keep the Melon Eyeballs refrigerated until just before serving to make sure they remain fresh and appetizing.
Pineapple Bats
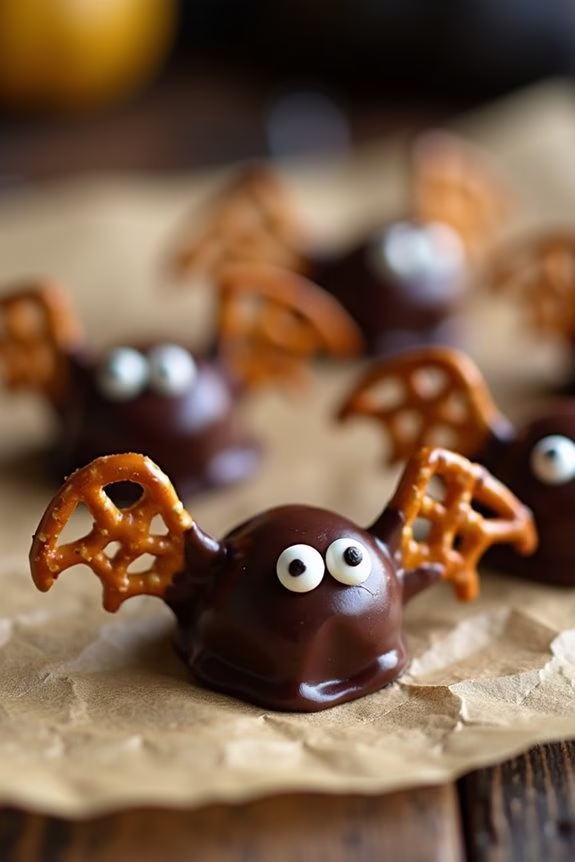
Halloween is the perfect time to get creative with your party snacks, and Pineapple Bats are a delicious and healthy option that will thrill your guests. These fun fruit treats combine the tropical sweetness of pineapple with the eerie charm of Halloween, making them a great addition to your spooky spread. Not only are they visually appealing, but they’re also easy to make, allowing you to spend more time enjoying the festivities and less time in the kitchen.
The key to perfect Pineapple Bats is using fresh pineapple slices and creatively cutting them into bat shapes. This dish is perfect for a serving size of 4-6 people, offering a balance of fun and flavor. Whether you’re hosting a kids’ party or an adult Halloween bash, these treats are sure to be a hit. With just a few ingredients and some simple steps, you can create a memorable and amusing Halloween snack that will have everyone swooning over your culinary skills.
Ingredients (serving size: 4-6 people):
- 1 large fresh pineapple
- 1 cup of dark chocolate chips
- 1 tablespoon coconut oil
- 12-18 pretzel sticks
- Candy eyes (optional, for decoration)
Instructions:
- Prepare the Pineapple: Start by cutting off the top and bottom of the pineapple to create a stable base. Stand the pineapple upright and carefully slice off the skin, making sure to remove all the prickly eyes. Once peeled, cut the pineapple into 1/2-inch thick slices.
- Cut Bat Shapes: Use a bat-shaped cookie cutter to cut out bat shapes from each pineapple slice. If you don’t have a bat-shaped cutter, you can use a sharp knife to carefully carve out the bat shapes freehand. Aim for 12-18 bats, depending on the size of your pineapple and cookie cutter.
- Melt the Chocolate: In a microwave-safe bowl, combine the dark chocolate chips and coconut oil. Microwave on medium power in 30-second intervals, stirring between each interval, until the chocolate is fully melted and smooth.
- Coat the Bats: Dip each pineapple bat into the melted chocolate, ensuring that it’s fully coated. Use a fork to lift the bat out of the chocolate, allowing any excess to drip off. Place the chocolate-coated bats on a baking sheet lined with parchment paper.
- Add Details: Before the chocolate sets, insert pretzel sticks into the ends of each bat as wings. If you’re using candy eyes, add them to the bats at this stage for a spooky effect.
- Chill the Bats: Transfer the baking sheet to the refrigerator and let the bats chill for at least 30 minutes, or until the chocolate has hardened.
Extra Tips:
For an extra touch of Halloween fun, consider using different types of fruit to create a variety of spooky shapes. You can mix in other fruits like melon or kiwi for a colorful platter.
If you’re short on time, you can prepare the pineapple bats in advance and store them in an airtight container in the refrigerator for up to a day before serving. Keep in mind that the use of candy eyes is optional, but it adds a playful and spooky vibe that can be especially appealing at a Halloween party.
Enjoy your Pineapple Bats and have a delightfully spooky Halloween!
Blood Orange Slices

Blood Orange Slices make a perfect addition to any Halloween party, offering a vibrant and spooky touch to your fruit snack selection. These slices not only provide a splash of blood-red color, but they’re also invigorating and naturally sweet, balancing out the other sugary treats typically found at Halloween gatherings.
The unique flavor of blood oranges, with their hints of raspberry and citrus, make them a standout choice that will tantalize taste buds and add a touch of elegance to your snack table.
Preparing Blood Orange Slices is incredibly simple and requires minimal ingredients, making it an ideal recipe for party hosts who want to offer a healthy option without spending hours in the kitchen. The key is to select ripe blood oranges, which will be juicy and easy to slice. With their striking appearance and delicious taste, these slices are sure to be a hit with both kids and adults alike.
Below is a recipe designed for a serving size of 4-6 people.
Ingredients:
- 6 blood oranges
- 1 tablespoon honey
- 1 teaspoon ground cinnamon
- 1 tablespoon fresh mint leaves (optional, for garnish)
Instructions:
- Prepare the Oranges: Begin by washing the blood oranges thoroughly under cool running water to remove any dirt or residue from the surface. Pat them dry with a clean towel.
- Slice the Oranges: Using a sharp knife, slice off both ends of each blood orange to create a flat base. Stand the orange upright and carefully slice downwards to remove the peel and pith, following the curve of the fruit. Once peeled, slice the oranges crosswise into 1/4-inch thick rounds.
- Arrange the Slices: Place the orange slices on a large serving platter, slightly overlapping them in a circular pattern or in neat rows, depending on your presentation preference.
- Drizzle with Honey: Warm the honey slightly in the microwave or on the stovetop to make it easier to drizzle. Using a spoon, lightly drizzle the honey over the arranged blood orange slices, guaranteeing each slice gets a touch of sweetness.
- Sprinkle with Cinnamon: Evenly sprinkle the ground cinnamon over the honey-drizzled slices. The cinnamon will add warmth and enhance the natural sweetness of the oranges.
- Garnish and Serve: If desired, chop the fresh mint leaves finely and sprinkle them over the orange slices for a pop of color and a hint of invigorating taste. Serve immediately or cover and refrigerate until ready to serve.
Extra Tips:
When selecting blood oranges, look for ones that feel heavy for their size, as this indicates juiciness. It’s best to use a sharp knife for slicing to guarantee clean, even cuts without bruising the fruit.
If preparing in advance, you can slice the oranges and keep them refrigerated, covered lightly with plastic wrap, for a few hours before serving. This will help preserve their freshness and vibrant color.
Finally, consider experimenting with additional spices such as nutmeg or cloves for a more autumnal flavor profile.
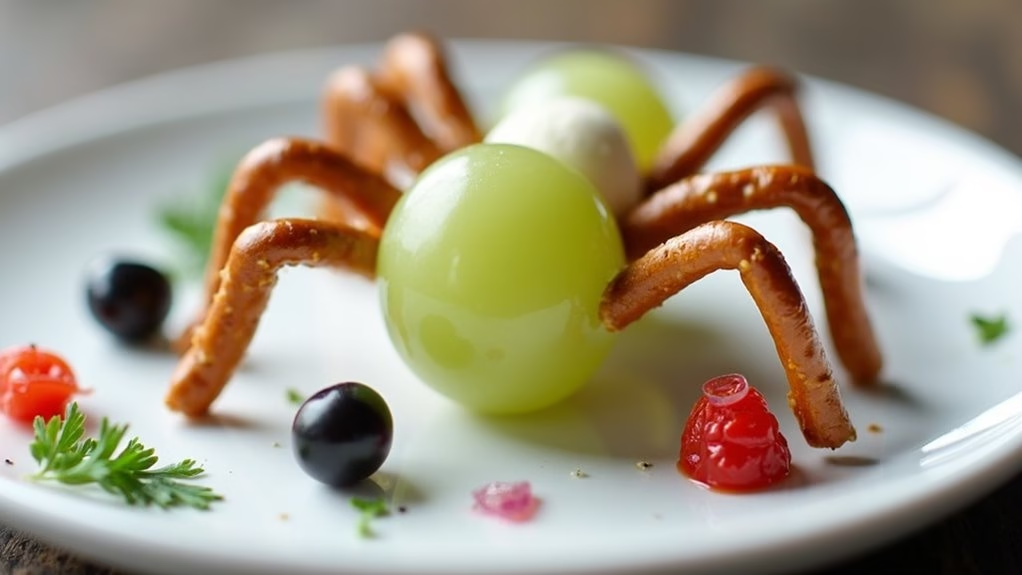
Grape and Cheese Spiders

Are you aiming to add a spooky yet delicious touch to your Halloween party spread? Search no more than these fun and festive Grape and Cheese Spiders. This creative snack combines the juicy sweetness of grapes with the creamy richness of cheese, all assembled in a creepy-crawly spider form that’s sure to delight both kids and adults.
Perfectly sized for munching and easy to prepare in advance, these treats will add a unique and tasty element to your Halloween festivities. Designed to serve 4-6 people, this recipe is simple, quick, and doesn’t require any cooking. It’s a great way to involve the little ones in the kitchen, making it an ideal family activity.
Whether you’re hosting a large gathering or a small celebration, these Grape and Cheese Spiders will surely be a hit at your party. So, get ready to creep out your guests in the most delicious way possible!
Ingredients:
- 24 large green grapes
- 12 small mozzarella balls
- 24 pretzel sticks
- 12 raisins
- 24 black olive slices
- 12 cherry tomatoes
- 6 sprigs of fresh parsley
Instructions:
- Prepare the Grapes and Cheese: Begin by washing the grapes and patting them dry with a paper towel. Confirm the mozzarella balls are drained and ready to use. If the mozzarella balls are large, cut them in half to fit the size of the grapes better.
- Assemble the Spider Bodies: Take a grape and a mozzarella ball, and use a toothpick to skewer the grape first, followed by the mozzarella. This will form the body of your spider, with the grape acting as the head and the mozzarella as the abdomen.
- Add Legs: Break each pretzel stick in half. Insert four half-sticks on each side of the mozzarella ball to resemble spider legs. Make sure they’re evenly spaced and firmly inserted.
- Create the Eyes: Use a dab of cream cheese or hummus as edible glue to attach two raisins onto each grape. This will form the eyes of the spider, giving it a spooky yet cute appearance.
- Decorate: Cut the cherry tomatoes into halves or quarters, and attach them to the grape with a toothpick as a nose or mouth. Add a small piece of black olive slice on top of each grape for added detail. Finally, finish by garnishing with fresh parsley around the spiders for a touch of greenery.
- Serve: Arrange the Grape and Cheese Spiders on a platter and refrigerate until ready to serve. This will keep the cheese fresh and the grapes crisp.
Extra Tips:
For the best visual effect, use a variety of colored grapes such as green, red, and black to create a more vibrant presentation. If you’re serving these outdoors or in a warm environment, consider keeping them on a chilled platter to maintain freshness.
You can also experiment with different cheeses like cheddar or gouda for a more robust flavor. Finally, if you’re concerned about kids handling toothpicks, substitute with edible spaghetti sticks for added safety. Enjoy crafting these creepy crawlers and have a spooky, fun Halloween!