

Hey there, fellow Halloween enthusiasts! 🎃
As you plan your spooktacular bash, I’ve got some treats that will transform your gathering into a memorable feast of frightful fun.
Think Witch’s Fingers Breadsticks, Monster Sliders, and Mummy Jalapeño Poppers. These aren’t just snacks; they’re a spooky experience, combining festive themes with irresistible flavors.
Are you ready to make your party the one everyone raves about? Let’s explore these devilishly delicious delights together!
Witch’s Fingers Breadsticks

Witch’s Fingers Breadsticks are a spooktacular addition to any Halloween party spread. These eerie breadsticks are shaped like witch’s fingers, complete with almond fingernails and knobby knuckles. They’re both delicious and creepy, perfect for delighting and horrifying your guests. The recipe uses simple ingredients and is fun to make, especially if you involve kids in the preparation process.
The breadsticks are seasoned with herbs and garlic, giving them a savory flavor that pairs well with dips like marinara sauce or a cheesy fondue. Their appearance is sure to be a conversation starter, and they can be made ahead of time, allowing you to focus on other party preparations. Here’s how you can make Witch’s Fingers Breadsticks for 4-6 people.
Ingredients:
- 1 packet (2 1/4 tsp) active dry yeast
- 1 cup warm water (110°F/45°C)
- 2 1/2 cups all-purpose flour
- 1 tsp sugar
- 1 tsp salt
- 2 tbsp olive oil
- 1 tsp dried oregano
- 1 tsp garlic powder
- 24 whole blanched almonds
- 2 tbsp butter, melted
- Optional: red food coloring or ketchup for decoration
Instructions:
- Activate Yeast: In a large bowl, dissolve the sugar in warm water and sprinkle the yeast over the top. Let it sit for about 5 minutes, or until it becomes frothy.
- Prepare Dough: Add flour, salt, olive oil, oregano, and garlic powder to the yeast mixture. Stir until a dough begins to form.
- Knead Dough: Transfer the dough to a lightly floured surface and knead it for about 6-8 minutes, or until it becomes smooth and elastic.
- First Rise: Place the dough in a lightly oiled bowl, cover it with a damp cloth, and let it rise in a warm area for about 1 hour, or until it doubles in size.
- Preheat Oven: Preheat your oven to 375°F (190°C) and line a baking sheet with parchment paper.
- Shape Fingers: Punch down the dough to release the air, then divide it into 24 equal pieces. Roll each piece into a finger-like shape, making sure to add knuckles by pinching and shaping the dough.
- Add Fingernails: Press a blanched almond into the tip of each breadstick to create a fingernail. If desired, paint the almond with red food coloring or ketchup for a bloody effect.
- Second Rise: Place the witch’s fingers on the prepared baking sheet and let them rise for about 15 minutes.
- Bake: Brush the breadsticks with melted butter and bake in the preheated oven for 15-20 minutes, or until golden brown.
- Cool and Serve: Allow the breadsticks to cool slightly before arranging them on a platter. Serve with your choice of dip.
Extra Tips:
For an extra spooky touch, add wrinkles to the fingers by scoring the dough with a knife before baking. If you don’t have blanched almonds, you can use sliced almonds or even pumpkin seeds as substitutions.
Be careful not to over-bake the breadsticks, as they may become too hard. These breadsticks can be made a day in advance and reheated in the oven before serving. Enjoy the screams and delights as your guests reach for these creepy creations!
Creepy Deviled Eyeballs
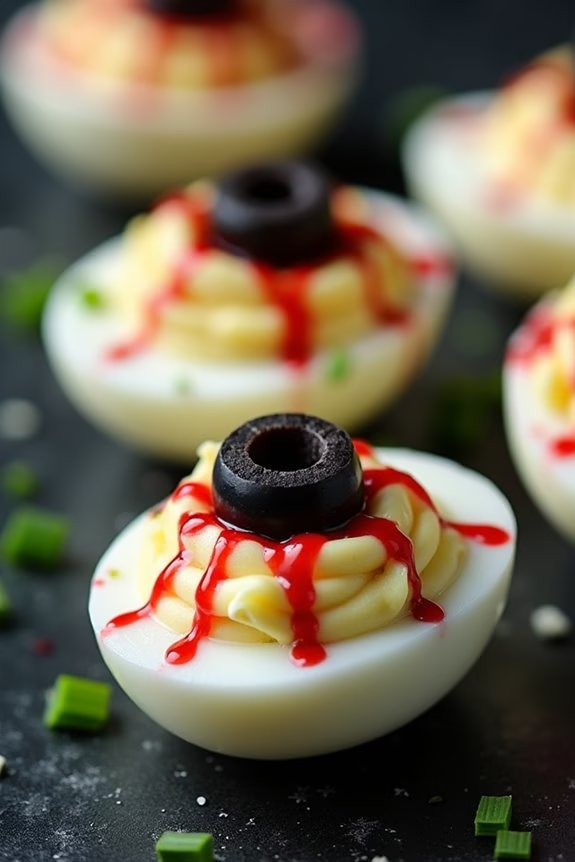
Creepy Deviled Eyeballs are the perfect Halloween finger food, designed to delight and spook your guests in equal measure. These devilishly delicious bites are a creative twist on the classic deviled eggs, adding a ghoulishly fun element to your Halloween spread. With their eerie appearance mimicking bloodshot eyes, these appetizers will be a conversation starter at any themed party.
Not only are they visually striking, but they’re also wonderfully tasty, combining the creamy richness of deviled eggs with the sharp tang of olives and the fiery kick of hot sauce.
Ideal for a serving size of 4-6 people, Creepy Deviled Eyeballs are relatively simple to prepare and can be made ahead of time, giving you plenty of space to focus on other party preparations. By using basic ingredients that are easy to source and assembling them with just a bit of creative flair, you can create a platter of these spooky snacks that will have your guests coming back for more.
Whether you’re hosting a children’s party or a grown-up Halloween bash, these little bites guarantee you have something to fit the theme perfectly.
Ingredients:
- 6 large eggs
- 1/4 cup mayonnaise
- 1 teaspoon Dijon mustard
- 1 teaspoon white vinegar
- Salt and pepper to taste
- Red food coloring
- 6 black olives, pitted
- 1-2 teaspoons hot sauce (optional, for heat lovers)
- 1-2 teaspoons chopped chives or parsley (for garnish)
Instructions:
- Boil the Eggs: Place the eggs in a pot and cover them with cold water. Bring the pot to a boil over medium-high heat. Once boiling, remove the pot from the heat, cover it, and let the eggs sit for 10-12 minutes. This will guarantee perfectly cooked hard-boiled eggs.
- Prepare the Eggs: Carefully drain the hot water and transfer the eggs to a bowl of ice water to cool for about 5 minutes. Once cooled, peel the eggs and slice them in half lengthwise. Gently remove the yolks and place them in a separate bowl.
- Make the Filling: Mash the yolks with a fork until smooth. Add the mayonnaise, Dijon mustard, white vinegar, salt, and pepper, mixing until the filling is creamy and well combined. If desired, add a bit of hot sauce for an extra kick.
- Color the Whites: Dip a toothpick into the red food coloring and lightly draw bloodshot patterns onto the surface of the egg whites. This will mimic the look of bloodshot eyeballs. Use a clean toothpick for each egg to maintain the detail.
- Assemble the Eyeballs: Spoon or pipe the yolk mixture back into the egg white halves. Slice the black olives into thirds and place a slice on top of each filled egg, pressing slightly to adhere. The olive slice will act as the pupil of the eyeball.
- Garnish and Serve: Sprinkle chopped chives or parsley around the edges of the serving platter to add a touch of green. Arrange the deviled eyeballs on the platter and serve immediately or refrigerate until ready to serve.
Extra Tips:
To guarantee that your Creepy Deviled Eyeballs have a perfectly creepy appearance, make sure the eggs are boiled just right. Overcooking eggs can lead to a greenish-gray ring around the yolk, which can be unappealing in presentation.
Additionally, when drawing the bloodshot lines with the red food coloring, less is more—subtlety can go a long way in making them look realistic.
Finally, if you find the filling too thick for piping, add a bit more mayonnaise or a splash of milk to achieve the desired consistency. Enjoy these spooky treats and have a frightfully fun Halloween!
Monster Sliders
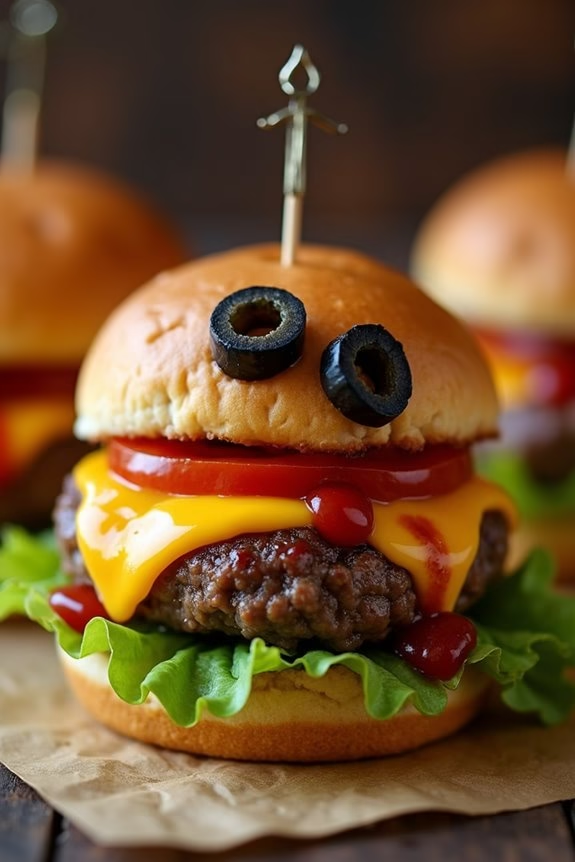
Get ready to spook your guests with these delicious Monster Sliders, perfect for any Halloween gathering. These bite-sized burgers aren’t only delicious but also fun to make, ensuring your party is a hit. The sliders are made with juicy beef patties, gooey cheddar cheese, and a variety of toppings to create a monstrous face, making them both a treat for the eyes and the taste buds.
Whether you’re hosting a kids’ party or an adult gathering, these sliders are sure to impress. The key to these Monster Sliders is in the presentation. With a little creativity, you can transform a simple slider into a Halloween masterpiece. The sliders will be assembled using mini burger buns, and the patties will be topped with cheese, lettuce, tomatoes, and pickles fashioned into monstrous faces.
Serve these up on a platter, and watch them disappear as quickly as they were made. Now, let’s get started with the ingredients and cooking instructions for a serving size of 4-6 people.
Ingredients (for 4-6 servings):
- 1 pound ground beef
- 1 teaspoon salt
- 1/2 teaspoon black pepper
- 1/2 teaspoon garlic powder
- 1/2 teaspoon onion powder
- 6 mini burger buns
- 6 slices cheddar cheese
- 6 lettuce leaves
- 1 large tomato, sliced into thin rounds
- 12 pickle slices
- Ketchup
- Mustard
- 12 black olives, halved
Cooking Instructions:
- Prepare the Patties: In a mixing bowl, combine ground beef, salt, black pepper, garlic powder, and onion powder. Mix until the ingredients are just combined. Form the mixture into 6 small patties, ensuring they’re slightly larger than the size of the mini burger buns as they’ll shrink when cooked.
- Cook the Patties: Preheat a skillet or grill over medium-high heat. Cook the patties for about 3-4 minutes on each side, or until they reach your desired level of doneness. Place a slice of cheddar cheese on each patty during the last minute of cooking to allow it to melt.
- Assemble the Sliders: Begin by placing a lettuce leaf on the bottom half of each mini burger bun. Place the cooked beef patty with melted cheese on top of the lettuce.
- Create Monster Faces: Use the tomato slices to create a tongue or mouth for each slider. Position the pickle slices as eyes, securing each with a toothpick that also holds a halved black olive for pupils. Use ketchup and mustard to add details like fangs or stitches on the cheese.
- Finish the Sliders: Place the top half of the bun on each slider, slightly askew to reveal the monstrous faces. Serve immediately on a large platter.
Extra Tips: When creating the monster faces, don’t be afraid to get creative with the toppings and their arrangement. You can use additional ingredients like sliced bell peppers or onions for more facial features.
To save time, you can prepare the patties and toppings in advance, then cook and assemble them just before your guests arrive. If you’re expecting a larger crowd, feel free to double the recipe. Also, consider providing a variety of condiments and toppings on the side so guests can customize their own monster sliders to their liking.
Bloody Marinara Meatball Bites

Transform your Halloween party into a spooktacular event with these Bloody Marinara Meatball Bites. Perfect as finger foods, these meatball bites aren’t only delicious but also visually enchanting with their rich, blood-red marinara sauce.
Whether you’re hosting a large gathering or a small soiree, these savory bites are sure to be a hit among your guests. The blend of herbs and spices within the meatballs pairs beautifully with the tangy and slightly spicy marinara, making them an irresistible treat that perfectly fits the eerie Halloween theme.
When it comes to Halloween, presentation is key, and these meatball bites don’t disappoint. Serve them with toothpicks or skewers for easy grabbing, and place them on a platter garnished with fresh basil leaves for an extra pop of color.
The vibrant red sauce will naturally draw attention, and the aroma will have everyone reaching for more. Whether you’re a seasoned cook or a beginner in the kitchen, this recipe is straightforward and rewarding. Now, let’s explore the ingredients and cooking instructions to create this deliciously frightful dish.
Ingredients (Serving Size: 4-6 people):
- 1 pound ground beef
- 1/2 cup breadcrumbs
- 1/4 cup grated Parmesan cheese
- 1 large egg
- 2 cloves garlic, minced
- 1 teaspoon dried Italian seasoning
- Salt and pepper to taste
- 2 cups marinara sauce
- 1 tablespoon olive oil
- 1/4 teaspoon red pepper flakes (optional for extra spice)
- Fresh basil leaves for garnish
- Toothpicks or skewers for serving
Cooking Instructions:
- Prepare the Meatball Mixture: In a large mixing bowl, combine the ground beef, breadcrumbs, Parmesan cheese, egg, minced garlic, Italian seasoning, salt, and pepper. Mix everything thoroughly with your hands or a spatula until well combined.
- Shape the Meatballs: Roll the mixture into small, bite-sized meatballs, approximately 1 inch in diameter, and place them on a plate. This size is perfect for finger foods and guarantees they cook evenly.
- Cook the Meatballs: Heat the olive oil in a large skillet over medium heat. Add the meatballs in batches, making sure not to overcrowd the pan. Cook them for about 8-10 minutes, turning occasionally, until they’re browned on all sides and cooked through.
- Simmer in Marinara Sauce: Once all the meatballs are cooked, reduce the heat to low and add the marinara sauce to the skillet. Gently stir in the red pepper flakes if using. Allow the meatballs to simmer in the sauce for about 10 minutes, making sure they’re well-coated and the sauce is heated through.
- Serve and Garnish: Transfer the meatballs onto a serving platter. Insert toothpicks or skewers into each meatball for easy serving. Garnish with fresh basil leaves for an added touch of color and flavor.
Extra Tips:
For an even richer flavor, consider making the meatballs a day in advance and allowing them to sit overnight in the refrigerator. This will let the flavors meld together beautifully.
If you’re short on time, you can use store-bought marinara sauce, but homemade is always a delightful option if you have the ingredients on hand.
When cooking the meatballs, resist the urge to turn them too frequently, as this can prevent them from getting a nice, even browning. Adjust the level of spice to your preference by adding more or less red pepper flakes.
Enjoy your Bloody Marinara Meatball Bites and have a spooky Halloween!
Ghostly Cheese Puffs
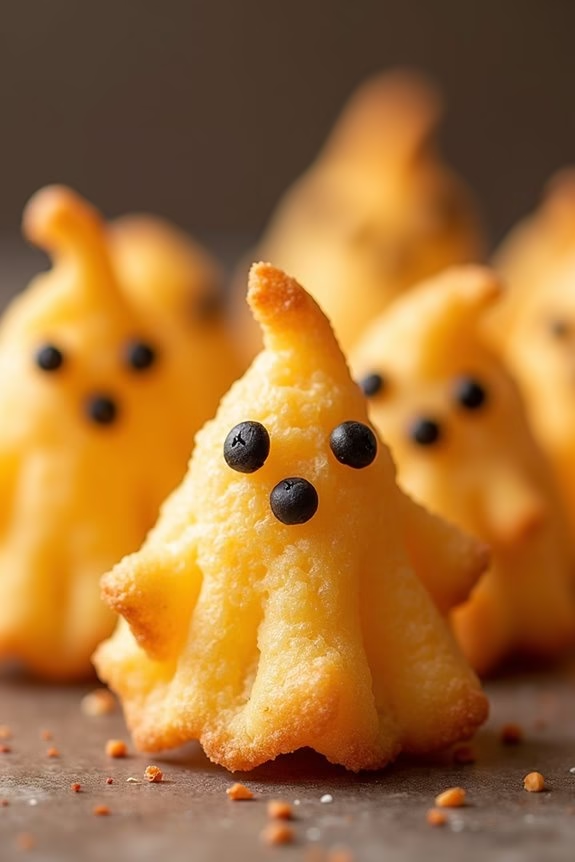
Ghostly Cheese Puffs are the perfect spooky addition to any Halloween party. Their light, airy texture and cheesy flavor make them a hit with both kids and adults. Shaped to look like little ghosts, these puffs aren’t only delicious but also add a fun, eerie touch to your party spread.
Whether you’re hosting a large gathering or a small get-together, these delightful snacks are sure to impress your guests and get everyone in the Halloween spirit. This recipe is designed to serve 4-6 people, making it ideal for a small party or as part of a larger buffet.
The key to achieving the perfect ghostly shape lies in the careful piping of the dough, which can be a fun activity to involve the kids in. With a few simple ingredients and a little bit of creativity, you can whip up a batch of these hauntingly delicious cheese puffs in almost no time at all.
Ingredients:
- 1 cup water
- 1/2 cup unsalted butter
- 1 cup all-purpose flour
- 4 large eggs
- 1 cup grated sharp cheddar cheese
- 1/2 teaspoon salt
- 1/4 teaspoon cayenne pepper
- Black sesame seeds or poppy seeds (for eyes)
Cooking Instructions:
- Preheat the Oven: Start by preheating your oven to 375°F (190°C). Line two baking sheets with parchment paper to prevent the puffs from sticking.
- Prepare the Dough: In a medium saucepan, combine the water, butter, and salt. Bring the mixture to a boil over medium heat. Once boiling, reduce the heat to low and add the flour all at once, stirring vigorously with a wooden spoon until the mixture forms a ball and pulls away from the sides of the pan.
- Incorporate the Eggs: Remove the pan from heat and let the dough cool for about 5 minutes. Beat in the eggs one at a time, making sure each egg is fully incorporated before adding the next. The dough should become smooth and glossy.
- Add the Cheese and Seasoning: Stir in the grated cheddar cheese and cayenne pepper until evenly distributed throughout the dough.
- Shape the Ghosts: Transfer the dough to a piping bag fitted with a large round tip. Pipe small mounds onto the prepared baking sheets, spacing them about 2 inches apart. Use a damp finger to smooth out any peaks on the puffs, giving them a more ghostly shape.
- Add the Eyes: Carefully press two black sesame seeds or poppy seeds onto each puff to create the ghost’s eyes.
- Bake: Place the baking sheets in the oven and bake for 20-25 minutes, or until the puffs are golden brown and crisp. Allow them to cool slightly before serving.
Extra Tips: For best results, make sure all the ingredients are at room temperature before starting. If you find the dough is too stiff to pipe, you can add a little extra beaten egg to achieve the right consistency.
Be sure to bake the puffs until they’re fully golden and crisp; underbaked puffs may collapse as they cool. Ultimately, feel free to experiment with different types of cheese or add herbs to customize the flavor to your liking. Enjoy your ghostly cheese puffs warm or at room temperature for the best taste and texture!
Pumpkin Patch Hummus Cups

Pumpkin Patch Hummus Cups are a delightful and festive addition to any Halloween party spread. These adorable and tasty snacks not only look like miniature pumpkin patches but also offer a healthy and flavorful bite. The combination of smooth hummus, vibrant vegetables, and crunchy toppings makes them an irresistible treat for guests of all ages.
Whether you’re hosting a spooky soirée or simply looking for a fun appetizer to serve, these hummus cups are sure to impress. Ideal for a serving size of 4-6 people, this recipe is both simple and quick to prepare. With a few easy-to-find ingredients and a touch of creativity, you can transform ordinary ingredients into a show-stopping party snack.
The hummus provides a creamy base, while the toppings add color and texture, creating a visually appealing and delicious addition to your Halloween festivities.
Ingredients:
- 2 cups of hummus
- 12 mini bell peppers (preferably orange or yellow)
- 12 cherry tomatoes
- 1 cucumber
- 1/4 cup black olives
- Fresh parsley or cilantro for garnish
- 12 small cupcake liners or small serving cups
Instructions:
- Prepare the Vegetables: Start by washing all the vegetables thoroughly. Slice the tops off the mini bell peppers and remove any seeds. Cut the cherry tomatoes in half. Peel the cucumber and cut it into thin slices.
- Assemble the Cups: Place the cupcake liners or small serving cups on a tray. Spoon approximately 2 tablespoons of hummus into each cup, making sure the hummus fills the bottom.
- Create the Pumpkin Patch Look: Stick one mini bell pepper into each hummus cup, with the open end facing up. Place a cherry tomato half next to each bell pepper to represent a pumpkin. Arrange a few cucumber slices around the bell pepper and tomato to mimic leaves.
- Add Finishing Touches: Slice the black olives into rings and place a ring on top of each cherry tomato for added detail. Garnish each cup with a small sprig of parsley or cilantro to enhance the ‘patch’ effect.
- Serve: Arrange the completed Pumpkin Patch Hummus Cups on a platter or serving tray. They’re now ready to impress your guests!
Extra Tips:
To save time, you can prepare the hummus cups a few hours in advance and store them in the refrigerator until your guests arrive. For added flavor, consider using flavored hummus, such as roasted red pepper or garlic hummus.
If you want to add more color to your pumpkin patch, you can use a variety of bell pepper colors. Additionally, if you’re catering to a larger crowd, simply double the ingredients to accommodate more servings.
These hummus cups are a versatile and customizable snack that can easily be adapted to fit your party needs.
Mummy Jalapeño Poppers
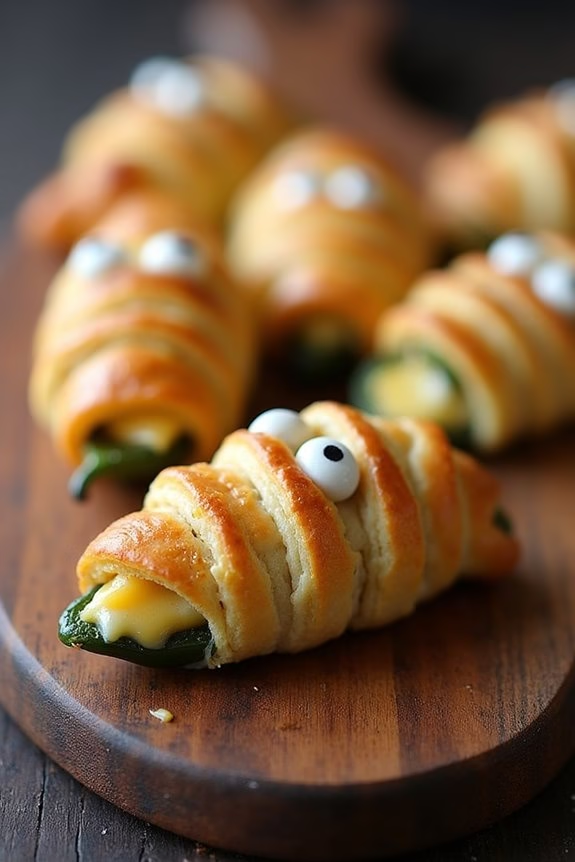
Mummy Jalapeño Poppers are a spooky and delicious appetizer perfect for any Halloween party. These cute and flavorful bites combine the heat of jalapeños with creamy cheese and crispy, golden pastry for a delightful combination that will have your guests coming back for more.
The “mummy” effect is created by wrapping the poppers in strips of crescent roll dough, giving them a festive and fun look that fits perfectly with the Halloween theme. Not only are Mummy Jalapeño Poppers visually appealing, but they’re also incredibly easy to make.
This recipe is ideal for serving a crowd, as it yields enough for 4-6 people. With just a few simple ingredients and some creative assembly, you can whip up a batch of these tasty treats in no time. Whether you’re hosting a Halloween bash or simply enjoying a themed dinner at home, these poppers are sure to impress.
Ingredients:
- 12 large jalapeño peppers
- 8 oz cream cheese, softened
- 1 cup shredded cheddar cheese
- 1/2 teaspoon garlic powder
- 1/2 teaspoon onion powder
- 1/2 teaspoon smoked paprika
- 1 package crescent roll dough
- 24 candy eyeballs
Cooking Instructions:
- Prepare the Jalapeños: Preheat your oven to 375°F (190°C). Slice the jalapeños in half lengthwise and remove the seeds and membranes to reduce the heat. Set aside.
- Make the Filling: In a mixing bowl, combine the softened cream cheese, shredded cheddar cheese, garlic powder, onion powder, and smoked paprika. Mix until well blended and smooth.
- Fill the Jalapeños: Using a small spoon or a piping bag, fill each jalapeño half with the cheese mixture, making sure it’s evenly distributed.
- Wrap the Poppers: Open the crescent roll dough and cut it into thin strips. Wrap each filled jalapeño half with the dough strips, leaving a small gap for the “eyes” to peek through. Make sure to wrap the dough in a way that resembles a mummy.
- Bake: Place the wrapped jalapeños on a baking sheet lined with parchment paper. Bake in the preheated oven for 15-20 minutes, or until the dough is golden brown and the cheese is bubbly.
- Decorate: Remove the poppers from the oven and let them cool slightly. Press two candy eyeballs into the cheese filling of each popper to give them their spooky mummy appearance.
Extra Tips:
When handling jalapeños, it’s advisable to wear gloves to prevent skin irritation from the oils. If you prefer milder poppers, make certain you remove all the seeds and membranes from the peppers.
For a more flavorful twist, consider adding some crumbled bacon to the cheese mixture. Additionally, these poppers can be prepared a day in advance; simply refrigerate them after assembling and bake them directly from the fridge when you’re ready to serve.
Enjoy your Halloween festivities with these adorable and tasty Mummy Jalapeño Poppers!
Spider Web Taco Dip
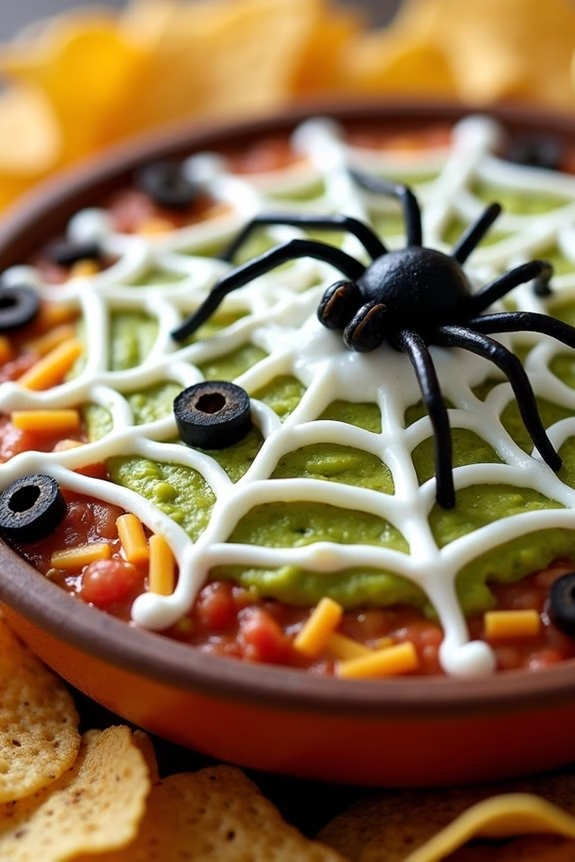
Spider Web Taco Dip is a festive and delicious dish perfect for any Halloween party. This spooky spin on a classic dip combines layers of flavorful ingredients that come together to create a delightful treat for your guests. The dip isn’t only visually appealing with its spider web design but also packs a punch of taste, making it a party favorite.
With its combination of creamy, spicy, and savory flavors, the Spider Web Taco Dip is guaranteed to be a hit. This recipe is designed to serve 4-6 people, making it an ideal appetizer for small gatherings or a great addition to a larger buffet table. The layers of beans, guacamole, cheese, and sour cream come together seamlessly to create a dish that’s as much fun to eat as it’s to make.
By layering the ingredients and adding the decorative spider web touch, you’ll have a dish that will impress every goblin and ghost at your party.
Ingredients:
- 1 can (15 oz) refried beans
- 1 packet taco seasoning
- 1 cup guacamole
- 1 cup sour cream
- 1 cup salsa
- 1 cup shredded Mexican cheese blend
- 1 can (2.25 oz) sliced black olives, drained
- Tortilla chips, for serving
Instructions:
- Prepare the Bean Layer: In a medium-sized mixing bowl, combine the refried beans with the taco seasoning. Mix well until the seasoning is fully incorporated into the beans. This will add a flavorful base to your dip.
- Layer the Dip: In a shallow serving dish, spread the seasoned refried beans evenly across the bottom. Next, gently spread the guacamole over the bean layer. Then, layer the salsa evenly over the guacamole. Finally, sprinkle the shredded Mexican cheese blend over the top of the salsa layer.
- Create the Spider Web: Fill a small plastic sandwich bag with sour cream. Snip a small corner off the bag to create a piping bag. Carefully pipe a spiral pattern, starting from the center of the dish and working outward. Using a toothpick or a knife, drag lines from the center of the spiral to the edges to create a web-like effect.
- Add Decorative Touches: Scatter the sliced black olives over the top of the dip to add contrast and a bit of texture. This step is optional, but it enhances the visual appeal of your dish.
- Serve: Place the dish in the refrigerator for about 30 minutes to allow the flavors to meld together. Serve the Spider Web Taco Dip with tortilla chips and enjoy the spooky treat with your guests.
Extra Tips:
For best results, use fresh guacamole and salsa to enhance the flavors of your dip. If you’re short on time, pre-made versions work well too.
When piping the sour cream, confirm the hole in the bag is small to maintain control and precision for your web design. If you want to add more Halloween flair, consider including plastic spider decorations around the dip, but be sure to remove them before serving.
Additionally, this dip can be made a few hours in advance and stored in the refrigerator; just cover it with plastic wrap to keep it fresh. Enjoy your spooky creation!
Bat Wings With Spicy Sauce

Get ready to spook your guests with these deliciously eerie Bat Wings with Spicy Sauce. Perfect for Halloween parties, this dish is sure to be a hit with its rich flavors and eye-catching presentation. The wings are marinated in a blend of spices, creating a dark, slightly charred appearance reminiscent of bat wings, and they’re paired with a fiery sauce that will have your guests reaching for more.
Whether you’re hosting a large gathering or a small get-together, these bat wings are an excellent addition to your Halloween menu. These wings aren’t only delicious but also easy to prepare, making them an ideal choice for party hosts who want to impress without spending hours in the kitchen.
The combination of crispy skin and tender meat, paired with a spicy dipping sauce, creates a mouthwatering experience that will leave your guests raving. Follow this recipe to create a spooky and scrumptious dish that will elevate your Halloween festivities.
Ingredients for 4-6 servings:
- 2 pounds chicken wings
- 1/4 cup soy sauce
- 1 tablespoon olive oil
- 1 tablespoon smoked paprika
- 1 teaspoon garlic powder
- 1 teaspoon onion powder
- 1/2 teaspoon black pepper
- 1/2 teaspoon salt
- 1/4 teaspoon cayenne pepper
- 1/2 cup hot sauce
- 2 tablespoons butter
- 1 tablespoon honey
- 1 tablespoon apple cider vinegar
Cooking Instructions:
- Prepare the Marinade: In a large bowl, combine the soy sauce, olive oil, smoked paprika, garlic powder, onion powder, black pepper, salt, and cayenne pepper. Mix well until all the ingredients are thoroughly combined.
- Marinate the Chicken Wings: Add the chicken wings to the bowl with the marinade. Toss the wings until they’re evenly coated with the marinade. Cover the bowl with plastic wrap and refrigerate for at least 2 hours, or overnight for best results.
- Preheat the Oven: Preheat your oven to 400°F (200°C). Line a baking sheet with aluminum foil for easy cleanup, and place a wire rack on top of the baking sheet.
- Bake the Wings: Remove the marinated wings from the refrigerator and arrange them in a single layer on the wire rack. Bake in the preheated oven for 40-45 minutes, or until the wings are crispy and cooked through, turning them halfway through the cooking time.
- Prepare the Spicy Sauce: While the wings are baking, prepare the sauce by combining the hot sauce, butter, honey, and apple cider vinegar in a small saucepan. Heat over medium-low heat, stirring occasionally, until the butter is melted and the sauce is smooth.
- Coat the Wings: Once the wings are done baking, transfer them to a large bowl. Pour the spicy sauce over the wings and toss them until they’re well coated.
- Serve: Arrange the coated wings on a serving platter and garnish with your favorite herbs or serve with a side of ranch dressing for dipping.
Extra Tips:
For an extra crispy texture, you can broil the wings for an additional 3-5 minutes after baking, keeping a close eye to prevent burning. If you’re short on time, you can use a store-bought spicy sauce, but making your own allows you to adjust the heat level to your preference.
To make these bat wings even more visually striking, consider adding a few drops of black food coloring to the marinade for a darker appearance. Enjoy these wings with some chilled drinks to balance out the spiciness.
Graveyard Chocolate Pudding Cups

Graveyard Chocolate Pudding Cups are a spooktacular addition to any Halloween party. These delightful desserts not only look the part with their eerie graveyard theme but also provide a rich and creamy chocolate flavor that will satisfy any sweet tooth. Perfect for a gathering of 4-6 people, these pudding cups are both fun to make and a hit among both kids and adults.
With a combination of creamy pudding, crumbly cookies, and decorative tombstones, they’re sure to be a memorable treat for your Halloween festivities.
The process of making Graveyard Chocolate Pudding Cups is straightforward and can be a fun activity to involve the whole family. Start by preparing a simple chocolate pudding base, which will be topped with crushed cookies to resemble dirt, and use creatively decorated cookies as tombstones.
For added fun, you can personalize each tombstone with spooky messages or names. This recipe not only looks impressive but also allows for creativity, making it an engaging project that results in a deliciously haunting dessert.
Ingredients (Serving size: 4-6 people):
- 2 cups whole milk
- 1/2 cup granulated sugar
- 1/4 cup unsweetened cocoa powder
- 3 tablespoons cornstarch
- 1/4 teaspoon salt
- 1 teaspoon vanilla extract
- 1 tablespoon unsalted butter
- 1 cup crushed chocolate sandwich cookies
- 6 rectangular cookies (e.g., Milano cookies) for tombstones
- Decorating gel or edible markers
- Gummy worms or candy pumpkins (optional)
Instructions:
- Prepare the Pudding: In a medium saucepan, combine the sugar, cocoa powder, cornstarch, and salt. Gradually whisk in the milk until the mixture is smooth. Place the saucepan over medium heat and bring the mixture to a boil, whisking constantly to prevent lumps from forming.
- Cook the Pudding: Once boiling, reduce the heat to low and continue to cook, still whisking, until the pudding thickens. This should take about 2-3 minutes. Remove the saucepan from the heat and stir in the vanilla extract and butter until fully incorporated.
- Cool the Pudding: Transfer the pudding into a large bowl and cover the surface with plastic wrap to prevent a skin from forming. Let it cool at room temperature for about 15 minutes, then refrigerate for at least 1 hour until it’s set and chilled.
- Prepare the Graveyard Toppings: While the pudding chills, crush the chocolate sandwich cookies in a sealed plastic bag using a rolling pin until they resemble dirt. Set aside.
- Decorate the Tombstones: Use decorating gel or edible markers to write spooky messages or names onto the rectangular cookies to create tombstones. Let them dry completely before using.
- Assemble the Pudding Cups: Once the pudding is set, spoon the chilled pudding into individual cups or small bowls. Sprinkle a generous layer of the crushed cookies over the top to resemble dirt.
- Add the Tombstones: Insert the decorated tombstone cookies into the pudding, allowing them to stand upright. Optionally, add gummy worms or candy pumpkins around the tombstones for extra decoration.
Extra Tips:
For a more intense chocolate flavor, consider adding a tablespoon of instant espresso powder to the pudding mix. Verify that the pudding is completely chilled before assembling the cups, as this helps maintain the structure of the graveyard scene.
If making these cups ahead of time, wait to insert the tombstones and add the cookie crumbs until just before serving to keep the cookies from becoming soggy. Encourage guests to personalize their tombstones for a fun and interactive party experience!