

I’ve hosted plenty of Halloween gatherings, and trust me, there’s nothing like a table full of spooky-themed finger foods to thrill your guests. Picture their excitement when they spot Witch’s Broomstick Snacks or Monster Eyeball Meatballs. These treats do more than just fill bellies—they ignite conversations and laughter. Want to make your party a memorable one with these eerie goodies? Let’s uncover the tasty secrets that await.
Witch’s Broomstick Snacks
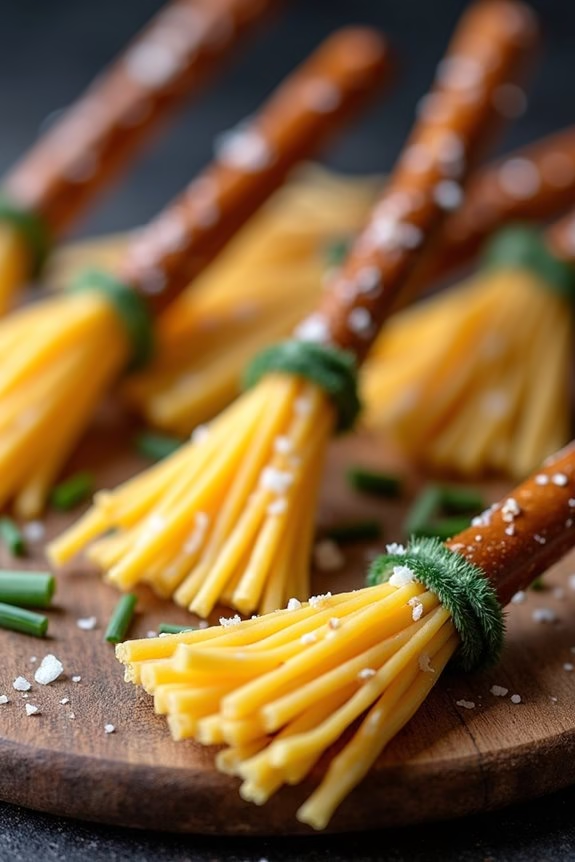
Halloween is the perfect time to get creative in the kitchen, especially when it comes to finger foods that thrill and delight guests of all ages. Witch’s Broomstick Snacks are a fun and easy way to add a touch of spooky charm to your Halloween party spread. These whimsical treats not only look great but are also deliciously savory, making them the perfect addition to any festive celebration.
The beauty of Witch’s Broomstick Snacks lies in their simplicity and visual appeal. Combining the salty taste of pretzel sticks with the creamy texture of string cheese, these snacks are easy to assemble and require no cooking. With just a few ingredients, you can whip up a batch of these broomsticks that are sure to enchant your party guests and keep them coming back for more.
Ingredients (Serving Size: 4-6 people)
- 12 pretzel sticks
- 6 string cheese sticks
- Fresh chives (about 12-15 strands)
Cooking Instructions
- Prepare the Cheese: Begin by unwrapping each string cheese stick. Cut each stick in half crosswise, so you have two shorter sticks from each original piece. This will form the base of the broom’s bristles.
- Create the Bristles: Take one of the half string cheese sticks and gently pull apart one end into thin strips, about half the length of the stick. Be careful not to pull all the way through, as the top needs to stay intact to hold the pretzel stick.
- Assemble the Broomstick: Insert one pretzel stick into the intact end of the string cheese, pushing it in just enough so it feels secure. The pretzel stick will serve as the broomstick handle.
- Tie the Broom: Take one or two strands of fresh chives and wrap them around the top of the cheese bristles, just where they meet the pretzel stick. Tie the chives into a small knot to secure them in place, trimming any excess.
- Repeat: Continue this process with the remaining string cheese, pretzel sticks, and chives until all broomsticks are assembled.
Extra Tips
For added flavor, consider using flavored string cheese such as mozzarella with herbs or jalapeño. If you don’t have fresh chives, you can substitute with thin strips of green onion or even decorative ribbon (just remind guests to remove it before eating).
To make the snacks even more festive, you could serve them on a platter decorated with Halloween-themed items, or pair them with a dipping sauce like marinara or ranch for extra taste.
Monster Eyeball Meatballs
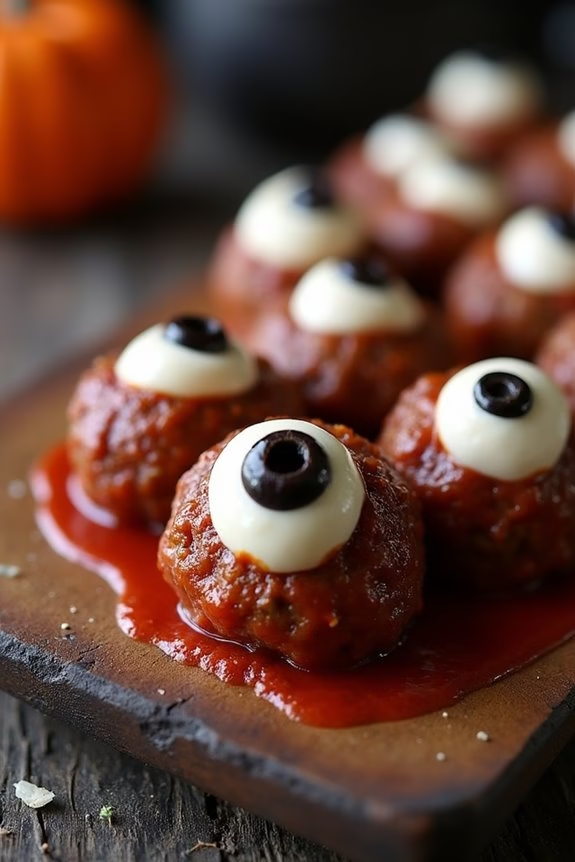
Get ready to spook and delight your guests with Monster Eyeball Meatballs, a ghoulishly delicious addition to your Halloween spread. These meatballs aren’t only easy to make but are also visually striking, with each one resembling a creepy eyeball staring right at you! Perfect for a party of 4-6 people, they can be served as a standalone appetizer or as part of a more extensive array of Halloween-themed finger foods.
The combination of savory meat, flavorful spices, and a touch of eerie decoration make these meatballs a must-have for your Halloween celebration. The base of this recipe is a traditional meatball, using a blend of ground beef and pork for a rich, juicy texture. The “eyeball” effect is achieved with the clever use of mozzarella balls and black olives. Not only do they add a delicious element to the dish, but they also create an eye-catching appearance that’s sure to be a conversation starter.
With just a few simple steps, you can transform regular meatballs into a spooky treat that’s sure to impress your party guests.
Ingredients (Serving Size: 4-6 people):
- 1 lb ground beef
- 1/2 lb ground pork
- 1/2 cup breadcrumbs
- 1/4 cup grated Parmesan cheese
- 2 cloves garlic, minced
- 1 egg
- 1/4 cup milk
- 1 teaspoon salt
- 1/2 teaspoon black pepper
- 1 teaspoon dried oregano
- 1 teaspoon dried basil
- 12 small mozzarella balls
- 12 black olives, sliced
- 1 cup marinara sauce
Cooking Instructions:
- Preheat the Oven: Start by preheating your oven to 375°F (190°C). This guarantees that the oven is ready for baking once the meatballs are prepared.
- Prepare the Meatball Mixture: In a large bowl, combine ground beef, ground pork, breadcrumbs, Parmesan cheese, minced garlic, egg, milk, salt, pepper, oregano, and basil. Mix everything together thoroughly with your hands until all the ingredients are evenly incorporated.
- Shape the Meatballs: Take a small portion of the mixture and roll it between your palms to form a meatball, roughly the size of a golf ball. Repeat this process until you have 12 evenly sized meatballs.
- Bake the Meatballs: Place the meatballs on a baking sheet lined with parchment paper or lightly greased with oil. Bake in the preheated oven for 20-25 minutes or until fully cooked through.
- Create the Eyeballs: Once the meatballs are cooked, remove them from the oven and allow them to cool slightly. Press a mozzarella ball into the top of each meatball, then place a slice of black olive on top of the mozzarella to create the “eyeball” effect.
- Heat the Marinara Sauce: While the meatballs cool, warm up the marinara sauce in a saucepan over medium heat until it begins to simmer.
- Serve the Monster Eyeball Meatballs: Arrange the meatballs on a platter and serve them with the warm marinara sauce on the side for dipping.
Extra Tips:
To guarantee the mozzarella balls stay in place and create a seamless “eyeball” look, use a small knife to carve a shallow indentation into the top of each meatball before pressing in the mozzarella. This helps secure the cheese and gives a more pronounced eyeball appearance.
Additionally, if you want to make the meatballs ahead of time, prepare them up to the baking stage and store them covered in the refrigerator. When ready to serve, bake and add the mozzarella and olives just before serving to keep the eyeballs fresh and appetizing.
Mummy Wrapped Hot Dogs
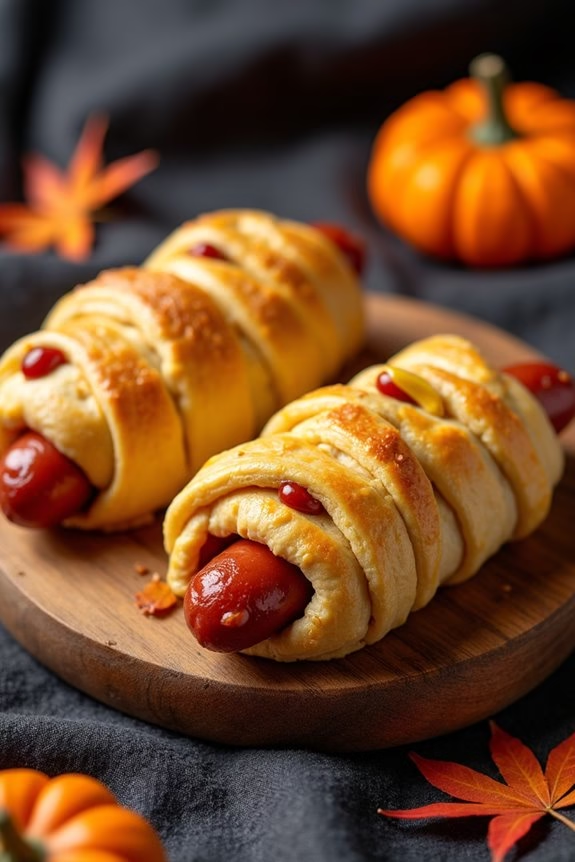
Looking to add a spooky yet delicious element to your Halloween party? Mummy Wrapped Hot Dogs are the perfect finger food that will delight both kids and adults.
These playful treats aren’t only easy to make, but they also add a touch of whimsy to your festive spread. With just a few simple ingredients, you can transform ordinary hot dogs into eerie mummy figures that are both fun to create and tasty to eat.
Perfect for serving a group of 4-6 people, these Mummy Wrapped Hot Dogs are a guaranteed hit. The process involves wrapping hot dogs with crescent roll dough to mimic the look of mummies, complete with little eyes made from mustard or ketchup.
They’re then baked to golden perfection, creating a savory snack that pairs well with a variety of dipping sauces. Serve them hot and watch them disappear as quickly as your Halloween ghosts and goblins!
Ingredients for 4-6 Servings:
- 1 can of crescent roll dough
- 8 hot dogs
- Mustard or ketchup for decorating
- 1 egg (optional, for egg wash)
- Cooking spray or parchment paper
Cooking Instructions:
- Preheat the Oven: Begin by preheating your oven to 375°F (190°C). This guarantees that your Mummy Wrapped Hot Dogs bake evenly and achieve a golden-brown finish.
- Prepare the Baking Sheet: Line a baking sheet with parchment paper or spray it lightly with cooking spray to prevent sticking.
- Roll Out the Dough: Open the can of crescent roll dough and unroll it onto a clean surface. Press the perforations to seal them and form a single sheet of dough.
- Cut the Dough: Using a sharp knife or pizza cutter, slice the dough into thin strips, approximately 1/4 inch wide. These strips will be used to wrap the hot dogs.
- Wrap the Hot Dogs: Take one hot dog and start wrapping it with the dough strips. Begin at one end and overlap the strips slightly until you reach the other end, leaving a gap for the “face.” Repeat for all hot dogs.
- Create the Mummy Face: Place the wrapped hot dogs on the prepared baking sheet. If desired, beat the egg and brush a little on the dough for a shiny finish. Use a toothpick or piping bag to dot mustard or ketchup to create eyes on the exposed part of the hot dog.
- Bake: Place the baking sheet in the preheated oven and bake for about 12-15 minutes, or until the dough is golden brown and cooked through.
- Serve: Remove from the oven and allow them to cool slightly before serving. Pair with your favorite dipping sauces for extra flavor.
Extra Tips:
When cutting the dough strips, aim for consistency in thickness to promote even cooking.
If you’re in a hurry, you can use pre-cut crescent dough sheets, which save time by eliminating the need to press seams together.
For a flavorful twist, consider adding a slice of cheese before wrapping the hot dogs, creating a gooey center when baked.
Finally, if you want to add a little more spookiness, use edible ink pens to draw faces or details on the dough after it has been baked.
Enjoy the creativity and fun that these Mummy Wrapped Hot Dogs bring to your Halloween celebration!
Vampire Bat Wings

Looking to add a spooky twist to your Halloween party menu? Vampire Bat Wings are the perfect finger food to impress your guests with their tantalizing flavor and eerie presentation. This dish is a delightful combination of tender chicken wings coated in a rich, dark sauce that mimics the appearance of bat wings, adding an exciting and thematic touch to your festivities.
Not only do these wings look the part, but they also deliver a punch of savory and slightly sweet flavors that will have your guests craving more. The key to achieving that distinct dark color is using a blend of soy sauce and balsamic vinegar, which not only imparts a deep hue but also enriches the wings with a complex, umami taste.
Paired with a hint of garlic, brown sugar, and a touch of smokiness, these Vampire Bat Wings are a simple yet effective way to bring the spirit of Halloween to your table. Whether you’re hosting a large gathering or a small get-together, this dish is sure to be a crowd pleaser.
Ingredients for 4-6 people:
- 2 pounds of chicken wings
- 1/2 cup soy sauce
- 1/4 cup balsamic vinegar
- 2 tablespoons olive oil
- 3 tablespoons brown sugar
- 4 garlic cloves, minced
- 1 teaspoon smoked paprika
- 1/2 teaspoon black pepper
- 1/2 teaspoon salt
- 1/2 teaspoon red pepper flakes (optional, for heat)
- Green onion or parsley for garnish (optional)
Cooking Instructions:
- Prepare the Marinade: In a large mixing bowl, combine the soy sauce, balsamic vinegar, olive oil, brown sugar, minced garlic, smoked paprika, black pepper, and salt. Whisk together until the sugar is dissolved, and the mixture is well-incorporated.
- Marinate the Wings: Add the chicken wings to the bowl, making certain they’re fully coated with the marinade. Cover the bowl with plastic wrap and refrigerate for at least 1 hour, or overnight for deeper flavor.
- Preheat the Oven: Preheat your oven to 400°F (200°C). Line a baking sheet with aluminum foil and place a wire rack on top. This setup allows the wings to cook evenly and prevents them from sitting in excess grease.
- Arrange the Wings: Remove the wings from the marinade, allowing any excess to drip off, and place them on the prepared wire rack. Make sure they’re evenly spaced to guarantee even cooking.
- Bake the Wings: Place the baking sheet in the preheated oven and bake the wings for 35-40 minutes, turning them halfway through the cooking time, until they’re crispy and fully cooked. The internal temperature should reach 165°F (74°C).
- Serve and Garnish: Remove the wings from the oven and let them rest for a few minutes. Transfer the Vampire Bat Wings to a serving platter and garnish with chopped green onion or parsley, if desired, for a pop of color.
Extra Tips:
For extra flavor, reserve some of the marinade before adding the raw chicken and use it to baste the wings midway through baking. This will add an extra layer of flavor and enhance their appearance.
If you prefer a smokier flavor, consider adding a splash of liquid smoke to the marinade. Additionally, don’t hesitate to adjust the amount of red pepper flakes to suit your guests’ spice preference. These Vampire Bat Wings pair wonderfully with a creamy dipping sauce, like ranch or blue cheese, to balance the bold flavors.
Ghostly Cheese Puffs
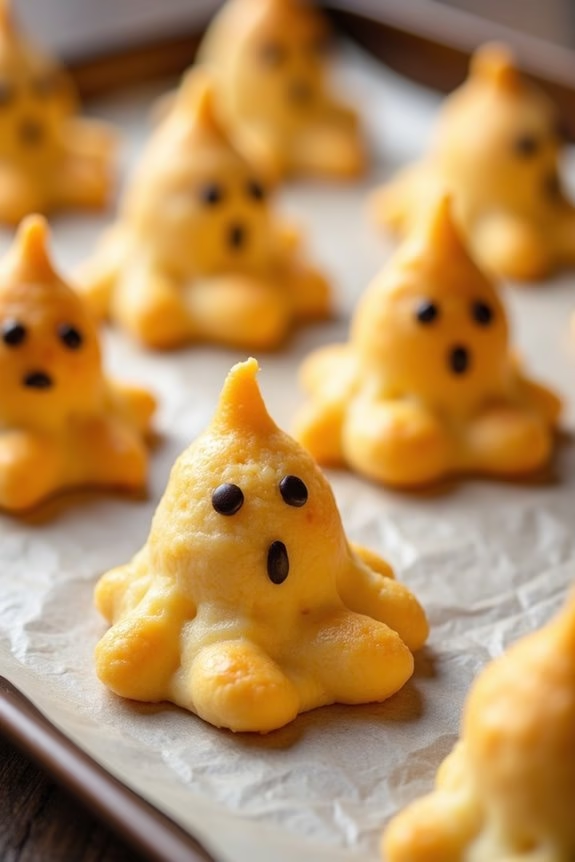
Halloween is the perfect time to get creative with your party snacks, and Ghostly Cheese Puffs are a delightful addition to any spooky gathering. These cheesy, airy delights aren’t only fun to make but also a treat to eat. Shaped like little ghosts, they add a playful touch to your Halloween spread and are sure to be a hit among both kids and adults.
With a deliciously cheesy flavor and a light, crisp texture, these cheese puffs will float right off the table! The beauty of Ghostly Cheese Puffs lies in their simplicity and the joy they bring with each bite. They can be made with staple ingredients found in most kitchens, and the process is straightforward, making them a great option for those new to baking or looking for a quick party snack.
Serve them warm or at room temperature for the best taste and texture experience. Let’s explore the ingredients and steps needed to bring these ghostly snacks to life.
Ingredients (Serving Size: 4-6 People):
- 1 cup water
- 1/2 cup unsalted butter
- 1 cup all-purpose flour
- 4 large eggs
- 1 cup shredded cheddar cheese
- 1/2 teaspoon salt
- 1/4 teaspoon cayenne pepper (optional, for a little heat)
- Black sesame seeds or edible ink pen for ghost faces
Cooking Instructions:
- Preheat the Oven: Start by preheating your oven to 400°F (200°C) to make sure it’s hot and ready for baking.
- Prepare the Dough: In a medium saucepan, combine the water, butter, and salt. Bring to a boil over medium heat. Once boiling, remove from heat and immediately stir in the flour until the mixture forms a ball.
- Incorporate the Eggs: Transfer the dough into a mixing bowl. Allow it to cool slightly. Add eggs one at a time, beating well after each addition until the dough is smooth and glossy.
- Add the Cheese: Stir in the shredded cheddar cheese and cayenne pepper, mixing until evenly incorporated into the dough.
- Shape the Puffs: Line a baking tray with parchment paper. Using a piping bag or a spoon, pipe or drop tablespoon-sized mounds of the dough onto the prepared baking sheet, leaving about 2 inches between each puff. Shape them into small ghostly forms by pulling the dough slightly upwards into a peak.
- Bake the Puffs: Place the tray in the preheated oven and bake for 20-25 minutes, or until the puffs are golden brown and puffed.
- Decorate: Once baked, let the cheese puffs cool slightly. Use black sesame seeds or an edible ink pen to draw little ghost faces on each puff.
Extra Tips:
For the best results, make sure the dough is cooled slightly before adding the eggs; this prevents the eggs from cooking in the hot dough. If you want to add a twist, consider mixing in other types of cheese, like Parmesan or Gruyere, for varied flavors.
Adjust the seasoning to your taste, especially if entertaining a crowd that enjoys a bit of spice. Finally, these cheese puffs are best enjoyed fresh out of the oven, but they can also be stored in an airtight container for up to a day. Reheat them in the oven for a few minutes to regain their delightful crispness before serving.
Spooky Spider Deviled Eggs
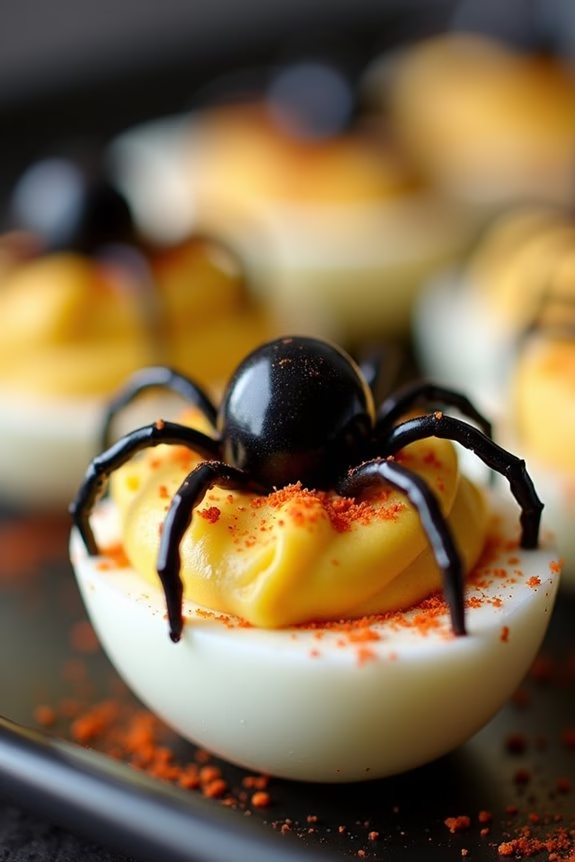
Transform your Halloween party spread into a delightfully eerie scene with these Spooky Spider Deviled Eggs. These devilishly delicious bites aren’t only a visual treat but also a flavorful addition to your finger food lineup. With a classic deviled egg base and a ghoulish garnish of black olive spiders, this dish is perfect for entertaining guests with both taste and creativity.
The contrasting colors and the creepy spider design make these deviled eggs an instant hit, capturing the essence of Halloween in every bite.
These Spooky Spider Deviled Eggs are easy to make and require minimal ingredients, making them an ideal choice for hosts looking to create something memorable without spending hours in the kitchen. The creamy, tangy filling pairs perfectly with the subtle saltiness of the olives, providing a well-balanced flavor profile that will have your guests reaching for more.
Plus, the assembly is simple enough that you can get the whole family involved, turning the preparation into a fun pre-party activity.
Ingredients for 4-6 servings:
- 6 large eggs
- 3 tablespoons mayonnaise
- 1 teaspoon Dijon mustard
- 1 teaspoon apple cider vinegar
- Salt and pepper to taste
- Paprika for garnish
- 12-15 black olives
Cooking Instructions:
- Boil the Eggs: Place the eggs in a single layer in a saucepan and cover them with water. Bring the water to a boil over medium-high heat. Once boiling, turn off the heat, cover the pan, and let the eggs sit for 12 minutes.
- Cool and Peel: After 12 minutes, transfer the eggs to a bowl of ice water to cool them quickly. Once cooled, peel the eggs carefully.
- Prepare the Filling: Slice each egg in half lengthwise and gently remove the yolks, placing them in a mixing bowl. Set the egg whites aside on a serving platter.
- Mix the Filling: Mash the yolks with a fork and add mayonnaise, Dijon mustard, apple cider vinegar, salt, and pepper. Mix until smooth and creamy.
- Fill the Egg Whites: Using a spoon or piping bag, fill each egg white half with the yolk mixture, making sure they’re generously filled.
- Create the Spiders: Cut the black olives in half. Use one half for the spider’s body. Slice the remaining halves into thin strips to form the spider’s legs.
- Assemble the Spiders: Place one olive half on top of each filled egg as the spider’s body. Arrange the olive strips around it to resemble legs.
- Final Touch: Lightly sprinkle paprika over the deviled eggs for added color and flavor.
Extra Tips:
For the best presentation, use fresh, large eggs as they’re easier to peel and provide ample space for the filling. If you find the filling too thick, add a bit more mayonnaise to achieve the desired consistency.
When creating the spiders, make certain the olive slices are thin enough to easily bend and position them firmly into the yolk mixture to keep them in place. If you’re preparing in advance, store the filled eggs covered in the refrigerator and add the olive spiders just before serving to maintain their shape and freshness.
Pumpkin Patch Cupcakes

Pumpkin Patch Cupcakes are a delightful Halloween treat that combines the sweetness of cupcakes with the fun, festive theme of a pumpkin patch. These cupcakes not only taste delicious, with their moist pumpkin-flavored cake and creamy frosting, but they also serve as a creative party decoration. Their charming appearance, topped with tiny candy pumpkins and crushed cookie “dirt,” makes them an engaging addition to any Halloween celebration.
Creating Pumpkin Patch Cupcakes is a fun activity that can involve the whole family. The process involves baking spiced pumpkin cupcakes, preparing a smooth, rich frosting, and assembling the decorations that transform the cupcakes into miniature pumpkin patches. Ideal for serving 4-6 people, these cupcakes are perfect for small gatherings or as a sweet treat for a cozy Halloween night in.
Ingredients (Serves 4-6 People)
- 1 cup all-purpose flour
- 1 teaspoon baking powder
- 1/2 teaspoon baking soda
- 1/2 teaspoon ground cinnamon
- 1/4 teaspoon ground nutmeg
- 1/4 teaspoon salt
- 1/2 cup canned pumpkin puree
- 1/2 cup granulated sugar
- 1/4 cup vegetable oil
- 1 large egg
- 1 teaspoon vanilla extract
- 1/4 cup milk
- 1 cup chocolate sandwich cookies, crushed
- 1 cup cream cheese frosting
- 12 candy pumpkins or candy corn-shaped pumpkins
Cooking Instructions
- Preheat the Oven and Prepare the Pan: Preheat your oven to 350°F (175°C). Line a 12-cup muffin pan with cupcake liners.
- Mix the Dry Ingredients: In a medium-sized bowl, whisk together the flour, baking powder, baking soda, cinnamon, nutmeg, and salt. This step guarantees that the spices and leavening agents are evenly distributed throughout the batter.
- Combine Wet Ingredients: In another bowl, mix the pumpkin puree, granulated sugar, vegetable oil, egg, and vanilla extract until well blended. The pumpkin puree adds moisture and flavor to the cupcakes.
- Combine Wet and Dry Mixtures: Gradually add the dry ingredient mixture to the wet mixture, alternating with the milk. Mix gently until just combined, being careful not to overmix to keep the cupcakes light and fluffy.
- Fill the Muffin Pan: Divide the batter evenly among the prepared cupcake liners, filling each about two-thirds full to allow room for rising.
- Bake the Cupcakes: Place the muffin pan in the preheated oven and bake for about 18-20 minutes, or until a toothpick inserted into the center of a cupcake comes out clean. Allow them to cool completely on a wire rack before frosting.
- Prepare the Toppings: While the cupcakes are cooling, crush the chocolate sandwich cookies in a food processor or by placing them in a zip-top bag and crushing them with a rolling pin. These will serve as the “dirt” for your pumpkin patch.
- Frost the Cupcakes: Once the cupcakes are completely cool, spread a layer of cream cheese frosting on top of each one.
- Decorate the Cupcakes: Sprinkle the crushed cookies over the frosting to create the appearance of dirt. Gently press a candy pumpkin into the center of each cupcake for the final touch.
Extra Tips
For an even more festive look, consider using green icing to pipe small vines or leaves around the candy pumpkins. You can also add gummy worms or other Halloween-themed candies to enhance the pumpkin patch effect.
If you prefer a stronger pumpkin flavor, consider adding a teaspoon of pumpkin pie spice to the batter. Remember, the key to perfect cupcakes isn’t to overmix the batter, as this can result in dense cupcakes. Enjoy the process and have fun creating your own spooky pumpkin patch!
Bloody Finger Pretzels

Bloody Finger Pretzels are a spooky and delicious addition to any Halloween party. These creepy treats aren’t only fun to make but also a hit among guests, both young and old. With their eerie appearance resembling severed fingers dripping in blood, they fit perfectly into the Halloween theme and are surprisingly easy to prepare. The combination of salty pretzel dough and sweet, sticky “blood” makes for an irresistible snack that will have everyone reaching for more.
This recipe yields enough Bloody Finger Pretzels to serve 4-6 people, making it ideal for small gatherings or as part of a larger spread of Halloween-themed foods. The key to these frightful fingers is in the details: shaping the pretzel dough just right and adding the perfect amount of “blood” to give them their gory look. With a little creativity and the right ingredients, you can whip up a batch of these spooky snacks in no time.
Ingredients:
- 1 can (13.8 oz) refrigerated pizza dough
- 1/4 cup baking soda
- 1 egg, beaten
- Coarse salt
- 12 whole almonds
- Red gel food coloring
- 1/4 cup raspberry or strawberry jam
Instructions:
- Preheat the Oven: Preheat your oven to 400°F (200°C). Line a baking sheet with parchment paper for easy cleanup.
- Prepare the Dough: Unroll the pizza dough onto a lightly floured surface. Cut the dough into 12 long strips, approximately 1/2 inch wide. These will form the “fingers.”
- Shape the Fingers: Roll each strip into a finger shape by gently stretching and rolling the dough. Pinch one end of each strip to create a tapered fingertip.
- Add Knuckle Details: Using a small knife, make shallow cuts in the dough to mimic knuckles and wrinkles on each finger.
- Prepare the Baking Soda Bath: In a large pot, bring 4 cups of water and the baking soda to a boil. Carefully drop each dough finger into the boiling water for about 30 seconds, then remove with a slotted spoon and place on the prepared baking sheet.
- Add Almond Fingernails: Press an almond into the tapered end of each pretzel finger to resemble a fingernail. Brush each finger with the beaten egg to give them a golden color as they bake.
- Bake the Pretzels: Sprinkle each finger with coarse salt and bake in the preheated oven for 12-15 minutes, or until they’re golden brown.
- Add the Bloody Effect: While the pretzels are baking, mix the raspberry or strawberry jam with a few drops of red gel food coloring to achieve a blood-like appearance. Once the pretzels are done and slightly cooled, use a small brush or spoon to apply the jam around the base of each almond and along the knuckles to create a bloody effect.
Extra Tips:
For the most realistic effect, try varying the shapes and sizes of each finger slightly to mimic the natural differences in real fingers. If you want to make them even more grotesque, consider adding a few drops of green or brown food coloring to some of the dough fingers before baking to create a bruised appearance.
Additionally, confirm the dough isn’t too sticky when shaping; add a little flour if necessary to prevent sticking. Finally, if you don’t have almonds, pumpkin seeds can serve as a suitable alternative for the fingernails.
Frankenstein’s Monster Guacamole
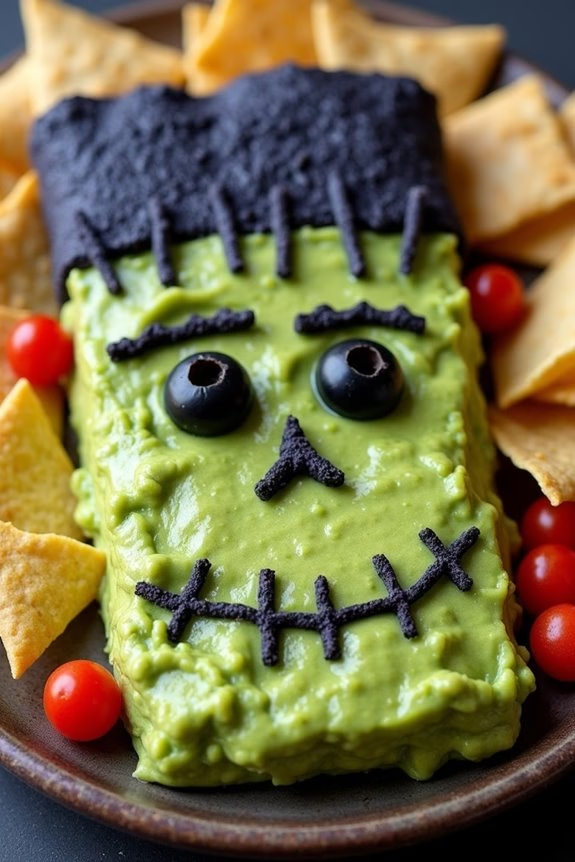
Frankenstein’s Monster Guacamole is a spooky and delicious addition to any Halloween party. This creative twist on traditional guacamole transforms the classic dip into a fun and festive centerpiece. With its vibrant green hue and clever use of decorations, this dish is certain to be a hit with both kids and adults alike.
The creamy, savory flavors of the guacamole paired with the crunchy toppings make it an irresistible treat that’s as fun to look at as it’s to eat. This recipe is designed to serve 4-6 people, making it a perfect addition to your Halloween spread. The guacamole is shaped and decorated to resemble Frankenstein’s monster, complete with a scarred face and bolts on the sides.
It’s a simple yet effective way to add a touch of ghoulish flair to your party table. Gather your ingredients and follow these instructions to create your own monstrous masterpiece.
Ingredients:
- 4 ripe avocados
- 1 lime, juiced
- 1 small red onion, finely chopped
- 1 small tomato, diced
- 1-2 cloves of garlic, minced
- 2 tablespoons fresh cilantro, chopped
- Salt and pepper, to taste
- Blue corn tortilla chips or black olives (for hair)
- Sliced black olives (for eyes)
- Cherry tomatoes or red bell pepper (for bolts)
- Sour cream or Greek yogurt (for scars)
- Tortilla chips, for serving
Instructions:
- Prepare the Avocados: Begin by cutting the avocados in half, removing the pit, and scooping the flesh into a large mixing bowl. Use a fork or potato masher to mash the avocados to your desired consistency.
- Combine Ingredients: Add the lime juice, finely chopped red onion, diced tomato, minced garlic, and chopped cilantro to the mashed avocados. Mix everything together until well combined. Season with salt and pepper to taste.
- Shape the Guacamole: Spread the guacamole onto a serving platter, shaping it into a rectangular or square shape to resemble a face.
- Decorate the Face: Use blue corn tortilla chips or arrange black olives along the top edge of the guacamole for hair. Place two sliced black olives on the guacamole to create eyes. For bolts, position cherry tomatoes or slices of red bell pepper on either side of the guacamole face.
- Add Scars: Use a small piping bag or a plastic bag with a small hole cut in the corner to pipe thin lines of sour cream or Greek yogurt onto the guacamole to create scars.
- Serve and Enjoy: Pair the Frankenstein’s Monster Guacamole with tortilla chips for dipping. Arrange the chips around the platter and serve immediately.
Extra Tips: To keep your guacamole fresh and prevent it from browning, make sure it’s covered with plastic wrap directly on the surface until ready to serve. For added flavor, you can include a pinch of cumin or red pepper flakes in the guacamole.
If you’re preparing the dish in advance, wait to add the decorative elements until just before serving to keep them crisp and vibrant.
Creepy Crawly Chocolate Spiders
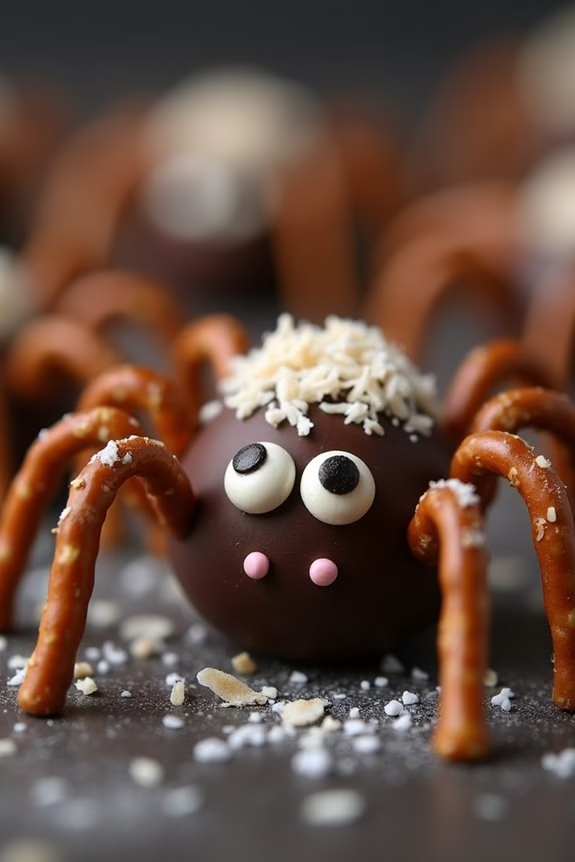
Halloween is the perfect time to let your culinary creativity run wild, and Creepy Crawly Chocolate Spiders are a fantastically fun treat to serve at your next spooky gathering.
These delightful finger foods aren’t only easy to make, but they’re also certain to wow your guests with their whimsical and eerie design. Made with a rich chocolate base and adorned with candy eyes, these spiders are as delicious as they’re creepy, providing a perfect balance of sweetness and spookiness for your Halloween party.
Transforming simple ingredients into an adorable yet spine-chilling snack, Creepy Crawly Chocolate Spiders are a treat both kids and adults will enjoy. This recipe serves 4-6 people, making it ideal for small gatherings or as part of a larger spread of Halloween-themed treats.
Ready in a matter of minutes, these chocolate spiders are sure to become a favorite at your Halloween festivities, leaving your guests both impressed and satisfied.
Ingredients:
- 1 cup semi-sweet chocolate chips
- 1 tablespoon coconut oil
- 12 large pretzel sticks
- 24 mini pretzel sticks
- 24 candy eyes
- 1/2 cup mini chocolate chips
- 1/4 cup shredded coconut (optional)
Cooking Instructions:
- Melt the Chocolate: In a microwave-safe bowl, combine the semi-sweet chocolate chips and coconut oil. Microwave in 30-second intervals, stirring in between, until the chocolate is completely melted and smooth.
- Prepare the Legs: Break each large pretzel stick into quarters, creating 48 smaller pieces. These will be the spider’s legs. If you prefer longer legs, you can use mini pretzel sticks as they are.
- Form the Spider Bodies: Line a baking sheet with parchment paper. Use a spoon to drop a heaping tablespoon of melted chocolate onto the parchment, creating a round shape. Repeat until you have 12 chocolate rounds.
- Attach the Legs: While the chocolate is still warm, arrange four pretzel legs on each side of the chocolate rounds, pressing gently so they stick. Confirm the legs are evenly spaced around the chocolate body.
- Add Eyes and Texture: Place two candy eyes on each chocolate spider body. If desired, sprinkle shredded coconut over the spiders for a hairy texture. Press mini chocolate chips into the body for added texture and flavor.
- Chill: Place the baking sheet in the refrigerator for about 15-20 minutes, or until the chocolate has hardened completely.
- Serve and Enjoy: Once set, carefully remove the chocolate spiders from the parchment paper. Serve them on a platter and watch them disappear at your Halloween party!
Extra Tips:
For an extra spooky effect, consider using dark chocolate instead of semi-sweet chocolate for a richer taste.
If you want to add a touch of color, you could drizzle colored candy melts over the top of the spiders before they set.
To make the eyes stand out even more, place a tiny dot of melted chocolate on the candy eyes before adhering them to the spider bodies.
Finally, if you’re serving these at an outdoor event, keep them in the shade or in a cooler to prevent the chocolate from melting.