
As Halloween approaches, I can’t help but get excited about crafting spooky yet adorable treats for the little ones. Their faces light up at the sight of Monster Eyeball Meatballs, and they giggle at Ghostly Cheese Sticks. It’s all about bringing festive joy and tantalizing flavors to the table. Join me on this delightful adventure, where each bite promises a playful surprise and a touch of magic. These recipes are sure to make your Halloween celebration extra memorable.
Monster Eyeball Meatballs
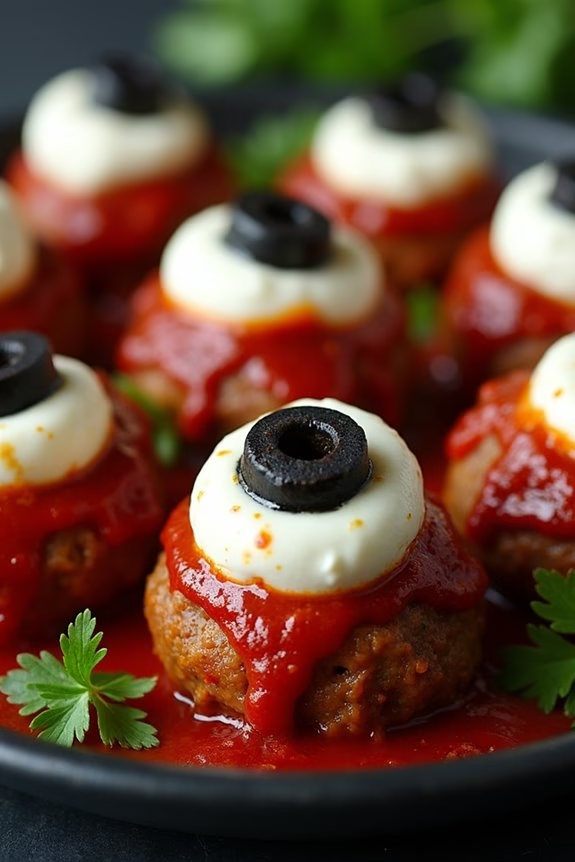
Monster Eyeball Meatballs are a spooktacular addition to any Halloween party spread, especially for kids who love a good fright with their food. These creepy yet delicious meatballs are designed to look like eerie eyeballs, complete with edible pupils and spooky irises. Not only do they make for an entertaining snack, but they also pack a flavorful punch that kids will love.
Whether you’re hosting a Halloween bash or simply looking to add a touch of the haunted to your dinner table, these Monster Eyeball Meatballs are certain to be a hit. Perfect for a serving size of 4-6 people, this recipe combines simple ingredients and a bit of creativity to create a dish that’s both fun and easy to make.
The meatballs are crafted from a blend of ground meat and spices, then decorated with mozzarella and olives to achieve their monstrous appearance. The result is a deliciously spooky treat that will thrill kids and adults alike. So, gather your ingredients, roll up your sleeves, and prepare to bring these monstrous delights to life.
Ingredients (serving size: 4-6 people):
- 1 pound ground beef or turkey
- 1/2 cup breadcrumbs
- 1/4 cup grated Parmesan cheese
- 1 large egg
- 2 cloves garlic, minced
- 1 teaspoon salt
- 1/2 teaspoon black pepper
- 1 teaspoon dried Italian herbs
- 1 cup marinara sauce
- 12 small mozzarella balls
- 12 black olives, pitted and sliced
- Fresh parsley for garnish (optional)
Cooking Instructions:
- Preheat the Oven: Start by preheating your oven to 375°F (190°C). This will guarantee that it’s at the right temperature when you’re ready to bake your meatballs.
- Prepare the Meat Mixture: In a large bowl, combine the ground beef or turkey, breadcrumbs, Parmesan cheese, egg, minced garlic, salt, pepper, and Italian herbs. Mix everything thoroughly until all the ingredients are well incorporated.
- Form the Meatballs: Roll the mixture into 12 evenly-sized meatballs. Place them on a baking sheet lined with parchment paper, ensuring they’re spaced out to cook evenly.
- Bake the Meatballs: Place the baking sheet in the preheated oven and bake for 20-25 minutes or until the meatballs are cooked through and golden brown.
- Add Marinara Sauce: While the meatballs are baking, warm the marinara sauce in a saucepan over low heat. Once the meatballs are done, transfer them to the saucepan and coat them with the marinara sauce.
- Create the Eyeballs: Place a mozzarella ball on top of each meatball, pressing gently so they stick. Then, add a slice of black olive to the center of each mozzarella ball to create the pupil.
- Serve and Garnish: Arrange the Monster Eyeball Meatballs on a serving platter. Garnish with fresh parsley if desired and serve warm.
Extra Tips:
For an extra spooky effect, you can use green or red olives instead of black to vary the color of the pupils. Additionally, if you’re looking to make these meatballs gluten-free, substitute the breadcrumbs with almond flour or gluten-free breadcrumbs.
To guarantee the mozzarella balls don’t slide off, you can secure them with toothpicks, which can be removed before serving. Enjoy your creepy creation and watch your little monsters devour these delicious eyeballs with glee!
Ghostly Cheese Sticks

Halloween is a time for spooky fun and creativity, and what better way to delight your little ghouls and goblins than with some Ghostly Cheese Sticks? These adorable and tasty snacks are perfect for Halloween parties or as a fun treat for your kids to enjoy.
Made with simple ingredients, Ghostly Cheese Sticks aren’t only easy to prepare but also a healthier option compared to other Halloween treats. These whimsical snacks will be a hit with children and adults alike, adding a hauntingly delicious element to your festivities.
The secret to Ghostly Cheese Sticks is in the presentation. By transforming ordinary cheese sticks into ghostly figures with just a few simple additions, you create a kid-friendly snack that’s both fun to make and eat. The process involves minimal cooking, making it an excellent activity for kids to participate in.
Plus, these ghostly snacks can be prepared in advance, saving you time on the day of your Halloween celebration. With just a few ingredients and some creativity, you can serve up a batch of these spooky snacks to a small group of 4-6 people.
Ingredients:
- 6 mozzarella string cheese sticks
- 12 black olive slices
- 1 tablespoon cream cheese (optional, for sticking)
- 6 pretzel sticks
- 1 tablespoon of olive oil (optional, for sheen)
Instructions:
- Prepare the Cheese Sticks: Begin by unwrapping each mozzarella string cheese stick. These will form the body of your ghostly cheese sticks.
- Create the Ghost Faces: Use a small piece of cream cheese as “glue” to attach two black olive slices onto each cheese stick to form eyes. If you’re not using cream cheese, gently press the olive slices into the cheese to make them stick.
- Add the Mouths: Cut small pieces of black olive to create mouths and attach them below the eyes. Again, use cream cheese if needed to help them adhere.
- Make the Ghostly Base: Insert a pretzel stick into the bottom of each cheese stick. This will serve as a handle, making it easy for kids to hold and eat their ghostly cheese stick.
- Optional Finishing Touches: If you want to add a bit of sheen to your ghosts, lightly brush the cheese sticks with olive oil. This step is optional but gives the cheese a nice, polished look.
Extra Tips:
For an added touch of fun, you can use edible markers to draw different expressions on each ghost’s face, giving each one its own personality.
To save time on the day of your event, prepare the cheese sticks up to a day in advance and store them in an airtight container in the refrigerator.
Get creative with the eyes and mouths; you can use other edible items like capers or small cut vegetables if preferred. Remember, the goal is to have fun while creating these ghostly treats, so let your imagination run wild!
Witch’s Broomstick Pretzels
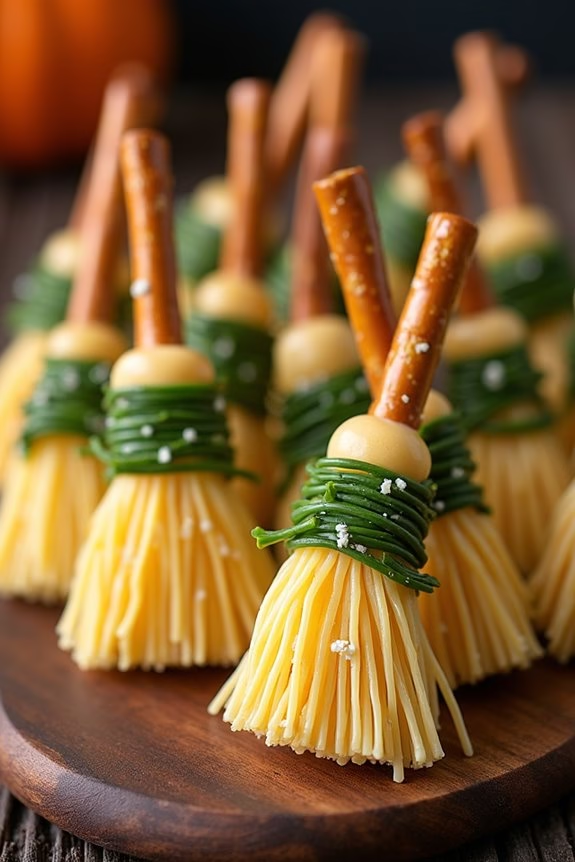
Witch’s Broomstick Pretzels are a fun and spooky addition to any Halloween party, especially for kids. These tasty treats combine the savory crunch of pretzels with the mild creaminess of string cheese, creating a delightful snack that’s both visually appealing and delicious. Perfectly designed to resemble a witch’s broomstick, these snacks aren’t only easy to make but also a great way to get children involved in the kitchen, sparking their creativity and enthusiasm during the holiday season.
The process of making Witch’s Broomstick Pretzels is straightforward and requires minimal ingredients, making it an ideal choice for a quick and festive treat. These broomsticks can be prepared in advance, allowing you to focus on other party preparations. With just a few simple steps, you can create a whimsical snack that’s bound to be a hit with kids and adults alike. Serve them as part of a Halloween buffet or as a playful appetizer to get everyone in the spooky spirit.
Ingredients (for 4-6 people):
- 12 pretzel sticks
- 4 pieces of string cheese
- Fresh chives or thin strips of green onions (about 12)
Cooking Instructions:
- Prepare the Cheese: Begin by unwrapping the string cheese. Cut each piece into three equal parts. Each part will form the bristles of your broomstick.
- Create the Broom Bristles: Take each piece of string cheese and carefully fray one end by pulling apart the strands. This will create the appearance of broom bristles.
- Assemble the Broomstick: Insert one pretzel stick into the un-frayed end of each piece of string cheese. Push it in gently to guarantee it stays in place.
- Secure with Chives: Take a piece of chive or green onion strip and wrap it around the top of the cheese where it meets the pretzel stick. Tie it snugly to hold everything together, and trim any excess.
- Repeat the Process: Continue the process for all the pretzel sticks and cheese pieces until you have your desired number of broomsticks.
- Serve Immediately: Arrange the broomsticks on a platter and serve them fresh. They’re best enjoyed on the same day to guarantee the pretzels remain crisp.
Extra Tips:
For an added touch, you can serve these Witch’s Broomstick Pretzels with a side of marinara or ranch dressing for dipping. If you can’t find fresh chives or green onions, use thin strips of bell peppers as an alternative.
To prevent the cheese from drying out, cover the broomsticks with a damp paper towel if you’re preparing them ahead of time. Encourage the kids to help with the assembly process, as the simplicity of the steps makes it a perfect activity for little hands.
Mummy Hot Dogs
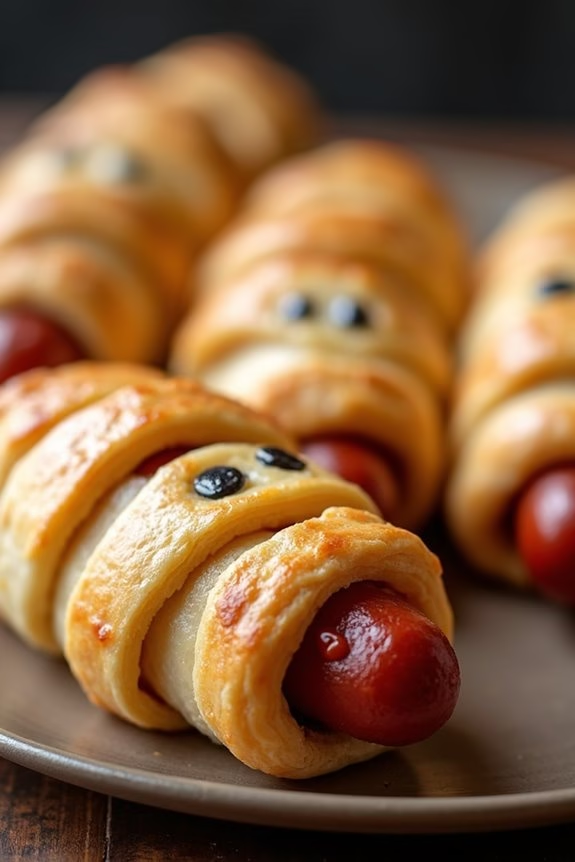
Mummy Hot Dogs are a fun and spooky addition to any Halloween party, especially for kids. These delightful treats aren’t only easy to make but also a hit with the little ones. The concept is simple: hot dogs wrapped in dough to resemble little mummies. This dish is perfect for busy parents looking for a quick and festive Halloween snack. The best part? You can get the kids involved in the preparation, making it a fun family activity.
The combination of the warm, savory hot dogs with the flaky, golden-brown dough is irresistible. Plus, the presentation of these Mummy Hot Dogs will surely impress both children and adults alike. Serve them with a side of ketchup or mustard for dipping, and you have a deliciously spooky treat that’s sure to be a highlight of your Halloween festivities. This recipe serves 4-6 people, making it ideal for small gatherings or playdates.
Ingredients
- 1 can (8 ounces) refrigerated crescent roll dough
- 8 hot dogs
- 2 tablespoons of mustard or ketchup for decorating
- Cooking spray or parchment paper
Cooking Instructions
- Preheat the Oven: Start by preheating your oven to 375°F (190°C) to guarantee it’s ready for baking the mummies.
- Prepare the Dough: Open the can of crescent roll dough and unroll it onto a clean surface. Separate the dough into triangles and then cut each triangle into thin strips.
- Wrap the Hot Dogs: Take a hot dog and begin wrapping it with the dough strips, leaving a small gap at one end to resemble a mummy’s face. Continue wrapping until each hot dog is fully covered, with some gaps to mimic mummy bandages.
- Arrange on Baking Sheet: Place the wrapped hot dogs on a baking sheet lined with parchment paper or lightly sprayed with cooking spray.
- Bake: Place the baking sheet in the preheated oven and bake for 12-15 minutes, or until the dough is golden brown.
- Decorate: Once baked, remove the hot dogs from the oven. Use a toothpick to dab small dots of mustard or ketchup on the exposed part of the hot dog to create eyes for the mummy.
Extra Tips
For a more flavorful twist, consider adding cheese slices beneath the dough before wrapping the hot dogs. You can also use mini sausages for smaller-sized mummies, making them perfect bite-sized snacks.
If desired, try using whole wheat dough for a slightly healthier version. Remember to let the kids help with wrapping the hot dogs; it’s a fun and engaging way for them to participate in the Halloween preparations.
Spider Web Nachos

Spider Web Nachos are a fun and spooky addition to any Halloween celebration, especially for kids. This dish combines the classic, beloved snack of nachos with a creative twist that makes them look like a spider web. Perfect for parties or a festive family snack, these nachos aren’t only visually appealing but also deliciously satisfying. The recipe is simple enough to involve the kids in the preparation, making it a fun family activity that results in a tasty treat.
The base of the Spider Web Nachos is a bed of crispy tortilla chips, topped with a savory blend of seasoned beef, melted cheese, and refried beans. The signature spider web effect is created using sour cream, which is piped over the top in a web-like pattern. This dish can be customized with additional toppings such as guacamole, jalapeños, or olives, depending on your family’s preferences. The perfect balance of flavors and textures, these nachos are bound to be a hit at any gathering.
Ingredients for 4-6 servings:
- 1 bag of tortilla chips
- 1 pound ground beef
- 1 packet taco seasoning
- 1 cup refried beans
- 2 cups shredded cheddar cheese
- 1 cup sour cream
- 1/2 cup sliced black olives (optional)
- 1/2 cup sliced jalapeños (optional)
- 1/2 cup guacamole (optional)
- 1/4 cup chopped cilantro (optional)
Cooking Instructions:
- Preheat Oven: Begin by preheating your oven to 350°F (175°C). This will guarantee that the nachos bake evenly and that the cheese melts perfectly.
- Cook the Beef: In a skillet over medium-high heat, cook the ground beef until it’s browned and fully cooked, breaking it apart with a spatula. Drain any excess fat, then stir in the taco seasoning according to the package instructions for a flavorful meat topping.
- Prepare the Nachos: On a large, oven-safe platter or baking sheet, spread out the tortilla chips in an even layer. Spoon the refried beans over the chips, followed by the seasoned beef. Sprinkle the shredded cheddar cheese evenly over the top.
- Bake the Nachos: Place the platter in the preheated oven and bake for 10-15 minutes, or until the cheese is fully melted and bubbly.
- Create the Spider Web: While the nachos are baking, prepare the sour cream by placing it into a squeeze bottle or a resealable plastic bag with a small corner snipped off. Once the nachos are out of the oven, carefully pipe the sour cream over the top in a web-like pattern.
- Add Optional Toppings: If using, scatter the sliced black olives, jalapeños, guacamole, and chopped cilantro over the top, adding extra flavor and visual appeal.
Extra Tips:
For a more intense flavor, consider using a blend of cheeses such as Monterey Jack or Pepper Jack in addition to cheddar. If you want to add a bit of heat, incorporate some hot sauce into the ground beef or choose a spicy taco seasoning.
To guarantee the sour cream creates a neat spider web, practice your piping on a plate or piece of parchment paper beforehand. Serve the nachos immediately after baking for the best texture and taste.
Pumpkin Patch Deviled Eggs
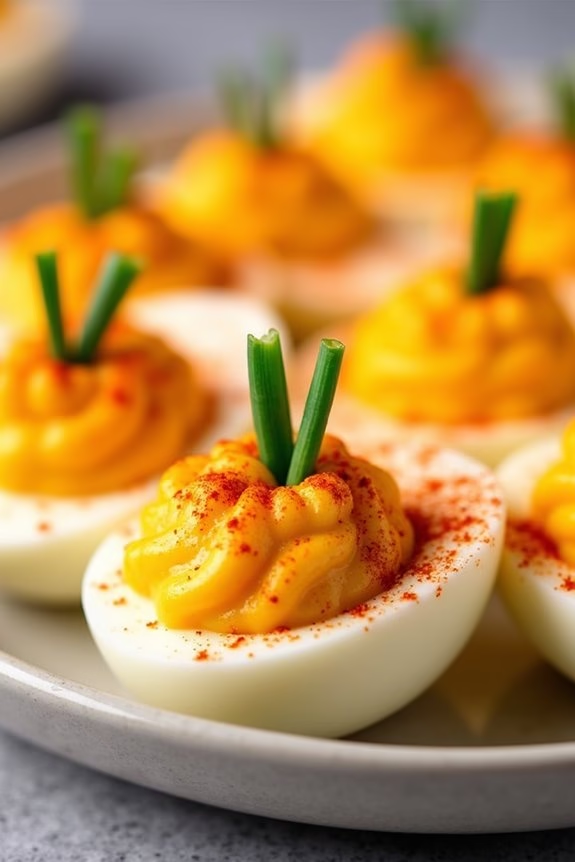
Halloween is an exciting time for kids and what better way to celebrate than with some spooky-themed finger foods? Pumpkin Patch Deviled Eggs are a delightful twist on traditional deviled eggs, perfect for a Halloween party or a festive snack.
These deviled eggs not only taste amazing but also look adorable with their pumpkin-like appearance, making them a hit with kids and adults alike. The creamy filling, seasoned just right, paired with the vibrant orange hue, creates a playful dish that’s both appetizing and visually appealing.
The key to making these Pumpkin Patch Deviled Eggs stand out is in the presentation. By using a bit of creativity, you can transform a classic appetizer into a Halloween-themed treat. The filling is dyed with a hint of orange food coloring to mimic the look of pumpkins, and a small piece of chive is used as the stem to complete the pumpkin look.
This recipe is simple enough for kids to help with, making it a fun family activity to kick off the Halloween festivities.
Ingredients (serving size: 4-6 people):
- 6 large eggs
- 3 tablespoons mayonnaise
- 1 teaspoon Dijon mustard
- 1/2 teaspoon white vinegar
- 1/4 teaspoon salt
- 1/8 teaspoon black pepper
- Orange food coloring
- Paprika, for garnish
- Fresh chives, cut into small pieces
Cooking Instructions:
- Boil the Eggs: Place the eggs in a saucepan and cover them with cold water. Bring the water to a boil over medium-high heat. Once boiling, remove from heat, cover, and let them sit for 10-12 minutes.
- Cool and Peel: Drain the hot water and immediately place the eggs in a bowl of ice water to cool for about 5 minutes. Once cool, gently peel the eggs and set them aside.
- Prepare the Filling: Slice the eggs in half lengthwise and carefully scoop out the yolks into a medium-sized bowl. Place the egg whites on a serving platter.
- Mix the Filling: Mash the yolks with a fork, then add mayonnaise, Dijon mustard, white vinegar, salt, and black pepper. Mix until smooth and creamy.
- Color the Filling: Add a few drops of orange food coloring to the yolk mixture and stir until the color is evenly distributed and resembles a pumpkin’s hue.
- Fill the Egg Whites: Spoon or pipe the yolk mixture back into the egg white halves, creating a slight mound to mimic the shape of a pumpkin.
- Garnish: Lightly dust the tops with paprika for added color and flavor. Place a small piece of chive on top of each yolk mound to resemble a pumpkin stem.
Extra Tips:
To get the perfect orange color for your pumpkin patch deviled eggs, start with just a couple of drops of food coloring and gradually add more if needed. This helps in achieving a natural pumpkin color without making it too vibrant.
If you’re making these eggs in advance, keep them refrigerated until serving. Additionally, confirm the eggs are completely cooled before peeling to prevent the whites from sticking to the shell, which can lead to a less attractive presentation.
Enjoy your spooky and delicious creation!
Franken-Kabobs
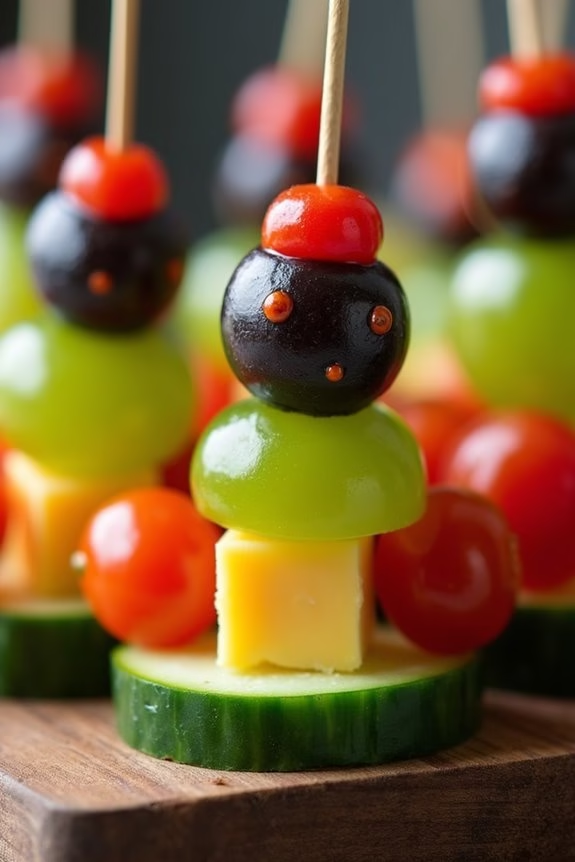
The preparation involves skewering a delightful combination of grapes, cheese, olives, and other colorful foods onto sticks, transforming them into tiny edible monsters. Not only are Franken-Kabobs easy to make, but they also provide a nutritious option amidst the candy and sugary treats typically associated with Halloween.
This dish is perfect for serving 4-6 people, making it an ideal choice for small gatherings or as a fun activity to do with your kids.
Ingredients (Serving Size: 4-6 people):
- 1 cup green grapes
- 1 cup black grapes
- 1 cup cherry tomatoes
- 1 cup cubed cheese (cheddar or mozzarella work well)
- 6-8 green olives (pitted)
- 1 cucumber
- 12 wooden skewers
- 1 black edible marker or small tube of black icing
Cooking Instructions:
- Prepare the Ingredients: Wash the fruits and vegetables thoroughly. Pat them dry with paper towels to guarantee they aren’t slippery when skewering.
- Cut and Slice: Cut the cucumber into thick slices to act as the base of the kabob. Halve the cherry tomatoes and olives. Cube the cheese if it’s not pre-cubed.
- Assemble the Kabobs: Begin by placing a cucumber slice at the bottom of each skewer. Add a grape, followed by a cheese cube, then a cherry tomato, and another grape. Repeat the pattern until the skewer is almost full. Top each skewer with a half olive to represent Frankenstein’s “head.”
- Add Details: Using a black edible marker or small tube of black icing, draw Frankenstein’s features on the olive. You can add eyes, a stitched mouth, and even a small scar for extra character.
- Finish and Serve: Once all kabobs are assembled and decorated, arrange them on a platter. They’re now ready to be served as a delightful Halloween finger food.
Extra Tips: For an added twist, consider using different colored grapes or a mix of cheeses to create a more vibrant appearance. If serving to very young children, you may want to cut the skewers in half to make them easier to handle.
Additionally, encourage kids to help with the assembly process; it can be a fun way to involve them in the kitchen while also teaching them about healthy eating habits.
Creepy Crawly Cupcakes
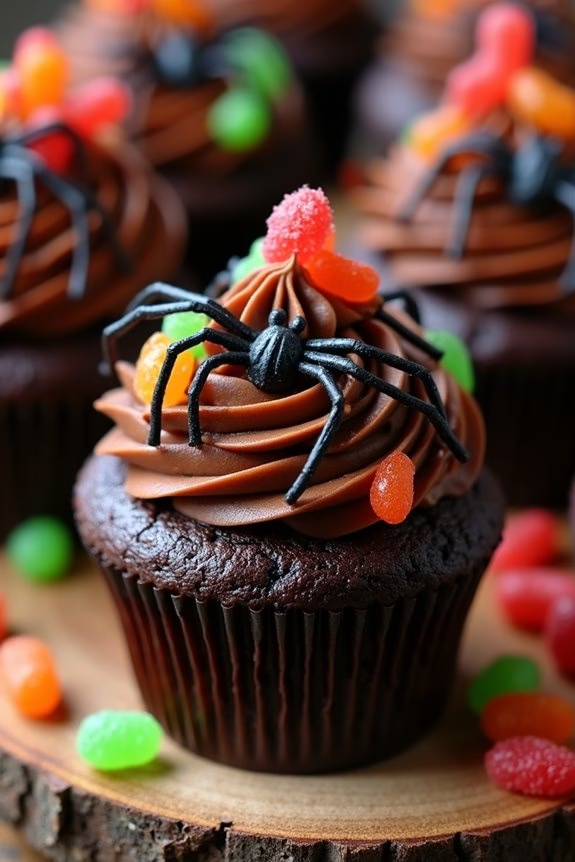
Halloween is a thrilling time for kids and what better way to add to the excitement than with some spine-tingling treats? Creepy Crawly Cupcakes are a fun and delicious way to make your Halloween celebrations memorable. These cupcakes are a blend of delightful flavors and eerie decorations that will surely be a hit with the little ones. With a rich chocolate base and spooky decorations, these cupcakes look like they’ve just crawled out of a haunted bakery.
The beauty of Creepy Crawly Cupcakes lies in their versatility. You can get as creative as you want with the decorations, using gummy worms, candy spiders, or even black licorice to create the perfect creepy effect. Designed to serve 4-6 people, this recipe is perfect for a small Halloween gathering or a spooky family night in. Gather your ingredients and let’s get baking!
Ingredients (serves 4-6):
- 1 cup all-purpose flour
- 1/2 cup unsweetened cocoa powder
- 1 teaspoon baking soda
- 1/2 teaspoon baking powder
- 1/4 teaspoon salt
- 1/2 cup unsalted butter, softened
- 1 cup granulated sugar
- 2 large eggs
- 1 teaspoon vanilla extract
- 1/2 cup buttermilk
- 1 cup chocolate frosting
- Assorted gummy worms
- Candy spiders
- Black licorice strings
Instructions:
- Preheat and Prepare: Preheat your oven to 350°F (175°C) and line a muffin tin with cupcake liners. This will guarantee that the cupcakes bake evenly and are easy to remove from the pan.
- Mix Dry Ingredients: In a medium-sized bowl, whisk together the flour, cocoa powder, baking soda, baking powder, and salt. This helps to evenly distribute the leavening agents and cocoa powder throughout the dry ingredients.
- Cream Butter and Sugar: In a large bowl, beat the softened butter and granulated sugar together until light and fluffy. This should take about 3-4 minutes. Add the eggs one at a time, beating well after each addition, then mix in the vanilla extract.
- Combine Wet and Dry Ingredients: Gradually add the dry ingredients to the butter mixture, alternating with the buttermilk, starting and ending with the flour mixture. Mix until just combined, being careful not to overmix.
- Fill and Bake: Divide the batter evenly among the prepared cupcake liners, filling each about two-thirds full. Bake in the preheated oven for 18-20 minutes, or until a toothpick inserted into the center of a cupcake comes out clean.
- Cool and Decorate: Allow the cupcakes to cool in the pan for 5 minutes, then transfer them to a wire rack to cool completely. Once cooled, spread a generous amount of chocolate frosting on each cupcake. Decorate with gummy worms, candy spiders, and pieces of black licorice to create a creepy crawly effect.
Extra Tips:
When decorating your Creepy Crawly Cupcakes, feel free to let your imagination run wild. You can use different types of candy to create various spooky effects.
If you have kids helping, let them choose their own decorations to personalize their cupcakes. For an extra eerie touch, sprinkle some crumbled chocolate cookies on top of the frosting to resemble dirt.
These cupcakes are best enjoyed fresh, but they can be stored in an airtight container for up to two days.
Bat Wing Chips and Salsa
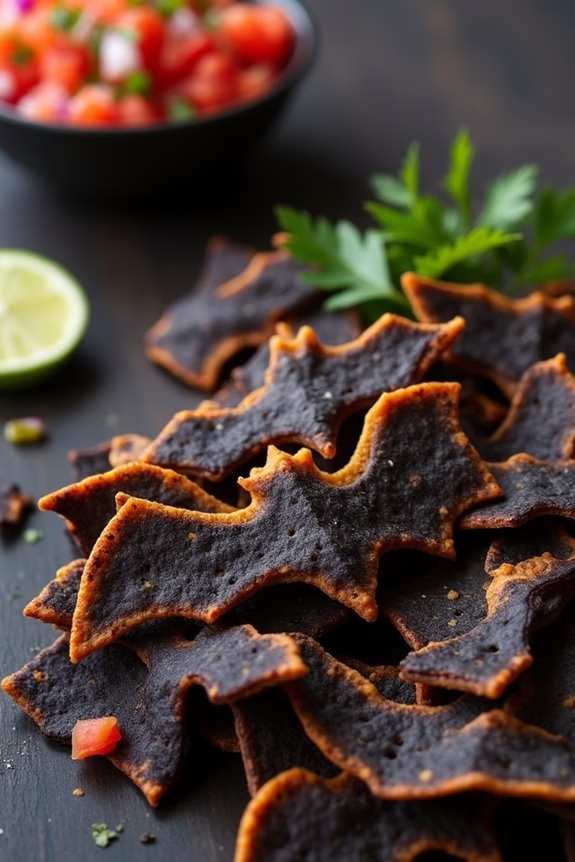
Halloween is a time for spooky fun and delicious treats, and what better way to celebrate than with Bat Wing Chips and Salsa? This eerie take on a classic dish is perfect for kids and adults alike, combining the crunch of homemade chips with the vibrant flavors of a fresh, tangy salsa.
The chips are cleverly designed to resemble bat wings, adding a playful and thematic touch to your Halloween spread. This recipe isn’t only a hit with kids due to its fun presentation, but also appreciated by adults for its fresh ingredients and flavors.
The tortilla chips are baked to perfection, ensuring they’re crispy and delicious, while the salsa features a delightful blend of tomatoes, onions, cilantro, and lime. Together, they make a ghoulishly good snack that’s sure to disappear quickly at any Halloween gathering.
Ingredients (serving size: 4-6 people):
- 8 large flour tortillas
- 2 tablespoons olive oil
- 1 teaspoon black food coloring
- 2 teaspoons salt
- 4 ripe tomatoes, diced
- 1 small red onion, finely chopped
- 1 cup fresh cilantro, chopped
- 1-2 jalapeño peppers, seeded and minced (optional for heat)
- Juice of 2 limes
- Salt and pepper to taste
Instructions:
- Prepare the Bat Wing Chips: Preheat your oven to 350°F (175°C). Using a bat-shaped cookie cutter, cut out bat shapes from the flour tortillas. If you don’t have a cutter, you can use a knife to cut out wing-like shapes.
- Color and Season: Mix the olive oil with black food coloring in a small bowl. Use a pastry brush to lightly coat each tortilla piece with the colored oil mixture. Sprinkle with salt for added flavor.
- Bake the Chips: Place the coated tortilla pieces on a baking sheet lined with parchment paper, ensuring they don’t overlap. Bake in the preheated oven for 8-10 minutes or until the edges are crisp and golden.
- Make the Salsa: While the chips are baking, combine the diced tomatoes, chopped onion, cilantro, and minced jalapeños in a medium bowl. Squeeze in the lime juice and mix well. Season with salt and pepper to taste.
- Serve and Enjoy: Once the chips are done baking, allow them to cool slightly before serving. Plate them alongside a bowl of the fresh salsa, inviting your guests to plunge into this spooky snack.
Extra Tips:
For an even spookier presentation, consider adding a few drops of food-safe black coloring to the salsa to give it a murkier, Halloween-appropriate appearance.
Additionally, if you’re short on time, you can use store-bought tortilla chips and enhance them with the colored oil for a quick and easy version. Finally, feel free to adjust the level of jalapeño in the salsa to suit your guests’ spice preferences, making it mild or fiery as desired.
Vampire Fang Apples
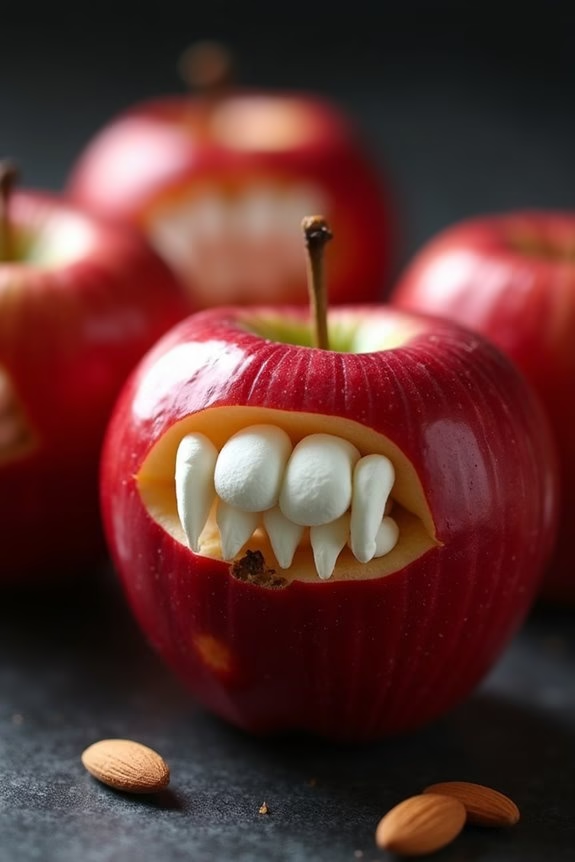
Vampire Fang Apples are a delightful and spooky treat perfect for Halloween parties, especially for young ones. This recipe combines the natural sweetness of apples with the playful theme of vampires, making it a fun and healthy finger food option. The dish is simple to prepare, allowing kids to even participate in the creation process, which can add an extra layer of enjoyment to your Halloween festivities.
These apple fangs not only look creative but are also packed with nutrients, making them a guilt-free snack that parents will love. The red apple skin mimics the look of gums, while the almond and marshmallow additions create a striking appearance of sharp vampire teeth. Easy to make and delicious to eat, Vampire Fang Apples are bound to be a hit at any Halloween gathering.
Ingredients (for 4-6 servings):
- 3 red apples
- 1 cup mini marshmallows
- 1 cup slivered almonds
- 1 tablespoon lemon juice
- 1 tablespoon water
Instructions:
- Prepare the Apples: Begin by washing the apples thoroughly. This step is essential to guarantee they’re clean and safe to eat. After washing, cut each apple into quarters and remove the core from each piece.
- Prevent Browning: In a small bowl, mix the lemon juice and water. Lightly brush this mixture onto the cut sides of the apple quarters. This will prevent them from turning brown and keep them looking fresh and appealing.
- Create the Mouths: Take each apple quarter and carefully carve out a small wedge from the skin side to create the appearance of a mouth. Be careful not to cut too deeply, as you want to maintain the stability of the apple slice.
- Add the Fangs: Insert slivered almonds along the top and bottom edges of the carved-out mouth to mimic sharp vampire fangs. You can adjust the number of almonds based on how many teeth you want to show.
- Complete with Marshmallows: Place mini marshmallows inside the carved-out mouth, pressing gently so they stick, and adjust as needed so they look like gums or additional teeth.
- Serve: Arrange the completed apple fangs on a platter and serve immediately. They make for a fantastic and eye-catching addition to any Halloween spread.
Extra Tips:
To keep the Vampire Fang Apples fresh and appealing, make them as close to serving time as possible. If you need to prepare them in advance, keep them refrigerated and covered with plastic wrap to maintain their freshness.
For a nut-free version, replace almonds with sunflower seeds or omit them entirely. Additionally, if you want to enhance the spooky factor, consider using a small amount of red food coloring in the lemon juice mixture to give the apples a blood-like appearance.
Boo-nana Pops

Halloween is the perfect time to get creative with snacks, and Boo-nana Pops are a delightfully spooky treat that kids will adore. These treats aren’t only fun to make but also a healthier option, blending the natural sweetness of bananas with the irresistible allure of chocolate and decorative sprinkles or mini candy eyes.
Perfect for a Halloween party or just a fun family activity, Boo-nana Pops bring a playful element to the table. Kids will love helping to craft these sweet ghosts and gobbling them up just as much!
Boo-nana Pops aren’t only a feast for the eyes but also incredibly easy to assemble. With minimal ingredients and preparation time, these delightful ghostly snacks are convenient for busy parents.
They can be customized with various toppings, making them a versatile treat that can be adapted to different dietary needs and preferences. Whether you’re looking to entertain a group of 4-6 kids or simply want a fun activity to engage your own children, Boo-nana Pops are sure to be a hit.
Ingredients for 4-6 People:
- 3 large bananas
- 1 cup white chocolate chips
- 1 tablespoon coconut oil
- Mini chocolate chips or candy eyes
- Black decorating gel (optional)
- Wooden popsicle sticks
Cooking Instructions:
- Prepare the Bananas: Peel the bananas and cut them in half, resulting in six pieces. Insert a wooden popsicle stick into the cut end of each banana half, ensuring it’s securely inserted to hold the banana without it splitting.
- Melt the Chocolate: In a microwave-safe bowl, combine the white chocolate chips and coconut oil. Microwave in 30-second intervals, stirring in between, until the chocolate is smooth and fully melted. Be careful not to overheat the chocolate.
- Dip the Bananas: Hold a banana by the stick and dip it into the melted chocolate, using a spoon to help coat it evenly. Allow the excess chocolate to drip off before placing it on a baking sheet lined with parchment paper.
- Decorate the Boo-nana: While the chocolate is still wet, press two mini chocolate chips or candy eyes onto the banana to create the ghost’s eyes. You can also use black decorating gel to draw a spooky mouth or other features.
- Chill the Pops: Once all the bananas are coated and decorated, place the baking sheet in the freezer for at least 30 minutes or until the chocolate is set and the bananas are firm.
- Serve and Enjoy: After chilling, serve the Boo-nana Pops immediately. They’re best enjoyed cold, right from the freezer.
Extra Tips:
To make Boo-nana Pops even more fun, consider using different types of chocolate or colored candy melts to create a variety of ghostly appearances.
You can also add a dash of cinnamon or nutmeg to the melted chocolate for a hint of autumn spice. If the chocolate starts to thicken as you work, simply reheat it in the microwave in short bursts to maintain a smooth, dippable consistency.
Enjoy crafting these playful treats with your kids, and embrace the festive spirit of Halloween!
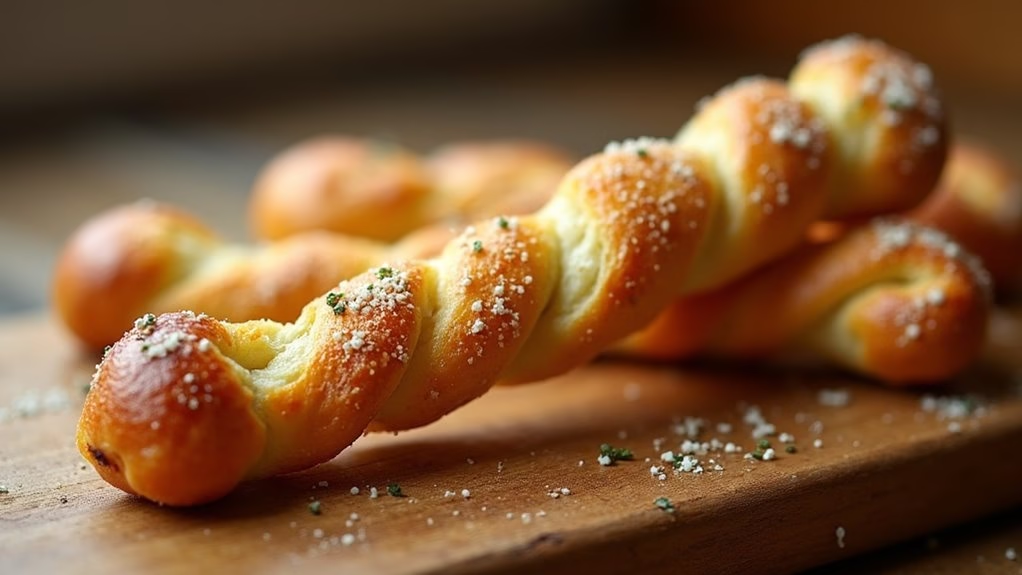
Skeleton Bone Breadsticks

Skeleton Bone Breadsticks are a fun and spooky addition to any Halloween party, especially for kids. These breadsticks are designed to look like skeletal bones, adding a creepy yet delicious touch to your festive table. Not only do they look impressive, but they’re also surprisingly easy to make with just a few simple ingredients.
Perfect for little hands, these breadsticks are soft on the inside and slightly crispy on the outside, making them a delightful snack for children. Ideal for serving 4-6 people, this recipe involves shaping dough into bone-like figures and baking them to perfection. The result is a tasty, eerie treat that’s sure to be a hit with both children and adults.
Serve them with a side of marinara sauce or a cheesy dip to enhance their flavor. Whether you’re planning a Halloween party or simply want to entertain your kids with a creative snack, these Skeleton Bone Breadsticks are a must-try.
Ingredients:
- 1 package (13.8 ounces) refrigerated pizza dough
- 2 tablespoons olive oil
- 1 teaspoon garlic powder
- 1 teaspoon Italian seasoning
- 1/4 teaspoon salt
- 1/4 cup grated Parmesan cheese
- Marinara sauce (optional, for dipping)
Instructions:
- Preheat the Oven: Preheat your oven to 375°F (190°C). Line a baking sheet with parchment paper or lightly grease it with cooking spray.
- Prepare the Dough: Unroll the pizza dough onto a lightly floured surface. Using a sharp knife or pizza cutter, slice the dough into strips about 1 inch wide and 6 inches long.
- Shape the Bones: To form bone shapes, make a 1-inch slit at each end of the dough strips. Gently pull each slit to the side to create a rounded nub, resembling the end of a bone. Pinch the middle of the strip slightly to give it the appearance of a bone.
- Season the Breadsticks: In a small bowl, mix the olive oil, garlic powder, Italian seasoning, and salt. Brush the seasoned oil mixture evenly over the shaped dough strips.
- Add Cheese: Sprinkle the grated Parmesan cheese generously over the dough bones to add flavor and a slightly crispy texture.
- Bake: Place the breadsticks on the prepared baking sheet, making sure they aren’t touching. Bake in the preheated oven for about 12-15 minutes, or until they turn golden brown.
- Serve: Allow the breadsticks to cool slightly before serving. If desired, serve with a side of marinara sauce for dipping.
Extra Tips:
To give the Skeleton Bone Breadsticks an even more realistic look, you can twist the middle section of the dough slightly before baking. This will enhance the bone-like appearance.
Additionally, if you want to add a little extra flavor, consider sprinkling some crushed red pepper flakes on top before baking for a hint of spice. These breadsticks are best enjoyed fresh out of the oven, but they can also be reheated in a toaster oven to regain their crispiness.