

Hey there, fellow Halloween enthusiasts! 🎃
As I get ready to host a spooktacular Halloween dinner party, I’m bubbling over with excitement to share my hauntingly delicious menu with you all. Think eerie appetizers, spine-chilling main courses, and ghoulishly delightful desserts that will make your guests howl with delight. From Spooky Stuffed Peppers to Ghostly Gnocchi, each recipe is designed to enchant and satisfy. Let’s conjure up these wickedly fun ideas together and ensure your celebration is as festive as it is flavorful!
Spooky Stuffed Peppers
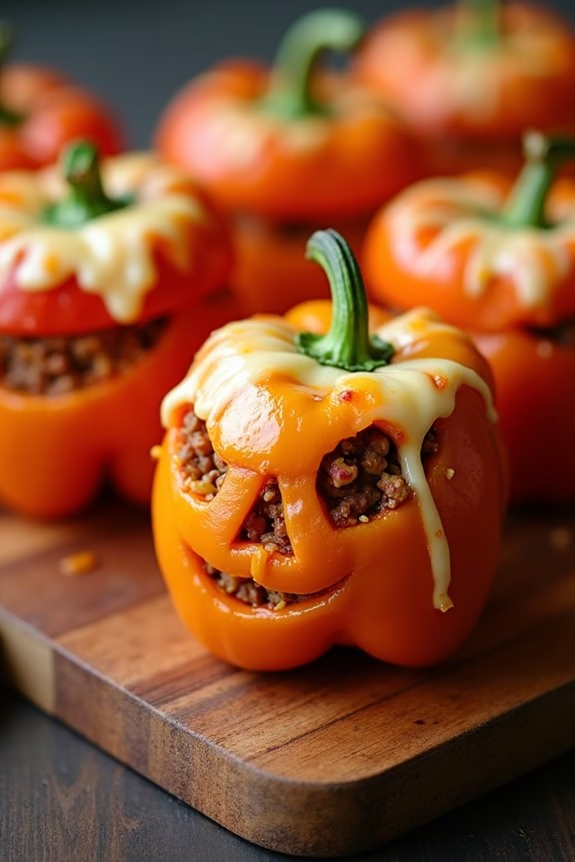
Halloween is the perfect time to get creative in the kitchen, and Spooky Stuffed Peppers are a delightful dish that combines both fun and flavor. These festive peppers are carved to resemble jack-o’-lanterns, making them a perfect centerpiece for your Halloween dinner table. Not only do they look spook-tacular, but they’re also packed with a delicious filling that will satisfy both kids and adults alike.
The key to making these peppers truly spooky is in the carving. Using a small knife, you can transform ordinary bell peppers into mini pumpkins with eerie faces. The filling, a savory blend of ground beef, rice, and spices, is tucked inside the peppers, and when baked, it infuses the entire dish with rich flavors. This recipe serves 4-6 people, making it an ideal choice for a family meal or a small Halloween gathering.
Ingredients:
- 6 medium orange bell peppers
- 1 tablespoon olive oil
- 1 medium onion, chopped
- 2 cloves garlic, minced
- 1 pound ground beef
- 1 cup cooked rice
- 1 can (15 ounces) diced tomatoes, drained
- 1 teaspoon salt
- 1/2 teaspoon black pepper
- 1 teaspoon paprika
- 1 teaspoon dried oregano
- 1 cup shredded mozzarella cheese
Cooking Instructions:
- Prepare the Peppers: Preheat your oven to 375°F (190°C). Cut the tops off the bell peppers and remove the seeds and membranes. Use a small knife to carve jack-o’-lantern faces into one side of each pepper.
- Cook the Filling: In a large skillet, heat the olive oil over medium heat. Add the chopped onion and minced garlic, sautéing until the onion becomes translucent. Add the ground beef and cook until browned, breaking it apart with a spoon as it cooks.
- Mix the Filling: Stir in the cooked rice, drained diced tomatoes, salt, black pepper, paprika, and oregano. Cook for an additional 5 minutes, allowing the flavors to meld together. Remove the skillet from heat.
- Stuff the Peppers: Spoon the beef and rice mixture into each carved pepper, filling them to the top. Place the stuffed peppers upright in a baking dish.
- Bake the Peppers: Cover the baking dish with foil and bake in the preheated oven for 25 minutes. Remove the foil, sprinkle the tops with mozzarella cheese, and return to the oven for an additional 10 minutes, or until the cheese is melted and bubbly.
- Serve and Enjoy: Allow the peppers to cool slightly before serving. Enjoy your spooky creation as a main dish or part of a larger Halloween spread.
Extra Tips:
For an added touch of Halloween charm, consider using a variety of colored bell peppers, such as green or yellow, to create a more colorful presentation.
You can also prepare the filling a day in advance to save time, and simply stuff and bake the peppers on the day of your event.
If you prefer a vegetarian version, substitute the ground beef with a meatless alternative or additional vegetables like mushrooms or zucchini.
These Spooky Stuffed Peppers are sure to be a hit, delighting guests with their whimsical appearance and hearty taste.
Witch’s Brew Soup

As the eerie night of Halloween approaches, there’s no better way to enchant your guests than with a cauldron of Witch’s Brew Soup. This creepy yet delicious soup is perfect for warming up your ghoulish guests after a night of trick-or-treating. Filled with a mix of vibrant veggies and a hint of spooky spices, Witch’s Brew Soup is sure to delight both young and old.
This hearty soup not only embraces the spirit of Halloween with its eerie green color but also provides a nutritious and comforting meal. It’s easy to prepare and can be adjusted to suit your desired spiciness level. Whether you’re hosting a Halloween party or simply enjoying a festive meal with your family, Witch’s Brew Soup is the perfect addition to your Halloween dinner table.
Ingredients (Serving Size: 4-6 people):
- 2 tablespoons olive oil
- 1 large onion, chopped
- 2 cloves garlic, minced
- 4 cups vegetable broth
- 3 cups chopped kale
- 2 cups peeled and diced potatoes
- 1 cup chopped celery
- 1 cup frozen peas
- 1 teaspoon dried thyme
- 1 teaspoon dried rosemary
- Salt and pepper to taste
- 1 cup heavy cream
- 1/4 cup grated Parmesan cheese
- A few drops of green food coloring (optional)
Cooking Instructions:
- Prepare the Ingredients: Begin by chopping the onion, mincing the garlic, and dicing the potatoes. Chop the kale and celery into bite-sized pieces.
- Sauté the Aromatics: Heat the olive oil in a large pot over medium heat. Add the chopped onion and minced garlic, sautéing them until the onion becomes translucent and aromatic.
- Add the Vegetables: Add the diced potatoes and chopped celery to the pot. Stir well to coat with oil and cook for about 5 minutes, allowing the vegetables to soften slightly.
- Simmer the Soup: Pour in the vegetable broth, then add the chopped kale, frozen peas, dried thyme, and dried rosemary. Bring the mixture to a boil, then reduce the heat to low. Cover and let it simmer for about 20 minutes, or until the potatoes are tender.
- Blend the Soup: Using an immersion blender, carefully blend the soup until smooth. If you prefer a chunkier texture, blend only a portion of the soup.
- Add Cream and Cheese: Stir in the heavy cream and grated Parmesan cheese, mixing well until the cheese melts and the soup becomes creamy.
- Adjust Seasoning and Color: Taste the soup and add salt and pepper to your liking. If desired, add a few drops of green food coloring to enhance the spooky appearance of the soup.
- Serve: Ladle the Witch’s Brew Soup into bowls and serve hot. Garnish with extra Parmesan cheese or a drizzle of cream for an extra touch.
Extra Tips:
To make the Witch’s Brew Soup even more magical, consider adding a dash of nutmeg for a hint of warmth. For a vegan version, replace the heavy cream with coconut milk and omit the Parmesan cheese.
If you want to add protein, cooked chicken or tofu can be stirred in during the final stages. Keep in mind that the green food coloring is optional, but it certainly adds to the Halloween theme. Enjoy the brew with a side of crusty bread or garlic toast for a complete meal!
Mummy Meatballs

Mummy Meatballs are a spooky and fun addition to any Halloween dinner spread. These delightful morsels are perfect for both kids and adults, making them a versatile choice for your festive gathering. Wrapped in a delicious blanket of puff pastry, the meatballs not only look like mummies but also offer a savory bite packed with flavors. Serve them with a side of marinara sauce for an extra touch of flavor, and watch them disappear as quickly as they came to life.
The beauty of Mummy Meatballs lies not only in their visual appeal but also in their simplicity and versatility. You can prepare them as an appetizer or a main course, depending on the size and serving style. The combination of seasoned meatballs and flaky pastry is a match made in Halloween heaven, and with a few simple steps, you’ll have a platter of mummies ready to haunt your dinner table. This recipe is designed to serve 4-6 people, making it ideal for small gatherings or family dinners.
Ingredients (serving size: 4-6 people):
- 1 pound ground beef or turkey
- 1/4 cup breadcrumbs
- 1/4 cup Parmesan cheese, grated
- 1 egg
- 2 cloves garlic, minced
- 1 teaspoon Italian seasoning
- Salt and pepper to taste
- 1 package of refrigerated puff pastry sheets
- 1/4 cup sliced black olives
- 1/4 cup marinara sauce (for serving)
- 1 tablespoon olive oil
Instructions:
- Prepare the Meatball Mixture: Preheat your oven to 375°F (190°C). In a large mixing bowl, combine the ground meat, breadcrumbs, Parmesan cheese, egg, minced garlic, Italian seasoning, salt, and pepper. Mix the ingredients until well combined.
- Form the Meatballs: Using your hands, shape the meat mixture into small, even-sized balls, about 1 to 1.5 inches in diameter. You should have about 20-24 meatballs.
- Cook the Meatballs: Heat the olive oil in a large skillet over medium heat. Add the meatballs to the skillet and cook them for about 5-7 minutes, turning occasionally, until they’re browned on all sides. Transfer the meatballs to a baking sheet lined with parchment paper.
- Prepare the Puff Pastry: While the meatballs are cooking, roll out the puff pastry sheets on a lightly floured surface. Cut the pastry into thin strips, approximately 1/2 inch wide.
- Wrap the Meatballs: Once the meatballs are cooked, wrap each one with several strips of puff pastry, leaving small gaps to create a mummy-like appearance. Make sure to tuck the ends of the pastry underneath each meatball to secure them.
- Bake the Mummy Meatballs: Place the wrapped meatballs back on the baking sheet and bake in the preheated oven for 15-20 minutes, or until the pastry is golden brown and crispy.
- Add the Eyes: Remove the meatballs from the oven and let them cool slightly. Place two slices of black olives on each meatball to create the eyes of the mummy.
- Serve: Arrange the Mummy Meatballs on a platter and serve them warm with a side of marinara sauce for dipping.
Extra Tips:
To guarantee your Mummy Meatballs are perfectly tender and juicy, avoid overmixing the meat mixture, as this can make the meatballs dense. Additionally, if you have extra time, allow the meatballs to chill in the refrigerator for 10-15 minutes before cooking. This helps them hold their shape better during cooking.
For a bit of creativity, use different types of olives or even small pieces of red bell pepper to vary the look of the mummy eyes. Enjoy your hauntingly delicious creation!
Ghostly Gnocchi
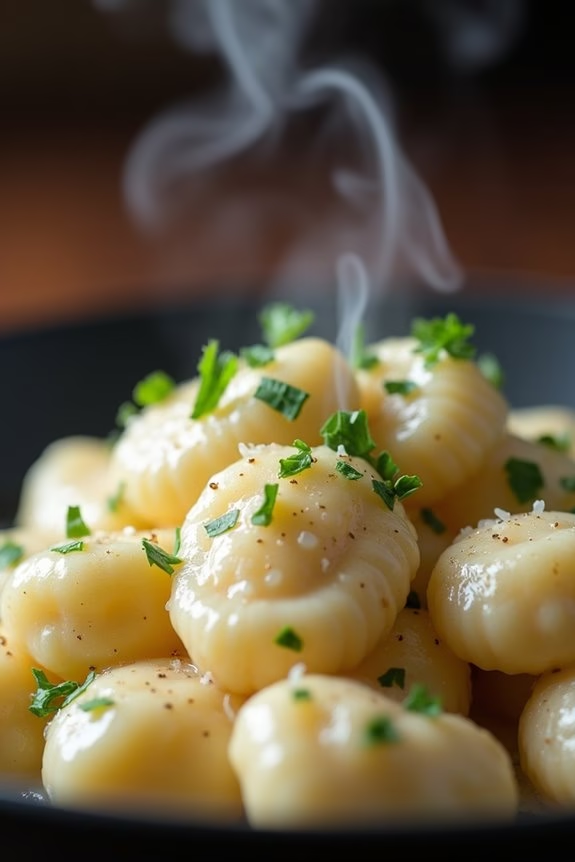
Transform your Halloween dinner into a bewitching feast with our Ghostly Gnocchi. This dish combines the delicate, pillowy texture of gnocchi with a creamy, spooky sauce that will delight your guests. Perfect for a festive gathering, Ghostly Gnocchi not only satisfies the palate but also adds a touch of whimsy to your Halloween table.
With its ghostly white appearance and subtle flavors, this dish is sure to be a hit with both adults and children alike. Creating this enchanting meal is simpler than it seems, requiring just a handful of ingredients and a bit of culinary magic. The gnocchi will be the star of the dish, while the sauce, enriched with flavors of garlic and cheese, will provide the perfect haunting touch.
Serve it as a main course for a Halloween dinner party or a cozy family meal — it’s sure to become a spooky season favorite.
Ingredients (serving size: 4-6 people):
- 2 pounds of potatoes, preferably Russet
- 2 cups all-purpose flour, plus extra for dusting
- 1 egg
- Salt, to taste
- 4 tablespoons unsalted butter
- 3 cloves garlic, minced
- 1 cup heavy cream
- 1 cup grated Parmesan cheese
- Freshly ground black pepper, to taste
- Fresh parsley, chopped, for garnish
Instructions:
1. Prepare the Potatoes: Begin by boiling the potatoes with their skins on in a large pot of salted water until they’re tender when pierced with a fork, about 20-25 minutes. Drain and allow them to cool slightly.
2. Make the Gnocchi Dough: Once the potatoes are cool enough to handle, peel them and pass them through a potato ricer or mash them until smooth. Place the mashed potatoes on a clean work surface, creating a well in the center. Add the flour, egg, and a pinch of salt into the well. Gently mix the ingredients, kneading lightly, until a dough forms.
Be careful not to overwork the dough to keep the gnocchi light and fluffy.
3. Shape the Gnocchi: Divide the dough into four portions. Roll each portion into a long rope about 1/2 inch in diameter. Cut each rope into 1-inch pieces. If desired, you can shape each piece by rolling it down the tines of a fork to create ridges, which help the sauce adhere better.
4. Cook the Gnocchi: Bring a large pot of salted water to a boil. Add the gnocchi in batches, cooking until they float to the surface, about 2-3 minutes. Use a slotted spoon to remove the gnocchi and set them aside on a plate.
5. Prepare the Sauce: In a large skillet over medium heat, melt the butter and add the minced garlic. Sauté until fragrant, about 1 minute. Pour in the heavy cream and bring it to a gentle simmer. Stir in the Parmesan cheese, allowing it to melt into the sauce. Season with salt and pepper to taste.
6. Combine and Serve: Add the cooked gnocchi to the sauce, tossing gently to coat each piece. Allow them to simmer in the sauce for another minute, ensuring they’re heated through. Transfer to a serving dish and garnish with chopped parsley for a fresh touch.
Extra Tips:
For the best Ghostly Gnocchi, choose floury potatoes like Russets, as they create a lighter dough. When mixing the dough, work swiftly and gently to avoid activating too much gluten, which can make the gnocchi tough.
If you prefer a more pronounced garlic flavor, feel free to add an extra clove or two. For a creative twist, consider adding a few drops of black food coloring to the sauce for a more dramatic effect, perfect for Halloween!
Vampire Bat Wings

Release a night of spooky fun with Vampire Bat Wings, a hauntingly delicious addition to your Halloween dinner table. These wings aren’t only visually striking with their deep, dark hue, but they also pack a flavor punch that’s sure to satisfy your guests. With a blend of savory, sweet, and spicy elements, Vampire Bat Wings are perfect for those who dare to try something a little different this Halloween.
Whether you’re hosting a party or simply enjoying a themed dinner at home, these wings are bound to be a hit.
The secret to achieving the signature dark appearance of these wings is in the marinade, which uses a combination of soy sauce, balsamic vinegar, and a touch of black food coloring. These ingredients not only provide the desired color but also infuse the chicken with a rich, umami flavor.
Cooked to perfection, the wings are then brushed with a tantalizing glaze that balances sweetness with a hint of heat. Served as an appetizer or main dish, Vampire Bat Wings will add a touch of eerie elegance to your Halloween feast.
Ingredients (for 4-6 servings):
- 3 pounds chicken wings
- 1 cup soy sauce
- 1/2 cup balsamic vinegar
- 2 tablespoons honey
- 1 tablespoon brown sugar
- 1 teaspoon garlic powder
- 1 teaspoon onion powder
- 1/2 teaspoon cayenne pepper
- 1 teaspoon black food coloring (gel or powder)
- 2 tablespoons olive oil
- 1/4 cup ketchup
- 1 tablespoon hot sauce
- Salt and pepper to taste
- Fresh parsley or cilantro for garnish (optional)
Cooking Instructions:
- Prepare the Marinade: In a large mixing bowl, combine soy sauce, balsamic vinegar, honey, brown sugar, garlic powder, onion powder, cayenne pepper, and black food coloring. Whisk together until the sugar dissolves and the mixture is well combined.
- Marinate the Wings: Add the chicken wings to the marinade, ensuring they’re fully coated. Cover the bowl with plastic wrap and refrigerate for at least 2 hours, or overnight for best results. This will allow the flavors to seep into the wings.
- Preheat the Oven: When ready to cook, preheat your oven to 400°F (200°C). Line a large baking sheet with aluminum foil and place a wire rack on top. This will help the wings cook evenly and achieve a crispy texture.
- Bake the Wings: Remove the wings from the marinade and arrange them in a single layer on the wire rack. Drizzle with olive oil and season with salt and pepper. Bake in the preheated oven for 35-45 minutes, turning halfway through, until the wings are crispy and cooked through.
- Prepare the Glaze: While the wings are baking, prepare the glaze. In a small saucepan, combine ketchup, hot sauce, and any leftover marinade. Bring to a simmer over medium heat, stirring occasionally, until the sauce thickens.
- Glaze the Wings: Once the wings are cooked, remove them from the oven and brush generously with the prepared glaze. Return the wings to the oven for an additional 5-10 minutes, allowing the glaze to caramelize and adhere to the wings.
- Serve and Garnish: Remove the wings from the oven and transfer to a serving platter. Garnish with fresh parsley or cilantro, if desired, and serve immediately.
Extra Tips:
For a more intense black color, consider adding activated charcoal powder to the marinade, which is food-safe and provides a deep hue. If black food coloring isn’t available, replacing with dark soy sauce can also help achieve a similar effect.
Be mindful of the heat level when adding cayenne pepper and hot sauce; adjust to your preference to suit your guests’ palates. Additionally, keep an eye on the wings while they bake, as oven temperatures may vary and overcooking can dry them out.
Monster Mac and Cheese
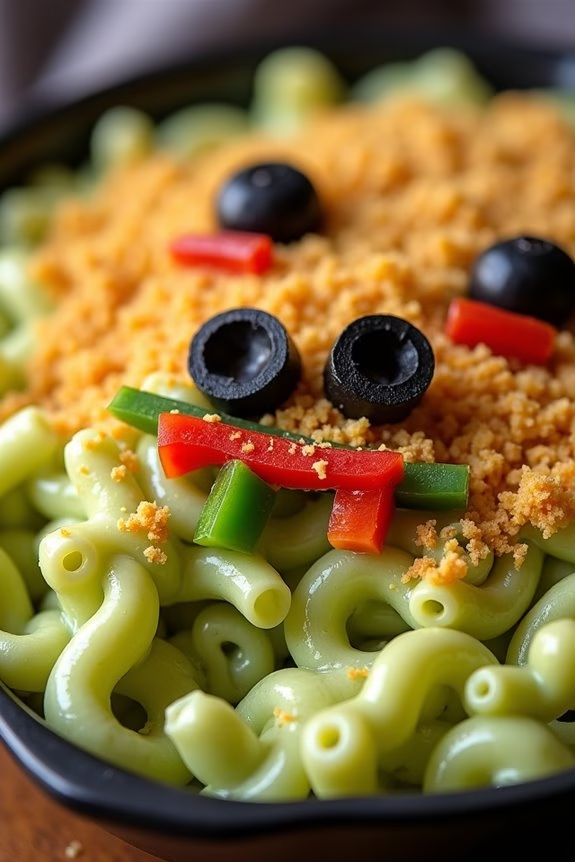
Transform your Halloween dinner table into a spooktacular feast with Monster Mac and Cheese! This ghastly dish combines the creamy comfort of traditional mac and cheese with a frightening twist, making it perfect for a Halloween-themed meal. The vibrant colors and monster-inspired decorations will capture the attention of both kids and adults, guaranteeing that your Halloween dinner is both memorable and delicious.
Monster Mac and Cheese isn’t only delightful to look at but also simple to prepare, allowing you to focus on the fun of Halloween. The recipe involves creating a classic, rich cheese sauce, adding a burst of color with food coloring, and topping it with crispy, scary toppings. Whether you’re hosting a Halloween party or enjoying a quiet family dinner, this dish will surely add a touch of festive fun to your night.
Ingredients (Serves 4-6):
- 12 oz elbow macaroni
- 2 cups milk
- 2 cups shredded cheddar cheese
- 1 cup shredded mozzarella cheese
- 1/4 cup unsalted butter
- 1/4 cup all-purpose flour
- Salt and pepper to taste
- Green food coloring
- Black olives (for decoration)
- Red bell pepper (for decoration)
- Green bell pepper (for decoration)
- 1 cup panko breadcrumbs
- 2 tablespoons olive oil
Cooking Instructions:
- Cook the Macaroni: Begin by bringing a large pot of salted water to a boil. Add the elbow macaroni and cook according to package instructions until al dente. Drain the pasta and set it aside.
- Prepare the Cheese Sauce: In a separate pot, melt the unsalted butter over medium heat. Once melted, whisk in the all-purpose flour and cook for about 1 minute, creating a roux. Gradually add the milk, whisking continuously to avoid lumps. Continue to cook until the mixture thickens.
- Add the Cheese: Reduce the heat to low and slowly stir in the shredded cheddar and mozzarella cheeses. Season with salt and pepper to taste. Stir until the cheese has melted and the sauce is smooth and creamy.
- Color the Sauce: Add green food coloring to the cheese sauce, a few drops at a time, until the desired monster green color is achieved.
- Combine Pasta and Sauce: Add the cooked macaroni to the cheese sauce, stirring well to confirm all pasta is evenly coated with the green cheese sauce.
- Prepare the Crispy Topping: In a small bowl, mix the panko breadcrumbs with olive oil. Spread evenly over the top of the mac and cheese in an oven-safe dish.
- Bake the Mac and Cheese: Preheat your oven to 350°F (175°C). Bake the mac and cheese for 20-25 minutes or until the top is golden brown and crispy.
- Decorate: While the mac and cheese is baking, slice the black olives and bell peppers to create monster eyes and mouths. Once the mac and cheese is finished baking, remove it from the oven and decorate the top with the olive and pepper slices to create monster faces.
Extra Tips:
To make your Monster Mac and Cheese even more festive, consider using different colors of food coloring to create a variety of monster hues. You can also experiment with different types of cheese for unique flavors, such as Gruyère or sharp cheddar.
For added texture and flavor, consider mixing in some cooked bacon or sautéed mushrooms into the cheese sauce before baking. Remember, the key to a great Monster Mac and Cheese is having fun with the decorations, so let your creativity run wild!
Jack-O’-Lantern Quesadillas

Get into the spooky spirit of Halloween with these Jack-O’-Lantern Quesadillas! Perfect for a festive dinner, these cheesy, crispy treats are sure to delight both kids and adults alike. By using tortillas as your canvas, you can carve out fun and spooky jack-o’-lantern faces before filling them with gooey cheese and your choice of delicious fillings.
Not only are these quesadillas visually appealing, but they’re also incredibly easy to prepare, making them an ideal dish for a quick Halloween meal or party appetizer.
What makes Jack-O’-Lantern Quesadillas so much fun is their versatility. You can customize them with various fillings to suit your family’s taste preferences, such as adding shredded chicken, veggies, or beans along with the cheese. This recipe is designed to serve 4-6 people, providing just the right amount for a small gathering.
Whether you’re looking for a spooky snack or a fun dinner option, these quesadillas are certain to become a Halloween favorite!
Ingredients (serves 4-6 people):
- 8 large flour tortillas
- 2 cups shredded cheddar cheese
- 1 cup shredded mozzarella cheese
- 1 cup cooked and shredded chicken (optional)
- 1 cup black beans, drained and rinsed
- 1/2 cup diced bell peppers
- 1/2 cup chopped green onions
- 2 tablespoons olive oil
- Salt and pepper to taste
- Salsa and sour cream for serving
Cooking Instructions:
- Prepare the Tortillas: Lay out the tortillas on a flat surface. Using a small sharp knife, cut out jack-o’-lantern faces on half of the tortillas. These will be the tops of your quesadillas.
- Prepare the Filling: In a large bowl, mix the shredded cheddar and mozzarella cheese. If using, add the shredded chicken, black beans, diced bell peppers, and chopped green onions. Season with salt and pepper, then mix well until all ingredients are combined.
- Assemble the Quesadillas: Take a plain tortilla and spread a generous amount of the filling mixture over it. Top with one of the jack-o’-lantern face tortillas. Press gently to confirm they stick together.
- Cook the Quesadillas: Heat 1 tablespoon of olive oil in a large skillet over medium heat. Place the assembled quesadilla in the skillet, and cook for 3-4 minutes on each side, or until the cheese is melted and the tortilla is golden brown and crispy. Repeat with the remaining quesadillas, adding more oil to the skillet as needed.
- Serve: Once cooked, remove the quesadillas from the skillet and let them cool for a minute before cutting them into wedges. Serve warm with salsa and sour cream on the side.
Extra Tips: When carving the jack-o’-lantern faces, use simple shapes to guarantee the tortillas don’t tear. You can also use cookie cutters for more intricate designs.
If you’re short on time, prepare the filling ahead of time and store it in the refrigerator until you’re ready to assemble the quesadillas. To make the dish even spookier, consider using orange-colored tortillas for an extra festive touch.
Creepy Crawly Pasta
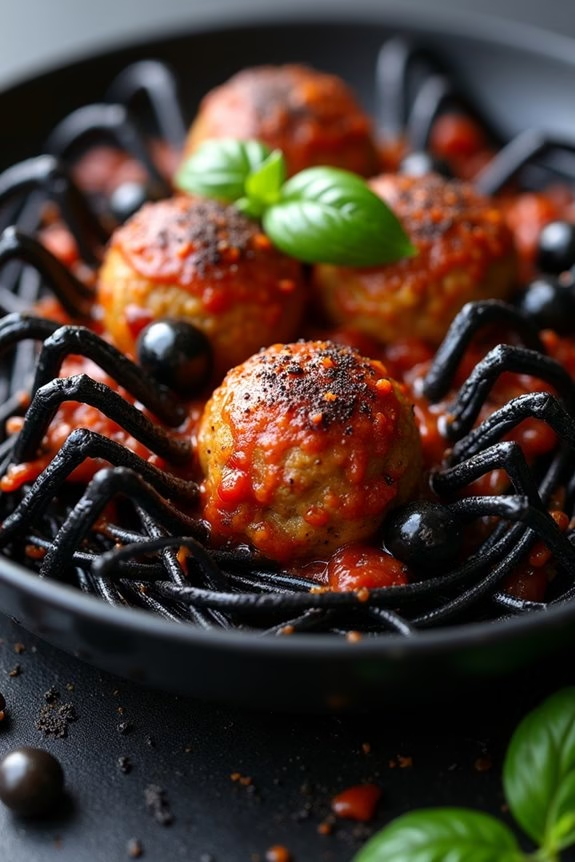
If you’re seeking to add a spooky touch to your Halloween dinner, search no further than Creepy Crawly Pasta. This dish combines the visual eeriness of “crawling” pasta with delicious flavors that will satisfy both kids and adults. With a few simple ingredients and a little creativity, you can transform a regular pasta dish into a Halloween masterpiece.
The key to this dish is using black spaghetti or squid ink pasta to create a dark, mysterious base. Combined with meatballs shaped like spiders and a rich tomato sauce, this dish is as delightful to observe as it’s to eat.
The Creepy Crawly Pasta is perfect for a Halloween gathering, easily serving 4-6 people. The combination of textures and flavors will have your guests excited to dig in, despite the spooky presentation. Not only is it fun to make, but it also invites everyone to get into the Halloween spirit. Whether you’re hosting a dinner party or just want to serve a festive family meal, Creepy Crawly Pasta is sure to be a hit.
Ingredients (serving size: 4-6 people):
- 12 ounces black spaghetti or squid ink pasta
- 1 pound ground beef
- 1/2 cup breadcrumbs
- 1/4 cup grated Parmesan cheese
- 1 egg
- 2 cloves garlic, minced
- Salt and pepper to taste
- 4 cups tomato sauce
- 2 tablespoons olive oil
- 12 black olives, pitted and halved
- Fresh basil leaves for garnish (optional)
Cooking Instructions:
- Prepare the Meatballs: In a large bowl, combine the ground beef, breadcrumbs, Parmesan cheese, egg, minced garlic, salt, and pepper. Mix well until all ingredients are evenly blended. Shape the mixture into small meatballs, about the size of a walnut.
- Cook the Meatballs: Heat the olive oil in a large skillet over medium heat. Add the meatballs and cook them for about 8-10 minutes, turning occasionally, until they’re browned on all sides and fully cooked through. Remove the meatballs from the skillet and set them aside.
- Cook the Pasta: In a large pot, bring salted water to a boil. Add the black spaghetti or squid ink pasta and cook according to the package instructions until al dente. Drain the pasta and set aside.
- Prepare the Sauce: In the same skillet you used for the meatballs, add the tomato sauce and heat over medium heat. Bring the sauce to a gentle simmer, then return the meatballs to the skillet. Let them cook in the sauce for about 5 minutes to absorb the flavors.
- Assemble the Dish: Place the cooked pasta on a large serving platter or individual plates. Arrange the meatballs on top of the pasta, spacing them out to resemble spiders crawling over the “web” of spaghetti. For each meatball, insert 6 olive halves around to form the “legs” of the spiders.
- Garnish and Serve: Garnish the dish with fresh basil leaves if desired and serve immediately while hot. Enjoy the spooky yet delicious Creepy Crawly Pasta!
Extra Tips:
For an even more authentic look, you can use thin strips of red bell pepper or roasted red pepper to add more “legs” to the spiders. If you can’t find black spaghetti or squid ink pasta, you can use regular spaghetti and dye it with black food coloring.
When making the meatballs, verify they’re roughly the same size to guarantee even cooking. Finally, encourage guests to add extra cheese or spices to taste at the table to customize their spooky dining experience.
Haunted Harvest Salad
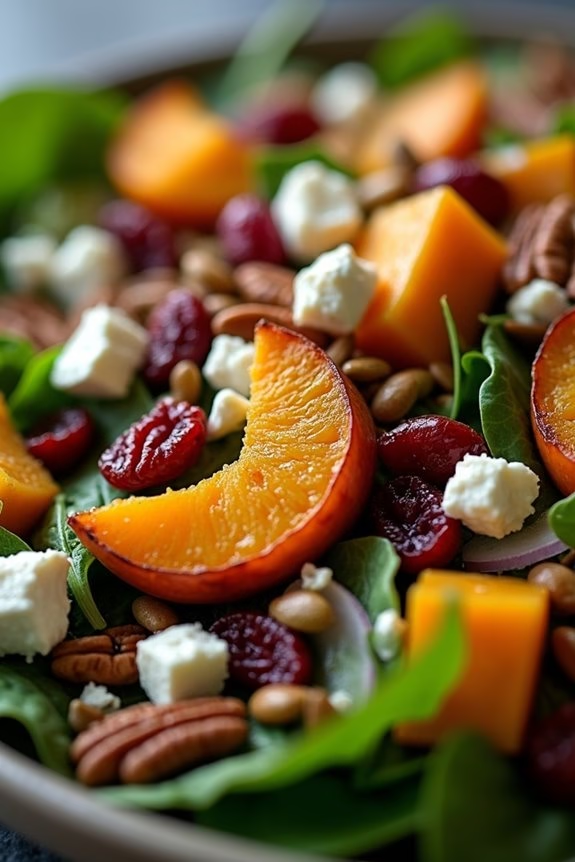
Halloween isn’t just about candy and costumes—it’s also a perfect opportunity to get creative with your dinner menu. Enter the Haunted Harvest Salad, a deliciously eerie dish that combines the best of autumn’s bounty with a spooky twist. This salad is a medley of vibrant fall colors and flavors, with a mix of roasted butternut squash, dried cranberries, and candied pecans, tossed in a zesty maple vinaigrette.
It’s not only a feast for the eyes but also a delightful treat for the taste buds, making it an ideal addition to your Halloween dinner table. The Haunted Harvest Salad is designed to serve 4-6 people, making it a perfect side dish for a small gathering. The combination of sweet, savory, and nutty elements guarantees that every bite is intriguing and satisfying.
As you prepare this dish, you’ll find that its simplicity is part of its charm—allowing the natural flavors of the ingredients to shine through. Whether you’re hosting a Halloween party or simply want to add a festive touch to your family dinner, this salad is sure to impress.
Ingredients (Serving size: 4-6)
- 4 cups mixed salad greens (such as arugula and baby spinach)
- 2 cups butternut squash, peeled and cubed
- 1 tablespoon olive oil
- 1 teaspoon ground cinnamon
- Salt and pepper, to taste
- 1/2 cup dried cranberries
- 1/2 cup candied pecans
- 1/4 cup crumbled goat cheese
- 1/4 cup pumpkin seeds
- 1/4 red onion, thinly sliced
- 1/2 cup maple vinaigrette (can be store-bought or homemade)
Cooking Instructions
- Prepare the Butternut Squash: Preheat your oven to 400°F (200°C). In a large bowl, toss the cubed butternut squash with olive oil, cinnamon, salt, and pepper until well coated. Spread the squash evenly on a baking sheet lined with parchment paper.
- Roast the Squash: Place the baking sheet in the preheated oven and roast the squash for 25-30 minutes, or until it’s tender and slightly caramelized. Stir halfway through the cooking time to guarantee even roasting. Once done, remove from oven and let cool slightly.
- Assemble the Salad: In a large salad bowl, combine the mixed greens, roasted butternut squash, dried cranberries, candied pecans, goat cheese, pumpkin seeds, and red onion. Toss gently to mix all the ingredients.
- Dress the Salad: Drizzle the maple vinaigrette over the salad just before serving. Toss the salad lightly to guarantee the dressing is evenly distributed.
- Serve: Transfer the salad to a serving platter or individual plates. Confirm each serving has a good mix of all the ingredients to enjoy the full range of flavors and textures.
Extra Tips
For the freshest taste, try to assemble the salad just before serving. If you want to prepare some components ahead of time, you can roast the squash and store it in the refrigerator for up to two days. Reheat it slightly before adding to the salad.
To make your own maple vinaigrette, whisk together 1/4 cup of maple syrup, 2 tablespoons of apple cider vinegar, 1 tablespoon of Dijon mustard, and 1/4 cup of olive oil. Season with salt and pepper to taste.
Experiment with different types of greens or add a bit of crunch with some sliced apples or pears for a personalized touch.
Devilish Deviled Eggs

Devilish Deviled Eggs are the perfect spooky appetizer to set the tone for your Halloween dinner party. With their creamy, tangy filling and a hint of spice, these eggs aren’t only delicious but also a visual treat. This dish is a play on traditional deviled eggs, enhanced with some creative Halloween flair.
Whether you’re hosting a large gathering or an intimate affair, these eggs are sure to delight your guests with their devilish charm. The key to making Devilish Deviled Eggs is to focus on both flavor and presentation. By using a combination of classic ingredients and a bit of creativity, you can transform ordinary deviled eggs into something truly spook-tacular.
The addition of paprika and a touch of hot sauce gives them a fiery kick, while edible decorations like black olives and chives add an eerie touch. Perfect for a serving size of 4-6 people, this recipe is easy to prepare and can be made in advance, giving you more time to enjoy the festivities.
Ingredients:
- 6 large eggs
- 3 tablespoons mayonnaise
- 1 teaspoon Dijon mustard
- 1 teaspoon apple cider vinegar
- 1/4 teaspoon salt
- 1/4 teaspoon black pepper
- 1/4 teaspoon smoked paprika
- 1/4 teaspoon hot sauce (optional)
- Black olives (for decoration)
- Fresh chives (for decoration)
Instructions:
1. Boil the Eggs:
Start by placing the eggs in a saucepan and cover them with cold water. Bring the water to a boil over medium-high heat. Once boiling, remove the saucepan from the heat, cover it with a lid, and let the eggs sit in the hot water for about 12 minutes. This method guarantees perfectly hard-boiled eggs without overcooking.
2. Cool and Peel the Eggs:
After 12 minutes, transfer the eggs to a bowl of ice water to stop the cooking process and cool them down. Let them sit for at least 5 minutes before peeling. Gently tap each egg on a flat surface, roll it slightly to crack the shell, and then peel under running water to make the process easier.
3. Prepare the Filling:
Once peeled, slice each egg in half lengthwise. Carefully remove the yolks and place them in a mixing bowl. Add mayonnaise, Dijon mustard, apple cider vinegar, salt, black pepper, smoked paprika, and hot sauce to the yolks. Mash the mixture with a fork until smooth and creamy.
4. Fill the Egg Whites:
Spoon or pipe the yolk mixture back into the egg white halves. Use a piping bag with a star tip for a more decorative look, or simply use a spoon for a more rustic appearance.
5. Decorate the Eggs:
To give your deviled eggs a devilish look, slice black olives into small pieces to use as eyes and horns, and cut fresh chives into small strips for additional spooky decoration. Arrange them on top of the yolk mixture creatively.
6. Chill and Serve:
Once decorated, refrigerate the deviled eggs for at least 30 minutes before serving. This allows the flavors to meld together and guarantees they’re chilled for your guests to enjoy.
Extra Tips:
When boiling eggs, adding a splash of vinegar to the water can help prevent the egg whites from leaking out if any cracks occur. For a smoother filling, use a sieve to press the yolks through before mixing with the other ingredients.
If you’re making these deviled eggs in advance, keep them covered in the refrigerator to maintain freshness. Finally, get creative with your decorations—use food coloring to tint the yolk mixture or add different toppings to suit your Halloween theme.
Zombie Stuffed Mushrooms

Get ready to spook your guests with these delicious Zombie Stuffed Mushrooms, the perfect Halloween appetizer that’s both eerie and tasty. These mushrooms are stuffed with a savory mixture of herbs, garlic, cream cheese, and breadcrumbs, giving them a rich and satisfying flavor. The unique presentation will be sure to impress, as each mushroom resembles a creepy yet tempting treat.
Serve them at your Halloween dinner party, and watch as they disappear faster than a ghost at midnight!
Not only are Zombie Stuffed Mushrooms a delight to look at, but they’re also straightforward to make, guaranteeing you spend less time in the kitchen and more time enjoying the festivities. This recipe is perfect for serving 4-6 people, making it an ideal choice for small gatherings.
With just a few ingredients and some simple steps, you can create a dish that’s certain to be a hit with both kids and adults alike.
Ingredients (Serving Size: 4-6 people):
- 18-24 large button mushrooms
- 1 tablespoon olive oil
- 3 cloves garlic, minced
- 1 small onion, finely chopped
- 1/2 cup breadcrumbs
- 8 oz cream cheese, softened
- 1/4 cup grated Parmesan cheese
- 2 tablespoons chopped fresh parsley
- Salt and pepper to taste
- Red and black food coloring (optional, for decoration)
- Edible eyes or small olives (optional, for decoration)
Cooking Instructions:
- Prepare the Mushrooms: Preheat your oven to 375°F (190°C). Carefully clean the mushrooms with a damp paper towel and remove the stems. Set the mushroom caps aside on a baking sheet lined with parchment paper.
- Make the Filling: Heat the olive oil in a skillet over medium heat. Add the garlic and onion and sauté until the onion is translucent, about 5 minutes. Remove from heat and allow to cool slightly.
- Combine Ingredients: In a mixing bowl, combine the sautéed garlic and onion, breadcrumbs, cream cheese, Parmesan cheese, parsley, salt, and pepper. Mix until well combined and creamy.
- Stuff the Mushrooms: Using a small spoon, fill each mushroom cap generously with the cream cheese mixture. Press down lightly to confirm the filling is secure.
- Add Decorations (Optional): For a spooky touch, use a toothpick to add a few drops of red and black food coloring to the filling, creating a marbled effect. Place edible eyes or small olives on top of each stuffed mushroom for an added eerie look.
- Bake: Place the baking sheet in the preheated oven and bake for 20-25 minutes, or until the mushrooms are tender and the tops are golden brown.
- Serve: Remove from the oven and let them cool for a few minutes. Serve warm and enjoy your creepy creations!
Extra Tips:
For the best results, choose mushrooms that are similar in size to guarantee even cooking.
Feel free to experiment with the filling by adding your favorite herbs or spices, such as thyme or crushed red pepper flakes, to customize the flavor to your liking.
If you want to save time, you can prepare the stuffing mixture a day in advance and refrigerate it until you’re ready to use it.
Remember to handle the food coloring with care, as it can easily stain clothing and surfaces.
Frankenstein’s Veggie Platter

Frankenstein’s Veggie Platter is a fun, spooky, and healthy addition to your Halloween dinner menu. This colorful and creative platter will delight guests of all ages while offering a nutritious option amidst the candy and sweets. By using a variety of fresh vegetables and a little bit of creativity, you can craft a fun and festive dish that resembles the classic monster, Frankenstein. Perfect for gatherings and certain to be a conversation starter, this veggie platter is a delicious way to celebrate the holiday.
The process of assembling Frankenstein’s Veggie Platter is straightforward and requires no cooking, making it an ideal choice for those looking to prepare a quick yet impressive dish. The key is to select a variety of vegetables that can be easily shaped or arranged to create the iconic look of Frankenstein’s face. A simple selection of dips will enhance the flavors and provide a tasty accompaniment. This recipe serves 4-6 people, making it perfect for a small party or family gathering.
Ingredients:
- 1 head of broccoli
- 1 cucumber
- 1 red bell pepper
- 1 yellow bell pepper
- 1 cup cherry tomatoes
- 1 small cauliflower
- 1 cup black olives
- 1 cup baby carrots
- 1 cup snap peas
- 1 cup hummus or dip of choice
Instructions:
- Prepare the Vegetables: Wash all vegetables thoroughly. Cut the broccoli and cauliflower into small florets. Slice the cucumber into thin rounds. Slice the bell peppers into strips, and halve the cherry tomatoes.
- Assemble the Face: On a large platter, arrange the broccoli florets at the top to resemble Frankenstein’s hair. Below the broccoli, place the cucumber slices to form the forehead and face.
- Create the Eyes and Nose: Use two cucumber slices for the eyes and place a black olive on top of each for the pupils. Position half of a cherry tomato as the nose.
- Design the Mouth: Arrange a line of red bell pepper strips to form the mouth. For the teeth, use small cauliflower pieces placed along the top of the red pepper strips.
- Add the Details: Use the snap peas to form the bolts on either side of the face. Scatter baby carrots around the platter as a border or to fill in any gaps.
- Serve with Dip: Place the hummus or your dip of choice in a small bowl and set it on the platter for dipping. Arrange additional vegetables around the dip bowl if desired.
Extra Tips:
When selecting vegetables for Frankenstein’s Veggie Platter, try to choose fresh, crisp ones to guarantee the best flavor and presentation. Feel free to experiment with different vegetables based on availability or preference; for example, sliced zucchini can substitute for cucumber, or use purple cauliflower for a more colorful platter.
If you want to add an extra spooky touch, consider using a knife to carve small scars or stitches into the cucumber slices before assembling the face. This platter is a great way to get creative while also providing a healthy snack option for your Halloween gathering.
Gory Goulash

Gory Goulash is a perfect Halloween dinner idea, combining the warmth of a hearty stew with a gruesome twist that’s sure to delight and spook your guests. This dish not only delivers on flavor with its rich, savory meat and vegetable combination, but it also plays into the eerie theme of the holiday with a presentation that will leave a lasting impression.
Whether you’re hosting a Halloween party or just want to enjoy a themed meal with your family, Gory Goulash is the ideal choice to bring a bit of eerie excitement to your dinner table.
This recipe is designed to serve 4-6 people, making it perfect for a small gathering or family meal. The key to this gory dish lies in its use of vibrant red tomato sauce and strategically placed pasta shapes to mimic bones or other spooky elements. With a few simple ingredients and a bit of creativity, you can transform a classic goulash into a Halloween masterpiece that’s as visually striking as it’s delicious.
Ingredients:
- 2 tablespoons olive oil
- 1 large onion, chopped
- 3 cloves garlic, minced
- 1 pound ground beef
- 2 tablespoons tomato paste
- 1 can (14.5 ounces) diced tomatoes
- 2 cups beef broth
- 1 tablespoon paprika
- 1 teaspoon dried oregano
- Salt and pepper to taste
- 3 cups uncooked pasta (elbow macaroni or pasta shaped like bones for effect)
- 1 red bell pepper, diced
- 1 cup sliced mushrooms
- 1 cup frozen peas
- Red food coloring (optional, for extra gore effect)
- Fresh parsley for garnish
Cooking Instructions:
- Sauté the Aromatics: In a large pot or Dutch oven, heat the olive oil over medium heat. Add the chopped onion and minced garlic, sautéing until the onion becomes translucent and fragrant, about 5 minutes.
- Brown the Meat: Add the ground beef to the pot, breaking it apart with a wooden spoon. Cook until the beef is browned all over, ensuring it’s well cooked and no pink remains.
- Incorporate Tomato Elements: Stir in the tomato paste, making sure it coats the meat well. Then add the diced tomatoes, along with their juice, and stir to combine.
- Add Liquid and Spices: Pour in the beef broth, and add the paprika, oregano, salt, and pepper. Stir everything together, bringing the mixture to a gentle simmer.
- Simmer the Mixture: Allow the goulash to simmer for 15-20 minutes, stirring occasionally. This will help the flavors meld together and the sauce to thicken slightly.
- Cook the Pasta: While the sauce simmers, cook the pasta in a separate pot according to package instructions. Once cooked, drain and set aside.
- Combine Ingredients: Add the diced red bell pepper, sliced mushrooms, and frozen peas to the simmering sauce. Let it cook for an additional 5-7 minutes, until the vegetables are tender.
- Assemble the Goulash: Stir the cooked pasta into the meat and vegetable mixture until well combined. If desired, add a few drops of red food coloring to enhance the gory appearance, stirring well to distribute evenly.
- Garnish and Serve: Remove the goulash from heat, garnish with fresh parsley, and serve hot. Arrange the pasta creatively to add to the spooky presentation.
Extra Tips: To enhance the Halloween theme, consider using pasta shaped like bats, pumpkins, or other spooky figures. You can also add a few drops of red food coloring to the sauce for a more intense, blood-like appearance.
If you prefer a thicker sauce, allow the goulash to simmer for a bit longer to reduce the liquid further. For added texture, consider topping the dish with crispy fried onions just before serving. Enjoy the spooky and delicious experience!
Chilling Chili

Invite a spine-tingling atmosphere into your Halloween dinner with this Chilling Chili recipe. Perfect for the fall season, this dish combines hearty ingredients with a hint of spookiness, making it ideal for both family gatherings and Halloween parties alike.
The rich, savory flavors of this chili, simmered to perfection, will warm you up on a cool October night while adding a touch of ghoulish fun to your meal. Chilling Chili is both delicious and easy to prepare, allowing you to spend less time in the kitchen and more time enjoying the Halloween festivities.
With a mix of beans, ground beef, and a variety of spices, this chili is sure to be a hit. The recipe serves 4-6 people, making it perfect for a small group of friends or family members to enjoy together.
Ingredients:
- 1 tablespoon olive oil
- 1 large onion, chopped
- 2 cloves garlic, minced
- 1 pound ground beef
- 1 (28-ounce) can diced tomatoes
- 2 tablespoons tomato paste
- 1 (15-ounce) can kidney beans, drained and rinsed
- 1 (15-ounce) can black beans, drained and rinsed
- 1 (15-ounce) can pinto beans, drained and rinsed
- 1 green bell pepper, chopped
- 1 red bell pepper, chopped
- 2 tablespoons chili powder
- 1 teaspoon ground cumin
- 1 teaspoon smoked paprika
- 1 teaspoon salt
- 1/2 teaspoon black pepper
- 1/4 teaspoon cayenne pepper (optional, for extra heat)
- 1 cup beef broth
- 1 cup frozen corn
- Sour cream (for serving)
- Shredded cheddar cheese (for serving)
- Chopped fresh cilantro (for serving)
Instructions:
- Prepare the Ingredients: Begin by preparing your ingredients. Chop the onion, mince the garlic, and chop the bell peppers. Open and drain the cans of beans.
- Cook the Aromatics: Heat the olive oil in a large pot over medium heat. Add the chopped onion and minced garlic, sautéing for about 3-5 minutes until the onion becomes translucent and fragrant.
- Brown the Ground Beef: Add the ground beef to the pot, breaking it apart with a wooden spoon. Cook until the beef is browned and cooked through, about 5-7 minutes.
- Combine Base Ingredients: Stir in the diced tomatoes, tomato paste, kidney beans, black beans, pinto beans, green and red bell peppers. Mix well to combine all ingredients.
- Season the Chili: Add the chili powder, ground cumin, smoked paprika, salt, black pepper, and cayenne pepper (if using) to the pot. Stir well to guarantee all the spices are evenly distributed.
- Simmer the Chili: Pour in the beef broth and bring the mixture to a boil. Reduce the heat to low and let the chili simmer for about 30-40 minutes, stirring occasionally. This allows the flavors to meld together.
- Add the Corn: Stir in the frozen corn and cook for an additional 5 minutes until the corn is heated through.
- Serve: Ladle the Chilling Chili into bowls and top each serving with a dollop of sour cream, a sprinkle of shredded cheddar cheese, and a garnish of chopped fresh cilantro.
Extra Tips:
For those who prefer a vegetarian option, you can substitute the ground beef with an equal amount of chopped mushrooms or a plant-based protein alternative.
To enhance the spooky theme, serve the chili in small hollowed-out pumpkins or add a splash of dark food coloring for an eerie effect. Adjust the level of heat by adding more or less cayenne pepper based on your guests’ preferences.
Finally, remember that chili often tastes even better the next day, so consider making it a day in advance to allow the flavors to deepen overnight.
Phantom Flatbreads

Looking to add a spooky twist to your Halloween dinner menu? Phantom Flatbreads are a ghoulishly delightful choice, perfect for setting the eerie mood while satisfying your taste buds.
These flatbreads aren’t only visually haunting with their ghostly appearance, but also deliciously savory, making them a crowd-pleaser for both adults and children alike. With a crispy base, topped with a haunting blend of ingredients, these flatbreads deliver a burst of flavors that are sure to enchant your guests.
Whether you’re hosting a Halloween party or enjoying a quiet evening with family, Phantom Flatbreads are easy to prepare and can be customized to suit any palate. The combination of fresh vegetables, flavorful cheeses, and a hint of spice guarantees that these flatbreads aren’t only festive but also nutritious.
Let your creativity run wild as you shape your flatbreads into ghostly figures and watch them come to life in the oven, ready to be devoured by your enthusiastic guests.
Ingredients for 4-6 people:
- 4 flatbread bases
- 1 cup pizza sauce
- 1 cup shredded mozzarella cheese
- 1/2 cup black olives, sliced
- 1/2 cup red bell peppers, thinly sliced
- 1/2 cup mushrooms, sliced
- 1/4 cup red onions, thinly sliced
- 1 teaspoon dried oregano
- 1/2 teaspoon garlic powder
- 1/4 teaspoon red pepper flakes (optional)
- Olive oil, for brushing
Cooking Instructions:
- Preheat the Oven: Start by preheating your oven to 400°F (200°C). This guarantees that the flatbreads cook evenly and develop a crispy base.
- Prepare the Flatbreads: Lay the flatbread bases on a large baking sheet. Lightly brush each flatbread with olive oil to create a golden crust as they bake.
- Spread the Sauce: Evenly spread about 1/4 cup of pizza sauce over each flatbread, leaving a small border around the edges to mimic a ghostly shape.
- Add the Cheese: Sprinkle a generous amount of shredded mozzarella cheese over the sauce, guaranteeing even coverage. The cheese will melt and bubble, adding to the spooky effect.
- Top with Vegetables: Distribute the sliced black olives, red bell peppers, mushrooms, and red onions over the cheese. Arrange them in a way that resembles ghost faces or patterns, using olives for eyes and peppers for mouths.
- Season the Flatbreads: Sprinkle the dried oregano, garlic powder, and red pepper flakes (if using) over the flatbreads for added flavor and aroma.
- Bake the Flatbreads: Place the baking sheet in the preheated oven and bake for 12-15 minutes, or until the cheese is melted and bubbly, and the edges are crispy.
- Serve: Remove the flatbreads from the oven and let them cool slightly. Cut into slices and serve while warm, enjoying the spooky delight.
Extra Tips:
For an even more eerie presentation, consider using cookie cutters to shape the flatbreads into ghostly forms before topping them.
You can also experiment with different cheeses for added flavor complexity, such as smoked gouda or provolone. To make the flatbreads extra crispy, pre-bake the bases for a few minutes before adding the toppings.
If you’re catering to a vegan crowd, substitute the cheese with a plant-based alternative to keep the dish inclusive.