

As October nights start to whisper with a chill, I find myself dreaming up dinner ideas that echo the Halloween spirit. Think spooky stuffed bell peppers with grinning faces or a plate of eerie pasta that teases the senses. These festive dishes promise more than just flavor; they turn an ordinary meal into a whimsical feast. Are you ready to explore these culinary delights? The cauldron is just beginning to bubble.
Spooky Stuffed Bell Peppers

This recipe is designed to serve 4-6 people, making it ideal for a small gathering or family dinner. The combination of seasoned ground beef, hearty rice, and melted cheese makes these stuffed peppers both filling and flavorful. The process is straightforward, allowing you to focus on the fun of carving and stuffing the peppers while still delivering a dish that’s both visually appealing and mouthwateringly good.
Ingredients:
- 4-6 large bell peppers (orange, red, or yellow)
- 1 pound ground beef
- 1 cup cooked rice
- 1 small onion, diced
- 2 cloves garlic, minced
- 1 can (14.5 ounces) diced tomatoes, drained
- 1 tablespoon tomato paste
- 1 teaspoon Italian seasoning
- Salt and pepper to taste
- 1 cup shredded mozzarella cheese
- Olive oil
Cooking Instructions:
- Prepare the Bell Peppers: Preheat your oven to 375°F (190°C). Cut the tops off the bell peppers and remove the seeds and membranes. Use a small knife to carve jack-o’-lantern faces into the peppers, if desired. Lightly brush the outside of the peppers with olive oil and place them in a baking dish.
- Cook the Filling: In a large skillet, heat a tablespoon of olive oil over medium heat. Add the diced onion and minced garlic, sautéing until the onion is translucent. Add the ground beef, cooking until browned and fully cooked. Drain any excess fat.
- Combine the Ingredients: Stir in the cooked rice, diced tomatoes, tomato paste, and Italian seasoning. Season with salt and pepper to taste. Allow the mixture to simmer for about 5 minutes, giving flavors time to meld.
- Stuff the Peppers: Spoon the beef and rice mixture evenly into each prepared bell pepper, pressing down gently to pack the filling. Top each stuffed pepper with a generous amount of shredded mozzarella cheese.
- Bake: Cover the baking dish with foil and bake in the preheated oven for 25-30 minutes. Remove the foil and bake for an additional 10 minutes or until the cheese is golden and bubbly.
- Serve and Enjoy: Allow the peppers to cool slightly before serving. Enjoy your spooky creation alongside a mixed green salad or garlic bread.
Extra Tips:
When carving the peppers, make certain the cuts aren’t too large, as this can cause the filling to spill out during baking.
If you’re short on time, you can prepare the filling a day in advance and refrigerate it until ready to use.
For a vegetarian version, substitute the ground beef with black beans or a plant-based meat alternative.
Feel free to get creative with the faces—each pepper can have a unique personality, adding to the Halloween fun.
Creepy-Crawly Pasta With Black Squid Ink
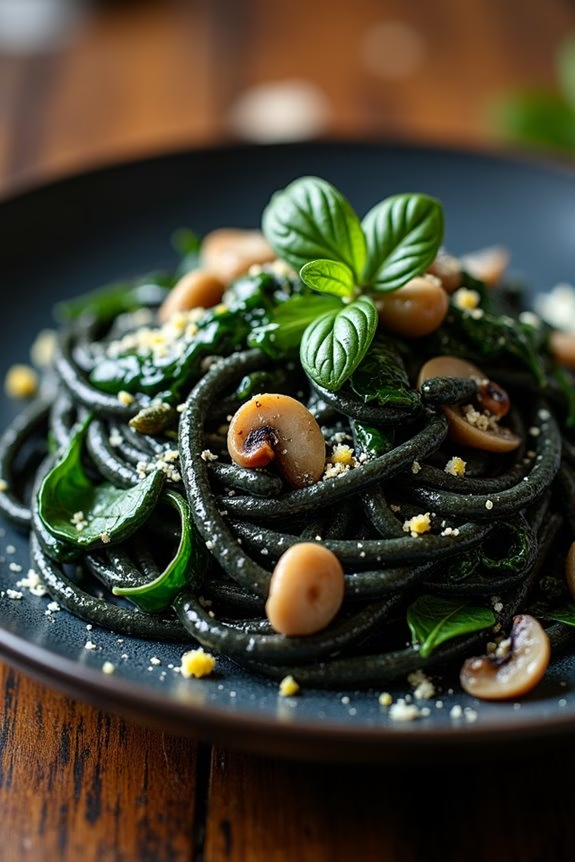
Creepy-Crawly Pasta With Black Squid Ink is a perfect dish to serve at your Halloween dinner party. The dark, inky color of the pasta creates an eerie appearance that’s sure to impress your guests and add to the spooky ambiance. The squid ink not only gives the pasta its striking color but also adds a subtle briny flavor that pairs beautifully with the accompanying ingredients.
This dish is as delicious as it’s visually stunning, making it a must-try for those looking to add a unique twist to their Halloween menu. The dish combines the rich, savory taste of garlic and chili with the fresh zestiness of lemon and the umami depth of Parmesan cheese, creating a flavor profile that’s both complex and satisfying.
Black squid ink pasta is complemented by sautéed mushrooms and tender baby spinach, adding an earthy touch to the meal. The dish isn’t only a feast for the eyes but also a delight for the taste buds, guaranteeing that your Halloween dinner is both memorable and delicious.
Ingredients (Serves 4-6)
- 1 lb (450g) black squid ink pasta
- 2 tablespoons olive oil
- 4 cloves garlic, minced
- 1 teaspoon red pepper flakes
- 8 oz (225g) button or cremini mushrooms, sliced
- 6 oz (170g) baby spinach
- 1/2 cup (120ml) dry white wine
- Zest and juice of 1 lemon
- 1/2 cup (50g) grated Parmesan cheese
- Salt and freshly ground black pepper, to taste
- Fresh parsley, chopped for garnish
Instructions
- Cook the Pasta: Begin by bringing a large pot of salted water to a boil. Add the black squid ink pasta and cook according to the package instructions until al dente. Drain the pasta, reserving about 1 cup of the pasta water, and set aside.
- Sauté Garlic and Chili: In a large skillet, heat the olive oil over medium heat. Add the minced garlic and red pepper flakes, sautéing until the garlic is fragrant and just beginning to turn golden, about 1-2 minutes.
- Cook the Mushrooms: Add the sliced mushrooms to the skillet and cook until they’re tender and have released their liquid, about 5-7 minutes.
- Add Spinach and Wine: Stir in the baby spinach and cook until wilted, about 2 minutes. Pour in the white wine and let it simmer for 2-3 minutes, allowing the alcohol to evaporate and the flavors to meld.
- Combine Pasta and Flavors: Add the cooked pasta to the skillet along with the lemon zest and juice. Toss everything together, adding reserved pasta water a little at a time to achieve your desired sauce consistency.
- Finish with Cheese and Seasoning: Remove the skillet from the heat and stir in the grated Parmesan cheese. Season with salt and freshly ground black pepper to taste.
- Garnish and Serve: Transfer the pasta to a serving platter or individual plates. Garnish with fresh parsley and additional Parmesan cheese if desired. Serve immediately.
Extra Tips
For an extra touch of Halloween flair, consider garnishing the pasta with some edible flowers or a few drops of squid ink for added drama.
Be sure to rinse the pasta briefly after draining to prevent it from sticking together, but not so much that it loses all its flavor. If you can’t find squid ink pasta, you can use regular pasta and add a teaspoon of squid ink to the sauce for color.
Mummy Meatloaf
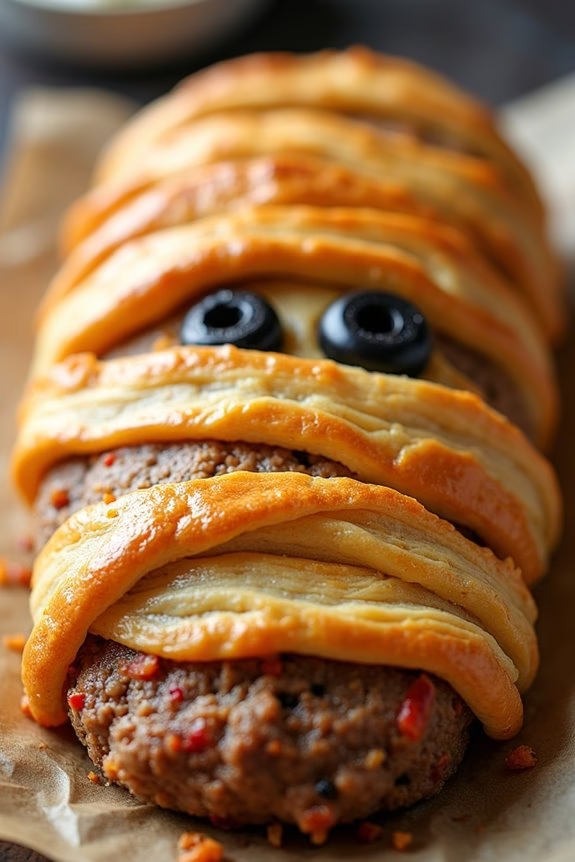
This Halloween, bring a touch of spooky fun to your dinner table with a Mummy Meatloaf. This creative twist on a classic dish not only tastes delicious but also adds a festive flair to your Halloween celebration. The mummy wrap, made from strips of crescent roll dough, gives the meatloaf a playful appearance that’s sure to delight kids and adults alike.
With a savory meat filling and a golden, flaky crust, this Mummy Meatloaf is a surefire hit for your Halloween gathering. Crafting this dish is simpler than it looks, making it perfect for a family dinner or a Halloween party. The key is in the presentation, with strategically placed olives for eyes and a pattern of dough strips that mimic a mummy’s bandages.
The combination of beef, pork, and spices creates a flavorful base, while the crescent roll adds a buttery, flaky texture. This recipe serves 4-6 people, guaranteeing that there’s enough for everyone to enjoy a slice of this spooky meatloaf.
Ingredients (Serves 4-6):
- 1 pound ground beef
- 1/2 pound ground pork
- 1 cup breadcrumbs
- 1/2 cup milk
- 1/2 cup grated Parmesan cheese
- 1 egg
- 1 small onion, finely chopped
- 2 cloves garlic, minced
- 1 tablespoon Worcestershire sauce
- 1 teaspoon salt
- 1/2 teaspoon black pepper
- 1 can (8 oz) refrigerated crescent roll dough
- 2 black olives (for eyes)
- Ketchup (optional, for serving)
Cooking Instructions:
- Preheat the Oven: Start by preheating your oven to 350°F (175°C) to guarantee it’s at the right temperature for baking the meatloaf.
- Prepare the Meat Mixture: In a large bowl, combine the ground beef, ground pork, breadcrumbs, milk, Parmesan cheese, egg, onion, garlic, Worcestershire sauce, salt, and pepper. Mix everything thoroughly until all ingredients are well incorporated.
- Shape the Meatloaf: On a baking sheet lined with parchment paper, shape the meat mixture into an elongated oval, resembling the body of a mummy.
- Wrap with Crescent Dough: Open the can of crescent roll dough and unroll it. Cut the dough into thin strips. Carefully wrap the strips around the meatloaf, leaving small gaps to resemble a mummy’s bandages.
- Add Eyes: Slice the black olives into small circles. Place two circles on the top part of the meatloaf to create the mummy’s eyes.
- Bake the Meatloaf: Place the baking sheet in the preheated oven and bake for 45-55 minutes, or until the internal temperature of the meatloaf reaches 160°F (70°C) and the dough is golden brown.
- Cool and Serve: Let the meatloaf cool for a few minutes before slicing. Serve with ketchup, if desired, for a gory touch.
Extra Tips:
When shaping the meatloaf, make sure it’s compact to maintain the mummy shape during baking. If the dough browns too quickly, cover the loaf loosely with aluminum foil.
For added flavor, consider incorporating your favorite herbs or spices into the meat mixture. When wrapping the dough, don’t worry about being too precise; a slightly haphazard look adds to the mummy’s charm.
Witch’s Brew Stew
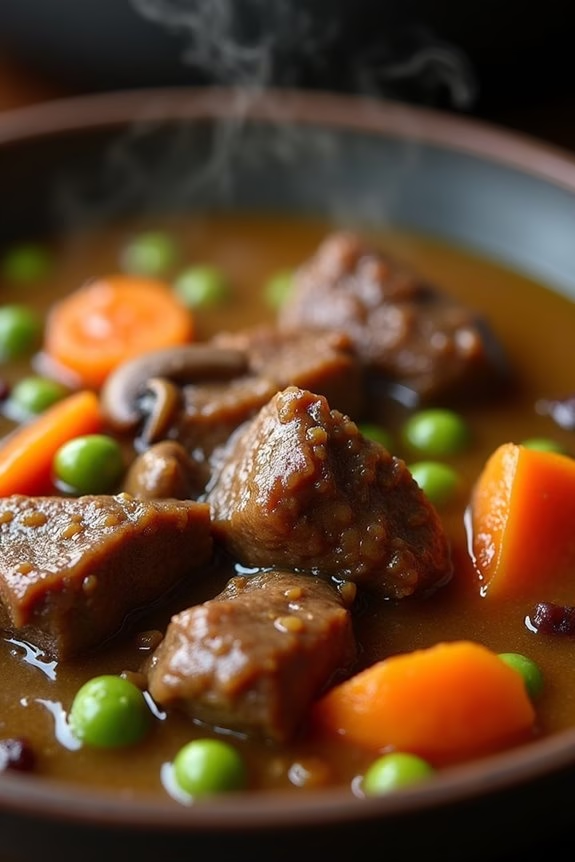
Transform your Halloween dinner table into a cauldron of flavors with our Witch’s Brew Stew. This hearty and savory dish is perfect for those chilly October nights and will surely enchant your guests. Packed with a variety of vegetables, tender meat, and a blend of spices, this stew will bubble away on your stove, filling your home with a tantalizing aroma that will draw everyone to the table.
Whether you’re hosting a spooky soiree or simply looking for a themed family dinner, this Witch’s Brew Stew is sure to cast a delicious spell. This recipe serves 4-6 people and offers a delightful combination of textures and tastes. The rich, flavorful broth is complemented by tender chunks of beef and a selection of seasonal vegetables, making it a nourishing and satisfying meal.
Whether you’re serving it in a traditional bowl or a more whimsical cauldron, this stew is bound to be the star of your Halloween feast. Grab your ladle and get ready to stir up some magic with this witchy delight!
Ingredients:
- 2 pounds beef stew meat, cut into 1-inch cubes
- 2 tablespoons olive oil
- 1 large onion, chopped
- 3 cloves garlic, minced
- 4 cups beef broth
- 1 cup red wine
- 2 tablespoons tomato paste
- 2 teaspoons Worcestershire sauce
- 1 teaspoon dried thyme
- 1 teaspoon dried rosemary
- 1 bay leaf
- 4 carrots, peeled and sliced
- 3 potatoes, peeled and cubed
- 2 cups mushrooms, sliced
- 1 cup peas
- Salt and pepper to taste
Cooking Instructions:
- Sear the Meat: Heat the olive oil in a large pot over medium-high heat. Add the beef cubes in batches, ensuring not to overcrowd the pot. Sear the meat until browned on all sides, about 5-7 minutes per batch. Remove the beef and set aside.
- Sauté the Vegetables: In the same pot, add the chopped onion and sauté for about 5 minutes until translucent. Add the minced garlic and cook for an additional 1-2 minutes until fragrant.
- Combine Ingredients: Return the seared beef to the pot. Stir in the beef broth, red wine, tomato paste, Worcestershire sauce, thyme, rosemary, and bay leaf. Bring the mixture to a boil.
- Simmer the Stew: Reduce the heat to low, cover, and let the stew simmer for about 1.5 to 2 hours, or until the beef is tender. Stir occasionally and skim off any foam that may appear on the surface.
- Add Remaining Vegetables: Add the carrots, potatoes, and mushrooms to the pot. Continue to simmer, covered, for another 30-40 minutes or until the vegetables are tender.
- Finish the Stew: Stir in the peas and allow them to heat through, about 5 minutes. Remove the bay leaf and adjust seasoning with salt and pepper to taste before serving.
Extra Tips:
For an even richer flavor, consider marinating the beef in the red wine for a few hours before cooking. If you prefer a thicker stew, you can mash some of the potatoes against the side of the pot or mix a tablespoon of cornstarch with cold water and stir it into the stew during the last 10 minutes of simmering.
To make the dish even more festive, serve it in hollowed-out mini pumpkins or bread bowls. Enjoy your spooky and scrumptious Witch’s Brew Stew!
Pumpkin and Sausage Risotto

Pumpkin and Sausage Risotto is a comforting and flavorful dish perfect for Halloween dinner. The creamy texture of the risotto combined with the savory taste of sausage and the subtle sweetness of pumpkin makes it an ideal meal for a cozy evening with family or friends.
The vibrant orange color of the pumpkin adds a festive touch to your Halloween table, while the rich flavors create a satisfying one-pot meal that everyone will enjoy.
This recipe serves 4-6 people and is perfect for a small gathering. It brings together the earthy flavors of fresh pumpkin and the hearty, spiced notes of sausage, all enveloped in the creamy embrace of arborio rice. The addition of fresh herbs and Parmesan cheese elevates the dish, making it a memorable center piece for your Halloween dinner menu.
Ingredients:
- 2 tablespoons olive oil
- 1 medium onion, finely chopped
- 2 cloves garlic, minced
- 1 pound Italian sausage, casing removed
- 1 cup arborio rice
- 1 cup pumpkin puree
- 4 cups chicken or vegetable broth
- 1/2 cup dry white wine
- 1/2 cup grated Parmesan cheese
- Salt and pepper to taste
- 1/4 cup fresh parsley, chopped
- 2 tablespoons butter
- Optional: 1/4 teaspoon nutmeg
Cooking Instructions:
- Prepare the Ingredients: Begin by prepping all the ingredients. Chop the onion and mince the garlic. Remove the casing from the Italian sausage and set aside. Measure the arborio rice and pumpkin puree, and have the broth ready in a separate pot, kept warm over low heat.
- Cook the Sausage: In a large saucepan or Dutch oven, heat the olive oil over medium heat. Add the sausage and cook until browned, breaking it apart with a spoon as it cooks. This should take about 5-7 minutes. Remove the sausage with a slotted spoon and set aside.
- Sauté Onion and Garlic: In the same pan, add the chopped onion and cook until translucent, about 3-4 minutes. Add the minced garlic and cook for an additional minute until fragrant.
- Toast the Rice: Add the arborio rice to the pan with the onions and garlic. Stir well to coat the rice in the oil, cooking for about 2 minutes until the rice becomes slightly translucent around the edges.
- Deglaze with Wine: Pour in the white wine and stir continuously until the wine is mostly absorbed by the rice.
- Add Broth Gradually: Begin adding the warm broth, one ladle at a time, stirring frequently. Allow the rice to absorb the broth before adding the next ladleful. Continue this process for about 18-20 minutes, or until the rice is creamy and cooked al dente.
- Incorporate Pumpkin and Sausage: Stir in the pumpkin puree and cooked sausage, mixing well to combine. Cook for an additional 5 minutes, stirring frequently. Season with salt, pepper, and nutmeg if using.
- Finish with Cheese and Butter: Remove the risotto from heat and stir in the Parmesan cheese, butter, and chopped parsley. Mix until the cheese is melted and the risotto is creamy.
- Serve: Taste and adjust seasoning if necessary. Serve the risotto hot, garnished with additional Parmesan cheese and parsley if desired.
Extra Tips:
For the best texture, make certain the broth is warm before adding it to the rice. This helps maintain the cooking temperature and aids in the proper absorption of liquid.
If you prefer a slightly richer flavor, you can substitute half of the broth with chicken stock. Remember to stir the risotto frequently to prevent it from sticking to the bottom of the pan and to achieve that classic creamy consistency.
If you have leftover risotto, you can shape it into patties and fry them for a delicious snack the next day.
Monster Burger Sliders

Monster Burger Sliders are a frightfully fun addition to your Halloween dinner party menu. These bite-sized burgers aren’t only delicious but also creatively designed to fit the spooky Halloween theme. Perfect for guests of all ages, these sliders can be customized with assorted toppings to bring out the monster in each burger. With a little creativity, you can transform regular sliders into something that will both delight and amuse your guests.
The foundation of these Monster Burger Sliders is a juicy beef patty, seasoned to perfection and grilled to your liking. Once the patties are ready, the fun begins with assembling the sliders to resemble little monsters. Using toppings like cheese, pickles, and olives, you can create eyes, teeth, and even horns to give each slider a personality of its own. Let your imagination run wild, and serve up a batch of these monstrous creations that are sure to be a hit at any Halloween gathering.
Ingredients (Serving Size: 4-6 people):
- 1.5 pounds ground beef
- 1 teaspoon salt
- 1/2 teaspoon black pepper
- 1 teaspoon garlic powder
- 1 teaspoon onion powder
- 1 tablespoon Worcestershire sauce
- 6 slices cheddar cheese
- 12 small slider buns
- 1/4 cup mayonnaise
- 1/4 cup ketchup
- 12 pickles (sliced into rounds)
- 12 olives (for eyes)
- 1 small red onion (sliced into rings)
- Lettuce leaves, as needed
- Pretzel sticks (optional, for horns)
Cooking Instructions:
- Prepare the Beef Patties: In a large mixing bowl, combine the ground beef with salt, black pepper, garlic powder, onion powder, and Worcestershire sauce. Mix gently until everything is well incorporated. Divide the mixture into 12 equal portions and shape each into a small patty, about the size of a slider bun.
- Cook the Patties: Heat a grill or skillet over medium-high heat. Once hot, add the patties and cook for about 3-4 minutes on each side, or until they reach your desired level of doneness. In the last minute of cooking, place a slice of cheddar cheese on top of each patty to melt.
- Prepare the Buns: While the patties are cooking, slice the slider buns in half and lightly toast them on the grill or in a toaster. This will give them a nice crunch and help them hold up to the toppings.
- Assemble the Sliders: Spread a little mayonnaise and ketchup on the bottom half of each bun. Place a lettuce leaf on top, followed by the cheesy beef patty. Add a pickle slice for the mouth, and use the olives to create eyes by skewering them with toothpicks and placing them on top of the bun. For added flair, insert pretzel sticks into the top of the bun as horns.
- Serve: Secure the top bun with a toothpick to hold the components in place. Arrange the sliders on a platter and serve them warm to your guests.
Extra Tips: For an added spooky effect, consider using food coloring to dye the cheese or mayonnaise in Halloween colors like green or purple. If you’re serving children, you might want to prepare some of the toppings in advance to speed up the assembly process.
Additionally, allowing guests to create their own monster designs can be a fun interactive activity at your dinner party. Remember, the key to these sliders is creativity, so have fun with the design and enjoy the compliments on your monstrous masterpieces!
Ghostly White Pizza

Ghostly White Pizza is a spooktacular treat that’s perfect for your Halloween dinner party. This eerie twist on a classic dish features a hauntingly delicious white sauce, topped with ghostly mozzarella and fresh herbs to create an otherworldly experience.
Whether you’re hosting a gathering for ghouls and goblins or just want something fun and festive for the family, this pizza is bound to be a hit.
The creamy white sauce made with garlic and Parmesan cheese serves as the ideal base for this pizza, while the mozzarella ghosts add a playful touch. Using a pre-made pizza crust keeps things simple, but if you’re feeling adventurous, you can make your own dough from scratch.
Serve this Ghostly White Pizza with a side of green salad or perhaps some “bloody” marinara sauce for dipping.
Ingredients (Serves 4-6):
- 1 pre-made pizza crust (12-inch)
- 1 cup Alfredo sauce
- 2 cups shredded mozzarella cheese
- 2 cloves garlic, minced
- 1/4 cup grated Parmesan cheese
- 1 tablespoon olive oil
- 1 teaspoon dried oregano
- 1 teaspoon dried basil
- Black olives (sliced, for eyes)
- Fresh basil leaves (optional, for garnish)
Cooking Instructions:
- Preheat Oven: Preheat your oven to 450°F (230°C). This guarantees the pizza crust will bake evenly and achieve a crispy texture.
- Prepare the Sauce: In a small saucepan over medium heat, combine the Alfredo sauce, minced garlic, and grated Parmesan cheese. Stir occasionally until the mixture is heated through and the cheese is melted. This will be your rich, flavorful base for the pizza.
- Assemble the Pizza: Place the pre-made pizza crust on a baking sheet or pizza stone. Brush the crust lightly with olive oil, which will give it a lovely golden color once baked. Spread the prepared white sauce evenly over the crust.
- Add Cheese and Seasoning: Sprinkle shredded mozzarella cheese generously over the sauce. Arrange the mozzarella slices on top, shaping them into ghostly figures. Use sliced black olives to create eyes for the ghost shapes. Sprinkle dried oregano and basil over the pizza for extra flavor.
- Bake the Pizza: Place the pizza in the preheated oven and bake for 12-15 minutes, or until the cheese is bubbly and slightly golden, and the crust is crisp. Keep a close eye to prevent burning.
- Garnish and Serve: Remove the pizza from the oven and let it cool slightly before slicing. Garnish with fresh basil leaves, if desired, to add a pop of color and freshness. Serve immediately and enjoy!
Extra Tips:
For a truly spooky presentation, consider using a cookie cutter to shape the mozzarella slices into ghost forms before placing them on the pizza.
Additionally, you can add a little bit of spinach or arugula to the pizza for extra color and nutrients. If you prefer a homemade crust, prepare it in advance and allow it to rise before assembling the pizza.
When using fresh herbs, add them just before serving to preserve their flavor and vibrancy.
Bat Wings With Spicy BBQ Sauce

Halloween is the perfect time to get creative in the kitchen, and what better way to celebrate than with a spooky dish like Bat Wings With Spicy BBQ Sauce? These deliciously dark chicken wings are perfect for adding a touch of frightful fun to your Halloween dinner spread.
The rich and spicy BBQ sauce clings to the crispy, baked wings, making them a delightfully messy treat that will have your guests coming back for more. The intense flavors combined with a hint of heat make for an unforgettable dish that will surely be the talk of your Halloween party.
The secret to this dish lies in the balance of flavors in the BBQ sauce and the cooking method that guarantees the wings are crispy on the outside and juicy on the inside. The wings are seasoned and baked to perfection before being tossed in a homemade spicy BBQ sauce that’s both sweet and tangy, with just the right amount of kick.
This recipe serves 4-6 people, making it ideal for a small gathering or as part of a larger Halloween feast.
Ingredients:
- 2 pounds chicken wings
- 2 tablespoons olive oil
- Salt and pepper to taste
- 1 cup ketchup
- 1/4 cup apple cider vinegar
- 1/4 cup brown sugar
- 2 tablespoons Worcestershire sauce
- 1 tablespoon hot sauce (adjust for desired heat)
- 2 teaspoons smoked paprika
- 1 teaspoon garlic powder
- 1 teaspoon onion powder
- 1 teaspoon cayenne pepper
- Black food coloring (optional, for a spooky effect)
- Fresh parsley for garnish (optional)
Cooking Instructions:
- Preheat the Oven: Start by preheating your oven to 400°F (200°C). This guarantees that the wings cook evenly and become crispy.
- Prepare the Chicken Wings: Place the chicken wings in a large bowl. Drizzle with olive oil and season with salt and pepper. Toss to coat the wings evenly.
- Bake the Wings: Arrange the wings on a baking sheet lined with parchment paper or a silicone mat. Bake for 40-45 minutes, turning once halfway through, until the wings are golden brown and crispy.
- Make the BBQ Sauce: While the wings are baking, prepare the BBQ sauce. In a medium saucepan over medium heat, combine ketchup, apple cider vinegar, brown sugar, Worcestershire sauce, hot sauce, smoked paprika, garlic powder, onion powder, and cayenne pepper. Stir well and bring to a simmer. Cook for about 10 minutes, stirring occasionally, until the sauce thickens slightly.
- Add Food Coloring: If you want to give your BBQ sauce a spooky look, add a few drops of black food coloring to the sauce and stir until fully incorporated.
- Toss the Wings in Sauce: Once the wings are done, remove them from the oven and let them cool slightly. Place them in a large bowl and pour the spicy BBQ sauce over the wings. Toss to coat the wings evenly.
- Garnish and Serve: Transfer the sauced wings to a serving platter. If desired, garnish with fresh parsley for a pop of color. Serve immediately and enjoy!
Extra Tips:
- For extra crispy wings, pat them dry with paper towels before seasoning. Removing excess moisture helps them crisp up better in the oven.
- If you prefer a smokier flavor, consider grilling the wings instead of baking, but adjust the cooking time accordingly.
- Feel free to adjust the level of heat by varying the amount of hot sauce and cayenne pepper in the BBQ sauce.
- If you don’t have black food coloring, you can skip it or use activated charcoal powder for a natural alternative.
- Leftover wings can be reheated in the oven to maintain their crispiness rather than using a microwave, which can make them soggy.
Vampire Garlic Shrimp
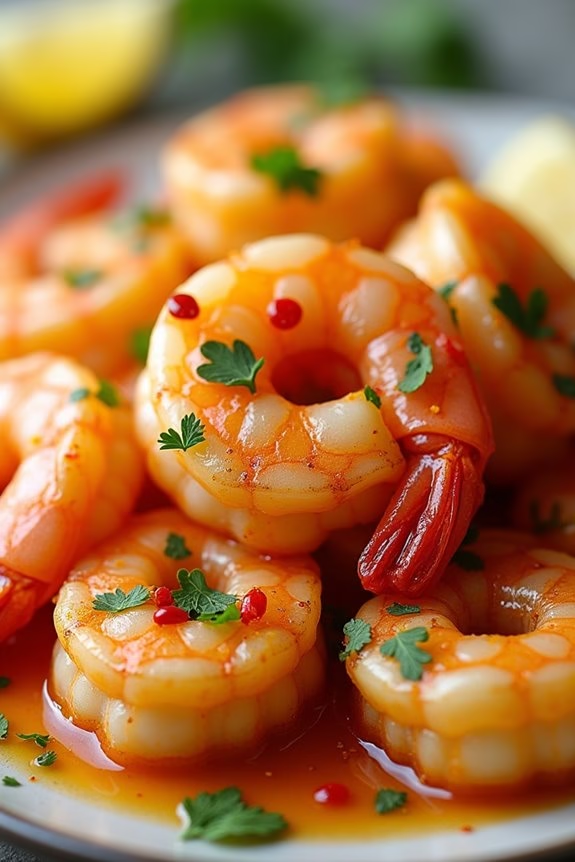
Vampire Garlic Shrimp is a delightfully spooky dish perfect for a Halloween dinner. This dish combines the rich flavors of garlic with succulent shrimp, resulting in a savory meal that even the most bloodthirsty vampires would crave. The bold garlic flavor makes it a standout dish, while the tender shrimp provide a satisfying texture.
Whether you’re hosting a Halloween party or simply want to add some festive flair to your dinner table, Vampire Garlic Shrimp is guaranteed to impress. This dish not only captures the essence of Halloween but also brings a bit of elegance to your dinner spread. The preparation is simple yet effective, allowing the natural flavors of the ingredients to shine through.
Serve it with a side of crusty bread or over a bed of pasta for a complete meal that will keep your guests coming back for more. It’s an ideal choice for those who want to celebrate the spooky season with a gourmet twist.
Ingredients for 4-6 servings:
- 2 pounds large shrimp, peeled and deveined
- 10 cloves garlic, minced
- 1/4 cup olive oil
- 1/4 cup unsalted butter
- 1/2 teaspoon red pepper flakes
- 1/4 cup fresh parsley, chopped
- Salt and pepper to taste
- Juice of one lemon
- Lemon wedges for serving
Cooking Instructions:
- Prepare the Shrimp: Begin by making sure your shrimp are properly peeled and deveined. Rinse them under cold water and pat dry with paper towels. Season lightly with salt and pepper.
- Heat the Oil and Butter: In a large skillet, heat the olive oil and butter over medium heat until the butter is fully melted and begins to bubble slightly.
- Sauté the Garlic: Add the minced garlic to the skillet and sauté for about 1-2 minutes until fragrant, being careful not to let it burn. The garlic should turn a light golden color.
- Cook the Shrimp: Add the shrimp to the skillet in a single layer. Cook for 2-3 minutes on one side until they start to turn pink and opaque.
- Add Spice and Flip: Sprinkle the red pepper flakes over the shrimp and flip them over using tongs. Cook for an additional 2-3 minutes until fully cooked through.
- Finish with Lemon and Parsley: Remove the skillet from heat. Squeeze the juice of one lemon over the shrimp and sprinkle with chopped parsley. Toss everything in the skillet to coat the shrimp evenly.
- Serve: Transfer the shrimp to a serving platter and garnish with lemon wedges. Serve immediately with your choice of side dish.
Extra Tips:
For the best flavor, use fresh garlic instead of pre-minced options, as it will provide a more robust taste. When cooking the shrimp, avoid overcrowding the pan; cook them in batches if necessary to make sure they cook evenly.
Be attentive to the garlic as it cooks, as it can quickly go from golden to burnt, altering the flavor of the dish. If you prefer a milder dish, adjust the amount of red pepper flakes to suit your taste. Enjoy your Vampire Garlic Shrimp with a chilled glass of white wine for a complete culinary experience.
Freaky Frankenstein Tacos
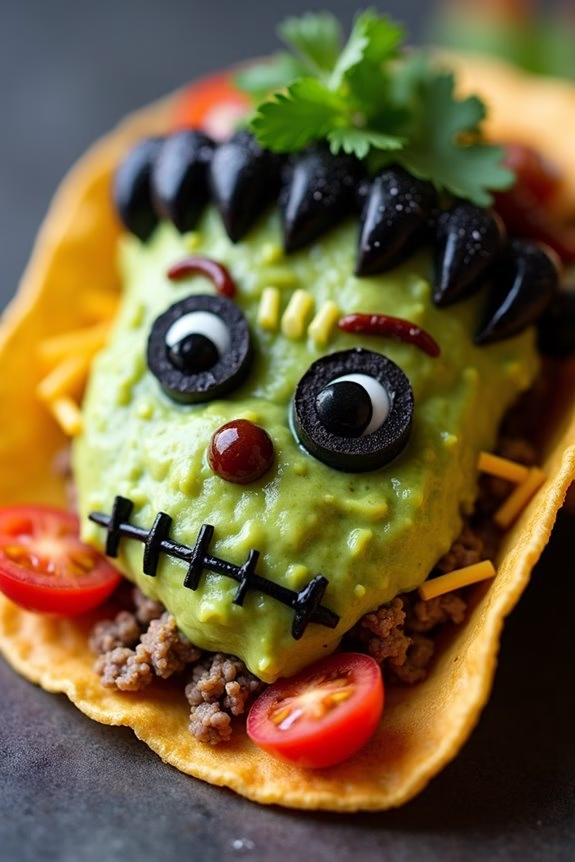
Freaky Frankenstein Tacos are a spooky and delicious way to celebrate Halloween with your family and friends. These creative and monstrous tacos not only look frighteningly fun, but they also pack a flavorful punch that will have everyone coming back for more. Perfect for a Halloween dinner party or a themed family meal, these tacos are designed to resemble the classic Frankenstein monster, complete with green guacamole faces, olive eyes, and cheesy hair. They’re sure to be a hit with both kids and adults alike.
The preparation of Freaky Frankenstein Tacos involves crafting a colorful range of ingredients into a delightful and festive dish. The combination of seasoned ground beef, fresh vegetables, and creamy guacamole makes these tacos a crowd-pleaser. The decorative toppings add an extra layer of excitement, turning a simple taco into a Halloween-themed masterpiece. With a little creativity and some basic kitchen skills, you can easily whip up this meal to impress your guests and bring a touch of Halloween spirit to your dinner table.
Ingredients for 4-6 people:
- 1 pound ground beef
- 1 packet taco seasoning
- 12 taco shells
- 2 cups shredded lettuce
- 1 cup shredded cheddar cheese
- 1 cup guacamole
- 1/2 cup black olives, sliced
- 1/2 cup cherry tomatoes, halved
- 1/4 cup sour cream
- 1/4 cup salsa
- 1/4 cup chopped cilantro
Cooking Instructions:
- Prepare the Ground Beef: In a large skillet over medium heat, cook the ground beef until it’s browned and fully cooked. Drain any excess fat, then add the taco seasoning and a little water according to the package instructions. Stir well to combine and let it simmer for about 5 minutes until the mixture thickens.
- Warm the Taco Shells: While the beef is simmering, preheat your oven to 350°F (175°C). Arrange the taco shells on a baking sheet and warm them in the oven for about 5 minutes. This will make them crispy and ready to hold all the delicious fillings.
- Assemble the Tacos: Spread a layer of guacamole on the inside of each taco shell to serve as Frankenstein’s “face.” Add a generous spoonful of the seasoned beef on top of the guacamole, followed by a layer of shredded lettuce.
- Create Frankenstein’s Features: Sprinkle shredded cheddar cheese along the top edge of the taco shell to resemble Frankenstein’s hair. Use slices of black olives for the eyes, and place two cherry tomato halves as bolts on each side of the taco. Add a dollop of sour cream for the nose and a zigzag of salsa for the mouth.
- Garnish and Serve: Sprinkle chopped cilantro over the top for added flavor and color. Serve immediately, while the tacos are still warm and the cheese is slightly melted.
Extra Tips:
When making Freaky Frankenstein Tacos, feel free to get creative with the toppings to make each taco unique. For instance, you can use different colored peppers to create additional facial features or swap out the beef for a vegetarian alternative if desired.
Make sure to prepare all your toppings before assembling to guarantee a smooth and efficient process. Additionally, keep the guacamole fresh by adding a little lime juice to prevent browning. Serve these tacos with a side of chips and extra guacamole or salsa for dipping to complete the Halloween feast.
Devilish Deviled Eggs

Devilish Deviled Eggs are a spooky twist on the traditional deviled eggs, making them a perfect appetizer for your Halloween dinner party. These sinister snacks aren’t only visually enchanting but also deliciously flavorful. They boast a creamy, tangy filling with a hint of heat, and are garnished to mimic eerie eyeballs, ensuring they’re a hit with both kids and adults alike.
Whether you’re hosting a haunted house gathering or a simple family dinner, these deviled eggs will add the perfect eerie element to your menu. For a serving size of 4-6 people, this recipe combines the classic flavors of deviled eggs with a devilish touch, using simple ingredients that you likely already have on hand.
The preparation requires minimal effort but yields impressive results that are sure to become a conversation starter at your Halloween feast. So, gather your ingredients, roll up your sleeves, and get ready to create some frightfully fun and tasty treats!
Ingredients:
- 12 large eggs
- 1/2 cup mayonnaise
- 2 teaspoons yellow mustard
- 1 teaspoon white vinegar
- 1/2 teaspoon salt
- 1/4 teaspoon black pepper
- 1/4 teaspoon paprika, plus extra for garnish
- 12 sliced black olives
- Red food coloring
Instructions:
- Boil the Eggs: Place the eggs in a large pot and cover them with water. Bring the water to a boil over medium-high heat. Once boiling, remove the pot from heat and cover it with a lid. Let the eggs sit for about 10-12 minutes.
- Cool and Peel: After the eggs have cooked, drain the hot water and transfer the eggs to a bowl of ice water. Let them cool for about 5 minutes. Once cooled, gently peel the eggs and set them aside.
- Prepare the Filling: Slice each egg in half lengthwise and carefully remove the yolks, placing them in a medium-sized bowl. Set the egg whites aside. To the yolks, add mayonnaise, mustard, vinegar, salt, black pepper, and paprika. Mash the mixture with a fork until smooth and creamy.
- Add the Devilish Touch: Use a toothpick to add a drop or two of red food coloring to the yolk mixture, stirring until you achieve a desired devilish hue. Adjust the color as needed.
- Fill the Egg Whites: Spoon or pipe the yolk mixture back into the egg white halves, creating a small mound. For an extra spooky look, smooth the surface with the back of a spoon.
- Garnish with Eyes: Top each filled egg with a slice of black olive to resemble an eyeball. Sprinkle a light dusting of paprika over the completed eggs for added color and flavor.
- Chill and Serve: Refrigerate the deviled eggs for at least 30 minutes to allow the flavors to meld. Serve chilled as a creepy Halloween appetizer.
Extra Tips:
For added flair, consider using different colors of food dye to create a variety of sinister shades in the yolk mixture. You can also use sliced green olives for a different eye effect.
If you prefer a spicier kick, add a dash of hot sauce or cayenne pepper to the yolk mixture. When peeling the eggs, be gentle to avoid tearing the whites, and if necessary, roll the eggs on a hard surface to help loosen the shells.
Chilling Chili Con Carne
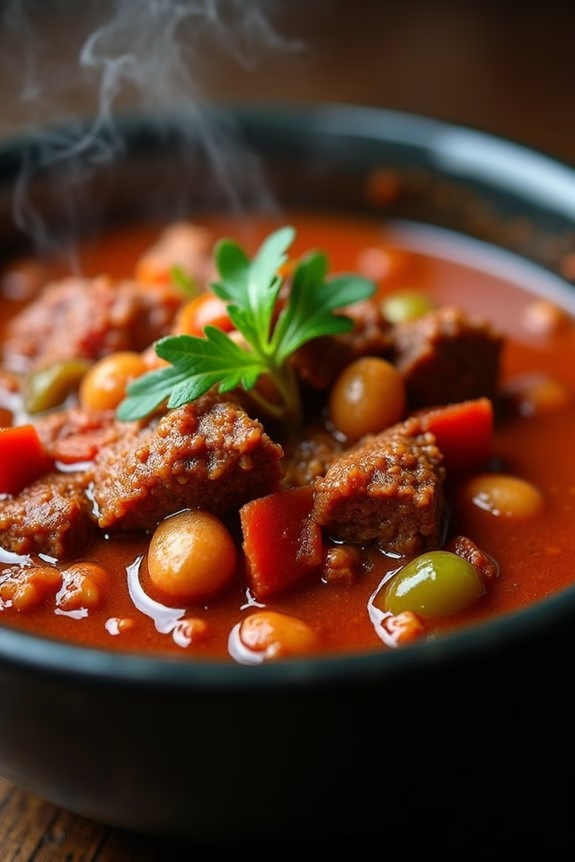
As the autumn leaves drift down and the air turns crisp, there’s no better way to celebrate Halloween than with a warm, hearty dish that evokes the spirit of the season. Chilling Chili Con Carne is a spicy, flavorful dish perfect for a Halloween dinner. Its fiery kick and deep, smoky flavors will warm up even the chilliest of nights, making it an ideal centerpiece for your spooky evening.
This recipe combines tender beef, rich tomatoes, and a mix of aromatic spices to create a dish that’s both comforting and exciting. Whether you’re hosting a Halloween party or simply enjoying a quiet night in, this Chilling Chili Con Carne is sure to be a hit. Serve it with some crusty bread or over a bed of rice for a complete meal that will satisfy your hunger and thrill your taste buds.
Ingredients (Serves 4-6):
- 2 tablespoons olive oil
- 1 large onion, chopped
- 3 cloves garlic, minced
- 1 red bell pepper, chopped
- 1 green bell pepper, chopped
- 2 pounds ground beef
- 2 tablespoons chili powder
- 1 teaspoon ground cumin
- 1 teaspoon smoked paprika
- 1/2 teaspoon cayenne pepper
- Salt and black pepper to taste
- 1 (14.5-ounce) can diced tomatoes
- 1 (6-ounce) can tomato paste
- 1 (15-ounce) can kidney beans, drained and rinsed
- 1 (15-ounce) can black beans, drained and rinsed
- 1 cup beef broth
- 1 tablespoon Worcestershire sauce
- 1 teaspoon sugar
- 1 bay leaf
Cooking Instructions:
- Prepare the Aromatics: In a large pot or Dutch oven, heat the olive oil over medium heat. Add the chopped onion and sauté until translucent, about 5 minutes. Stir in the minced garlic, red bell pepper, and green bell pepper, and cook for another 3 minutes until the peppers begin to soften.
- Brown the Beef: Increase the heat to medium-high and add the ground beef to the pot. Cook, breaking up the meat with a wooden spoon, until it’s fully browned and no pink remains, about 8-10 minutes. Drain any excess fat if necessary.
- Season the Mixture: Sprinkle in the chili powder, ground cumin, smoked paprika, cayenne pepper, salt, and black pepper. Stir well to coat the meat and vegetables with the spices, releasing their aromas.
- Simmer the Chili: Add the diced tomatoes, tomato paste, kidney beans, black beans, beef broth, Worcestershire sauce, sugar, and bay leaf to the pot. Stir to combine all ingredients thoroughly.
- Cook Slowly: Bring the mixture to a boil, then reduce the heat to low. Cover the pot and let the chili simmer for at least 45 minutes to 1 hour, stirring occasionally to prevent sticking. This allows the flavors to meld together beautifully.
- Final Touches: Taste the chili and adjust seasoning as needed. Remove the bay leaf before serving.
Extra Tips:
For an extra layer of flavor, consider roasting the bell peppers before adding them to the chili. This adds a smoky depth that complements the other spices beautifully.
You can also experiment with different types of beans or add a splash of beer for a unique twist. If you prefer your chili thicker, let it simmer uncovered for the last 15 minutes.
And remember, chili often tastes even better the next day, so don’t hesitate to make it ahead of time!