

As Halloween approaches, I can’t help but feel the excitement of creating some spooky, family-friendly dinner ideas. It’s such a delightful way to add a sprinkle of magic to the dinner table and get everyone involved in the kitchen. From rolling out Monster Meatball Mummies to brewing up Witch’s Brew Stew, there’s a treat for every taste. Gather your little goblins and let’s explore these playful dishes together. Who’s ready to make some unforgettable Halloween memories?
Monster Meatball Mummies

Halloween is the perfect occasion to indulge in fun and spooky-themed recipes that delight both kids and adults. Monster Meatball Mummies are a festive addition to any Halloween dinner table, combining the savory goodness of meatballs with a playful presentation that resembles wrapped mummies.
These meatball mummies are easy to make and can double as both a main dish and a party appetizer. With just a few ingredients and some creative assembly, you can serve up a meal that’s as entertaining as it’s delicious.
Monster Meatball Mummies take the classic meatball and wrap it in thin strips of crescent roll dough to resemble mummy bandages. As they bake to golden perfection, the dough crisps up around the meatballs, creating a delightful texture contrast.
Adding small edible eyes completes the look, giving your dish a charmingly eerie appearance. Whether you’re hosting a Halloween party or simply looking for a fun family dinner option, these mummies are sure to be a hit with everyone at the table.
Ingredients (Serves 4-6):
- 1 pound ground beef or turkey
- 1/4 cup breadcrumbs
- 1/4 cup grated Parmesan cheese
- 1 large egg
- 1 teaspoon garlic powder
- 1 teaspoon onion powder
- Salt and pepper to taste
- 1 tube of crescent roll dough
- Edible candy eyes or small pieces of black olives for eyes
- Marinara sauce for dipping (optional)
Cooking Instructions:
- Preheat the oven: Set your oven to 375°F (190°C) to allow it to fully heat while you prepare the meatball mixture.
- Prepare the meatball mixture: In a large mixing bowl, combine the ground meat, breadcrumbs, Parmesan cheese, egg, garlic powder, onion powder, salt, and pepper. Mix until all ingredients are well incorporated.
- Shape the meatballs: Using your hands, form the meat mixture into small balls, roughly 1-1.5 inches in diameter. Aim for uniformity to guarantee even cooking.
- Wrap the meatballs: Unroll the crescent roll dough and cut it into thin strips, approximately 1/4 inch wide. Wrap each meatball with the dough strips, leaving small gaps to mimic the appearance of mummy bandages.
- Bake the mummies: Place the wrapped meatballs on a baking sheet lined with parchment paper. Bake in the preheated oven for 15-20 minutes, or until the meatballs are cooked through and the crescent dough is golden brown.
- Add the eyes: Once baked, remove from the oven and allow to cool slightly. Place two edible eyes on each meatball mummy to complete the look.
- Serve: Arrange the Monster Meatball Mummies on a platter, and if desired, serve with a side of marinara sauce for dipping.
Extra Tips:
For an extra flavorful twist, you can add chopped fresh herbs such as parsley or basil to the meatball mixture. If you prefer a spicier kick, consider incorporating a pinch of red pepper flakes.
When wrapping the meatballs, take care not to overlap the dough strips too much to guarantee even baking. You can substitute the crescent dough with puff pastry for a flakier texture if preferred.
Finally, if you don’t have edible candy eyes, small pieces of black olives work perfectly as a substitute to give your mummies their iconic spooky stare.
Spooky Spider Pizza Pockets

Spooky Spider Pizza Pockets are a frightfully fun and delicious way to enjoy Halloween with your family. These creepy yet tasty treats are perfect for a themed dinner, adding a bit of spooky flair to the evening. With a crispy crust and gooey cheese filling, they’re sure to be a hit with both kids and adults alike.
The fun doesn’t stop at their taste: crafting these spider-like pockets can be a delightful family activity, with everyone joining in to shape and decorate their own edible arachnids.
These pizza pockets aren’t only entertaining but also versatile, allowing you to fill them with a variety of ingredients to suit your family’s tastes. Whether you prefer classic pepperoni, a veggie medley, or something more adventurous, the choice is yours.
Assembling the spider legs and adding olive eyes make for a fun and engaging way to bring these Halloween creatures to life. Perfect for a family of 4-6 people, these Spooky Spider Pizza Pockets will certainly become a staple in your Halloween menu for years to come.
Ingredients (Serving size: 4-6 people):
- 2 sheets of pre-made pizza dough
- 1 cup pizza sauce
- 2 cups shredded mozzarella cheese
- 1 cup sliced pepperoni or preferred toppings
- 1 egg, beaten
- Black olives, sliced for eyes
- 1 tablespoon olive oil
- Flour for dusting
Cooking Instructions:
- Preheat the Oven: Set your oven to 400°F (200°C) and allow it to preheat while you prepare the pizza pockets.
- Prepare the Dough: Lightly dust your work surface with flour. Roll out the pizza dough sheets to about 1/4 inch thickness. Cut each sheet into 6-8 circles using a large cookie cutter or a bowl as a guide.
- Assemble the Filling: On one half of each dough circle, spread a tablespoon of pizza sauce, sprinkle some shredded mozzarella cheese, and add a few slices of pepperoni or your preferred toppings.
- Seal the Pockets: Fold the dough over the filling to create a half-moon shape. Press the edges together with a fork to seal them tightly.
- Create the Spider Legs: From the remaining dough scraps, cut thin strips to form the spider legs. Attach four strips on each side of the pocket by pressing them gently into the dough.
- Add the Eyes: Place two slices of black olives on top of each pocket for the eyes, pressing them gently into the dough to secure.
- Egg Wash and Bake: Brush the top of each pizza pocket with the beaten egg to give it a golden finish. Place the pockets on a lined baking sheet and bake for 15-20 minutes or until golden brown and crispy.
- Cool and Serve: Remove from the oven and allow to cool slightly before serving. Enjoy your creepy yet delicious Spooky Spider Pizza Pockets!
Extra Tips:
For an even crispier crust, you can brush the dough with olive oil before adding the filling. If you’re making these with young children, let them help by placing the toppings or arranging the spider legs.
Be sure to keep the edges of the pockets sealed to prevent the filling from leaking out during baking. Feel free to experiment with various fillings like mushrooms, bell peppers, or even a touch of spicy jalapeños to suit your family’s taste.
These pizza pockets are best enjoyed warm but can also be reheated in the oven if you have leftovers.
Witch’s Brew Stew

Introducing Witch’s Brew Stew, a delightful concoction that will captivate your Halloween festivities with its rich flavors and spooky presentation. Perfect for a family dinner or a themed party, this hearty stew combines a variety of vegetables, meats, and spices to create a dish that’s as mysterious as it’s delicious.
The blend of vibrant colors and aromas will have your guests spellbound, making it an excellent centerpiece for your Halloween table. Witch’s Brew Stew isn’t only a feast for the taste buds but also a fun, interactive cooking experience for the entire family. The process of crafting this magical dish can be a wonderful way to involve children, allowing them to help with safe, age-appropriate tasks like counting ingredients or stirring the pot.
Its adaptable nature means you can tailor the ingredients to suit your family’s preferences or dietary needs, guaranteeing everyone gets to enjoy a bowl of this tantalizing treat.
Ingredients for Witch’s Brew Stew (Serves 4-6):
- 2 tablespoons olive oil
- 1 pound beef stew meat, cubed
- 1 large onion, chopped
- 3 cloves garlic, minced
- 4 cups beef broth
- 2 cups water
- 3 large potatoes, peeled and cubed
- 3 carrots, sliced
- 2 stalks celery, chopped
- 1 red bell pepper, chopped
- 1 cup frozen peas
- 1 can (14.5 ounces) diced tomatoes
- 1 teaspoon dried thyme
- 1 teaspoon dried rosemary
- Salt and pepper to taste
- 2 bay leaves
- 1 tablespoon Worcestershire sauce
Instructions:
- Prepare the Ingredients: Begin by gathering all your ingredients. Chop the onions, garlic, potatoes, carrots, celery, and bell pepper. Measure out the spices, oil, broth, and Worcestershire sauce.
- Brown the Meat: In a large pot or Dutch oven, heat the olive oil over medium-high heat. Add the beef stew meat and cook until browned on all sides. This should take about 5-7 minutes. Remove the meat from the pot and set it aside.
- Sauté the Vegetables: In the same pot, add the chopped onion and garlic. Sauté until the onion becomes translucent, approximately 3-4 minutes.
- Combine Ingredients: Return the browned meat to the pot. Add the beef broth, water, potatoes, carrots, celery, bell pepper, and canned tomatoes with their juice. Stir to combine all ingredients.
- Season the Stew: Add thyme, rosemary, salt, pepper, bay leaves, and Worcestershire sauce. Stir well to make sure the spices are evenly distributed.
- Simmer the Stew: Bring the mixture to a boil, then reduce the heat to low. Cover and let it simmer for about 1.5 to 2 hours, or until the meat is tender and the vegetables are cooked through.
- Final Touches: About 10 minutes before serving, add the frozen peas to the stew and stir them in. Allow the stew to continue simmering until the peas are heated through.
- Serve: Remove bay leaves before serving. Ladle the Witch’s Brew Stew into bowls and enjoy a warm, comforting meal that’s perfect for a chilly Halloween night.
Extra Tips:
When preparing Witch’s Brew Stew, feel free to get creative with the ingredients. Substitute or add vegetables like squash, mushrooms, or green beans for more variety.
If you prefer a thicker stew, consider adding a tablespoon of flour or cornstarch mixed with a little water to thicken the mixture before the final simmer. For an extra kick, you might add a dash of hot sauce or red pepper flakes.
Finally, serve with crusty bread or over rice for a complete meal that will satisfy the whole family.
Creepy Crawly Tacos

Transform your Halloween dinner into a fun and spooky event with Creepy Crawly Tacos. This dish is perfect for families looking to enjoy a festive meal that’s both delicious and entertaining. By using simple ingredients and a little creativity, you can make tacos that resemble creepy crawly critters, enticing kids and adults alike to partake in the Halloween spirit while enjoying a flavorful meal.
The combination of savory taco meat, fresh toppings, and eerie decorations makes this dish a standout at any Halloween gathering. Creepy Crawly Tacos aren’t only visually appealing but also easy to prepare, making them an ideal choice for busy families.
With just a few steps, you can create an interactive dining experience that encourages everyone to get involved. Whether you’re hosting a Halloween party or simply having a themed family dinner, these tacos will be a hit. The recipe is designed to serve 4-6 people, making it perfect for a small gathering or family dinner.
Ingredients (Serves 4-6):
- 1 pound ground beef or turkey
- 1 packet taco seasoning mix
- 12 taco shells or tortillas
- 1 cup shredded lettuce
- 1 cup shredded cheese (cheddar or Mexican blend)
- 1 cup diced tomatoes
- 1 can black olives (sliced)
- 1 cup sour cream
- 1/2 cup salsa
- 1 bag tortilla chips (preferably triangle shapes)
- Edible eyeball candies or olives cut in half for decoration
Instructions:
- Prepare the Meat: In a large skillet, cook the ground beef or turkey over medium heat until it’s browned and fully cooked, breaking it apart with a spatula as it cooks. Drain any excess grease from the pan.
- Season the Meat: Add the taco seasoning mix to the cooked meat, following the instructions on the seasoning packet (usually adding water and simmering for a few minutes). Stir well to guarantee the meat is evenly coated with the seasoning.
- Warm the Taco Shells: Preheat your oven to 350°F (175°C). Arrange the taco shells on a baking sheet and warm them in the oven for about 5 minutes, or until they’re lightly crisped.
- Assemble the Tacos: Fill each taco shell with a generous spoonful of the seasoned meat. Top with shredded lettuce, cheese, and diced tomatoes.
- Decorate the Tacos: To create the creepy crawly effect, arrange tortilla chips around the edges of the taco to resemble legs sticking out. Add slices of black olives or edible eyeball candies on top of the tacos for eyes, securing them with a small dab of sour cream if needed.
- Add Final Touches: Serve the tacos with additional sour cream and salsa on the side for dipping. Encourage everyone to enjoy the spooky presentation before digging in.
Extra Tips:
For added fun, encourage kids to help with the decoration process, letting them place the “legs” and “eyes” on each taco. If you’re serving a larger crowd, consider setting up a taco bar with various toppings so everyone can customize their own Creepy Crawly Tacos.
You can also use ground chicken or a vegetarian substitute for a lighter or meat-free version. To make the tacos even spookier, consider using blue corn tortilla chips for a darker look or food-safe color spray to tint the taco shells in festive Halloween colors.
Pumpkin Patch Pasta
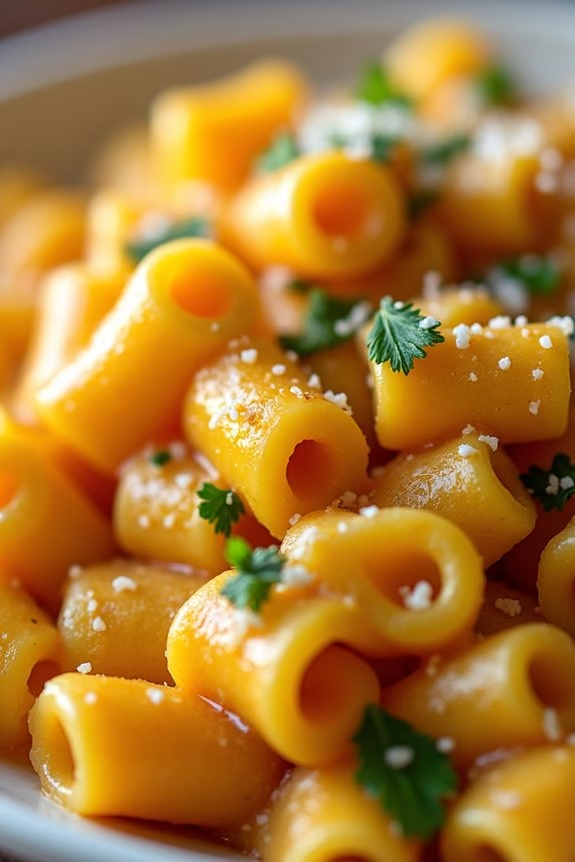
As Halloween approaches, families are often in search of festive yet hearty meals that capture the spirit of the season. Pumpkin Patch Pasta is a delightful dish that combines the comforting essence of pasta with the rich, earthy flavors of pumpkin. This dish not only serves as a delicious dinner option but also brings a touch of Halloween to the dinner table, making it a perfect choice for family gatherings.
The creamy sauce made from pumpkin puree and a hint of nutmeg envelops the pasta, offering a warm and inviting taste that kids and adults alike will enjoy.
Pumpkin Patch Pasta is also an excellent way to incorporate seasonal produce into your meals. Pumpkins are abundant during the fall, and their subtle sweetness perfectly complements the savory elements of this dish. With a few simple ingredients, you can create a meal that’s as nutritious as it’s festive.
This recipe serves 4-6 people, making it ideal for a small family dinner or a Halloween party dish. Let’s explore the ingredients and steps needed to make this comforting pasta dish.
Ingredients for 4-6 servings:
- 500g (1 lb) of pasta (penne or rigatoni works best)
- 2 tablespoons olive oil
- 1 small onion, finely chopped
- 2 cloves garlic, minced
- 400g (about 15 oz) can of pumpkin puree
- 1 cup heavy cream
- 1/2 cup grated Parmesan cheese
- 1/4 teaspoon ground nutmeg
- Salt and pepper to taste
- Fresh parsley, chopped for garnish
- Optional: 1/4 teaspoon red pepper flakes for a hint of spice
Cooking Instructions:
- Cook the Pasta: Begin by bringing a large pot of salted water to a boil. Add the pasta and cook according to package instructions until al dente. Drain the pasta, reserving about 1 cup of the pasta water, and set aside.
- Prepare the Base: In a large skillet, heat the olive oil over medium heat. Add the chopped onion and sauté until it becomes translucent, about 5 minutes. Stir in the minced garlic and cook for an additional 1-2 minutes until fragrant.
- Create the Sauce: Add the pumpkin puree to the skillet and stir to combine with the onions and garlic. Gradually pour in the heavy cream, stirring continuously to create a smooth sauce. Mix in the grated Parmesan cheese and ground nutmeg, allowing the cheese to melt and the flavors to meld together.
- Season the Sauce: Add salt, pepper, and optional red pepper flakes to taste. If the sauce is too thick, slowly add some reserved pasta water until desired consistency is reached.
- Combine Pasta and Sauce: Add the cooked pasta to the skillet, tossing it gently to coat it evenly with the pumpkin sauce. Allow the pasta to simmer in the sauce for a few minutes to absorb the flavors.
- Serve: Transfer the Pumpkin Patch Pasta to a serving dish. Garnish with fresh parsley and an extra sprinkle of Parmesan cheese if desired. Serve warm and enjoy!
Extra Tips:
For a richer flavor, consider roasting a fresh pumpkin and pureeing it instead of using canned pumpkin puree. This will add a depth of flavor that can enhance the dish.
If you prefer a meatier version, add cooked sausage or crispy bacon bits to the sauce for additional texture and taste.
Also, for a gluten-free option, simply substitute regular pasta with gluten-free pasta. Adjust the seasoning according to your taste preference, and feel free to experiment with different types of cheese to find your perfect combination.
Ghostly Grilled Cheese Sandwiches

To create these ghoulish delights, use ghost-shaped cookie cutters to transform regular slices of bread into a haunted feast. This recipe is designed to serve 4-6 people, making it a perfect family meal. You can pair these sandwiches with a warm bowl of tomato soup or a fresh salad for a complete dinner experience.
Whether you’re hosting a Halloween party or just looking for a festive meal to enjoy with your loved ones at home, these Ghostly Grilled Cheese Sandwiches are sure to be a hit.
Ingredients (Serves 4-6):
- 12 slices of white or whole wheat bread
- 6 tablespoons of unsalted butter, softened
- 12 slices of your favorite cheese (such as cheddar, mozzarella, or American)
- Ghost-shaped cookie cutter
Cooking Instructions:
- Prepare the Bread: Begin by using the ghost-shaped cookie cutter to cut out ghost shapes from each slice of bread. You should have 12 ghost-shaped pieces of bread when you’re done.
- Butter the Bread: Spread a thin layer of softened butter on one side of each ghost-shaped bread slice. This will help achieve a golden, crispy texture when the sandwiches are grilled.
- Assemble the Sandwiches: Place a slice of cheese on the unbuttered side of half the ghost-shaped bread slices (6 pieces). Top each cheese slice with another piece of ghost-shaped bread, buttered side facing outwards, to form a sandwich.
- Grill the Sandwiches: Heat a non-stick skillet or griddle over medium heat. Once hot, place the sandwiches buttered side down onto the skillet. Grill each sandwich for 2-3 minutes until the bottom is golden brown.
- Flip and Continue Grilling: Carefully flip the sandwiches using a spatula and grill the other side for an additional 2-3 minutes, or until the cheese is melted and the bread is golden brown.
- Serve Warm: Once cooked, remove the sandwiches from the skillet and allow them to cool slightly before serving. This will help the cheese set slightly, making them easier to eat.
Extra Tips:
For an extra spooky touch, you can use edible markers or food-safe pens to draw ghost faces on the sandwiches after grilling.
If you don’t have a ghost-shaped cookie cutter, you can also cut out ghost shapes freehand using a sharp knife.
For a healthier option, consider using whole grain bread or adding a slice of tomato or spinach to the cheese filling.
Adjust the type and amount of cheese according to your preference, and experiment with different cheese combinations for a unique taste.
Haunted Hot Dog Fingers

This Halloween, turn your dinner table into a frightful feast with Haunted Hot Dog Fingers! These creepy yet delicious hot dog fingers are a fun and easy way to add a spooky touch to your family dinner. Perfect for kids and adults alike, these ghoulish snacks are sure to be a hit during your Halloween celebrations.
With just a few simple ingredients, you can create a dish that not only looks eerie but also satisfies everyone’s taste buds. The Haunted Hot Dog Fingers are designed to resemble severed fingers, complete with fingernails and “bloody” nail beds. By using hot dogs, crescent roll dough, and a few creative touches, you can quickly whip up a batch of these spooky treats.
This recipe serves 4-6 people and can easily be doubled if you’re hosting a larger gathering. Let’s plunge into the ingredients and instructions to bring these haunted fingers to life!
Ingredients (Serves 4-6):
- 8 hot dogs
- 1 tube of crescent roll dough
- 8 sliced almonds
- Ketchup or barbecue sauce
- Cooking spray or parchment paper
Cooking Instructions:
- Preheat the Oven: Begin by preheating your oven to 375°F (190°C). This guarantees that the crescent roll dough bakes evenly and achieves a golden-brown color.
- Prepare the Hot Dogs: Cut each hot dog in half. On one end of each half, make a small slit to resemble a fingernail bed. This will be where the sliced almond will be placed later to mimic a nail.
- Wrap the Hot Dogs: Open the tube of crescent roll dough and unroll it. Cut the dough into strips, approximately 1/2 inch wide. Wrap each hot dog half with a strip of dough, leaving the “nail bed” end uncovered. This will give the appearance of a finger emerging from a mummy wrap.
- Add Fingernails: Place a sliced almond into the slit at the end of each hot dog, securing it in place to resemble a fingernail.
- Bake: Arrange the wrapped hot dogs on a baking sheet lined with parchment paper or lightly coated with cooking spray. Bake in the preheated oven for about 12-15 minutes or until the dough is golden brown and cooked through.
- Decorate with “Blood”: Once baked, remove the hot dog fingers from the oven and let them cool slightly. Using a small brush or the tip of a knife, apply a small amount of ketchup or barbecue sauce around the base of each almond to create a “bloody” effect.
Extra Tips:
For an extra spooky presentation, consider serving the Haunted Hot Dog Fingers on a platter lined with lettuce or spinach to mimic a grassy graveyard.
You can also place them in small, individual coffins made from black paper for added effect. If you want to add more flavor, try sprinkling some garlic powder or Italian seasoning onto the crescent roll dough before baking.
These deliciously creepy fingers can be paired with a side of mustard or spicy dipping sauce to add a zing to your Halloween dinner spread. Enjoy scaring and delighting your guests with this fun and festive dish!
Vampire Veggie Platters
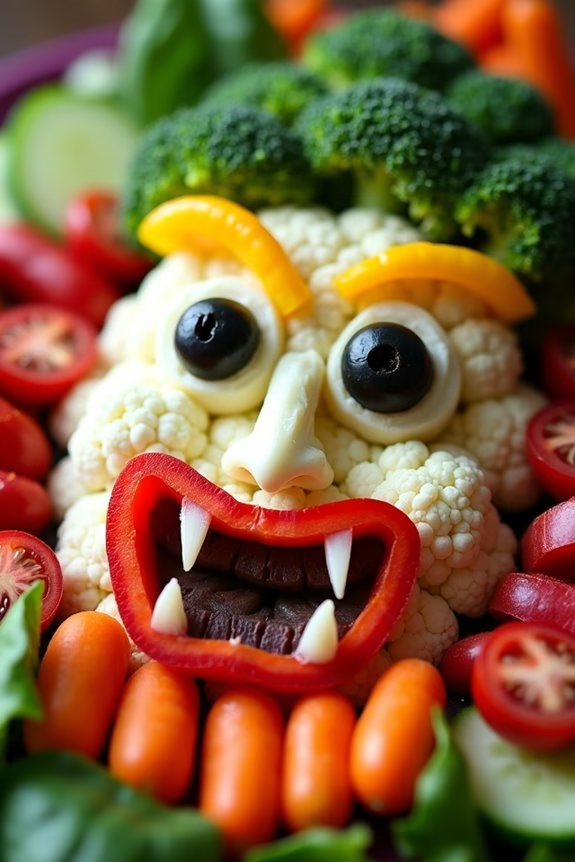
Vampire Veggie Platters are a fun and healthy addition to any Halloween dinner table. This vibrant and colorful dish is an excellent way to promote both kids and adults to enjoy their vegetables during the spooky season. With a creative presentation, these platters can be transformed into an eye-catching centerpiece that’s both delicious and nutritious. The idea is to assemble a variety of fresh vegetables to resemble a vampire face, complete with fangs and creepy eyes, adding an element of fun to your Halloween feast.
Not only is this dish visually appealing, but it also allows for customization based on personal preferences and available ingredients. You can easily tailor the platter to suit dietary restrictions or taste preferences, making it an inclusive option for gatherings. The key is to select an assortment of colorful vegetables that complement one another both in taste and visually. This dish is perfect for serving 4-6 people and is sure to be a hit at your Halloween celebration.
Ingredients for Vampire Veggie Platters (Serves 4-6):
- 1 head of cauliflower
- 1 red bell pepper
- 1 yellow bell pepper
- 1 cucumber
- 1 small bunch of broccoli
- 1 cup cherry tomatoes
- 1 cup baby carrots
- 1 small red onion
- 1 small bunch of radishes
- 2 black olives
- 1 cup hummus or ranch dressing (for dipping)
- 1 handful of spinach leaves (for garnish)
Cooking Instructions:
- Prepare the Vegetables: Wash all the vegetables thoroughly under cold running water. Pat them dry with a clean kitchen towel.
- Cauliflower and Broccoli: Break the cauliflower and broccoli into small, bite-sized florets. Arrange them on a large platter to form the base of the face shape.
- Bell Peppers: Cut the red and yellow bell peppers into strips. Use the red bell pepper strips to create a mouth shape with fangs at the bottom of the face. Arrange the yellow bell pepper strips to form eyebrows or other facial features.
- Cucumber and Carrots: Slice the cucumber into thin rounds, and lay them out to create the outline of the face. Place the baby carrots around the platter to add color and variety.
- Cherry Tomatoes and Radishes: Halve the cherry tomatoes and slice the radishes thinly. Use these to fill in any gaps and add depth to the face, enhancing its vampire-like appearance.
- Onion and Black Olives: Slice the red onion into rings and use them to create spooky eyes. Place the black olives in the center of the onion rings to complete the eyes.
- Assemble the Platter: Arrange all the prepared vegetables on the platter, making sure that they form a cohesive and visually appealing vampire face. Use spinach leaves as a garnish to add a touch of green and to fill any empty spaces.
- Serve with Dip: Place a bowl of hummus or ranch dressing in the center of the platter or alongside it, providing a delicious dip for the vegetables.
Extra Tips:
For an extra touch of fun, use cookie cutters to shape some of the vegetables into Halloween-themed designs, such as stars or pumpkin faces. If you want to add a bit of variety, consider including other vegetables like snap peas or cherry bell peppers.
To guarantee freshness, prepare the platter just before serving. If you need to prepare in advance, store the cut vegetables in airtight containers in the refrigerator and assemble them right before your guests arrive. This dish not only delights the eyes but also provides a healthy option amidst all the sugary treats typical of Halloween festivities.
Devilish Deviled Eggs

Devilish Deviled Eggs are a perfect addition to your Halloween dinner spread, offering a spooky twist on the classic appetizer. With their bold flavors and eerie presentation, these eggs are sure to delight both kids and adults alike. By adding a few simple ingredients and a creative touch, you can transform ordinary deviled eggs into a devilishly delightful treat. This recipe is designed to serve 4-6 people, making it ideal for a family gathering or a festive Halloween party.
The key to making Devilish Deviled Eggs lies in the combination of traditional flavors with a hint of Halloween flair. The filling is a creamy blend of egg yolks, mayonnaise, mustard, and a touch of hot sauce for a devilish kick. To enhance the spooky theme, we use black olives and paprika for garnish, creating an eye-catching and appetizing dish. The contrasting colors and flavors will make these devilish eggs disappear faster than a ghost at midnight.
Ingredients (Serves 4-6):
- 6 large eggs
- 3 tablespoons mayonnaise
- 1 teaspoon Dijon mustard
- 1 teaspoon white vinegar
- 1/4 teaspoon salt
- 1/4 teaspoon freshly ground black pepper
- 1/2 teaspoon hot sauce
- Paprika for garnish
- 6 black olives, pitted and sliced
- Red food coloring (optional)
Cooking Instructions:
- Boil the Eggs: Place the eggs in a single layer in a saucepan and cover them with water. Bring to a boil over medium-high heat. Once boiling, cover the saucepan, remove it from heat, and let the eggs sit for 10-12 minutes.
- Cool and Peel: Drain the hot water and transfer the eggs to a bowl of ice water to cool for about 5 minutes. Gently crack the eggshells and peel them under cold running water to guarantee they’re smooth and intact.
- Prepare the Filling: Slice each egg in half lengthwise. Carefully remove the yolks and place them in a separate bowl. Arrange the egg whites on a serving platter.
- Mix the Filling: Mash the egg yolks with a fork until crumbly. Add mayonnaise, Dijon mustard, white vinegar, salt, pepper, and hot sauce. Mix until the filling is smooth and creamy. If desired, add a drop of red food coloring for a spooky orange hue.
- Fill the Egg Whites: Spoon or pipe the yolk mixture back into the egg whites, filling the cavities generously.
- Garnish: Dust the tops with paprika for a smoky flavor and vibrant color. Place a slice of black olive on each deviled egg to create an “eye” effect.
- Chill and Serve: Refrigerate the deviled eggs for at least 30 minutes before serving to allow the flavors to meld. Serve chilled, and watch them vanish!
Extra Tips:
When making Devilish Deviled Eggs, ascertain the eggs are boiled just right to avoid rubbery whites or undercooked yolks. If you prefer a milder flavor, you can adjust the amount of hot sauce to your liking.
For an extra creepy effect, use a toothpick to create bloodshot lines on the egg whites with a bit of red food coloring. This dish can be prepared a few hours in advance, making it convenient for busy cooks planning a Halloween feast. Enjoy crafting these deliciously devilish treats!
Mummy Mac and Cheese
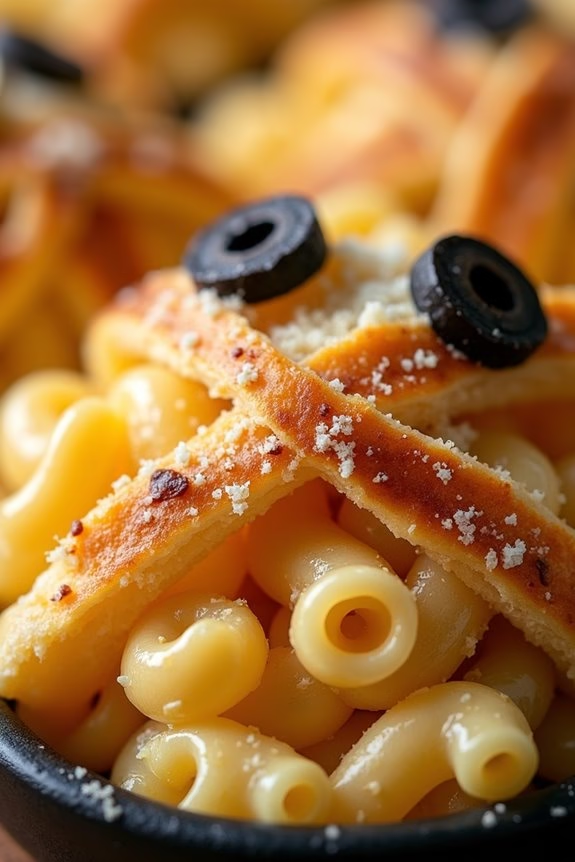
Mummy Mac and Cheese is a delightful twist on a classic comfort dish that’s perfect for adding a spooky touch to your Halloween dinner table. This dish combines the creamy, cheesy goodness of traditional macaroni and cheese with a fun, playful presentation that resembles a mummy, making it a hit with both kids and adults.
The rich cheese sauce envelops the pasta, while strips of crescent dough mimic the mummy’s bandages, adding a deliciously flaky texture to each bite. Not only is Mummy Mac and Cheese a festive addition to your Halloween menu, but it’s also an easy recipe to prepare, allowing you more time to enjoy the holiday festivities with your family.
The following recipe serves 4-6 people, making it a great choice for family dinners or small gatherings. Feel free to adjust the ingredients to match your taste preferences or dietary needs.
Ingredients:
- 8 oz elbow macaroni
- 2 tablespoons butter
- 2 tablespoons all-purpose flour
- 2 cups milk
- 2 cups shredded cheddar cheese
- 1 teaspoon mustard powder
- Salt and pepper to taste
- 1 can (8 oz) refrigerated crescent roll dough
- Olive oil (for brushing)
- 1/2 cup panko bread crumbs
- 2 tablespoons grated Parmesan cheese
- Black olives (optional, for eyes)
Cooking Instructions:
- Cook the Pasta: Begin by bringing a large pot of salted water to a boil. Add the elbow macaroni and cook according to package instructions until al dente. Drain and set aside.
- Prepare the Cheese Sauce: In a medium saucepan, melt the butter over medium heat. Stir in the flour and cook for about 1 minute until a paste forms. Gradually whisk in the milk, making sure there are no lumps. Continue to cook, stirring constantly, until the mixture thickens, about 5 minutes.
- Add Cheese and Seasonings: Remove the pan from heat and stir in the shredded cheddar cheese and mustard powder until the cheese is fully melted and the sauce is smooth. Season with salt and pepper to taste.
- Combine Pasta and Sauce: In a large mixing bowl, combine the cooked macaroni with the cheese sauce, stirring until the pasta is well coated.
- Assemble the Mummy: Preheat the oven to 375°F (190°C). Pour the mac and cheese mixture into a greased 9×13-inch baking dish. Unroll the crescent roll dough and cut it into thin strips. Arrange the strips in a crisscross pattern over the mac and cheese to mimic mummy bandages.
- Add Toppings: Brush the dough strips lightly with olive oil. Mix the panko bread crumbs with the grated Parmesan cheese and sprinkle the mixture over the top for added crunch.
- Bake: Place the baking dish in the preheated oven and bake for 20-25 minutes, or until the crescent dough is golden brown and crispy.
- Add Eyes (Optional): If desired, slice black olives into small rounds and place them on top of the baked dish to resemble eyes.
Extra Tips:
To make your Mummy Mac and Cheese even more flavorful, consider adding a pinch of garlic powder or paprika to the cheese sauce. If you prefer a spicier kick, a dash of hot sauce can also be a great addition.
For a healthier option, whole wheat pasta and low-fat cheese can be used without sacrificing taste. Finally, verify the crescent roll strips aren’t too thick to prevent them from baking unevenly. Enjoy your spooky and delicious creation!
Skeleton Salad Bowls
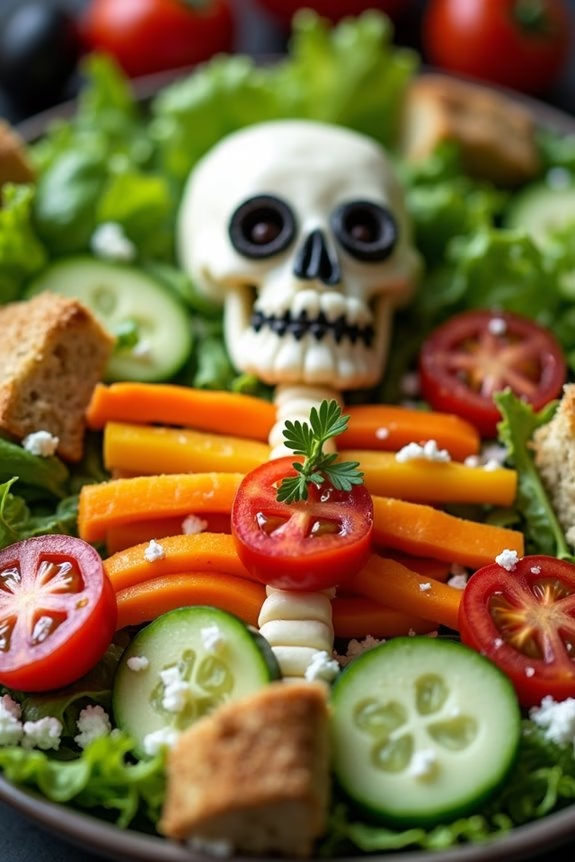
Get ready to spook and delight your family with this fun and healthy Halloween dinner idea: Skeleton Salad Bowls. Perfect for a family of 4-6, these inviting and eerie bowls provide a nutritious yet playful way to incorporate more veggies into your Halloween meal. Each bowl is designed to resemble a skeleton, using a variety of fresh vegetables as the bones and body parts. This dish isn’t only visually appealing but also packed with flavors that complement each other, ensuring that it’s a hit with both kids and adults alike.
Skeleton Salad Bowls are a great way to encourage creativity at the dinner table. You can let your kids help in designing their own skeletons, making it a family activity that combines cooking, fun, and a bit of spooky flair. The combination of crisp vegetables, creamy dressing, and crunchy toppings makes for a delightful texture and taste experience. Whether you’re preparing for a Halloween party or simply want to add a festive touch to your family dinner, these salad bowls will surely be a memorable addition to your Halloween celebration.
Ingredients (Serves 4-6):
- 1 head of romaine lettuce
- 1 large cucumber
- 2 large carrots
- 1 red bell pepper
- 1 yellow bell pepper
- 1 small red onion
- 1 cup cherry tomatoes
- 1 cup black olives
- 1 cup shredded mozzarella cheese
- 1 cup croutons
- 1 cup ranch or Caesar dressing
- 1 bunch fresh parsley
Cooking Instructions:
- Prepare the Vegetables:
- Wash and dry all vegetables thoroughly. Chop the romaine lettuce into bite-sized pieces and use it as the base for each salad bowl.
- Slice the cucumber into rounds to create the skeleton’s spine and ribs.
- Peel and slice the carrots into thin sticks to form the arms and legs.
- Cut the red and yellow bell peppers into strips for additional bones and to add color.
- Assemble the Skeleton:
- Arrange the lettuce on the bottom of each bowl. Start building the skeleton by placing cucumber rounds down the center for the spine and branching out for the ribs.
- Use carrot sticks to create the arms and legs, arranging them in a fun skeletal pattern.
- Add strips of bell peppers to enhance the skeleton’s structure, creating visual interest and flavor.
- Add Facial Features:
- Use cherry tomatoes to represent joints or as decoration around the skeleton.
- Halve black olives and place them as eyes on a cucumber slice for the skull.
- Thinly slice the red onion and use it to add hair or other facial features as desired.
- Finish with Toppings:
- Sprinkle shredded mozzarella cheese over the skeleton for a touch of texture and contrast.
- Add a few croutons around the skeleton to provide a crunchy element.
- Garnish with fresh parsley to add a pop of green and freshness.
- Serve with Dressing:
- Serve each salad bowl with a side of ranch or Caesar dressing, allowing guests to drizzle or dip according to their preference.
Extra Tips:
To make your Skeleton Salad Bowls even more fun, consider using cookie cutters to shape some of the vegetables into spooky forms like ghosts or bats.
If time permits, you can also roast some of the vegetables for added flavor and warmth, making the salad even more inviting on a chilly Halloween night.
Remember to keep extra dressing on the side for those who prefer a more generous serving.
Finally, encourage everyone to get creative with their own skeleton designs—it’s all about having fun with food!
Cauldron Chili Cups

Halloween is a time for creativity and fun, not just with costumes and decorations, but also with the food you serve. Cauldron Chili Cups are a fantastic way to bring a little spooky charm to your family dinner table while serving a warm, hearty meal. This dish combines the comforting flavors of chili with a playful presentation that will delight both children and adults. By serving the chili in small bread bowls, you create the illusion of bubbling cauldrons perfect for a Halloween feast.
These Cauldron Chili Cups aren’t only fun to eat but also simple to prepare. The chili is rich and flavorful, packed with ground beef, beans, and spices, making it a satisfying meal on a chilly October evening. The bread bowls add an additional element of fun and are perfect for soaking up all the delicious chili. This recipe serves 4-6 people and can easily be adjusted to cater to more guests by doubling the ingredients.
Ingredients:
- 1 pound ground beef
- 1 tablespoon olive oil
- 1 medium onion, diced
- 3 cloves garlic, minced
- 1 red bell pepper, chopped
- 2 tablespoons chili powder
- 1 teaspoon cumin
- 1 teaspoon paprika
- 1/2 teaspoon cayenne pepper (optional)
- 1 (14-ounce) can diced tomatoes
- 1 (14-ounce) can kidney beans, drained and rinsed
- 1 (14-ounce) can black beans, drained and rinsed
- 1 cup beef broth
- Salt and pepper to taste
- 6 small round bread loaves (for bread bowls)
- Grated cheddar cheese (for garnish)
- Chopped green onions (for garnish)
Cooking Instructions:
- Prepare the Ingredients: Begin by gathering all your ingredients. Dice the onion, mince the garlic, and chop the red bell pepper. Drain and rinse the kidney and black beans, and set them aside.
- Cook the Beef: In a large pot or Dutch oven, heat the olive oil over medium-high heat. Add the ground beef and cook until browned, breaking it apart with a wooden spoon, about 5-7 minutes. Once browned, drain excess fat if necessary.
- Sauté the Vegetables: Add the diced onion, minced garlic, and chopped red bell pepper to the pot with the beef. Cook for about 5 minutes, stirring occasionally, until the vegetables are soft and fragrant.
- Add the Spices: Stir in the chili powder, cumin, paprika, and cayenne pepper (if using). Cook for an additional 2 minutes to let the spices bloom, enhancing their flavors.
- Simmer the Chili: Pour in the diced tomatoes, kidney beans, black beans, and beef broth. Stir everything together and bring the mixture to a gentle simmer. Reduce the heat to low, cover the pot, and let it cook for about 30 minutes, stirring occasionally.
- Prepare the Bread Bowls: While the chili is simmering, preheat your oven to 350°F (175°C). Cut the top off each small bread loaf and hollow out the inside to create a bowl. Place the bread bowls on a baking sheet and bake for 10 minutes to crisp them up.
- Serve: Once the chili has thickened and flavors have melded, season with salt and pepper to taste. Ladle the chili into the prepared bread bowls, and top with grated cheddar cheese and chopped green onions.
Extra Tips:
For an extra spooky touch, use a small knife to carve jack-o’-lantern faces into the front of the bread bowls before baking them. If you prefer a milder chili, reduce the amount of cayenne pepper or omit it entirely.
You can also make the chili a day ahead, as the flavors tend to deepen and improve after resting. Additionally, feel free to customize the toppings with sour cream, jalapeños, or tortilla strips to suit your family’s taste preferences.