
Hello lovely readers! 🍁 If you’re as enchanted by the cozy flavors of autumn as I am, you’re in for a treat. I’ve rounded up some spooktacular Halloween dinner ideas that are sure to impress. Think creamy Pumpkin Risotto and the intriguing Black Pasta with Squid Ink. Each recipe celebrates the magic of fall, promising a deliciously unique experience with every bite.
Pumpkin Risotto With Sage and Parmesan
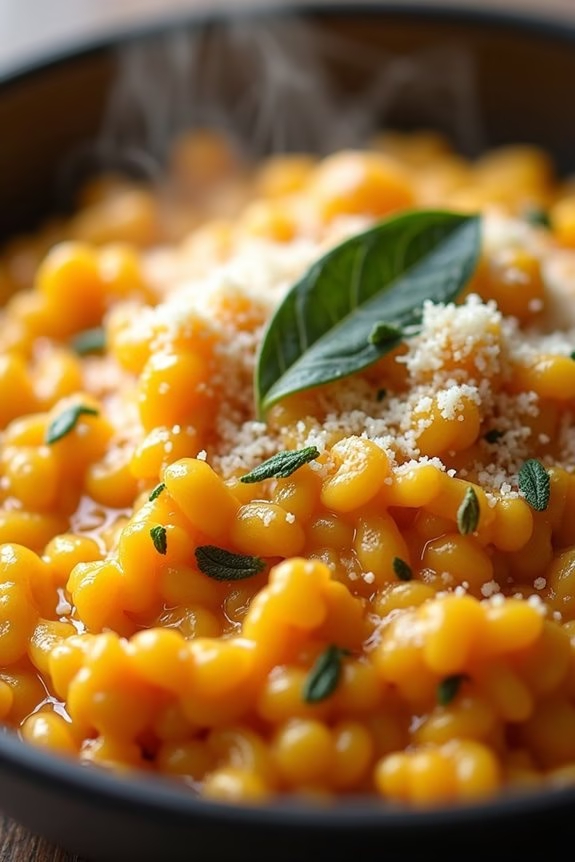
Pumpkin Risotto With Sage and Parmesan is a delightful and sophisticated dish, perfect for a Halloween dinner for adults. This creamy risotto combines the earthy flavors of pumpkin with the aromatic notes of fresh sage, complemented by the richness of Parmesan cheese.
It’s a comforting dish that captures the essence of autumn, making it an excellent choice for a festive gathering. The risotto’s vibrant orange hue also adds a seasonal touch, enhancing your Halloween dinner table with both flavor and visual appeal.
Risotto, a classic Italian rice dish, requires a bit of patience and attention to detail, but the result is well worth the effort. The key to a successful risotto is the gradual addition of broth, which allows the rice to release its starches, creating a creamy texture.
The addition of pumpkin puree not only enhances the creaminess but also imparts a subtle sweetness that balances the savory flavors of sage and Parmesan. This recipe serves 4-6 people, making it ideal for an intimate dinner party or a cozy family meal.
Ingredients (Serves 4-6):
- 2 cups Arborio rice
- 4 cups chicken or vegetable broth
- 1 cup canned pumpkin puree
- 1/2 cup dry white wine
- 1 medium onion, finely chopped
- 2 cloves garlic, minced
- 2 tablespoons olive oil
- 1 tablespoon unsalted butter
- 1/2 cup freshly grated Parmesan cheese
- 1 tablespoon fresh sage, finely chopped
- Salt and pepper to taste
- Optional: additional Parmesan and sage leaves for garnish
Cooking Instructions:
- Prepare the Broth: In a saucepan, heat the chicken or vegetable broth over medium heat until it’s warm. Keep it warm throughout the cooking process, as adding cold broth can halt the cooking of the rice.
- Sauté Aromatics: In a large, heavy-bottomed pot, heat the olive oil and butter over medium heat. Add the chopped onion and garlic, cooking until the onion is translucent and the garlic is fragrant, about 3-4 minutes.
- Toast the Rice: Add the Arborio rice to the pot, stirring to coat it in the oil and butter. Cook for about 2 minutes until the edges of the rice grains become translucent.
- Deglaze with Wine: Pour in the white wine, stirring continuously until it’s absorbed by the rice. This will add a depth of flavor to the risotto.
- Cook the Risotto: Begin adding the warm broth to the rice, one ladle at a time. Stir constantly and allow the liquid to be absorbed before adding the next ladle. Continue this process for about 15-20 minutes until the rice is al dente.
- Incorporate Pumpkin: Stir in the pumpkin puree, mixing well to combine with the rice. Cook for another 3-5 minutes, allowing the flavors to meld together.
- Finish the Dish: Remove the pot from the heat and stir in the Parmesan cheese and chopped sage. Season with salt and pepper to taste. The risotto should be creamy and slightly loose in consistency.
- Serve: Spoon the risotto onto plates, garnishing with additional Parmesan cheese and whole sage leaves if desired. Serve immediately for the best texture and flavor.
Extra Tips: To guarantee the perfect texture, always use warm broth when making risotto. This helps the rice cook evenly and absorb the liquid properly.
Stirring constantly is also essential, as it helps release the rice’s starches, resulting in a creamy consistency. If you prefer a more intense sage flavor, consider infusing the broth with sage leaves during warming.
Finally, resist the urge to rush the process by adding too much broth at once, as the slow addition is key to developing the rich, creamy texture characteristic of a well-made risotto.
Black Pasta With Squid Ink and Garlic Shrimp
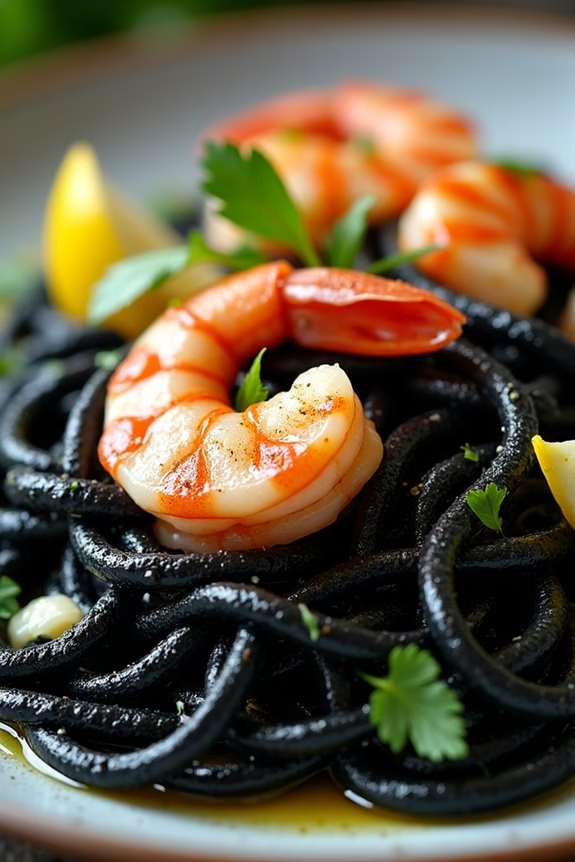
Black Pasta With Squid Ink and Garlic Shrimp is a sophisticated and visually striking dish that’s perfect for an adult Halloween dinner. The deep, mysterious color of the squid ink pasta sets the stage for an elegant and haunting meal. Coupled with succulent garlic shrimp, this dish is both a feast for the eyes and the palate. The flavors are bold and luxurious, with the brininess of the squid ink complementing the rich, buttery garlic shrimp, creating a taste experience that’s nothing short of memorable.
This recipe combines Italian culinary tradition with a touch of the sea, making it a delightful choice for those who appreciate gourmet dining at home. Squid ink pasta is typically made with durum wheat and infused with squid ink, giving it a unique flavor and color. When paired with garlic shrimp, it not only becomes a delicious meal but also a conversation starter, perfect for a Halloween dinner party for adults. This dish serves 4-6 people, ensuring there’s enough to satisfy everyone at your gathering.
Ingredients:
- 1 pound squid ink pasta
- 1 pound large shrimp, peeled and deveined
- 4 cloves garlic, thinly sliced
- 1/4 cup olive oil
- 1/2 cup dry white wine
- 1 tablespoon lemon juice
- 1 teaspoon red pepper flakes
- Salt and black pepper to taste
- Fresh parsley, chopped, for garnish
- Lemon wedges, for serving
Cooking Instructions:
- Prepare the Pasta: Bring a large pot of salted water to a boil. Add the squid ink pasta and cook according to package instructions until al dente. Reserve 1 cup of pasta water, then drain the rest and set the pasta aside.
- Cook the Shrimp: In a large skillet over medium heat, add the olive oil. Once hot, add the sliced garlic and sauté for about 30 seconds, or until fragrant. Be careful not to burn the garlic.
- Sauté the Shrimp: Add the shrimp to the skillet in a single layer. Season with salt, black pepper, and red pepper flakes. Cook for about 2-3 minutes on each side until they’re pink and opaque.
- Deglaze the Pan: Pour the white wine into the skillet, scraping up any bits from the bottom of the pan. Let the wine simmer for about 2 minutes until it reduces slightly.
- Combine Ingredients: Add the cooked pasta to the skillet along with the reserved pasta water. Toss to combine and coat the pasta with the sauce. Stir in the lemon juice.
- Finish the Dish: Remove the skillet from heat and sprinkle with chopped fresh parsley. Adjust seasoning with more salt and pepper if needed.
- Serve: Serve immediately with lemon wedges on the side for an extra burst of flavor.
Extra Tips:
When cooking the shrimp, be sure not to overcrowd the pan, as this can cause them to steam rather than sauté, which affects their texture. If necessary, cook the shrimp in batches.
Additionally, if you can’t find squid ink pasta at your local store, consider checking specialty stores or ordering online. The reserved pasta water is essential for achieving a silky sauce that clings to the pasta, so don’t forget to save it before draining.
Finally, if you want to add more depth to the dish, consider topping it with a sprinkle of grated Parmesan cheese or a drizzle of extra virgin olive oil before serving.
Stuffed Acorn Squash With Wild Rice and Cranberries
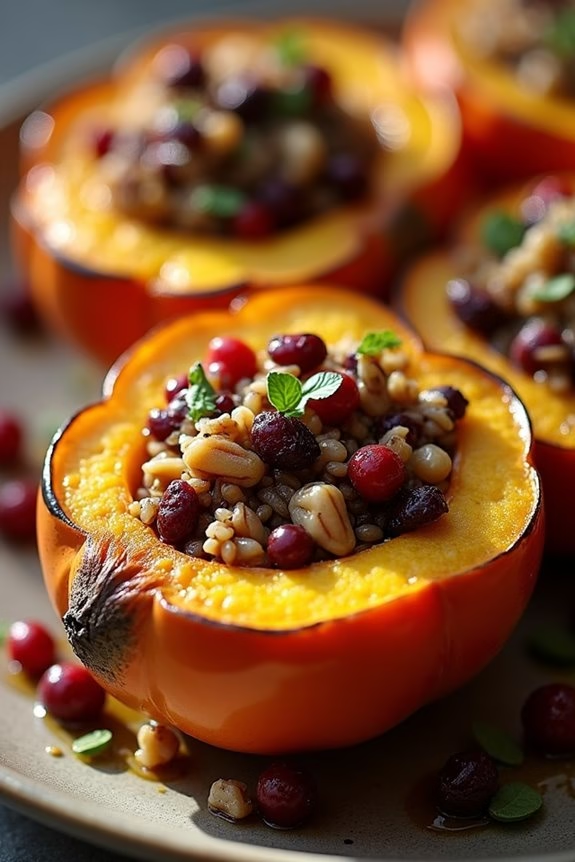
If you’re looking to impress your guests with a festive yet sophisticated Halloween dinner, consider serving Stuffed Acorn Squash with Wild Rice and Cranberries. This dish isn’t only visually appealing with its vibrant autumn colors, but it also offers a delightful blend of flavors and textures. The natural sweetness of the acorn squash pairs beautifully with the tartness of cranberries and the nutty flavor of wild rice, making it a perfect centerpiece for an adult Halloween gathering.
This recipe is a great choice for those who want to offer a hearty and healthy meal. Acorn squash is rich in vitamins and minerals, while wild rice provides a good source of protein and fiber. The addition of cranberries and a few spices enhances the dish, giving it a warm and inviting aroma. Whether you’re hosting a dinner party or just want to enjoy a special meal at home, this stuffed squash recipe is sure to impress.
Ingredients (Serves 4-6):
- 3 medium acorn squashes
- 1 cup wild rice
- 2 cups vegetable broth
- 1/2 cup dried cranberries
- 1/2 cup chopped pecans
- 1 small onion, finely chopped
- 2 cloves garlic, minced
- 1 tablespoon olive oil
- 1 teaspoon dried thyme
- 1/2 teaspoon cinnamon
- Salt and pepper to taste
Cooking Instructions:
- Prepare the Squash: Preheat your oven to 400°F (200°C). Cut each acorn squash in half lengthwise and scoop out the seeds. Lightly brush the insides of the squash with olive oil and sprinkle lightly with salt and pepper. Place the squash halves cut side down on a baking sheet lined with parchment paper. Roast in the preheated oven for 30-35 minutes until the flesh is tender.
- Cook the Wild Rice: While the squash is roasting, rinse the wild rice under cold water. In a medium saucepan, combine the wild rice and vegetable broth. Bring to a boil, then reduce the heat to a simmer. Cover and cook for about 45 minutes, or until the rice is tender and has absorbed most of the liquid.
- Prepare the Filling: In a large skillet, heat the olive oil over medium heat. Add the chopped onion and garlic, and sauté until the onion is translucent and fragrant. Add the dried cranberries, chopped pecans, cooked wild rice, dried thyme, cinnamon, and season with salt and pepper. Stir to combine and cook for an additional 5 minutes to allow the flavors to meld together.
- Assemble the Dish: Once the squash is done roasting, remove it from the oven and carefully turn each half over. Spoon the wild rice mixture evenly into each squash half, packing it lightly. Return the stuffed squash halves to the oven and bake for an additional 10-15 minutes, until everything is heated through.
- Serve: Carefully plate the stuffed acorn squash halves, ensuring each serving is visually appealing. You can garnish with a few additional cranberries or a sprinkle of chopped pecans for added texture.
Extra Tips:
When selecting acorn squash, look for ones that are heavy for their size with a deep, rich color. This indicates ripeness and sweetness. If wild rice isn’t readily available, you can substitute it with a wild rice blend or even quinoa for a different texture. For a richer flavor, consider adding a handful of grated Parmesan cheese to the filling before baking. Finally, if you prefer a sweeter touch, drizzle a little maple syrup over the stuffed squash just before serving.
Spicy Butternut Squash Soup With Toasted Pumpkin Seeds
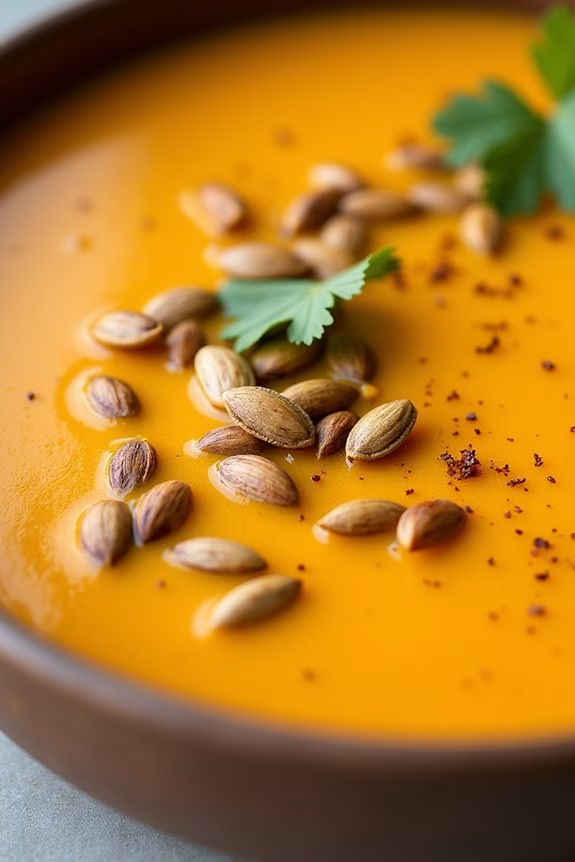
This Halloween, elevate your dinner party with a warm and savory Spicy Butternut Squash Soup with Toasted Pumpkin Seeds. This dish combines the rich, velvety texture of butternut squash with a delightful kick of spice, making it perfect for an adult gathering.
The soup’s vibrant orange color aligns with the festive Halloween theme, while the crunchy pumpkin seeds add a nutty contrast that makes each spoonful a delight. Perfect for serving 4 to 6 people, this soup isn’t only delicious but also nourishing.
The spices infuse the squash with a depth of flavor that’s both intriguing and comforting. Whether you’re hosting a Halloween dinner or looking for a cozy meal to enjoy with friends, this spicy butternut squash soup will leave a lasting impression.
Ingredients:
- 1 large butternut squash, peeled, seeded, and cubed
- 2 tablespoons olive oil
- 1 large onion, chopped
- 2 cloves garlic, minced
- 1 tablespoon fresh ginger, grated
- 1 teaspoon ground cumin
- 1 teaspoon ground coriander
- 1/2 teaspoon cayenne pepper
- 4 cups vegetable broth
- Salt and pepper to taste
- 1/2 cup heavy cream
- 1/2 cup pumpkin seeds, toasted
- 1/4 cup fresh cilantro, chopped (optional, for garnish)
Instructions:
- Prepare the Butternut Squash: Preheat your oven to 400°F (200°C). Spread the cubed butternut squash on a baking sheet, drizzle with 1 tablespoon of olive oil, and season with salt and pepper. Roast for 25-30 minutes, or until the squash is tender and slightly caramelized.
- Cook the Aromatics: In a large pot, heat the remaining 1 tablespoon of olive oil over medium heat. Add the chopped onion and sauté until translucent. Stir in the minced garlic, grated ginger, ground cumin, ground coriander, and cayenne pepper. Cook for 2-3 minutes until the spices are fragrant.
- Combine and Simmer: Add the roasted butternut squash to the pot, followed by the vegetable broth. Stir to combine and bring the mixture to a boil. Reduce the heat and let it simmer for 15-20 minutes, allowing the flavors to meld together.
- Blend the Soup: Using an immersion blender, blend the soup until smooth and creamy. Alternatively, carefully transfer the soup in batches to a countertop blender, then return it to the pot.
- Finish the Soup: Stir in the heavy cream and heat through without boiling. Taste and adjust the seasoning with salt and pepper if needed.
- Serve and Garnish: Ladle the soup into bowls and garnish each serving with toasted pumpkin seeds and a sprinkle of fresh cilantro, if desired.
Extra Tips:
For an even more intense roasted flavor, you can toast the pumpkin seeds in the oven alongside the butternut squash. Just spread them on a baking sheet, drizzle with a little olive oil, and roast for about 10 minutes, keeping a close eye to prevent burning.
If you prefer a milder soup, adjust the cayenne pepper to your taste. This soup can also be made a day ahead and reheated gently before serving, allowing the flavors to deepen overnight.
Roasted Beet and Goat Cheese Salad With Candied Pecans

Roasted Beet and Goat Cheese Salad With Candied Pecans is a sophisticated and vibrant dish perfect for a Halloween dinner party for adults. The deep red color of the roasted beets fits the spooky theme effortlessly, while the creamy goat cheese adds a rich and tangy flavor contrast. The candied pecans introduce a delightful crunch and a touch of sweetness, balancing the earthiness of the beets. Together, these ingredients create a salad that’s both visually stunning and deliciously satisfying.
This salad can be served as a starter or a side dish, offering a revitalizing yet indulgent experience for your guests. The combination of textures and flavors makes it an unforgettable addition to your Halloween menu. With a little preparation, this salad can be easily assembled, allowing you to focus on the other elements of your dinner party. Below, you’ll find a detailed list of ingredients and step-by-step instructions to help you create this elegant dish for 4-6 people.
Ingredients:
- 4 medium-sized beets
- 4 oz goat cheese, crumbled
- 1 cup candied pecans
- 6 cups mixed salad greens (such as arugula, spinach, and baby kale)
- 1/4 cup balsamic vinegar
- 1/4 cup olive oil
- 1 tablespoon honey
- Salt and pepper to taste
Cooking Instructions:
- Preheat the Oven: Set your oven to 400°F (200°C) to prepare for roasting the beets.
- Prepare the Beets: Wash the beets thoroughly and trim off any greens. Wrap each beet individually in aluminum foil and place them on a baking sheet.
- Roast the Beets: Roast the wrapped beets in the preheated oven for 45-60 minutes, or until they’re tender when pierced with a fork. Once done, remove from the oven and allow them to cool slightly.
- Peel and Slice the Beets: Once the beets are cool enough to handle, use a paper towel to gently rub off the skins. Slice the beets into thin wedges or rounds.
- Make the Dressing: In a small bowl, whisk together the balsamic vinegar, olive oil, honey, salt, and pepper until well combined.
- Assemble the Salad: In a large salad bowl, combine the mixed salad greens and roasted beet slices. Drizzle the dressing over the salad and toss gently to coat.
- Add Goat Cheese and Pecans: Sprinkle the crumbled goat cheese and candied pecans over the top of the salad. Give it a final gentle toss to distribute the ingredients evenly.
- Serve: Transfer the salad to a serving platter or individual plates, and serve immediately.
Extra Tips:
To enhance the flavor of the candied pecans, consider toasting them lightly in a dry skillet for a few minutes before adding them to the salad. This will bring out their natural oils and add an extra layer of flavor.
You can also prepare the beets a day in advance and store them in the refrigerator until you’re ready to assemble the salad. For added visual appeal, use a mix of red and golden beets. Finally, feel free to adjust the amount of goat cheese and pecans according to your preference for a personalized touch.
Pork Tenderloin With Apple Cider Glaze
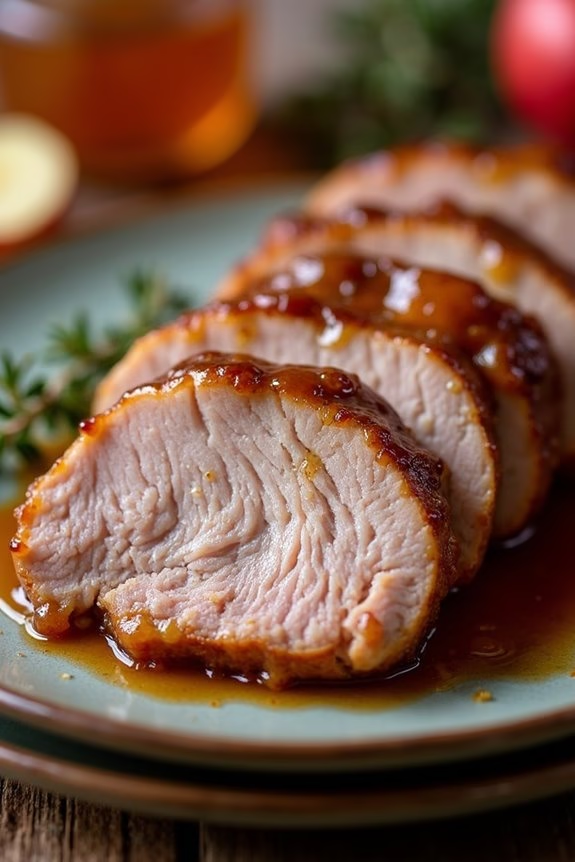
For a sophisticated Halloween dinner that’s both savory and slightly sweet, try this Pork Tenderloin with Apple Cider Glaze. This dish combines tender, juicy pork with a luscious apple cider glaze, bringing an autumnal touch to your dinner table. The natural sweetness of the apple cider is perfectly balanced with savory spices and a hint of tartness, creating a harmonious blend of flavors.
This recipe is ideal for an adult Halloween gathering, offering a gourmet experience that’s easy to prepare yet impressive enough to delight your guests. The key to this dish lies in the careful preparation and cooking of the pork tenderloin, guaranteeing it remains succulent and flavorful. The apple cider glaze not only enhances the taste but also provides a beautiful, glossy finish to the meat.
This recipe serves 4-6 people, making it perfect for a small dinner party or a family meal. Pair it with roasted vegetables or a fresh autumn salad for a complete, balanced meal.
Ingredients (serves 4-6):
- 2 pork tenderloins (about 1 pound each)
- Salt and freshly ground black pepper
- 2 tablespoons olive oil
- 1 cup apple cider
- 1/4 cup apple cider vinegar
- 2 tablespoons Dijon mustard
- 2 tablespoons brown sugar
- 1 teaspoon fresh thyme leaves (or 1/2 teaspoon dried thyme)
- 2 cloves garlic, minced
- 1 tablespoon unsalted butter
Cooking Instructions:
- Preheat the Oven: Preheat your oven to 375°F (190°C) to make certain it’s ready for the pork after searing.
- Prepare the Pork: Pat the pork tenderloins dry with paper towels. Season them generously with salt and pepper on all sides.
- Sear the Pork: Heat the olive oil in a large oven-safe skillet over medium-high heat. Once the oil is hot, add the pork tenderloins. Sear them on all sides until they’re golden brown, about 3-4 minutes per side.
- Make the Glaze: While the pork is searing, in a small saucepan, combine apple cider, apple cider vinegar, Dijon mustard, brown sugar, thyme, and minced garlic. Bring the mixture to a boil over medium heat, then reduce the heat and let it simmer until it reduces by half and thickens slightly, about 10 minutes.
- Bake the Pork: Once the pork is seared, pour half of the apple cider glaze over the pork in the skillet. Transfer the skillet to the preheated oven and bake for 15-20 minutes, or until the internal temperature of the pork reaches 145°F (63°C).
- Rest and Slice: Remove the pork from the oven and let it rest for about 5 minutes. This allows the juices to redistribute through the meat, keeping it moist. Slice the pork into medallions.
- Finish the Glaze: Return the saucepan with the remaining glaze to medium heat. Add the butter and stir until melted and combined. Drizzle the warm glaze over the sliced pork before serving.
Extra Tips:
For the best results, use a meat thermometer to check the internal temperature of the pork to prevent overcooking. The apple cider glaze can be prepared in advance and stored in the refrigerator for up to 3 days. Reheat it gently on the stove before using.
If you like your glaze to be thicker, continue reducing it on the stove until it reaches your desired consistency. Pair this dish with a crisp white wine or a light-bodied red to complement the flavors of the apple cider glaze.
Mushroom and Gruyère Tart With Thyme

Mushroom and Gruyère Tart With Thyme is a sophisticated and savory dish perfect for a Halloween dinner party for adults. This tart combines earthy mushrooms, rich Gruyère cheese, and fragrant thyme in a flaky pastry crust, offering a delightful blend of flavors that’s both comforting and elegant. The deep umami notes from the mushrooms, paired with the creamy, nutty taste of Gruyère, make this tart a memorable centerpiece for your spooky celebration.
This recipe is designed to serve 4-6 people, making it an ideal choice for a small gathering. Whether served as a main course or as part of a larger spread, the Mushroom and Gruyère Tart With Thyme is sure to impress your guests with its delicious flavors and beautiful presentation. The tart can be prepared ahead of time, allowing you to enjoy the party without being stuck in the kitchen.
Ingredients:
- 1 sheet of puff pastry (thawed)
- 2 tablespoons olive oil
- 1 medium onion, thinly sliced
- 3 cloves garlic, minced
- 500g (about 1 lb) mixed mushrooms, cleaned and sliced
- 1 teaspoon fresh thyme leaves
- Salt and pepper to taste
- 1 cup (about 100g) grated Gruyère cheese
- 1 egg, beaten (for egg wash)
- 1 tablespoon chopped fresh parsley for garnish (optional)
Cooking Instructions:
- Prepare the Pastry: Preheat your oven to 200°C (400°F). Roll out the thawed puff pastry on a lightly floured surface to fit your tart pan or baking sheet. Carefully place the pastry in the pan, trimming any excess from the edges. Prick the base of the pastry with a fork to prevent it from puffing up while baking. Chill the pastry in the refrigerator while you prepare the filling.
- Cook the Onions and Garlic: Heat olive oil in a large skillet over medium heat. Add the sliced onion and sauté for about 5 minutes, or until they begin to soften. Stir in the minced garlic and cook for an additional 1-2 minutes, until fragrant.
- Sauté the Mushrooms: Increase the heat to medium-high and add the sliced mushrooms to the skillet. Cook, stirring occasionally, until the mushrooms are golden brown and have released their moisture, about 10 minutes. Add the fresh thyme leaves, and season with salt and pepper. Stir well to combine.
- Assemble the Tart: Remove the chilled pastry from the refrigerator. Spread the cooked mushroom mixture evenly over the pastry base. Sprinkle the grated Gruyère cheese on top of the mushrooms.
- Bake the Tart: Brush the edges of the pastry with the beaten egg to create a golden crust. Bake in the preheated oven for 20-25 minutes, or until the pastry is golden brown and the cheese is bubbly and melted.
- Garnish and Serve: Allow the tart to cool slightly before slicing. Garnish with chopped fresh parsley if desired. Serve warm or at room temperature.
Extra Tips:
For even more flavor, consider adding a splash of white wine or a tablespoon of balsamic vinegar to the mushroom mixture as it cooks. This will enhance the depth of flavor and complement the richness of the Gruyère.
If you want a crispier crust, you can pre-bake the pastry shell for 10 minutes before adding the filling. Just remember to let it cool slightly before proceeding with the assembly.
Finally, if you can’t find Gruyère, you can substitute with another cheese such as Comté or Emmental for a similar taste profile.
Blood Orange and Balsamic Glazed Chicken
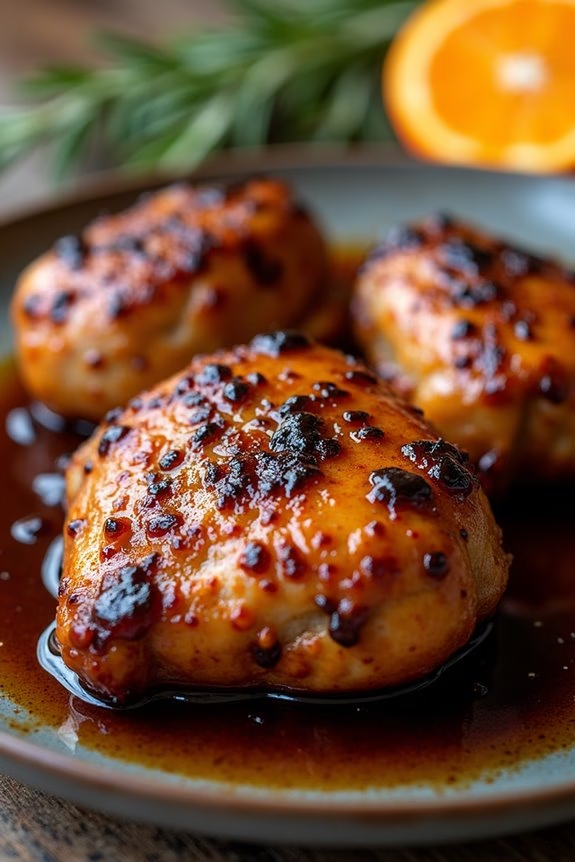
Blood Orange and Balsamic Glazed Chicken is a delightful and sophisticated dish perfect for an adult Halloween dinner party. It combines the rich, deep flavors of balsamic vinegar with the bright, citrusy notes of blood oranges to create an enchanting glaze that coats tender, juicy chicken. The vibrant color of the blood orange glaze is reminiscent of the eerie hues of Halloween, making it a thematic and visually striking centerpiece for your festive table.
This recipe isn’t only delicious but also certain to impress your guests with its elegant presentation and complex flavors.
To prepare this dish, you marinate the chicken in a blend of blood orange juice, balsamic vinegar, and aromatic herbs before roasting it to perfection. The glaze is then reduced to a syrupy consistency, enhancing the caramelized, tangy, and sweet flavors that envelop the chicken. This Blood Orange and Balsamic Glazed Chicken serves 4-6 people and is a perfect way to elevate your Halloween dinner with a touch of gourmet flair.
Ingredients:
- 6 bone-in, skin-on chicken thighs
- 1 cup fresh blood orange juice (from about 4-5 blood oranges)
- Zest of 2 blood oranges
- 1/2 cup balsamic vinegar
- 1/4 cup honey
- 3 cloves garlic, minced
- 1 tablespoon fresh rosemary, chopped
- 1 tablespoon fresh thyme leaves
- Salt and freshly ground black pepper, to taste
- 2 tablespoons olive oil
Instructions:
- Prepare the Marinade: In a large bowl, combine the blood orange juice, blood orange zest, balsamic vinegar, honey, minced garlic, rosemary, thyme, a generous pinch of salt, and freshly ground black pepper. Whisk until the honey is fully dissolved and the ingredients are well combined.
- Marinate the Chicken: Place the chicken thighs in a large resealable plastic bag or a shallow dish. Pour the marinade over the chicken, guaranteeing each piece is well coated. Seal the bag or cover the dish with plastic wrap, and refrigerate for at least 2 hours, preferably overnight, to allow the flavors to penetrate the meat.
- Preheat the Oven: Preheat your oven to 400°F (200°C). Remove the chicken from the marinade, allowing any excess to drip off, and reserve the marinade for later use.
- Sear the Chicken: In a large ovenproof skillet, heat the olive oil over medium-high heat. Once hot, add the chicken thighs, skin side down, and sear until the skin is golden brown and crispy, about 4-5 minutes. Turn the chicken over and cook for an additional 2 minutes.
- Roast the Chicken: Transfer the skillet to the preheated oven and roast for about 25-30 minutes, or until the chicken is cooked through and the internal temperature reaches 165°F (74°C).
- Prepare the Glaze: While the chicken is roasting, pour the reserved marinade into a small saucepan. Bring it to a boil over medium-high heat, then reduce the heat to low and simmer until the glaze thickens to a syrupy consistency, about 10-15 minutes.
- Glaze the Chicken: Once the chicken is cooked, remove it from the oven and brush the thickened blood orange balsamic glaze generously over each thigh. Return the chicken to the oven for an additional 5 minutes to allow the glaze to caramelize slightly.
- Serve: Transfer the glazed chicken to a serving platter and garnish with additional fresh rosemary or thyme if desired. Serve warm and enjoy the rich, tangy flavors of this Halloween-inspired dish.
Extra Tips:
To guarantee the chicken remains juicy and flavorful, allow it to marinate overnight if possible. This extended marinating time helps the meat absorb the complex flavors of the blood orange and balsamic mixture.
When reducing the glaze, keep a close eye on it to prevent over-thickening or burning. If the glaze becomes too thick, simply add a tablespoon of water and stir until it reaches the desired consistency.
Finally, for a complete Halloween-themed meal, consider pairing the chicken with roasted root vegetables or a vibrant autumn salad.
Savory Sweet Potato and Black Bean Enchiladas

Halloween is often associated with sweet treats, but a hearty and satisfying dinner can set the tone for a night of spooky festivities. These Savory Sweet Potato and Black Bean Enchiladas are the perfect blend of sweet, spicy, and savory flavors, making them an ideal choice for an adult Halloween dinner. Packed with nutritious ingredients, this dish not only delights the palate but also provides a wholesome meal that will keep you energized throughout the evening.
The combination of tender sweet potatoes, protein-rich black beans, and melty cheese wrapped in warm tortillas and smothered in enchilada sauce makes for a comforting and delicious meal. This recipe is perfect for a group of friends or family, serving 4-6 people, and is an excellent way to kick off your Halloween celebration with a touch of seasonal flair.
Ingredients
- 2 large sweet potatoes, peeled and diced
- 1 tablespoon olive oil
- Salt and pepper, to taste
- 1 teaspoon ground cumin
- 1 teaspoon smoked paprika
- 1 can (15 oz) black beans, drained and rinsed
- 1 cup frozen corn, thawed
- 2 cups shredded cheese (cheddar or Monterey Jack)
- 8-10 corn tortillas
- 2 cups enchilada sauce
- 1/4 cup chopped fresh cilantro
- 1 lime, cut into wedges
Instructions
- Preheat and Prepare Sweet Potatoes: Preheat your oven to 400°F (200°C). On a baking sheet, toss the diced sweet potatoes with olive oil, salt, pepper, cumin, and smoked paprika. Spread them out evenly and roast for 20-25 minutes, or until they’re tender and slightly caramelized.
- Mix the Filling: In a large bowl, combine the roasted sweet potatoes with black beans, corn, and 1 cup of shredded cheese. Mix well to guarantee the ingredients are evenly distributed.
- Prepare the Enchiladas: Reduce the oven temperature to 375°F (190°C). Spread a thin layer of enchilada sauce on the bottom of a 9×13 inch baking dish. Warm the tortillas slightly to make them pliable, then spoon about 1/4 cup of the filling mixture onto each tortilla. Roll them up tightly and place them seam-side down in the prepared baking dish.
- Top and Bake: Pour the remaining enchilada sauce over the top of the rolled tortillas, ensuring they’re well-covered. Sprinkle the remaining 1 cup of cheese over the sauce. Cover the dish with foil and bake for 20 minutes. Remove the foil and bake for an additional 10 minutes, or until the cheese is bubbly and golden brown.
- Garnish and Serve: Once baked, remove the enchiladas from the oven and let them sit for a few minutes before serving. Garnish with chopped cilantro and serve with lime wedges on the side for an extra burst of flavor.
Extra Tips
For an added layer of flavor, try adding diced green chilies or jalapeños to the filling for a spicy kick. If you prefer a smokier taste, consider using chipotle peppers in adobo sauce within the enchilada sauce.
To make the dish even more festive, you can serve it with a side of guacamole or a fresh tomato salsa. Finally, if you have leftover filling, it can be used as a topping for nachos or as a filling for quesadillas.
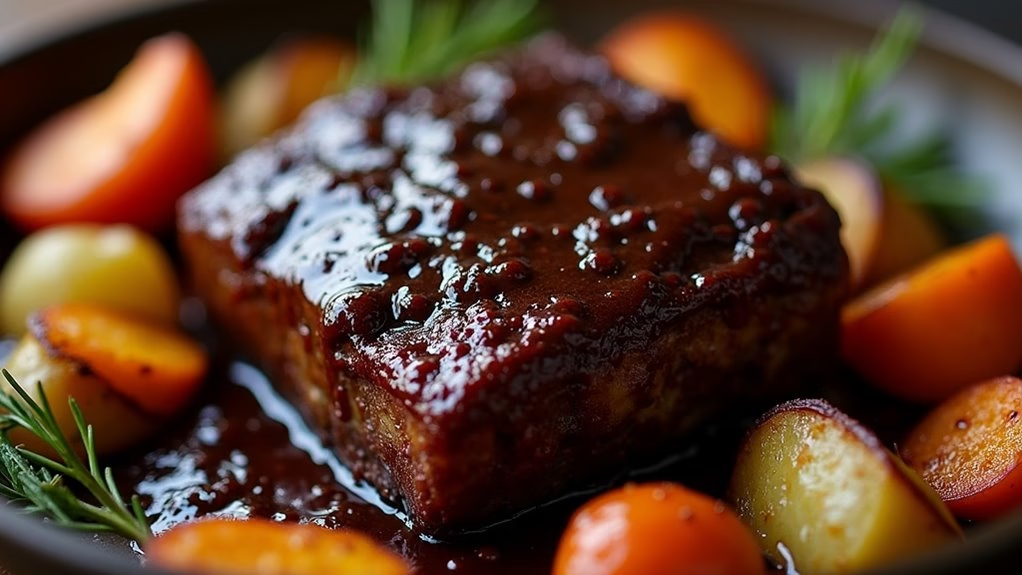
Dark Chocolate and Red Wine Braised Short Ribs

Imagine sinking your teeth into tender, fall-off-the-bone short ribs rich with the deep flavors of dark chocolate and red wine. This dish is perfect for an adult Halloween dinner, offering a sophisticated yet hauntingly delicious experience. The combination of dark chocolate and red wine creates a savory sauce that perfectly complements the succulent short ribs. Not only does this dish bring a touch of elegance to your Halloween celebration, but it also warms the soul with its hearty and bold flavors.
For this recipe, the short ribs are first seared to lock in their juices, and then braised slowly in a mixture of red wine, beef broth, and dark chocolate. The result is a dish with an impressive depth of flavor that’s sure to captivate your guests. Serve these ribs with a side of creamy mashed potatoes or roasted root vegetables to soak up the luscious sauce. This recipe serves 4-6 people, making it an ideal main course for a small dinner gathering.
Ingredients:
- 4-5 pounds bone-in beef short ribs
- Salt and freshly ground black pepper
- 2 tablespoons olive oil
- 1 large onion, chopped
- 3 cloves garlic, minced
- 2 cups red wine (such as Cabernet Sauvignon or Merlot)
- 2 cups beef broth
- 2 tablespoons tomato paste
- 2 ounces dark chocolate (at least 70% cocoa), chopped
- 2 sprigs fresh thyme
- 2 bay leaves
Instructions:
- Prepare the Short Ribs: Season the short ribs generously with salt and freshly ground black pepper on all sides.
- Sear the Ribs: In a large Dutch oven or heavy pot, heat the olive oil over medium-high heat. Once hot, add the short ribs in batches, ensuring not to overcrowd the pan. Sear them on all sides until browned (about 8-10 minutes per batch). Remove the ribs and set aside.
- Sauté the Aromatics: In the same pot, lower the heat to medium and add the chopped onion. Cook until translucent and soft, about 5 minutes. Add the minced garlic and cook for another minute until fragrant.
- Deglaze the Pot: Pour the red wine into the pot, scraping up any browned bits from the bottom with a wooden spoon. Let the wine simmer for about 5 minutes to reduce slightly.
- Create the Braising Liquid: Stir in the beef broth and tomato paste until well combined. Add the chopped dark chocolate, allowing it to melt and blend into the sauce.
- Add the Ribs and Herbs: Return the seared short ribs to the pot, ensuring they’re submerged in the liquid. Add the fresh thyme and bay leaves.
- Braise the Short Ribs: Cover the pot with a lid and transfer it to a preheated oven at 325°F (160°C). Let the ribs braise for 2.5 to 3 hours, or until the meat is tender and falling off the bone.
- Finish and Serve: Once cooked, carefully remove the short ribs from the pot. Skim off any excess fat from the surface of the sauce. Serve the ribs hot, generously drizzled with the rich chocolate and wine sauce.
Extra Tips:
For the best results, choose a red wine with deep, rich flavors that can stand up to the boldness of the dark chocolate. Cabernet Sauvignon or Merlot are excellent choices.
If you find the sauce too thick after braising, you can thin it down with a little more beef broth. Conversely, if you prefer a thicker sauce, reduce it on the stovetop over medium heat until it reaches your desired consistency.
Finally, for an enhanced flavor experience, consider making the dish a day in advance; the flavors will develop further as it rests overnight.