

Planning a Halloween party has me dreaming about the enchanting possibilities of a dessert table. Spooky Spiderweb Cupcakes with their intricate designs and Monster Eyeball Cake Pops are sure to captivate and delight. Each treat, from Witch’s Brew Brownies to Creepy Crawly Dirt Pudding, brings its own magical story to life. What will be the next bewitching bite on this spine-tingling dessert journey? Let’s uncover these spine-chilling delights together!
Spooky Spiderweb Cupcakes

Spooky Spiderweb Cupcakes are the perfect treat for any Halloween party, delighting guests with their eerie design and scrumptious flavor. The combination of rich chocolate cupcakes and a creamy vanilla frosting sets the stage for a deliciously spooky dessert. The intricate spiderweb design on top is crafted using melted chocolate, adding an artistic touch that will impress both the young and the young at heart.
These cupcakes not only taste fantastic but also serve as a fun and creative way to get into the Halloween spirit. The process of making Spooky Spiderweb Cupcakes begins with a moist and fluffy chocolate cupcake base. Once baked to perfection, the cupcakes are topped with a smooth vanilla frosting, creating the perfect canvas for the spiderweb design.
Using a simple technique involving melted chocolate, you can transform these cupcakes into a creepy-crawly masterpiece. Whether you’re hosting a Halloween bash or just want to treat yourself to some festive fun, these cupcakes are sure to be a hit.
Ingredients for 4-6 servings:
- 1 cup all-purpose flour
- 1 cup granulated sugar
- 1/3 cup unsweetened cocoa powder
- 1 teaspoon baking powder
- 1/2 teaspoon baking soda
- 1/4 teaspoon salt
- 1/2 cup milk
- 1/4 cup vegetable oil
- 1 large egg
- 1 teaspoon vanilla extract
- 1/2 cup boiling water
- 1 cup unsalted butter (softened)
- 2 cups powdered sugar
- 1 teaspoon vanilla extract
- 2 tablespoons milk
- 1/2 cup semi-sweet chocolate chips
Cooking Instructions:
- Preheat the Oven: Preheat your oven to 350°F (175°C) and line a standard muffin tin with cupcake liners.
- Mix Dry Ingredients: In a large bowl, whisk together the flour, sugar, cocoa powder, baking powder, baking soda, and salt until well combined.
- Combine Wet Ingredients: In another bowl, mix the milk, vegetable oil, egg, and vanilla extract. Gradually add the wet ingredients to the dry ingredients, stirring until well incorporated.
- Add Boiling Water: Carefully add the boiling water to the batter, mixing until smooth. The batter will be thin, but this is normal.
- Bake the Cupcakes: Pour the batter evenly into the cupcake liners, filling each about two-thirds full. Bake for 18-20 minutes or until a toothpick inserted into the center comes out clean. Allow the cupcakes to cool completely on a wire rack.
- Prepare the Frosting: In a medium bowl, beat the softened butter until creamy. Gradually add the powdered sugar, vanilla extract, and milk, beating until smooth and fluffy.
- Frost the Cupcakes: Once cooled, spread a generous amount of frosting on each cupcake, smoothing it with a spatula.
- Create the Spiderweb Design: Melt the chocolate chips in a microwave-safe bowl in 30-second intervals, stirring until smooth. Transfer the melted chocolate to a piping bag or a resealable plastic bag with a tiny corner snipped off. Pipe circles of chocolate on top of the frosted cupcakes, then use a toothpick to drag lines from the center to the edge, creating a spiderweb pattern.
Extra Tips:
For best results, verify your cupcakes are completely cooled before frosting to prevent the frosting from melting. If you’re short on time, you can use store-bought chocolate cupcakes and frosting as a base and focus on the spiderweb design for a quick yet impressive treat.
To add an extra touch of spookiness, consider placing a small plastic spider on top of each cupcake or using colored sprinkles for added flair.
Monster Eyeball Cake Pops
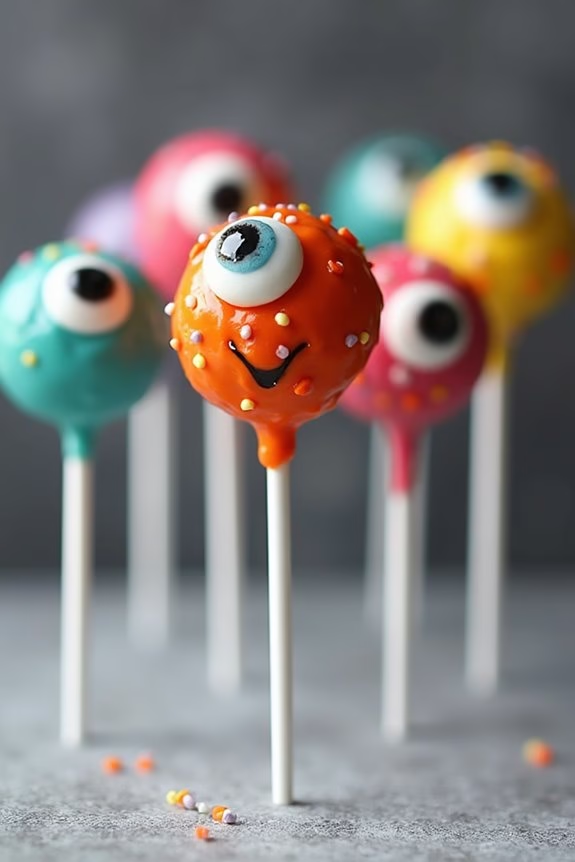
Monster Eyeball Cake Pops are a spine-chilling treat that will be the highlight of any Halloween party. These ghoulish goodies aren’t only a feast for the eyes but also a delightful indulgence for the taste buds. With their eerie appearance and deliciously moist cake centers, they’re sure to capture the attention and admiration of both kids and adults alike.
These cake pops are a fun and creative way to celebrate the spooky season, and they’re surprisingly easy to make with just a few simple ingredients.
The process of making Monster Eyeball Cake Pops involves crumbling a cake into fine crumbs, mixing it with frosting to form a dough, and then shaping them into balls. The cake balls are then dipped in candy melts and decorated with edible eyes to give them a creepy yet charming appearance.
Whether you’re hosting a Halloween party or simply want to surprise your family with a themed dessert, these cake pops are the perfect choice. Gather your ingredients and follow the steps below to create these monstrous treats that will leave everyone begging for more.
Ingredients (Serves 4-6 people):
- 1 box of cake mix (any flavor)
- Ingredients required for cake mix (usually eggs, oil, and water)
- 1 cup of frosting (store-bought or homemade)
- 2 cups of candy melts (white, green, or your choice of colors)
- Edible candy eyeballs
- Lollipop sticks
- Food coloring (optional, for decoration)
Instructions:
1. Prepare the Cake:
Preheat your oven according to the cake mix instructions. Prepare the cake batter following the instructions on the box, and bake it in a 9×13 inch pan. Once baked, allow the cake to cool completely.
2. Crumble the Cake:
Crumble the cooled cake into a large mixing bowl using your hands or a fork. Verify there are no large chunks, and the crumbs are fine and even.
3. Mix with Frosting:
Add the frosting to the cake crumbs, starting with half a cup, and mix until the mixture is moist and can hold together when pressed. Add more frosting if necessary, but be careful not to make it too wet.
4. Form Cake Balls:
Using your hands or a small ice cream scoop, form the mixture into balls about 1 inch in diameter. Place them on a baking sheet lined with parchment paper.
5. Chill the Cake Balls:
Refrigerate the cake balls for at least 30 minutes to firm them up before dipping.
6. Melt the Candy:
In a microwave-safe bowl, melt the candy melts according to the package instructions. Stir until smooth and fully melted. If desired, add food coloring to achieve the desired monster color.
7. Insert Sticks:
Dip the tip of each lollipop stick into the melted candy and insert it halfway into each cake ball. This helps the stick adhere to the cake pop.
8. Dip the Cake Pops:
Holding the stick, dip each cake ball into the melted candy, gently tapping off any excess. Place them upright in a styrofoam block or a cake pop stand to dry.
9. Decorate with Eyes:
Before the candy coating sets, press a candy eyeball onto each cake pop. Allow the completed cake pops to set completely.
Extra Tips:
When working with candy melts, make sure they don’t overheat as this can cause them to thicken. If this happens, you can add a small amount of vegetable oil to thin it out.
Additionally, for a more professional look, consider using a cake pop mold to ensure uniform sizes. If you’re making these in advance, store them in an airtight container in the refrigerator, and bring them to room temperature before serving for the best texture.
Enjoy your creepy and delicious Monster Eyeball Cake Pops!
Witch’s Brew Brownies
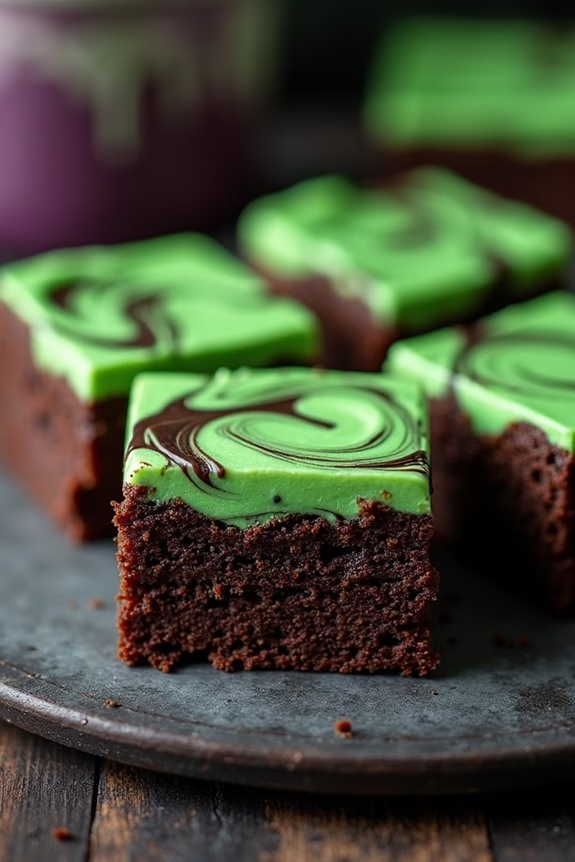
Witch’s Brew Brownies are the perfect spooky treat to add a touch of magic to your Halloween party. These rich, chocolatey brownies are infused with a swirl of eerie green cream cheese to create a bewitching effect that will leave your guests enchanted. Perfect for both kids and adults, these brownies aren’t only visually striking but also deliciously decadent. The combination of fudgy chocolate and creamy, tangy topping makes them a must-have on your festive table.
This recipe is designed to serve 4-6 people, making it ideal for a small gathering or as part of a larger dessert spread. The preparation involves a simple brownie base topped with a green-tinted cream cheese mixture, which is then swirled to create an enchanting pattern. With just a few steps and common ingredients, you can whip up these Witch’s Brew Brownies and add a touch of Halloween magic to your dessert offerings.
Ingredients:
- 1 cup (2 sticks) unsalted butter
- 2 cups granulated sugar
- 4 large eggs
- 1 teaspoon vanilla extract
- 1 cup all-purpose flour
- 3/4 cup unsweetened cocoa powder
- 1/4 teaspoon salt
- 1 teaspoon baking powder
- 8 oz cream cheese, softened
- 1/4 cup granulated sugar
- 1 large egg
- 1/2 teaspoon vanilla extract
- Green food coloring
Instructions:
- Preheat the Oven: Begin by preheating your oven to 350°F (175°C). Grease a 9×13 inch baking pan or line it with parchment paper for easy removal.
- Prepare the Brownie Batter: In a large microwave-safe bowl, melt the butter. Stir in 2 cups of sugar, 4 eggs, and 1 teaspoon of vanilla extract until well combined. Add the flour, cocoa powder, salt, and baking powder. Mix until smooth and fully incorporated.
- Make the Cream Cheese Mixture: In a separate bowl, beat the softened cream cheese with 1/4 cup of sugar, 1 egg, and 1/2 teaspoon vanilla extract until smooth. Add green food coloring and mix until you reach your desired shade of green.
- Assemble the Brownies: Pour the brownie batter into the prepared pan, spreading it evenly. Drop spoonfuls of the green cream cheese mixture over the top of the brownie batter. Use a knife or skewer to swirl the cream cheese mixture into the brownie batter, creating a marbled effect.
- Bake: Place the pan in the preheated oven and bake for 30-35 minutes, or until a toothpick inserted into the center comes out with a few moist crumbs attached. Avoid overbaking to keep the brownies fudgy.
- Cool and Serve: Allow the brownies to cool completely in the pan on a wire rack before slicing into squares and serving.
Extra Tips:
For an extra spooky touch, consider adding edible glitter or witch-themed sprinkles to the top before baking. If you prefer a more intense green color, gradually add more food coloring until you reach the desired hue.
Be sure to cool the brownies fully before cutting to guarantee clean, defined slices. For a denser brownie, use a bit less baking powder. Finally, enjoy these with a scoop of vanilla ice cream or a glass of cold milk to complement their rich flavor.
Ghostly Meringue Cookies
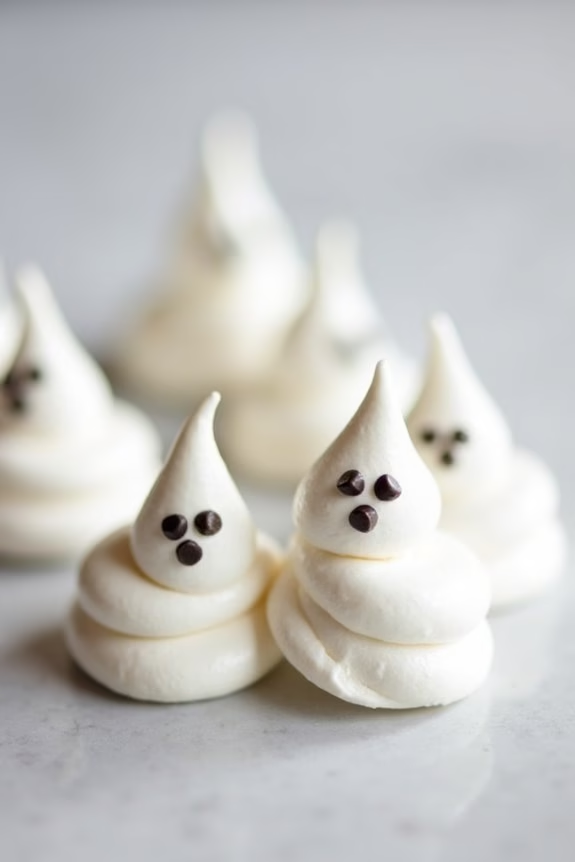
Creating a spook-tacular Halloween dessert spread wouldn’t be complete without the whimsical Ghostly Meringue Cookies. These sweet treats aren’t only delicious but also fun to make, adding a playful element to your Halloween party. With their ethereal appearance and melt-in-your-mouth texture, these cookies are sure to be a hit with both kids and adults alike.
The lightness of the meringue combined with a hint of vanilla creates a delightful contrast to the richness of other Halloween confections.
To get started on these ghostly delights, you’ll need to whip up a classic meringue base. This involves beating egg whites until they form stiff peaks, then folding in sugar to create that irresistible, glossy finish. The key to perfecting these cookies is making sure your egg whites are at room temperature, which helps to achieve maximum volume.
Once piped onto a baking sheet, each meringue is transformed into a cute little ghost with the simple addition of mini chocolate chips for eyes.
Ingredients for 4-6 servings:
- 4 large egg whites, at room temperature
- 1 cup granulated sugar
- 1/4 teaspoon cream of tartar
- 1 teaspoon vanilla extract
- Mini chocolate chips
Cooking Instructions:
- Preheat the Oven: Begin by preheating your oven to 225°F (110°C). Line two baking sheets with parchment paper to prevent the meringues from sticking.
- Beat Egg Whites: In a clean, dry mixing bowl, beat the egg whites using an electric mixer on medium speed until they become frothy.
- Add Cream of Tartar: Add the cream of tartar to stabilize the egg whites and continue beating until soft peaks form.
- Incorporate Sugar: Gradually add the sugar, a tablespoon at a time, making sure it dissolves completely before adding more. Continue beating on high speed until stiff, glossy peaks form.
- Add Vanilla: Gently fold in the vanilla extract using a spatula, being careful not to deflate the meringue.
- Pipe the Meringues: Transfer the meringue to a piping bag fitted with a round tip. Pipe ghost shapes onto the prepared baking sheets, spacing them about an inch apart.
- Add Eyes: Gently press two mini chocolate chips into each meringue to create eyes.
- Bake: Bake the meringues in the preheated oven for 1 hour, then turn off the oven and let them cool inside with the door closed for another hour. This helps dry them out completely.
- Cool and Store: Once cooled, transfer the meringues to an airtight container. They can be stored at room temperature for up to a week.
Extra Tips:
For best results, make sure all equipment is completely clean and dry before use, as any grease or moisture can prevent the egg whites from whipping up properly.
If your meringue mixture doesn’t reach stiff peaks, try adding the sugar more slowly or extending the beating time. Patience is key with these cookies, as rushing the process can lead to deflated ghosts.
Finally, avoid making meringues on humid days, as the moisture in the air can affect their crispness. Enjoy these ghostly meringues as part of your Halloween festivities, and watch them disappear like magic!
Pumpkin Spice Whoopie Pies
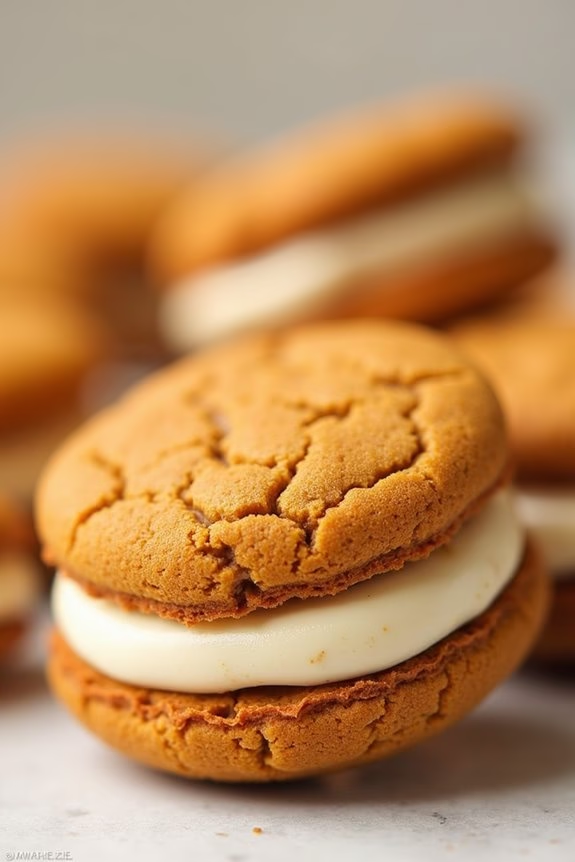
Pumpkin Spice Whoopie Pies are a delightful treat that perfectly capture the essence of fall. These soft, cake-like cookies are sandwiched together with a creamy filling, blending the warm flavors of pumpkin and spices. Whether you’re hosting a Halloween party or simply indulging in the seasonal spirit, these whoopie pies are certain to be a hit with guests of all ages. Their light and fluffy texture, paired with the rich, spiced filling, make for a comforting and delicious dessert.
Crafting Pumpkin Spice Whoopie Pies is a rewarding experience that fills your kitchen with the aroma of autumn. This recipe serves 4-6 people, making it perfect for small gatherings or as a festive treat throughout the Halloween season. The combination of pumpkin puree, spices, and a cream cheese filling makes these whoopie pies irresistible. Follow this recipe to create a batch of whoopie pies that are both a feast for the eyes and the taste buds.
Ingredients (Serving Size: 4-6 people):
For the Cookies:
- 2 cups all-purpose flour
- 1 teaspoon baking powder
- 1 teaspoon baking soda
- 1 tablespoon ground cinnamon
- 1 teaspoon ground ginger
- 1/2 teaspoon ground nutmeg
- 1/2 teaspoon salt
- 1 cup granulated sugar
- 1/2 cup vegetable oil
- 1 cup pumpkin puree
- 1 teaspoon vanilla extract
- 2 large eggs
For the Filling:
- 4 ounces cream cheese, softened
- 1/2 cup unsalted butter, softened
- 2 cups powdered sugar
- 1 teaspoon vanilla extract
Cooking Instructions:
- Preheat the Oven: Start by preheating your oven to 350°F (175°C). Line two baking sheets with parchment paper or silicone baking mats.
- Mix Dry Ingredients: In a medium bowl, whisk together the flour, baking powder, baking soda, cinnamon, ginger, nutmeg, and salt. Set aside.
- Prepare Wet Ingredients: In a large mixing bowl, beat the sugar and oil together until well combined. Add the pumpkin puree and vanilla extract, and mix until smooth.
- Combine Wet and Dry Ingredients: Gradually add the dry ingredients into the wet mixture, mixing until just combined. Scrape down the sides of the bowl as needed.
- Add Eggs: Beat in the eggs one at a time, making sure each is fully incorporated before adding the next.
- Scoop and Bake: Using a small ice cream scoop or two tablespoons, drop rounded spoonfuls of batter onto the prepared baking sheets, spacing them about 2 inches apart. Bake in the preheated oven for 10-12 minutes, or until the cookies spring back when lightly pressed. Allow to cool completely on a wire rack.
- Prepare the Filling: In a medium bowl, beat the cream cheese and butter together until smooth and creamy. Gradually add the powdered sugar, beating until well combined. Mix in the vanilla extract.
- Assemble the Whoopie Pies: Once the cookies have cooled, spread or pipe a generous amount of the filling onto the flat side of half of the cookies. Top with the remaining cookies to form sandwiches.
Extra Tips:
For a more pronounced spice flavor, consider adding a pinch of ground cloves or allspice to the cookie batter. If you’re short on time, the cookie batter can be prepared a day in advance and refrigerated; just be sure to bring it to room temperature before baking.
When making the filling, verify the cream cheese and butter are softened at room temperature for a smoother consistency. To enhance the presentation, roll the edges of the whoopie pies in festive sprinkles or finely chopped nuts. Enjoy these Pumpkin Spice Whoopie Pies with a glass of milk or a hot cup of coffee for the ultimate fall treat.
Creepy Crawly Dirt Pudding

Creepy Crawly Dirt Pudding is the perfect Halloween dessert to spook and delight your party guests. This fun, no-bake treat resembles a freshly dug grave, complete with edible “dirt” and “worms”. It’s a hit with kids and adults alike, combining rich chocolate flavors with a playful presentation.
The pudding is easy to assemble and can be made ahead of time, making it an ideal choice for busy hosts preparing for a festive gathering.
The dish consists of layers of creamy chocolate pudding, crushed chocolate sandwich cookies, and gummy worms that wriggle their way through the “soil”. The texture contrast between the smooth pudding and crunchy cookies, along with the chewy gummies, creates a delightful eating experience.
Serve it in clear cups or a large dish for a centerpiece effect. With just a few simple ingredients, this Creepy Crawly Dirt Pudding will become a favorite Halloween tradition.
Ingredients (Serves 4-6):
- 1 package (3.9 oz) instant chocolate pudding mix
- 2 cups cold milk
- 1 package (14.3 oz) chocolate sandwich cookies
- 12 gummy worms
- 1 cup whipped topping (optional)
Instructions:
- Prepare the Pudding: In a medium-sized bowl, combine the instant chocolate pudding mix with 2 cups of cold milk. Whisk for about 2 minutes until the pudding thickens. Let it sit for 5 minutes to fully set.
- Crush the Cookies: While the pudding is setting, place the chocolate sandwich cookies in a resealable plastic bag. Use a rolling pin or your hands to crush the cookies into fine crumbs that resemble dirt.
- Layer the Dessert: In your serving cups or dish, start by adding a layer of the pudding at the bottom, followed by a layer of cookie crumbs. Repeat these layers until you have used all the pudding and cookies, ending with a layer of cookie crumbs on top.
- Add the Gummy Worms: Insert gummy worms halfway into the top layer of cookie crumbs, leaving the other half exposed to mimic worms crawling out of the dirt.
- Chill and Serve: If using, top with a dollop of whipped topping for added creaminess. Refrigerate the dessert for at least 30 minutes to allow the flavors to meld and the pudding to firm up further. Serve chilled.
Extra Tips:
For a more intense chocolate flavor, consider adding a tablespoon of cocoa powder to the pudding mix before whisking.
If you want to make the dessert more interactive, provide your guests with small shovels (plastic spoons) to dig into their dirt pudding.
You can also customize the pudding with other edible decorations like candy eyes or small chocolate grave markers for added spookiness.
Keep the dessert refrigerated until ready to serve to guarantee the pudding remains firm and the cookies maintain their crumbly texture.
Vampire Bite Red Velvet Cheesecake
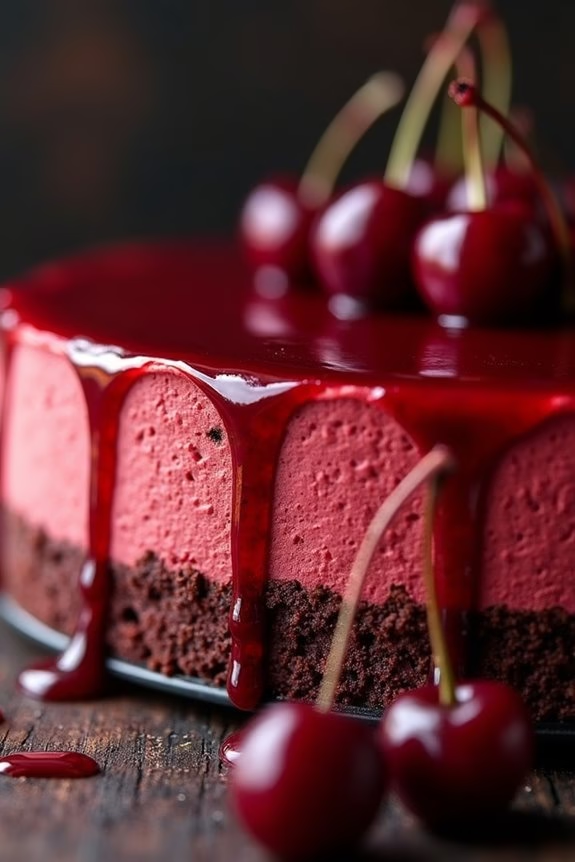
Vampire Bite Red Velvet Cheesecake is a spooky and delicious dessert perfect for Halloween parties. This cheesecake is a delightful mix of rich, creamy textures and bold, eye-catching colors. The classic red velvet flavor is enhanced with a hint of chocolate, while the cheesecake layer adds a smooth, tangy contrast. Topped with a “bloody” cherry sauce, this dessert not only tastes amazing but is also a visual treat, resembling a vampire’s bite.
The preparation of this dessert involves creating a crumbly chocolate crust, a vibrant red velvet cheesecake layer, and a topping that resembles blood dripping from vampire bites. It’s an impressive centerpiece for any Halloween party that will have your guests both spooked and satisfied. With the following recipe, you’ll be able to serve 4-6 people.
Ingredients:
- 1 1/2 cups chocolate wafer cookie crumbs
- 1/4 cup unsalted butter, melted
- 16 oz cream cheese, softened
- 3/4 cup granulated sugar
- 1/4 cup sour cream
- 2 large eggs
- 2 teaspoons vanilla extract
- 1 tablespoon cocoa powder
- 1 tablespoon red food coloring
- 1 tablespoon white vinegar
- 1/2 cup heavy cream
- 1 cup cherry pie filling (for topping)
- Red gel food coloring (optional, for extra blood effect)
Cooking Instructions:
- Prepare the Crust: Preheat your oven to 325°F (163°C). In a medium bowl, combine the chocolate wafer cookie crumbs and melted butter. Mix until the crumbs are evenly coated. Press the mixture into the bottom of a 9-inch springform pan to form an even crust. Bake for 10 minutes, then set aside to cool.
- Make the Cheesecake Filling: In a large mixing bowl, beat the softened cream cheese until smooth. Add the granulated sugar, sour cream, and vanilla extract, and continue beating until well combined. Add the eggs one at a time, beating just until incorporated. In a small bowl, mix the cocoa powder, red food coloring, and white vinegar, then stir into the cream cheese mixture until the color is consistent throughout.
- Assemble and Bake: Pour the red velvet cheesecake mixture over the cooled crust in the springform pan. Smooth the top with a spatula. Place the pan on a baking sheet and bake in the preheated oven for about 50-60 minutes, or until the center is set but still slightly jiggly. Turn off the oven, crack the door open, and let the cheesecake cool inside the oven for about an hour.
- Chill the Cheesecake: Remove the cheesecake from the oven and let it cool to room temperature. Once cooled, refrigerate for at least 4 hours or overnight for best results.
- Prepare the Topping: In a small saucepan over medium heat, warm the cherry pie filling until slightly thickened. If desired, add a few drops of red gel food coloring for a more intense “blood” effect. Allow the topping to cool slightly before spreading it over the cheesecake.
- Serve the Cheesecake: Remove the cheesecake from the springform pan and transfer it to a serving platter. Spoon the cherry sauce over the top, allowing some to drip down the sides for a dramatic effect. Slice and serve to your guests.
Extra Tips: For a smoother cheesecake, make certain all the ingredients, especially the cream cheese, are at room temperature before mixing. This will help prevent lumps in the batter. If you want a more intense red color, feel free to adjust the amount of red food coloring to your preference. Additionally, when slicing the cheesecake, dip the knife in hot water and wipe it clean between cuts to achieve clean slices.
Black Cat Oreo Truffles

Black Cat Oreo Truffles are a fun and delicious treat that are perfect for any Halloween party. These truffles are as delightful to look at as they’re to eat, featuring a charming and spooky black cat design. Made from crushed Oreo cookies and cream cheese, these truffles are dipped in chocolate and decorated with candy eyes and licorice tails to bring the whimsical cats to life. Not only are they incredibly tasty, but they also make a great centerpiece for your party table.
These truffles are easy to make and require no baking, which is a bonus for those looking for a quick and simple dessert option. The combination of the rich Oreo center with the smooth chocolate coating creates a decadent treat that’s sure to be a hit with both kids and adults. This recipe makes enough Black Cat Oreo Truffles to serve 4-6 people, perfect for a small gathering or as part of a larger dessert spread.
Ingredients:
- 24 Oreo cookies
- 4 oz cream cheese, softened
- 8 oz semisweet chocolate, melted
- 12 candy eyes
- Black licorice strings, cut into small pieces for tails
- 6 mini M&M’s for noses
- 12 small black jelly beans or candies for ears
Instructions:
- Prepare the Oreo Mixture:
- Place the Oreo cookies in a food processor and pulse until they become fine crumbs. Alternatively, place cookies in a sealed plastic bag and crush them with a rolling pin.
- Transfer the crumbs to a bowl and add the softened cream cheese. Mix until well combined and the mixture is smooth.
- Shape the Truffles:
- Using your hands, roll the Oreo mixture into 12 small balls, about 1 inch in diameter. Place them on a baking sheet lined with parchment paper.
- Chill the Balls:
- Refrigerate the Oreo balls for about 30 minutes to firm them up, making them easier to dip in chocolate.
- Coat with Chocolate:
- Melt the semisweet chocolate in a microwave-safe bowl, stirring every 30 seconds until smooth.
- Dip each Oreo ball into the melted chocolate, confirming it’s fully coated. Use a fork to remove it, allowing any excess chocolate to drip off. Place them back on the parchment-lined sheet.
- Decorate the Truffles:
- Quickly place two candy eyes on each truffle before the chocolate sets.
- Add a mini M&M for a nose and press two jelly beans or candies on top for ears.
- Stick a piece of black licorice into the back of each truffle for a tail.
- Set the Truffles:
- Allow the truffles to set at room temperature until the chocolate hardens, about 10-15 minutes. Alternatively, place them in the fridge to speed up the process.
Extra Tips:
For the best results, make sure your cream cheese is completely softened before mixing it with the Oreo crumbs, as this will guarantee a smoother texture. If you find the chocolate is hardening too quickly while decorating, place it back in the microwave for a few seconds to re-melt.
Additionally, you can get creative with the decorations by using different colored candies or sprinkles to give each black cat its own unique personality. These truffles can be made a day in advance and stored in an airtight container in the refrigerator until you’re ready to serve them. Enjoy the delightful combination of flavors and the spooky charm they bring to your Halloween festivities!
Frankenstein Rice Krispie Treats
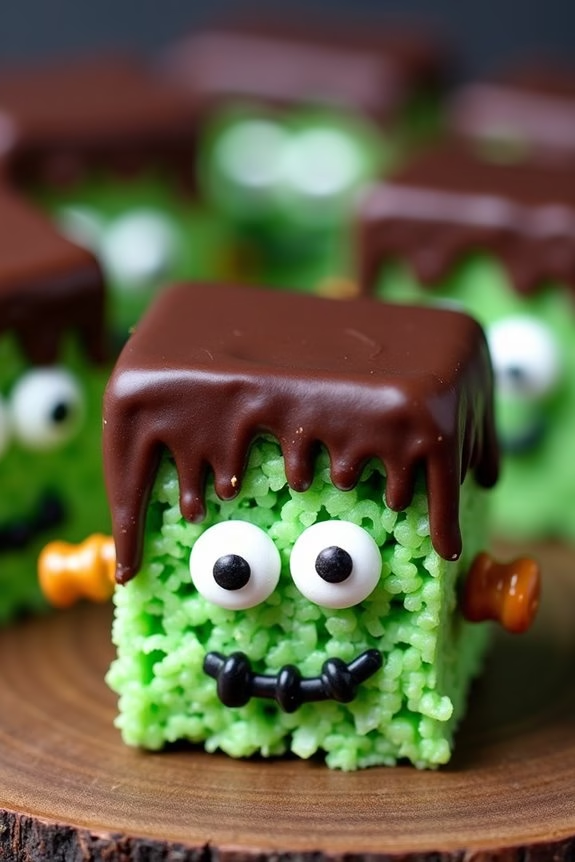
Frankenstein Rice Krispie Treats are a spooktacular addition to any Halloween party spread! These treats aren’t only fun to make with the whole family, but they also bring a delightful twist to the classic rice krispie treats we all know and love. With their ghoulish green hue and adorable monster faces, these treats will certainly be the highlight of your Halloween dessert table. Perfect for a serving size of 4-6 people, they’re an ideal choice for small gatherings or parties.
This recipe involves making traditional rice krispie treats and adding a creative twist by coloring them green and decorating them to resemble Frankenstein’s monster. The process is simple and requires minimal baking skills, making it a great activity for kids to participate in. The decoration possibilities are endless, and you can get as creative as you want with your Frankenstein designs. With the right ingredients and a bit of imagination, you’ll have a batch of monstrously delightful treats ready in no time.
Ingredients (serving size: 4-6 people):
- 3 tablespoons unsalted butter
- 10 ounces mini marshmallows
- 6 cups rice krispie cereal
- Green food coloring
- 1 cup chocolate chips (for melting)
- 24 candy eyes
- 12 pretzel sticks (for bolts)
- Black decorating gel
Instructions:
- Prepare the Pan: Grease a 9×13-inch baking pan with butter or non-stick spray and set aside.
- Melt Butter and Marshmallows: In a large saucepan, melt the butter over low heat. Once melted, add the mini marshmallows and stir continuously until completely melted and smooth.
- Add Food Coloring: Quickly add several drops of green food coloring to the melted marshmallow mixture. Stir until the color is evenly distributed. Add more coloring if needed until you achieve your desired shade of green.
- Mix in Cereal: Remove the saucepan from the heat and immediately add the rice krispie cereal. Stir until all the cereal is well coated with the green marshmallow mixture.
- Press into Pan: Pour the mixture into the prepared baking pan. Use a buttered spatula or a piece of wax paper to press it evenly into the pan. Allow it to cool and set for about 30 minutes.
- Cut and Decorate: Once set, cut the rice krispie treats into rectangles to form the monster bodies. Melt the chocolate chips in a microwave-safe bowl in 30-second intervals, stirring in between, until smooth. Dip the top of each rectangle into the melted chocolate to create Frankenstein’s hair.
- Add Details: Place two candy eyes on each treat, just below the chocolate hair. Break pretzel sticks in half and insert them into the sides of the treats to resemble bolts. Use the black decorating gel to draw a mouth and any additional details you desire on the monsters’ faces.
- Serve: Allow the decorations to set before serving. Enjoy your spooky creations!
Extra Tips: For best results, use fresh marshmallows and rice krispie cereal to guarantee the treats are soft and chewy. If you find the mixture sticking to your hands while shaping, try buttering your fingers or using wax paper to press down the mixture. Adjust the quantity of green food coloring based on how vibrant you want your Frankenstein treats to appear. Be creative with the facial expressions using different shapes for the eyes and mouths to give each treat its own personality.
Mummy Wrapped Donuts
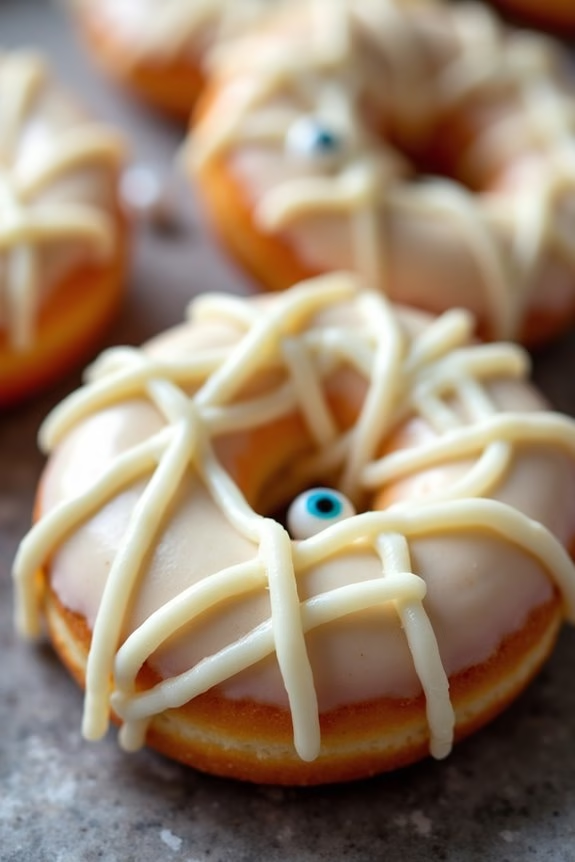
Halloween parties are the perfect opportunity to get creative with your desserts, and Mummy Wrapped Donuts are a delightfully spooky treat that will impress both kids and adults alike.
These donuts aren’t only visually appealing but also incredibly delicious, making them a surefire hit at any gathering. The combination of soft, fluffy donuts wrapped in sweet icing that resembles mummy bandages is both fun and festive.
Whether you’re hosting a large Halloween bash or having a small get-together, these Mummy Wrapped Donuts will add a touch of eerie elegance to your dessert table.
The beauty of this recipe is its simplicity. By using store-bought donuts and a few additional ingredients, you can quickly transform ordinary treats into a Halloween-themed masterpiece.
The process of decorating these donuts is an excellent activity to involve children, allowing them to express their creativity while also indulging in the sugary goodness. With minimal preparation and maximum impact, Mummy Wrapped Donuts are the perfect addition to your Halloween dessert lineup.
Ingredients for 4-6 people:
- 12 plain store-bought donuts
- 1 cup white chocolate chips
- 1 tablespoon coconut oil
- 24 small candy eyes
- 1 tube of white icing or frosting
Cooking Instructions:
- Prepare the Chocolate: In a microwave-safe bowl, combine the white chocolate chips and coconut oil. Microwave in 30-second intervals, stirring after each interval, until the chocolate is fully melted and smooth.
- Coat the Donuts: Dip each donut into the melted white chocolate, making sure it’s fully coated. Allow any excess chocolate to drip off before placing the donut on a wire rack or a parchment-lined baking sheet.
- Add Eyes: While the chocolate coating is still wet, add two candy eyes to the top of each donut. Position them close together for the best mummy effect.
- Create the Bandages: Fill a piping bag with the white icing or frosting. If you don’t have a piping bag, a resealable plastic bag with a small corner snipped off will work. Pipe the icing across each donut in a random crisscross pattern to create the appearance of mummy bandages.
- Set the Donuts: Allow the donuts to sit at room temperature for about 20-30 minutes, or until the chocolate and icing have fully set.
Extra Tips:
When making Mummy Wrapped Donuts, make sure the chocolate isn’t too hot when applying it to the donuts, as this can cause the candy eyes to melt or slide off.
If you’re short on time, you can replace the white chocolate coating with store-bought white icing for an even quicker assembly.
Feel free to add a little food coloring to the icing if you want to give your mummies a fun twist with colored bandages.
Storing the donuts in a cool place will keep the icing firm and prevent any melting mishaps.
Candy Corn Parfait
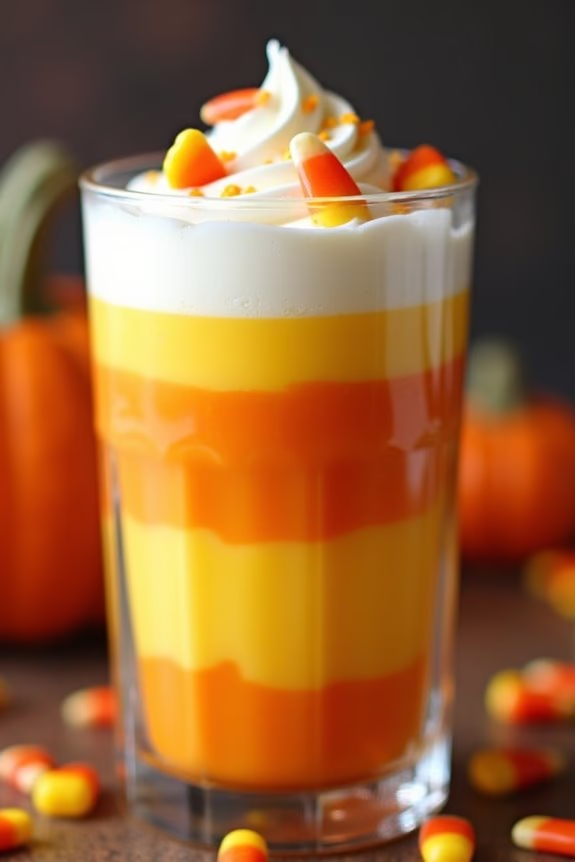
Candy Corn Parfait is a delightful, layered dessert that perfectly captures the essence of Halloween with its vibrant colors and sweet flavors. This delicious treat combines creamy layers with the iconic look of candy corn, making it both visually appealing and incredibly tasty.
It’s an easy-to-make dessert that’s perfect for Halloween parties or any spooky occasion. Each layer offers a distinct flavor and texture, creating a fun and festive treat that both kids and adults will love.
The parfait is typically made with a combination of pudding, whipped cream, and fruit, layered to resemble the colors of candy corn: yellow, orange, and white. The result is a dessert that’s not only delicious but also visually striking. This recipe serves 4-6 people, making it a great choice for small gatherings or family celebrations.
Prepare to impress your guests with this Halloween-themed dessert that’s as fun to make as it’s to eat.
Ingredients (for 4-6 servings):
- 2 cups vanilla pudding
- 1 cup whipped cream
- 1 cup mango or peach puree
- 1 cup pineapple puree
- Yellow food coloring
- Orange food coloring
- 1 cup candy corn (for garnish)
Instructions:
- Prepare the Pudding: Divide the vanilla pudding into two separate bowls. In one bowl, add a few drops of yellow food coloring and stir until the color is evenly distributed. This will be the base layer of your parfait.
- Create the Orange Layer: In the second bowl of pudding, add the mango or peach puree along with a few drops of orange food coloring. Mix well until the pudding achieves a vibrant orange color. This will be the middle layer of your parfait.
- Assemble the Parfait: In clear cups or glasses, start by spooning the yellow pudding into the bottom to form the first layer. Next, add a layer of the orange pudding on top. Finally, top with a generous layer of whipped cream to mimic the white tip of candy corn.
- Garnish and Serve: To finish, sprinkle candy corn on top of the whipped cream layer for added decoration and flavor. Serve immediately or refrigerate for up to an hour before serving.
Extra Tips:
For a more intense flavor, you can use fresh pureed fruit instead of canned, guaranteeing a fresher taste and texture.
If you want to prepare these parfaits in advance, assemble the pudding layers and keep them covered in the refrigerator, adding the whipped cream and candy corn just before serving to maintain their freshness and visually appealing nature.
For an extra twist, consider layering in some crumbled cookies or graham crackers for added crunch.
Bloody Finger Cookies
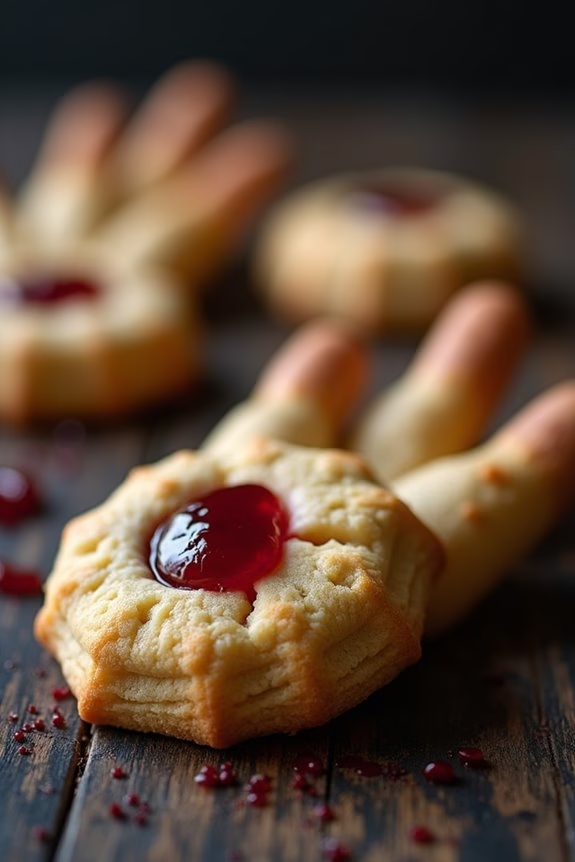
Halloween is a time when creativity in the kitchen can be both fun and deliciously spooky. One such treat that captures the essence of Halloween is Bloody Finger Cookies. These eerie delights aren’t only a visual spectacle but also a scrumptious addition to your Halloween party spread. The concept is simple yet effective: cookies shaped like fingers, complete with almond “fingernails” and a splash of red jam to mimic blood. Their realistic appearance is sure to both amuse and slightly terrify your guests, making them a perfect conversation starter at any gathering.
These cookies are crafted from a buttery shortbread dough, which guarantees they’re both tender and flavorful. The addition of red jam gives them a gory yet appetizing finish. You can prepare them ahead of time, making them an ideal choice for party planning. The following recipe yields enough cookies to serve 4-6 people, making it suitable for most intimate gatherings or as part of a larger dessert table selection.
Ingredients (Serves 4-6):
- 1 cup unsalted butter, softened
- 1 cup powdered sugar
- 1 large egg
- 1 teaspoon vanilla extract
- 1 teaspoon almond extract
- 2 3/4 cups all-purpose flour
- 1 teaspoon baking powder
- 1/2 teaspoon salt
- 3/4 cup whole blanched almonds
- 1/4 cup strawberry or raspberry jam
Instructions:
- Prepare the Dough: In a large mixing bowl, cream together the softened butter and powdered sugar until the mixture is light and fluffy. This should take about 2-3 minutes using an electric mixer on medium speed.
- Add Wet Ingredients: Beat in the egg, vanilla extract, and almond extract until well combined. Confirm that the egg is fully incorporated into the butter mixture.
- Combine Dry Ingredients: In a separate bowl, whisk together the all-purpose flour, baking powder, and salt. Gradually add the dry ingredients to the wet ingredients, mixing until a dough forms.
- Chill the Dough: Cover the dough with plastic wrap and chill in the refrigerator for at least 30 minutes. This will make the dough easier to handle and shape.
- Shape the Fingers: Preheat your oven to 325°F (165°C). Take a small amount of dough and roll it into a finger-sized cylinder, approximately 3 inches long and 1/2 inch wide. Make sure to shape it so that it resembles a finger, complete with knuckles.
- Add Fingernails and Wrinkles: Press a blanched almond at one end of each “finger” to create a nail. Use a knife to make small lines and wrinkles on the fingers to give them a more realistic appearance.
- Bake the Cookies: Place the shaped fingers on a parchment-lined baking sheet and bake for 20-25 minutes or until lightly golden. Be sure to check them halfway through to prevent over-baking.
- Add the Bloody Effect: Once the cookies have cooled, remove the almond “nails” and put a small amount of red jam in the indentation. Press the almond back into place, allowing some of the jam to ooze out for a bloody effect.
Extra Tips:
For an even more realistic look, consider using a toothpick to create additional small veins or cracks in the dough before baking. You can also use food coloring to tint the almonds a slightly yellowed hue for an aged appearance.
If you find the dough too sticky to handle, dust your hands with a little flour to make shaping easier. These cookies can be stored in an airtight container for up to a week, which makes them ideal for preparing in advance. Enjoy your Halloween festivities with these delightfully creepy treats!
Chocolate Bat Treats
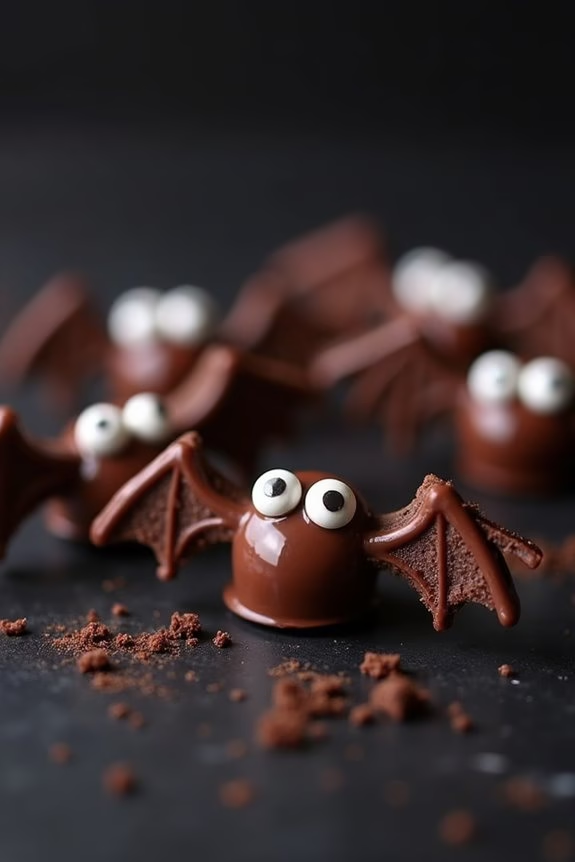
Halloween is the perfect time to get creative in the kitchen, and these Chocolate Bat Treats are the ideal spooky dessert to delight both kids and adults at your party.
These fun treats not only look festive but also satisfy that chocolate craving. With a combination of rich chocolate and a hint of crunch, these treats are sure to be a hit among all party-goers.
Whether you’re hosting a Halloween bash or just looking to add some spooky flair to your dessert table, these Chocolate Bat Treats are simple to make and require minimal ingredients. The recipe caters to 4-6 people, making it perfect for a small gathering or as part of a larger array of Halloween-themed treats.
Now, let’s plunge into how you can bring these delightful bats to life!
Ingredients:
- 1 cup semi-sweet chocolate chips
- 12 Oreo cookies
- 6 miniature peanut butter cups
- Edible candy eyes
- 1 tablespoon shortening
- 1/4 cup melted chocolate or chocolate frosting (for attaching)
Instructions:
- Prepare the Chocolate: In a microwave-safe bowl, combine the semi-sweet chocolate chips and shortening. Microwave on medium power for 30-second intervals, stirring after each interval, until the chocolate is completely melted and smooth.
- Separate the Cookies: Carefully twist apart the Oreo cookies to separate the halves. Scrape off the cream filling with a knife or spoon and discard or set aside for another use.
- Create Bat Wings: Cut each cookie half into two equal parts to form the bat wings. You should have 24 wings in total.
- Attach Wings to Bodies: Dip the straight edge of each cookie wing into the melted chocolate and attach two wings to each peanut butter cup, pressing gently to secure. Let them set on a baking sheet lined with parchment paper.
- Add the Eyes: Use a small dot of melted chocolate or chocolate frosting to attach the edible candy eyes to the top of each peanut butter cup, just above where the wings are attached.
- Let Set: Allow the Chocolate Bat Treats to set at room temperature or place them in the refrigerator for 10-15 minutes to speed up the process.
Extra Tips:
To make certain your Chocolate Bat Treats are picture-perfect, verify that the melted chocolate is smooth and not overheated, as this can cause it to seize up.
If you don’t have edible candy eyes, you can use small white chocolate chips with a dot of dark chocolate as an alternative.
When cutting the Oreo cookies, use a gentle sawing motion with a sharp knife to avoid breaking them.
Finally, if you’re preparing these treats in advance, store them in an airtight container at room temperature or in the fridge to keep them fresh and ready for your Halloween festivities!
Haunted Graveyard Cake
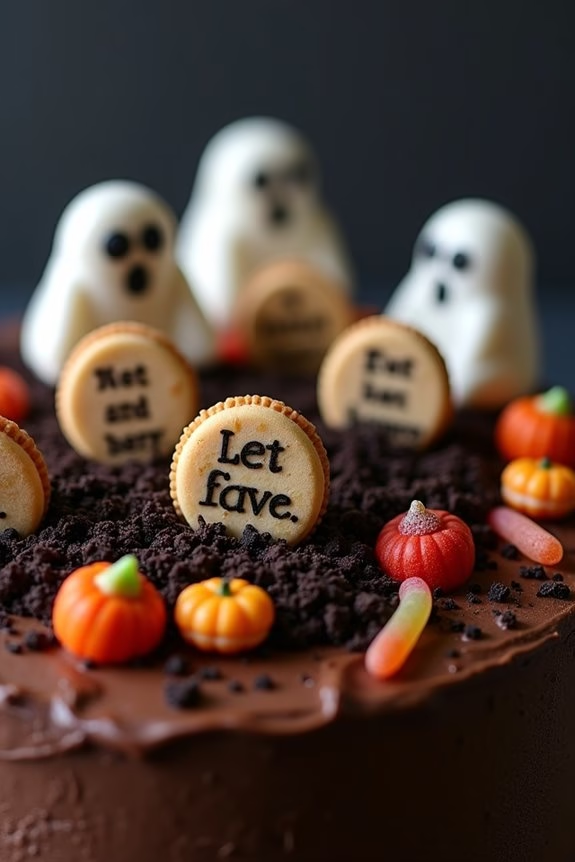
Transform your Halloween party into a spine-chilling event with this spooky Haunted Graveyard Cake. This eerie dessert isn’t only visually thrilling but also deliciously satisfying. The cake is adorned with tombstones, ghosts, and creepy crawlies, making it the perfect centerpiece for your Halloween celebration. This recipe is designed to serve 4-6 people, ensuring that everyone can enjoy a slice of this ghostly delight.
Creating a Haunted Graveyard Cake involves layering rich chocolate cake with a luscious chocolate frosting, then decorating it to resemble a haunted graveyard. The use of crushed cookies mimics dirt, while candy and fondant become gravestones and ghosts. With a little creativity and attention to detail, you can craft a cake that’s both fun and frightful, sure to impress your guests and leave them with a memorable Halloween experience.
Ingredients:
- 1 box of chocolate cake mix
- 3 large eggs
- 1 cup water
- 1/3 cup vegetable oil
- 2 cups chocolate frosting
- 1 cup crushed chocolate sandwich cookies
- 6 oval-shaped cookies (e.g., Milano) for tombstones
- Black edible marker
- Assorted Halloween candies (e.g., gummy worms, candy pumpkins)
- White fondant
- Black gel food coloring
Instructions:
- Prepare the Cake Batter:
- Preheat your oven to 350°F (175°C). Grease and flour a 9×13 inch baking pan.
- In a large mixing bowl, combine the chocolate cake mix, eggs, water, and vegetable oil. Beat the mixture with an electric mixer on medium speed for about 2 minutes, until smooth.
- Bake the Cake:
- Pour the batter into the prepared baking pan and spread it evenly.
- Bake in the preheated oven for 25-30 minutes, or until a toothpick inserted into the center comes out clean.
- Allow the cake to cool completely in the pan on a wire rack.
- Apply the Frosting:
- Once the cake is completely cooled, spread the chocolate frosting evenly over the top of the cake using a spatula.
- Create the Graveyard Scene:
- Sprinkle the crushed chocolate sandwich cookies over the frosting to resemble dirt.
- Use the black edible marker to write spooky messages on the oval-shaped cookies to create tombstones.
- Press the tombstones gently into the cake, standing upright.
- Decorate further with assorted Halloween candies, such as gummy worms and candy pumpkins, to add color and creepiness.
- Add Ghosts:
- Roll small pieces of white fondant into ghost shapes.
- Use a toothpick dipped in black gel food coloring to draw eyes and mouths on the fondant ghosts.
- Place the ghosts around the cake for added spookiness.
Extra Tips:
When crafting your Haunted Graveyard Cake, feel free to let your imagination run wild. You can add more decorations like plastic spiders or use green-colored frosting to simulate grass.
If using a different cake flavor or homemade cake, adjust the cooking time as needed. To make the tombstones more sturdy, chill them in the fridge before inserting them into the cake.
This cake is best made fresh but can be prepared a day in advance and stored in the refrigerator. Let it come to room temperature before serving for the best taste and texture.
Brainy Jello Shots

Get ready to spook your guests with these eerie yet delicious Brainy Jello Shots. Perfect for Halloween parties, these shots not only look creepy but also taste fantastic. With their gelatinous texture and clever presentation, they’re bound to be the centerpiece of your party spread.
The brainy appearance is achieved with a simple combination of gelatin, food coloring, and a creative mold, while the flavor is enhanced with a splash of vodka to add an adult twist. The process is straightforward, allowing you to prepare them ahead of time and focus on other party preparations.
These jello shots are a great conversation starter and will surely impress your guests with their creative and festive look. Whether you’re hosting a large gathering or a small get-together, these Brainy Jello Shots will add a touch of frightful fun to your Halloween celebrations.
Ingredients (Serves 4-6 people):
- 1 package (3 oz) of flavored gelatin (such as lime or berry)
- 1 cup boiling water
- 1/2 cup cold water
- 1/2 cup vodka
- 1-2 drops red food coloring
- 1-2 drops blue food coloring
- A brain-shaped mold or standard muffin tin
Instructions:
- Prepare Gelatin Mixture: In a medium-sized mixing bowl, pour the flavored gelatin powder. Add 1 cup of boiling water to the powder and stir well until the gelatin is completely dissolved. This guarantees there are no lumps and the gelatin sets properly.
- Add Alcohol and Coloring: Once the gelatin is dissolved, add 1/2 cup of cold water and 1/2 cup of vodka to the mixture. Stir to combine. Next, add 1-2 drops of red food coloring and 1-2 drops of blue food coloring to achieve a brain-like hue. Mix until the color is evenly distributed.
- Prepare the Mold: Lightly grease the brain-shaped mold or muffin tin with a non-stick spray to facilitate easy removal of the jello shots once set.
- Pour and Set: Carefully pour the gelatin mixture into the prepared mold or muffin tin. Place the mold in the refrigerator and allow it to chill for at least 4 hours, or until the gelatin is fully set and firm to the touch.
- Unmold and Serve: Once the jello shots have set, gently remove them from the mold by loosening the edges with a small spatula or knife if necessary. Place them on a serving platter and enjoy your spooky creation!
Extra Tips:
For a non-alcoholic version, simply replace the vodka with an equal amount of cold water or fruit juice. If you’re using a brain-shaped mold, it may be helpful to run the bottom of the mold under warm water for a few seconds to help release the gelatin without damaging its shape.
Additionally, you can experiment with different flavors and colors to match your party theme or personal preference. These shots are best served cold, so keep them refrigerated until you’re ready to serve them.