
Halloween is just around the corner, and what better way to celebrate than with a charcuterie board that’s both spooky and scrumptious? Picture a spread filled with ghostly cheese sticks, mummy-wrapped sausages, and pumpkin-shaped cheese bites. It’s a feast for the eyes and the taste buds, bringing joy and flavor to your Halloween festivities. Each idea is a burst of creativity, ensuring the little ones stay entertained and nourished. Ready to make this Halloween utterly delightful?
Ghostly Cheese Sticks
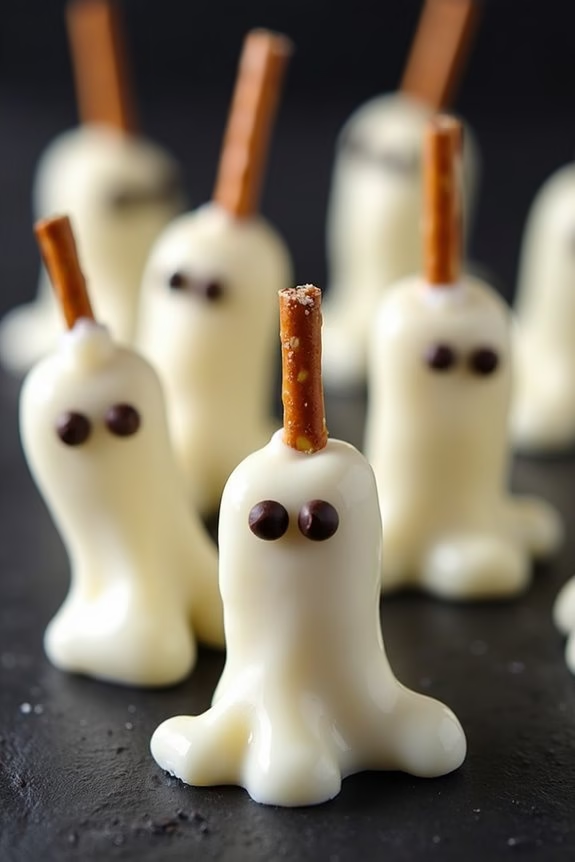
Ghostly Cheese Sticks are a fun and spooky addition to any Halloween charcuterie board, especially for kids! These delightful cheese sticks aren’t only delicious but also incredibly easy to make. They feature mozzarella string cheese transformed into little edible ghosts, bringing a festive touch to your Halloween spread. Perfect for parties or just a fun snack, these cheese sticks are bound to be a hit with children and adults alike.
The beauty of Ghostly Cheese Sticks lies in their simplicity. With just a few basic ingredients and a little creativity, you can whip up a delightful treat that everyone will enjoy. Whether you’re hosting a Halloween party or just want to surprise your kids with a fun snack, these cheese sticks are an ideal choice. Not only are they tasty, but they also offer a good source of calcium and protein, making them a healthier option compared to candy and sweets.
Ingredients for Ghostly Cheese Sticks (Serves 4-6)
- 8 mozzarella string cheese sticks
- 16 mini chocolate chips
- 16 pretzel sticks
- 1 tablespoon of cream cheese (optional, for sticking eyes)
Cooking Instructions
- Prepare the Cheese Sticks: Unwrap each mozzarella string cheese stick and place them on a clean surface. These will serve as the body of your ghost.
- Create the Ghostly Shape: Gently pull apart the ends of each cheese stick to create a fringed effect. This will give the cheese stick a ghostly appearance.
- Add the Eyes: Take two mini chocolate chips and press them gently into the cheese stick to create eyes. If the chocolate chips have trouble sticking, use a small dab of cream cheese to help them adhere.
- Attach the Pretzel Stick: Insert a pretzel stick into the top of each cheese stick. This will serve as a handle for easy grabbing on the charcuterie board.
- Arrange: Place the Ghostly Cheese Sticks on your Halloween charcuterie board, spacing them out for effect.
Extra Tips
For an extra spooky touch, consider placing the Ghostly Cheese Sticks on a dark-colored plate or serving tray to make the white cheese pop. You can also experiment with different types of cheese if you prefer a different flavor, but mozzarella works best for the ghostly appearance.
If you’re preparing these ahead of time, keep them refrigerated until serving to guarantee they stay fresh and maintain their shape. Enjoy creating this fun and festive snack that’s sure to delight your little goblins and ghouls!
Mummy Wrapped Sausages

Mummy Wrapped Sausages are a delightful and spooky addition to any Halloween charcuterie board, especially for kids. This fun and easy recipe transforms simple sausages into playful, mummy-like treats that are bound to be a hit. The combination of flaky pastry and savory sausage isn’t only delicious but also visually appealing, making these mummies a perfect centerpiece for your festive spread.
These Mummy Wrapped Sausages are both easy to make and customize. You can choose your favorite type of sausage, whether it be mini cocktail sausages or larger ones for a heartier bite. The wrapping is done with pre-made puff pastry or crescent roll dough, adding a light and crispy texture that complements the juicy sausage within. They’re perfect for a Halloween party or a fun family dinner, and what’s more, kids can even participate in preparing this dish!
Ingredients for 4-6 servings:
- 12 mini cocktail sausages
- 1 package of crescent roll dough or puff pastry
- 1 egg, beaten
- 1 tablespoon of milk
- Mustard or ketchup for decorating
- Cooking spray or parchment paper
Instructions:
- Preheat the oven: Start by preheating your oven to 375°F (190°C). This guarantees that the oven is at the right temperature once you’re ready to bake the mummies.
- Prepare the dough: Roll out the crescent roll dough or puff pastry on a lightly floured surface. If using crescent roll dough, pinch together the perforations to create a single sheet. Using a knife or pizza cutter, slice the dough into thin strips, about ¼ inch wide.
- Wrap the sausages: Take a mini sausage and start wrapping a strip of dough around it, leaving a small gap for the “face.” Overlap the dough slightly to resemble a mummy’s bandages. Repeat this process for each sausage.
- Prepare the egg wash: In a small bowl, mix the beaten egg with the milk. This will be used to give the mummies a golden brown finish.
- Bake the mummies: Place the wrapped sausages on a baking sheet lined with parchment paper or lightly sprayed with cooking spray. Brush each mummy with the egg wash to help them turn golden brown. Place the baking sheet in the preheated oven and bake for 12-15 minutes, or until the dough is cooked through and golden.
- Decorate and serve: Once baked, remove the mummies from the oven and allow them to cool slightly. Use mustard or ketchup to draw eyes on the mummies. Serve warm as part of your Halloween charcuterie board.
Extra Tips:
For an extra spooky effect, you can use black sesame seeds or small bits of olives to create pupils in the eyes made with mustard or ketchup. If you’re using larger sausages, adjust the baking time accordingly to guarantee they’re cooked through.
You can also experiment with different types of sausage for varying flavors. To make the wrapping process easier, chill the dough slightly before cutting it into strips. This recipe is a great opportunity to involve kids in the kitchen, letting them wrap and decorate their own mummy sausages.
Pumpkin-Shaped Cheese Bites
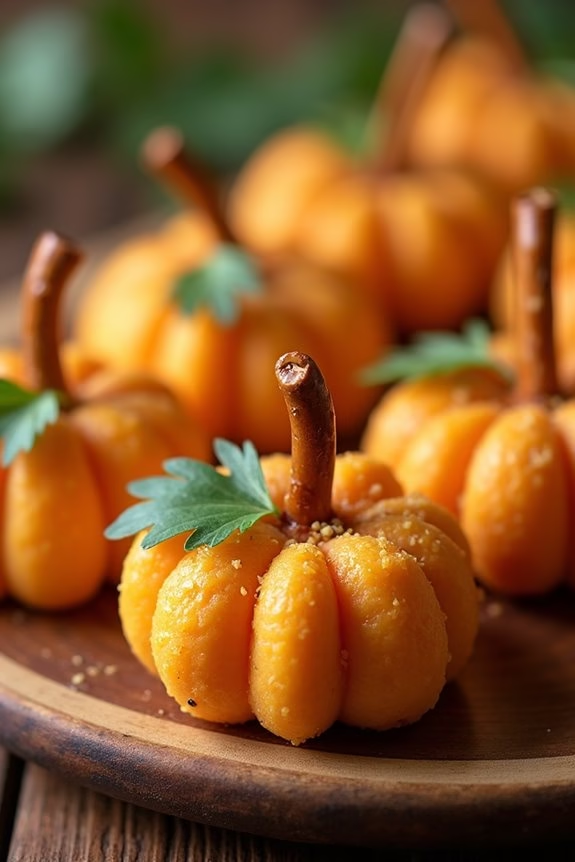
Pumpkin-Shaped Cheese Bites are a delightful addition to any Halloween charcuterie board, especially tailored for kids. These festive snacks aren’t only fun to make but also delicious to eat. Shaped like miniature pumpkins, these cheese bites are made with a mix of creamy cheese and spices, offering a savory taste that complements the sweet treats typically found during Halloween.
The bright orange color and pumpkin shape make them an eye-catching addition to your spread, sparking the festive spirit in both children and adults alike. Perfect for serving at a Halloween party or as a fun snack at home, these Pumpkin-Shaped Cheese Bites can be prepared in advance, making them a convenient option for busy parents planning holiday festivities.
They’re easy to assemble, requiring minimal ingredients and effort. With just a few simple steps, you can create these charming appetizers that will leave your little ones smiling. The following recipe will guide you in making a serving size suitable for 4-6 people.
Ingredients:
- 2 cups of cheddar cheese, shredded
- 8 ounces of cream cheese, softened
- 1 teaspoon of smoked paprika
- 1 teaspoon of garlic powder
- 1/2 teaspoon of salt
- 1/2 cup of crushed pretzels
- 12 small pretzel sticks
- Fresh parsley leaves for garnish
Cooking Instructions:
- Prepare the Cheese Mixture: In a large mixing bowl, combine the shredded cheddar cheese, softened cream cheese, smoked paprika, garlic powder, and salt. Blend the ingredients together until smooth and thoroughly mixed. This will be the base of your cheese bites.
- Shape the Bites: Once the cheese mixture is ready, take a small portion (about a tablespoon) and roll it into a ball using your hands. Repeat this process until all the cheese mixture is used, forming around 12 small balls.
- Coat with Crushed Pretzels: Place the crushed pretzels in a shallow dish. Roll each cheese ball in the pretzels until fully coated. This will give the cheese bites a crunchy texture and enhance the pumpkin-like appearance.
- Create the Pumpkin Look: Gently press a small pretzel stick into the top of each cheese ball to resemble a pumpkin stem. Add a fresh parsley leaf next to the pretzel stick for a realistic touch.
- Chill Before Serving: Arrange the Pumpkin-Shaped Cheese Bites on a platter and refrigerate for at least 30 minutes before serving. Chilling helps the cheese bites firm up and hold their shape.
Extra Tips:
When making Pumpkin-Shaped Cheese Bites, verify the cream cheese is properly softened to allow for easy mixing. If you prefer a spicier kick, add a pinch of cayenne pepper to the cheese mixture.
For a more vibrant color, you can also add a few drops of orange food coloring to enhance the pumpkin appearance. When serving, keep the bites chilled until they’re ready to be eaten to maintain their firmness and shape. Enjoy these tasty and festive treats, perfect for any Halloween gathering!
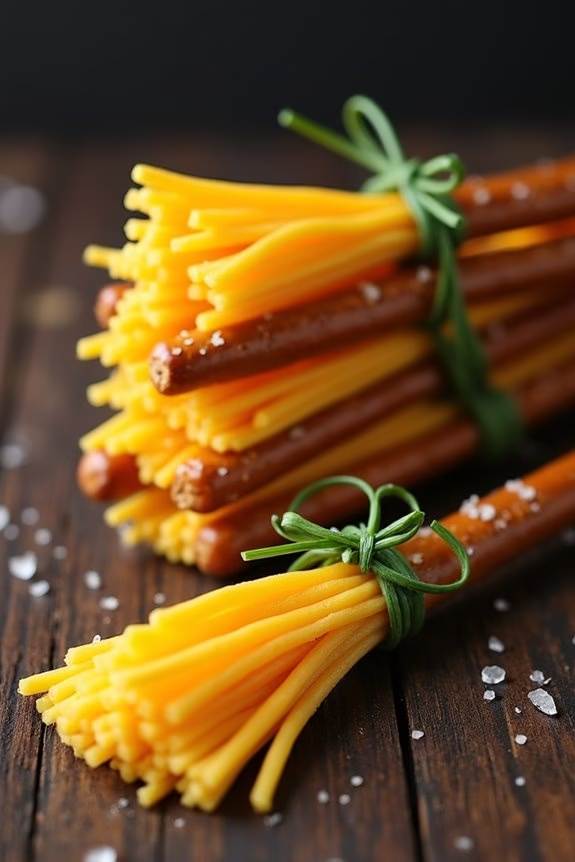
Witch’s Broomstick Snacks
Halloween is a time of fun, creativity, and, of course, deliciously spooky treats! If you’re planning a Halloween-themed charcuterie board for kids, Witch’s Broomstick Snacks are a must-have addition.
These charming and healthy snacks aren’t only easy to make but also a delightful way to add some magic to your Halloween festivities. Made with just a few simple ingredients, these tasty broomsticks are the perfect balance of savory and whimsical, sure to enchant the little witches and wizards at your party.
Witch’s Broomstick Snacks are the ideal finger food, combining the crispness of pretzel sticks with the creamy texture of cheese. The addition of fresh chives gives them a touch of color and a hint of savory flavor.
Perfect for a serving size of 4-6 people, these broomsticks can be made quickly and are a great way to involve kids in the kitchen. Their adorable presentation will surely make them the talk of your Halloween charcuterie board!
Ingredients:
- 12 pretzel sticks
- 6 string cheese sticks
- Fresh chives, enough for tying (about 12-18 strands)
Instructions:
- Prepare the String Cheese: Start by unwrapping the string cheese sticks. Cut each cheese stick in half to create two shorter sticks. These will serve as the bristle part of the broomstick.
- Create the Broom Bristles: Take each half of the string cheese and carefully use a knife to make several vertical cuts at one end, about two-thirds of the way up. This will create the appearance of broom bristles.
- Assemble the Broomsticks: Insert a pretzel stick into the uncut end of each string cheese piece. Be gentle to avoid breaking the pretzel. The pretzel should be inserted firmly enough to hold the string cheese but not so forcefully that it cracks.
- Tie with Chives: Take a fresh chive and wrap it around the top of the string cheese, just above the cuts. Tie the chive into a knot to secure it, giving the appearance of a broomstick handle. Trim any excess chive for a neat finish.
- Present Your Snacks: Arrange the completed broomsticks on a platter, spacing them out to prevent them from sticking together. Serve immediately, or refrigerate until you’re ready to add them to your Halloween charcuterie board.
Extra Tips:
When making Witch’s Broomstick Snacks, try to choose pretzel sticks and string cheese that are similar in diameter for a more cohesive look.
If you find the chives are too short or difficult to tie, you can use a small piece of green onion as an alternative. To make the snacks even more appealing, consider using cheese sticks with different flavors or colors, such as cheddar or mozzarella.
This will add variation and excitement to your charcuterie board. Finally, involve the kids in the assembly process; they’ll love creating these magical treats and it’s a great way to bond over Halloween preparations!
Spider Web Crackers

Halloween is the perfect time to get creative with food, and a Spider Web Cracker is a fun and spooky addition to a Halloween Charcuterie Board for kids. This dish brings together the crunchiness of crackers with a creamy and slightly tangy spread that’s perfect for the spooky season.
The highlight of this recipe is the spider web design, which can be made using a simple piping technique that even kids can enjoy. Paired with some edible spider decorations, these crackers will be the star of your Halloween spread.
Creating Spider Web Crackers isn’t only fun but also an engaging way to get children involved in cooking. This recipe is designed for a serving size of 4-6 people, making it ideal for a small Halloween gathering or party. With just a few simple ingredients, you can transform ordinary crackers into a festive treat that delights both kids and adults.
Let’s plunge into the ingredients and steps needed to create these spooky snacks.
Ingredients (Serving Size: 4-6 people):
- 24 round crackers
- 1 cup cream cheese, softened
- 1 tablespoon sour cream
- Black food coloring
- 1 small piping bag or ziplock bag
- Candy eyes or small edible spiders for decoration
Cooking Instructions:
- Prepare the Cream Cheese Mixture: In a medium bowl, combine the softened cream cheese and sour cream. Mix until smooth and creamy. This mixture will form the base for your spider web design.
- Color the Mixture: Add a few drops of black food coloring to the cream cheese mixture. Stir well until the color is evenly distributed and you achieve your desired shade of black. Adjust the color by adding more food coloring as needed.
- Fill the Piping Bag: Transfer the black cream cheese mixture into a small piping bag or a ziplock bag. If using a ziplock bag, snip a small corner off to create a makeshift piping tip.
- Create the Spider Web Design: Lay out the round crackers on a flat surface. Pipe a small dot in the center of each cracker, then pipe circles around the dot, gradually increasing in size until you reach the edge of the cracker. Use a toothpick to gently drag lines from the center dot to the edge, creating a spider web effect.
- Add Decorations: Place candy eyes or edible spiders on the spider web crackers for a spooky touch. Confirm the decorations are securely placed before moving the crackers.
- Serve and Enjoy: Arrange the Spider Web Crackers on your Halloween Charcuterie Board. Serve immediately or store in the refrigerator until ready to serve.
Extra Tips:
For an even more festive look, consider using different colored food coloring to create a variety of spider web designs. You can also use different types of crackers, such as whole wheat or flavored options, to add variety to your board.
If you find the cream cheese mixture too thick for piping, a small amount of milk can be added to reach the desired consistency. Ultimately, let the children get creative with the design and decoration process, which not only makes it a fun activity but also encourages them to try their creations!
Monster Fruit Faces
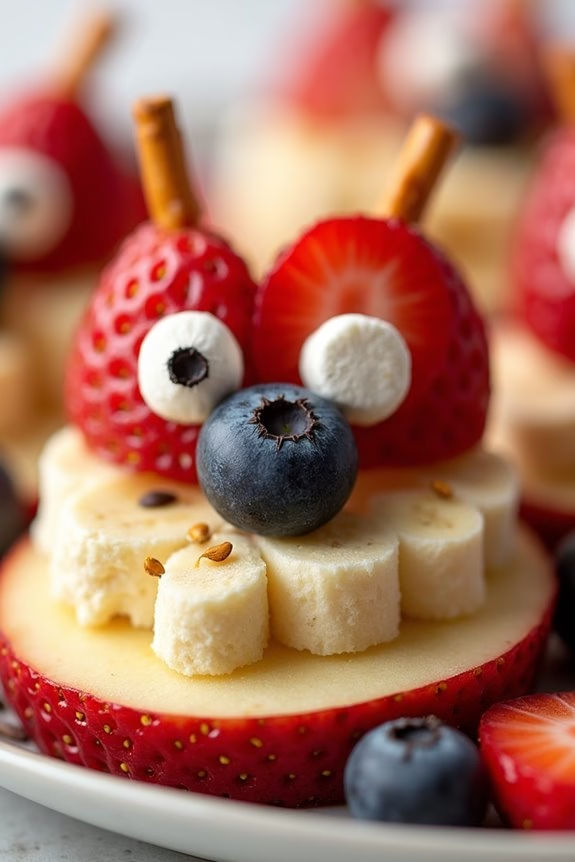
Creating Monster Fruit Faces is an engaging activity that combines healthy snacks with Halloween fun, making it an ideal choice for a festive charcuterie board for kids. This recipe is perfect for involving children in the kitchen, allowing them to express their creativity while learning about different fruits. The Monster Fruit Faces aren’t only colorful and delicious but also provide a nutritious option that parents can feel good about serving during Halloween celebrations.
These delightful fruit faces can be arranged on a board, mixing various textures and flavors to keep things exciting. The following recipe is designed to serve 4-6 people, making it perfect for a small gathering or family event. With a variety of fruits and a few fun additions, you can create an array of spooky monster faces that will captivate both kids and adults alike.
Ingredients for Monster Fruit Faces (Serves 4-6):
- 2 apples
- 2 bananas
- 1 cup of seedless grapes
- 1/2 cup of strawberries
- 1/4 cup of blueberries
- 1/4 cup of raisins
- 1/4 cup of mini marshmallows
- 1/4 cup of chocolate chips
- 1/4 cup of pretzel sticks
- 1/4 cup of sunflower seeds
Cooking Instructions:
- Prepare the Fruits:
- Wash all the fruits thoroughly. Slice the apples and bananas into thin rounds. Halve the strawberries and remove the stems.
- Assemble the Monster Faces:
- Lay out the apple and banana slices on a large board or platter to form the base of each monster face. Use the strawberries, grapes, and blueberries to create eyes and noses.
- Add Facial Features:
- Use mini marshmallows and chocolate chips to make eyes, securing them with a bit of peanut butter or cream cheese if needed. Arrange pretzel sticks for hair or antennae, and use raisins or sunflower seeds for additional facial details like mouths or freckles.
- Display the Charcuterie Board:
- Arrange the Monster Fruit Faces on the board, filling any gaps with additional fruit or snacks. Keep the design playful and spooky, mixing different shapes and colors.
- Serve:
- Present the completed board to your guests, encouraging them to create their own monster faces by mixing and matching the available ingredients.
Extra Tips:
To make the Monster Fruit Faces more interactive, consider providing small bowls of peanut butter, yogurt, or cream cheese for dipping and sticking different elements together.
You can also substitute any of the fruits with others that are in season or preferred by your family. To keep apples from browning, toss them in a bit of lemon juice before assembling the faces.
Encourage creativity by letting the kids design their own unique monsters, making this a fun and educational activity for all involved.
Creepy Crawly Pretzels
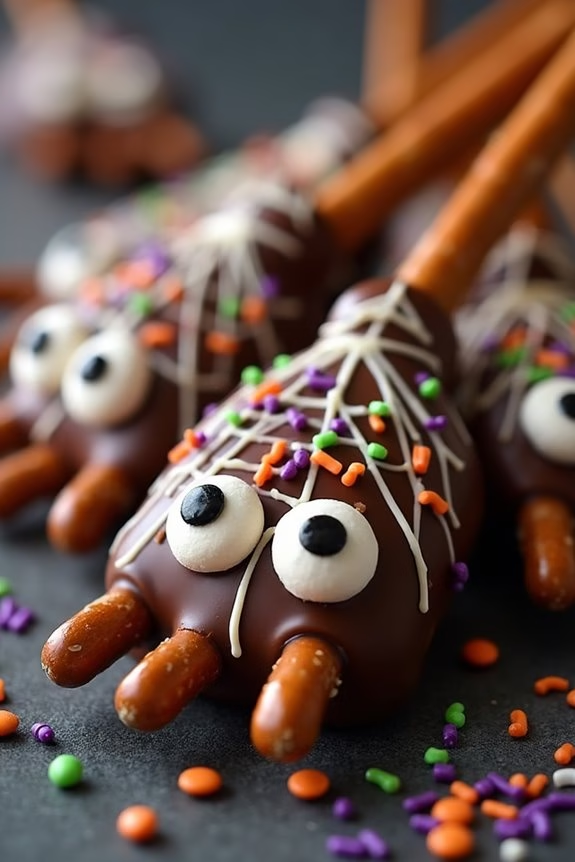
Looking to add a spooky touch to your Halloween charcuterie board for kids? These Creepy Crawly Pretzels are the perfect addition! Not only are they fun to make, but they also add an eerie element to your festive spread.
These pretzels are designed to resemble spiders and other creepy crawlies, making them a hit with kids and adults alike. With the right balance of sweet and salty, they’re both delicious and entertaining.
These Creepy Crawly Pretzels are perfect for a family gathering or a Halloween party and are certain to be a crowd-pleaser. Kids will love the chance to create their own edible monsters, and the process is simple enough for little hands to help with decorating.
Plus, they make for a great interactive activity as guests can build their own creepy creations right at the table.
Ingredients for 4-6 servings:
- 24 large pretzel rods
- 2 cups of semi-sweet chocolate chips
- 1 cup of white chocolate chips
- 1 cup of candy eyes
- 1 cup of mini marshmallows
- Assorted Halloween-themed sprinkles
- ½ cup of red or black licorice laces
Instructions:
1. Prepare the Work Area: Begin by lining a baking sheet with parchment paper to prevent sticking. This will serve as the drying area for your creepy crawly pretzels once they’re decorated.
2. Melt the Chocolate: In a microwave-safe bowl, melt the semi-sweet chocolate chips in 20-second intervals, stirring in between, until smooth. Do the same with the white chocolate chips in a separate bowl.
3. Coat the Pretzels: Dip each pretzel rod into the melted semi-sweet chocolate, using a spoon to help coat the pretzel evenly, leaving about an inch at the bottom uncoated for holding. Allow excess chocolate to drip off before placing the pretzel on the parchment paper.
4. Decorate the Creepy Crawlies: While the chocolate is still wet, press candy eyes onto the pretzel to create faces. Cut licorice laces into short pieces to resemble legs, and press them into the chocolate.
Add mini marshmallows and sprinkles to enhance your designs. Use the white chocolate to create additional details by drizzling it over the pretzels or using it as glue for additional decorations.
5. Set the Pretzels: Allow the decorated pretzels to sit at room temperature or refrigerate for 10-15 minutes until the chocolate is fully set.
Extra Tips:
For an extra spooky effect, consider using colored candy melts for your chocolate coating to create vibrant, Halloween-themed pretzel creatures.
If you’re short on time, pre-made candy decorations can be used for ease. Make sure the chocolate coating isn’t too hot to prevent melting the candy eyes.
Have fun experimenting with different designs and shapes, allowing kids to personalize their creepy crawly pretzels. Enjoy the creativity and uniqueness each pretzel can bring to your Halloween charcuterie board!
Bat-Shaped Sandwiches
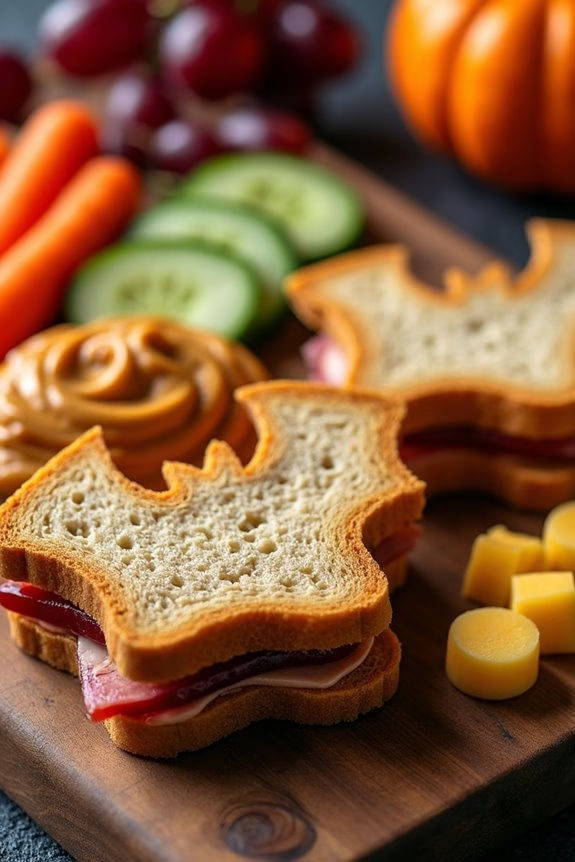
Bring a touch of spooky fun to your Halloween charcuterie board with these delightful bat-shaped sandwiches. Perfect for kids, these sandwiches aren’t only visually appealing but also delicious and easy to make. Using simple ingredients like bread, your choice of filling, and a bat-shaped cookie cutter, you can create a whimsical and festive dish that will surely be a hit at any Halloween gathering.
These Bat-Shaped Sandwiches are versatile and can be customized to suit different tastes. Whether your kids prefer classic peanut butter and jelly, turkey and cheese, or a vegetarian option like hummus and cucumber, there’s a bat-shaped sandwich for everyone. The key to these sandwiches is guaranteeing the filling is spread evenly, so the bat shape remains intact and doesn’t fall apart when picked up. Easy to assemble and fun to eat, these sandwiches are a perfect addition to a Halloween-themed charcuterie board for 4-6 people.
Ingredients for 4-6 People:
- 12 slices of whole wheat or white bread
- 1 cup of creamy peanut butter (or any nut butter of choice)
- 1 cup of jelly or jam
- 1/2 pound of sliced turkey or ham
- 6 slices of cheese
- 1 cucumber, thinly sliced
- 1 cup of hummus
- Bat-shaped cookie cutter
Cooking Instructions:
- Prepare the Workspace: Start by laying out all your ingredients and tools, including the bat-shaped cookie cutter, on a clean and spacious work surface. This will make the assembly process smooth and efficient.
- Cut the Bread: Using the bat-shaped cookie cutter, cut out bat shapes from each slice of bread. Ensure you press firmly to get a clean cut, and set aside any leftover bread pieces for another use, like breadcrumbs.
- Prepare the Fillings: Decide on your sandwich combinations. For peanut butter and jelly, spread peanut butter on one side of a bat-shaped bread and jelly on the other, then sandwich them together. For turkey and cheese, layer turkey slices and cheese between two bat-shaped bread pieces. For the vegetarian option, spread a layer of hummus on one side of the bread and add cucumber slices before topping with another piece of bat-shaped bread.
- Assemble the Sandwiches: Once all the fillings are prepared, carefully press the two halves of each sandwich together. Ensure that the bat shapes are aligned and the filling is evenly distributed within the edges.
- Plate Your Creations: Arrange the bat-shaped sandwiches on your Halloween charcuterie board. You can layer them or stand them up for a more dynamic presentation. Add additional Halloween-themed snacks around them, like carrot sticks, cheese cubes, and grapes, to complete the spooky ensemble.
Extra Tips:
To prevent the sandwiches from becoming soggy, make sure to spread the peanut butter and hummus all the way to the edges of the bread, creating a barrier for any moisture from the jelly or cucumber.
If you’re planning these sandwiches ahead of time, consider assembling them shortly before serving to maintain freshness. Additionally, allow the kids to get creative with the fillings or even decorate the sandwiches with edible eyes or other Halloween-themed edible decorations for added fun!
Skeleton Vegetable Platter
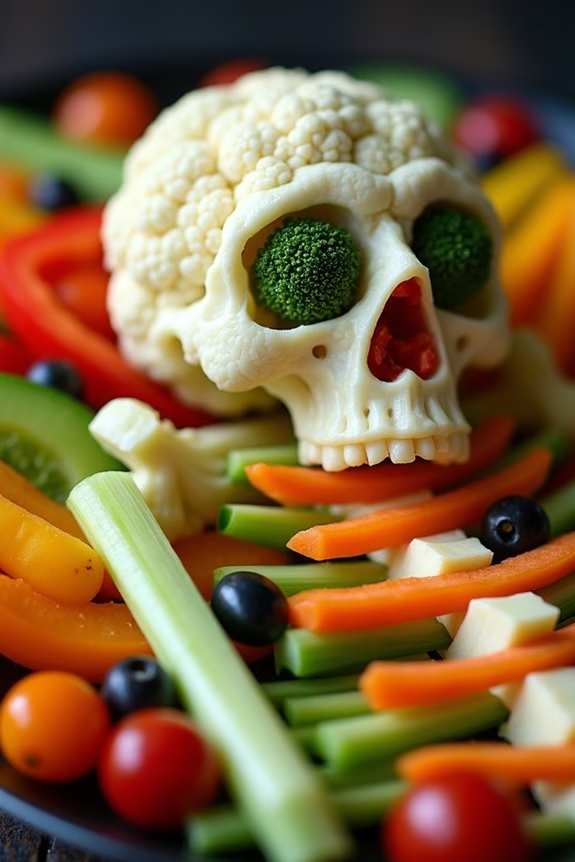
Skeleton Vegetable Platter is a fun and spooky way to serve up healthy veggies for kids during a Halloween celebration. This dish isn’t only visually appealing but also a great way to encourage children to eat more vegetables in a festive and engaging manner. The concept is simple: arrange fresh vegetables to resemble a skeleton’s body on a large platter. It’s an artistic challenge and a nutritional win, making it a must-have for any Halloween charcuterie board.
The Skeleton Vegetable Platter is perfect for a serving size of 4-6 people, offering a variety of fresh vegetables that are both colorful and crunchy. The key to a successful platter is selecting a range of vegetables that vary in color and texture while being easy for kids to eat. This recipe provides a delightful balance of taste and presentation, ensuring that even the pickiest of eaters will enjoy this healthy Halloween treat.
Ingredients for 4-6 people:
- 1 large head of cauliflower
- 1 bunch of celery
- 1 small bunch of broccoli
- 1 red bell pepper
- 1 yellow bell pepper
- 1 cucumber
- 1 cup cherry tomatoes
- 1 bunch of baby carrots
- 1/2 cup black olives
- Ranch dressing or hummus for dipping
Cooking Instructions:
- Prepare the Vegetables: Wash all vegetables thoroughly under cold water. Pat them dry with a clean towel to remove any excess moisture.
- Create the Skeleton Head: Cut the cauliflower head in half. Use one half to form the skull by arranging it at the top of a large platter. Use small pieces of broccoli for the eyes and a slice of red bell pepper for the mouth.
- Assemble the Skeleton Body: Use celery sticks to form the spine and ribs. Lay them out from the bottom of the skull down the center of the platter. Arrange the celery sticks horizontally on either side to resemble ribs.
- Add Arms and Legs: Use cucumber slices for the arms and legs. Arrange them extending out from the top and bottom of the spine made of celery.
- Create Hands and Feet: Use baby carrots to form the hands and feet. Place them at the ends of the cucumber slices.
- Add Details: Use cherry tomatoes for joints or additional bones, and slice the yellow bell pepper into strips to add around the platter for extra color and decoration.
- Complete the Look: Add black olives to enhance facial features on the cauliflower skull or as additional decoration around the platter.
- Serve with Dip: Place a small bowl of ranch dressing or hummus at the bottom of the platter for dipping.
Extra Tips:
To make the Skeleton Vegetable Platter even more enticing for kids, consider using small cookie cutters to shape some of the vegetables into fun Halloween-themed shapes like bats or pumpkins.
If you want to add a bit more variety, include other vegetables like sliced radishes or sugar snap peas. Remember, presentation is key, so take your time arranging the vegetables neatly.
This platter can be prepared a few hours in advance and stored in the refrigerator until party time, ensuring the vegetables remain fresh and crisp.
Candy Corn Popcorn Mix
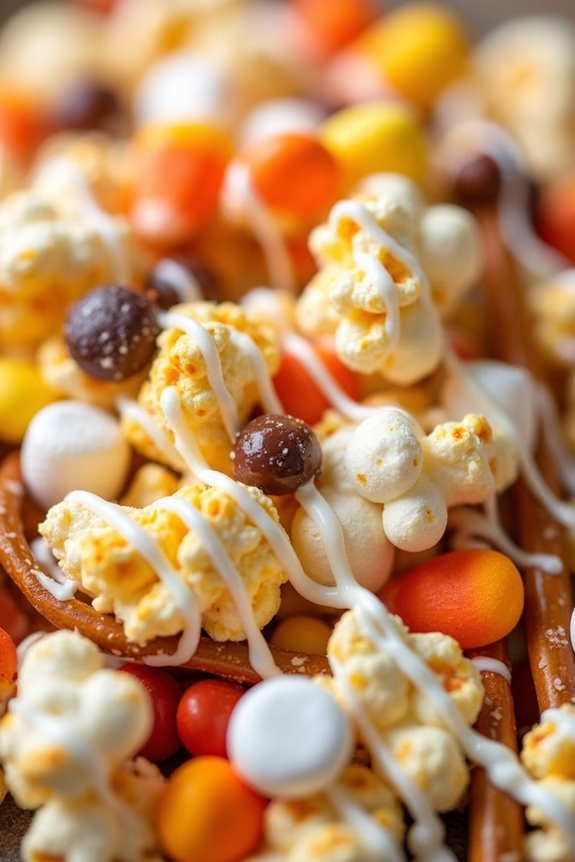
Halloween is a time for fun, creativity, and of course, delicious treats. One festive snack that kids will love is the Candy Corn Popcorn Mix. This colorful and sweet snack combines the classic flavors of candy corn with the buttery taste of popcorn, creating a delightful mix that’s perfect for a Halloween charcuterie board.
Not only is it easy to make, but it also adds a splash of color to any Halloween table setting. This recipe is ideal for serving 4-6 people, making it a great choice for small Halloween gatherings or family movie nights. The combination of the salty popcorn with the sweet candy corn and chocolate candies makes for an irresistible treat that both kids and adults can enjoy.
Plus, this mix can be easily customized with additional ingredients to suit your taste preferences.
Ingredients:
- 8 cups of popped popcorn
- 2 cups of candy corn
- 1 cup of pretzel sticks
- 1 cup of mini marshmallows
- 1 cup of chocolate candies (such as M&M’s)
- 1 cup of salted peanuts (optional)
- 1/4 cup of melted white chocolate (for drizzling, optional)
Instructions:
- Prepare the Popcorn: Start by popping 8 cups of popcorn. You can use microwave popcorn for convenience or pop your own on the stove for a more homemade touch. Confirm that the popcorn is fully popped and remove any unpopped kernels to prevent any unwanted surprises in the mix.
- Mix Ingredients: In a large mixing bowl, combine the popped popcorn, candy corn, pretzel sticks, mini marshmallows, chocolate candies, and salted peanuts (if using). Gently toss the mixture to confirm the ingredients are evenly distributed.
- Add the Drizzle: If you want to add an extra layer of sweetness, melt 1/4 cup of white chocolate using a microwave or a double boiler. Once melted, drizzle it over the popcorn mix. Use a spoon or a piping bag to confirm even coverage.
- Let it Set: Allow the mix to sit for a few minutes so the chocolate drizzle can set. This will help the ingredients stick together slightly, making it easier to serve and eat.
- Serve: Transfer the Candy Corn Popcorn Mix to a large serving bowl or divide it into individual cups for easy serving on your Halloween charcuterie board.
Extra Tips:
For an added touch of Halloween spirit, consider using themed serving bowls or cups featuring spooky designs. If you prefer a less sweet version, reduce the amount of candy corn or swap it for another ingredient, like dried cranberries or yogurt-covered raisins.
Additionally, feel free to experiment with different types of chocolate or add a pinch of cinnamon or pumpkin spice to the mix for a seasonal twist. Remember to store any leftovers in an airtight container to keep the popcorn fresh and crunchy.
Frankenstein Rice Krispie Treats
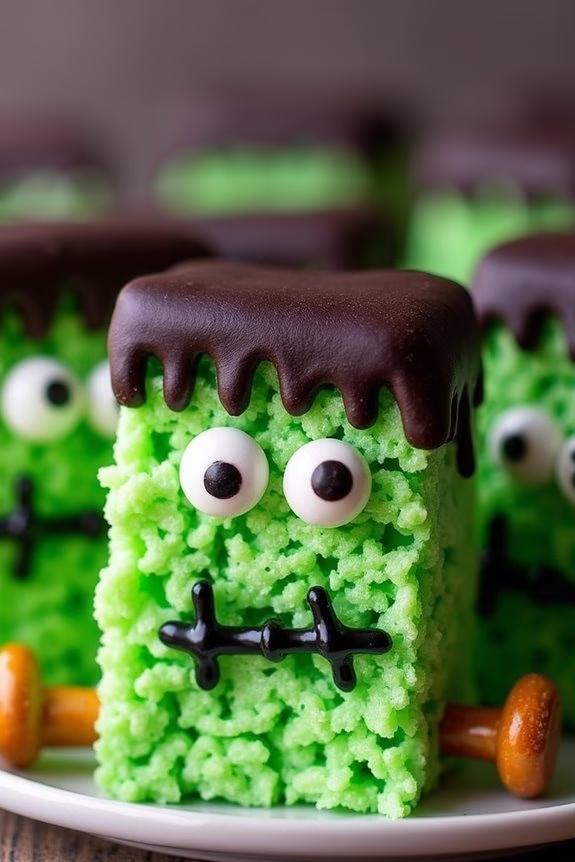
Frankenstein Rice Krispie Treats are a fun and spooky addition to any Halloween charcuterie board, especially for kids. These treats aren’t only delicious but also a fantastic way to get creative in the kitchen. By transforming simple Rice Krispie treats into mini Frankenstein monsters, you’ll create a memorable snack that will surely delight children and adults alike.
The combination of crispy cereal, marshmallow goodness, and colorful decorations makes this a treat that’s as fun to make as it’s to eat. To bring these little monsters to life, you’ll start by preparing classic Rice Krispie treats. Then, with the help of some food coloring and a few decorative candies, you’ll give them a ghoulish makeover.
This recipe is perfect for a serving size of 4-6 people, providing enough treats to keep everyone at your Halloween gathering satisfied. With just a few simple ingredients and steps, you’ll have a batch of Frankenstein Rice Krispie Treats that are certain to become a Halloween tradition.
Ingredients (serving size: 4-6 people):
- 6 cups of Rice Krispies cereal
- 4 cups of mini marshmallows
- 3 tablespoons of unsalted butter
- Green food coloring
- Black gel icing or edible marker
- Candy eyes
- Pretzel sticks (for the bolts)
- Chocolate chips (or chocolate melts for hair)
- Cooking spray
Cooking Instructions:
- Prep Your Pan: Begin by lightly spraying a 9×13-inch baking pan with cooking spray to guarantee the treats don’t stick. Set aside.
- Melt the Butter and Marshmallows: In a large saucepan, melt the butter over low heat. Add the mini marshmallows and stir continuously until they’re completely melted and combined with the butter.
- Add Food Coloring: Once the marshmallow mixture is smooth, add a few drops of green food coloring. Stir until the mixture is uniformly green. Adjust the color as needed to achieve the desired shade of Frankenstein green.
- Mix in the Cereal: Remove the saucepan from heat and gradually add the Rice Krispies cereal, stirring gently until all the cereal is coated evenly with the green marshmallow mixture.
- Shape the Treats: Transfer the mixture into the prepared baking pan. Use a greased spatula or wax paper to press the mixture evenly into the pan. Allow it to cool and set for about 30 minutes.
- Cut and Decorate: Once set, cut the treats into rectangles to form Frankenstein’s head. Melt the chocolate chips in a microwave or over a double boiler, then dip one edge of each treat into the chocolate to create hair. Let the chocolate set.
- Add Facial Features: Use the black gel icing or edible marker to draw a mouth and stitches on each treat. Attach candy eyes using a small dab of melted chocolate. Finally, insert a pretzel stick into both sides of each treat to resemble Frankenstein’s bolts.
Extra Tips:
For an even more festive touch, consider dusting the treats with edible glitter or adding additional candies for more facial features. If you don’t have candy eyes, small chocolate chips can be used as an alternative.
When working with the marshmallow mixture, work quickly as it can cool and harden fast. If it becomes too sticky, lightly grease your hands or utensils with cooking spray to handle it more easily. These treats can be made a day in advance and stored in an airtight container to keep them fresh.
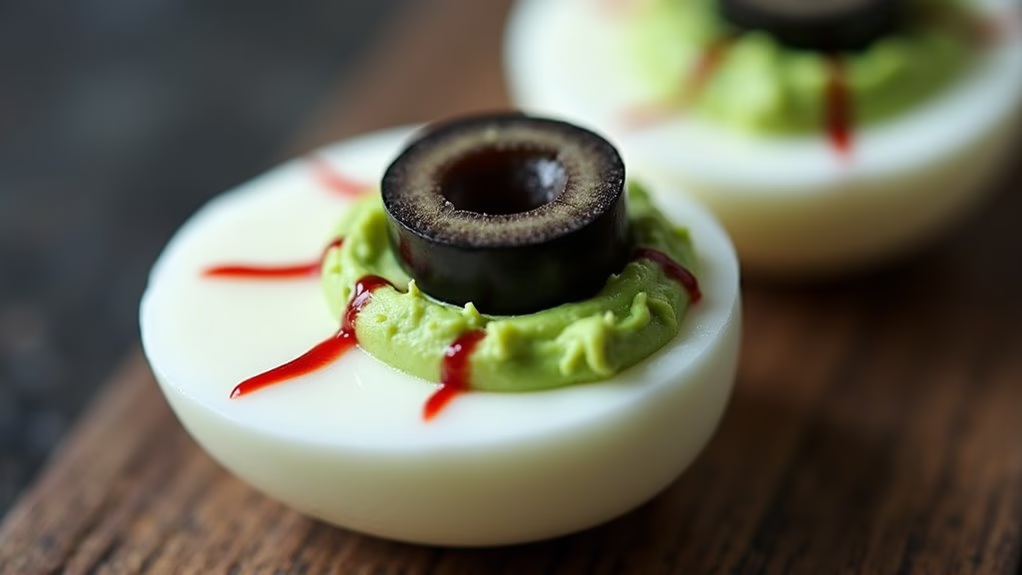
Eyeball Deviled Eggs
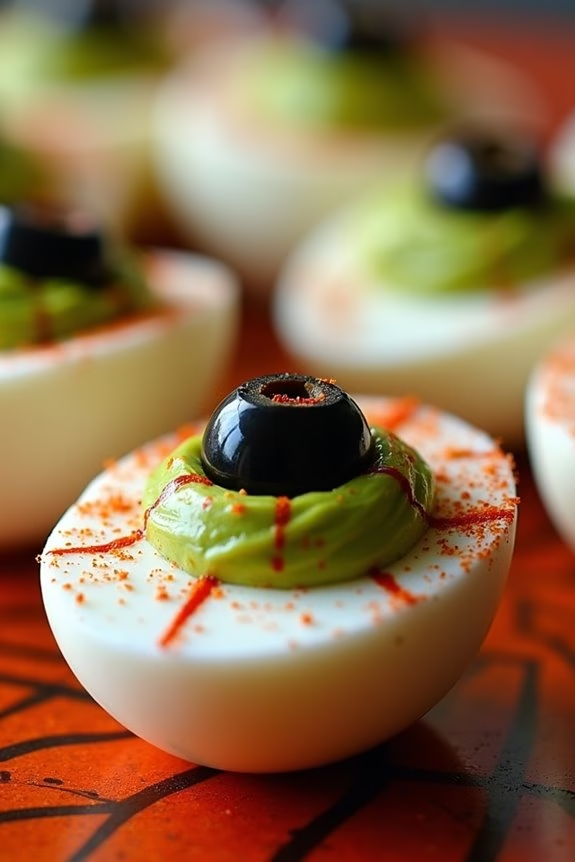
Halloween is a time for spooky fun and delicious treats, and Eyeball Deviled Eggs are the perfect addition to any kid-friendly Halloween charcuterie board. These ghoulishly delightful appetizers aren’t only fun to make, but they’re also a nutritious option that will be a hit with children and adults alike.
With a creamy filling and an eerie appearance, these deviled eggs will surely capture the essence of Halloween without being too scary for young ones. Crafting Eyeball Deviled Eggs is an enjoyable activity that the whole family can join in on. The process involves simple ingredients that you likely already have in your kitchen.
By adding a few creative twists to the traditional deviled eggs, you can create a dish that’s both visually appealing and tasty. Whether you’re planning a Halloween party or just want to surprise the kids with a themed snack, these eyeball deviled eggs will definitely leave a lasting impression.
Ingredients for 4-6 servings:
- 6 large eggs
- 1/4 cup mayonnaise
- 1 teaspoon yellow mustard
- 1/2 teaspoon salt
- 1/4 teaspoon black pepper
- Green food coloring
- Black olives
- Red food coloring
- Toothpicks
- Paprika (optional)
Instructions:
- Boil the Eggs: Place the eggs in a saucepan and cover them with water. Bring to a boil over medium-high heat. Once the water is boiling, cover the pan, turn off the heat, and let the eggs sit for 10-12 minutes.
- Prepare the Eggs: After boiling, transfer the eggs to a bowl of ice water and let them cool for about 5 minutes. Once cooled, gently peel the eggs under running water to remove the shells.
- Make the Filling: Slice each egg in half lengthwise and remove the yolks, placing them in a separate bowl. Add mayonnaise, mustard, salt, and pepper to the yolks and mash until smooth.
- Color the Mixture: Add a few drops of green food coloring to the yolk mixture and mix until you achieve the desired shade of green. This will give the filling a spooky appearance reminiscent of monster eyes.
- Assemble the Eyeballs: Spoon or pipe the green yolk mixture back into the egg whites. Slice black olives into small circles to resemble pupils and place one on top of each filled egg.
- Add Details: Dip a toothpick into red food coloring and carefully draw thin lines on the egg whites to create a bloodshot effect, making the eggs look like spooky eyeballs.
- Finish and Serve: Optionally, sprinkle a bit of paprika on top for added flavor. Arrange the eyeball deviled eggs on a platter and serve them as part of your Halloween charcuterie board.
Extra Tips:
When boiling eggs, it’s helpful to add a teaspoon of vinegar to the water to prevent the shells from cracking. For a smoother yolk mixture, consider using a food processor.
If the kids are involved in the process, be sure to supervise them when using toothpicks and handling food coloring to avoid any messes or accidents. These eyeball deviled eggs can be made a day in advance and stored in the refrigerator, making them a practical option for busy Halloween celebrations.