

I’ve got a scrumptious idea that’s perfect for your Halloween festivities and it’s sure to enchant every sweet lover in the room. Picture a dazzling array of candy corn, gummy pumpkins, and chocolate-covered pretzels, all beautifully arranged to tantalize both the eyes and taste buds. These candy charcuterie boards are not just treats; they’re a visual delight that marries spooky charm with mouthwatering flavors. Are you ready to explore some hauntingly delicious ideas?
Classic Candy Corn Delight
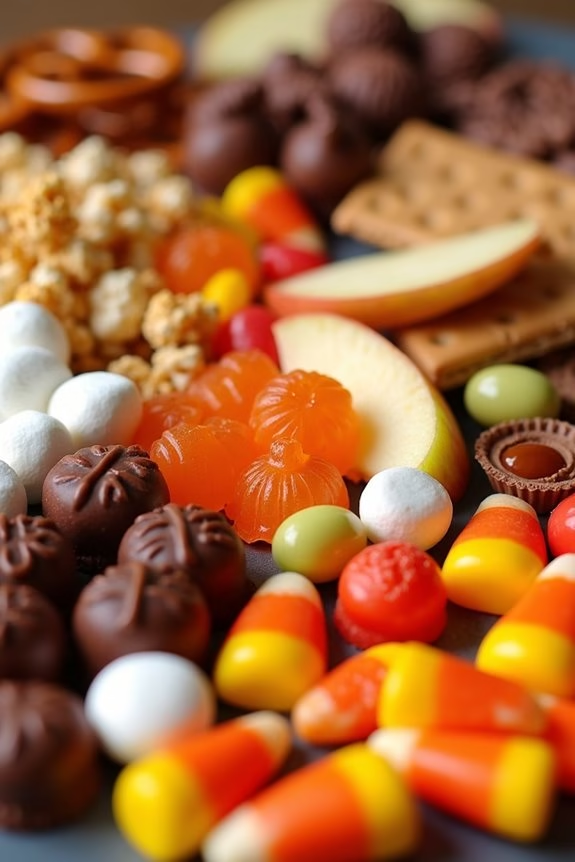
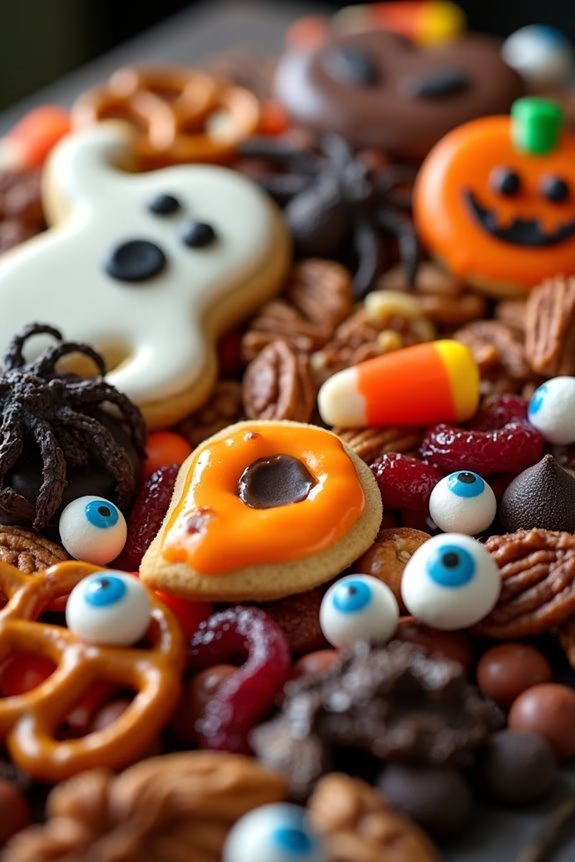
Delight in the quintessential flavors of autumn with this whimsical and sweet Classic Candy Corn Delight charcuterie board. Perfect for Halloween gatherings or a cozy night in, this candy charcuterie board is a playful twist on the traditional cheese and meat platter.
With a rich palette of colors and textures, this board captures the essence of Halloween spirit, inviting family and friends to indulge in a sweet treat experience. From the iconic candy corn to an array of complementary sweets and snacks, each component has been thoughtfully selected to create a vibrant and satisfying spread.
Ideal for serving 4-6 people, this board combines the nostalgic taste of candy corn with an assortment of chocolates, gummies, and festive snacks, designed to please both the young and the young at heart. The key to a successful candy charcuterie board lies in the balance of flavors and presentation, using a mix of candies and snacks that are sure to delight.
Whether you’re hosting a Halloween party or simply enjoying a spooky movie night at home, this Classic Candy Corn Delight is sure to be the centerpiece of your celebration.
Ingredients (Serves 4-6):
- 1 cup of candy corn
- 1 cup of mini marshmallows
- 1 cup of chocolate-covered pretzels
- 1 cup of gummy pumpkins
- 1/2 cup of peanut butter cups
- 1/2 cup of caramel popcorn
- 1/2 cup of chocolate truffles
- 1/2 cup of yogurt-covered raisins
- 1/2 cup of assorted fruit-flavored jelly beans
- 1/2 cup of apple slices
- 1/2 cup of graham crackers, broken into pieces
- 1/4 cup of chocolate bark, broken into pieces
Instructions:
- Prepare the Board: Begin by selecting a large wooden or slate board as the base for your charcuterie display. Confirm the board is clean and dry, ready to hold the assortment of candies and snacks.
- Arrange the Candy Corn: Place the candy corn in a small bowl or pile it directly onto the board in the center. This will act as the focal point of your board, from which you’ll build outwards.
- Add Sweet Elements: Around the candy corn, arrange the mini marshmallows, chocolate-covered pretzels, and gummy pumpkins. These should be placed in small sections, creating a visually appealing and varied texture.
- Incorporate Chocolates: Distribute the peanut butter cups, chocolate truffles, and chocolate bark in different sections. This will add depth and richness to the board, complementing the sweetness of the other candies.
- Balance with Savory and Fruity: Arrange the apple slices and caramel popcorn in small piles, creating a balance between sweet and savory elements. Introduce the yogurt-covered raisins and jelly beans for an additional burst of color and flavor.
- Finish with Crackers: Break the graham crackers into bite-sized pieces and tuck them around the board, filling any gaps and adding a crunchy texture to the assortment.
- Final Touches: Once all items are placed, make any final adjustments to confirm even distribution and visual appeal. You can add small decorative items like Halloween-themed picks or miniature pumpkins for a festive touch.
Extra Tips:
To enhance the visual appeal of your candy charcuterie board, consider using a variety of small bowls and decorative containers for some of the candies. This not only adds height and dimension but also helps in organizing the sweet treats neatly.
Always verify to use fresh, high-quality candies and snacks for the best flavor and texture. If preparing in advance, store the board covered in a cool, dry place to maintain freshness. Finally, feel free to customize the board with your favorite Halloween candies or seasonal treats to make it uniquely yours.
Spooky Chocolate Truffle Treats

Transform your Halloween candy charcuterie board into a delightfully eerie affair with these Spooky Chocolate Truffle Treats. These bite-sized indulgences are perfect for adding a touch of sophistication and spooky fun to your Halloween spread. Made with rich, velvety chocolate and shaped into ghostly figures, these truffles are both a visual and gastronomic delight.
They’re easy to prepare, making them an excellent choice for both novice and seasoned confectioners looking to impress their guests. The truffles are crafted with a creamy ganache base, which is then coated in a layer of finely tempered chocolate for a glossy finish.
To create the spooky effect, each truffle is decorated with edible eyes and colored icing to resemble little ghostly figures or other Halloween-themed characters. These Spooky Chocolate Truffle Treats are sure to be the highlight of your Halloween candy charcuterie board, providing a sweet and spooky experience for all your Halloween guests.
Ingredients (Serving size: 4-6 people):
- 1 cup heavy cream
- 8 oz dark chocolate, chopped
- 2 tbsp unsalted butter
- 1 tsp vanilla extract
- 1/4 cup cocoa powder (for dusting)
- 12 oz white chocolate, melted (for coating)
- Edible eyes or decorations
- Colored icing (black and orange suggested)
Cooking Instructions:
- Prepare the Ganache: Begin by heating the heavy cream in a small saucepan over medium heat until it reaches a gentle simmer. Don’t let it boil. Remove from heat and add the chopped dark chocolate and butter. Stir continuously until the chocolate and butter have fully melted and the mixture is smooth. Add the vanilla extract and stir well to combine.
- Chill the Mixture: Pour the ganache mixture into a shallow dish and refrigerate it for at least 2 hours or until it’s firm enough to scoop. This will make it easier to shape the truffles later.
- Shape the Truffles: Once the ganache is firm, use a small cookie scoop or a spoon to portion out the ganache into 1-inch balls. Roll each portion between your palms to make a smooth ball. This recipe should yield about 12-18 truffles, depending on the size.
- Coat the Truffles: Roll each ball in cocoa powder to give it a thin coating. This will help the white chocolate stick to the truffles. Next, dip each truffle into the melted white chocolate, ensuring they’re thoroughly coated. Place them on a baking sheet lined with parchment paper.
- Decorate the Truffles: While the white chocolate is still tacky, place edible eyes on each truffle to transform them into little spooky characters. Use colored icing to add features like mouths or other details to enhance the spooky appearance.
- Set the Coating: Allow the truffles to sit at room temperature until the white chocolate coating has fully set. Alternatively, you can refrigerate them for a faster setting process.
Extra Tips:
Ensure that the chocolate you use for the ganache is of high quality for the best flavor. When melting the white chocolate, be patient and use low heat or a double boiler to prevent it from seizing.
If you want to add a bit more fun, consider adding a few drops of food coloring to the white chocolate to create different colored ghosts or Halloween characters. Finally, store these truffles in an airtight container in the refrigerator if you’re making them ahead of time, and take them out about 30 minutes before serving for the best texture and flavor.
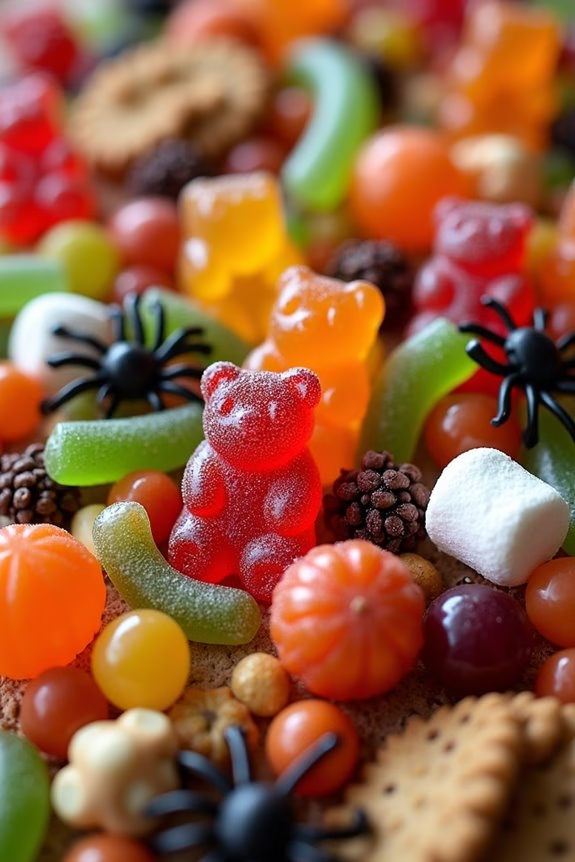
Gummy Worm Wonderland
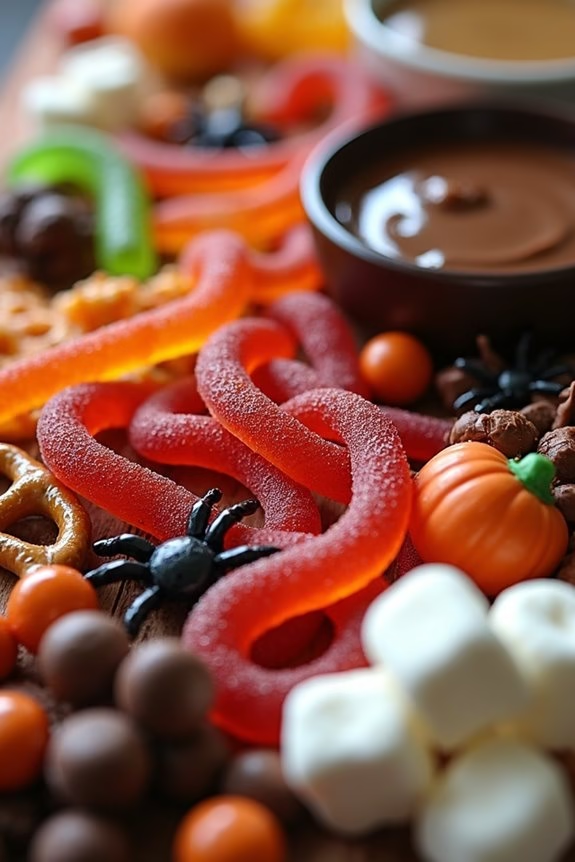
Elevate your Halloween festivities with a whimsical and colorful treat: the Gummy Worm Wonderland Charcuterie Board. This delightful masterpiece combines the playful charm of gummy worms with the sophisticated presentation of a charcuterie board. Perfectly suited for a gathering of 4-6 people, this board will captivate both kids and adults alike.
The vibrant colors and chewy textures of the variety of candies will create a feast for the eyes and a joy for the taste buds, making your Halloween celebration even more memorable.
This candy charcuterie board is incredibly versatile and easy to assemble, making it a great last-minute addition to your party spread. The key to a successful Gummy Worm Wonderland is variety and balance, guaranteeing that each element on the board complements the others while also standing out on its own.
The combination of sweet, sour, and tangy flavors will provide a delightful contrast that keeps your guests coming back for more. Let’s plunge into the ingredients and instructions to create your very own spooky-sweet masterpiece.
Ingredients for Serving Size 4-6:
- 1 bag (12 oz) of assorted gummy worms
- 1 bag (10 oz) of gummy spiders
- 1 bag (10 oz) of gummy pumpkins
- 1 bag (10 oz) of candy corn
- 1 bag (8 oz) of chocolate-covered pretzels
- 1 bag (8 oz) of mini marshmallows
- 1 bag (8 oz) of sour gummy rings
- 1 bag (8 oz) of M&M’s or similar candy-coated chocolates
- 1 small bowl of caramel dip
- 1 small bowl of chocolate sauce
- Optional: Edible glitter or sprinkles for decoration
Instructions:
- Choose Your Board: Begin by selecting a large, flat serving board or platter. Confirm it’s clean and dry. The size should be adequate to comfortably hold all the ingredients.
- Place the Bowls: Place the small bowls for caramel dip and chocolate sauce on opposite ends of the board. This creates focal points and adds symmetry to your arrangement.
- Arrange the Gummy Worms: Lay the gummy worms diagonally across the board, creating a flowing, winding path. This acts as the central theme of your board.
- Add Gummy Elements: Scatter the gummy spiders and pumpkins around the gummy worm path, guaranteeing a balanced and even distribution across the board.
- Incorporate Other Candies: Fill in the spaces with candy corn, sour gummy rings, and chocolate-covered pretzels. Aim for a varied and colorful arrangement that maintains visual appeal.
- Add Texture with Marshmallows: Place mini marshmallows in small clusters around the board to add a soft texture contrast.
- Finish with M&M’s: Sprinkle M&M’s or similar candy-coated chocolates over the board for a pop of color and added sweetness.
- Decorate with Glitter: If desired, lightly dust the entire board with edible glitter or sprinkles to enhance the magical, whimsical feel.
Extra Tips:
When assembling your Gummy Worm Wonderland Charcuterie Board, consider the color palette of your ingredients to create a visually appealing display.
Try to mix and match different shapes and textures for a more dynamic look. You can also customize the board with your favorite Halloween-themed candies or add small Halloween decorations like toy spiders or themed picks for added flair.
Keep the board in a cool place until ready to serve to prevent any candies from melting. Enjoy the process of arranging your board, and remember, there’s no right or wrong way to create this fun and festive treat!
Wickedly Delicious Caramel Popcorn
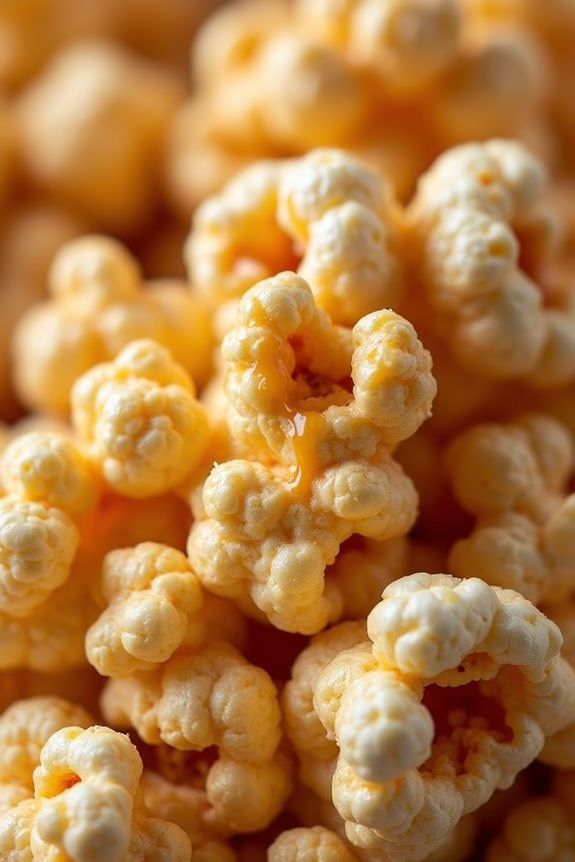
Get ready to wow your guests with this Wickedly Delicious Caramel Popcorn, an irresistible treat that’s perfect for your Halloween Candy Charcuterie Board. This sweet and salty delight isn’t only a crowd-pleaser but also a fantastic addition to your spooky spread. The crunchy popcorn coated in a luscious caramel sauce is elevated with a hint of vanilla, creating a symphony of flavors that will leave everyone craving more.
Whether you’re hosting a Halloween party or simply enjoying a cozy night in, this caramel popcorn is certain to be a hit. The Wickedly Delicious Caramel Popcorn isn’t only a treat for the taste buds but also a visual delight that adds a festive flair to your Halloween board. With its golden hue and tempting aroma, it’s a snack that’s hard to resist.
Plus, it’s relatively easy to make, requiring just a few ingredients and simple steps. Enjoy this delightful concoction with family and friends, and watch as it quickly becomes the highlight of your Halloween celebration.
Ingredients (Serves 4-6):
- 10 cups popped popcorn
- 1 cup unsalted butter
- 2 cups light brown sugar
- 1/2 cup light corn syrup
- 1 teaspoon salt
- 1/2 teaspoon baking soda
- 1 teaspoon vanilla extract
Cooking Instructions:
- Prepare the Popcorn: Start by popping your popcorn. You can use an air popper or stovetop method. Once popped, place the popcorn in a large mixing bowl and set aside.
- Make the Caramel Sauce: In a medium saucepan over medium heat, melt the butter. Once the butter is melted, add the brown sugar, corn syrup, and salt. Stir continuously until the mixture comes to a boil.
- Simmer the Sauce: Allow the mixture to boil for about 5 minutes without stirring. This helps guarantee the sugar fully dissolves and the caramel develops a rich flavor.
- Add Baking Soda and Vanilla: Remove the saucepan from heat and carefully stir in the baking soda and vanilla extract. The mixture will bubble up, so stir gently until fully combined.
- Coat the Popcorn: Pour the hot caramel sauce over the popcorn in the mixing bowl. Use a spatula or large spoon to gently toss and coat the popcorn evenly with the caramel.
- Bake the Popcorn: Preheat your oven to 250°F (120°C). Spread the caramel-coated popcorn onto a large baking sheet lined with parchment paper. Bake for 1 hour, stirring every 15 minutes to guarantee even coating and prevent burning.
- Cool and Serve: Once baked, remove the popcorn from the oven and let it cool completely on the baking sheet. Once cooled, break apart any large clusters and transfer the caramel popcorn to a serving bowl or directly onto your Halloween candy charcuterie board.
Extra Tips:
For a fun twist, consider adding a sprinkle of sea salt on the caramel popcorn as it cools for an enhanced sweet and salty flavor. If you’re feeling adventurous, mix in some Halloween-themed candies, such as candy corn or chocolate pieces, after the popcorn has cooled.
This adds a pop of color and additional sweetness to your board. Always verify the caramel is evenly distributed by stirring well during the baking process, and be careful while handling hot caramel to avoid burns. Enjoy your Wickedly Delicious Caramel Popcorn and have a fang-tastic Halloween!
Chocolate-Covered Pretzel Magic

Indulge in the perfect Halloween treat with our Chocolate-Covered Pretzel Magic, a delightful addition to any Halloween candy charcuterie board. This sweet and salty combination is sure to be a hit at any party or gathering. The salty crunch of pretzels paired with the rich, smooth chocolate creates an irresistible flavor that’s further enhanced by a variety of colorful Halloween-themed sprinkles. This recipe isn’t only simple to make but also allows for creativity in decoration.
Whether you’re hosting a spooky soirée or a cozy family get-together, this recipe serves 4-6 people and can be easily doubled or tripled for larger gatherings. The key to this treat is to use high-quality chocolate and pretzels to guarantee the best flavor and texture. Feel free to mix and match dark, milk, and white chocolate to cater to different taste preferences. Let’s plunge into this fun and festive treat that’s sure to impress your guests and satisfy your sweet tooth.
Ingredients (Serves 4-6):
- 24 large pretzel rods
- 1 cup semi-sweet chocolate chips
- 1 cup white chocolate chips
- 1/2 cup milk chocolate chips
- 2 tablespoons coconut oil or vegetable shortening
- Assorted Halloween-themed sprinkles
- Optional: orange and purple food coloring for white chocolate
Cooking Instructions:
- Prepare the Work Area: Line a baking sheet with parchment paper and set aside. This will be used for placing the chocolate-covered pretzels to set and harden.
- Melt the Chocolate: In a microwave-safe bowl, combine the semi-sweet chocolate chips with 1 tablespoon of coconut oil. Microwave in 20-second intervals, stirring well between each interval, until the chocolate is fully melted and smooth. Be careful not to overheat.
- Coat the Pretzels: Dip each pretzel rod into the melted chocolate, using a spoon to help cover about two-thirds of the pretzel. Allow the excess chocolate to drip back into the bowl. Place the coated pretzel on the prepared baking sheet.
- Decorate: Before the chocolate sets, sprinkle the pretzel rods with your choice of Halloween-themed sprinkles. Be creative with the designs!
- Repeat for White Chocolate: Melt the white chocolate chips with 1 tablespoon of coconut oil using the same method. If desired, divide the melted white chocolate into two bowls and add a few drops of orange and purple food coloring to each bowl to create festive colors.
- Dip and Decorate Again: Repeat the dipping and decorating process with the white chocolate (or colored white chocolate), allowing each pretzel to have unique patterns and colors.
- Set and Serve: Allow the chocolate-covered pretzels to set completely at room temperature, or place them in the refrigerator for quicker setting. Once the chocolate has hardened, your Chocolate-Covered Pretzel Magic is ready to serve!
Extra Tips:
For the best results, confirm that your work area is cool and dry, as humidity can affect the chocolate setting process. If you find the chocolate is setting too quickly while decorating, reheat it briefly in the microwave to maintain a smooth consistency.
Experiment with different types of sprinkles or edible glitter to add a unique touch to each pretzel. Additionally, these pretzels can be made a day in advance and stored in an airtight container, making them a convenient option for pre-party preparation. Enjoy the magic of this sweet treat, perfect for Halloween festivities!
Sinister Sour Candy Feast

Embrace the spooky spirit of Halloween with a tantalizing Sinister Sour Candy Feast. This candy charcuterie board is a vibrant and tangy delight, perfect for those who love a little pucker with their sweets. Designed to serve 4-6 people, this board is a creative blend of sour candies that will captivate taste buds and add a burst of color to your Halloween festivities.
From gummy worms to sour belts, each candy brings its own unique texture and flavor, creating a symphony of sourness that will keep your guests coming back for more.
Creating the perfect Sinister Sour Candy Feast begins with selecting an assortment of sour treats that are both visually appealing and deliciously tangy. The key to a successful candy charcuterie board lies in the arrangement and variety of the candies. Aim for a mix of shapes, sizes, and colors to create an enticing display.
This recipe will guide you through the process of assembling a board that not only looks great but also offers a delightful sour experience for all who dare to taste it.
Ingredients (Serves 4-6)
- 1 cup sour gummy worms
- 1 cup sour gummy bears
- 1 cup sour patch kids
- 1 cup sour belts (variety of colors)
- 1 cup sour cherries
- 1 cup sour rainbow strips
- 1 cup lemon-flavored hard candies
- 1 cup sour apple rings
- 1 cup sour lollipops
- 1 cup sour jelly beans
Instructions
- Prepare the Board: Begin by selecting a large, flat surface such as a wooden cutting board or a platter. Confirm it’s clean and dry before you start arranging the candies.
- Group by Type: Divide the sour candies into different groups based on type. This will make it easier to arrange them on the board.
- Arrange the Base Layer: Start by placing the larger candies like the sour gummy worms and sour belts as the base layer on the board. Spread them out evenly to cover a good portion of the surface.
- Add Medium-Sized Candies: Next, layer the medium-sized candies such as sour gummy bears and sour patch kids. Position them in clusters or lines to create visual interest.
- Fill in with Smaller Candies: Use the smaller candies like sour cherries and jelly beans to fill in the gaps. Sprinkle them around the board, confirming that they’re evenly distributed.
- Create Height and Texture: Add height by stacking the sour lollipops and arranging them in a fan shape. For texture, intersperse the lemon-flavored hard candies and the sour apple rings around the board.
- Final Touches: Check the board for any empty spots and fill them with remaining candies. Make sure the entire board is covered with a vibrant mix of sour candies.
- Presentation: Place the board in the center of your serving area. Use small tongs or candy scoops to allow guests to easily select their sour delights.
Extra Tips
When crafting your Sinister Sour Candy Feast, consider using a mix of textures and flavors to keep the experience exciting. You can explore different sour flavor profiles, like incorporating spicy candies for an extra kick.
Always taste your candies before purchasing to confirm they meet your desired sourness level. Finally, if you want to add a thematic element, incorporate small Halloween decorations, such as plastic spiders or mini pumpkins, around the board for an added spooky touch.
Enjoy your tangy, colorful creation!
Bewitching Black Licorice Spread
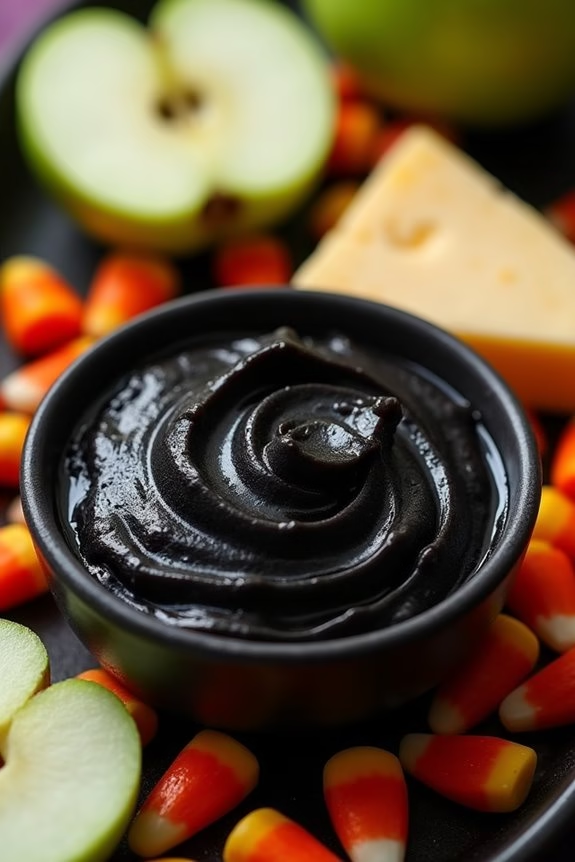
Transform your Halloween candy charcuterie board into a mysterious and enchanting treat with our Bewitching Black Licorice Spread. This unique and flavorful spread is perfect for those who love the bold taste of black licorice, combined with a hint of sweetness and spice.
It serves as a delightful centerpiece on your charcuterie board, adding a touch of darkness that pairs well with a variety of candies, fruits, and cheeses. Whether you’re hosting a spooky soiree or just want to indulge in some Halloween fun, this spread is sure to impress your guests with its intriguing flavors and eerie presentation.
The Bewitching Black Licorice Spread is easy to make and requires only a few key ingredients. Its smooth and creamy texture, combined with a deep, rich color, makes it a standout addition to any Halloween-themed spread.
With its unique taste and visually striking appearance, this spread will captivate both licorice lovers and those new to the flavor. It’s perfect for dipping apple slices, spreading on crackers, or pairing with sharp cheeses. Follow the instructions below to create a bewitching spread that will leave your guests spellbound.
Ingredients (Serves 4-6 people):
- 1 cup black licorice pieces
- 1/2 cup cream cheese, softened
- 1/4 cup unsalted butter, softened
- 1 tablespoon honey
- 1/2 teaspoon vanilla extract
- 1/4 teaspoon ground cinnamon
- Pinch of salt
- Black food coloring (optional)
Cooking Instructions:
- Prepare the Licorice Base: Begin by chopping the black licorice pieces into smaller chunks. Place them in a small saucepan and add 1/4 cup of water. Heat over low-medium heat, stirring occasionally, until the licorice is melted and smooth. This may take about 10-15 minutes. Once melted, let it cool slightly.
- Blend the Base Ingredients: In a mixing bowl, combine the softened cream cheese and unsalted butter. Use a hand mixer or a stand mixer to blend them together until smooth and creamy. This will create the base of your spread.
- Incorporate Sweetness and Spice: Add the honey, vanilla extract, ground cinnamon, and a pinch of salt to the cream cheese mixture. Mix well until all ingredients are fully incorporated, ensuring a smooth consistency.
- Combine the Licorice with the Base: Slowly pour the melted black licorice into the cream cheese mixture, blending continuously with the mixer. If you desire a deeper black color, add a few drops of black food coloring and mix until evenly combined.
- Adjust the Consistency: If the spread is too thick, you can add a teaspoon of water or milk at a time until you reach the desired consistency. The spread should be smooth and easily spreadable.
- Chill and Serve: Transfer the spread to a serving bowl and refrigerate for at least 30 minutes to allow it to set. Serve the Bewitching Black Licorice Spread with your favorite Halloween-themed charcuterie items.
Extra Tips:
To enhance the flavor of your Bewitching Black Licorice Spread, consider adding a dash of anise extract for an extra licorice punch.
If you prefer a less intense licorice flavor, reduce the amount of licorice used or balance it with more cream cheese. For an eye-catching presentation, use decorative dishes or molds to shape the spread before chilling.
Pair the spread with bright-colored candies and fruits to create a visually appealing contrast on your Halloween board.
Monster Marshmallow Madness
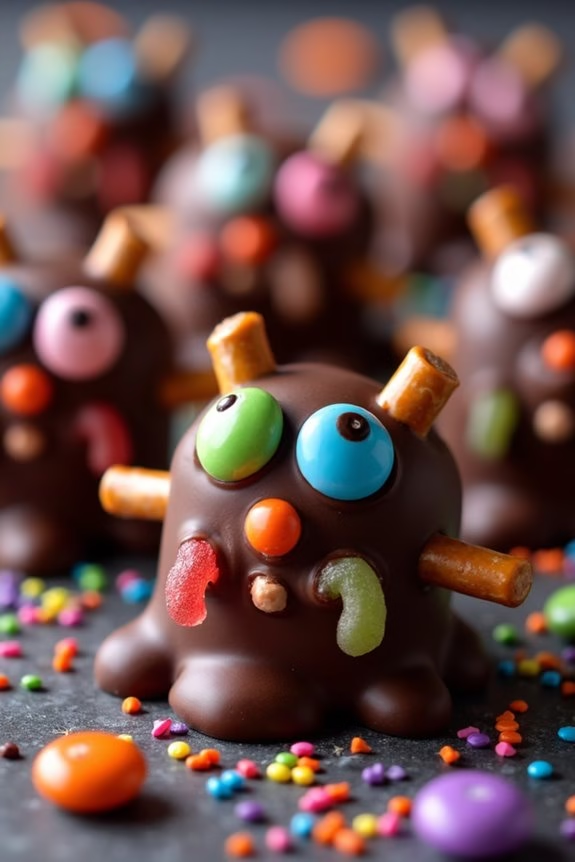
If you’re looking to add a spooky yet delightful touch to your Halloween festivities, the Monster Marshmallow Madness is the perfect addition to your candy charcuterie board. This whimsical treat combines the gooey goodness of marshmallows with a medley of colorful candies and chocolate, creating a visual masterpiece that’s as fun to make as it’s to eat.
Kids and adults alike will be enchanted by these adorable monster-themed marshmallows, making them an instant hit at any Halloween gathering.
The beauty of Monster Marshmallow Madness lies in its simplicity and versatility. You can customize each marshmallow monster with different candies, allowing your creativity to run wild.
Gather your little ghouls and goblins in the kitchen for a fun family activity as you decorate each marshmallow with an assortment of eyes, teeth, and other creepy features. The end result isn’t only delicious but also a visually striking centerpiece that will surely be the talk of your Halloween spread.
Ingredients for 4-6 People:
- 24 large marshmallows
- 1 cup semi-sweet chocolate chips
- 2 tablespoons coconut oil
- Assorted candy eyes
- Mini M&M’s
- Gummy worms
- Colored sprinkles
- Pretzel sticks
- Food coloring (optional)
Cooking Instructions:
- Prepare the Chocolate Coating: In a microwave-safe bowl, combine the semi-sweet chocolate chips and coconut oil. Microwave in 30-second intervals, stirring between each, until the chocolate is completely melted and smooth.
- Coat the Marshmallows: Using a fork or skewer, dip each marshmallow halfway into the melted chocolate, allowing any excess to drip off. Place the coated marshmallows on a parchment-lined baking sheet.
- Decorate the Monsters: Before the chocolate sets, press assorted candy eyes, mini M&M’s, or gummy worms into the chocolate to create monster faces. Use pretzel sticks to add arms or antennae as desired.
- Add Sprinkles and Color: For added flair, sprinkle colored sprinkles over the wet chocolate. You can also use food coloring to tint any leftover chocolate and drizzle it over the marshmallows for extra color.
- Set the Marshmallows: Allow the chocolate-covered marshmallows to set at room temperature for about 30 minutes, or refrigerate them for faster setting.
- Arrange on a Board: Once the chocolate has hardened, arrange your monster marshmallows on your Halloween candy charcuterie board, combining them with other treats like candy corn, gummy bats, and chocolate bars.
Extra Tips:
When creating your Monster Marshmallow Madness, feel free to experiment with different types of candies and decorations to create a variety of monster expressions.
If you find that the chocolate is setting too quickly, keep it warm by placing the bowl over a pot of simmering water. Additionally, to make the treats more enticing, consider using flavored marshmallows or adding a drop of mint or orange extract to the chocolate for a unique twist.
Enjoy your monstrously delicious creations!
Ghostly Gummy Bear Gathering
Transform your Halloween celebration into a delightful treat with a Ghostly Gummy Bear Gathering charcuterie board. This fun and colorful board will be the highlight of your spooky festivities, offering a perfect blend of sweet and sour candies that cater to both kids and adults.
By artfully arranging gummy bears, candy corn, and other Halloween-themed candies, you’ll create a visually appealing spread that tantalizes the taste buds and adds a festive flair to your party decor.
This candy charcuterie board is designed to serve 4-6 people, making it an ideal centerpiece for a small gathering or family celebration. The key to this board is in the variety and presentation of the candies.
By mixing textures, colors, and flavors, you’ll guarantee there’s something for everyone. Whether it’s the chewy gummy bears or the crisp candy-coated chocolates, each candy adds its unique charm to the board. So, gather your candies and let your creativity shine as you assemble this spooky Halloween treat.
Ingredients (serving size: 4-6 people):
- 2 cups gummy bears
- 1 cup candy corn
- 1 cup mini marshmallows
- 1 cup chocolate-coated candies (e.g., M&Ms)
- 1 cup sour gummy worms
- 1 cup pumpkin-shaped candies
- 1 cup jelly beans
- 1/2 cup chocolate spiders or Halloween-themed chocolates
- 1/2 cup licorice pieces
- Assorted small cookies or crackers
- 1/2 cup dried fruit (e.g., cranberries or raisins)
Instructions:
- Prepare the Board: Start with a large wooden or slate charcuterie board as your base. Confirm it’s clean and dry before beginning your arrangement.
- Anchor with Bowls: Place small bowls or ramekins on the board to hold smaller candies like mini marshmallows and chocolate-coated candies. This helps to prevent them from rolling off the board.
- Arrange the Candies: Begin by placing the largest items, like gummy bears and pumpkin-shaped candies, on the board first. Spread them out to create focal points across the board.
- Fill in the Gaps: Use the smaller candies, like jelly beans and candy corn, to fill in the spaces between the larger items. This will create a visually pleasing mosaic of colors and textures.
- Add the Sweets with Texture: Place the sour gummy worms and licorice pieces in small piles around the board to add variety in texture and shape.
- Include a Sweet Surprise: Tuck in chocolate spiders or Halloween-themed chocolates throughout the board for a festive surprise.
- Balance with Cookies and Dried Fruit: Add small cookies or crackers around the edges of the board. Scatter dried fruit like cranberries or raisins to add a touch of natural sweetness.
- Final Touches: Adjust the candies as needed to guarantee the board looks balanced and inviting. Add any finishing touches, like small Halloween-themed decorations, if desired.
Extra Tips:
When assembling your Ghostly Gummy Bear Gathering, keep in mind that the key to an attractive charcuterie board is balance and variety. Aim for a mix of colors and shapes to make the board visually appealing.
If you have leftover candies, save them for refilling the board as they get eaten. Consider dietary preferences and include an assortment of candies that caters to different tastes, like sweet, sour, and chocolatey options.
Finally, don’t be afraid to get creative with the presentation; the more festive and fun, the better!
Haunted Hard Candy Haven
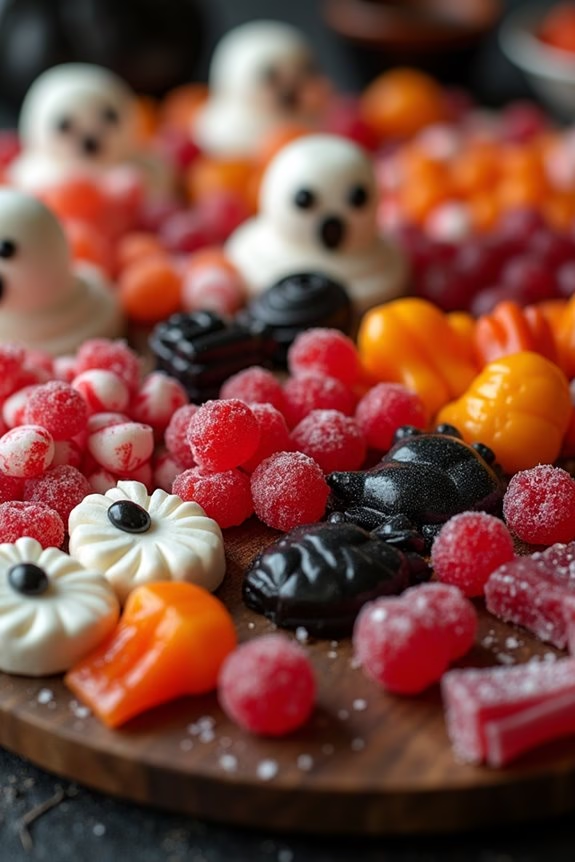
Transform your Halloween festivities with a Haunted Hard Candy Haven, the ultimate charcuterie board experience for those with a sweet tooth. This spooky spread combines an array of colorful hard candies, creating a whimsical yet eerie presentation that’s bound to impress guests. Perfect for a Halloween party or a family movie night, this board isn’t only visually alluring but also offers a delightful mix of flavors that everyone from kids to adults will enjoy.
Haunted Hard Candy Haven is designed to serve 4-6 people, guaranteeing everyone gets a taste of Halloween magic. The key to this charcuterie board is variety and presentation. By incorporating different shapes, textures, and colors, you can create a visually striking centerpiece that captures the essence of the spooky season. Whether it’s ghostly white mints or blood red lollipops, each candy should evoke the spirit of Halloween in its own unique way.
Ingredients:
- 1 cup assorted fruit-flavored hard candies
- 1 cup black licorice pieces
- 1 cup candy corn
- 1/2 cup ghost-shaped marshmallows
- 1/2 cup gumballs (various colors)
- 1/2 cup Halloween-themed gummies (e.g., bats, pumpkins)
- 6 lollipops (various flavors and colors)
- 1/2 cup chocolate eyeballs
- 1/2 cup peppermint candies
- 1/2 cup jelly beans (Halloween colors)
- 1/4 cup rock candy sticks (assorted colors)
Instructions:
- Prepare the Base: Begin by selecting a large wooden board or platter for your charcuterie setup. This will serve as the foundation for your Haunted Hard Candy Haven.
- Arrange the Lollipops: Position the lollipops around the edges of the board, spacing them evenly for a balanced look. Use different heights by standing some upright and laying others flat.
- Create Candy Clusters: Form clusters of each type of candy across the board. Start with the larger items like fruit-flavored hard candies and black licorice pieces, placing them in separate sections.
- Add Decorative Elements: Fill in the gaps with smaller candies like gumballs, jelly beans, and chocolate eyeballs. Confirm each cluster is distinct yet seamlessly flows into the next.
- Incorporate Themed Candies: Add Halloween-themed gummies and ghost-shaped marshmallows to introduce a playful element. Scatter them strategically to maintain the overall aesthetic.
- Finish with Accents: Place candy corn and peppermint candies in smaller sections to provide contrast in color and flavor. Conclude by inserting rock candy sticks for height and texture.
- Final Touches: Adjust the candies to guarantee every part of the board is accessible and visually appealing. Step back to assess the arrangement and make any necessary tweaks for balance.
Extra Tips:
When creating your Haunted Hard Candy Haven, remember that the key to a successful candy charcuterie board is diversity. Mix different shapes, sizes, and colors to keep the board interesting and engaging. Use candies with varied textures, such as the smoothness of jelly beans against the crunch of rock candy, to offer a dynamic tasting experience.
If you’re serving children, be mindful of choking hazards and opt for larger candy pieces or confirm adult supervision. Finally, consider adding small themed decorations, like plastic spiders or cobwebs, to enhance the Halloween atmosphere without compromising the candy’s appeal.
Pumpkin Spice Everything
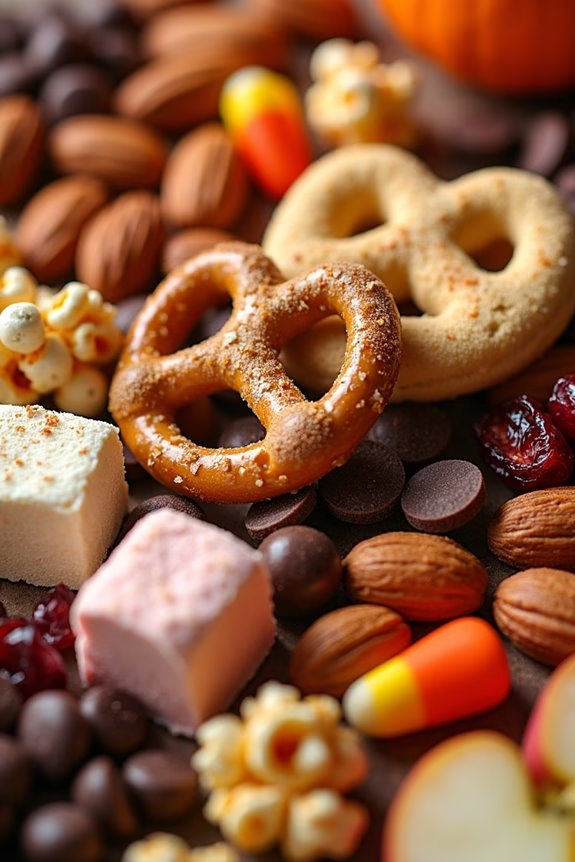
Embrace the cozy flavors of autumn with a Pumpkin Spice Halloween Candy Charcuterie Board. This festive spread is perfect for Halloween gatherings, blending the warm spices of fall with the sweet delights of assorted candies. The board not only features a variety of pumpkin spice treats but also includes a selection of Halloween-themed candies, creating a visually appealing and delicious centerpiece for your party.
The combination of textures and flavors will delight both kids and adults, making your Halloween celebration memorable. The beauty of a charcuterie board lies in its versatility and creativity. You can customize this Pumpkin Spice Halloween Candy Charcuterie Board to suit your guests’ tastes and dietary preferences.
Whether it’s a cozy family gathering or a spooky party with friends, this board offers a little something for everyone. With an easy assembly process and no cooking required, you can focus on enjoying the festivities and the delightful flavors of fall.
Ingredients (serves 4-6 people):
- 1 cup pumpkin spice almonds
- 1 cup pumpkin spice pretzels
- 1 cup pumpkin spice marshmallows
- 1 cup assorted Halloween candies (gummy worms, candy corn, etc.)
- 1/2 cup pumpkin spice chocolate chip cookies
- 1/2 cup white chocolate chips
- 1/2 cup dark chocolate chips
- 1/2 cup caramel popcorn
- 1/2 cup dried cranberries
- 1/2 cup salted pumpkin seeds
- Assorted fresh fruit slices (apples, pears)
Instructions:
- Prepare the Base: Start by selecting a large wooden board or platter as the base for your charcuterie board. Confirm it’s clean and dry before you begin arranging your ingredients.
- Place Larger Items First: Arrange the pumpkin spice almonds, pretzels, and marshmallows in small piles or bowls on the board. These larger items will serve as the anchors for your layout.
- Add Halloween Candies: Scatter assorted Halloween candies like gummy worms and candy corn around the larger items. This creates a colorful and festive look.
- Include Sweet Treats: Add the pumpkin spice chocolate chip cookies and chocolate chips to the board, placing them in small clusters for easy access.
- Incorporate Crunchy Elements: Sprinkle the caramel popcorn and salted pumpkin seeds around the board to add a crunchy texture to the mix.
- Fresh and Chewy Additions: Place dried cranberries and fresh fruit slices in any remaining spaces on the board to provide a balance of chewy and fresh elements.
- Finishing Touches: Take a step back and confirm the board looks balanced and appealing. Adjust any items as needed to fill in gaps and create an inviting display.
Extra Tips:
To keep the board looking fresh, prepare and arrange the ingredients shortly before serving. You can prep some items, like cutting fruit slices, in advance to save time.
Consider adding small decorative elements like mini pumpkins or Halloween-themed napkins around the board for an extra festive touch. Keep in mind that the key to a great charcuterie board is variety and balance, so feel free to swap out ingredients based on your preferences or dietary needs.
Enjoy your Pumpkin Spice Halloween Candy Charcuterie Board with a warm cup of cider or a spooky-themed cocktail for the ultimate autumn experience.
Eerie Edible Eyeballs

Eerie Edible Eyeballs are a fun and spooky treat to include on your Halloween candy charcuterie board. These creepy confections are easy to make and are sure to delight both kids and adults at your Halloween festivities. The combination of creamy white chocolate, gooey marshmallows, and eye-catching candy creates a delicious and visually appealing snack that perfectly complements the eerie theme of Halloween.
Not only do they look like something straight out of a haunted house, but they also offer a delightful mix of textures and flavors, making them an instant hit at any party. Crafting these Eerie Edible Eyeballs is a simple and enjoyable process, perfect for getting the whole family involved. You can customize them with different fillings or candy pieces to match your personal taste or to use up your leftover Halloween candy.
This recipe yields enough for 4-6 people, ensuring that everyone at your gathering gets a taste of these spooky treats. Whether you’re hosting a large Halloween party or a small gathering, these eyeballs are a fantastic addition to your charcuterie board, adding a touch of ghoulish charm.
Ingredients for 4-6 servings:
- 12 large marshmallows
- 1 cup white chocolate chips
- 1 tablespoon coconut oil
- 12 Gummy Life Savers
- 12 chocolate chips (or M&Ms)
- Red food coloring gel
- Black food coloring gel
Cooking Instructions:
- Prepare the Marshmallows:
- Place the large marshmallows on a tray lined with parchment paper. This will serve as the base for your edible eyeballs.
- Melt the White Chocolate:
- In a microwave-safe bowl, combine the white chocolate chips and the coconut oil. Microwave in 20-second intervals, stirring in between, until the mixture is smooth and fully melted.
- Coat the Marshmallows:
- Using a fork or toothpick, dip each marshmallow into the melted white chocolate, making sure to cover them entirely. Place them back on the parchment paper to set.
- Create the Eye Design:
- While the white chocolate is still soft, press a Gummy Life Saver into the center of each marshmallow to form the iris. Then, place a chocolate chip or M&M in the center of the Gummy Life Saver to create the pupil.
- Add the Veins:
- Using a fine-tipped brush or toothpick, apply small streaks of red food coloring gel from the center of each eyeball outward to create a veiny appearance.
- Define the Pupil:
- Use a small amount of black food coloring gel on the tip of a toothpick to darken the center of the chocolate chip or M&M for a more realistic pupil effect.
- Set the Eyeballs:
- Allow the decorated marshmallows to set completely at room temperature or in the refrigerator for about 10-15 minutes before serving.
Extra Tips:
To make your Eerie Edible Eyeballs even more eye-catching, consider using different colors of Gummy Life Savers to create a variety of eye colors. If you’re short on time, you can speed up the setting process by placing the completed eyeballs in the freezer for a few minutes.
Additionally, be sure to use gel food coloring for a more vibrant and precise application. And remember, this recipe is very flexible, so feel free to experiment with different candies and toppings to suit your Halloween theme or personal preferences.
Creepy Cookie Corner
Halloween is the perfect time to release your creativity and craft a show-stopping Creepy Cookie Corner Charcuterie Board. This spooky yet delicious array is designed to enchant and thrill both kids and adults alike. Filled with a selection of eerie-themed cookies and complementary sweets, it’s an ideal treat for any Halloween gathering.
The combination of ghoulish goodies and savory bites creates a balanced platter that offers something for everyone while fitting seamlessly into the chilling festivities.
Creating a Creepy Cookie Corner Charcuterie Board is all about mixing textures, flavors, and the perfect touch of Halloween horror. With a few simple ingredients and a dash of creativity, you can assemble an impressive board that’s both fun and flavorful. This recipe serves 4-6 people, guaranteeing there’s enough spooky delight to go around.
Gather your ingredients and let’s jump into assembling this hauntingly delicious dish.
Ingredients (Serves 4-6):
- 12 Halloween-themed cookies (e.g., ghost, pumpkin, spider shapes)
- 1 cup chocolate-covered pretzels
- 1 cup candy corn
- 1 cup gummy worms
- 1 cup mini marshmallows
- 1/2 cup dark chocolate chips
- 1/2 cup white chocolate chips
- 1/2 cup assorted nuts (e.g., almonds, pecans)
- 1/2 cup dried cranberries
- 1/4 cup candy eyeballs
- 1/4 cup black licorice bites
Instructions:
- Prepare the Base: Start with a large wooden or slate board as your base. This will serve as the canvas for your Creepy Cookie Corner. Make sure the board is clean and dry before beginning.
- Arrange the Cookies: Place the Halloween-themed cookies in a focal area of the board. Spread them out to create a visually appealing arrangement, ensuring each cookie shape is showcased.
- Add the Pretzels and Candy Corn: Around the cookies, create clusters of chocolate-covered pretzels and candy corn. This adds both texture and color to your board, enhancing the Halloween theme.
- Incorporate Gummy Elements: Strategically position gummy worms so they appear to be crawling out from under cookies or pretzels, adding a creepy yet fun element to the board.
- Sprinkle the Marshmallows and Chocolate Chips: Scatter mini marshmallows and a mix of dark and white chocolate chips around the board. This provides a sweet contrast to the savory elements and adds visual interest.
- Add Nuts and Dried Cranberries: Create small piles of assorted nuts and dried cranberries around the board. These elements balance the sweetness with a bit of savory and tartness.
- Finalize with Candy Eyeballs and Licorice: Place candy eyeballs strategically among the treats for an extra spooky effect. Add black licorice bites for additional flavor and a touch of darkness to the board.
Extra Tips:
To make the Creepy Cookie Corner even more exciting, consider using a variety of cookie shapes and sizes to create depth and interest. You can also personalize the board with additional treats like popcorn or seasonal fruits like apples or pears for a more extensive spread.
For an added touch of spookiness, serve the board under dim lighting with flickering candles to enhance the Halloween ambiance. Remember, the key is to have fun and let your creativity run wild with this hauntingly delightful charcuterie board.
Vampire Bat Chocolate Bonanza
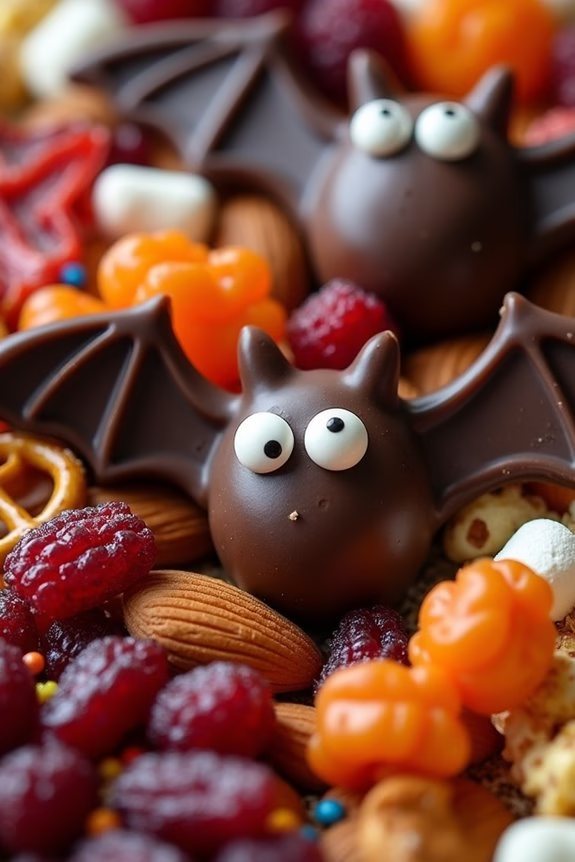
Prepare to delight your Halloween guests with a spooky and sweet treat: the Vampire Bat Chocolate Bonanza. This charcuterie board is a fun and festive way to showcase your Halloween spirit using an array of chocolates and candies designed to resemble creepy, crawly vampire bats. Perfect for a party of 4-6 people, this themed board will be the highlight of your Halloween celebration, providing a deliciously eerie experience that both adults and kids will enjoy.
The Vampire Bat Chocolate Bonanza combines a variety of textures and flavors, offering something for everyone on the board. From rich, dark chocolate bat shapes to sweet and chewy gummies that mimic the vibrant colors of the season, this board is as thrilling to assemble as it’s to devour. You’ll also incorporate elements of savory-sweet pairings, providing a balanced taste profile that keeps your guests reaching for more. Immerse yourself in the creative process of crafting this unique Halloween treat, and watch as your guests marvel at your culinary creativity.
Ingredients (serving size 4-6 people):
- 12 ounces dark chocolate, melted
- 1 cup bat-shaped pretzels
- 1/2 cup chocolate-covered almonds
- 1/2 cup raspberry jelly candies
- 1/2 cup red licorice ropes
- 1/4 cup dried cranberries
- 1/4 cup salted caramel popcorn
- 1/4 cup mini marshmallows
- 1/4 cup assorted Halloween-themed sprinkles
- Edible candy eyes
- Wax paper
Cooking Instructions:
- Prepare the Chocolate Bats:
- Line a baking sheet with wax paper. Pour the melted dark chocolate into bat-shaped molds and gently tap the molds to remove any air bubbles.
- Once filled, place the candy eyes on each chocolate bat while the chocolate is still melted. Refrigerate the molds for about 20-30 minutes, or until the chocolate sets completely.
- Assemble the Board:
- On a large platter or wooden board, start by placing the chocolate bats at different focal points to create visual interest.
- Arrange the bat-shaped pretzels and chocolate-covered almonds around the chocolate bats, forming clusters for a cohesive look.
- Add the Sweet Elements:
- Scatter the raspberry jelly candies and red licorice ropes in between the clusters of chocolate bats and pretzels.
- Add the dried cranberries and salted caramel popcorn for a pop of color and texture.
- Finish with the Final Touches:
- Fill in any gaps with mini marshmallows and sprinkle the entire board with Halloween-themed sprinkles for an extra festive touch.
- Confirm the candy eyes are visible by placing a few more around the board to create an eerie effect.
Extra Tips:
When crafting your Vampire Bat Chocolate Bonanza, consider using different types of chocolate, such as milk or white chocolate, to add variety to your board. If you can’t find bat-shaped molds, you can use a knife to cut bat shapes from a slab of chocolate.
Feel free to incorporate other candies or snacks that suit your family’s preferences, like candy corn or gummy worms, for a personalized touch. Remember to keep the board balanced with both sweet and slightly savory elements to cater to diverse palates.
Candy-Coated Apple Adventure
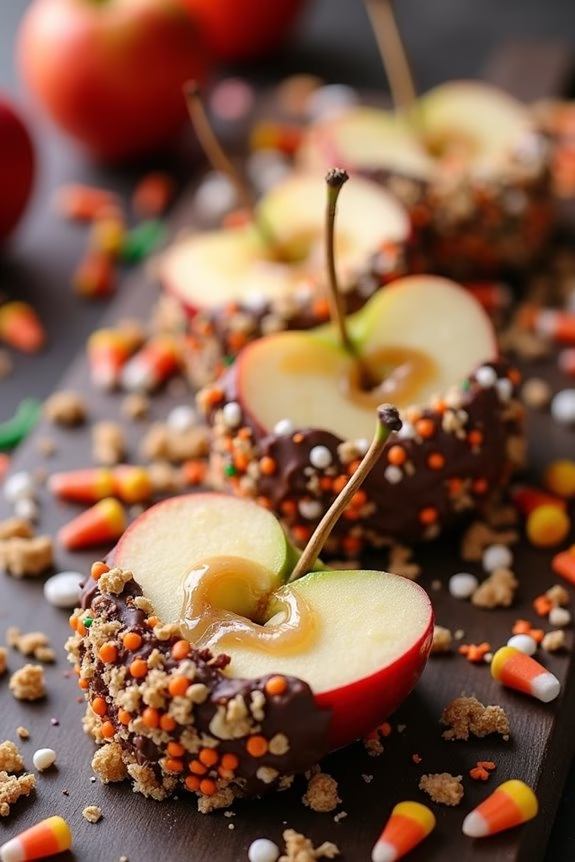
Halloween is the perfect time to indulge your sweet tooth, and what better way to do it than with a Candy-Coated Apple Adventure charcuterie board? This is a fun and festive twist on the traditional charcuterie board, swapping out meats and cheeses for a colorful spread of candy-coated apple slices, perfect for any Halloween gathering.
This board combines the crispness of fresh apples with a variety of sweet, crunchy, and gooey toppings, offering a delightful mix of flavors and textures that both kids and adults will love.
Creating this Candy-Coated Apple Adventure board is as much about presentation as it’s about taste. The key is to have a variety of toppings and candies, so each bite is a surprise. You’ll start with fresh, tart apples and dip them in melted candy coatings, then sprinkle them with your choice of toppings.
Once your apple slices are ready, arrange them artfully on a board alongside small bowls of extra toppings and additional candies for a truly eye-catching display that invites everyone to engage.
Ingredients (Serving Size: 4-6 people):
- 4 large tart apples (such as Granny Smith)
- 1 cup white chocolate chips
- 1 cup dark chocolate chips
- 1 cup caramel sauce
- 1 cup crushed graham crackers
- 1 cup mini marshmallows
- 1 cup chopped nuts (such as almonds or pecans)
- 1 cup candy corn
- 1 cup gummy worms
- 1 cup assorted Halloween candies (e.g., M&M’s, Reese’s Pieces)
- 1 tablespoon lemon juice
- Assorted Halloween-themed sprinkles
Cooking Instructions:
- Prepare the Apples: Wash and dry the apples thoroughly. Core and slice them into even wedges. To prevent browning, toss the apple slices with lemon juice and set them aside.
- Melt the Coatings: In separate microwave-safe bowls, melt the white chocolate chips and dark chocolate chips by microwaving them in 30-second intervals, stirring each time, until smooth. Do the same for the caramel sauce.
- Coat the Apple Slices: Dip each apple slice into either the white chocolate, dark chocolate, or caramel sauce, letting any excess drip off. Place the coated slices on a parchment-lined baking sheet.
- Add Toppings: While the coatings are still warm, sprinkle your choice of crushed graham crackers, mini marshmallows, chopped nuts, candy corn, and sprinkles over the apple slices. You can mix and match toppings for different flavor combinations.
- Set the Coated Apples: Allow the coated apple slices to set at room temperature or refrigerate them for quicker setting.
- Assemble the Board: Arrange the candy-coated apple slices on a large serving board. Add small bowls filled with additional toppings like gummy worms and assorted Halloween candies. Organize everything in a visually appealing manner, creating a festive and colorful display.
Extra Tips:
When preparing the Candy-Coated Apple Adventure board, consider drying the apple slices thoroughly after washing to guarantee the coatings adhere properly.
Also, if you want to prepare the board in advance, you can coat the apple slices and store them in the refrigerator for up to a day. Just make sure to cover them with plastic wrap to prevent them from drying out.
For an extra festive touch, use a variety of Halloween-themed sprinkles to add a pop of color and fun to your board.