

Hey, lovely bakers! 🎃
With Halloween just around the corner, I’ve whipped up some spooktacular cake ideas that will leave your guests spellbound.
Think Haunted Graveyard Cake with eerie tombstones or a Witch’s Cauldron Cake bubbling with spooky charm.
From the Mummy Wrapped Cake to the Ghostly Chocolate Cake, every creation promises a delightful treat.
Curious about the Monster Mash-Up Cake or the Skull and Roses Cake? There’s so much to explore!
Haunted Graveyard Cake
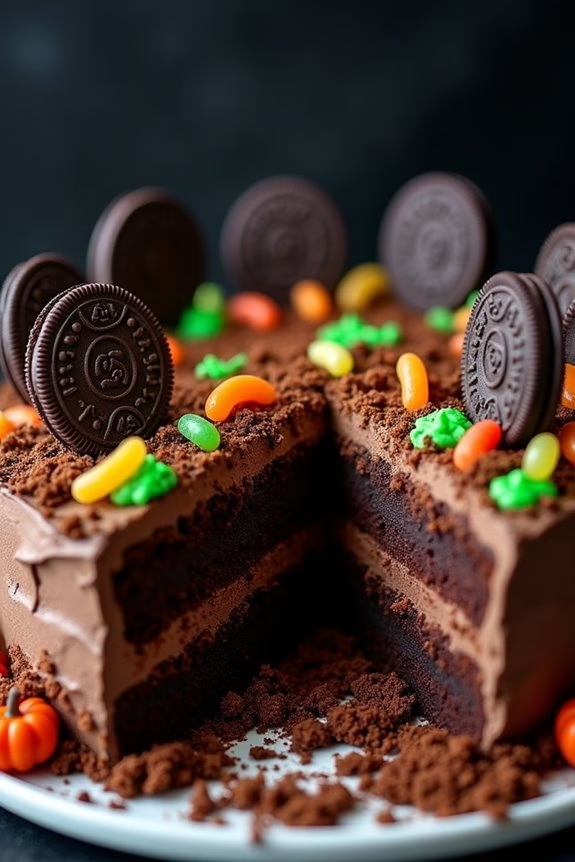
Transform your Halloween celebrations into a spine-chilling spectacle with a Haunted Graveyard Cake that will both enchant and frighten your guests! This eerie creation combines rich, moist chocolate cake with devilishly delightful decorations that resemble a spooky graveyard. Perfect for a Halloween party, this cake will make a haunting centerpiece that not only looks impressive but also tastes absolutely delicious.
With each slice, your guests will enjoy layers of delectable chocolate cake, creamy frosting, and the crunch of chocolate cookie “dirt.” The ghostly decorations and tombstones add a whimsical yet spooky touch that will have everyone raving about your Halloween baking skills. This recipe serves 4-6 people, making it ideal for a small gathering or family celebration.
Ingredients:
- 1 1/2 cups all-purpose flour
- 1 cup granulated sugar
- 1/2 cup unsweetened cocoa powder
- 1 teaspoon baking soda
- 1/2 teaspoon baking powder
- 1/2 teaspoon salt
- 1/2 cup vegetable oil
- 1 cup buttermilk
- 1 teaspoon vanilla extract
- 2 large eggs
- 1 cup hot water
- 1 cup chocolate frosting
- 1 cup crushed chocolate sandwich cookies (for “dirt”)
- 6 chocolate sandwich cookies, halved (for “tombstones”)
- Halloween-themed candies (e.g., gummy worms, candy pumpkins)
- Green icing or gel for grass decoration
Instructions:
- Preheat and Prepare Pans: Preheat your oven to 350°F (175°C). Grease and flour two 8-inch round cake pans to guarantee the cakes don’t stick.
- Mix Dry Ingredients: In a large mixing bowl, combine the flour, sugar, cocoa powder, baking soda, baking powder, and salt. Whisk the ingredients together until they’re thoroughly mixed.
- Combine Wet Ingredients: In a separate bowl, mix together the vegetable oil, buttermilk, vanilla extract, and eggs. Beat the mixture until it’s smooth and well incorporated.
- Combine Wet and Dry Mixtures: Gradually add the wet ingredients to the dry ingredients, mixing gently. Slowly pour in the hot water, mixing until the batter is smooth and well combined.
- Bake the Cakes: Divide the batter evenly between the prepared cake pans. Bake for 30-35 minutes or until a toothpick inserted in the center comes out clean. Let the cakes cool in the pans for 10 minutes before transferring them to a wire rack to cool completely.
- Assemble the Cake: Place one cake layer on a serving platter. Spread a thick layer of chocolate frosting over the top. Place the second cake layer on top and frost the entire cake with the remaining chocolate frosting.
- Create the Graveyard Scene: Sprinkle crushed chocolate sandwich cookies over the top of the cake to create the look of “dirt.” Insert halved chocolate sandwich cookies into the cake to resemble tombstones. Decorate the cake with Halloween-themed candies and use green icing or gel to add tufts of grass around the tombstones.
Extra Tips:
When creating your Haunted Graveyard Cake, feel free to let your creativity run wild with the decorations. Use assorted Halloween candies to add more spooky elements, like candy bones or edible eyes.
If you don’t have buttermilk on hand, you can make a quick substitute by adding a tablespoon of lemon juice or white vinegar to a cup of milk and letting it sit for a few minutes.
Remember to chill the cake in the fridge before serving to allow the frosting to set and make slicing easier. Happy haunting!
Witch’s Cauldron Cake
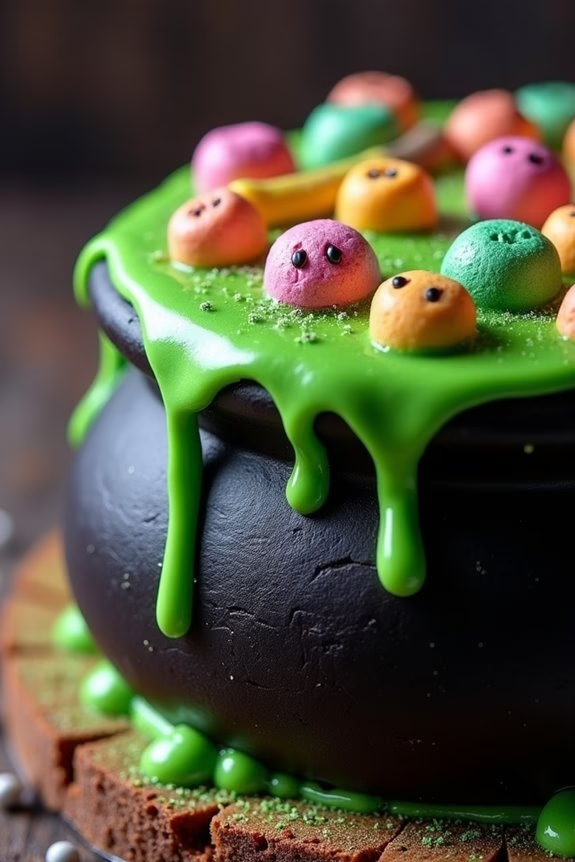
Witch’s Cauldron Cake is a mesmerizing centerpiece for your Halloween festivities. This cake isn’t only visually striking but also delectably satisfying, making it the perfect addition to your Halloween party spread. Shaped and decorated to resemble a bubbling witch’s cauldron, it’s sure to impress your guests with both its appearance and flavor. The rich chocolate cake base provides a deep, indulgent flavor, while the vibrant decorations bring a playful touch to the spooky season.
Creating this Witch’s Cauldron Cake is a fun and engaging process, allowing you to express your creativity. The cake itself is made with layers of moist chocolate sponge, filled with creamy frosting, and covered in black fondant to mimic the look of a cauldron. The bubbling effect is achieved by using a variety of candies and colored frosting to simulate a magical concoction.
Whether you’re hosting a Halloween party or simply want to treat your family to a festive dessert, this cake offers a delightful combination of flavor and fun.
Ingredients (Serves 4-6):
- 2 cups all-purpose flour
- 1 ¾ cups granulated sugar
- ¾ cup unsweetened cocoa powder
- 1 ½ teaspoons baking soda
- 1 ½ teaspoons baking powder
- 1 teaspoon salt
- 2 large eggs
- 1 cup whole milk
- ½ cup vegetable oil
- 2 teaspoons vanilla extract
- 1 cup boiling water
- 3 cups black fondant
- 2 cups green frosting
- Assorted candy (e.g., marshmallows, gummy worms, candy eyeballs)
- Edible glitter or luster dust (optional)
Cooking Instructions:
- Preheat and Prepare: Preheat your oven to 350°F (175°C). Grease and flour two 9-inch round cake pans.
- Mix Dry Ingredients: In a large bowl, whisk together the flour, sugar, cocoa powder, baking soda, baking powder, and salt until well combined.
- Combine Wet Ingredients: In another bowl, beat the eggs, milk, vegetable oil, and vanilla extract until smooth. Gradually add the dry ingredients to the wet mixture, stirring until just combined.
- Add Boiling Water: Carefully stir in the boiling water until the batter is smooth and thin.
- Bake: Divide the batter evenly between the prepared cake pans. Bake in the preheated oven for 30-35 minutes, or until a toothpick inserted into the center comes out clean. Allow the cakes to cool in the pans for 10 minutes, then turn out onto a wire rack to cool completely.
- Assemble the Cake: Once the cakes are completely cooled, place one cake layer on a serving plate. Spread a layer of green frosting on top, then place the second cake layer on top. Cover the entire cake with a thin layer of green frosting (a crumb coat) and refrigerate for 30 minutes.
- Cover with Fondant: Roll out the black fondant to about 1/8-inch thickness. Carefully drape the fondant over the cake, smoothing it gently to eliminate air bubbles and wrinkles.
- Decorate: Use the remaining green frosting to create a bubbling effect on top of the cake. Arrange assorted candies around the top to resemble ingredients bubbling over. If desired, dust with edible glitter or luster dust for a magical touch.
Extra Tips:
When working with fondant, it’s important to knead it until it’s soft and pliable before rolling it out. This will help prevent cracking when you drape it over the cake.
If you find the fondant sticking to your work surface or rolling pin, dust the area lightly with powdered sugar or cornstarch. Be sure to handle the fondant gently to avoid tears or uneven coverage.
For the bubbling effect, feel free to get creative with the candies you choose—anything that adds texture and color will work beautifully.
Mummy Wrapped Cake
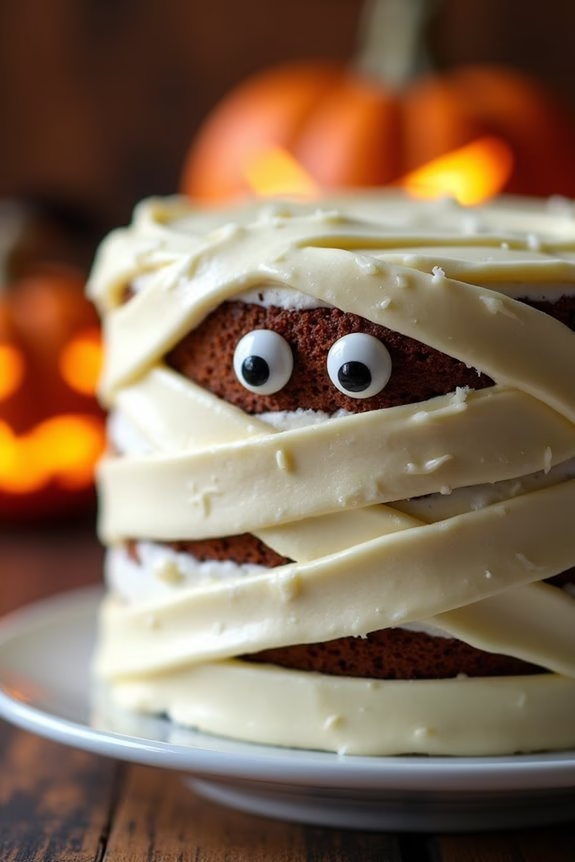
Looking to spook up your Halloween dessert table? A Mummy Wrapped Cake is a fun and delicious way to celebrate the season. This cake isn’t only visually striking but also incredibly tasty, with its moist layers and sweet frosting. The design is simple yet effective, creating the appearance of a mummy with strips of frosting and candy eyes peeking out. It’s perfect for a Halloween party or a family gathering, adding a festive touch to your dessert spread.
To create the Mummy Wrapped Cake, you’ll need to start with a basic chocolate or vanilla cake as your base, which will be wrapped in layers of creamy, white frosting. The frosting will mimic the look of mummy bandages, and a pair of candy eyes will complete the look. This recipe is designed for a serving size of 4-6 people, making it ideal for small gatherings or family treats. Let’s get started with the ingredients you’ll need.
Ingredients:
- 2 cups all-purpose flour
- 1 ½ cups granulated sugar
- ¾ cup unsweetened cocoa powder (if making a chocolate cake)
- 1 ½ teaspoons baking powder
- 1 ½ teaspoons baking soda
- 1 teaspoon salt
- 2 large eggs
- 1 cup whole milk
- ½ cup vegetable oil
- 2 teaspoons vanilla extract
- 1 cup boiling water
- 3 cups powdered sugar
- 1 cup unsalted butter, softened
- 2 tablespoons heavy cream
- 1 teaspoon vanilla extract (for frosting)
- Candy eyes
Instructions:
- Prepare the Cake Batter: Preheat your oven to 350°F (175°C). Grease and flour two 9-inch round cake pans. In a large bowl, mix together the flour, sugar, cocoa powder (if using), baking powder, baking soda, and salt. Add the eggs, milk, vegetable oil, and vanilla extract. Beat on medium speed for 2 minutes. Stir in the boiling water until the batter is well combined and smooth.
- Bake the Cake: Pour the batter evenly into the prepared cake pans. Bake in the preheated oven for 30 to 35 minutes, or until a toothpick inserted into the center comes out clean. Allow the cakes to cool in the pans for 10 minutes, then remove them from the pans and transfer to a wire rack to cool completely.
- Make the Frosting: In a large bowl, beat the softened butter on medium speed until creamy. Gradually add the powdered sugar, beating well after each addition. Add the heavy cream and vanilla extract, and beat on high speed for about 2 minutes until the frosting is light and fluffy.
- Assemble the Cake: Once the cakes are completely cool, place one cake layer on a serving plate. Spread a layer of frosting on top, then place the second cake layer on top. Frost the top and sides of the cake with a thin layer of frosting, known as a crumb coat. Refrigerate the cake for about 30 minutes to set the frosting.
- Decorate as a Mummy: Using a piping bag fitted with a flat tip, pipe strips of frosting across the cake to create the mummy’s bandages. Leave a small space open in the middle to attach the candy eyes. Continue piping until you have a layered effect that mimics a wrapped mummy.
- Finish with Eyes: Gently place the candy eyes in the open space between the frosting strips. Adjust the eyes as needed to give your mummy cake a playful or spooky expression.
Extra Tips:
When creating your Mummy Wrapped Cake, it’s important to guarantee that the cake layers are completely cooled before you begin frosting. This helps prevent the frosting from melting and guarantees a clean finish.
If you prefer a more textured look, use a serrated knife to trim the tops of the cake layers before assembling. For an extra spooky effect, consider tinting some of the frosting with a drop of black food coloring to add depth to the bandages.
Remember to have fun with the decoration and let your creativity shine!
Spiderweb Layer Cake
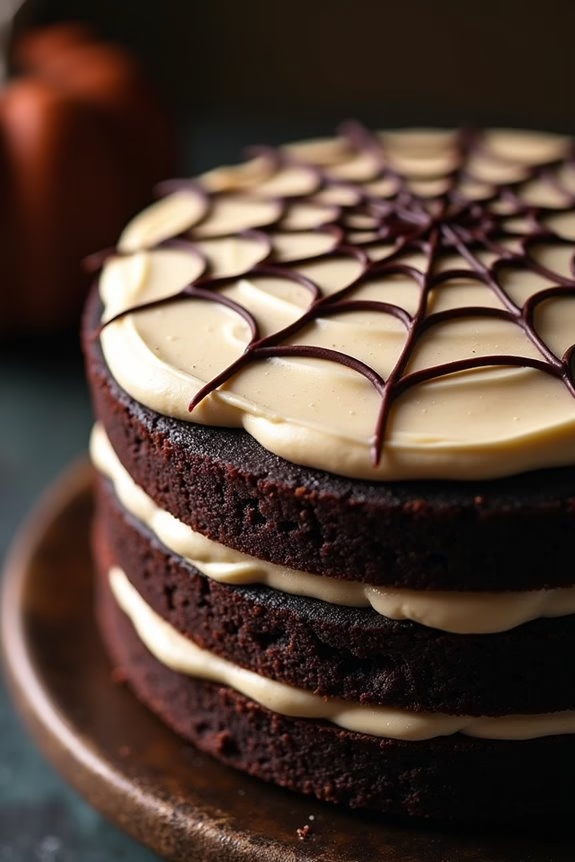
Get ready to delight your friends and family with a spooky yet delicious Spiderweb Layer Cake, perfect for a Halloween celebration. This cake not only tastes divine with its layers of rich chocolate sponge and creamy frosting but also captivates with its intricate spiderweb design on top. The artistic decoration is easier than it looks and will make your Halloween gathering a memorable event.
Crafting this cake involves creating moist chocolate layers, which are then sandwiched together with creamy frosting. The crowning touch is the chocolate spiderweb design that will be etched on the top layer of the cake, offering a dramatic and eerie effect perfect for the season. Serve this cake to 4-6 people, and watch as everyone is enchanted by its bewitching appearance and delightful flavors.
Ingredients (Serves 4-6):
- 1 ½ cups all-purpose flour
- 1 cup granulated sugar
- ½ cup unsweetened cocoa powder
- 1 ½ teaspoons baking powder
- ½ teaspoon baking soda
- ½ teaspoon salt
- 2 large eggs
- ½ cup whole milk
- ¼ cup vegetable oil
- 1 teaspoon vanilla extract
- ½ cup boiling water
- 2 cups confectioners’ sugar
- ½ cup unsalted butter, softened
- 2 tablespoons heavy cream
- 1 teaspoon vanilla extract (for frosting)
- ¼ cup chocolate chips (for spiderweb)
Instructions:
- Prepare the Cake Batter:
- Preheat your oven to 350°F (175°C). Grease and flour two 8-inch round cake pans.
- In a large bowl, combine the flour, sugar, cocoa powder, baking powder, baking soda, and salt. Mix well until all dry ingredients are evenly incorporated.
- Add the eggs, milk, vegetable oil, and vanilla extract to the dry ingredients. Beat the mixture on medium speed for 2 minutes, guaranteeing a smooth consistency.
- Gradually stir in the boiling water until the batter is thin and smooth.
- Bake the Cake:
- Pour the batter evenly into the prepared cake pans.
- Bake in the preheated oven for 30-35 minutes, or until a toothpick inserted into the center of the cake comes out clean.
- Allow the cakes to cool in the pans for 10 minutes before transferring them to a wire rack to cool completely.
- Make the Frosting:
- In a medium bowl, beat the softened butter until creamy. Gradually add the confectioners’ sugar, heavy cream, and vanilla extract. Beat until the frosting is fluffy and spreadable.
- Assemble the Cake:
- Once the cakes are completely cool, spread a layer of frosting over the top of one cake. Place the second cake layer on top and frost the top and sides of the entire cake.
- Create the Spiderweb Design:
- Melt the chocolate chips in a microwave-safe bowl, stirring every 20 seconds until fully melted and smooth.
- Transfer the melted chocolate to a piping bag or small zip-top bag with a tiny corner snipped off.
- Starting from the center of the cake, pipe a spiral or concentric circles outward. Using a toothpick or a skewer, drag lines from the center to the edges to create a spiderweb effect.
Extra Tips:
For an even more dramatic effect, consider adding plastic spider decorations to your cake. If you want a taller cake, you can double the recipe and create additional layers.
Confirm that the cake is completely cool before frosting to prevent the icing from melting. For a more intense chocolate flavor, use dark cocoa powder.
This cake can also be made a day ahead and stored in an airtight container, which allows the flavors to meld beautifully. Enjoy your hauntingly delicious creation!
Ghostly Chocolate Cake
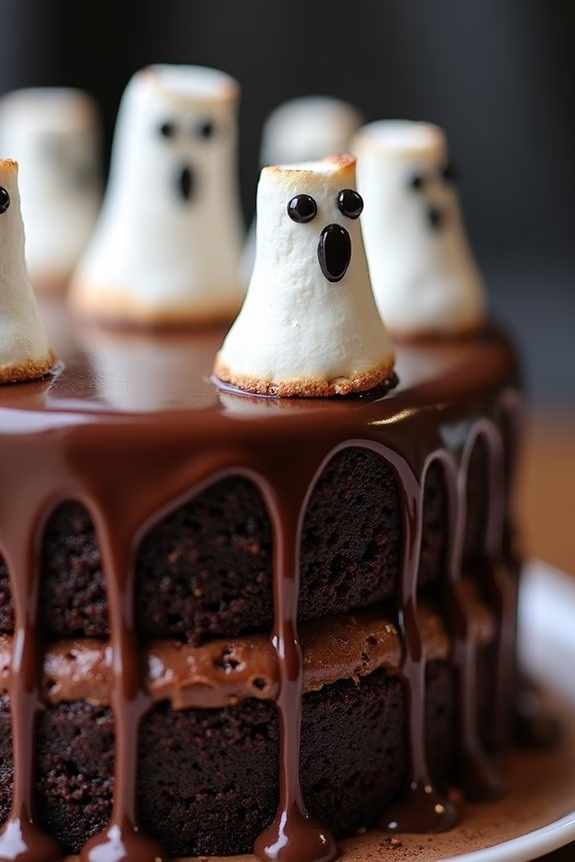
Indulge in the spookiest of treats this Halloween with a Ghostly Chocolate Cake that’s sure to delight and frighten your family and friends. This decadent dessert features rich, moist chocolate layers and a hauntingly delightful ghostly design that’s as fun to make as it’s to eat. Perfect for Halloween parties or a cozy night in, this cake combines classic flavors with a whimsical twist, making it an instant favorite among both kids and adults.
The Ghostly Chocolate Cake is designed to serve 4-6 people, making it ideal for small gatherings or a family dessert. It’s a wonderful addition to any Halloween spread and pairs beautifully with a warm cup of coffee or a glass of milk. With a touch of creativity and a few simple ingredients, you can create a deliciously spooky masterpiece that will have everyone reaching for seconds.
Ingredients:
- 1 ¾ cups all-purpose flour
- ¾ cup unsweetened cocoa powder
- 2 cups granulated sugar
- 1 ½ teaspoons baking powder
- 1 ½ teaspoons baking soda
- 1 teaspoon salt
- 2 large eggs
- 1 cup whole milk
- ½ cup vegetable oil
- 2 teaspoons vanilla extract
- 1 cup boiling water
- 1 cup heavy cream
- 8 ounces semi-sweet chocolate, finely chopped
- 1 package of mini marshmallows
- Edible black gel or black fondant for ghost faces
Instructions:
- Preheat and Prepare Pans: Preheat your oven to 350°F (175°C). Grease and flour two 9-inch round cake pans and set them aside.
- Mix Dry Ingredients: In a large mixing bowl, combine the flour, cocoa powder, sugar, baking powder, baking soda, and salt. Whisk them together until well blended.
- Combine Wet Ingredients: In another bowl, beat the eggs, milk, oil, and vanilla extract together until smooth. Gradually add this mixture to the dry ingredients, mixing on medium speed until well incorporated.
- Add Boiling Water: Carefully stir in the boiling water to the batter. The batter will be thin; this is normal as it will result in a moist cake. Divide the batter evenly between the prepared cake pans.
- Bake the Cake: Bake in the preheated oven for 30 to 35 minutes, or until a toothpick inserted into the center of the cakes comes out clean. Allow the cakes to cool in the pans for 10 minutes, then remove them from the pans and transfer to a wire rack to cool completely.
- Prepare Chocolate Ganache: While the cakes are cooling, heat the heavy cream in a small saucepan over medium heat until it begins to simmer. Remove from heat, pour over the chopped chocolate, and let sit for 5 minutes. Stir until smooth and glossy. Let the ganache cool slightly until it’s thickened but still pourable.
- Assemble the Cake: Place one cake layer on a serving plate and spread a layer of chocolate ganache over the top. Place the second cake layer on top and pour the remaining ganache over the entire cake, allowing it to drip down the sides.
- Decorate with Ghosts: Press mini marshmallows into the ganache-covered cake to create ghost shapes. Use edible black gel or small pieces of black fondant to add eyes and mouths to the marshmallow ghosts.
Extra Tips:
For an even spookier effect, use a small kitchen torch to gently toast the marshmallow ghosts, giving them a slightly charred appearance. If you want to add more depth to your chocolate flavor, consider using dark chocolate instead of semi-sweet for the ganache.
Additionally, keeping the cake in the refrigerator for about 30 minutes before serving will firm up the ganache, making it easier to slice. Enjoy your ghostly creation and have a hauntingly good Halloween!
Pumpkin Patch Cake
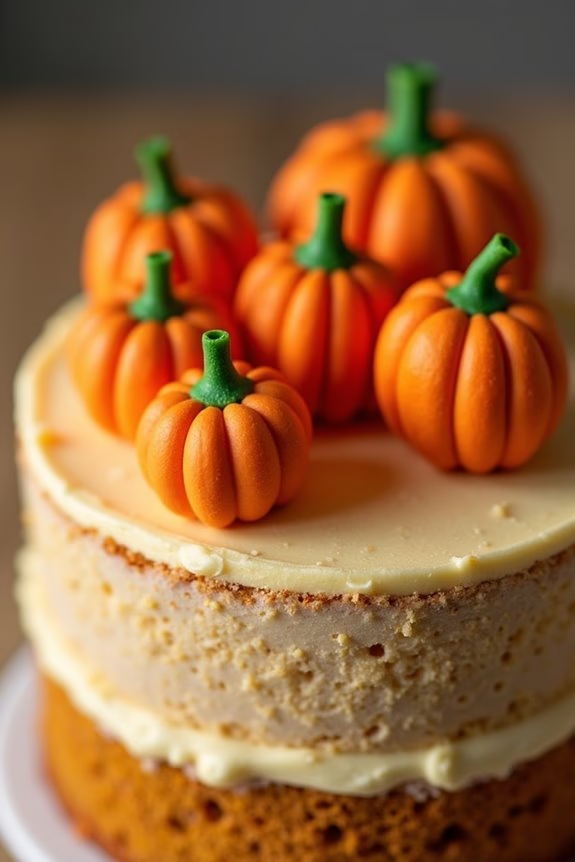
The Pumpkin Patch Cake is a delightful Halloween treat that combines the flavors of pumpkin and spices with a festive and decorative twist. This cake is designed to resemble a mini pumpkin patch, complete with little pumpkin decorations on top. It’s perfect for a Halloween party or a cozy autumn gathering.
The cake itself is moist and tender, infused with aromatic spices that evoke the essence of fall. The cream cheese frosting adds a rich and tangy contrast, while the decorative pumpkins made from marzipan or fondant add a fun and whimsical touch.
Creating a Pumpkin Patch Cake involves a few different components: the pumpkin spice cake base, a luscious cream cheese frosting, and the charming marzipan pumpkins. The cake layers are flavored with pumpkin puree and a blend of cinnamon, nutmeg, and cloves, giving it a warm and inviting flavor profile.
The cream cheese frosting is smooth and creamy, complementing the spiced cake perfectly. Finally, the marzipan pumpkins can be shaped and colored to resemble miniature pumpkins, completing the festive look. This recipe serves 4-6 people, making it ideal for a small gathering.
Ingredients
- 1 ¾ cups all-purpose flour
- 1 teaspoon baking powder
- 1 teaspoon baking soda
- 1 teaspoon ground cinnamon
- ½ teaspoon ground nutmeg
- ½ teaspoon ground cloves
- ½ teaspoon salt
- 1 cup pumpkin puree
- ½ cup vegetable oil
- 1 cup granulated sugar
- ½ cup brown sugar
- 2 large eggs
- 1 teaspoon vanilla extract
For the Cream Cheese Frosting:
- 8 oz cream cheese, softened
- ½ cup unsalted butter, softened
- 4 cups powdered sugar
- 1 teaspoon vanilla extract
For the Marzipan Pumpkins:
- 8 oz marzipan
- Orange and green food coloring
Instructions
- Preheat and Prepare Pans: Preheat your oven to 350°F (175°C). Grease and flour two 8-inch round cake pans or line them with parchment paper for easy removal.
- Mix Dry Ingredients: In a medium-sized bowl, whisk together the flour, baking powder, baking soda, cinnamon, nutmeg, cloves, and salt. Set aside.
- Combine Wet Ingredients: In a large bowl, mix the pumpkin puree, vegetable oil, granulated sugar, brown sugar, eggs, and vanilla extract until smooth and well combined.
- Combine Wet and Dry Mixtures: Gradually add the dry ingredients to the wet ingredients, mixing just until combined. Be careful not to overmix, as this can make the cake dense.
- Bake the Cake: Divide the batter evenly between the prepared cake pans. Bake for 25-30 minutes or until a toothpick inserted into the center comes out clean. Let the cakes cool in the pans for about 10 minutes before transferring them to a wire rack to cool completely.
- Make the Cream Cheese Frosting: In a large bowl, beat the softened cream cheese and butter together until smooth and creamy. Gradually add the powdered sugar, one cup at a time, beating well after each addition. Mix in the vanilla extract.
- Shape the Marzipan Pumpkins: Divide the marzipan into small portions. Use orange food coloring to dye most of the marzipan orange. Shape them into small pumpkin shapes. Use a toothpick to create grooves on the sides. Color a small portion of marzipan green for the stems and attach them to the pumpkins.
- Assemble the Cake: Place one cake layer on a serving plate. Spread a generous amount of cream cheese frosting on top. Place the second cake layer on top and frost the top and sides of the cake. Arrange the marzipan pumpkins on top of the cake to resemble a pumpkin patch.
Extra Tips
For a more pronounced pumpkin flavor, consider adding a teaspoon of pumpkin pie spice to the cake batter. If you don’t have marzipan, you can substitute with fondant or even molded orange candies for the pumpkins.
When shaping the marzipan pumpkins, using a small brush to apply the food coloring will help achieve a more natural look. Allow the cake to chill in the refrigerator for at least an hour before serving to let the flavors meld and the frosting set.
Black Cat Magic Cake
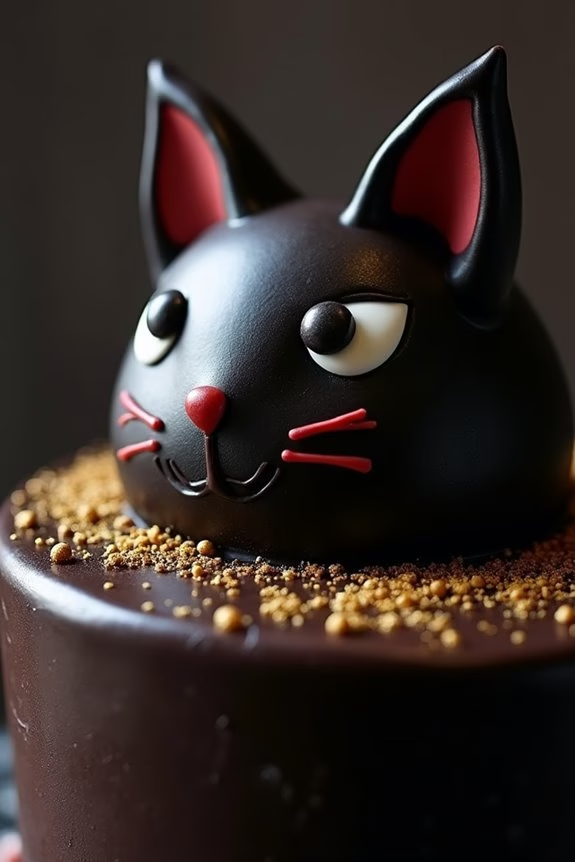
Delight your Halloween guests with a mysterious and enchanting Black Cat Magic Cake. This whimsical dessert combines rich chocolate flavors with a touch of spooky charm. Perfect for a Halloween party or a family gathering, this cake isn’t only visually striking but also irresistibly delicious. The moist chocolate layers are enveloped in a dark, luscious frosting, adorned with playful cat features that will captivate both young and old alike.
Creating a Black Cat Magic Cake is a fun and rewarding experience. With a little bit of creativity and some basic baking skills, you can bring this magical creature to life. The recipe is designed to serve 4-6 people, making it perfect for a small gathering. Whether you’re an experienced baker or a novice in the kitchen, you’ll find this cake both easy to prepare and a joy to decorate.
Ingredients (Serves 4-6):
- 1 ½ cups all-purpose flour
- 1 cup granulated sugar
- ½ cup unsweetened cocoa powder
- 1 teaspoon baking soda
- ½ teaspoon baking powder
- ½ teaspoon salt
- 1 cup buttermilk
- ½ cup vegetable oil
- 2 large eggs
- 1 teaspoon vanilla extract
- 1 cup boiling water
- 1 cup heavy cream
- 8 oz dark chocolate, chopped
- Black food coloring
- White and black fondant
- Edible gold glitter (optional)
Instructions:
- Prepare the Cake Batter: Preheat your oven to 350°F (175°C). Grease and flour two 8-inch round cake pans. In a large mixing bowl, combine flour, sugar, cocoa powder, baking soda, baking powder, and salt. Whisk together until well blended.
- Mix Wet Ingredients: In a separate bowl, whisk together the buttermilk, vegetable oil, eggs, and vanilla extract until smooth. Gradually add the wet mixture to the dry ingredients, stirring until just combined.
- Add Boiling Water: Carefully stir in the boiling water until the batter is smooth and well combined. The batter will be thin, but this is normal.
- Bake the Cakes: Divide the batter evenly between the prepared cake pans. Bake for 30-35 minutes, or until a toothpick inserted into the center comes out clean. Allow the cakes to cool in the pans for 10 minutes before transferring them to a wire rack to cool completely.
- Make the Ganache Frosting: In a small saucepan, heat the heavy cream until it just begins to simmer. Remove from heat and add the chopped dark chocolate. Stir until the chocolate is completely melted and the mixture is smooth. Add a few drops of black food coloring until desired shade is achieved. Let the ganache cool slightly until thickened but still spreadable.
- Assemble the Cake: Place one cake layer on a serving plate and spread a layer of ganache on top. Place the second cake layer on top and cover the entire cake with the remaining ganache, smoothing it out with an offset spatula.
- Decorate the Cake: Roll out the black fondant and cut out two cat ears and a tail. Use the white fondant to create the cat’s eyes and nose. Attach the fondant pieces to the cake with a dab of ganache. Optionally, sprinkle some edible gold glitter for a magical touch.
Extra Tips:
When assembling and decorating your Black Cat Magic Cake, make sure that the cakes are completely cooled to prevent the ganache from melting.
If you’re short on time, you can prepare the cake layers a day in advance, wrap them tightly in plastic wrap, and store them in the refrigerator.
For an extra touch of fun, consider using edible glitter or candy eyes to enhance the magical appearance of your cake.
Monster Mash-Up Cake
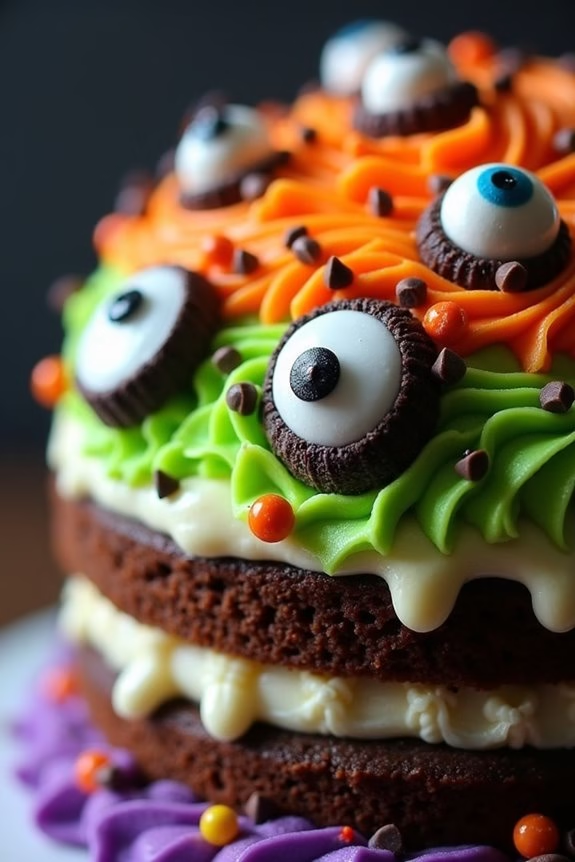
Get ready to delight and thrill with a spooky yet delightful Halloween treat—our Monster Mash-Up Cake. This cake is an explosion of fun, featuring vibrant colors and playful designs that will excite both kids and adults. Perfect for a Halloween party or a special treat for your family, this cake combines the classic flavors of vanilla and chocolate, layered and topped with colorful frosting and monster-themed decorations.
Creating this cake is a chance to let your imagination run wild, allowing you to customize monster faces and themes to your heart’s content. The Monster Mash-Up Cake is designed to serve 4-6 people, making it an ideal centerpiece for a small Halloween gathering. The recipe is simple yet leaves plenty of room for creativity, guaranteeing that your edible masterpiece is as unique as it’s delicious.
From the preparation of the cake layers to the final touches of decoration, each step is crafted to guarantee you have a spooky and sweet success at your celebration.
Ingredients
- 1 cup all-purpose flour
- 1 cup granulated sugar
- 1/2 cup unsweetened cocoa powder
- 1 teaspoon baking powder
- 1/2 teaspoon baking soda
- 1/4 teaspoon salt
- 2 large eggs
- 1/2 cup milk
- 1/4 cup vegetable oil
- 1 teaspoon vanilla extract
- 1/2 cup boiling water
- 1 cup unsalted butter, softened
- 4 cups powdered sugar
- 1/4 cup heavy cream
- Gel food coloring (green, orange, purple)
- Candy eyeballs, assorted shapes and sizes
- Black licorice, cut into small pieces
- Chocolate chips and sprinkles for decoration
Instructions
- Prepare the Cake Batter: Preheat your oven to 350°F (175°C) and grease two 9-inch round cake pans. In a large bowl, mix together the flour, sugar, cocoa powder, baking powder, baking soda, and salt. Add the eggs, milk, oil, and vanilla extract. Beat the mixture on medium speed for 2 minutes. Stir in the boiling water until the batter is smooth and well combined.
- Bake the Cake Layers: Divide the batter evenly between the prepared pans. Bake for 30-35 minutes or until a toothpick inserted into the center comes out clean. Allow the cakes to cool in the pans for 10 minutes, then remove them from the pans and place on a wire rack to cool completely.
- Prepare the Frosting: In a large mixing bowl, beat the softened butter until creamy. Gradually add the powdered sugar, 1 cup at a time, beating on low speed until incorporated. Increase the speed and add the heavy cream, beating until the frosting is light and fluffy. Divide the frosting into three bowls and tint each with a different gel food coloring (green, orange, purple).
- Assemble the Cake: Place one cake layer on a serving plate and spread a layer of colored frosting on top. Place the second cake layer on top and cover the entire cake with a thin layer of frosting (crumb coat). Chill in the refrigerator for 15 minutes.
- Decorate the Cake: Use the remaining colored frosting to creatively frost the cake, creating different monster faces or patterns. Press candy eyeballs into the frosting to create monster eyes, and use the black licorice to create mouths or other facial features. Add chocolate chips and sprinkles for additional texture and fun.
- Final Touches: Once decorated, chill the cake for another 15 minutes to set the frosting. Slice and serve your monster masterpiece to enthusiastic guests.
Extra Tips
For a more dramatic effect, consider using different piping tips to create various textures on your monster faces, such as fluffy fur or spiky scales. You can also experiment with different candies or edible decorations to personalize each monster.
If you want to add an extra layer of flavor, try incorporating a flavored extract such as almond or orange to the frosting. Always keep the cake chilled until ready to serve to guarantee the decorations stay intact and the frosting remains stable.
Skull and Roses Cake

Creating a Skull and Roses Cake is a perfect way to bring an eerie elegance to your Halloween festivities. This cake combines the dark allure of a skull with the delicate beauty of roses, making it a show-stopping centerpiece for your spooky celebration.
With rich layers of chocolate cake, creamy frosting, and intricate decorations, this dessert isn’t only visually stunning but also irresistibly delicious. Whether you’re hosting a Halloween party or simply want to indulge in a creatively themed treat, this cake is bound to impress your guests.
Begin by envisioning the bold design of your Skull and Roses Cake. The base will be a moist and decadent chocolate cake, providing a rich foundation for the intricate decorations. The skull is crafted using fondant, offering a smooth and detailed surface for artistic expression.
To complement the skull, red fondant roses are carefully shaped and placed around the cake, adding a touch of color and contrast. This recipe serves 4-6 people, making it perfect for a small gathering or family treat.
Ingredients:
- 1 ½ cups all-purpose flour
- 1 ½ cups granulated sugar
- ¾ cup unsweetened cocoa powder
- 1 ½ teaspoons baking powder
- 1 ½ teaspoons baking soda
- 1 teaspoon salt
- 2 large eggs
- 1 cup whole milk
- ½ cup vegetable oil
- 2 teaspoons vanilla extract
- 1 cup boiling water
- 1 ½ cups unsalted butter, room temperature
- 4 cups powdered sugar
- 1 teaspoon almond extract
- White fondant
- Red fondant
- Black food coloring gel
- Silver edible luster dust
Instructions:
- Preheat and Prepare: Preheat your oven to 350°F (175°C). Grease and flour two 9-inch round cake pans and set them aside.
- Mix Dry Ingredients: In a large mixing bowl, sift together the flour, sugar, cocoa powder, baking powder, baking soda, and salt.
- Combine Wet Ingredients: In a separate bowl, whisk the eggs, milk, vegetable oil, and vanilla extract until well blended.
- Create Cake Batter: Gradually add the wet mixture to the dry ingredients, mixing until smooth. Slowly stir in the boiling water until the batter is well combined and slightly thin.
- Bake the Cake: Divide the batter evenly between the prepared cake pans. Bake for 30-35 minutes or until a toothpick inserted in the center comes out clean. Allow the cakes to cool in the pans for 10 minutes before transferring them to a wire rack to cool completely.
- Prepare the Frosting: In a large bowl, beat the butter until creamy. Gradually add the powdered sugar, continuing to beat until smooth. Mix in the almond extract.
- Assemble the Cake: Place one cake layer on a serving plate. Spread a layer of frosting on top, then place the second cake layer over it. Frost the entire cake evenly.
- Decorate with Fondant: Roll out the white fondant and cover the cake, smoothing it down gently. Shape the skull using the fondant, adding details with black food coloring gel and silver luster dust for a haunting effect.
- Craft the Roses: Roll the red fondant into small balls, then flatten and shape them into rose petals. Assemble the petals into roses and place them around the base of the skull and on the cake.
- Final Touches: Dust the cake with a little more luster dust for a shimmering finish. Allow the cake to set before serving.
Extra Tips:
When working with fondant, make certain your hands and work surface are dusted with cornstarch to prevent sticking. If you’re new to fondant work, practice shaping small details before attempting the skull and roses for the cake.
To enhance the flavor, consider adding a few drops of your favorite flavored extract to the fondant. Finally, remember to keep the cake in a cool, dry place to maintain the integrity of the decorations until you’re ready to serve.
Frankenstein’s Monster Cake
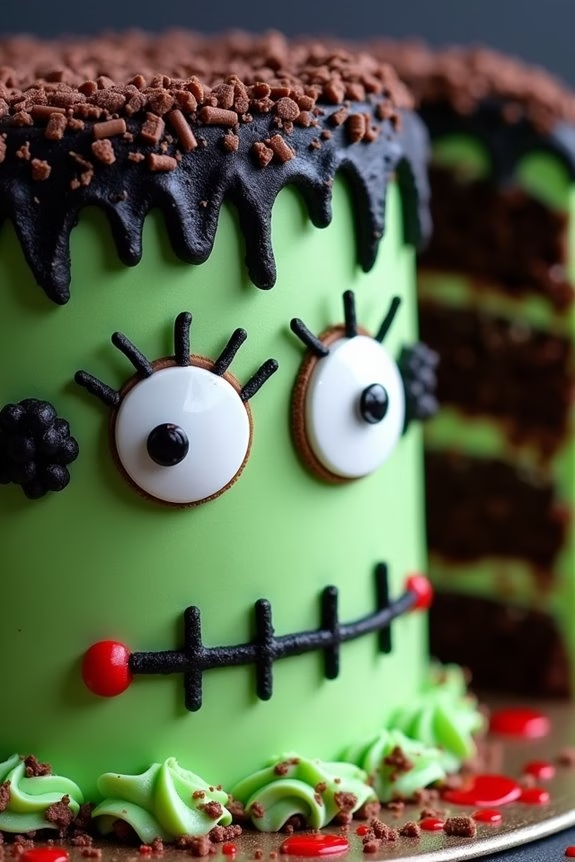
Frankenstein’s Monster Cake is a spooky, delightful treat that will bring your Halloween party to life. This cake is a creative masterpiece that captures the iconic look of Frankenstein’s monster, complete with a green face, bold stitches, and a menacing expression. Perfect for both adults and kids, this cake not only makes for a fantastic centerpiece but also tastes delicious with its rich chocolate layers and creamy buttercream frosting.
Whether you’re hosting a Halloween bash or simply embracing the spooky season, this cake is sure to impress your ghoulish guests.
Creating a Frankenstein’s Monster Cake involves baking a moist chocolate cake and decorating it with colorful frostings and edible embellishments to mimic the monster’s features. The process is fun and allows for a lot of creativity, as you can personalize the cake to match your vision of Frankenstein’s monster. This recipe serves 4-6 people, making it ideal for a small gathering.
Let’s jump into the ingredients you’ll need and the steps to bring this eerie cake to life.
Ingredients
- 1 ½ cups all-purpose flour
- 1 cup granulated sugar
- ½ cup unsweetened cocoa powder
- 1 teaspoon baking powder
- ½ teaspoon baking soda
- ¼ teaspoon salt
- 2 large eggs
- ½ cup vegetable oil
- 1 cup milk
- 1 teaspoon vanilla extract
- 1 cup boiling water
- 1 cup unsalted butter, softened
- 4 cups powdered sugar
- 2 tablespoons milk
- Green food coloring
- Black food coloring
- Red food coloring
- Chocolate sprinkles
- Edible eyes
- Black licorice strings
Cooking Instructions
- Preheat the Oven and Prepare Cake Pans: Preheat your oven to 350°F (175°C). Grease and flour two 8-inch round cake pans to guarantee the cake doesn’t stick and can be easily removed after baking.
- Mix Dry Ingredients: In a large mixing bowl, whisk together the flour, sugar, cocoa powder, baking powder, baking soda, and salt until well combined.
- Combine Wet Ingredients: In another bowl, beat the eggs, vegetable oil, milk, and vanilla extract. Gradually add the wet mixture to the dry ingredients, mixing until smooth.
- Incorporate Boiling Water: Slowly add the boiling water to the batter, mixing continuously. The batter will be thin, but this is necessary for a moist cake.
- Bake the Cake: Divide the batter evenly between the prepared cake pans. Bake in the preheated oven for 30-35 minutes, or until a toothpick inserted into the center comes out clean. Let the cakes cool in the pans for 10 minutes, then transfer them to a wire rack to cool completely.
- Prepare the Buttercream Frosting: In a separate bowl, beat the softened butter until creamy. Gradually add the powdered sugar and two tablespoons of milk, beating until the frosting is smooth and fluffy.
- Color the Frosting: Divide the frosting into three portions. Tint the largest portion green for the monster’s face, a small portion black for the hair and stitches, and a tiny portion red for any bloody details.
- Assemble the Cake: Place one cake layer on a serving plate. Spread a layer of green frosting on top, then place the second cake layer over it. Cover the top and sides of the cake with the remaining green frosting.
- Decorate the Cake: Use black frosting to create the monster’s hair and stitches. Attach the edible eyes to the front of the cake. Use chocolate sprinkles to add texture to the hair and black licorice strings for the scars or bolts. Add red frosting details for a dramatic effect.
- Final Touches: Once decorated, refrigerate the cake for at least 30 minutes to let the frosting set before serving.
Extra Tips
For an even richer flavor, consider adding a teaspoon of instant coffee granules to the boiling water before mixing it into the batter. This will enhance the chocolate taste.
When applying the frosting, use a spatula dipped in warm water to smooth out any uneven areas on the cake for a professional finish. If you want to get creative, you can personalize the cake further with additional edible decorations or by using different shades of green to create depth and dimension on the monster’s face.
Voodoo Doll Cake
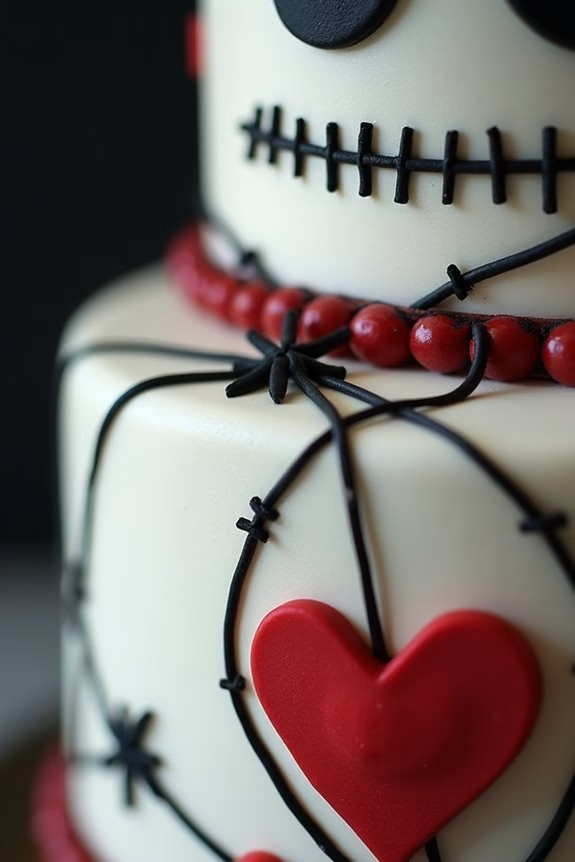
Voodoo Doll Cake is a spooktacular treat perfect for Halloween gatherings, combining the eerie allure of voodoo dolls with the deliciousness of cake. This cake isn’t only eye-catching but also surprisingly easy to make, embodying the spirit of Halloween with its creepy yet playful design. The cake consists of a moist chocolate base, topped with rich vanilla frosting, and decorated with fondant to create the iconic voodoo doll look.
Whether you’re hosting a Halloween party or simply want to surprise your friends and family with a unique dessert, this Voodoo Doll Cake is bound to be a hit.
Crafting this cake involves a few creative steps, but don’t worry—it’s all part of the fun. The process starts with baking a simple sheet cake, which will serve as the body of the doll. Once the cake has cooled, it’s time to get artistic by shaping the cake into a doll-like figure and covering it with fondant.
Decorating the cake is where your creativity can shine, as you use fondant and edible markers to add stitches, buttons, and other voodoo doll details. The final result is a deliciously haunting cake that will enchant your Halloween guests.
Ingredients (Serves 4-6 people):
- 1 ½ cups all-purpose flour
- 1 cup granulated sugar
- ½ cup unsweetened cocoa powder
- 1 teaspoon baking powder
- ½ teaspoon baking soda
- ½ teaspoon salt
- 2 large eggs
- 1 cup whole milk
- ½ cup vegetable oil
- 2 teaspoons vanilla extract
- 1 cup boiling water
- 1 cup unsalted butter, softened
- 4 cups powdered sugar
- 2 teaspoons vanilla extract
- 2 tablespoons milk
- Fondant (white, black, and red)
- Edible markers or food coloring pens
Cooking Instructions:
- Prepare the Cake Batter:
- Preheat your oven to 350°F (175°C) and grease a 9×13 inch baking pan.
- In a large mixing bowl, combine flour, sugar, cocoa powder, baking powder, baking soda, and salt. Whisk to blend.
- Add eggs, milk, vegetable oil, and vanilla extract to the dry ingredients. Mix until well combined.
- Carefully pour in the boiling water and mix until the batter is smooth. It will be thin.
- Bake the Cake:
- Pour the batter into the prepared baking pan.
- Bake for 30-35 minutes or until a toothpick inserted in the center comes out clean.
- Allow the cake to cool completely in the pan on a wire rack.
- Prepare the Frosting:
- In a large bowl, beat the softened butter until creamy.
- Gradually add powdered sugar, beating until well incorporated.
- Mix in vanilla extract and milk, and beat until the frosting is smooth and spreadable.
- Shape the Cake:
- Once the cake is cool, carefully remove it from the pan.
- Use a serrated knife to shape the cake into a rectangle with rounded edges, resembling a voodoo doll.
- Frost the Cake:
- Apply a thin layer of frosting over the entire cake to act as a crumb coat.
- Refrigerate the cake for 15-20 minutes to set the crumb coat.
- Spread a thicker layer of frosting over the cake, smoothing it out with a spatula.
- Decorate with Fondant:
- Roll out the white fondant and cover the entire cake, smoothing it out to eliminate wrinkles and air bubbles.
- Use black fondant to create stitches, eyes, and other doll features.
- Use red fondant for a heart or other distinct features.
- Utilize edible markers to add extra details like stitching lines and buttons.
Extra Tips:
When working with fondant, make certain your hands and work surface are dusted lightly with powdered sugar to prevent sticking. If the fondant becomes too sticky, a small amount of cornstarch can also help.
Feel free to customize the voodoo doll design by adding additional details or using different colors. If you’re new to using fondant, practice rolling and shaping it before applying it to the cake to build confidence.
Candy Corn Surprise Cake
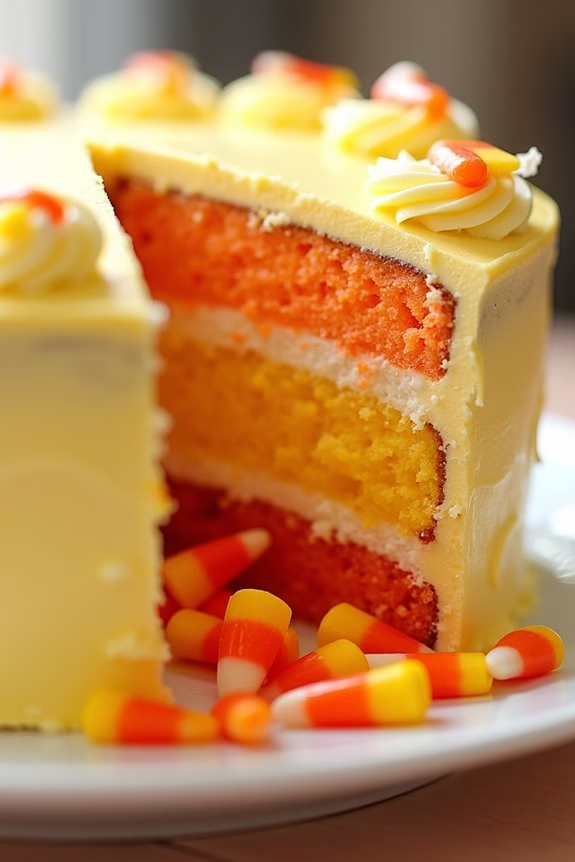
Candy Corn Surprise Cake is a delightful Halloween treat that won’t only satisfy your sweet tooth but also add a touch of fun and mystery to your Halloween party. This cake is a wonderful combination of vibrant colors and delicious flavors, featuring a hidden surprise of candy corn inside. The cake is designed to look like an ordinary cake from the outside, but when you slice into it, a cascade of candy corn spills out, creating an exciting and surprising moment for your guests.
Whether you’re hosting a Halloween party or simply want to create a festive dessert for your family, this Candy Corn Surprise Cake is bound to be a hit.
To prepare this cake, you’ll need to make a simple vanilla cake batter that will serve as the base. The batter is then divided into three portions and colored with food coloring to match the iconic candy corn colors: yellow, orange, and white. The layers are baked separately and then assembled with a hollow center to hold the candy corn surprise.
Once baked and cooled, the layers are stacked with a creamy frosting, and the center cavity is filled with candy corn. A final layer of frosting covers the cake, hiding the surprise within. Here’s how to make this exciting cake for 4-6 people.
Ingredients:
- 2 1/2 cups all-purpose flour
- 2 1/2 teaspoons baking powder
- 1/2 teaspoon salt
- 3/4 cup unsalted butter, softened
- 1 3/4 cups granulated sugar
- 3 large eggs
- 1 tablespoon vanilla extract
- 1 cup whole milk
- Yellow, orange, and white gel food coloring
- 2 cups candy corn
- 3 cups buttercream frosting
Instructions:
- Preheat and Prepare Pans: Preheat your oven to 350°F (175°C). Grease and flour three 8-inch round cake pans.
- Mix Dry Ingredients: In a medium bowl, whisk together the flour, baking powder, and salt. Set aside.
- Cream Butter and Sugar: In a large mixing bowl, cream the butter and sugar together until light and fluffy, about 3-4 minutes using an electric mixer.
- Add Eggs and Vanilla: Beat in the eggs one at a time, guaranteeing each is fully incorporated before adding the next. Mix in the vanilla extract.
- Combine Dry Ingredients and Milk: Gradually add the dry ingredients to the butter mixture, alternating with the milk, beginning and ending with the dry ingredients. Mix until just combined.
- Divide and Color Batter: Divide the batter evenly into three separate bowls. Color one bowl of batter yellow, another orange, and leave the last one white.
- Bake the Layers: Pour each colored batter into the prepared cake pans. Bake for 20-25 minutes or until a toothpick inserted into the center comes out clean. Allow the cakes to cool in the pans for 10 minutes, then turn them out onto a wire rack to cool completely.
- Hollow the Center: Once cooled, use a round cookie cutter or a glass to cut a circle out of the center of each cake layer, but not all the way through the bottom layer.
- Assemble the Cake: Place the first layer on a serving plate and spread a thin layer of frosting around the hole. Stack the second layer on top and spread frosting around the hole.
- Fill with Candy Corn: Fill the hollow center with candy corn, guaranteeing it reaches the top of the hole.
- Top and Frost the Cake: Place the final layer on top, ensuring it isn’t hollowed out. Frost the entire cake with the remaining buttercream, smoothing the sides and top.
- Decorate as Desired: Decorate with additional candy corn or Halloween-themed decorations.
Extra Tips:
For the best results, verify all ingredients are at room temperature before beginning. This will help the batter mix evenly and the cake to rise properly.
When adding food coloring, start with a small amount and gradually add more until you achieve your desired shade. If you prefer, you can use a store-bought cake mix as a shortcut. Just follow the package instructions and proceed with the coloring and assembly steps.
Remember to have fun with the decorating—this cake is meant to be a festive and playful centerpiece for your Halloween celebration!