

As Halloween approaches, the magic of the season fills the air, and what better way to celebrate than with some whimsical baking adventures? Halloween baking is the perfect chance for little hands to get delightfully messy while creating spooky treats. From Monster Mash Cupcakes to Creepy Crawly Spider Cookies, each recipe turns the kitchen into a playground of creativity and fun. Ready to uncover more deliciously eerie delights that will enchant your little ghouls and goblins? Let’s explore a world of spooky sweets together!
Monster Mash Cupcakes
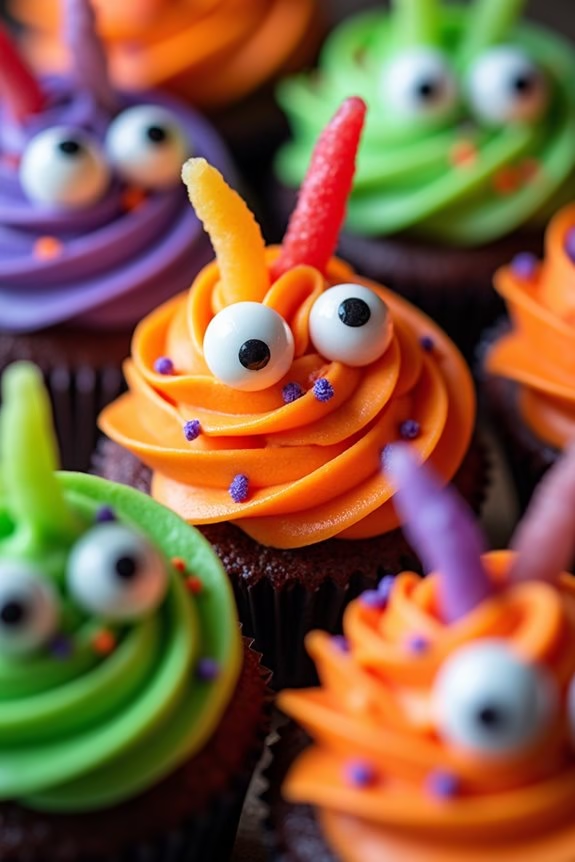
Monster Mash Cupcakes are the perfect treat for Halloween, combining spooky fun with delicious flavors that kids will love. These cupcakes are designed to look like little monsters, complete with vibrant frosting, candy eyes, and playful decorations that will delight young bakers. They aren’t only fun to make but also simple enough to involve kids in the baking process, providing an excellent opportunity for family bonding in the kitchen.
The base of these cupcakes is a moist chocolate cake, which is a hit with children and adults alike. Topped with colorful buttercream frosting, each cupcake is transformed into a unique monster with the help of assorted candies and sprinkles. This recipe yields 12 cupcakes, making it ideal for a small Halloween gathering or a fun baking session with family and friends.
Get ready to release your creativity and craft these delightful Monster Mash Cupcakes!
Ingredients (Serves 4-6 people):
- 1 cup all-purpose flour
- 1 cup granulated sugar
- 1/2 cup unsweetened cocoa powder
- 1 teaspoon baking powder
- 1/2 teaspoon baking soda
- 1/4 teaspoon salt
- 1/2 cup unsalted butter, melted
- 2 large eggs
- 1 teaspoon vanilla extract
- 1/2 cup milk
- 1/2 cup boiling water
For the Frosting and Decoration:
- 1 cup unsalted butter, softened
- 3 cups powdered sugar
- 2 tablespoons heavy cream
- 1 teaspoon vanilla extract
- Food coloring (various colors)
- Assorted candies (gummy worms, candy eyes, licorice, etc.)
- Sprinkles
Cooking Instructions:
- Prepare the Cupcake Batter: Preheat your oven to 350°F (175°C) and line a 12-cup muffin tin with cupcake liners. In a large mixing bowl, sift together the flour, sugar, cocoa powder, baking powder, baking soda, and salt.
- Mix Wet Ingredients: In another bowl, whisk together the melted butter, eggs, vanilla extract, and milk until well combined.
- Combine Wet and Dry Ingredients: Gradually add the wet ingredients to the dry mixture, stirring until just combined. Be careful not to overmix. Once combined, slowly add the boiling water to the batter, mixing until smooth. The batter will be thin, which is normal.
- Bake the Cupcakes: Divide the batter evenly among the cupcake liners, filling each about two-thirds full. Bake for 18-20 minutes, or until a toothpick inserted into the center of a cupcake comes out clean. Allow the cupcakes to cool in the pan for 5 minutes, then transfer them to a wire rack to cool completely.
- Prepare the Frosting: In a large bowl, beat the softened butter with an electric mixer until creamy. Gradually add the powdered sugar, heavy cream, and vanilla extract, beating on low until combined, then increase the speed to medium-high and beat until fluffy.
- Color and Decorate: Divide the frosting into separate bowls and add different food coloring to each, mixing until the desired colors are achieved. Using a piping bag or a spatula, frost each cupcake with your chosen colors. Decorate with candies and sprinkles to create monster faces, using candy eyes, gummy worms, and licorice to add personality.
Extra Tips:
When making Monster Mash Cupcakes, encourage kids to get creative with the decorations. You can set up a decorating station with various candies and sprinkles to let them design their own unique monsters.
If you’re short on time, you can use store-bought frosting as a quick alternative. Just remember to have fun and embrace the messiness – the more colorful and wacky the cupcakes, the better!
Creepy Crawly Spider Cookies
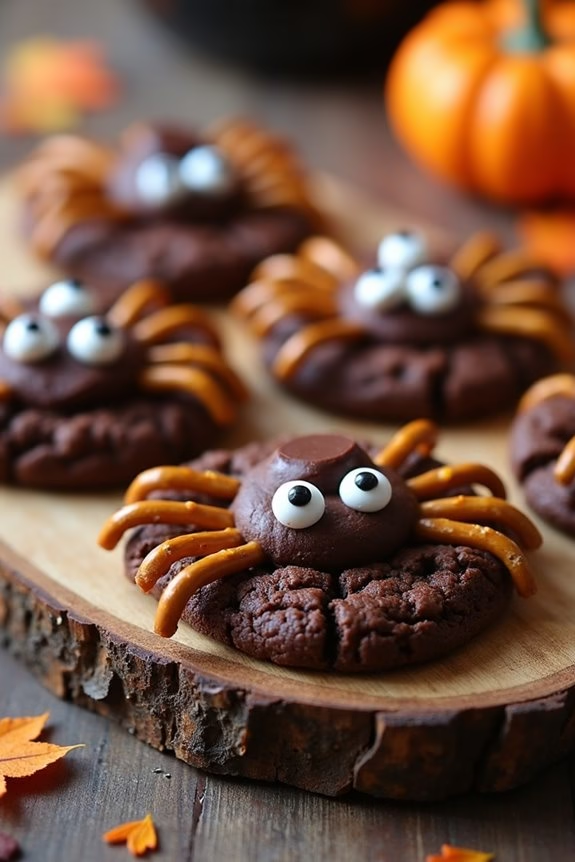
Halloween is the perfect time to get creative in the kitchen with spooky treats that are both fun to make and delicious to eat. Creepy Crawly Spider Cookies are a fantastic way to engage kids in baking, allowing them to express their creativity while learning basic cooking skills.
These cookies aren’t only visually striking but also deliciously chocolaty, making them a hit with both kids and adults alike. Each cookie is designed to resemble a spider, complete with edible legs and googly eyes, adding an element of playful fright to your Halloween celebration.
This recipe yields enough Creepy Crawly Spider Cookies to serve 4-6 people, making them perfect for a small Halloween gathering. The crunchy cookie base is complemented by a rich chocolate coating, and the addition of candy eyes and pretzel legs gives these cookies their signature creepy crawly look.
Whether you’re hosting a Halloween party or simply indulging in some festive baking with the kids, these cookies will definitely steal the show.
Ingredients (Serves 4-6):
- 1 cup all-purpose flour
- 1/2 cup unsweetened cocoa powder
- 1/2 teaspoon baking soda
- 1/4 teaspoon salt
- 1/2 cup unsalted butter, softened
- 1/2 cup granulated sugar
- 1/2 cup packed brown sugar
- 1 large egg
- 1 teaspoon vanilla extract
- 1 cup semi-sweet chocolate chips
- 24 mini pretzel sticks, broken in half
- 48 candy eyes
Instructions:
- Preheat the Oven: Begin by preheating your oven to 350°F (175°C). Line a baking sheet with parchment paper to prevent the cookies from sticking and guarantee even baking.
- Prepare Dry Ingredients: In a medium-sized bowl, whisk together the flour, cocoa powder, baking soda, and salt. This will guarantee that the dry ingredients are evenly distributed.
- Mix Wet Ingredients: In a large bowl, cream the softened butter, granulated sugar, and brown sugar together using a hand mixer or stand mixer until the mixture is light and fluffy. This should take about 3 minutes. Beat in the egg and vanilla extract until fully incorporated.
- Combine Ingredients: Gradually add the dry ingredients to the wet ingredients, mixing on low speed until just combined. Be careful not to overmix as this can make the cookies tough.
- Shape Cookies: Scoop tablespoon-sized amounts of cookie dough onto the prepared baking sheet, leaving about 2 inches between each cookie. Use your fingers to gently flatten each cookie into a disc shape.
- Add Chocolate Chips: Press a few chocolate chips into the top of each cookie. These will act as the spider’s body.
- Bake: Place the baking sheet in the preheated oven and bake for 8-10 minutes, or until the cookies are set around the edges but still soft in the center.
- Cool and Decorate: Allow the cookies to cool on the baking sheet for about 5 minutes before transferring them to a wire rack. While the cookies are still warm, gently press the broken pretzel sticks into the sides to form the spider’s legs. Add two candy eyes to each cookie using a dab of chocolate as adhesive.
- Serve: Once the cookies are completely cool, they’re ready to serve. Enjoy these spooky treats with a glass of milk or your favorite Halloween punch!
Extra Tips:
To make these Creepy Crawly Spider Cookies even more fun, let your kids get involved in the decorating process. They can help place the chocolate chips, pretzel legs, and candy eyes.
If you’re looking to add even more variety, consider using different colored candy eyes or adding a touch of edible glitter for a sparkly effect. Additionally, if you don’t have candy eyes on hand, you can use small white chocolate chips with a dot of melted chocolate for the pupils.
Remember to store any leftovers in an airtight container to keep them fresh and delicious!
Eyeball Cake Pops

Halloween is a time for spooky fun, and what better way to celebrate than with delicious Eyeball Cake Pops? These creepy and tasty treats are perfect for kids to enjoy and can add a festive touch to any Halloween party.
Easy to make and even more fun to decorate, Eyeball Cake Pops are guaranteed to be a hit with the little ones. The process involves making a simple cake pop base, dipping it in candy melts, and then adding some creative decorations to resemble eerie eyeballs looking right at you.
To start, you’ll need to bake a cake and crumble it up into fine crumbs. The crumbs are then mixed with frosting to create a moldable dough. Once you’ve rolled the mixture into balls and inserted sticks, they’re dipped in white candy melts to create a blank canvas for your spooky designs.
The fun part comes next as you use colored candy melts and edible markers to draw on bloodshot veins, pupils, and irises. Kids will love getting involved in the decorating process, adding their personal touch to each eyeball, and then seeing their creations come to life.
Ingredients for 4-6 People:
- 1 box of cake mix (flavor of your choice)
- Ingredients required for cake mix (usually eggs, oil, water)
- 1 cup of frosting (store-bought or homemade)
- 12 oz white candy melts
- 4 oz red candy melts
- 4 oz blue or green candy melts
- Edible food markers
- Lollipop sticks
- Black gel or icing for pupils
Cooking Instructions:
- Prepare the Cake: Follow the instructions on the cake mix box to bake the cake. Once baked, allow it to cool completely.
- Crumble the Cake: Break the cooled cake into fine crumbs using your hands or a food processor. Make sure there are no large pieces left.
- Mix with Frosting: Gradually add the frosting to the cake crumbs and mix until you have a dough-like consistency that holds together when formed into a ball.
- Form Cake Balls: Roll the mixture into small, even balls about the size of a golf ball. Place them on a baking sheet lined with parchment paper.
- Insert Sticks: Melt a small amount of white candy melts. Dip the tip of each lollipop stick into the melted candy, then insert it halfway into each cake ball. This will help secure the sticks.
- Chill the Cake Balls: Place the cake pops in the freezer for about 15-20 minutes to firm up.
- Melt the Candy Coating: Melt the white candy melts in a microwave-safe bowl, stirring every 30 seconds until smooth.
- Dip the Cake Pops: Remove the cake pops from the freezer. Dip each pop into the melted candy coating, ensuring it’s fully covered. Gently tap off any excess.
- Decorate: While the coating is still wet, use the red candy melts to create bloodshot veins. Allow it to set slightly, then use blue or green candy melts for the iris and black gel for the pupil. Use edible markers for additional details if desired.
- Let Set: Allow the cake pops to stand until the candy coating is completely set and hardened.
Extra Tips:
To make the process more manageable, prepare the cake a day ahead to make sure it’s completely cool before crumbling.
You can also play around with different cake flavors and candy melt colors to create a variety of spooky eyeball designs. If you don’t have edible markers, you can use various colored gels and icing to achieve similar effects.
Keep the cake pops refrigerated until you’re ready to serve them to make certain they stay firm and delicious.
Witch’s Brew Brownies
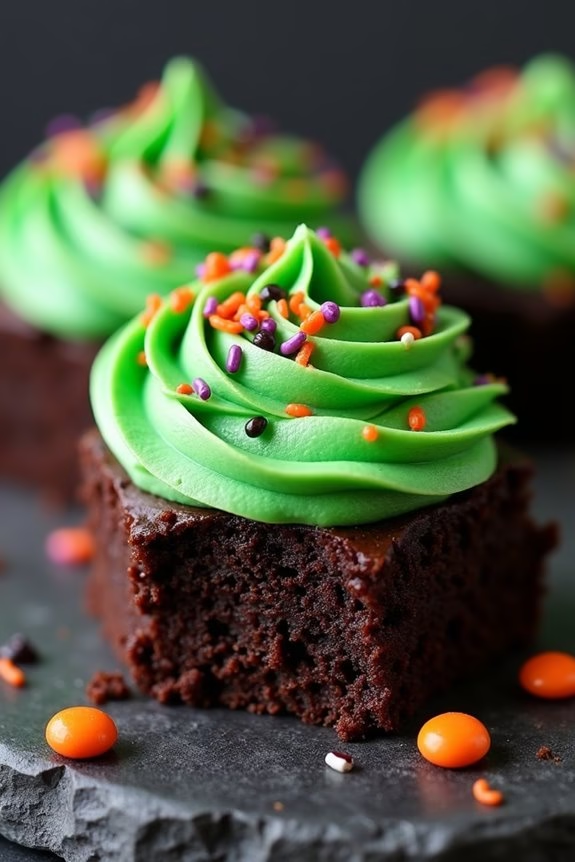
Witch’s Brew Brownies are a spooky and delightful treat perfect for Halloween festivities. These brownies aren’t only delicious but also fun to make, especially with kids. The recipe combines rich, fudgy chocolate brownies with a swirl of green “witch’s brew” frosting, creating a magical and eerie appearance.
This whimsical dessert will captivate both the taste buds and imaginations of children and adults alike, making it a must-have for any Halloween party.
The Witch’s Brew Brownies are easy to prepare and require basic ingredients, most of which you probably already have in your pantry. The recipe is designed for a serving size of 4-6 people, making it ideal for a small Halloween gathering or family treat. The gooey texture of the brownies pairs perfectly with the colorful frosting, ensuring that each bite is as enjoyable as it’s festive.
Gather the little ones, don your witches’ hats, and prepare to cast a delicious spell over your Halloween spread.
Ingredients for Witch’s Brew Brownies (serving size: 4-6 people):
- 1 cup all-purpose flour
- 1 cup granulated sugar
- 1/2 cup unsweetened cocoa powder
- 1/2 teaspoon baking powder
- 1/4 teaspoon salt
- 1/2 cup unsalted butter, melted
- 2 large eggs
- 1 teaspoon vanilla extract
- 1/4 cup milk
- 1 cup powdered sugar
- 2 tablespoons unsalted butter, softened
- 2 tablespoons milk
- Green food coloring
- Optional: Halloween-themed sprinkles or candy decorations
Cooking Instructions:
- Preheat and Prepare the Pan: Preheat your oven to 350°F (175°C). Grease an 8×8 inch baking pan or line it with parchment paper for easy removal of the brownies later.
- Mix Dry Ingredients: In a large mixing bowl, combine the flour, granulated sugar, cocoa powder, baking powder, and salt. Stir until all the dry ingredients are well combined.
- Combine Wet Ingredients: In another bowl, whisk together the melted butter, eggs, vanilla extract, and 1/4 cup milk until fully mixed.
- Combine Wet and Dry Mixtures: Gradually add the wet ingredients to the dry ingredients, stirring until you have a smooth batter with no lumps.
- Pour and Bake: Pour the brownie batter into the prepared baking pan, spreading it evenly. Bake in the preheated oven for 25-30 minutes, or until a toothpick inserted into the center comes out with a few moist crumbs.
- Prepare the Witch’s Brew Frosting: While the brownies are baking, prepare the frosting by beating together powdered sugar, 2 tablespoons of softened butter, and 2 tablespoons of milk until smooth. Add a few drops of green food coloring and mix until you achieve the desired shade of green.
- Frost and Decorate: Once the brownies are out of the oven and have cooled completely, spread the green frosting evenly over the top. Add Halloween-themed sprinkles or candy decorations if desired.
- Serve: Cut into squares and serve, revealing the spooky green witch’s brew topping on each piece.
Extra Tips:
For an extra touch of Halloween fun, use cookie cutters to cut the brownies into shapes like bats or ghosts before frosting.
If you want to enhance the flavor, consider adding a teaspoon of instant coffee granules to the brownie batter for a deeper chocolate taste. Always make sure the brownies are completely cooled before applying the frosting to prevent it from melting.
This recipe is great for involving kids in the kitchen, allowing them to help with mixing and decorating, making it an enjoyable family activity.
Ghostly Meringue Cookies
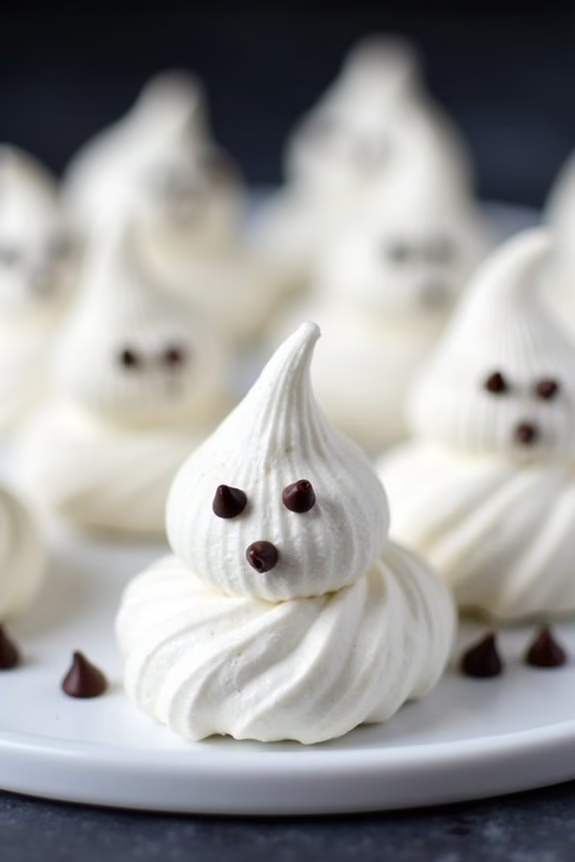
Looking for a fun and spooky treat to make with your kids this Halloween? Try these Ghostly Meringue Cookies! Perfectly light and airy, these cookies are as much fun to make as they’re to eat. Shaped like little ghosts, they’re sure to be a hit at any Halloween party or as a delightful treat at home. Plus, they’re a low-fat option that the whole family can enjoy.
These meringue cookies are made with just a few simple ingredients, making them an easy and quick baking project to do with kids. Not only will your children love shaping the meringues into ghostly figures, but they’ll also enjoy decorating them with cute little eyes and mouths. This recipe is designed to serve 4-6 people, making it perfect for a small gathering or a cozy family night in. Gather your ingredients, and let’s get started on these hauntingly delicious cookies!
Ingredients (Serves 4-6)
- 4 large egg whites
- 1 cup granulated sugar
- 1/2 teaspoon cream of tartar
- 1 teaspoon vanilla extract
- Mini chocolate chips (for decorating)
Instructions
- Preheat the Oven: Begin by preheating your oven to 225°F (110°C). Line two baking sheets with parchment paper to prevent the meringues from sticking.
- Whip the Egg Whites: In a clean, dry mixing bowl, add the egg whites. Use an electric mixer on medium speed to beat the egg whites until they become frothy.
- Add Ingredients: Gradually add the cream of tartar and continue to beat the mixture. Slowly incorporate the granulated sugar, one tablespoon at a time, while continuing to beat. This step is vital for guaranteeing the sugar dissolves properly and the meringues hold their shape.
- Whip to Stiff Peaks: Increase the mixer speed to high and whip the egg whites until stiff peaks form. You’ll know the peaks are stiff when they stand upright without collapsing when you lift the beaters. Add the vanilla extract and beat just until combined.
- Shape the Ghosts: Transfer the meringue mixture into a piping bag fitted with a large round tip. Pipe ghost shapes onto the prepared baking sheets, about 2 inches tall. You can make them as tall or short as you like, but be sure to leave some space between each ghost for even baking.
- Decorate: Gently press two mini chocolate chips into each meringue to create eyes. You can also use a toothpick to gently draw a small mouth if desired.
- Bake the Meringues: Place the baking sheets in the oven and bake for about 1.5 to 2 hours. The meringues should be crisp and dry to the touch. Turn off the oven and let the meringues cool inside with the door slightly ajar for about an hour to guarantee they dry completely.
- Serve: Once cooled, carefully remove the meringues from the parchment paper and serve them on a spooky platter for a fun Halloween treat!
Extra Tips
When making meringue, it’s essential to guarantee that your mixing bowl and beaters are completely clean and free from any grease or residue, as this can prevent the egg whites from whipping properly.
It’s also important to add the sugar slowly and gradually to avoid deflating the meringue. If you find that your ghosts are browning too much in the oven, you can lower the temperature slightly and extend the cooking time.
Finally, be patient while cooling; meringues are delicate and need time to set properly. Enjoy your ghostly creations!
Slime-filled Doughnuts
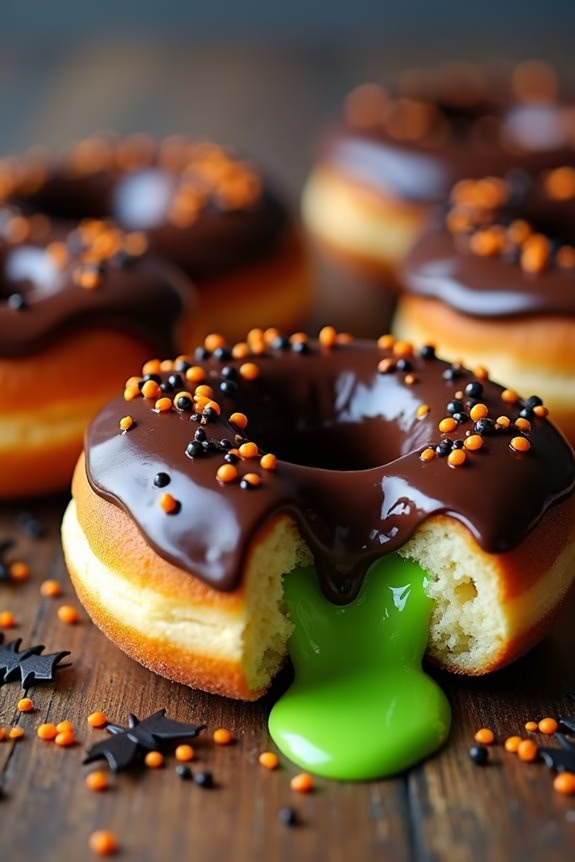
Get ready to delight and spook your kids this Halloween with these delicious and gooey slime-filled doughnuts! These treats aren’t only fun to make but also a perfect way to engage kids in the kitchen. The doughnuts are soft and fluffy, coated with a sweet chocolate glaze, and filled with a tangy and vibrant green “slime” that oozes out with every bite. This recipe provides an exciting twist on traditional doughnuts, making them an ideal dessert for your Halloween celebrations.
These slime-filled doughnuts are designed to serve 4-6 people, making them perfect for a small party or family gathering. The recipe uses basic ingredients that you probably already have in your pantry, and the slime filling is made using simple ingredients, ensuring a hassle-free baking experience. Whether you’re a seasoned baker or a novice, this recipe is straightforward and fun to follow, ensuring that your Halloween party is a hit with both kids and adults.
Ingredients:
- 2 cups all-purpose flour
- 1/2 cup granulated sugar
- 2 teaspoons baking powder
- 1/2 teaspoon salt
- 1/2 cup milk
- 1/4 cup unsalted butter, melted
- 2 large eggs
- 1 teaspoon vanilla extract
- 1/2 cup chocolate chips (for glaze)
- 1/4 cup heavy cream (for glaze)
- 1/2 cup lime-flavored gelatin mix (for slime)
- 1 cup water
- Green food coloring
Cooking Instructions:
- Prepare the Doughnut Batter: In a large bowl, whisk together the flour, sugar, baking powder, and salt. In a separate bowl, combine the milk, melted butter, eggs, and vanilla extract. Gradually add the wet ingredients to the dry ingredients, stirring until just combined and smooth.
- Bake the Doughnuts: Preheat your oven to 375°F (190°C). Lightly grease a doughnut pan. Spoon the batter into the prepared pan, filling each cavity about 3/4 full. Bake for 10-12 minutes or until the doughnuts spring back when touched lightly. Allow them to cool in the pan for a few minutes before transferring to a wire rack to cool completely.
- Make the Slime Filling: In a small saucepan, combine the lime-flavored gelatin mix with 1 cup of water. Heat over medium heat, stirring constantly until the gelatin is fully dissolved. Add a few drops of green food coloring to enhance the slime effect. Let the mixture cool slightly until it thickens but is still pourable.
- Fill the Doughnuts: Once the doughnuts are completely cool, use a piping bag fitted with a small round tip to inject the slime filling into the doughnuts. Insert the tip into the side of each doughnut and gently squeeze to fill.
- Prepare the Chocolate Glaze: In a small saucepan, heat the heavy cream over medium heat until it begins to simmer. Remove from heat and add the chocolate chips, stirring until smooth and glossy. Dip the top of each doughnut into the glaze and place them back on the wire rack to set.
- Serve: Allow the glaze to set slightly before serving. You can add some Halloween-themed sprinkles on top for extra decoration if desired.
Extra Tips:
To make these slime-filled doughnuts even more festive, consider using different colored gelatin mixes or food coloring to create a variety of slime fillings. You can also experiment with different flavors of doughnuts and glazes to match your Halloween theme.
If you don’t have a doughnut pan, you can use a muffin pan and simply cut out the centers after baking to achieve a similar effect. Remember to store any leftover doughnuts in an airtight container to keep them fresh and gooey for the next day.
Pumpkin Patch Rice Krispie Treats
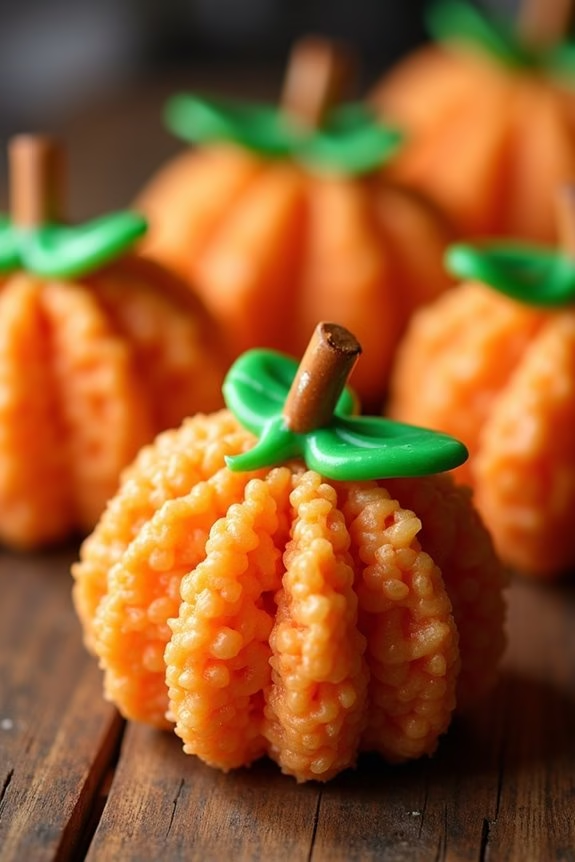
Delight your little ones this Halloween with a fun and festive treat that combines the classic crunch of Rice Krispie treats with the playful charm of a pumpkin patch. Pumpkin Patch Rice Krispie Treats aren’t only delicious but also a creative project for kids to enjoy.
These treats are perfect for Halloween parties, classroom events, or simply as a spooky snack at home. With a few simple ingredients and some creativity, you can transform ordinary Rice Krispie treats into a delightful pumpkin patch that will impress kids and adults alike.
This recipe yields approximately 12-16 Pumpkin Patch Rice Krispie Treats, making it perfect for a small gathering or a family treat night. Kids will love helping out with the shaping and decorating of these cute little pumpkins. Set aside some time to craft these treats together, turning your kitchen into a Halloween workshop full of sugary fun.
Ingredients (serves 4-6 people):
- 3 tablespoons unsalted butter
- 1 package (10 oz) mini marshmallows
- 6 cups Rice Krispies cereal
- Red and yellow food coloring
- 1 cup green candy melts or green frosting
- Pretzel sticks or Tootsie Roll candies (for stems)
- Green frosting or icing (for leaves)
Cooking Instructions:
- Prepare the Base: Start by melting the butter in a large saucepan over low heat. Once melted, add the mini marshmallows, stirring continuously until they’re completely melted and the mixture is smooth.
- Add Color: After removing the saucepan from heat, add a few drops of red and yellow food coloring to achieve a bright orange color, reminiscent of pumpkins. Stir well until the color is evenly distributed.
- Mix with Cereal: Gradually add the Rice Krispies cereal to the melted marshmallow mixture. Stir until all the cereal is well-coated with the orange marshmallow mixture.
- Shape the Pumpkins: Once the mixture is cool enough to handle, lightly grease your hands with butter or cooking spray. Shape the mixture into small pumpkin-sized balls, about the size of a golf ball. Place them on a wax paper-lined tray to set.
- Add Stems: While the pumpkin balls are setting, break pretzel sticks into halves or thirds, or cut small pieces of Tootsie Roll candies. Insert one into the top of each pumpkin to serve as a stem.
- Decorate with Leaves: Melt the green candy melts according to the package instructions or use green frosting. Use a piping bag or a small spoon to add a small leaf design next to each stem. Alternatively, use green icing to pipe leaves directly onto the pumpkins.
- Set and Serve: Allow the pumpkins to set completely at room temperature. Once set, arrange them on a serving platter to resemble a pumpkin patch, and enjoy!
Extra Tips:
For an easier cleanup, line your work surfaces with parchment or wax paper before starting. If you’re working with kids, consider letting them shape the pumpkins with lightly greased hands to prevent sticking.
You can also use flavored marshmallows or add a few drops of vanilla extract for a different taste. If you want to get more creative, use candy eyes or other small candies to add faces to your pumpkins for a spookier treat.
Mummy Wrapped Hot Dogs
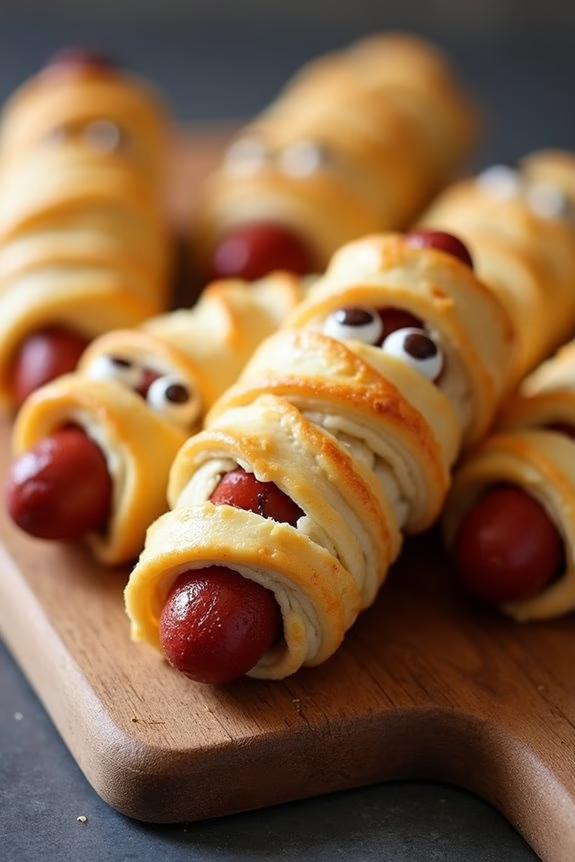
Mummy Wrapped Hot Dogs are a fun and spooky Halloween treat that kids will love. This creative twist on a classic dish is easy to make and perfect for little hands to help prepare. By wrapping hot dogs in crescent roll dough to resemble mummies, you can create a festive and delicious snack that’s certain to be a hit at your Halloween gathering.
Not only are these mummy hot dogs visually appealing, but they’re also a tasty treat that combines the savory flavor of hot dogs with the buttery crust of crescent rolls.
This recipe is designed to serve 4-6 people, making it perfect for a small Halloween party or family gathering. You can easily double the recipe to accommodate a larger group. The fun part about making Mummy Wrapped Hot Dogs is that you can get creative with the decorations, using ketchup, mustard, or edible eyes to give each mummy its own unique expression.
Whether you’re looking to entertain kids or just want a festive snack for Halloween night, these mummy hot dogs are sure to delight.
Ingredients (Serves 4-6):
- 1 can (8 oz) refrigerated crescent roll dough
- 8 hot dogs
- 1 tablespoon all-purpose flour (for dusting the work surface)
- 1 tablespoon melted butter (optional, for brushing)
- Ketchup or mustard (optional, for decoration)
- Edible candy eyes (optional)
Cooking Instructions:
- Preheat the oven: Start by preheating your oven to 375°F (190°C). This will guarantee your mummy hot dogs cook evenly once they’re ready to bake.
- Prepare the dough: Unroll the crescent roll dough on a lightly floured surface. Use a rolling pin to flatten it slightly, then cut the dough into thin strips about 1/4 inch wide.
- Wrap the hot dogs: Take each hot dog and wrap the dough strips around it, leaving a small gap near one end for the face. You can wrap the dough randomly to create a mummy-like appearance, leaving some gaps so the hot dog peeks through.
- Arrange on baking sheet: Place the wrapped hot dogs on a baking sheet lined with parchment paper. Make sure to space them out evenly so they cook thoroughly and don’t stick together.
- Brush with butter: If desired, brush a light layer of melted butter over the dough for a golden, crispy finish.
- Bake: Place the baking sheet in the preheated oven and bake for 12-15 minutes, or until the crescent roll dough is golden brown.
- Decorate: Once out of the oven, let the mummy hot dogs cool slightly. Use ketchup or mustard to draw faces on each mummy, or attach edible candy eyes for a fun touch.
Extra Tips:
For a more flavorful twist, you can sprinkle the crescent roll dough with a bit of garlic powder or grated cheese before wrapping the hot dogs. If you’re using cheese, be careful not to overdo it, as it can leak out while baking.
Feel free to experiment with different types of sausages instead of traditional hot dogs, like chicken or turkey dogs, for a healthier option. Mummy Wrapped Hot Dogs can be served with a variety of dipping sauces such as mustard, ketchup, or barbecue sauce, making them even more enjoyable for kids.
Frankenstein Marshmallow Pops
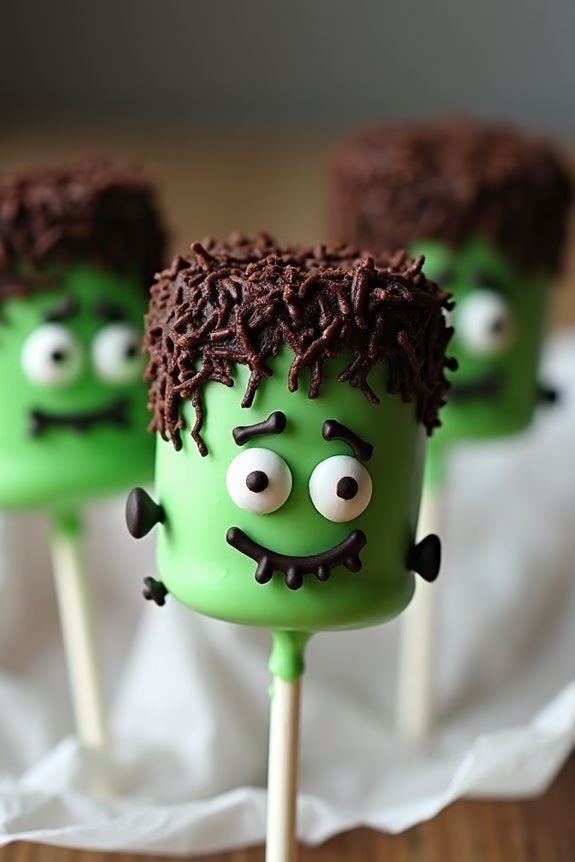
Are you looking for a spooky yet fun treat to make with your kids this Halloween? Frankenstein Marshmallow Pops are the perfect concoction! These adorable green monster pops are easy to make and a delightful addition to any Halloween party. With their playful design, they’re sure to capture the imaginations of both children and adults alike.
Plus, they offer a sweet and satisfying treat that balances marshmallow fluffiness with a crunchy candy coating. Gather your little monsters and prepare to release your creativity in the kitchen. The process of making these pops involves dipping marshmallows in vibrant green candy melts, decorating them with candy eyes, and adding fun hair and facial expressions.
This recipe makes enough for 4-6 people, guaranteeing there are plenty of Frankenstein Marshmallow Pops to go around.
Ingredients:
- 12 large marshmallows
- 1 cup green candy melts
- 12 lollipop sticks
- 24 candy eyes
- 1/4 cup black decorating gel
- 1/4 cup chocolate sprinkles
- 1/4 cup mini chocolate chips
- 2 tablespoons vegetable oil
Cooking Instructions:
- Prepare the Workspace: Line a baking sheet with parchment paper. This will be where you place the finished pops to set, keeping your workspace clean and organized.
- Melt the Candy: In a microwave-safe bowl, combine the green candy melts and vegetable oil. Heat in the microwave in 30-second intervals, stirring between each, until completely melted and smooth. This will create the vibrant green coating for your Frankenstein Pops.
- Assemble the Pops: Insert a lollipop stick into each marshmallow, making sure it’s secure but not poking through the top.
- Dip the Marshmallows: Hold a marshmallow by the stick and dip it into the melted candy, fully coating it. Allow excess candy to drip back into the bowl before placing the marshmallow upright on the prepared baking sheet.
- Add Eyes and Hair: While the candy coating is still wet, press two candy eyes onto each marshmallow. For Frankenstein’s hair, dip the top of the coated marshmallow in chocolate sprinkles or mini chocolate chips, pressing gently so they adhere.
- Create Facial Features: Using black decorating gel, draw a mouth and stitches on the face of each Frankenstein. Get creative with expressions to bring your marshmallow monsters to life.
- Set and Serve: Allow the pops to set at room temperature or speed up the process by placing them in the fridge for about 15 minutes. Once set, your Frankenstein Marshmallow Pops are ready to be enjoyed!
Extra Tips:
For the best results, make sure the candy melts are completely smooth before dipping the marshmallows; any lumps can affect the coating. If the candy melts start to harden while you’re working, simply reheat them in the microwave for a few seconds.
When decorating, use a toothpick to help position the candy eyes or to fix any gel mishaps. These pops are versatile, so feel free to experiment with different colors or decorations to personalize your Frankenstein creations!
Batty Chocolate Bark

Halloween is the perfect time to get creative in the kitchen, and Batty Chocolate Bark is a spooktacular treat that kids will love both making and eating. This simple and fun recipe allows children to participate in the kitchen while producing a deliciously eerie snack that’s sure to be a hit at any Halloween gathering.
The combination of rich chocolate, crunchy toppings, and cute bat decorations makes this bark both visually appealing and deliciously irresistible. The best part about Batty Chocolate Bark is that it’s highly customizable, allowing you to adjust the toppings based on what you have on hand or what your little ones prefer.
Whether you’re hosting a Halloween party or simply looking for a fun family activity, this recipe is a wonderful way to engage kids in the holiday spirit while creating a tasty treat. This recipe serves 4-6 people, making it perfect for sharing with friends and family.
Ingredients:
- 16 oz semisweet chocolate chips
- 1/2 cup white chocolate chips
- 1/4 cup pretzel sticks, broken into pieces
- 1/4 cup candy eyes
- 1/4 cup assorted Halloween sprinkles
- 1/4 cup sliced almonds (for bat wings)
- Black food coloring
Instructions:
- Prepare the Baking Sheet: Line a baking sheet with parchment paper. This will prevent the chocolate from sticking and make clean-up a breeze.
- Melt the Semisweet Chocolate: In a microwave-safe bowl, heat the semisweet chocolate chips in 30-second intervals, stirring after each interval, until fully melted and smooth. Be careful not to overheat the chocolate.
- Spread the Chocolate: Pour the melted semisweet chocolate onto the prepared baking sheet. Use a spatula to spread it into an even layer, about 1/4 inch thick.
- Melt the White Chocolate: In another microwave-safe bowl, melt the white chocolate chips in 15-second intervals, stirring until smooth. Add a few drops of black food coloring and mix until evenly colored.
- Create Bat Decorations: Using a spoon, drizzle the black-tinted white chocolate over the semisweet chocolate layer to create bat shapes. Use a toothpick to help define the wings and body.
- Add Toppings: While the chocolate is still melted, scatter the pretzel pieces, candy eyes, and Halloween sprinkles over the chocolate. Place sliced almonds on the bat shapes to form the wings.
- Chill the Bark: Transfer the baking sheet to the refrigerator and let it chill for about 30 minutes, or until the chocolate is fully set.
- Break into Pieces: Once set, remove the bark from the refrigerator and break it into pieces. Serve immediately or store in an airtight container.
Extra Tips:
For even more fun, let the kids use their imagination to create different spooky shapes and designs with the chocolate. If you don’t have candy eyes, mini chocolate chips or small candy pieces can be used as substitutes.
Make sure to supervise younger children when working with melted chocolate to avoid any accidental burns. Adjust the toppings according to your taste; crushed cookies, nuts, or dried fruits can add extra flavor and texture to your Batty Chocolate Bark.