
Hey there, lovely readers!
With Halloween just around the corner, it’s time to whip up some spooktacular appetizers for your adults-only bash.
Think Devilish Deviled Eggs and Vampire Bat Wings that are as tasty as they are frightful.
Your guests will be both thrilled and enchanted by these chillingly delicious creations.
Let’s get into the Halloween spirit and conjure up some wickedly delightful treats together!
Devilish Deviled Eggs

Halloween is the perfect time to dazzle your guests with spooky and delicious treats, and what better way to do so than with Devilish Deviled Eggs? These tantalizing bites are a twisted take on the classic deviled egg, infused with a dash of heat and a touch of mischief. The creamy yolk filling is amped up with spicy ingredients, while the presentation adds an eerie flair to your Halloween party spread.
Whether you’re hosting a small gathering or a larger soirée, this dish promises to delight and thrill your adult guests. The key to making these Devilish Deviled Eggs a hit is the balance of flavors and the fun, thematic presentation. The vibrant orange of the yolk mixture, speckled with red pepper flakes and paprika, creates a fiery appearance that matches its bold taste.
Garnished with black olives or capers to mimic devil horns or creepy eyes, these eggs will surely steal the spotlight on your appetizer table. Here’s how to make a batch that serves 4-6 people:
Ingredients:
- 12 large eggs
- 1/2 cup mayonnaise
- 2 teaspoons Dijon mustard
- 1 tablespoon white vinegar
- 1 teaspoon hot sauce
- 1/4 teaspoon cayenne pepper
- 1/2 teaspoon smoked paprika
- Salt and black pepper to taste
- 2 tablespoons finely chopped chives
- Black olives or capers for garnish
Instructions:
- Boil the Eggs: Place the eggs in a single layer in a large saucepan. Cover them with water, about an inch above the eggs. Bring to a boil over medium-high heat. Once boiling, cover the pan and remove it from the heat. Let the eggs sit for 10-12 minutes for perfectly hard-boiled eggs.
- Cool and Peel: Transfer the eggs to an ice bath to cool completely. Once cooled, gently tap the eggs on a hard surface to crack the shell and peel under running water for ease.
- Prepare the Filling: Slice the eggs in half lengthwise and carefully scoop out the yolks into a mixing bowl. Arrange the egg whites on a serving platter.
- Mix the Yolk Mixture: Mash the yolks with a fork. Add the mayonnaise, Dijon mustard, white vinegar, hot sauce, cayenne pepper, smoked paprika, salt, and black pepper. Mix until smooth and creamy. Adjust seasoning to taste.
- Fill the Egg Whites: Use a piping bag or a spoon to fill the egg white halves with the yolk mixture. Be generous with the filling to create a mounded effect.
- Garnish: Slice black olives or use capers to create spooky designs on top of the filled eggs. These can resemble devil horns or eerie eyes for added Halloween flair.
- Chill and Serve: Refrigerate the deviled eggs for at least 30 minutes before serving to allow the flavors to meld and the filling to firm up slightly.
Extra Tips:
For an even spookier presentation, consider adding a few drops of red food coloring to the yolk mixture for an intense fiery appearance. If you prefer less heat, adjust the cayenne pepper and hot sauce to your liking, or alternatively, offer a milder version alongside the spicy ones for variety.
When boiling the eggs, confirm they aren’t overcooked to avoid a greenish hue around the yolk. This dish is best served chilled, so prepare them ahead of time and store them in the refrigerator until your guests arrive.
Ghostly Gouda Bites

Ghostly Gouda Bites are the ultimate Halloween appetizer for adults, blending the smooth, nutty flavor of gouda cheese with a spooky presentation. Perfect for a Halloween gathering, these bite-sized delights will enchant your guests and delight their taste buds. The creamy gouda is paired with a touch of spice and a crispy exterior, making them an irresistible treat.
As a fun and festive addition to any Halloween party, these Ghostly Gouda Bites are as delicious as they’re fun to make. This recipe is designed to serve 4-6 people, making it ideal for intimate gatherings or as an addition to a larger spread. With just a few simple ingredients, you can create a dish that not only looks impressive but also packs a flavorful punch.
The combination of melted gouda and a crispy coating creates a texture contrast that’s sure to be a hit. Add a dash of creativity with your presentation, and you’ll have an appetizer that fits perfectly with the Halloween theme.
Ingredients:
- 1 ½ cups of shredded gouda cheese
- 1 cup of all-purpose flour
- 2 eggs, beaten
- 1 cup of panko breadcrumbs
- 1 tsp of smoked paprika
- ½ tsp of cayenne pepper
- ½ tsp of garlic powder
- Salt and pepper to taste
- Vegetable oil for frying
- Fresh parsley, for garnish
Instructions:
- Prepare the Cheese Mixture: In a large mixing bowl, combine the shredded gouda cheese, smoked paprika, cayenne pepper, garlic powder, salt, and pepper. Mix thoroughly until the spices are evenly distributed throughout the cheese.
- Set Up a Breading Station: Arrange three shallow bowls or plates. Place the flour in the first, the beaten eggs in the second, and the panko breadcrumbs in the third. This setup will help streamline the breading process.
- Form the Cheese Bites: Take small amounts of the cheese mixture and roll them into balls about the size of a walnut. This should yield approximately 18-24 bites, depending on the size.
- Coat the Cheese Bites: Roll each cheese ball in the flour, making sure it’s completely coated. Dip it in the beaten eggs, allowing any excess to drip off, then roll it in the panko breadcrumbs to coat completely.
- Heat the Oil: Pour vegetable oil into a deep frying pan, filling it to about 1 inch deep. Heat the oil over medium-high heat until it reaches 350°F (175°C), or until a small piece of bread dropped in the oil sizzles and turns golden brown within a minute.
- Fry the Cheese Bites: Carefully place the coated cheese balls into the hot oil, frying in batches to avoid overcrowding. Fry them for about 2-3 minutes, or until they’re golden brown and crispy on the outside.
- Drain and Serve: Using a slotted spoon, remove the fried cheese bites from the oil and place them on a paper towel-lined plate to drain any excess oil. Garnish with fresh parsley before serving warm.
Extra Tips:
For a spookier presentation, you can serve the Ghostly Gouda Bites on a platter lined with black napkins or a decorative Halloween-themed tray. If you want to make them ahead of time, you can prepare the cheese balls and freeze them before frying.
When you’re ready to serve, simply fry them directly from the freezer, adding an extra minute or two to the frying time. Adjust the seasoning level to your taste, especially if you prefer a milder or spicier bite. Enjoy these cheesy delights with your favorite dipping sauce for an added flavor dimension.
Vampire Bat Wings

Vampire Bat Wings are a spooky and delicious appetizer perfect for an adult Halloween gathering. This dish transforms regular chicken wings into a creepy culinary masterpiece by using a dark and tangy glaze that brings out the Halloween spirit. With a combination of savory and sweet flavors, these wings are sure to be a hit at your next party.
The dish isn’t only visually striking but also offers a delightful taste that will leave your guests craving more. To achieve the dark, bat-like appearance, these wings are coated in a soy sauce and balsamic vinegar mixture, which gives them their unique color and flavor. They’re then baked to perfection, resulting in a crispy exterior and a tender, juicy interior.
This recipe serves 4-6 people and is perfect for a small gathering or as a part of a larger buffet. Whether you’re hosting a Halloween bash or simply enjoying the spooky season, these Vampire Bat Wings will add a fun and tasty element to your festivities.
Ingredients (serves 4-6):
- 2 lbs chicken wings
- 1/2 cup soy sauce
- 1/4 cup balsamic vinegar
- 1/4 cup honey
- 2 tablespoons olive oil
- 1 tablespoon minced garlic
- 1 teaspoon smoked paprika
- 1/2 teaspoon black pepper
- 1/4 teaspoon cayenne pepper
- 1 tablespoon fresh lemon juice
- Fresh parsley, chopped (for garnish)
Instructions:
- Prepare the Marinade: In a large mixing bowl, combine the soy sauce, balsamic vinegar, honey, olive oil, minced garlic, smoked paprika, black pepper, cayenne pepper, and lemon juice. Whisk together until all the ingredients are well incorporated.
- Marinate the Wings: Add the chicken wings to the bowl with the marinade. Toss the wings to confirm they’re fully coated with the mixture. Cover the bowl with plastic wrap and refrigerate for at least 2 hours, or overnight if possible, to allow the flavors to seep into the meat.
- Preheat the Oven: Preheat your oven to 400°F (200°C). Line a baking sheet with aluminum foil for easy cleanup and place a wire rack on top. This will allow the wings to cook evenly and become crispy.
- Bake the Wings: Arrange the marinated chicken wings on the wire rack in a single layer. Bake in the preheated oven for 25-30 minutes. Flip the wings halfway through the cooking time to confirm they cook evenly on both sides.
- Finish and Serve: Once the wings are cooked through and have a dark, caramelized appearance, remove them from the oven. Let them rest for a few minutes before transferring to a serving platter. Garnish with chopped fresh parsley for a touch of color.
Extra Tips: For an extra kick of flavor, consider adding a splash of hot sauce to the marinade. If you prefer a sweeter glaze, increase the amount of honey. To confirm the wings are extra crispy, make sure they’re patted dry with paper towels before marinating. This helps the glaze adhere better and results in a crispier texture.
Finally, always use a meat thermometer to check that the internal temperature of the wings reaches at least 165°F (74°C) for safe consumption.
Spooky Stuffed Mushrooms

Spooky Stuffed Mushrooms are the perfect Halloween appetizer for adults looking to add a touch of eerie elegance to their spooky soiree. These bite-sized delights combine the earthiness of mushrooms with a rich, creamy filling, creating a hauntingly delicious treat that’s both sophisticated and satisfying. The best part? They’re easy to prepare and guaranteed to impress your guests with their ghoulishly good flavor.
The key to these Spooky Stuffed Mushrooms lies in the combination of textures and flavors. The mushrooms provide a tender, juicy base, while the filling, made with cream cheese, garlic, and herbs, offers a smooth and savory contrast. Topped with a sprinkle of breadcrumbs and Parmesan cheese, these morsels are baked to golden perfection, creating a crunchy exterior that gives way to a luscious, melt-in-your-mouth center. Serve them hot and watch them disappear faster than a ghost at midnight!
Ingredients (Serves 4-6):
- 16 large button mushrooms
- 8 oz cream cheese, softened
- 1/4 cup grated Parmesan cheese
- 2 cloves garlic, minced
- 1/4 cup chopped fresh parsley
- 1/4 cup chopped green onions
- 1/2 teaspoon dried thyme
- Salt and pepper to taste
- 1/4 cup breadcrumbs
- 2 tablespoons olive oil
Instructions:
- Preheat the Oven: Start by preheating your oven to 375°F (190°C). This guarantees that the mushrooms cook evenly and the filling bakes to a perfect consistency.
- Prepare the Mushrooms: Clean the mushrooms by wiping them with a damp paper towel. Carefully remove the stems and set them aside. Place the mushroom caps on a baking sheet lined with parchment paper.
- Make the Filling: In a mixing bowl, combine the softened cream cheese, Parmesan cheese, minced garlic, chopped parsley, chopped green onions, dried thyme, salt, and pepper. Mix until all ingredients are well combined and you have a smooth, uniform filling.
- Stuff the Mushrooms: Using a small spoon or piping bag, fill each mushroom cap with the cream cheese mixture. Be generous with the filling, ensuring each cap is well-stuffed.
- Add a Crunchy Topping: In a small bowl, mix the breadcrumbs with olive oil until the breadcrumbs are lightly coated. Sprinkle a bit of this mixture on top of each stuffed mushroom, pressing it down gently to adhere.
- Bake: Place the baking sheet in the preheated oven and bake the mushrooms for 20-25 minutes, or until the tops are golden brown and the mushrooms are cooked through.
- Serve: Remove the mushrooms from the oven and let them cool slightly before serving. Arrange them on a platter, and garnish with additional parsley for a festive touch.
Extra Tips:
For an extra layer of flavor, consider adding crumbled bacon or finely chopped sun-dried tomatoes to the filling. This will provide a smoky or tangy note that complements the creamy cheese mixture beautifully.
Additionally, if you prefer a spicier kick, a pinch of red pepper flakes can be incorporated into the filling. Remember to handle the mushrooms gently to avoid tearing, and use fresh, firm mushrooms for the best results.
Enjoy your Spooky Stuffed Mushrooms as a standout appetizer at your Halloween gathering!
Mummified Brie
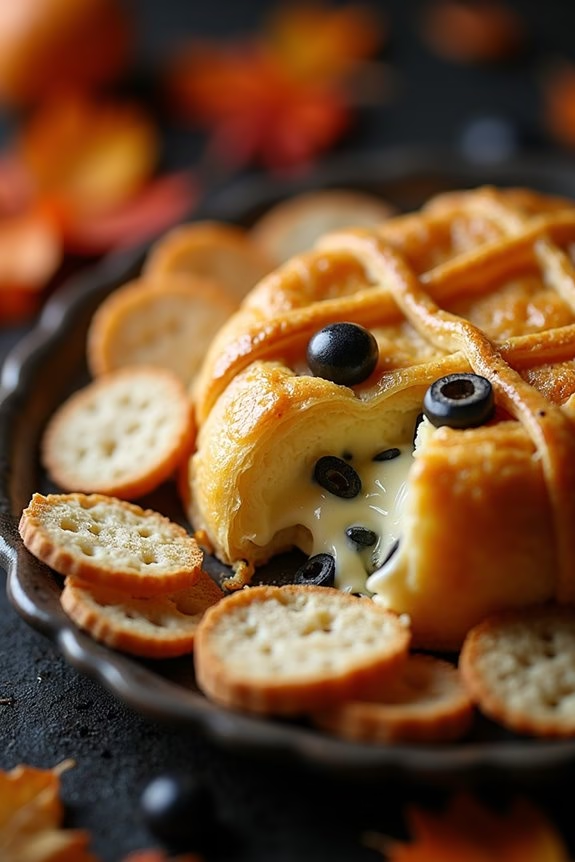
Elevate your Halloween appetizer game with Mummified Brie, a playful yet sophisticated dish perfect for an adult gathering. This spooky twist on the classic baked brie involves wrapping the cheese in flaky puff pastry to resemble a mummy, complete with olive eyes. While it may look eerie, the rich and creamy brie paired with the buttery pastry will leave your guests enchanted.
Whether you’re hosting a haunted dinner party or simply enjoying a cozy evening with friends, this dish is certain to be a hit. The preparation for Mummified Brie not only delights the taste buds but also provides a fun activity for you and your guests. It requires minimal ingredients and effort, making it an ideal choice for busy hosts.
As the brie melts inside its golden pastry sarcophagus, it creates a gooey, delicious center that pairs wonderfully with sweet or savory accompaniments like fruit preserves, honey, or nuts. Serve this dish with a selection of crackers or sliced baguette, and watch it become the star of your Halloween spread.
Ingredients (serving size: 4-6 people):
- 1 wheel of brie cheese (approximately 8 ounces)
- 1 sheet of puff pastry, thawed
- 1 egg
- 1 tablespoon water
- 2 black olives (for eyes)
- Optional: fruit preserves, honey, or nuts for serving
Instructions:
- Preheat the Oven: Start by preheating your oven to 375°F (190°C) to make sure it’s ready for the baking process.
- Prepare the Puff Pastry: Unroll the thawed puff pastry on a lightly floured surface. Use a rolling pin to gently roll it out to make certain it’s large enough to completely wrap the brie.
- Wrap the Brie: Place the wheel of brie in the center of the puff pastry. Fold the edges of the pastry over the top of the brie, sealing any gaps to keep the cheese contained as it bakes. You can trim any excess pastry and set aside for later use.
- Create the Mummy Effect: With the excess pastry, cut thin strips to resemble bandages. Gently drape these strips across the wrapped brie in a crisscross pattern, leaving a small gap where you’ll place the olive eyes.
- Add the Eyes: Slice the black olives into small rounds and place them in the gap left between the pastry strips to create the eyes of the mummy.
- Egg Wash: In a small bowl, whisk together the egg and water to create an egg wash. Brush this mixture over the entire surface of the pastry to give it a golden, glossy finish once baked.
- Bake: Place the wrapped brie on a baking sheet lined with parchment paper. Bake in the preheated oven for 20-25 minutes, or until the pastry is golden brown and crisp.
- Serve: Allow the Mummified Brie to cool for a few minutes before serving. This will help the cheese to set slightly, making it easier to slice. Serve with crackers or sliced baguette, along with optional fruit preserves, honey, or nuts.
Extra Tips:
When working with puff pastry, keep it cool but pliable to prevent it from becoming too sticky. If the pastry becomes too warm, return it to the refrigerator for a few minutes before proceeding.
Additionally, be sure to seal the edges well to prevent the cheese from leaking out during baking. For an added festive touch, use a small cookie cutter to cut shapes out of the excess pastry and bake them alongside your brie for decorative accents.
Enjoy your Mummified Brie as part of a Halloween appetizer spread, pairing it with a crisp white wine or a sparkling cider for a delightful culinary experience.
Witch’s Finger Breadsticks

Halloween is the perfect time to get creative with your appetizers, and what better way to spook your adult guests than with a plate of Witch’s Finger Breadsticks? These eerie breadsticks aren’t only a visual treat but also a delicious addition to any Halloween party spread. Shaped like creepy witch’s fingers, they’re sure to add an element of fun and fright to your gathering.
With just the right blend of bread, herbs, and a touch of spookiness, these breadsticks are the perfect way to kick off your Halloween festivities.
The beauty of Witch’s Finger Breadsticks lies in their simplicity. They’re easy to make and require just a few basic ingredients that you might already have in your pantry. Whether you’re a seasoned cook or a kitchen novice, you’ll find this recipe straightforward and rewarding.
The key to these spooky breadsticks is in the details—making them look as realistic as possible with almond “nails” and a bit of creative shaping. Serve them with a side of marinara or a cheese dip for a deliciously chilling experience.
Ingredients for 4-6 people:
- 1 package refrigerated breadstick dough (approx. 12 breadsticks)
- 24 whole almonds
- 1 egg
- 1 tablespoon water
- 1 teaspoon dried oregano
- 1 teaspoon garlic powder
- Red food coloring (optional)
- Marinara sauce or cheese dip for serving
Cooking Instructions:
- Preheat the Oven: Start by preheating your oven to 375°F (190°C). Preparing the oven ahead guarantees it reaches the right temperature for evenly baked breadsticks.
- Prepare the Egg Wash: In a small bowl, whisk together the egg and water to create an egg wash. This will help the almonds stick to the dough and give the breadsticks a nice golden finish.
- Shape the Fingers: Roll out each piece of breadstick dough into a thin, elongated shape resembling a finger. Press lightly to make knuckle marks and use a knife to create small lines for a realistic effect.
- Attach Almond Nails: Place an almond at the tip of each breadstick to act as the “nail.” Press gently to make certain it sticks, using a bit of egg wash if necessary.
- Season the Breadsticks: Lightly brush each breadstick with the egg wash. Then, sprinkle them with oregano and garlic powder to add flavor and a realistic, textured look.
- Add Bloody Detail (Optional): If desired, use a small brush or toothpick to apply red food coloring around the almond to mimic blood, enhancing the spooky effect.
- Bake: Place the breadsticks on a baking sheet lined with parchment paper. Bake in the preheated oven for 12-15 minutes or until golden brown.
- Serve: Once baked, allow the breadsticks to cool slightly. Serve with marinara sauce or a cheese dip for dipping.
Extra Tips:
For even more realistic Witch’s Finger Breadsticks, try using green food coloring in the egg wash for a sickly skin tone. You can also use a variety of herbs for different flavor profiles—rosemary or thyme can add a nice earthy touch.
If you want to make them ahead of time, shape and prepare the breadsticks, then refrigerate until you’re ready to bake. This recipe is very versatile, so feel free to experiment with different toppings and dips to suit your personal taste and party theme.
Creepy Caprese Skewers
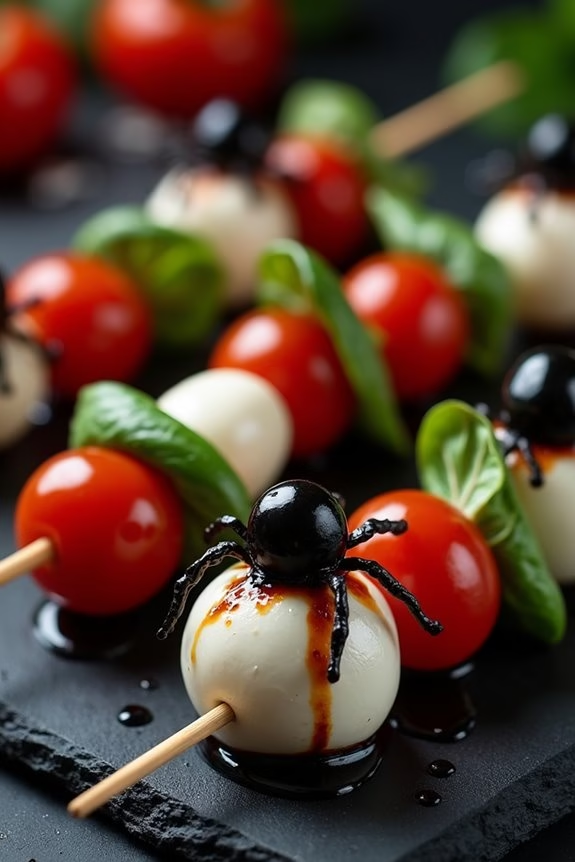
Creepy Caprese Skewers are the perfect Halloween appetizer for adults who want to enjoy a sophisticated yet spooky treat. These skewers take the classic flavors of a Caprese salad and give them a ghoulish twist, making them an ideal addition to any Halloween party spread. The combination of fresh mozzarella, ripe cherry tomatoes, and fragrant basil leaves is elevated with a drizzle of balsamic glaze, while the presentation is designed to delight and slightly frighten your guests with its eerie appearance.
The key to these Creepy Caprese Skewers is in the creative presentation. By using black olives to create the illusion of spider-like creatures and strategically placing them on the skewers, you can transform a simple appetizer into a festive Halloween dish. The vivid colors of the tomatoes and basil against the pale mozzarella provide a striking contrast, enhancing the spooky theme.
These skewers aren’t only visually appealing but also a delicious bite-sized treat that captures the essence of the season.
Ingredients (Serves 4-6):
- 24 cherry tomatoes
- 24 fresh basil leaves
- 24 mini mozzarella balls
- 12 black olives
- 12 bamboo skewers
- Balsamic glaze
- Salt and pepper to taste
Instructions:
- Prepare the Ingredients: Start by washing the cherry tomatoes and basil leaves thoroughly. Pat them dry to remove any excess moisture. Drain the mini mozzarella balls and set them aside in a bowl.
- Slice the Olives: Cut each black olive in half lengthwise. These olive halves will be used to create the “spider” effect on the skewers, so try to keep the halves intact.
- Assemble the Skewers: Take a bamboo skewer and begin by threading a cherry tomato, followed by a basil leaf, and then a mozzarella ball. Repeat this sequence, adding another cherry tomato, basil leaf, and mozzarella ball.
- Add the Creepy Touch: Once the basic skewer is assembled, take an olive half and place it on top of the mozzarella ball at the end of the skewer, using it as the “spider’s body.” Repeat for each skewer.
- Season and Drizzle: Lightly season each skewer with salt and pepper. Finish by drizzling balsamic glaze over the skewers for a touch of sweetness and tang.
- Presentation: Arrange the skewers on a serving platter in a way that highlights the “spiders.” Confirm the olive halves are visible and evenly distributed for maximum creepy effect.
Extra Tips: For an added level of spookiness, consider using a small amount of food-safe black gel to draw “spider legs” coming from the olive halves on the mozzarella balls. This can be done with a fine-tipped decorating pen or toothpick.
Additionally, feel free to experiment with different herbs or add a hint of garlic to the balsamic glaze for a more robust flavor. Remember, the goal is to balance aesthetics with taste, guaranteeing your guests enjoy both the visual and culinary aspects of your Halloween appetizer.
Black Widow Cheese Ball
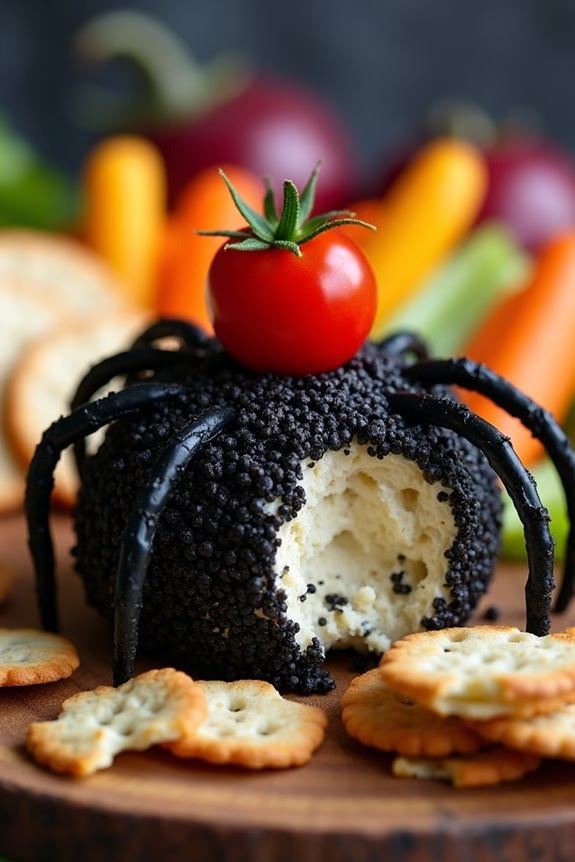
Black Widow Cheese Ball is the perfect spooky appetizer for your Halloween gathering, designed to intrigue your guests with its eerie appearance and delightful flavors. This dish combines creamy cheese, savory spices, and crunchy toppings to create a cheese ball that looks like a black widow spider. Not only is it a fun and festive addition to your Halloween spread, but it also offers a delicious blend of flavors and textures that will satisfy even the most discerning palate.
This cheese ball is shaped and decorated to resemble a spider, complete with black olive legs and a cherry tomato body, making it a conversation starter at any party. The combination of sharp cheddar cheese, cream cheese, and spicy seasonings gives it a flavorful kick that pairs perfectly with crackers or fresh veggies. This recipe serves 4-6 people, making it ideal for a small gathering or as part of a larger buffet.
Ingredients for Black Widow Cheese Ball:
- 1 package (8 oz) cream cheese, softened
- 1 cup sharp cheddar cheese, shredded
- 2 tablespoons sour cream
- 1 tablespoon Worcestershire sauce
- 1 teaspoon garlic powder
- 1 teaspoon onion powder
- 1/2 teaspoon smoked paprika
- 1/4 teaspoon cayenne pepper
- Salt and pepper to taste
- 1/2 cup crushed black peppercorns or poppy seeds (for coating)
- 1 large black olive, pitted and sliced
- 1 cherry tomato
- Crackers or vegetable sticks for serving
Cooking Instructions:
- Prepare the Cheese Mixture: In a medium-sized bowl, combine the softened cream cheese, shredded cheddar cheese, sour cream, Worcestershire sauce, garlic powder, onion powder, smoked paprika, cayenne pepper, salt, and pepper. Mix well using a hand mixer or a spatula until all ingredients are fully combined and the mixture is smooth and creamy.
- Shape the Cheese Ball: Once the cheese mixture is well combined, use your hands to form it into a ball. Place the cheese ball on a piece of plastic wrap or wax paper, and wrap it tightly. Chill in the refrigerator for at least 1 hour to allow it to firm up.
- Coat the Cheese Ball: After chilling, remove the cheese ball from the refrigerator. On a plate, spread out the crushed black peppercorns or poppy seeds. Roll the cheese ball in the coating until it’s fully covered, ensuring even coverage for a striking black appearance.
- Decorate the Cheese Ball: Cut the black olive slices into strips to form legs for the spider. Insert the olive strips into the cheese ball to create eight legs, four on each side. Place the cherry tomato on top of the cheese ball to serve as the spider’s body.
- Serve: Arrange the Black Widow Cheese Ball on a serving platter with crackers or vegetable sticks around it. Serve immediately or refrigerate until ready to serve.
Extra Tips:
To make the Black Widow Cheese Ball more visually striking, consider using a mix of poppy seeds and crushed black peppercorns for a varied texture and appearance. For a milder version, adjust the cayenne pepper to taste or omit it entirely if you prefer less heat.
If preparing ahead, you can make the cheese ball a day in advance, keeping it chilled until serving time. This allows the flavors to meld beautifully, enhancing the overall taste of your spooky appetizer.
Eerie Eyeball Caprese Bites
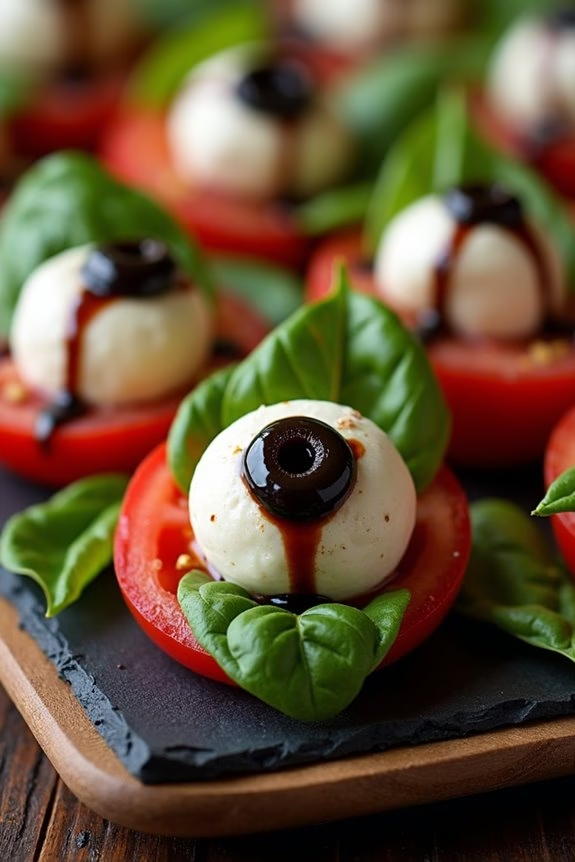
Eerie Eyeball Caprese Bites are a ghoulishly delightful appetizer perfect for adult Halloween gatherings. These spooky bites add a creepy twist to the traditional caprese salad, making them an ideal starter for a Halloween party. The combination of fresh mozzarella, ripe tomatoes, and fragrant basil is enhanced with a sinister presentation that’s sure to impress your guests.
The “eyeball” effect is achieved through clever assembly and the use of carefully selected garnishes, making each bite both delicious and visually striking. To create these Eerie Eyeball Caprese Bites, you’ll be working with simple yet flavorful ingredients that are transformed into a hauntingly beautiful appetizer.
This recipe serves 4-6 people, making it great for small gatherings. The key to success is in the details—using high-quality ingredients and taking care with the assembly process guarantees that each bite is as tasty as it’s terrifying. With a little creativity, your caprese bites will become the talk of the party, setting the tone for a fun and festive Halloween celebration.
Ingredients (serves 4-6):
- 12 small fresh mozzarella balls (bocconcini)
- 6 cherry tomatoes
- 12 fresh basil leaves
- 12 black olives (pitted)
- 1 tablespoon balsamic glaze
- 12 toothpicks
Instructions:
- Prepare the Tomatoes: Begin by slicing each cherry tomato in half. These will serve as the base for the mozzarella “eyeballs.” Set them aside once they’re all halved.
- Assemble the Eyeballs: Take each mozzarella ball and gently press a pitted black olive into the center. Confirm the olive is slightly embedded but still visible, resembling an iris.
- Add the Basil Leaves: Place a fresh basil leaf on top of each tomato half. The basil will act as a flavorful cushion between the tomato and the mozzarella.
- Construct the Bites: Carefully place each mozzarella “eyeball” on top of the basil-covered tomato halves. Secure each stack with a toothpick, ensuring all components are held together firmly.
- Drizzle with Balsamic Glaze: Once assembled, arrange the bites on a serving platter. Drizzle a small amount of balsamic glaze over each bite for added flavor and a visually appealing finish.
- Serve and Enjoy: These Eerie Eyeball Caprese Bites are best served fresh. Encourage guests to enjoy them as a part of a spooky spread at your Halloween party.
Extra Tips:
For the most visually striking and flavorful results, choose ripe and firm cherry tomatoes and fresh basil leaves. If you want to enhance the eerie appearance, consider using a small drop of balsamic glaze on the center of each olive to mimic a pupil.
Additionally, you can experiment with different types of olives if you prefer a stronger or milder flavor. Finally, assemble the bites close to serving time to maintain the freshness and integrity of the ingredients.
Poison Apple Bruschetta
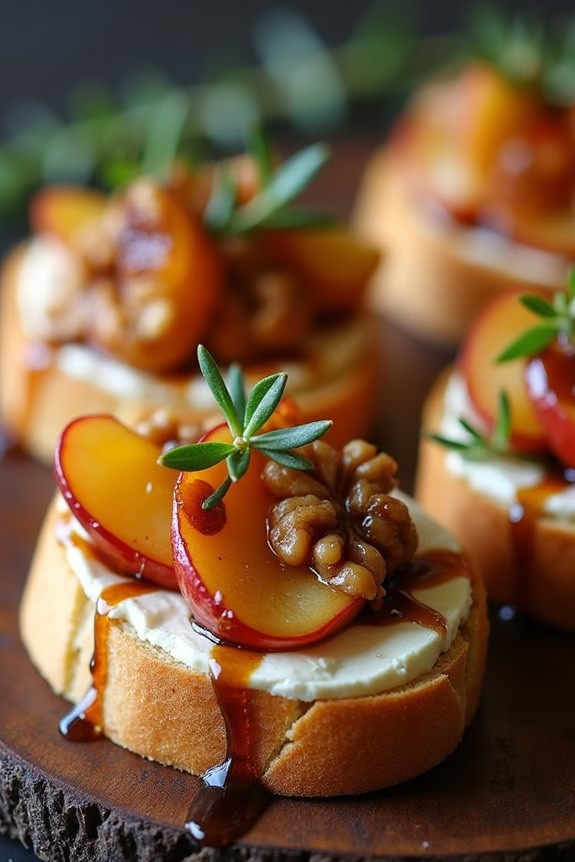
This Halloween, tantalize your guests with a sinister twist on a classic appetizer—Poison Apple Bruschetta. Perfectly suited for an adult gathering, this dish combines the sweetness of caramelized apples, the tang of goat cheese, and the earthiness of walnuts, all served on crispy baguette slices.
The deep, rich colors of the ingredients, accented by a drizzle of balsamic glaze, evoke the eerie charm of a witch’s brew, making it an irresistible starter for your Halloween feast.
Crafting this dish requires a delicate balance of flavors and textures. The apples are sautéed until they become tender and sweet, perfectly complementing the creamy goat cheese and crunchy walnuts. The balsamic glaze not only adds a touch of tartness but also enhances the visual appeal, mimicking the dark allure of a poison apple.
Serve this appetizer to delight and impress your guests with its spooky presentation and delicious taste.
Ingredients (Serving size: 4-6 people):
- 1 French baguette
- 3 tablespoons olive oil, divided
- 2 Granny Smith apples, cored and thinly sliced
- 2 tablespoons brown sugar
- 1 tablespoon lemon juice
- 1 teaspoon ground cinnamon
- 5 ounces goat cheese, softened
- 1/4 cup chopped walnuts
- 2 tablespoons honey
- Balsamic glaze for drizzling
- Fresh thyme leaves for garnish
Cooking Instructions:
- Prepare the Baguette: Preheat your oven to 375°F (190°C). Slice the baguette into 1/2-inch slices. Arrange them on a baking sheet, brush each slice with a tablespoon of olive oil, and bake for 8-10 minutes until golden and crispy.
- Caramelize the Apples: In a skillet over medium heat, add the remaining olive oil. Once hot, add the sliced apples, brown sugar, lemon juice, and cinnamon. Cook, stirring occasionally, until the apples are tender and caramelized, about 10 minutes. Remove from heat and set aside.
- Assemble the Bruschetta: Spread a generous amount of goat cheese on each toasted baguette slice. Top with a spoonful of caramelized apples, then sprinkle with chopped walnuts.
- Finish with Honey and Glaze: Drizzle honey over each bruschetta, followed by a light drizzle of balsamic glaze. Garnish with fresh thyme leaves for an aromatic finish.
- Serve: Arrange the bruschetta on a serving platter, and serve immediately to enjoy the contrast of warm apples and creamy cheese.
Extra Tips:
For an extra twist, try using different types of apples for varied sweetness and texture, such as Honeycrisp or Fuji.
To enhance the spooky theme, consider using a dark, pumpernickel or rye bread as the base instead of a traditional French baguette.
If you prefer a nutty flavor, lightly toast the walnuts before adding them to the bruschetta.
When drizzling balsamic glaze, use a squeeze bottle for better control over the amount and pattern, adding to the visual appeal of your Poison Apple Bruschetta.
Pumpkin Shaped Cheese Spread
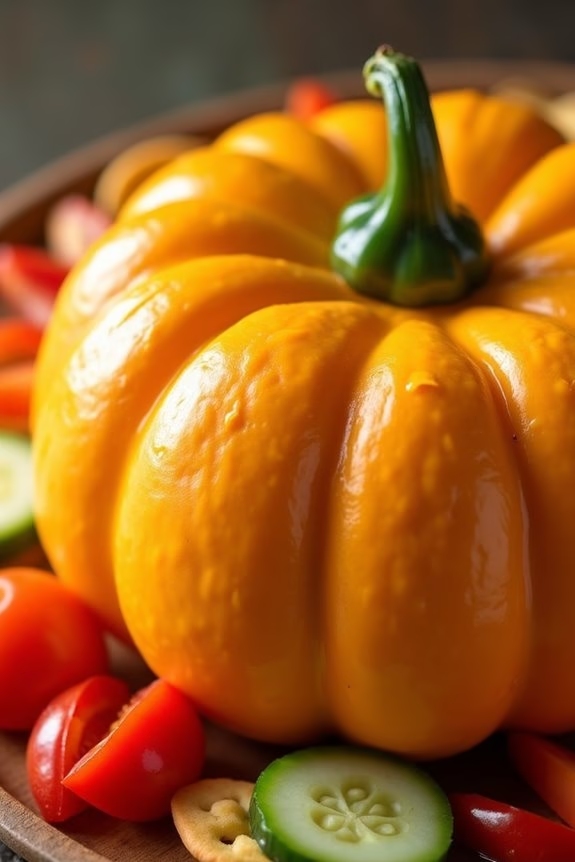
Pumpkin Shaped Cheese Spread is the perfect festive appetizer to impress your guests at any Halloween gathering. This delightful dish combines the creamy goodness of cheese with a playful presentation that’s bound to be a hit. The cheese spread is molded into the shape of a pumpkin and garnished with a stem, giving it a charming and spooky feel. Not only does it look fantastic, but it also offers a rich, savory flavor that pairs well with a variety of crackers or fresh vegetables.
Preparing this Pumpkin Shaped Cheese Spread is surprisingly simple, making it an ideal choice for busy hosts who still want to add a touch of Halloween spirit to their menu. The key to achieving the perfect pumpkin shape lies in the right combination of cheeses and a few strategic garnishes. Whether you’re hosting an intimate gathering or a larger party, this cheese spread is bound to be a crowd-pleaser.
Ingredients (Serves 4-6):
- 16 oz cream cheese, softened
- 2 cups sharp cheddar cheese, shredded
- 1 tablespoon Worcestershire sauce
- 1 teaspoon garlic powder
- 1 teaspoon smoked paprika
- 1/2 teaspoon cayenne pepper (optional)
- Salt and pepper to taste
- 1 small bell pepper stem
- Crackers or sliced vegetables for serving
Cooking Instructions:
- Prepare the Cheese Mixture: In a large mixing bowl, combine the softened cream cheese, shredded cheddar cheese, Worcestershire sauce, garlic powder, smoked paprika, cayenne pepper (if using), salt, and pepper. Use an electric mixer or a wooden spoon to thoroughly blend the ingredients until smooth and well combined.
- Shape the Cheese Ball: Once the mixture is smooth, transfer it onto a piece of plastic wrap. Gather the wrap around the cheese mixture and form it into a ball. Confirm that the plastic wrap is tightly sealed around the cheese to maintain the shape.
- Chill the Cheese Ball: Place the wrapped cheese ball in the refrigerator for at least 2 hours, or until it’s firm enough to hold its shape.
- Create the Pumpkin Shape: Once chilled, remove the cheese ball from the refrigerator and unwrap it. Using your hands, gently mold the cheese ball into a pumpkin shape by slightly flattening the top and bottom and creating vertical grooves around the sides to mimic a pumpkin’s natural texture.
- Add the Stem: Insert the bell pepper stem into the top center of the cheese ball to complete the pumpkin look.
- Serve: Transfer the pumpkin-shaped cheese spread to a serving platter and surround it with crackers or sliced vegetables for dipping.
Extra Tips:
For an even more authentic pumpkin appearance, you can dust the outside of the cheese ball with additional smoked paprika or finely crushed cheese-flavored crackers to enhance the orange color.
It’s important to use softened cream cheese to guarantee the mixture is easy to blend and shape. If you’re making this dish ahead of time, the cheese spread can be prepared and stored in the refrigerator for up to 24 hours before serving, allowing the flavors to meld beautifully.
Ghastly Guacamole Dip

Bring a spine-chilling twist to your Halloween party with this Ghastly Guacamole Dip. This spooky appetizer isn’t only a frighteningly good treat for the eyes but also a deliciously creamy and flavorful dip that will have your guests coming back for more. The bright green color of the guacamole, paired with black olive spiders or jalapeño jack-o’-lanterns, transforms this classic dip into a Halloween masterpiece that’s perfect for adult gatherings.
Whether you’re hosting a costume party or a casual get-together, this eerie guacamole is sure to haunt your taste buds in the best way possible. The key to making this dip both tasty and terrifying is in the presentation. By using a variety of edible decorations and serving it in a creative way, you can easily elevate your guacamole to fit the Halloween theme.
Don’t be afraid to get creative with the toppings – think black olives, cherry tomatoes, and even some spicy peppers for added heat. This recipe is designed to serve 4-6 people, making it perfect for a small gathering. Let’s plunge into the ingredients and steps to create your own Ghastly Guacamole Dip.
Ingredients for 4-6 servings:
- 4 ripe avocados
- 2 limes, juiced
- 1 small red onion, finely chopped
- 2 roma tomatoes, diced
- 1/4 cup cilantro, chopped
- 1 jalapeño, seeded and minced
- 2 cloves garlic, minced
- Salt and pepper to taste
- 1/2 cup black olives, sliced (for decoration)
- Sliced jalapeños or bell peppers (for decoration)
- Tortilla chips for serving
Cooking Instructions:
- Prepare the Avocados: Cut the avocados in half, remove the pits, and scoop the flesh into a large mixing bowl. Use a fork or potato masher to mash the avocados until you achieve your desired consistency. A slightly chunky texture works well for this dip.
- Add Fresh Ingredients: Squeeze the juice of two limes over the mashed avocados to add a zesty flavor and prevent browning. Add the finely chopped red onion, diced roma tomatoes, chopped cilantro, minced jalapeño, and minced garlic to the bowl. Stir everything together until fully combined.
- Season the Guacamole: Season the mixture with salt and pepper to your taste. Mix thoroughly to guarantee the flavors are well distributed throughout the guacamole.
- Create the Ghastly Presentation: Transfer the guacamole to a serving bowl. Use sliced black olives to create spider shapes on the surface of the guacamole. You can also use sliced jalapeños or bell peppers to design jack-o’-lantern faces. Get creative with your designs!
- Serve and Enjoy: Accompany your Ghastly Guacamole Dip with a side of tortilla chips for dipping. Arrange the chips around the guacamole to complete the spooky presentation and serve it to your guests.
Extra Tips:
To keep your guacamole fresh and prevent it from turning brown, make sure you cover the surface of the dip with plastic wrap, pressing it directly against the guacamole to minimize air exposure.
Additionally, if you want to add an extra layer of spookiness, consider serving the dip in a hollowed-out pumpkin or skull-shaped bowl. This dish can also be made ahead of time; just keep it chilled until you’re ready to serve.
Feel free to adjust the level of heat by adding more or less jalapeño according to your preference.
Petrifying Prosciutto Wrapped Figs
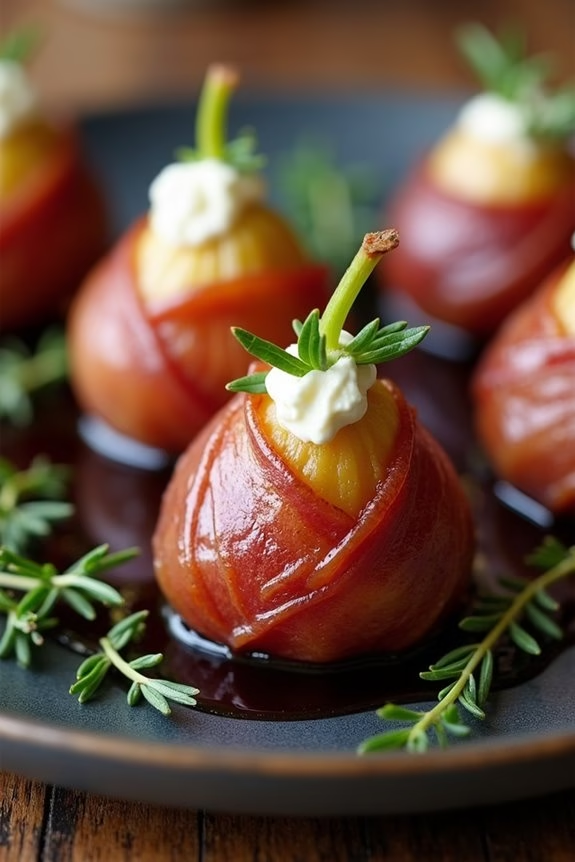
For a sophisticated yet spooky Halloween appetizer, consider serving Petrifying Prosciutto Wrapped Figs. This delightful recipe combines the natural sweetness of figs with the savory, salty flavor of prosciutto, creating a hauntingly delicious bite-sized treat.
Perfect for an adult Halloween gathering, these appetizers are both easy to prepare and certain to impress your guests with their unique flavor profile and elegant presentation.
The contrast between the soft, juicy figs and the crisp, salty prosciutto provides a tantalizing taste experience. Adding a touch of creamy goat cheese and a drizzle of balsamic glaze elevates these appetizers to a new level of indulgence.
Whether you’re hosting a Halloween party or just looking to enjoy a sophisticated snack, these Petrifying Prosciutto Wrapped Figs are a must-try.
Ingredients (Serves 4-6)
- 12 fresh figs
- 12 slices of prosciutto
- 4 oz goat cheese
- 1 tablespoon honey
- 1 teaspoon fresh thyme leaves
- Balsamic glaze, for drizzling
Cooking Instructions
- Prepare the Figs: Start by washing the figs under cool water and patting them dry with a paper towel. Use a sharp knife to slice off the stem of each fig, then cut an “X” into the top of each fig, being careful not to cut all the way through.
- Stuff the Figs: Gently open the top of each fig and spoon about 1 teaspoon of goat cheese into the center. For an extra touch of flavor, mix the goat cheese with a little honey before stuffing.
- Wrap with Prosciutto: Take a slice of prosciutto and wrap it around each fig, securing the cheese inside. Confirm that the prosciutto is snug enough to hold the fig and cheese together.
- Add Fresh Herbs: Sprinkle a few fresh thyme leaves over the top of each prosciutto-wrapped fig for an added hint of herbal flavor.
- Bake the Appetizers: Preheat your oven to 375°F (190°C). Arrange the wrapped figs on a baking sheet lined with parchment paper. Bake for about 10-12 minutes, or until the prosciutto is crisp and the figs are warm.
- Finish with Balsamic Glaze: Once the figs are out of the oven, allow them to cool slightly. Just before serving, drizzle each fig with a little balsamic glaze to enhance the flavors.
Extra Tips
To guarantee that your Petrifying Prosciutto Wrapped Figs are as delicious as possible, use ripe but firm figs to maintain their shape during baking.
If goat cheese isn’t to your taste, consider substituting it with blue cheese or cream cheese for a different flavor profile. Additionally, the prosciutto can be replaced with another type of cured meat, such as pancetta, if desired.
Finally, for a more visually striking presentation, serve the figs on a platter garnished with fresh thyme sprigs.
Bloodcurdling Bacon Jalapeño Poppers

If you’re looking to add a spooky twist to your Halloween party, Bloodcurdling Bacon Jalapeño Poppers are the perfect appetizer. These delicious little bites combine the smoky flavor of bacon with the spicy kick of jalapeños and creamy cheese, all wrapped up in a gory presentation that’s certain to thrill your guests.
Whether you’re hosting a haunted house gathering or just a casual get-together with friends, these poppers are bound to be a hit.
To make these spine-chilling treats, you’ll stuff fresh jalapeños with a mixture of cream cheese and shredded cheddar, wrap them in bacon, and bake them until they’re golden and bubbling. The bacon crisps up beautifully while the cheese melts into a gooey, irresistible filling.
Serve these poppers hot out of the oven for the best effect, and watch them disappear faster than a ghost at dawn.
Ingredients for 4-6 servings:
- 12 fresh jalapeños
- 8 ounces cream cheese, softened
- 1 cup shredded cheddar cheese
- 12 slices of bacon
- 1 teaspoon garlic powder
- 1 teaspoon onion powder
- 1 teaspoon smoked paprika
- Salt and pepper to taste
Cooking Instructions:
- Preheat the Oven: Start by preheating your oven to 400°F (200°C). This guarantees that the poppers will cook evenly and the bacon will crisp up nicely.
- Prepare the Jalapeños: Slice the jalapeños in half lengthwise and remove the seeds and membranes using a small spoon or a paring knife. Be careful during this step; consider wearing gloves to avoid getting the spicy oils on your skin.
- Mix the Filling: In a medium-sized bowl, combine the softened cream cheese, shredded cheddar cheese, garlic powder, onion powder, smoked paprika, salt, and pepper. Mix until all ingredients are well incorporated.
- Stuff the Jalapeños: Using a spoon, fill each jalapeño half with the cheese mixture. Be generous with the filling, but make sure it doesn’t overflow too much.
- Wrap with Bacon: Cut each bacon slice in half and wrap one half around each stuffed jalapeño. Secure the bacon with a toothpick if necessary to prevent it from unraveling during baking.
- Bake: Place the wrapped jalapeños on a baking sheet lined with parchment paper or a silicone mat. Bake in the preheated oven for 20-25 minutes or until the bacon is crispy and the cheese is bubbly.
- Serve: Once cooked, remove the poppers from the oven and let them cool for a few minutes before serving. Arrange them on a platter for a spooky presentation.
Extra Tips:
When selecting jalapeños, try to pick ones that are similar in size so they cook evenly. If you prefer a milder popper, you can blanch the jalapeños in boiling water for a minute before stuffing them to reduce the heat.
Additionally, feel free to experiment with different cheeses or add extra spices to the filling for a personalized touch. Enjoy your Halloween with these devilishly delicious appetizers!
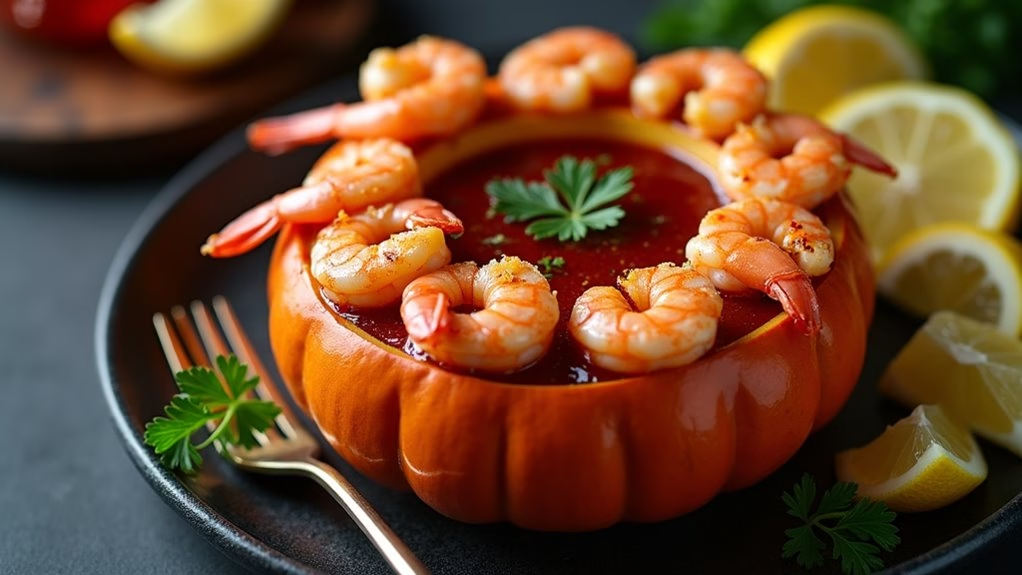
Sinister Shrimp Cocktail

Sinister Shrimp Cocktail is a perfect appetizer to set the eerie mood for an adult Halloween gathering. This dish combines the classic elegance of a shrimp cocktail with a dark, mysterious twist that will delight your guests. The shrimp are beautifully poached and served with a blood-red cocktail sauce, presented in a chilling and theatrical manner. The dramatic presentation and tantalizing flavors make this recipe an unforgettable start to your Halloween festivities.
To guarantee that each element of this dish adds to the sinister theme, the shrimp are seasoned with haunting spices and served in a spooky setup, perhaps on a bed of dark greens or nestled in a hollowed pumpkin for dramatic effect. The cocktail sauce, rich with a hint of heat, provides the perfect accompaniment to the tender shrimp, offering a balance of flavors that’s as intriguing as it’s delicious. This recipe is designed to serve 4-6 people, making it an ideal choice for an intimate Halloween soiree.
Ingredients:
- 2 pounds large shrimp, peeled and deveined
- 2 tablespoons olive oil
- 1 teaspoon smoked paprika
- 1 teaspoon garlic powder
- 1/2 teaspoon cayenne pepper
- Salt and pepper, to taste
- 1 cup ketchup
- 2 tablespoons horseradish
- 1 tablespoon Worcestershire sauce
- 1 tablespoon lemon juice
- 1 teaspoon hot sauce
- Fresh parsley, for garnish
- Lemon wedges, for garnish
Cooking Instructions:
- Prepare the Shrimp: Start by rinsing the peeled and deveined shrimp under cold water and patting them dry with paper towels. This guarantees they’re clean and ready to absorb the marinade.
- Season the Shrimp: In a large bowl, combine the shrimp with olive oil, smoked paprika, garlic powder, cayenne pepper, salt, and pepper. Toss until the shrimp are evenly coated with the spices.
- Cook the Shrimp: Heat a large skillet over medium-high heat. Add the shrimp to the skillet and cook for about 2-3 minutes on each side, or until they’re opaque and fully cooked. Remove from heat and set aside to cool slightly.
- Make the Cocktail Sauce: In a medium bowl, mix together the ketchup, horseradish, Worcestershire sauce, lemon juice, and hot sauce. Stir until well combined. Taste and adjust the seasoning if necessary.
- Assemble the Dish: Arrange the cooked shrimp on a platter, perhaps in a circular pattern for a dramatic effect. Pour the cocktail sauce into a small, dark-themed bowl or a hollowed-out mini pumpkin for added flair. Garnish with fresh parsley and lemon wedges around the edges for a pop of color.
Extra Tips:
For an extra spooky touch, consider serving the shrimp cocktail on a bed of black kale or dark greens to enhance the Halloween theme. If you want to spice things up, add more horseradish or hot sauce to the cocktail sauce according to your preference.
It’s important to not overcook the shrimp, as they can become rubbery; they should be just opaque and firm to the touch. Finally, chilling the cocktail sauce for at least an hour before serving will allow the flavors to meld together beautifully, adding depth to your Sinister Shrimp Cocktail.