

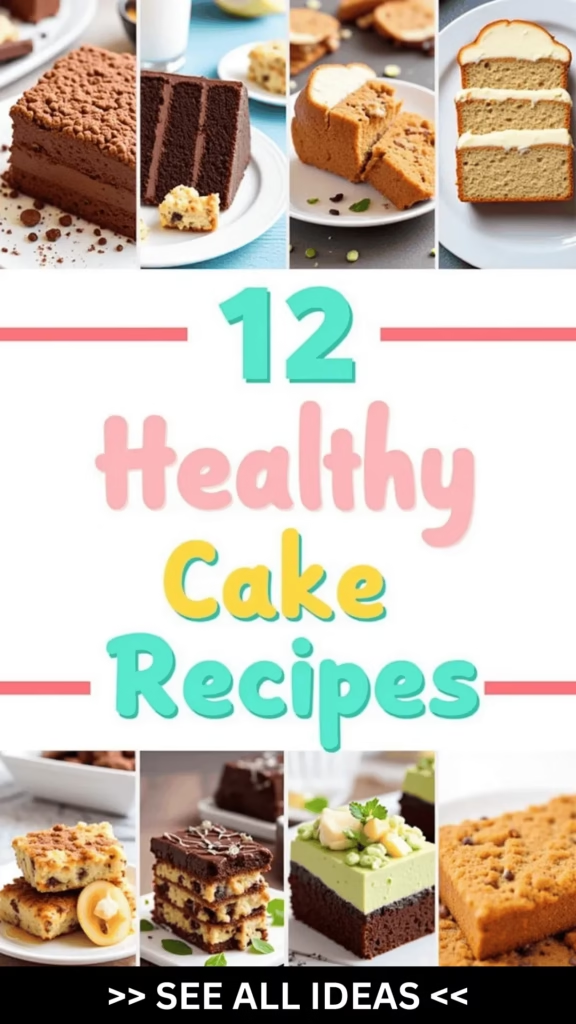
Oh, the joy of indulging in a slice of cake without a hint of guilt!
Picture savoring the richness of a chocolate cake made from almond flour, its texture both dense and moist, with each bite melting like a velvety dream.
And let’s not forget the zing of a Greek yogurt lemon cake, where tanginess meets sweetness in perfect harmony.
As a dessert lover who cherishes balance, these guilt-free delights are my absolute favorite.
Join me on this journey of guiltless indulgence with these delightful recipes!
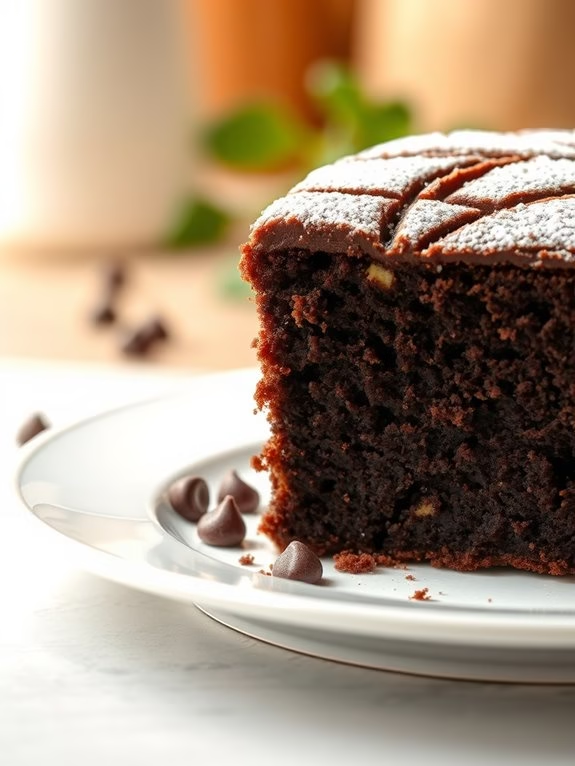
Almond Flour Chocolate Cake
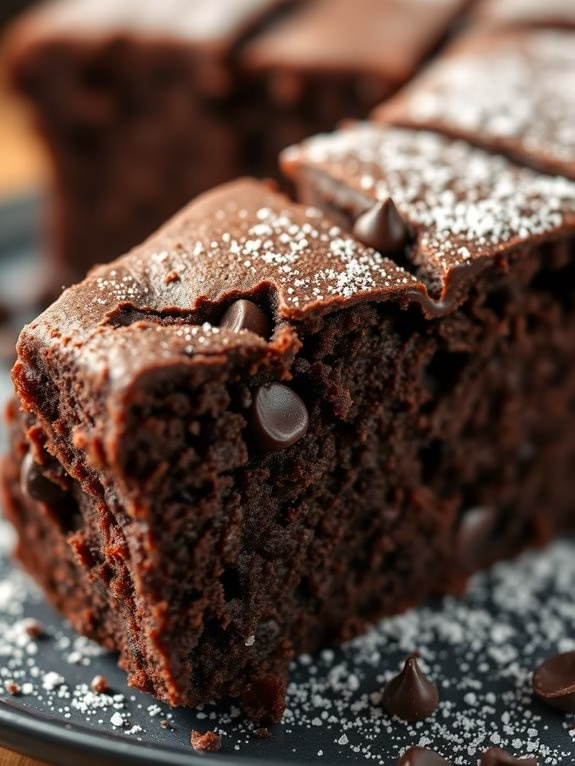
Almond Flour Chocolate Cake is a delicious and healthier alternative to traditional chocolate cakes, perfect for those looking to reduce their gluten intake. This cake combines the richness of chocolate with the nutty flavor and moist texture provided by almond flour, making it not only gluten-free but also more nutritious.
Almond flour is packed with healthy fats and proteins, which contribute to the moist crumb and satisfying taste of this cake. Ideal for any occasion, this cake is sure to impress your family and friends with its decadent yet wholesome qualities.
This recipe is designed for a serving size of 4-6 people, guaranteeing there’s enough to enjoy without being overwhelming. The use of high-quality cocoa powder and dark chocolate gives this cake a deep chocolate flavor, while the addition of ingredients like eggs and coconut oil or butter guarantees that it remains moist and flavorful.
Whether you’re serving it as a dessert or enjoying it as a treat with a cup of coffee or tea, this Almond Flour Chocolate Cake is sure to satisfy your sweet tooth without the guilt.
Ingredients (for 4-6 servings):
- 1 ½ cups almond flour
- ½ cup unsweetened cocoa powder
- 1 teaspoon baking powder
- ¼ teaspoon salt
- 3 large eggs
- ½ cup coconut oil or unsalted butter, melted
- ½ cup honey or maple syrup
- 1 teaspoon vanilla extract
- ½ cup dark chocolate chips (optional)
Cooking Instructions:
- Preheat the Oven: Set your oven to 350°F (175°C) and prepare a 9-inch round cake pan by greasing it lightly with coconut oil or butter. You can also line it with parchment paper for easier removal.
- Mix Dry Ingredients: In a large bowl, whisk together the almond flour, cocoa powder, baking powder, and salt until well combined. Make sure there are no lumps in the cocoa powder.
- Prepare Wet Ingredients: In a separate bowl, beat the eggs with a whisk until foamy. Add the melted coconut oil (or butter), honey (or maple syrup), and vanilla extract, mixing until smooth.
- Combine Mixtures: Gradually add the wet ingredients to the dry ingredients, stirring gently until they’re fully combined and the batter is smooth. If using, fold in the dark chocolate chips until evenly distributed.
- Transfer to Pan: Pour the batter into the prepared cake pan, spreading it evenly with a spatula to guarantee it bakes uniformly.
- Bake: Place the pan in the preheated oven and bake for 25-30 minutes, or until a toothpick inserted into the center comes out clean. Be careful not to overbake, as this can cause the cake to dry out.
- Cool and Serve: Once baked, remove the cake from the oven and let it cool in the pan for about 10 minutes. Then, transfer it to a wire rack to cool completely before serving. This cake can be served plain or with a dusting of powdered sugar or a dollop of whipped cream.
Extra Tips:
When making Almond Flour Chocolate Cake, it’s important to use finely ground almond flour for the best texture. Coarser almond meal can make the cake dense and gritty.
Additionally, make sure all your ingredients are at room temperature before mixing, as this helps maintain the batter’s consistency and guarantees even baking. If you prefer a sweeter cake, you can increase the honey or maple syrup slightly, but be cautious as this may affect the cake’s structure.
Finally, storing the cake in an airtight container will keep it fresh and moist for up to three days.
Vegan Carrot Cake
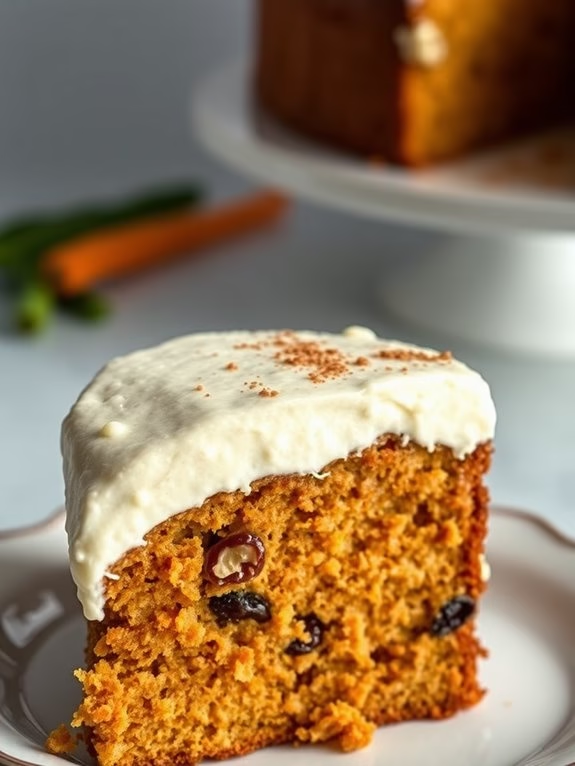
Vegan Carrot Cake
Indulge in a deliciously moist and fluffy Vegan Carrot Cake, perfect for satisfying your sweet tooth while staying true to a plant-based diet. This cake is made with wholesome ingredients, including freshly grated carrots, which lend a natural sweetness and vibrant color. The aromatic spices of cinnamon and nutmeg, combined with the rich, creamy vegan frosting, make this cake an irresistible treat for any occasion.
The beauty of this Vegan Carrot Cake lies in its simplicity and healthfulness. Not only is it free from dairy and eggs, but it’s also packed with nutrients, thanks to the addition of carrots, walnuts, and raisins. Whether you’re hosting a gathering or simply want to enjoy a slice with your afternoon tea, this cake is bound to be a hit with vegans and non-vegans alike.
Ingredients for 4-6 servings:
- 2 cups all-purpose flour
- 1 cup granulated sugar
- 1/2 cup brown sugar
- 1 teaspoon baking soda
- 1/2 teaspoon baking powder
- 1/2 teaspoon salt
- 1 teaspoon ground cinnamon
- 1/2 teaspoon ground nutmeg
- 1/2 cup unsweetened applesauce
- 1/2 cup vegetable oil
- 1 teaspoon vanilla extract
- 2 cups grated carrots
- 1/2 cup chopped walnuts
- 1/2 cup raisins
- 1 tablespoon apple cider vinegar
- 1/2 cup plant-based milk (such as almond or soy)
Cooking Instructions:
1. Preheat the Oven:
Start by preheating your oven to 350°F (175°C). Grease and flour a 9-inch round cake pan or line it with parchment paper to prevent the cake from sticking.
2. Mix the Dry Ingredients:
In a large mixing bowl, whisk together the all-purpose flour, granulated sugar, brown sugar, baking soda, baking powder, salt, cinnamon, and nutmeg. Confirm the mixture is well combined to spread the spices evenly throughout the cake.
3. Prepare the Wet Mixture:
In a separate bowl, combine the unsweetened applesauce, vegetable oil, and vanilla extract. Stir until the ingredients are fully blended. This mixture will help keep the cake moist and flavorful.
4. Combine the Mixtures:
Pour the wet ingredients into the dry mixture. Add the grated carrots, chopped walnuts, and raisins. Mix everything together until just combined. Be careful not to over-mix, as this can lead to a dense cake.
5. Activate the Leavening:
In a small bowl, mix the apple cider vinegar with the plant-based milk. This will create a vegan buttermilk, which helps the cake rise. Pour this mixture into the batter and gently fold it in until smooth.
6. Bake the Cake:
Transfer the batter into the prepared cake pan. Spread it evenly with a spatula. Bake in the preheated oven for 30-35 minutes, or until a toothpick inserted in the center comes out clean.
7. Cool and Frost:
Allow the cake to cool in the pan for about 10 minutes, then transfer it to a wire rack to cool completely. Once cooled, frost with your favorite vegan frosting or a simple glaze.
Extra Tips:
When grating the carrots, confirm they’re finely shredded to maintain the cake’s smooth texture. If you prefer a nuttier flavor, toast the walnuts lightly before adding them to the batter.
For an extra touch of flavor, consider adding a pinch of ground ginger or cloves to the spice mix. This Vegan Carrot Cake pairs beautifully with a vegan cream cheese frosting for a classic taste, but feel free to experiment with other frostings, such as a coconut or lemon glaze, to suit your preferences.
Greek Yogurt Lemon Cake
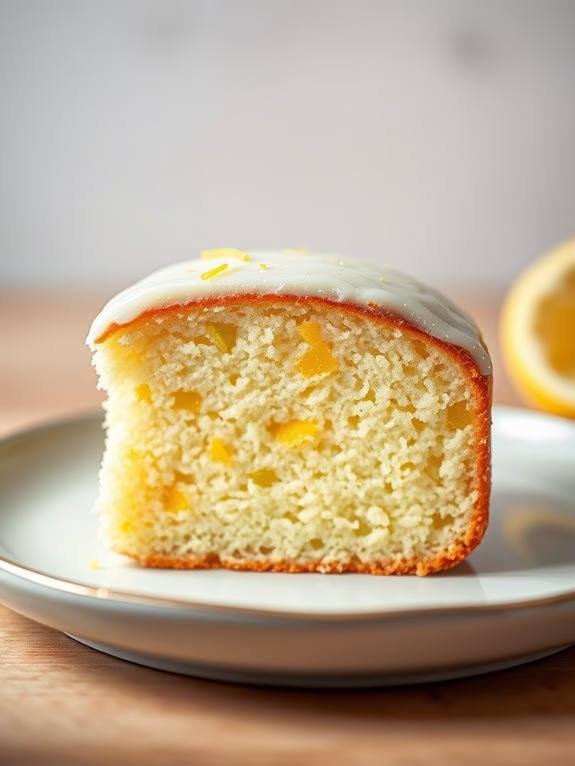
Greek Yogurt Lemon Cake is a delightful and healthier alternative to traditional cakes, offering a moist, tangy, and slightly sweet treat that’s perfect for any occasion. The combination of Greek yogurt and lemon gives the cake a revitalizing flavor while keeping it light and fluffy.
This cake is ideal for those who are looking to enjoy a sweet indulgence without compromising on their health goals, as it utilizes healthier ingredients without sacrificing taste.
This recipe is designed to serve 4-6 people, making it perfect for a family gathering or a small party. The use of Greek yogurt not only adds moisture to the cake but also incorporates beneficial probiotics and protein, making it a nutritious option. The zest and juice of fresh lemons provide a natural, vibrant flavor that complements the subtle sweetness of the cake.
Whether you’re serving it as a dessert or a tea-time snack, this Greek Yogurt Lemon Cake is sure to be a hit!
Ingredients:
- 1 1/2 cups all-purpose flour
- 2 teaspoons baking powder
- 1/2 teaspoon baking soda
- 1/4 teaspoon salt
- 1 cup plain Greek yogurt
- 1 cup granulated sugar
- 3 large eggs
- 1/3 cup vegetable oil
- Zest of 2 lemons
- Juice of 1 lemon
- 1 teaspoon vanilla extract
Instructions:
- Preheat the Oven: Start by preheating your oven to 350°F (175°C). Grease and flour a 9-inch round cake pan to prevent the cake from sticking.
- Prepare Dry Ingredients: In a medium-sized bowl, whisk together the flour, baking powder, baking soda, and salt. Set this mixture aside.
- Mix Wet Ingredients: In a large bowl, combine the Greek yogurt and sugar, whisking until well blended. Add the eggs one at a time, mixing well after each addition. Stir in the vegetable oil, lemon zest, lemon juice, and vanilla extract until everything is thoroughly combined.
- Combine Ingredients: Gradually add the dry ingredient mixture to the wet ingredients, stirring gently until just combined. Be careful not to overmix, as this can make the cake dense.
- Bake the Cake: Pour the batter into the prepared cake pan and smooth the top with a spatula. Bake in the preheated oven for 25-30 minutes, or until a toothpick inserted into the center of the cake comes out clean.
- Cool and Serve: Once baked, allow the cake to cool in the pan for about 10 minutes before transferring it to a wire rack to cool completely. Serve the cake plain, or with a dusting of powdered sugar or a light glaze, if desired.
Extra Tips:
For a more pronounced lemon flavor, you can add an additional tablespoon of lemon juice or more lemon zest. If you prefer a sweeter cake, consider drizzling a simple lemon glaze over the top by mixing powdered sugar with a bit of lemon juice.
Confirm that your Greek yogurt is at room temperature before mixing, as this will help the ingredients combine more smoothly. If you want to make this cake gluten-free, substitute the all-purpose flour with a gluten-free flour blend. Enjoy your delicious and healthy Greek Yogurt Lemon Cake!
Gluten-Free Banana Bread Cake
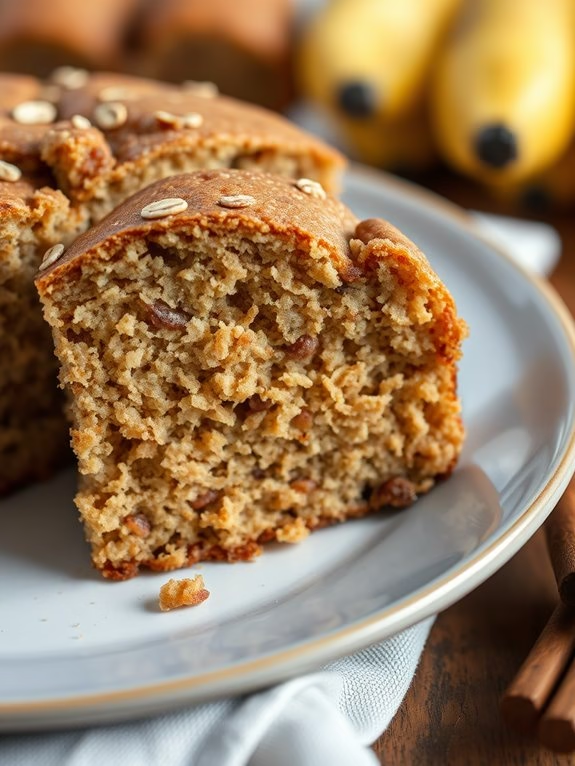
Gluten-Free Banana Bread Cake is a delectable treat that combines the classic flavors of banana bread with the rich texture of a cake, all while being gentle on the stomach for those who are gluten-sensitive. This recipe isn’t only perfect for those following a gluten-free diet but also for anyone who loves a moist, flavorful cake that’s easy to prepare and healthier than traditional options.
Packed with ripe bananas and a hint of cinnamon, this cake is a perfect snack, breakfast treat, or dessert option for family gatherings or casual get-togethers. This recipe focuses on using naturally gluten-free ingredients to guarantee that the cake remains light yet satisfying.
By incorporating almond flour and gluten-free oats, this cake maintains its structure without sacrificing flavor or texture. The sweetness of ripe bananas is complemented by a touch of honey, creating a balanced and deliciously sweet cake that everyone will enjoy. With a serving size designed for 4-6 people, this Gluten-Free Banana Bread Cake is sure to become a household favorite.
Ingredients (Serves 4-6)
- 3 ripe bananas, mashed
- 2 large eggs
- 1/4 cup honey
- 1 teaspoon vanilla extract
- 1/4 cup coconut oil, melted
- 1 1/2 cups almond flour
- 1/2 cup gluten-free oats
- 1 teaspoon baking soda
- 1/2 teaspoon cinnamon
- 1/4 teaspoon salt
- Optional: 1/2 cup chopped walnuts or chocolate chips
Cooking Instructions
- Preheat the Oven: Start by preheating your oven to 350°F (175°C). Grease a 9×5 inch loaf pan with a little coconut oil or line it with parchment paper to guarantee easy removal of the cake.
- Mix Wet Ingredients: In a large mixing bowl, combine the mashed bananas, eggs, honey, vanilla extract, and melted coconut oil. Use a whisk or an electric mixer to blend the ingredients until smooth and well combined.
- Prepare Dry Ingredients: In a separate bowl, mix together the almond flour, gluten-free oats, baking soda, cinnamon, and salt. Stir the dry ingredients thoroughly to distribute the baking soda evenly throughout the mixture.
- Combine Mixtures: Gradually add the dry ingredients into the wet ingredients, stirring gently with a spatula or wooden spoon until just combined. Be careful not to overmix the batter as this can affect the texture of the cake.
- Fold in Additions: If you’re using walnuts or chocolate chips, fold them into the batter at this stage. This step gives an extra layer of flavor and texture to your cake.
- Bake the Cake: Pour the batter into the prepared loaf pan, smoothing out the top with a spatula. Place the pan in the preheated oven and bake for about 45-50 minutes. To check for doneness, insert a toothpick into the center of the cake; it should come out clean or with only a few crumbs attached.
- Cool and Serve: Once baked, remove the cake from the oven and allow it to cool in the pan for about 10 minutes. Then, transfer it to a wire rack to cool completely before slicing and serving.
Extra Tips
For the best results, make sure that your bananas are very ripe, as this adds natural sweetness and moisture to the cake. Feel free to customize your Gluten-Free Banana Bread Cake with your favorite mix-ins such as dried fruits or seeds for added nutrition.
When storing, keep the cake in an airtight container at room temperature for up to three days, or refrigerate it for a longer shelf life. Finally, always check that your oats are certified gluten-free to avoid any cross-contamination issues.
Avocado Chocolate Mousse Cake

Avocado Chocolate Mousse Cake is a delightful fusion of rich chocolate and creamy avocado, offering a healthy yet indulgent dessert option. This cake is perfect for those looking to satisfy their sweet tooth without compromising on nutrition.
Avocado adds a velvety texture to the mousse, while its natural fats keep the cake moist and delicious. With its decadent flavor, it’s hard to believe this treat is packed with healthy ingredients.
Ideal for a dinner party or a special occasion, this cake caters to both vegans and non-vegans alike. The use of ripe avocados guarantees a luscious consistency, while the chocolate delivers the perfect amount of sweetness. Best of all, this cake is free from refined sugars, making it a guilt-free dessert.
Here’s how you can make an Avocado Chocolate Mousse Cake serving 4-6 people.
Ingredients:
- 2 ripe avocados
- 1 cup almond flour
- 1/2 cup cocoa powder
- 1/2 cup maple syrup
- 1/4 cup coconut oil, melted
- 1 tsp vanilla extract
- 1/4 tsp salt
- 1/2 tsp baking soda
- 1/4 cup almond milk
- 1/2 cup dark chocolate chips (dairy-free if preferred)
- Fresh berries for garnish (optional)
Cooking Instructions:
- Preheat the Oven and Prepare the Pan: Preheat your oven to 350°F (175°C). Grease a 9-inch round cake pan with coconut oil or line it with parchment paper.
- Blend Avocados: In a blender or food processor, combine the ripe avocados, maple syrup, melted coconut oil, and vanilla extract. Blend until smooth and creamy.
- Mix Dry Ingredients: In a large mixing bowl, sift together almond flour, cocoa powder, salt, and baking soda. Make sure there are no lumps in the mixture.
- Combine Wet and Dry Ingredients: Pour the avocado mixture into the dry ingredients. Add almond milk and stir until you have a smooth batter. Confirm all ingredients are fully combined.
- Melt Chocolate Chips: In a microwave-safe bowl, melt the dark chocolate chips in 30-second intervals, stirring in between, until completely melted and smooth.
- Incorporate Chocolate: Add the melted chocolate to the batter and mix thoroughly until well incorporated.
- Bake the Cake: Pour the batter into the prepared cake pan. Smooth the top with a spatula. Bake in the preheated oven for 25-30 minutes, or until a toothpick inserted into the center comes out clean.
- Cool and Decorate: Allow the cake to cool in the pan for about 10 minutes before transferring it to a wire rack to cool completely. Once cooled, garnish with fresh berries if desired.
Extra Tips:
For the best results, use ripe avocados to guarantee a creamy texture in the mousse. If you don’t have a food processor, mashing the avocados thoroughly by hand will also work, though it may not be as smooth.
To enhance the chocolate flavor, consider adding a pinch of espresso powder to the batter. Finally, store any leftovers in an airtight container in the fridge for up to three days; this cake actually tastes even better the day after baking as the flavors meld beautifully.
Coconut Flour Pineapple Cake

Coconut Flour Pineapple Cake
The Coconut Flour Pineapple Cake is a delightful and healthy dessert option that brings a tropical twist to traditional baking. Made with nutrient-rich coconut flour and naturally sweetened pineapple, this cake is both gluten-free and deliciously moist. Ideal for those looking to indulge without compromising on health, this cake captures the essence of the tropics with its subtle coconut flavor and juicy pineapple chunks.
Perfect for gatherings or a sweet treat after dinner, this cake serves 4-6 people, making it a great option for family meals or small parties. The natural sweetness from the pineapple complements the nutty flavor of the coconut flour, creating a balanced and satisfying dessert. Whether you’re catering to dietary restrictions or simply exploring healthier options, this Coconut Flour Pineapple Cake is sure to be a hit with everyone.
Ingredients:
- 1 cup coconut flour
- 1 cup pineapple chunks (fresh or canned)
- 1/2 cup unsweetened coconut milk
- 1/2 cup honey or maple syrup
- 4 large eggs
- 1/4 cup melted coconut oil
- 1 teaspoon vanilla extract
- 1 teaspoon baking powder
- 1/4 teaspoon salt
Cooking Instructions:
- Preheat the Oven: Start by preheating your oven to 350°F (175°C). This guarantees that the cake bakes evenly and achieves the right texture.
- Prepare the Baking Pan: Grease a 9-inch round cake pan with coconut oil or line it with parchment paper. This prevents the cake from sticking and makes it easier to remove after baking.
- Mix Dry Ingredients: In a mixing bowl, combine the coconut flour, baking powder, and salt. Whisk them together to guarantee the baking powder is evenly distributed.
- Blend Wet Ingredients: In a separate bowl, whisk together the eggs, coconut milk, honey (or maple syrup), melted coconut oil, and vanilla extract until well combined.
- Combine Ingredients: Gradually add the dry ingredients to the wet ingredients, mixing until a smooth batter forms. The batter may appear thicker than traditional cake batters due to the absorbent nature of coconut flour.
- Add Pineapple Chunks: Fold in the pineapple chunks gently, ensuring they’re evenly distributed throughout the batter.
- Pour and Bake: Pour the batter into the prepared cake pan, smoothing the top with a spatula. Place the pan in the preheated oven and bake for 30-35 minutes, or until a toothpick inserted into the center comes out clean.
- Cool and Serve: Once baked, remove the cake from the oven and allow it to cool in the pan for about 10 minutes. Then transfer it to a wire rack to cool completely before slicing and serving.
Extra Tips:
For best results, use fresh pineapple for a more vibrant flavor, but canned pineapple can be a convenient alternative.
Confirm your coconut oil is melted but not hot to avoid cooking the eggs prematurely. If you prefer a sweeter cake, adjust the quantity of honey or maple syrup to your taste.
This cake pairs wonderfully with a dollop of whipped coconut cream or a sprinkle of shredded coconut for added texture.
Be mindful that coconut flour can be dense, so a little goes a long way in recipes compared to regular flour.
Zucchini Chocolate Cake
Zucchini Chocolate Cake
Zucchini Chocolate Cake is a delightful and moist dessert that combines the nutritious benefits of zucchini with the indulgent taste of chocolate. This cake is perfect for those who want to enjoy a sweet treat without compromising on health. Zucchini adds a moist texture to the cake, while its mild flavor blends seamlessly with rich cocoa, making it an excellent choice for sneaking some vegetables into your diet.
Whether you’re serving it at a family gathering or enjoying it as an afternoon snack, this cake is sure to satisfy your chocolate cravings while giving you a boost of nutrients.
The recipe for Zucchini Chocolate Cake is straightforward and requires minimal ingredients, making it an ideal option for both novice and experienced bakers. With simple steps and a few pantry staples, you can whip up this delicious cake in no time.
The combination of cocoa powder and zucchini creates a dense, fudgy texture that’s both decadent and wholesome, while a hint of cinnamon adds warmth and depth to the flavor profile. This cake can be enjoyed on its own or paired with a dollop of whipped cream or a scoop of vanilla ice cream for an extra special treat.
Ingredients for 4-6 servings:
- 1 ½ cups all-purpose flour
- ½ cup unsweetened cocoa powder
- 1 teaspoon baking soda
- ½ teaspoon baking powder
- ½ teaspoon salt
- 1 teaspoon ground cinnamon
- 2 large eggs
- 1 ¼ cups granulated sugar
- ½ cup vegetable oil
- 1 teaspoon vanilla extract
- 2 cups grated zucchini
- ½ cup semi-sweet chocolate chips (optional)
Cooking Instructions:
- Prepare the Oven and Pan: Preheat your oven to 350°F (175°C). Grease a 9×13-inch baking pan with butter or non-stick spray, and set it aside for later use.
- Mix Dry Ingredients: In a medium bowl, sift together the flour, cocoa powder, baking soda, baking powder, salt, and cinnamon. Mix well to guarantee even distribution of the ingredients.
- Combine Wet Ingredients: In a separate large bowl, beat the eggs until light and fluffy. Add the granulated sugar, vegetable oil, and vanilla extract, and continue to beat until the mixture is smooth and well-combined.
- Add Zucchini: Gently fold the grated zucchini into the wet mixture. Confirm the zucchini is evenly distributed throughout the batter, which will help maintain the cake’s moisture.
- Combine Wet and Dry Ingredients: Gradually add the dry ingredients to the wet mixture, stirring until just combined. Avoid over-mixing to keep the cake tender.
- Optional Chocolate Chips: If using, fold in the chocolate chips gently to incorporate them throughout the batter.
- Bake the Cake: Pour the batter into the prepared baking pan, spreading it evenly. Bake in the preheated oven for 30-35 minutes, or until a toothpick inserted into the center comes out clean.
- Cool and Serve: Allow the cake to cool in the pan for about 10 minutes, then transfer it to a wire rack to cool completely before serving.
Extra Tips:
When baking Zucchini Chocolate Cake, confirm you don’t over-grate the zucchini, as this can release too much moisture and affect the cake’s texture. Ideally, use medium-sized zucchini and grate it using the larger holes of a box grater.
If the zucchini is particularly watery, you can lightly pat it dry with a paper towel before adding it to the batter. Additionally, feel free to experiment with different add-ins like chopped nuts or dried fruits to enhance the cake’s flavor and texture.
Finally, for a healthier twist, consider using whole wheat flour or substituting some of the sugar with a natural sweetener like honey or maple syrup.
Chia Seed Orange Cake
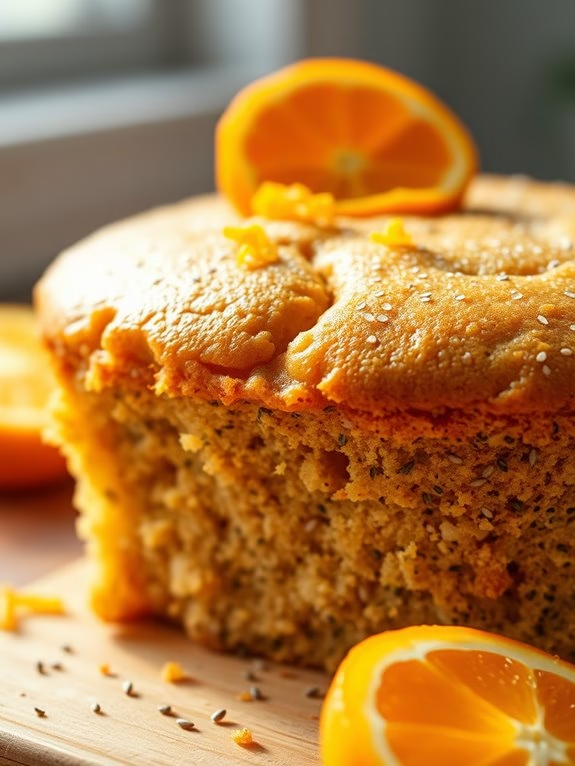
Chia Seed Orange Cake is a delightful and healthy dessert that perfectly balances the fresh, citrusy flavor of oranges with the nutritional benefits of chia seeds. This cake isn’t only moist and flavorful but also packed with fiber, omega-3 fatty acids, and antioxidants, making it a guilt-free indulgence.
Ideal for those who are health-conscious yet have a sweet tooth, this cake is perfect for any occasion, whether it’s a family gathering or a simple afternoon treat.
This cake recipe highlights the natural sweetness of oranges, which is complemented by the nutty flavor and crunchy texture of chia seeds. It’s a versatile dessert that can be enjoyed as is or topped with a light glaze or frosting for added flavor.
Best of all, the preparation is straightforward, making it an excellent option for both novice and experienced bakers. Let’s plunge into the recipe for this scrumptious Chia Seed Orange Cake that serves 4-6 people.
Ingredients:
- 1 cup whole wheat flour
- 1/2 cup almond flour
- 1 teaspoon baking powder
- 1/2 teaspoon baking soda
- 1/4 teaspoon salt
- 1/2 cup chia seeds
- 1/4 cup freshly squeezed orange juice
- 1 tablespoon orange zest
- 3/4 cup honey or maple syrup
- 2 large eggs
- 1/3 cup coconut oil, melted
- 1 teaspoon vanilla extract
- 1/2 cup plain Greek yogurt
Cooking Instructions:
- Preheat the Oven: Start by preheating your oven to 350°F (175°C). This guarantees that the oven is at the right temperature by the time you’re ready to bake the cake.
- Prepare the Baking Pan: Grease a 9-inch round cake pan with coconut oil or line it with parchment paper to prevent the cake from sticking.
- Mix Dry Ingredients: In a large bowl, whisk together the whole wheat flour, almond flour, baking powder, baking soda, salt, and chia seeds. This helps to evenly distribute the leavening agents and chia seeds throughout the flour.
- Combine Wet Ingredients: In another bowl, combine the orange juice, orange zest, honey (or maple syrup), eggs, melted coconut oil, and vanilla extract. Whisk until well combined.
- Incorporate Greek Yogurt: Add the Greek yogurt to the wet mixture and whisk until smooth. The yogurt adds moisture and a slight tang to the cake.
- Combine Wet and Dry Mixtures: Gradually add the wet ingredients to the dry ingredients, stirring gently until just combined. Be careful not to overmix, as this can make the cake dense.
- Pour and Bake: Pour the batter into the prepared cake pan, smoothing the top with a spatula. Bake in the preheated oven for 30-35 minutes, or until a toothpick inserted into the center comes out clean.
- Cool the Cake: Once baked, allow the cake to cool in the pan for about 10 minutes before transferring it to a wire rack to cool completely.
Extra Tips:
For an added burst of flavor, consider adding a teaspoon of cinnamon or nutmeg to the dry ingredients.
You can also customize the cake by adding nuts or dried fruits to the batter. If you prefer a sweeter cake, increase the amount of honey or maple syrup slightly.
To enhance the orange flavor, try using blood oranges or adding a splash of orange liqueur.
Oatmeal Apple Cake

Oatmeal Apple Cake Recipe
There’s something incredibly comforting about the combination of oats and apples, especially when they come together in a delightful cake that’s both healthy and satisfying. The Oatmeal Apple Cake is a perfect treat for those who are looking to indulge in dessert without the guilt. This cake isn’t only delicious but also packed with fiber and nutrients thanks to its wholesome ingredients like oats and fresh apples.
Whether you’re serving it as a dessert or a sweet breakfast option, this cake is sure to please everyone, from kids to adults. This recipe yields a moist and flavorful cake that’s easy to prepare and doesn’t require any fancy equipment. The natural sweetness of apples and a hint of cinnamon bring warmth and a lovely aroma to your kitchen.
The oats give the cake a hearty texture, making it a filling treat. Ideal for a family gathering or a cozy afternoon snack, this cake serves 4-6 people. Let’s explore the ingredients and the simple steps to create this delightful cake.
Ingredients:
- 2 cups rolled oats
- 1 ½ cups almond milk (or any preferred milk)
- 2 large apples, peeled, cored, and diced
- 1 cup whole wheat flour
- ½ cup maple syrup or honey
- ½ cup unsweetened applesauce
- 1 teaspoon vanilla extract
- 1 teaspoon ground cinnamon
- ½ teaspoon baking soda
- ½ teaspoon baking powder
- ¼ teaspoon salt
- 2 eggs
- ¼ cup chopped walnuts (optional)
- Cooking spray or a small amount of butter for greasing
Cooking Instructions:
- Preheat and Prepare: Preheat your oven to 350°F (175°C). Lightly grease a 9×9 inch baking dish with cooking spray or a small amount of butter. This will prevent the cake from sticking to the dish.
- Soak the Oats: In a large bowl, combine the rolled oats and almond milk. Let them soak for about 10 minutes. This process softens the oats, making them perfect for the cake batter.
- Prepare the Apples: While the oats are soaking, peel, core, and dice the apples into small pieces. Set them aside for later use.
- Mix Dry Ingredients: In a separate bowl, whisk together the whole wheat flour, ground cinnamon, baking soda, baking powder, and salt. This guarantees that all the dry ingredients are evenly distributed in the cake.
- Combine Wet Ingredients: Into the bowl with the soaked oats, add the maple syrup, applesauce, vanilla extract, and eggs. Mix well until all the ingredients are thoroughly combined.
- Combine Everything: Gradually add the dry ingredients to the wet mixture, stirring gently until just combined. Then fold in the diced apples and walnuts (if using). Be careful not to overmix, as this can make the cake dense.
- Bake the Cake: Pour the batter into the prepared baking dish. Smooth the top with a spatula to promote even baking. Place in the preheated oven and bake for 35-40 minutes, or until a toothpick inserted into the center comes out clean.
- Cool and Serve: Once baked, remove the cake from the oven and let it cool in the pan for about 10 minutes. Then transfer it to a wire rack to cool completely. Slice and serve as desired.
Extra Tips:
For a more pronounced apple flavor, consider using a mix of different apple varieties to add complexity to the taste. If you prefer a sweeter cake, you can increase the amount of maple syrup or add a handful of raisins for natural sweetness.
To make this recipe vegan, substitute the eggs with flax eggs (1 tablespoon of ground flaxseed mixed with 3 tablespoons of water per egg). Enjoy this cake on its own or with a dollop of yogurt or a scoop of vanilla ice cream for an extra treat.
Matcha Green Tea Cake
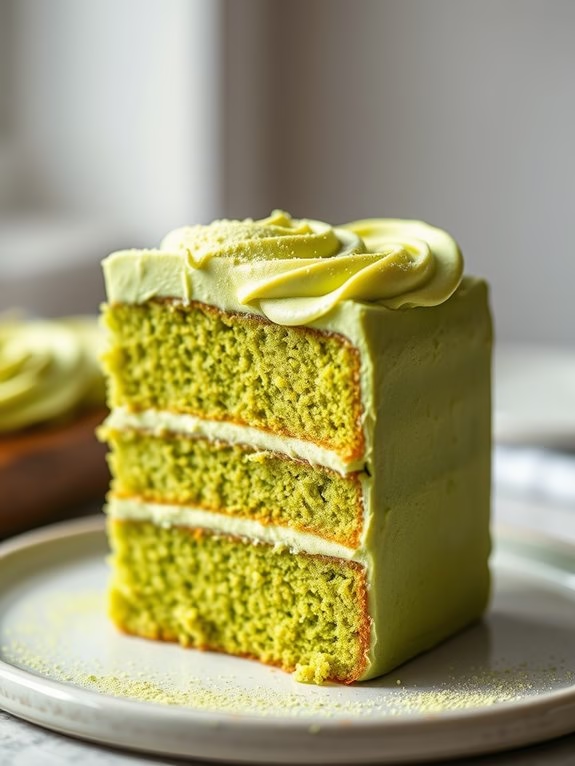
Matcha Green Tea Cake is a delightful fusion of traditional Asian flavors and classic cake-making techniques. The unique earthy taste of matcha, a finely ground green tea powder, is the star of this dessert, providing both its distinctive flavor and vibrant green hue.
This cake isn’t only a treat for the taste buds but is also packed with antioxidants, making it a healthy option for dessert lovers. By incorporating matcha into a light and fluffy cake batter, you can create a sophisticated and elegant cake that’s perfect for special occasions or a simple afternoon tea.
This matcha green tea cake recipe is designed to serve 4-6 people, making it ideal for small gatherings or family dinners. The cake is complemented by a creamy frosting that enhances the delicate matcha flavor without overpowering it.
Whether you’re a matcha enthusiast or new to its unique taste, this cake is sure to become a favorite. The following recipe provides all the necessary ingredients and step-by-step instructions to guarantee your matcha green tea cake turns out perfectly every time.
Ingredients:
- 1 cup all-purpose flour
- 1 tablespoon matcha green tea powder
- 1 teaspoon baking powder
- 1/4 teaspoon salt
- 3/4 cup granulated sugar
- 1/2 cup unsalted butter, softened
- 2 large eggs
- 1 teaspoon vanilla extract
- 1/2 cup milk
- 1 cup heavy cream
- 2 tablespoons powdered sugar
Cooking Instructions:
- Prepare the Dry Ingredients: In a medium-sized mixing bowl, sift together the all-purpose flour, matcha green tea powder, baking powder, and salt. This will guarantee that there are no lumps and that the matcha is evenly distributed throughout the flour.
- Cream Butter and Sugar: In a separate large mixing bowl, beat the softened butter and granulated sugar together using an electric mixer on medium speed until the mixture is light and fluffy. This should take about 3-5 minutes.
- Add Wet Ingredients: To the butter and sugar mixture, add the eggs one at a time, beating well after each addition. Stir in the vanilla extract until well combined.
- Combine Wet and Dry Ingredients: Gradually add the dry ingredients to the wet mixture, alternating with the milk. Begin and end with the dry ingredients, mixing just until incorporated. Be careful not to overmix, as this can result in a dense cake.
- Bake the Cake: Preheat your oven to 350°F (175°C). Grease and flour a round cake pan. Pour the batter into the prepared pan and smooth the top with a spatula. Bake for 25-30 minutes, or until a toothpick inserted into the center of the cake comes out clean. Allow the cake to cool in the pan for 10 minutes, then transfer it to a wire rack to cool completely.
- Prepare the Frosting: While the cake cools, make the frosting by whipping the heavy cream and powdered sugar together in a chilled bowl until soft peaks form. This will be your matcha frosting.
- Assemble the Cake: Once the cake is completely cooled, spread the matcha frosting evenly over the top and sides of the cake using a palette knife or spatula. If desired, dust a little extra matcha powder over the top for decoration.
Extra Tips: For an extra burst of flavor, consider folding in a handful of white chocolate chips into the batter before baking. Additionally, using high-quality matcha powder will enhance both the flavor and color of your cake.
Store any leftovers in the refrigerator to keep the frosting fresh, and allow the cake to come to room temperature before serving for the best texture and taste.
Beetroot Red Velvet Cake
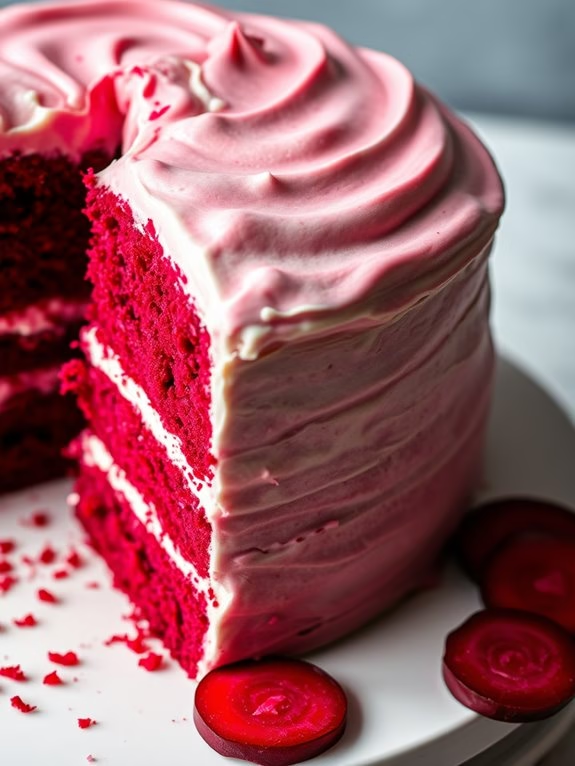
Beetroot Red Velvet Cake
Indulge in a healthier version of the classic red velvet cake with our Beetroot Red Velvet Cake recipe. By incorporating beetroot, this cake not only achieves its vibrant red hue naturally but also benefits from the nutritional advantages of this root vegetable. Beetroot is rich in vitamins, minerals, and antioxidants, making this cake not just a treat for your taste buds but also a better choice for your body.
Perfect for any occasion, this cake is moist, flavorful, and sure to impress your family and friends. Our Beetroot Red Velvet Cake is designed to serve 4-6 people, making it ideal for small gatherings or a cozy family dessert. The recipe substitutes some of the traditional ingredients with healthier alternatives, while still maintaining the cake’s signature texture and taste.
Whether you’re a seasoned baker or a beginner, this recipe is straightforward and easy to follow, guaranteeing a delightful baking experience.
Ingredients:
- 1 cup of cooked and pureed beetroot
- 1 1/2 cups of all-purpose flour
- 1 cup of granulated sugar
- 1/2 cup of unsweetened cocoa powder
- 1 teaspoon of baking soda
- 1/2 teaspoon of salt
- 3/4 cup of unsweetened almond milk (or any milk of choice)
- 1/3 cup of coconut oil, melted
- 1 tablespoon of apple cider vinegar
- 2 teaspoons of vanilla extract
- 1/4 cup of Greek yogurt
- 1/2 cup of cream cheese, softened (for frosting)
- 1/4 cup of honey or maple syrup (for frosting)
- 1 teaspoon of vanilla extract (for frosting)
Instructions:
- Prepare the Beetroot: Begin by cooking the beetroot until tender. You can boil or steam them for about 30-40 minutes. Once done, allow them to cool, peel, and then puree them in a food processor until smooth.
- Preheat the Oven: Preheat your oven to 350°F (175°C). Grease and flour two 8-inch round cake pans and set aside.
- Mix the Dry Ingredients: In a large bowl, sift together the all-purpose flour, cocoa powder, baking soda, and salt. This guarantees that all dry ingredients are thoroughly combined and free of lumps.
- Combine Wet Ingredients: In another bowl, mix the beetroot puree, granulated sugar, almond milk, melted coconut oil, apple cider vinegar, vanilla extract, and Greek yogurt. Stir until the mixture is smooth and homogenous.
- Combine Dry and Wet Ingredients: Gradually add the dry ingredients into the wet mixture, stirring continuously until you have a smooth batter. Be careful not to overmix, as this can result in a denser cake.
- Bake the Cake: Divide the batter evenly between the prepared cake pans. Place them in the preheated oven and bake for 25-30 minutes, or until a toothpick inserted into the center comes out clean.
- Prepare the Frosting: While the cake is baking, prepare the frosting by beating together the softened cream cheese, honey or maple syrup, and vanilla extract until smooth and creamy.
- Cool and Frost the Cake: Once the cakes are done, remove them from the oven and let them cool in the pans for about 10 minutes. Then, transfer them to a wire rack to cool completely. Once cooled, frost the top of one cake layer with the cream cheese frosting, place the second layer on top, and spread frosting over the top and sides of the cake.
Extra Tips:
For an extra moist cake, confirm that the beetroot puree is smooth and free of lumps before mixing it with other ingredients. If you prefer a less sweet frosting, adjust the amount of honey or maple syrup to your taste.
Additionally, if you want a more pronounced beet flavor, you can increase the amount of beetroot puree slightly. When storing, keep the cake in an airtight container in the refrigerator to maintain its freshness. Enjoy your Beetroot Red Velvet Cake chilled or at room temperature for the best flavor experience.
Quinoa Berry Cake
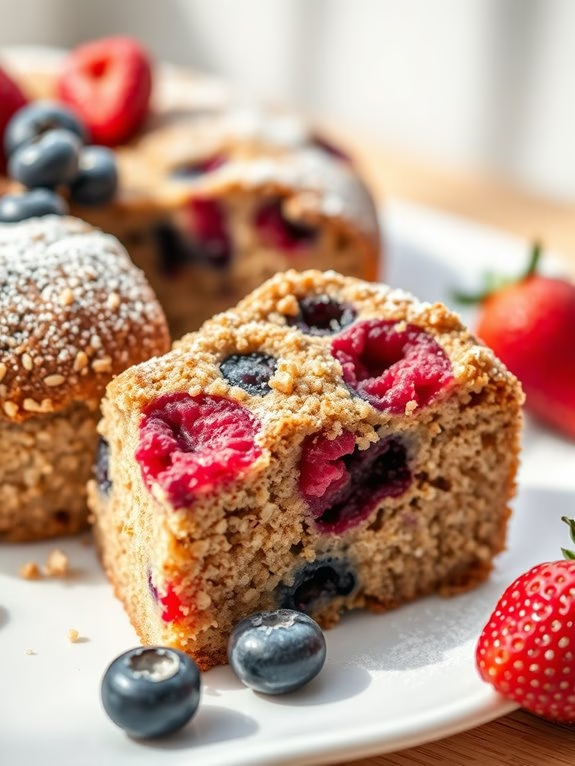
Quinoa Berry Cake is a delightful and nutritious dessert that combines the wholesome goodness of quinoa with the natural sweetness of fresh berries. This cake is perfect for those who want to enjoy a sweet treat without compromising on health. Packed with protein-rich quinoa and antioxidant-loaded berries, this cake not only satisfies your sweet tooth but also provides essential nutrients.
The moist texture and vibrant flavors make it a favorite for both kids and adults alike. This healthy cake is gluten-free and can be made dairy-free, making it an excellent option for people with dietary restrictions. It’s a versatile recipe that can be served as a dessert or a special breakfast treat.
The combination of quinoa and berries guarantees that you get a good dose of fiber, vitamins, and minerals, making it a guilt-free indulgence. With a few simple ingredients and easy-to-follow steps, you can create a delicious cake that everyone will love.
Ingredients (Serves 4-6)
- 1 cup cooked quinoa
- 1 cup almond flour
- 3/4 cup coconut sugar
- 1/2 cup unsweetened applesauce
- 1/4 cup almond milk
- 3 large eggs
- 1 teaspoon vanilla extract
- 1 teaspoon baking powder
- 1/2 teaspoon baking soda
- 1/4 teaspoon salt
- 1 cup mixed fresh berries (such as blueberries, raspberries, and strawberries)
- 1 tablespoon lemon zest
Instructions
- Preheat the Oven: Preheat your oven to 350°F (175°C). Grease a 9-inch round cake pan or line it with parchment paper to guarantee easy removal of the cake after baking.
- Prepare the Quinoa: If you haven’t cooked the quinoa yet, rinse 1/2 cup dry quinoa thoroughly and cook it according to package instructions. Measure out 1 cup of cooked quinoa and set it aside to cool.
- Mix Dry Ingredients: In a large mixing bowl, combine the almond flour, coconut sugar, baking powder, baking soda, and salt. Mix well to guarantee that all the dry ingredients are evenly distributed.
- Combine Wet Ingredients: In a separate bowl, whisk together the applesauce, almond milk, eggs, and vanilla extract until smooth. This mixture will add moisture and flavor to your cake.
- Combine All Ingredients: Gradually add the wet ingredients to the dry ingredients, stirring gently. Fold in the cooked quinoa and lemon zest, guaranteeing the mixture is well combined but not over-mixed.
- Add Berries: Gently fold in the mixed fresh berries, being careful not to crush them. This will distribute the berries evenly throughout the cake batter.
- Bake the Cake: Pour the batter into the prepared cake pan and smooth the top with a spatula. Bake in the preheated oven for 35-40 minutes, or until a toothpick inserted into the center comes out clean.
- Cool and Serve: Allow the cake to cool in the pan for about 10 minutes, then transfer it to a wire rack to cool completely. Serve the cake with a dusting of powdered sugar or a dollop of whipped coconut cream if desired.
Extra Tips
For an extra burst of flavor, you can add a teaspoon of cinnamon or nutmeg to the batter. If you prefer a sweeter cake, consider drizzling a light honey glaze over the top before serving.
To make the cake dairy-free, guarantee that all ingredients used, including the almond milk, are certified dairy-free. You can also experiment with different berries or nuts to customize the cake to your liking.
Finally, guarantee that the quinoa is fully cooled before adding it to the batter to prevent it from cooking the eggs prematurely.