
As the holiday season comes into view, hosting a Christmas dinner that stands out feels like a delightful challenge. Picture the Herb-Crusted Prime Rib Roast filling your home with its mouthwatering aroma. The vibrant Orange-Glazed Duck with Pomegranate Sauce will surely impress your guests. These dishes might take a little extra effort, but they’re bound to create unforgettable memories. Ready to explore these gourmet Christmas dinner recipes?
Herb-Crusted Prime Rib Roast
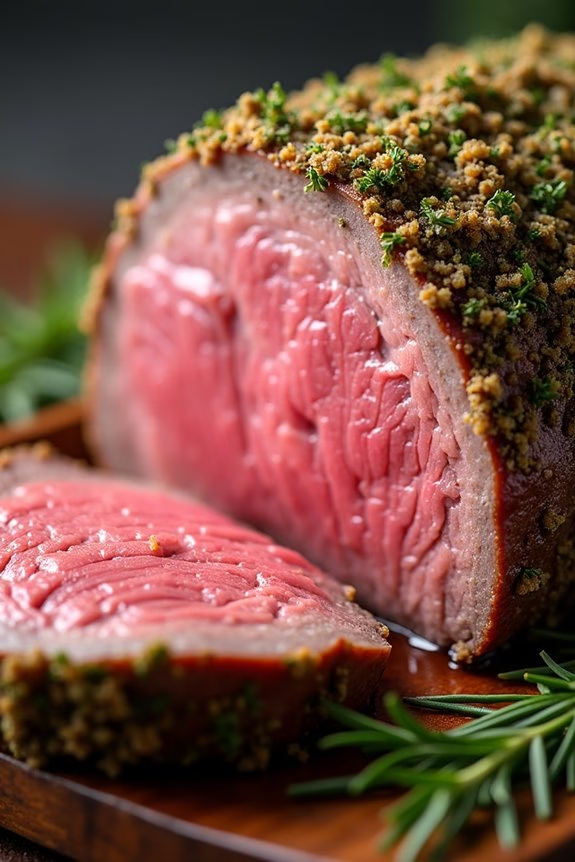
Herb-Crusted Prime Rib Roast is the perfect centerpiece for a gourmet Christmas dinner. This luxurious dish is known for its rich flavor and tender texture, making it an impressive choice for festive gatherings. The prime rib is generously coated with a flavorful herb crust that enhances the natural taste of the beef, while also providing a delightful contrast in texture. The result is a mouthwatering roast that’s juicy on the inside with a perfectly crisped crust on the outside.
Preparing this dish involves selecting a high-quality prime rib, guaranteeing it’s cooked to perfection, and allowing the herb crust to infuse its aromatic flavors into the meat. The herbs used in the crust not only add a depth of flavor but also create an enticing aroma that fills the kitchen as it roasts.
Whether you’re a seasoned home cook or trying your hand at something new for the holidays, this recipe guides you through each step to achieve a restaurant-quality meal at home.
Ingredients (Serves 4-6):
- 1 (4-5 pound) bone-in prime rib roast
- 2 tablespoons olive oil
- 4 cloves garlic, minced
- 2 tablespoons fresh rosemary, chopped
- 2 tablespoons fresh thyme, chopped
- 2 tablespoons fresh parsley, chopped
- 1 tablespoon kosher salt
- 1 tablespoon black pepper, freshly ground
- 1 teaspoon Dijon mustard
Cooking Instructions:
- Prepare the Roast: Remove the prime rib from the refrigerator at least 2 hours before cooking to bring it to room temperature. This guarantees even cooking throughout the roast.
- Preheat the Oven: Heat your oven to 450°F (232°C).
- Create the Herb Mixture: In a bowl, combine the minced garlic, rosemary, thyme, parsley, salt, pepper, olive oil, and Dijon mustard to form a paste.
- Apply the Herb Crust: Pat the prime rib dry with paper towels. Rub the entire roast generously with the herb mixture, guaranteeing all sides are evenly coated.
- Roast the Prime Rib: Place the roast on a rack in a roasting pan, bone-side down. Insert a meat thermometer into the thickest part of the roast, away from the bone. Roast in the preheated oven for 20 minutes.
- Adjust the Oven Temperature: After 20 minutes, reduce the oven temperature to 325°F (163°C). Continue roasting until the thermometer reads 130°F (54°C) for medium-rare, approximately 1.5 to 2 hours.
- Rest the Roast: Remove the roast from the oven and tent it loosely with aluminum foil. Allow it to rest for at least 20 minutes before carving. This step is essential for retaining the juices in the meat.
- Carve and Serve: Slice the roast into thick cuts and serve immediately alongside your favorite holiday sides.
Extra Tips:
When cooking a prime rib, it’s important to rely on a meat thermometer rather than time alone, as oven temperatures can vary. Allowing the meat to rest after roasting is vital for keeping it juicy.
If you prefer your meat cooked to a different level of doneness, adjust the target internal temperature accordingly (e.g., 140°F for medium). Additionally, the herb crust can be adjusted to your taste by experimenting with different herbs or adding a touch of lemon zest for extra freshness.
Orange-Glazed Duck With Pomegranate Sauce
Orange-Glazed Duck With Pomegranate Sauce is a delightful gourmet dish perfect for a Christmas dinner that combines the rich flavors of duck with the fresh, tangy notes of orange and pomegranate. This sophisticated dish isn’t only a feast for the palate but also a visual spectacle when served, making it an ideal centerpiece for your holiday table.
The succulent duck, with its crispy skin, is beautifully complemented by the sweet and slightly tart glaze, creating a harmonious balance of flavors that will impress your guests.
The preparation of this dish may seem intricate, but with careful attention to detail and a touch of patience, you can achieve restaurant-quality results at home. The key lies in properly roasting the duck to guarantee it remains juicy while achieving a golden, crispy exterior.
Meanwhile, the pomegranate sauce adds a burst of color and a unique depth of flavor that elevates the entire meal. This recipe serves 4-6 people, making it perfect for a small gathering.
Ingredients:
- 1 whole duck (about 5-6 pounds)
- Salt and freshly ground black pepper
- 2 oranges, zested and juiced
- 1 cup pomegranate juice
- 1/2 cup chicken stock
- 1/4 cup honey
- 1 tablespoon soy sauce
- 2 tablespoons cornstarch
- 1/4 cup water
- 1 pomegranate, seeds removed
- Fresh thyme sprigs for garnish
Cooking Instructions:
- Prepare the Duck: Preheat your oven to 375°F (190°C). Pat the duck dry with paper towels and season generously with salt and pepper, both inside and out. Prick the skin lightly with a fork to allow the fat to render while roasting.
- Roast the Duck: Place the duck on a rack in a roasting pan. Roast in the preheated oven for about 1 hour and 30 minutes, or until the internal temperature reaches 165°F (74°C). Baste the duck occasionally with its own juices to keep it moist.
- Make the Orange-Glaze: In a small saucepan, combine the orange juice, orange zest, pomegranate juice, chicken stock, honey, and soy sauce. Bring the mixture to a simmer over medium heat.
- Thicken the Sauce: In a small bowl, mix the cornstarch with water to create a slurry. Slowly whisk the slurry into the simmering sauce until it thickens to your desired consistency. Continue to cook for another 2-3 minutes, then remove from heat.
- Glaze the Duck: During the final 15 minutes of roasting, brush the duck with the orange glaze. Repeat a few times until the skin is glossy and caramelized.
- Garnish and Serve: Remove the duck from the oven and let it rest for 10 minutes before carving. Drizzle any remaining glaze over the carved duck and sprinkle with pomegranate seeds. Garnish with fresh thyme sprigs before serving.
Extra Tips:
When cooking Orange-Glazed Duck With Pomegranate Sauce, it’s important to allow the duck to rest before carving. This helps the juices redistribute throughout the meat, guaranteeing a moist and flavorful result.
Additionally, if you prefer a thicker sauce, you can adjust the amount of cornstarch in the slurry. For an even deeper pomegranate flavor, consider reducing the pomegranate juice slightly before mixing it with the other glaze ingredients.
Finally, don’t forget to save any leftover duck fat, as it’s excellent for roasting potatoes or vegetables.
Roasted Rack of Lamb With Garlic and Rosemary
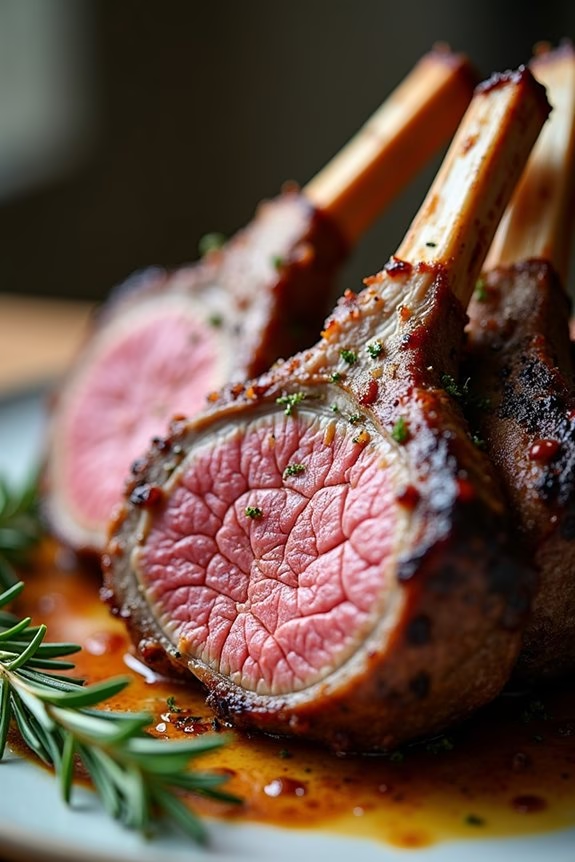
Roasted Rack of Lamb with Garlic and Rosemary is a luxurious and flavorful centerpiece for your Christmas dinner. The dish combines the rich taste of lamb with the aromatic flavors of garlic and rosemary, creating an unforgettable dining experience. Perfectly roasted to a juicy, tender finish, this dish is sure to impress your guests and elevate your holiday feast.
The combination of herbs and garlic infuses the lamb with a savory depth that complements its natural richness, and the roasting process guarantees a beautiful crust while keeping the meat succulent.
Preparing this dish may seem intimidating, but with careful attention to detail, you can achieve restaurant-quality results at home. The key to success is seasoning the lamb generously and allowing it to marinate, which enhances the flavors and tenderness.
Roasting the rack at a high temperature helps develop a crispy exterior without overcooking the interior, preserving the lamb’s natural juices. Serve this gourmet dish with a selection of sides such as roasted vegetables or a creamy potato gratin to complete your Christmas dinner menu.
Ingredients for 4-6 servings:
- 2 racks of lamb (about 1.5 pounds each, frenched)
- 4 cloves of garlic, minced
- 2 tablespoons fresh rosemary, finely chopped
- 2 tablespoons olive oil
- Salt and freshly ground black pepper, to taste
- 2 tablespoons Dijon mustard
- 1 tablespoon lemon juice
Cooking Instructions:
- Prepare the Marinade: In a small bowl, mix together the minced garlic, chopped rosemary, olive oil, salt, and pepper. This mixture will serve as your marinade and will infuse the lamb with flavor.
- Marinate the Lamb: Place the lamb racks on a large baking sheet or dish. Rub the marinade mixture evenly over both racks, making sure the meat is well-coated. Cover the dish with plastic wrap and let it marinate in the refrigerator for at least 1 hour, or up to overnight for deeper flavor.
- Preheat the Oven: When ready to cook, preheat your oven to 450°F (230°C). Remove the lamb from the refrigerator and let it sit at room temperature for 30 minutes to guarantee even cooking.
- Sear the Lamb: Heat a large skillet over medium-high heat. Add a bit of olive oil and sear the lamb racks on all sides until browned, about 3-4 minutes per side. This step helps to lock in the juices and create a flavorful crust.
- Roast the Lamb: Transfer the seared lamb racks to a roasting pan. Spread the Dijon mustard evenly over the top of the lamb, and sprinkle with additional rosemary if desired. Roast in the preheated oven for about 15-20 minutes, or until the internal temperature reaches 130°F (54°C) for medium-rare.
- Rest the Lamb: Remove the lamb from the oven and transfer it to a cutting board. Cover loosely with foil and let it rest for 10 minutes. Resting allows the juices to redistribute throughout the meat, guaranteeing a moist and tender roast.
- Serve: Carve the lamb between the ribs and arrange on a serving platter. Drizzle with lemon juice for a fresh finish and serve immediately.
Extra Tips: To guarantee the best results, use a meat thermometer to check the internal temperature of the lamb, preventing overcooking. Adjust cooking time based on your preferred doneness; remember that lamb continues to cook slightly after being removed from the oven.
For added flavor, consider adding a touch of balsamic glaze when serving. Finally, if you’re cooking for more than six people, consider preparing additional racks or supplementary dishes to accommodate your guests.
Beef Wellington With Mushroom Duxelles
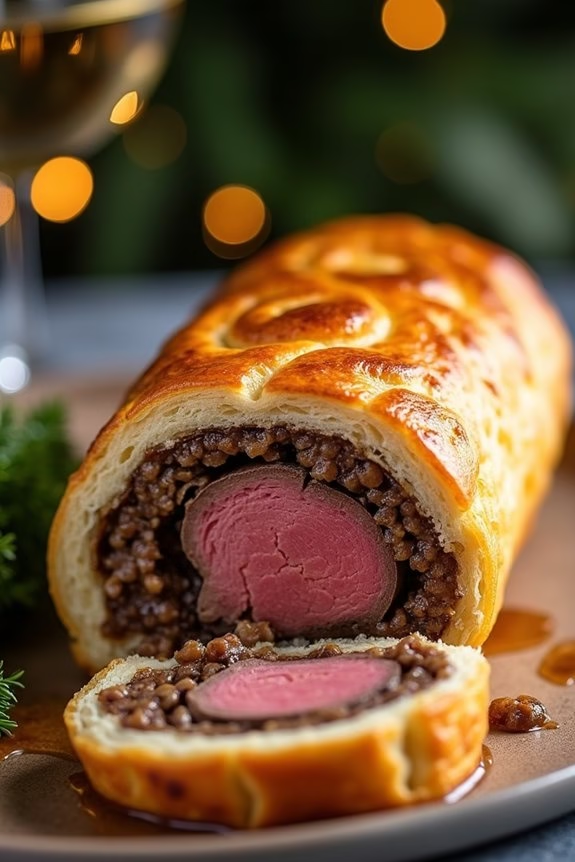
Beef Wellington with Mushroom Duxelles is a quintessential gourmet dish that’s sure to impress your guests at your Christmas dinner. This classic recipe features a succulent beef tenderloin coated with a rich mushroom duxelles and luxurious pâté, all encased in a golden, flaky puff pastry. The harmonious blend of flavors and textures makes it a showstopper on any festive table.
Originating from British cuisine, Beef Wellington has become a beloved dish worldwide for its elegance and deliciousness.
To prepare this exquisite dish, the key is in balancing the flavors of the beef, mushrooms, and pastry. The mushroom duxelles—a finely chopped mixture of mushrooms, shallots, and herbs—provides a savory, earthy depth to the dish, while the puff pastry adds a delightful crispiness.
It’s important to verify that the beef is cooked to your preferred level of doneness, making use of a meat thermometer for accuracy. With a little patience and attention to detail, you can create a Beef Wellington that will be the highlight of your holiday feast.
Ingredients for 4-6 servings:
- 2 pounds beef tenderloin
- Salt and pepper, to taste
- 2 tablespoons olive oil
- 2 tablespoons Dijon mustard
- 1 pound mushrooms (such as cremini or button)
- 2 tablespoons unsalted butter
- 2 shallots, finely chopped
- 2 cloves garlic, minced
- 1 sprig fresh thyme
- 4 slices prosciutto
- 1 pound puff pastry
- 1 egg, beaten
- 3 tablespoons pâté (optional)
Cooking Instructions:
- Prepare the Beef: Season the beef tenderloin generously with salt and pepper. In a large skillet over medium-high heat, add olive oil and sear the beef on all sides until browned, about 2-3 minutes per side. Remove from heat and let it cool. Brush the beef with Dijon mustard and set aside.
- Make the Mushroom Duxelles: Roughly chop the mushrooms and add them to a food processor, pulsing until finely chopped. In the same skillet, melt butter over medium heat. Add shallots and garlic, sautéing until softened. Stir in the mushrooms and thyme, cooking until all moisture evaporates and the mixture is dry. Remove from heat and let cool.
- Assemble the Wellington: Lay out a large piece of plastic wrap. Overlap the slices of prosciutto on the plastic wrap. Spread the mushroom duxelles evenly over the prosciutto, and place the beef tenderloin on top. If using, spread pâté over the beef. Using the plastic wrap, tightly roll the prosciutto and duxelles around the beef, twisting the ends of the wrap to seal. Refrigerate for 15 minutes.
- Wrap in Puff Pastry: Preheat your oven to 400°F (200°C). Roll out the puff pastry on a lightly floured surface. Unwrap the beef and place it on the pastry. Brush the edges of the pastry with the beaten egg, then wrap the beef, sealing the edges tightly. Place seam-side down on a baking sheet. Brush the top with more egg wash.
- Bake the Wellington: With a sharp knife, score the top of the pastry with a decorative pattern and sprinkle with a little sea salt. Bake in the preheated oven for 25-30 minutes, or until the pastry is golden brown. Use a meat thermometer to verify the beef is cooked to your desired temperature (medium-rare is 135°F/57°C).
- Rest and Serve: Allow the Beef Wellington to rest for 10 minutes before slicing. Serve with your choice of sides, such as roasted vegetables or a fresh salad.
Extra Tips:
For best results, verify that the mushroom duxelles is as dry as possible to prevent the pastry from becoming soggy. You can prepare the duxelles and sear the beef a day in advance to save time on the day of serving.
When working with puff pastry, keep it cold to verify it puffs up beautifully in the oven. Finally, remember that resting the Wellington is essential, as it allows the juices to redistribute, resulting in a juicier and more flavorful dish. Enjoy your gourmet creation!
Classic Coq Au Vin
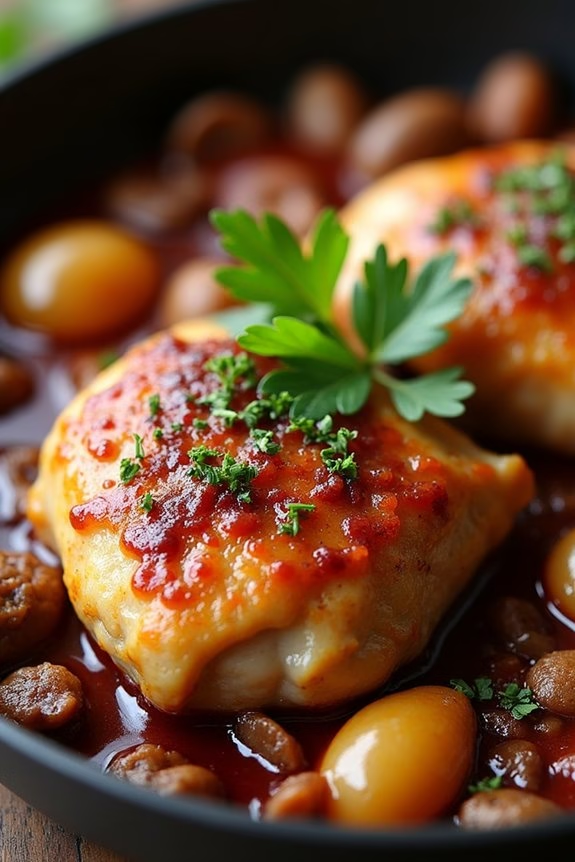
Sure, here’s a recipe for Classic Coq Au Vin, a traditional French dish that’s perfect for a gourmet Christmas dinner. This rich and flavorful dish features chicken slowly braised in red wine with mushrooms, pancetta, onions, and herbs, resulting in a deep, savory flavor that’s bound to impress your holiday guests.
The slow cooking process allows the flavors to meld beautifully, making it an ideal centerpiece for a festive meal. With its robust flavors and elegant presentation, Classic Coq Au Vin is both comforting and refined, offering a taste of French culinary tradition.
This recipe serves 4-6 people, making it a great choice for a small gathering or family dinner. While the recipe might seem intricate, following these steps will guarantee that you create a deliciously memorable dish. The combination of tender chicken and a luscious wine sauce makes this dish a quintessential part of any gourmet Christmas dinner.
Ingredients:
- 1 whole chicken (about 4 lbs), cut into 8 pieces
- Salt and freshly ground black pepper
- 3 tablespoons olive oil
- 4 ounces pancetta or bacon, diced
- 1 large onion, chopped
- 2 cloves garlic, minced
- 2 tablespoons all-purpose flour
- 2 cups red wine (preferably Burgundy or Pinot Noir)
- 1 cup chicken broth
- 2 tablespoons tomato paste
- 1 bouquet garni (parsley sprigs, thyme sprigs, and bay leaf tied together)
- 12 pearl onions, peeled
- 8 ounces mushrooms, quartered
- 2 tablespoons unsalted butter
- 2 tablespoons chopped fresh parsley, for garnish
Cooking Instructions:
- Prepare the Chicken: Season the chicken pieces generously with salt and freshly ground black pepper. This will guarantee the chicken is well-flavored throughout the cooking process.
- Brown the Chicken: In a large Dutch oven or heavy pot, heat 2 tablespoons of olive oil over medium-high heat. Add the pancetta or bacon and cook until crisp. Remove with a slotted spoon and set aside. In the same pot, brown the chicken pieces in batches until golden on all sides. Remove the chicken and set aside.
- Cook the Aromatics: Add the chopped onion and garlic to the pot. Cook over medium heat until the onions are soft and translucent, about 5 minutes. Sprinkle the flour over the onions and cook for an additional 2 minutes, stirring continuously.
- Deglaze the Pan: Pour in the red wine, scraping up any browned bits from the bottom of the pot. Bring the mixture to a boil, then reduce to a simmer for about 5 minutes.
- Simmer the Coq Au Vin: Return the chicken and pancetta to the pot. Add the chicken broth, tomato paste, and bouquet garni. Cover and simmer on low heat for about 30 minutes.
- Add Vegetables: In a separate pan, heat the remaining olive oil and butter over medium heat. Sauté the pearl onions and mushrooms until golden brown, about 10 minutes. Add these to the pot with the chicken.
- Finish Cooking: Continue to simmer the Coq Au Vin uncovered for another 20-30 minutes, or until the chicken is tender and the sauce has thickened.
- Serve: Remove the bouquet garni and adjust the seasoning with salt and pepper if needed. Garnish with chopped fresh parsley before serving.
Extra Tips:
When preparing Classic Coq Au Vin, the choice of wine plays a vital role in the dish’s flavor. Opt for a full-bodied red wine like Burgundy or Pinot Noir for the best results.
Additionally, allowing the dish to sit for a few hours or even overnight enhances the flavors, making it even more delicious. Serve with crusty bread or mashed potatoes to soak up the rich sauce.
If you find the sauce too thin, you can thicken it further by simmering it uncovered for a few more minutes or adding a slurry of flour and water. Enjoy your gourmet Christmas dinner!
Lobster Thermidor
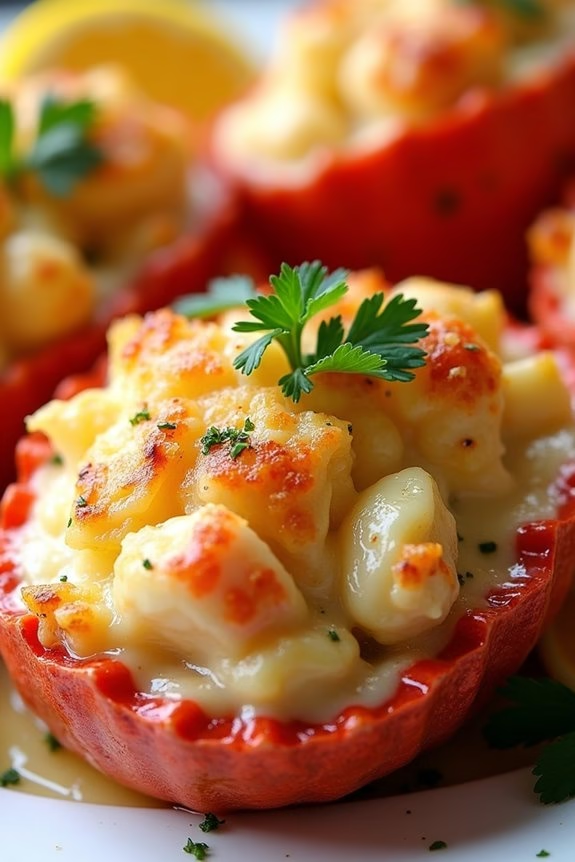
Lobster Thermidor is a classic French dish that perfectly embodies the luxurious spirit of a gourmet Christmas dinner. Known for its rich, creamy sauce, this dish features succulent lobster meat, elegantly presented in its shell. The combination of fresh lobster, creamy béchamel sauce, and a hint of mustard and cognac creates a decadent and flavorful experience that will leave your guests in awe.
Perfect for special occasions, Lobster Thermidor is a dish that requires a bit of preparation but rewards you with a stunning presentation and an unforgettable taste. This recipe serves 4-6 people, making it ideal for a small holiday gathering. The key to a successful Lobster Thermidor lies in the quality of ingredients and the careful execution of each step.
With a bit of patience and attention to detail, you’ll be able to create this gourmet masterpiece in your own kitchen. The following ingredients and instructions will guide you through the process, guaranteeing a delightful outcome that will be the highlight of your festive meal.
Ingredients:
- 4 live lobsters (about 1 1/2 pounds each)
- 1/4 cup unsalted butter
- 1/4 cup all-purpose flour
- 1 1/2 cups whole milk
- 1/2 cup heavy cream
- 2 tablespoons Dijon mustard
- 1/4 cup cognac
- 1/4 cup finely grated Gruyère cheese
- Salt and freshly ground black pepper, to taste
- 2 tablespoons chopped fresh parsley
- 1 lemon, cut into wedges (for serving)
Cooking Instructions:
- Cook the Lobsters: Fill a large pot with water and bring it to a boil. Add a generous amount of salt. Place the live lobsters into the boiling water, cover the pot, and cook for about 8-10 minutes until the lobsters are bright red. Remove the lobsters and let them cool slightly.
- Prepare the Lobster Meat: Once the lobsters are cool enough to handle, crack open the shells and remove the meat. Be careful to keep the shell halves intact as they’ll be used for serving. Chop the lobster meat into bite-sized pieces and set aside.
- Make the Béchamel Sauce: In a medium saucepan, melt the butter over medium heat. Whisk in the flour and cook for about 2 minutes until the mixture turns golden. Gradually add the milk and cream, whisking continuously until the sauce thickens, about 5 minutes. Stir in the Dijon mustard and cognac, and season with salt and pepper to taste.
- Combine and Fill the Shells: Preheat your oven to 375°F (190°C). Add the chopped lobster meat to the béchamel sauce and stir to combine. Spoon the lobster mixture back into the lobster shells, dividing it evenly.
- Bake the Lobsters: Place the filled lobster shells on a baking sheet. Sprinkle the grated Gruyère cheese over the top of each lobster. Bake in the preheated oven for 10-12 minutes, or until the cheese is melted and golden brown.
- Serve: Remove the Lobster Thermidor from the oven and garnish with chopped parsley. Serve immediately with lemon wedges on the side.
Extra Tips: When cooking Lobster Thermidor, it’s important to use fresh, high-quality lobster for the best flavor. If possible, purchase live lobsters on the day you plan to cook them.
Additionally, when making the béchamel sauce, make certain that you whisk continuously to avoid lumps and achieve a smooth consistency. If you prefer a stronger flavor, you can add a bit more mustard or cognac according to your taste. This dish pairs beautifully with a light, crisp white wine, such as a Chardonnay or Sauvignon Blanc, to enhance the dining experience.
Stuffed Crown Roast of Pork
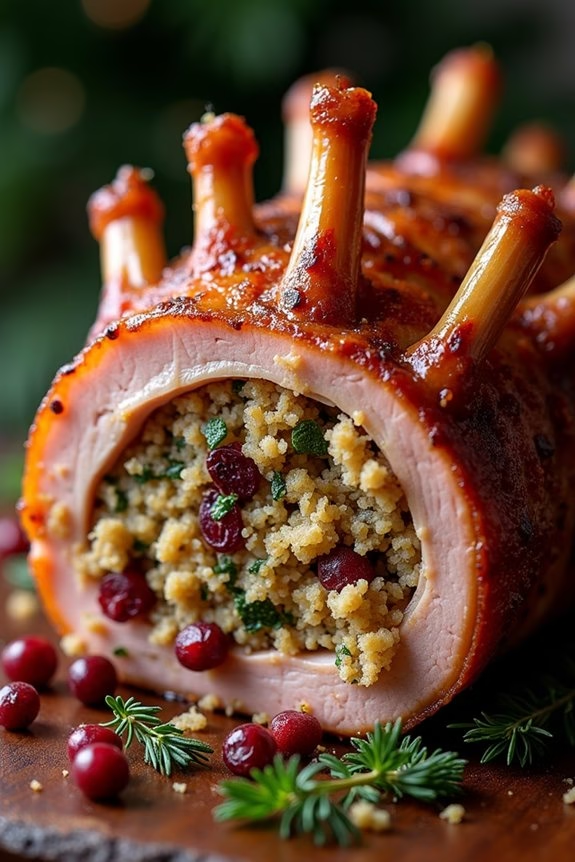
The Stuffed Crown Roast of Pork is a majestic centerpiece perfect for any festive Christmas dinner. It isn’t only visually impressive but also rich in flavor, offering a delightful combination of juicy pork and a savory stuffing that will leave your guests in awe.
A crown roast is fundamentally a rib roast with the ribs arranged in a circle and tied to resemble a crown. This elegant presentation, combined with the aromatic stuffing, makes it a luxurious choice for special occasions.
Whether you’re hosting a small gathering or a large family feast, this recipe serves 4-6 people and guarantees everyone will have a memorable dining experience. The combination of tender pork, aromatic herbs, and a luscious stuffing creates a harmonious blend of flavors and textures.
Despite its sophisticated appearance, the Stuffed Crown Roast of Pork is surprisingly straightforward to prepare, making it an ideal choice for both novice and experienced cooks alike.
Ingredients for 4-6 servings:
- 1 crown roast of pork (8-10 ribs)
- 1 tablespoon olive oil
- Salt and freshly ground black pepper, to taste
- 2 cups breadcrumbs
- 1 cup chicken broth
- 1/2 cup finely chopped onion
- 1/2 cup finely chopped celery
- 1/2 cup dried cranberries
- 1/4 cup chopped fresh parsley
- 1 teaspoon dried thyme
- 1 teaspoon dried sage
- 2 cloves garlic, minced
- 1/4 cup melted butter
- Kitchen twine
Cooking Instructions:
- Prepare the Crown Roast: Preheat your oven to 375°F (190°C). Place the crown roast of pork on a large roasting pan. Rub the olive oil all over the meat, then season generously with salt and freshly ground black pepper.
- Make the Stuffing: In a large bowl, combine the breadcrumbs, chicken broth, onion, celery, dried cranberries, parsley, thyme, sage, and minced garlic. Pour in the melted butter and mix until the stuffing is well combined and slightly moist.
- Stuff the Crown Roast: Fill the center of the crown roast with the prepared stuffing, packing it lightly. If there’s extra stuffing, you can bake it separately in a small dish.
- Secure the Roast: Use kitchen twine to tie the ribs together at the tips to help maintain the crown shape during cooking. This will also help to keep the stuffing in place.
- Roast the Pork: Place the roasting pan in the preheated oven. Roast for about 2 to 2.5 hours, or until the internal temperature of the meat reaches 145°F (63°C) when checked with a meat thermometer.
- Rest and Serve: Once cooked, remove the roast from the oven and let it rest for about 15 minutes before carving. This allows the juices to redistribute, guaranteeing a moist and flavorful pork roast. Carve between each rib to serve individual portions with a scoop of the stuffing.
Extra Tips:
When preparing the Stuffed Crown Roast of Pork, it’s crucial to select a high-quality cut of meat for the best results. Ask your butcher to prepare the crown roast for you, ensuring the bones are french-trimmed for an elegant presentation.
Always let the roast rest before carving to retain its juices. If you desire a more caramelized exterior, you can increase the oven temperature to 400°F (200°C) for the last 15 minutes of roasting.
Pair this dish with a rich gravy or a tangy apple sauce for an added layer of flavor.
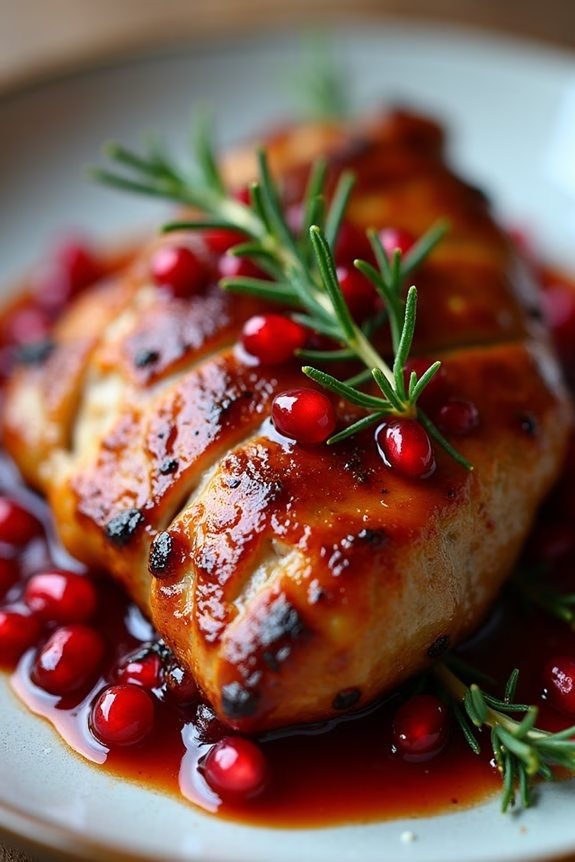
Maple-Glazed Ham With Spiced Pears
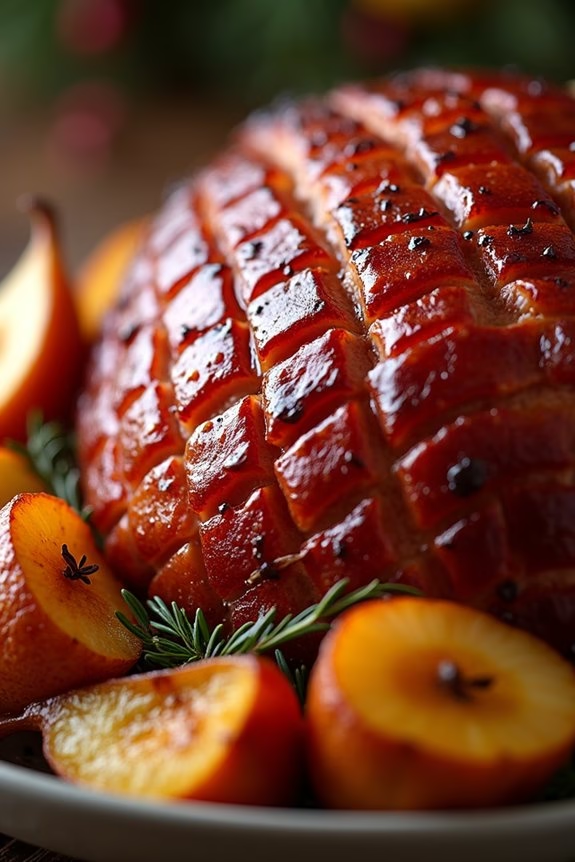
Maple-Glazed Ham With Spiced Pears is a delightful centerpiece for your Christmas dinner table, combining the sweet, earthy flavors of maple syrup with the warm spices of cinnamon, cloves, and nutmeg. This dish not only fills your home with comforting holiday aromas but also provides a beautiful visual display, with the golden-brown glaze on the ham contrasting with the vibrant pears.
Perfect for a family gathering, this recipe serves 4-6 people, ensuring everyone gets to enjoy a hearty slice of ham accompanied by succulent, spiced pears.
The key to a successful Maple-Glazed Ham With Spiced Pears is the balance of flavors, achieved by carefully glazing the ham and slowly cooking the pears until they’re tender and infused with spices. Whether you’re a seasoned cook or trying your hand at preparing a gourmet Christmas dinner for the first time, this recipe is straightforward and rewarding, resulting in a festive dish that will impress your guests and leave them craving more.
Ingredients for 4-6 Servings:
- 1 (4-5 pound) bone-in ham
- 1 cup pure maple syrup
- 2 tablespoons Dijon mustard
- 1/2 cup apple cider vinegar
- 1 teaspoon ground cinnamon
- 1/2 teaspoon ground cloves
- 1/4 teaspoon ground nutmeg
- 4 ripe pears, halved and cored
- 2 tablespoons unsalted butter
- Salt and pepper to taste
Cooking Instructions:
- Prepare the Ham: Preheat your oven to 325°F (165°C). Place the ham in a large roasting pan, fat side up. Score the surface of the ham in a diamond pattern using a sharp knife.
- Make the Glaze: In a medium saucepan, combine the maple syrup, Dijon mustard, apple cider vinegar, cinnamon, cloves, and nutmeg. Stir over medium heat until the mixture comes to a gentle boil. Reduce the heat and simmer for about 5 minutes until slightly thickened.
- Glaze the Ham: Pour half of the glaze over the scored ham, ensuring it’s evenly covered. Reserve the remaining glaze for later use. Cover the roasting pan with aluminum foil.
- Roast the Ham: Place the ham in the preheated oven and roast for about 1.5 to 2 hours, basting with the pan juices every 30 minutes.
- Prepare the Spiced Pears: While the ham is roasting, melt the butter in a large skillet over medium heat. Add the pear halves, cut side down, and cook until they start to brown, about 5 minutes. Sprinkle the pears with a pinch of salt and pepper, and spoon some of the reserved glaze over them. Allow the pears to cook for an additional 10-15 minutes until tender.
- Finish the Ham: After the initial roasting time, remove the foil and increase the oven temperature to 375°F (190°C). Brush the ham with the remaining glaze and return it to the oven. Roast uncovered for an additional 15-20 minutes, or until the glaze is caramelized and the internal temperature of the ham reaches 140°F (60°C).
- Serve: Transfer the ham to a serving platter and arrange the spiced pears around it. Let the ham rest for about 10 minutes before slicing and serving.
Extra Tips:
For the best results, choose a quality bone-in ham, as it retains moisture better and provides more flavor. When scoring the ham, be careful not to cut too deeply; shallow cuts will allow the glaze to penetrate without drying out the meat.
If you prefer a thicker glaze, you can reduce it further on the stove before pouring it over the ham. Additionally, if pears aren’t in season, apples make a great alternative that pairs well with the spices and sweetness of the glaze.
Truffle Risotto With Parmesan
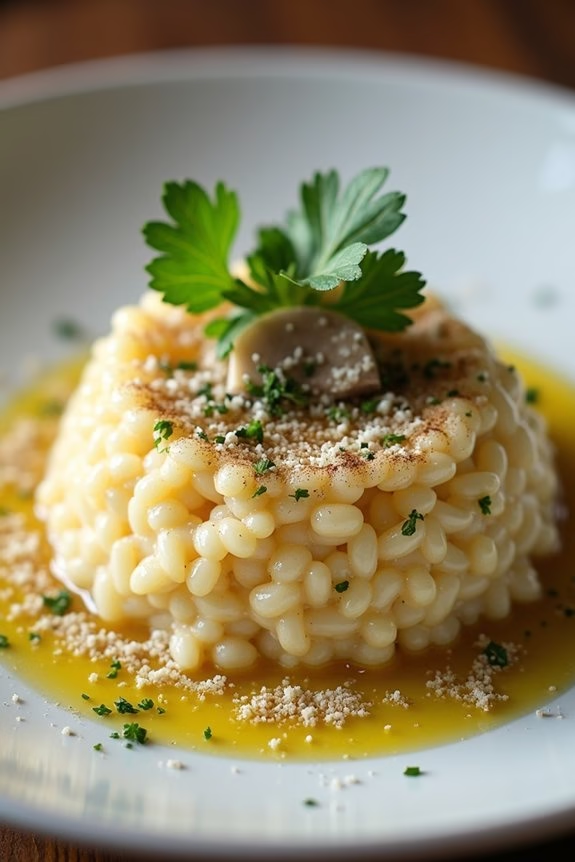
Indulge in the luxuriously creamy and aromatic Truffle Risotto With Parmesan, a gourmet dish that sings elegance and sophistication. Perfect for a festive Christmas dinner, this risotto showcases the exquisite flavors of truffles, complemented by the rich, nutty undertones of Parmesan cheese.
This dish not only tantalizes the taste buds but also adds a touch of culinary artistry to your holiday spread. Whether you’re planning an intimate gathering or a grand celebration, this risotto is certain to impress your guests with its intricate flavors and velvety texture.
The key to a perfect risotto lies in its methodical cooking process, which guarantees the rice is tender yet al dente, and enveloped in a creamy sauce. By combining the earthy aroma of truffles with the savory depth of Parmesan, this recipe elevates the classic Italian risotto to new heights.
The dish is best served immediately, allowing your guests to experience the luscious harmony of flavors and textures. Follow this recipe to create a stunning centerpiece for your holiday menu, serving 4-6 people.
Ingredients:
- 2 cups Arborio rice
- 1/4 cup olive oil
- 1 small onion, finely chopped
- 3 cloves garlic, minced
- 1/2 cup dry white wine
- 6 cups chicken or vegetable stock, kept warm
- 1/2 cup grated Parmesan cheese
- 2 tablespoons truffle oil
- Salt and pepper to taste
- 2 tablespoons unsalted butter
- Fresh parsley, chopped, for garnish
- Optional: Fresh truffle shavings for garnish
Instructions:
- Prepare the Base: In a large, heavy-bottomed saucepan, heat the olive oil over medium heat. Add the chopped onion, and sauté until translucent, about 5 minutes. Stir in the minced garlic and cook for an additional 1 minute until fragrant.
- Toast the Rice: Add the Arborio rice to the pan, stirring continuously for about 2-3 minutes until the rice is lightly toasted and coated with oil. This step helps the rice absorb flavors better and achieve the desired texture.
- Deglaze with Wine: Pour the white wine into the rice mixture, stirring constantly until the wine is completely absorbed. This deglazing step adds acidity and depth to the risotto.
- Cook the Risotto: Begin adding the warm chicken or vegetable stock, one ladleful at a time, allowing the liquid to be absorbed before adding the next. Stir frequently to affirm even cooking and prevent sticking. Continue this process for about 18-20 minutes until the rice is al dente and the mixture is creamy.
- Finish with Parmesan and Truffle: Once the rice is cooked, remove the pan from heat. Stir in the grated Parmesan cheese, truffle oil, and unsalted butter. Season with salt and pepper to taste, adjusting as necessary.
- Serve and Garnish: Plate the risotto immediately, garnishing with chopped fresh parsley and optional fresh truffle shavings for an extra touch of luxury.
Extra Tips:
For the best results, use high-quality Arborio rice, as it has the perfect starch content for a creamy risotto. Keep the stock warm throughout the cooking process to guarantee even absorption.
If you prefer a more intense truffle flavor, consider adding finely minced truffles directly into the risotto. Remember, risotto should be served immediately to maintain its creamy consistency; if it sits too long, it may thicken.
Adjust the seasoning only after adding Parmesan, as it contributes a salty flavor to the dish.
Wild Mushroom and Gruyere Tart
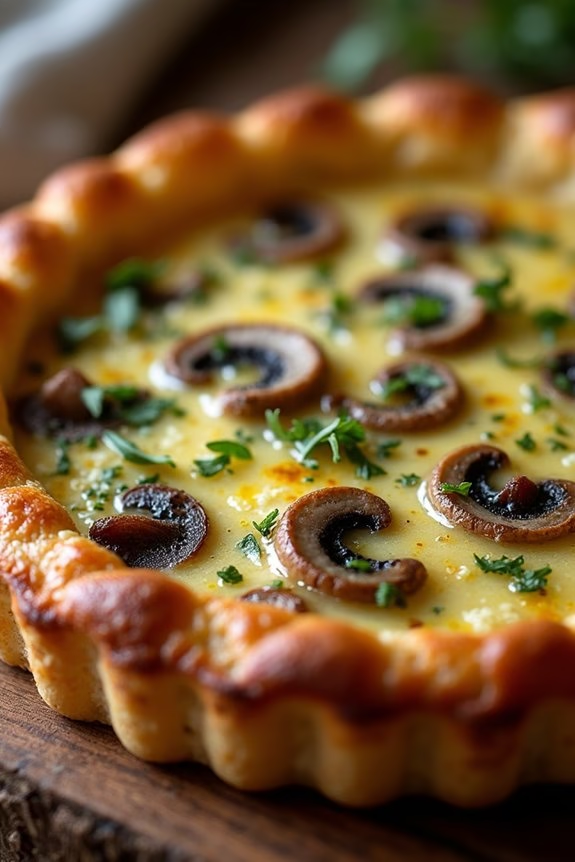
Indulge in the rich flavors of a Wild Mushroom and Gruyere Tart this holiday season. This elegant dish combines the earthiness of wild mushrooms with the nutty, creamy profile of Gruyere cheese, all encased in a flaky, golden pastry crust.
It’s a perfect centerpiece for a gourmet Christmas dinner, offering a sophisticated touch that will impress your guests. The combination of savory mushrooms and cheese creates a delightful depth of flavor, making it a memorable addition to your festive menu.
This tart isn’t only delectable but also visually stunning, with its beautifully browned crust and colorful mushroom topping. It’s versatile enough to serve as a main dish for vegetarians or as a side for those enjoying a more traditional meat-based main course.
With its harmonious blend of textures and flavors, the Wild Mushroom and Gruyere Tart is sure to become a holiday favorite. The following recipe serves 4-6 people, guaranteeing there’s plenty to go around for your holiday gathering.
Ingredients:
- 1 sheet of puff pastry, thawed
- 2 tablespoons olive oil
- 1 medium onion, finely chopped
- 2 cloves garlic, minced
- 500g mixed wild mushrooms, cleaned and sliced
- 1 teaspoon fresh thyme leaves
- Salt and freshly ground black pepper, to taste
- 1 cup Gruyere cheese, shredded
- 2 eggs, beaten
- 1/2 cup heavy cream
- 1 tablespoon Dijon mustard
- 1 tablespoon butter
- Fresh parsley, chopped (for garnish)
Instructions:
- Preheat and Prepare Pastry: Preheat your oven to 400°F (200°C). Roll out the puff pastry on a lightly floured surface to fit a tart pan. Line the pan with the pastry, trimming any excess. Prick the base with a fork to prevent bubbling. Chill in the refrigerator while preparing the filling.
- Cook the Onions and Garlic: Heat olive oil in a large skillet over medium heat. Add the onions and cook until soft and translucent, about 5 minutes. Stir in the garlic and cook for an additional minute until fragrant.
- Sauté the Mushrooms: Increase the heat to medium-high and add the wild mushrooms to the skillet. Sauté until the mushrooms are golden brown and any liquid released has evaporated, about 10 minutes. Stir in the thyme leaves, and season with salt and pepper. Remove from heat and let cool slightly.
- Prepare the Filling: In a mixing bowl, whisk together the beaten eggs, heavy cream, Dijon mustard, and a pinch of salt and pepper. Set aside.
- Assemble the Tart: Remove the pastry from the refrigerator. Spread the mushroom mixture evenly over the base of the pastry. Sprinkle the shredded Gruyere cheese over the mushrooms. Pour the egg mixture over the top, guaranteeing even coverage.
- Bake the Tart: Dot the top of the tart with small pieces of butter. Place the tart in the preheated oven and bake for 25-30 minutes, or until the filling is set and the top is golden brown.
- Cool and Serve: Remove the tart from the oven and allow it to cool slightly on a wire rack. Garnish with fresh parsley before serving.
Extra Tips:
For the best flavor, use a variety of wild mushrooms such as shiitake, oyster, or chanterelle. If wild mushrooms are unavailable, a combination of cremini and button mushrooms will also work well.
Confirm the puff pastry is thoroughly chilled before baking to achieve a perfectly crisp crust. Additionally, if you prefer a stronger cheese flavor, consider adding a touch of Parmesan along with the Gruyere.
This tart can be made a day in advance and reheated gently, making it a convenient option for holiday entertaining.
Cranberry and Chestnut Stuffing
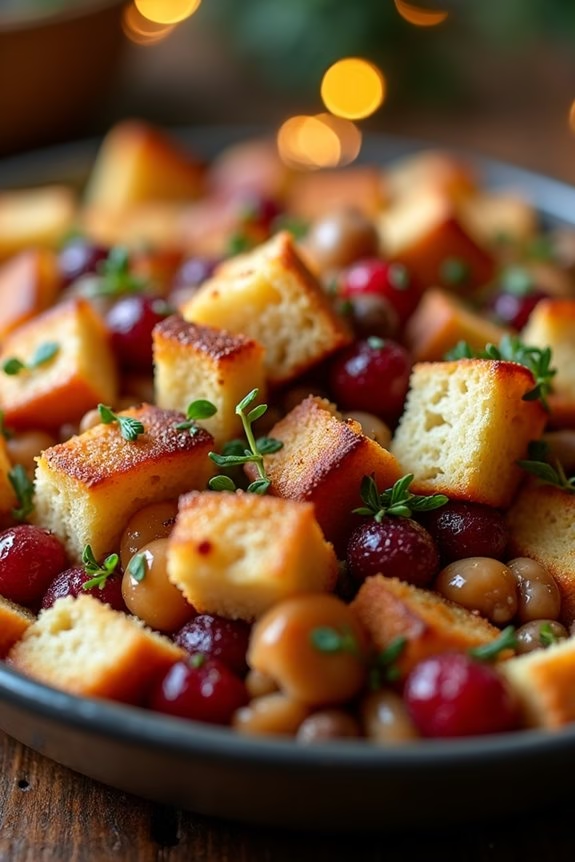
Christmas dinner is a time to indulge in luxurious flavors and festive treats, and nothing says holiday cheer quite like a delicious Cranberry and Chestnut Stuffing. This gourmet dish is perfect for adding a touch of sophistication to your holiday table. The combination of sweet-tart cranberries and rich, nutty chestnuts creates a stuffing that’s both flavorful and aromatic. The addition of herbs and spices enhances the depth of flavor, making this stuffing a show-stopping side dish that pairs beautifully with roast turkey or ham.
The Cranberry and Chestnut Stuffing serves 4-6 people, making it an ideal choice for intimate holiday gatherings. This recipe is a delightful mix of textures and tastes, with the cranberries providing a juicy burst of sweetness and the chestnuts offering a creamy, earthy complement. The stuffing is moist, fragrant, and sure to become a family favorite for years to come. By following this recipe, you can create a dish that not only pleases the palate but also impresses your guests with its gourmet flair.
Ingredients:
- 1 loaf of country-style bread, cubed (about 6 cups)
- 1 cup fresh cranberries
- 1 cup roasted chestnuts, chopped
- 2 tablespoons unsalted butter
- 1 medium onion, finely chopped
- 2 celery stalks, finely chopped
- 2 cloves garlic, minced
- 1 tablespoon fresh thyme, chopped
- 1 tablespoon fresh sage, chopped
- 1/2 teaspoon salt
- 1/4 teaspoon black pepper
- 1 cup chicken or vegetable broth
- 1/4 cup chopped parsley
Instructions:
- Preheat and Prepare: Preheat your oven to 350°F (175°C). Spread the cubed bread on a baking sheet and toast in the oven for about 10 minutes, or until lightly golden. Remove and set aside to cool.
- Cook Aromatics: In a large skillet, melt the butter over medium heat. Add the onion and celery, cooking until they’re soft and translucent, about 5 minutes. Stir in the garlic, thyme, and sage, and cook for an additional 1 minute until fragrant.
- Mix Ingredients: In a large mixing bowl, combine the toasted bread cubes, cranberries, chestnuts, and the cooked vegetables. Season with salt and black pepper, then pour in the broth. Toss everything gently until the bread is evenly moistened.
- Bake the Stuffing: Transfer the stuffing mixture into a greased baking dish. Cover with foil and bake in the preheated oven for 25 minutes. Remove the foil and continue baking for an additional 15 minutes, or until the top is golden and crisp.
- Garnish and Serve: Remove from the oven and sprinkle with chopped parsley before serving. This adds a fresh, vibrant touch to the finished dish.
Extra Tips:
When making Cranberry and Chestnut Stuffing, using country-style bread adds a rustic texture which holds up well against the moist ingredients. For added flavor, consider using homemade stock if available. If using dried cranberries instead of fresh, soak them in warm water for 10 minutes to plump them up before adding to the stuffing.
To save time, you can prepare the stuffing a day in advance and bake it just before serving. This dish can also be adjusted to suit vegetarian guests by using vegetable broth. Enjoy the delightful blend of flavors and festive cheer this dish brings to your Christmas table!
Honey-Glazed Carrots With Thyme
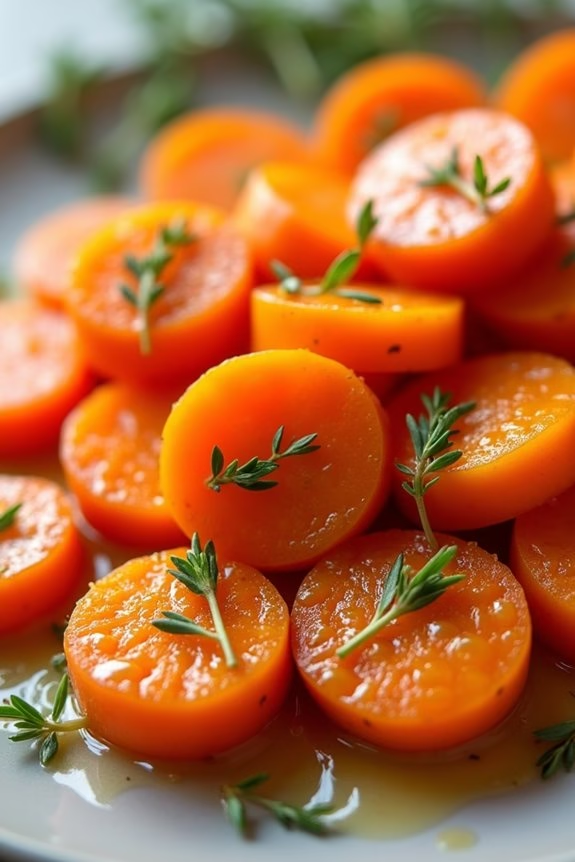
Honey-Glazed Carrots With Thyme is a delightful side dish that brings a touch of sweetness and aromatic herbs to your Christmas dinner. This dish elevates simple carrots to a gourmet level by glazing them with honey and complementing their natural sweetness with fragrant thyme. Perfectly tender and bursting with flavor, these carrots are sure to be a hit at your holiday table.
The combination of honey’s rich sweetness and the earthy notes of thyme creates a harmonious balance that enhances the natural flavors of the carrots. This dish isn’t only delicious but also visually appealing, with the vibrant orange of the carrots beautifully contrasting with the fresh green thyme.
It’s a simple yet elegant addition to your Christmas feast that can be prepared with minimal effort, allowing you more time to enjoy the festivities with your loved ones.
Ingredients (Serves 4-6):
- 2 pounds of carrots, peeled and sliced into 1/4 inch rounds
- 3 tablespoons of honey
- 2 tablespoons of unsalted butter
- 1 tablespoon of fresh thyme leaves (or 1 teaspoon of dried thyme)
- Salt and pepper to taste
- 1 tablespoon of olive oil
Cooking Instructions:
- Prepare the Carrots: Begin by peeling and slicing the carrots into uniform 1/4 inch rounds to guarantee even cooking. This step is essential for achieving a consistent texture throughout the dish.
- Cook the Carrots: In a large skillet or sauté pan, heat the olive oil over medium heat. Add the sliced carrots and sauté for about 5-7 minutes, stirring occasionally, until the carrots start to soften but are still firm to the bite.
- Add Butter and Honey: Reduce the heat to low, then add the unsalted butter to the pan. Once the butter has melted, drizzle the honey over the carrots. Stir well to coat the carrots evenly with the butter and honey mixture.
- Season and Add Thyme: Sprinkle the fresh thyme leaves over the glazed carrots. Season with salt and pepper to taste. Continue to cook on low heat for an additional 5-7 minutes, stirring occasionally, until the carrots are tender and the glaze is slightly thickened.
- Serve: Once cooked, transfer the honey-glazed carrots to a serving dish. Garnish with a few extra sprigs of fresh thyme if desired, and serve warm.
Extra Tips:
For an added depth of flavor, consider roasting the carrots in the oven before glazing them in the skillet. This will bring out their natural sweetness and add a slight caramelization.
If fresh thyme isn’t available, dried thyme works well, but remember that dried herbs are more potent, so adjust the quantity accordingly. Additionally, experiment with variations by adding a splash of balsamic vinegar or a pinch of cayenne pepper for a subtle kick.
Garlic Mashed Potatoes With Chives
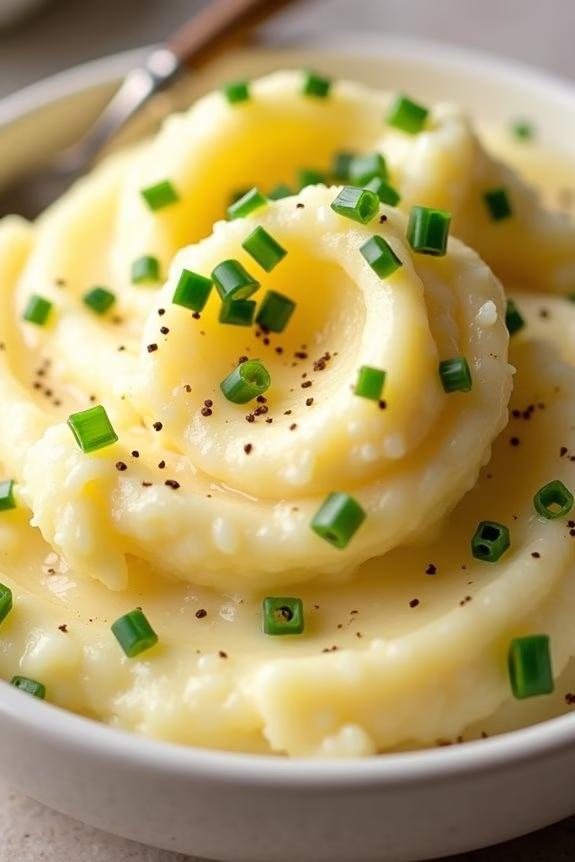
Garlic Mashed Potatoes With Chives are a classic and comforting side dish that complements any gourmet Christmas dinner. This recipe elevates traditional mashed potatoes by infusing them with the aromatic flavor of garlic and the fresh, mild taste of chives. Perfectly creamy and rich, these mashed potatoes are an ideal accompaniment to roasted meats and vegetables, providing a delightful contrast to the other flavors on your holiday table.
The secret to achieving the perfect consistency lies in the choice of potatoes and the method of preparation. By using Yukon Gold potatoes, which are known for their buttery texture, and mashing them just right, you can create a dish that’s both smooth and slightly chunky. The addition of garlic not only enhances the flavor but also adds a depth that’s both savory and satisfying. Chives, added at the end, provide a pop of color and a subtle onion flavor that ties all the components together beautifully.
Ingredients (Serves 4-6):
- 3 pounds Yukon Gold potatoes
- 4 cloves garlic, peeled and smashed
- 1 cup heavy cream
- 1/2 cup unsalted butter
- Salt and pepper to taste
- 1/4 cup chopped fresh chives
Cooking Instructions:
- Prepare the Potatoes: Peel the Yukon Gold potatoes and cut them into evenly sized chunks. This guarantees that they cook at the same rate and results in a uniform texture.
- Boil the Potatoes and Garlic: Place the potatoes and smashed garlic cloves in a large pot. Cover them with cold water and add a generous pinch of salt. Bring the water to a boil over medium-high heat, then reduce the heat to maintain a gentle simmer. Cook until the potatoes are tender and can be easily pierced with a fork, about 15-20 minutes.
- Heat the Cream and Butter: While the potatoes are cooking, combine the heavy cream and butter in a small saucepan. Warm over low heat until the butter is melted and the mixture is hot, but not boiling. This step guarantees that the ingredients blend smoothly into the potatoes.
- Mash the Potatoes: Drain the potatoes and garlic well, then return them to the pot. Use a potato masher or a ricer to mash the potatoes to your desired consistency. For a smoother texture, use a ricer; for a chunkier texture, a masher works well.
- Combine Ingredients: Gradually pour the hot cream and butter mixture into the mashed potatoes, stirring continuously until well combined. Season with salt and pepper to taste.
- Add Chives: Fold in the chopped chives just before serving, making sure they’re evenly distributed throughout the mashed potatoes.
- Serve: Transfer the garlic mashed potatoes with chives to a serving dish and garnish with additional chives if desired. Serve immediately for the best flavor and texture.
Extra Tips:
For an extra layer of flavor, consider roasting the garlic instead of boiling it with the potatoes. Roasted garlic adds a sweet, mellow flavor that can enhance the overall dish. To do this, simply wrap a whole garlic bulb in foil and bake at 400°F (200°C) for about 30 minutes, until soft. Squeeze the roasted garlic into the mashed potatoes along with the cream and butter mixture.
Additionally, you can adjust the amount of butter and cream to suit your preference for richness and creaminess.
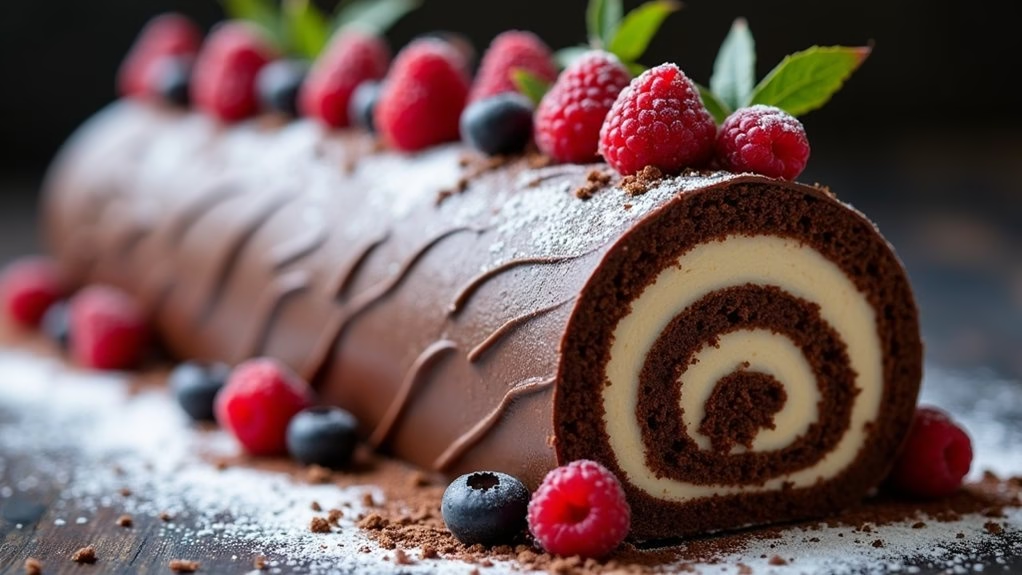
Bûche De Noël (Yule Log Cake)
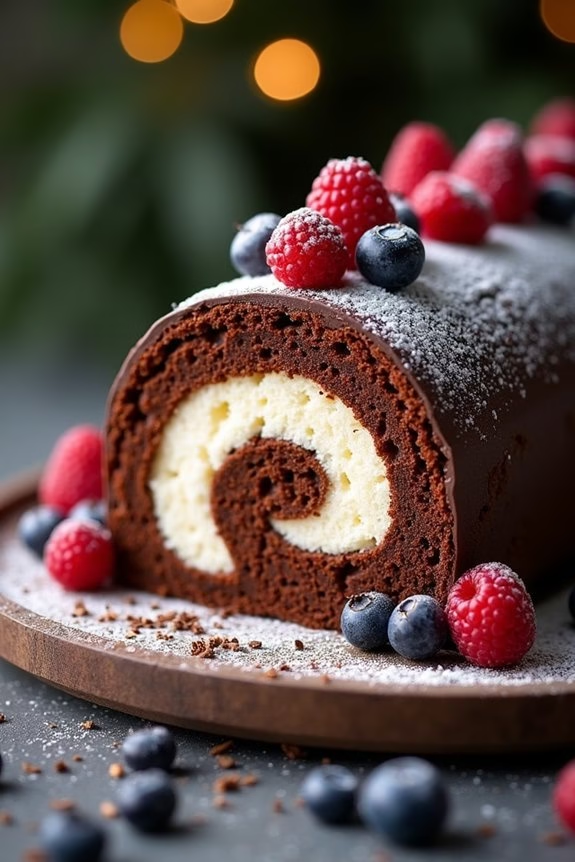
Bûche De Noël, also known as a Yule Log Cake, is a classic French dessert traditionally served during the Christmas holidays. This visually striking cake is designed to resemble a log, symbolizing the yule log that was burned in hearths during Christmas in the past.
The Bûche De Noël isn’t just a delightful treat but also a centerpiece that adds a festive touch to your holiday table. Made with a light and fluffy sponge cake rolled with a rich, creamy filling and topped with a smooth chocolate ganache, it’s a showstopper that tastes as good as it looks.
This recipe is perfect for serving 4-6 people and incorporates traditional flavors that will delight your guests. The beauty of a Bûche De Noël lies in its versatility; you can customize the filling and decoration to suit your taste. Whether you stick with the classic chocolate or experiment with flavors like coffee or hazelnut, this cake is sure to be a hit.
Follow the instructions carefully to achieve a perfect roll and a smooth ganache finish that will have everyone asking for seconds.
Ingredients (Serves 4-6):
- 4 large eggs, separated
- 2/3 cup granulated sugar
- 1 teaspoon vanilla extract
- 1/4 cup cocoa powder
- 1/4 cup all-purpose flour
- 1/4 teaspoon salt
- 1/2 teaspoon baking powder
- 1 cup heavy cream
- 2 tablespoons powdered sugar
- 1 teaspoon instant coffee powder (optional)
- 1 teaspoon vanilla extract
- 6 ounces semi-sweet chocolate, chopped
- 3/4 cup heavy cream (for ganache)
- Powdered sugar, for dusting
- Fresh berries, for garnish (optional)
- Chocolate shavings, for decoration (optional)
Instructions:
- Preheat and Prepare: Preheat your oven to 350°F (175°C). Line a 10×15-inch jelly roll pan with parchment paper and lightly grease it to guarantee easy removal of the cake.
- Make the Batter: In a large bowl, beat egg yolks, vanilla extract, and 1/3 cup of granulated sugar until thick and pale. In another bowl, sift together cocoa powder, flour, salt, and baking powder. Gradually add the dry ingredients to the egg yolk mixture, mixing until smooth.
- Whip Egg Whites: In a separate bowl, beat the egg whites until foamy. Gradually add the remaining 1/3 cup of granulated sugar, beating until stiff peaks form. Gently fold the egg whites into the cocoa mixture, taking care not to deflate the batter.
- Bake the Cake: Spread the batter evenly in the prepared pan. Bake for 12-15 minutes or until the cake springs back when touched. Don’t overbake, as this will make rolling difficult.
- Roll the Cake: Once baked, immediately turn the cake onto a clean towel dusted with powdered sugar. Carefully peel off the parchment paper. Roll the cake up in the towel, starting from the short end, and let it cool completely on a wire rack.
- Prepare the Filling: In a chilled bowl, whisk the heavy cream, powdered sugar, instant coffee powder (if using), and vanilla extract until stiff peaks form.
- Fill and Roll: Once the cake is cool, unroll it gently and spread the filling evenly over the surface. Re-roll the cake tightly, without the towel, and place it seam-side down on a serving platter.
- Make the Ganache: In a small saucepan, heat 3/4 cup heavy cream until it just begins to simmer. Remove from heat and pour over the chopped chocolate. Let it sit for a minute, then stir until smooth and glossy.
- Decorate the Cake: Spread the ganache evenly over the rolled cake, creating a bark-like texture with a spatula. Dust with powdered sugar and garnish with fresh berries and chocolate shavings if desired.
- Chill and Serve: Refrigerate the cake for at least an hour to set before slicing and serving.
Extra Tips: When rolling the cake, be gentle to avoid cracks. If cracks do appear, the ganache will help cover them. To guarantee smooth ganache, make sure the chocolate is finely chopped before adding the hot cream.
For added flavor, consider adding a tablespoon of liqueur, such as Grand Marnier or Frangelico, to the filling. Always use a serrated knife to slice the cake for clean cuts. Enjoy your Bûche De Noël with a hot cup of coffee or a festive beverage of your choice!