

Welcome to a tasty adventure where vegetarian fast food gets a homemade twist. Think classic veggie burgers packed with flavor and spicy jackfruit tacos that will make you forget about meat. We’ll also explore crispy cauliflower wings and loaded sweet potato fries. These vibrant and wholesome options are perfect for adding some plant-based creativity to your meals. Let’s get cooking and make your kitchen the heart of deliciousness!
Classic Veggie Burger

The Classic Veggie Burger is a delightful and hearty option for vegetarians who crave the satisfying experience of a burger but without the meat. This version combines a variety of vegetables, legumes, and grains to create a patty that isn’t only delicious but also packed with nutrients.
Whether you’re hosting a weekend barbecue or looking for a quick dinner option, these burgers are sure to please everyone at the table.
The beauty of the Classic Veggie Burger lies in its versatility. You can customize the patties with your choice of vegetables and spices, making it a perfect dish to experiment with different flavors.
Paired with fresh toppings and a soft bun, this burger is a demonstration of how vegetarian meals can be both exciting and fulfilling. Serve it with a side of sweet potato fries or a fresh salad for a complete meal that’s both healthy and satisfying.
Ingredients for 4-6 servings:
- 1 cup black beans, drained and rinsed
- 1 cup cooked quinoa
- 1/2 cup grated carrots
- 1/2 cup chopped mushrooms
- 1/4 cup finely chopped red onion
- 2 cloves garlic, minced
- 1/4 cup breadcrumbs
- 1 tablespoon soy sauce
- 1 teaspoon smoked paprika
- 1 teaspoon ground cumin
- Salt and pepper to taste
- 1 large egg (or flax egg for vegan option)
- 4-6 burger buns
- Lettuce, tomato slices, pickles, and your choice of cheese for toppings
Cooking Instructions:
1. Prepare the Ingredients: Start by cooking the quinoa according to package instructions and allow it to cool. Drain and rinse the black beans, then lightly mash them in a large bowl.
Add the cooked quinoa, grated carrots, chopped mushrooms, red onion, and minced garlic to the bowl.
2. Mix the Patty Mixture: Add breadcrumbs, soy sauce, smoked paprika, and ground cumin to the vegetable mixture. Season with salt and pepper to taste.
Stir until all ingredients are well combined. Add the egg (or flax egg) and mix thoroughly to bind the ingredients together.
3. Form the Patties: Divide the mixture into 4-6 equal portions and shape each into a patty, about 1/2 inch thick.
Make sure the patties are compact to prevent them from falling apart during cooking.
4. Cook the Patties: Heat a non-stick skillet or grill over medium heat and lightly oil the surface.
Cook each patty for about 4-5 minutes on each side, or until they’re golden brown and heated through.
5. Assemble the Burgers: Toast the burger buns if desired. Place a cooked patty on the bottom half of each bun.
Top with lettuce, tomato slices, pickles, and cheese, if using. Finish with the top half of the bun.
6. Serve and Enjoy: Serve your Classic Veggie Burgers immediately while they’re hot and fresh.
Pair them with your favorite sides for a complete meal.
Extra Tips:
When making the Classic Veggie Burger, it’s important to make sure that the patties are firm enough to hold their shape. If the mixture seems too wet, add a bit more breadcrumbs to absorb the moisture.
For a vegan option, replace the egg with a flax egg (1 tablespoon ground flaxseed mixed with 3 tablespoons water). You can also experiment with different spices and herbs to match your taste preferences, such as adding fresh cilantro or parsley for an extra burst of flavor.
Finally, consider toasting the buns and lightly oiling the cooking surface to prevent the patties from sticking.
Spicy Jackfruit Tacos

Spicy Jackfruit Tacos are a delightful and flavorful vegetarian fast-food option that can please even the most ardent meat lovers. These tacos are packed with the rich, meaty texture of jackfruit, which is a fantastic meat substitute due to its ability to absorb flavors and mimic the texture of pulled pork. When combined with a spicy marinade and topped with fresh ingredients, these tacos become a mouthwatering dish that’s perfect for a quick weeknight dinner or a fun weekend meal with friends and family.
This recipe serves 4-6 people and brings together a mix of spices, fresh vegetables, and jackfruit to create a vibrant and satisfying meal. The use of canned young green jackfruit makes the preparation process straightforward and quick, allowing that you can get these delicious tacos on the table in no time. Whether you’re a seasoned vegetarian or just looking to incorporate more plant-based meals into your diet, these Spicy Jackfruit Tacos are sure to become a favorite.
Ingredients for Spicy Jackfruit Tacos (Serves 4-6):
- 2 cans of young green jackfruit in water or brine (about 20 oz each)
- 2 tablespoons olive oil
- 1 onion, finely diced
- 3 cloves garlic, minced
- 1 tablespoon smoked paprika
- 1 tablespoon ground cumin
- 1 teaspoon chili powder
- 1 teaspoon cayenne pepper (adjust for desired spiciness)
- Salt and pepper to taste
- 1 cup vegetable broth
- 2 tablespoons tomato paste
- 1 tablespoon apple cider vinegar
- 12 small corn tortillas
- 1 cup shredded cabbage
- 1 avocado, sliced
- 1/2 cup fresh cilantro, chopped
- Lime wedges for serving
Cooking Instructions:
- Prepare the Jackfruit: Drain and rinse the canned jackfruit thoroughly under cold water. Pat it dry with a paper towel, then cut off the core and remove any seeds. Use your hands or a fork to gently separate the jackfruit into shreds, resembling pulled pork.
- Cook the Aromatics: In a large skillet, heat the olive oil over medium heat. Add the diced onion and sauté for about 3-4 minutes until translucent. Add the minced garlic and sauté for another minute until fragrant.
- Spice it Up: Add the smoked paprika, ground cumin, chili powder, and cayenne pepper to the skillet. Stir well to coat the onions and garlic with the spices, cooking for about 1 minute to allow the spices to bloom.
- Add the Jackfruit: Increase the heat to medium-high and add the shredded jackfruit to the skillet. Season with salt and pepper, and cook for 5 minutes, stirring occasionally to make sure the jackfruit is well-coated with the spice mixture.
- Simmer the Mixture: Pour in the vegetable broth, tomato paste, and apple cider vinegar. Stir to combine, then bring the mixture to a simmer. Reduce the heat to low, cover the skillet, and let it simmer for 20-25 minutes, stirring occasionally, until the jackfruit is tender and the flavors meld together.
- Warm the Tortillas: While the jackfruit simmers, warm the corn tortillas in a dry skillet over medium heat for about 30 seconds on each side, or until pliable. Keep them wrapped in a clean kitchen towel to stay warm.
- Assemble the Tacos: Once the jackfruit mixture is done, remove from heat. To assemble the tacos, place a generous spoonful of the spicy jackfruit mixture onto each tortilla. Top with shredded cabbage, avocado slices, and a sprinkle of fresh cilantro.
- Serve: Serve the tacos immediately with lime wedges on the side for squeezing over the top, adding a fresh zest to each bite.
Extra Tips:
For added flavor, you can prepare the jackfruit mixture a day ahead of time and refrigerate it. This allows the flavors to deepen and meld even further.
If you prefer a less spicy version, adjust the amount of cayenne pepper to suit your taste. To add some extra crunch, consider topping the tacos with thinly sliced radishes or a dollop of sour cream for a creamy contrast.
Finally, if you want a gluten-free option, verify that the corn tortillas are certified gluten-free.
Crispy Cauliflower Wings

Crispy Cauliflower Wings are a delightful vegetarian alternative to traditional chicken wings, offering a crunchy texture and spicy kick that will satisfy both vegetarians and meat-eaters alike. This dish takes humble cauliflower florets and transforms them into a mouthwatering treat with a crispy coating and a flavorful sauce. Perfect as an appetizer or party snack, these wings are certain to become a favorite, especially among those looking for a meat-free option that’s just as delicious.
To make these wings, cauliflower florets are first coated in a seasoned batter and baked until golden and crispy. The baked florets are then tossed in a spicy and tangy sauce that gives them a fiery flavor reminiscent of classic buffalo wings. Whether you’re hosting a game day gathering or simply craving something with a bit of heat, these Crispy Cauliflower Wings are easy to prepare and destined to impress.
Ingredients for 4-6 servings:
- 1 large head of cauliflower, cut into bite-sized florets
- 1 cup all-purpose flour
- 1 cup water
- 1 teaspoon garlic powder
- 1 teaspoon onion powder
- 1 teaspoon smoked paprika
- 1/2 teaspoon salt
- 1/2 teaspoon black pepper
- 1 cup panko breadcrumbs
- 1/2 cup hot sauce (such as Frank’s RedHot)
- 2 tablespoons unsalted butter
- 1 tablespoon honey (optional)
- Cooking spray
Cooking Instructions:
- Prepare the Cauliflower: Preheat your oven to 450°F (230°C) and line a baking sheet with parchment paper. Cut the cauliflower into bite-sized florets and set aside.
- Make the Batter: In a large mixing bowl, whisk together the flour, water, garlic powder, onion powder, smoked paprika, salt, and pepper until smooth. The batter should be thick enough to coat the back of a spoon.
- Coat the Cauliflower: Dip each cauliflower floret into the batter, making sure it’s fully coated, then roll it in the panko breadcrumbs. Place the coated florets onto the prepared baking sheet, ensuring they’re spaced apart.
- Bake the Cauliflower: Lightly spray the coated florets with cooking spray for added crispiness. Bake in the preheated oven for 20-25 minutes, or until the cauliflower is golden brown and crispy, flipping halfway through the cooking time for even baking.
- Prepare the Sauce: While the cauliflower is baking, melt the butter in a small saucepan over low heat. Stir in the hot sauce and honey (if using) until well combined. Remove from heat.
- Toss in Sauce: Once the cauliflower is baked, transfer the florets to a large bowl. Pour the hot sauce mixture over the florets and toss until each piece is well-coated.
- Serve: Serve the crispy cauliflower wings immediately with your choice of dipping sauce, such as ranch or blue cheese dressing.
For extra crispiness, verify the cauliflower florets aren’t overcrowded on the baking sheet, allowing hot air to circulate evenly around each piece. You can adjust the spice level by adding more or less hot sauce to suit your taste preferences. Additionally, using a cooling rack over the baking sheet can help elevate the cauliflower, promoting even cooking and avoiding sogginess.
Loaded Sweet Potato Fries

Loaded Sweet Potato Fries are a delicious and satisfying vegetarian fast food option that combines the natural sweetness of sweet potatoes with a variety of flavorful toppings. Perfect for a group gathering or a family dinner, this dish offers a delightful balance of sweet, savory, and spicy elements.
The crispy sweet potato fries serve as the perfect base for an array of toppings, including cheese, beans, avocado, and fresh herbs, making it a hearty and nutritious choice for 4-6 people.
This recipe is ideal for those who want to enjoy a quick yet nutritious meal that can be easily customized to suit different tastes and dietary preferences. Whether you’re a seasoned vegetarian or simply looking to incorporate more plant-based meals into your diet, Loaded Sweet Potato Fries are sure to become a favorite.
With a few simple ingredients and straightforward preparation, you can enjoy this tasty dish in no time.
Ingredients:
- 4 large sweet potatoes
- 2 tablespoons olive oil
- 1 teaspoon garlic powder
- 1 teaspoon smoked paprika
- 1 teaspoon salt
- 1/2 teaspoon black pepper
- 1 cup shredded cheddar cheese
- 1 can (15 oz) black beans, drained and rinsed
- 1 avocado, diced
- 1/2 cup sour cream or Greek yogurt
- 1/4 cup chopped fresh cilantro
- 1 jalapeño, sliced
- 1 lime, cut into wedges
Cooking Instructions:
- Preheat the Oven: Begin by preheating your oven to 425°F (220°C). This temperature will guarantee that your sweet potato fries become crispy and golden-brown.
- Prepare the Sweet Potatoes: Wash and peel the sweet potatoes, then cut them into thin, evenly-sized fries. This will help them cook evenly.
- Season the Fries: In a large bowl, toss the sweet potato fries with olive oil, garlic powder, smoked paprika, salt, and black pepper until they’re well coated. This seasoning will add flavor and help the fries crisp up in the oven.
- Bake the Fries: Spread the fries in a single layer on a baking sheet lined with parchment paper. Bake for 25-30 minutes, flipping halfway through, until they’re crispy and cooked through.
- Prepare the Toppings: While the fries are baking, prepare the toppings. Drain and rinse the black beans, dice the avocado, and chop the cilantro.
- Melt the Cheese: Once the fries are done, sprinkle the shredded cheddar cheese evenly over the hot fries on the baking sheet. Return them to the oven for an additional 3-5 minutes, or until the cheese is melted and bubbly.
- Assemble the Dish: Transfer the cheesy fries to a serving platter. Top with black beans, diced avocado, sliced jalapeño, a dollop of sour cream or Greek yogurt, and chopped cilantro.
- Garnish and Serve: Garnish with lime wedges on the side and serve immediately while the fries are still hot and crispy.
Extra Tips:
For the best results, verify your sweet potato fries are cut evenly to achieve consistent cooking.
If you prefer a spicier dish, consider adding a pinch of cayenne pepper to the seasoning mix or using a hotter variety of cheese.
For a vegan version, substitute the cheese with a vegan cheese alternative and use a plant-based yogurt.
Finally, feel free to get creative with additional toppings such as chopped tomatoes, green onions, or even a sprinkle of nutritional yeast for added flavor.
Zucchini Fritters With Dipping Sauce

Zucchini fritters are a delicious and nutritious vegetarian option perfect for a quick meal or snack. These golden-brown patties are made from grated zucchini, which is combined with a blend of flour, eggs, and seasonings to create a crispy, savory treat. Paired with a tangy dipping sauce, these fritters make for a delightful appetizer or side dish that even meat-lovers can enjoy.
The texture is crispy on the outside while remaining tender and moist on the inside, thanks to the fresh zucchini.
These zucchini fritters aren’t only easy to make but also versatile. You can serve them with a variety of dipping sauces, such as a yogurt-based sauce, spicy sriracha mayo, or a classic marinara. Ideal for serving 4-6 people, this recipe can be doubled or halved depending on your needs. The fritters can also be made ahead of time and reheated, making them a great option for meal prep or a fast food alternative.
Ingredients for Zucchini Fritters (Serving Size: 4-6)
- 4 medium zucchinis
- 1 teaspoon salt
- 2 large eggs
- 1/2 cup all-purpose flour
- 1/4 cup grated Parmesan cheese
- 2 cloves garlic, minced
- 1/2 teaspoon black pepper
- 1/4 cup chopped fresh parsley
- Olive oil for frying
Ingredients for Dipping Sauce
- 1/2 cup plain Greek yogurt
- 1 tablespoon lemon juice
- 1 tablespoon olive oil
- 1 teaspoon honey
- Salt and pepper to taste
Cooking Instructions
- Prepare the Zucchini: Grate the zucchinis using a box grater. Place the grated zucchini in a colander and sprinkle with salt. Let it sit for about 10 minutes to draw out excess moisture.
- Remove Excess Water: After 10 minutes, use a clean kitchen towel or cheesecloth to squeeze out as much liquid as possible from the zucchini. This step is vital to guarantee the fritters hold together and are crispy.
- Mix the Fritter Batter: In a large bowl, combine the drained zucchini, eggs, flour, Parmesan cheese, minced garlic, black pepper, and chopped parsley. Stir until well combined and the mixture holds together.
- Heat the Oil: In a large skillet, heat about 2 tablespoons of olive oil over medium heat. Confirm the oil is hot before adding the batter to prevent the fritters from sticking.
- Cook the Fritters: Scoop about 2 tablespoons of the zucchini mixture for each fritter, flattening them slightly in the skillet. Fry the fritters in batches, about 3-4 minutes per side, or until they’re golden brown and crispy.
- Prepare the Dipping Sauce: In a small bowl, whisk together the Greek yogurt, lemon juice, olive oil, honey, and a pinch of salt and pepper. Adjust seasoning to taste.
- Serve: Drain the cooked fritters on paper towels to remove excess oil. Serve warm with the prepared dipping sauce.
Extra Tips
For even crispier fritters, you can add a tablespoon of cornstarch to the batter. Additionally, confirm that your skillet isn’t overcrowded when frying the fritters to maintain the oil temperature, as this helps achieve a perfect golden-brown crust.
If desired, you can also add other herbs such as dill or mint for extra flavor. If you prefer a spicier kick, consider adding a pinch of chili flakes to the batter.
Quinoa and Black Bean Burritos
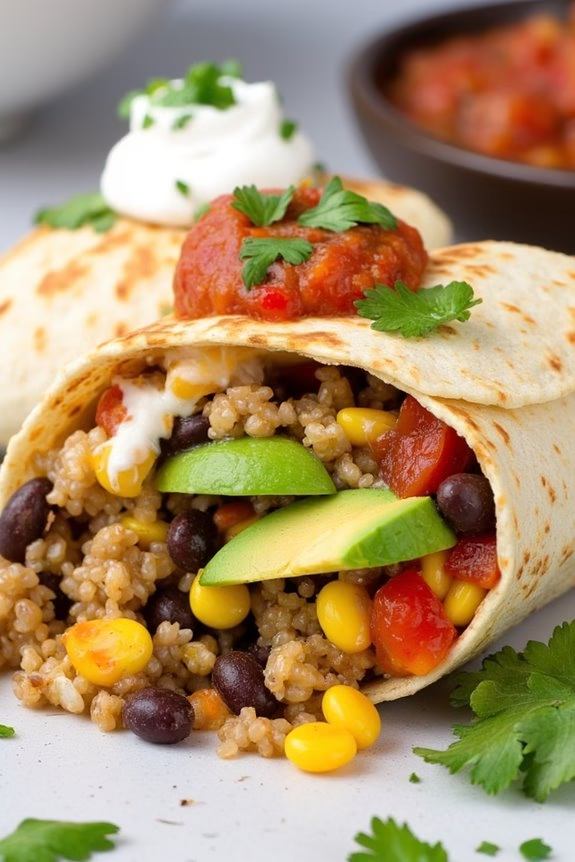
Quinoa and Black Bean Burritos are a delicious and nutritious vegetarian option that can satisfy even the most devout carnivores. This dish combines the nutty flavor of quinoa with the hearty texture of black beans, wrapped in a soft tortilla and packed with a variety of fresh and flavorful ingredients.
Perfect for a quick lunch or dinner, these burritos aren’t only healthy but also easy to prepare, making them an ideal fast food alternative for busy individuals or families. The blend of quinoa and black beans provides a complete protein source, essential for those following a vegetarian diet.
With the addition of spices, vegetables, and creamy avocado, these burritos are bursting with flavor in every bite. This recipe serves 4-6 people, making it great for a family meal or meal prep for the week. Enjoy the combination of textures and flavors that make these Quinoa and Black Bean Burritos a standout dish in vegetarian cuisine.
Ingredients (Serves 4-6)
- 1 cup quinoa, rinsed
- 2 cups vegetable broth
- 1 tablespoon olive oil
- 1 small onion, diced
- 3 cloves garlic, minced
- 1 bell pepper, diced
- 1 teaspoon ground cumin
- 1 teaspoon chili powder
- 1 can (15 oz) black beans, drained and rinsed
- 1 cup corn kernels (fresh, frozen, or canned)
- Salt and pepper to taste
- 6 large flour tortillas
- 1 avocado, sliced
- 1 cup shredded cheese (cheddar or Monterey Jack)
- 1 cup salsa
- ½ cup sour cream
- 2 tablespoons fresh cilantro, chopped
Cooking Instructions
- Cook the Quinoa: In a medium saucepan, combine the rinsed quinoa and vegetable broth. Bring to a boil over medium-high heat, then reduce the heat to low, cover, and let simmer for about 15 minutes, or until the liquid is absorbed and the quinoa is tender. Fluff with a fork and set aside.
- Sauté Vegetables: In a large skillet, heat the olive oil over medium heat. Add the diced onion and sauté for 3-4 minutes until it becomes translucent. Add the minced garlic and diced bell pepper, and continue to sauté for another 3 minutes until the bell pepper is tender.
- Season and Combine: Stir in the ground cumin and chili powder, allowing the spices to cook for about 30 seconds. Add the black beans and corn to the skillet, stirring to combine. Season with salt and pepper to taste. Cook for an additional 5 minutes, allowing the flavors to meld together.
- Assemble Burritos: Lay each tortilla flat on a clean surface. Spread a portion of the cooked quinoa mixture down the center of each tortilla. Top with sliced avocado, shredded cheese, and a spoonful of salsa. Fold in the sides of the tortilla and roll it up tightly from the bottom to create a burrito.
- Warm the Burritos: Preheat a non-stick skillet over medium heat. Place the burritos in the skillet, seam side down, and cook for 2-3 minutes on each side, or until the tortillas are golden brown and the cheese has melted.
- Serve: Remove the burritos from the skillet and serve warm. Garnish with a dollop of sour cream and a sprinkle of fresh cilantro.
Extra Tips
For a spicier kick, consider adding some diced jalapeños or a pinch of cayenne pepper to the filling. If you’re short on time, canned or pre-cooked quinoa can be used as a quick alternative.
Feel free to customize the burritos with additional toppings like lettuce, diced tomatoes, or hot sauce. To make the burritos more portable for on-the-go meals, wrap them in foil after cooking to keep them warm and easy to handle.
Enjoy your homemade Quinoa and Black Bean Burritos as a satisfying and healthy meal option!
Portobello Mushroom Sliders

Portobello Mushroom Sliders are a savory and satisfying vegetarian option perfect for those seeking a meatless fast food experience. These sliders offer a rich, umami flavor profile from the marinated portobello mushrooms, which are grilled to perfection. When paired with fresh toppings and a soft slider bun, they create a delightful combination that’s bound to please both vegetarians and meat-eaters alike.
Whether you’re hosting a casual gathering or simply wanting to enjoy a quick meal at home, these sliders are a fantastic choice.
The key to making delicious Portobello Mushroom Sliders lies in the preparation of the mushrooms. By marinating them, you enhance their natural flavors and guarantee they remain juicy during cooking. Once grilled, these flavorful mushrooms are complemented by classic slider toppings such as lettuce, tomato, and cheese, all nestled in a lightly toasted bun.
With just a few ingredients and simple steps, you can create a meal that’s both nutritious and indulgent.
Ingredients (serving size: 4-6 people):
- 6 large portobello mushroom caps
- 1/4 cup balsamic vinegar
- 1/4 cup olive oil
- 2 tablespoons soy sauce
- 2 cloves garlic, minced
- 1 teaspoon dried thyme
- Salt and pepper to taste
- 12 slider buns
- Lettuce leaves
- Sliced tomatoes
- 6 slices of cheese (optional)
- Condiments (such as mayonnaise, mustard, or ketchup)
Cooking Instructions:
- Prepare the Marinade: In a medium-sized bowl, combine the balsamic vinegar, olive oil, soy sauce, minced garlic, dried thyme, salt, and pepper. Mix well to guarantee the ingredients are fully combined.
- Marinate the Mushrooms: Place the portobello mushroom caps in a shallow dish or a large resealable plastic bag. Pour the marinade over the mushrooms, ensuring they’re completely coated. Let them marinate for at least 30 minutes, or up to 2 hours in the refrigerator for deeper flavor.
- Preheat the Grill: While the mushrooms are marinating, preheat your grill to medium-high heat. This guarantees that the mushrooms will cook evenly and develop a nice char.
- Grill the Mushrooms: Once marinated, remove the mushrooms from the marinade and place them on the grill, gill side up. Grill each side for about 5-7 minutes, until the mushrooms are tender and have grill marks.
- Prepare the Buns and Toppings: While the mushrooms are grilling, lightly toast the slider buns on the grill for about 1-2 minutes. Prepare the toppings by washing and slicing the lettuce and tomatoes.
- Assemble the Sliders: Place a grilled portobello mushroom cap on the bottom half of each slider bun. Add a slice of cheese if desired, followed by lettuce, tomato, and any condiments of your choice. Top with the other half of the bun.
- Serve and Enjoy: Serve the sliders immediately while warm, alongside your favorite side dishes.
Extra Tips: For added flavor, consider using smoked cheese or a spicy condiment to give your sliders a unique twist. If you don’t have access to a grill, you can use a grill pan or skillet on the stovetop to cook the mushrooms.
Additionally, guarantee that the mushrooms are of similar size for even cooking, and feel free to experiment with different herbs in the marinade to suit your taste preferences.
Vegetarian Sushi Rolls

Vegetarian sushi rolls are a delightful and healthy alternative to traditional sushi, perfect for those who are looking to enjoy the flavors of sushi without any meat or seafood.
These rolls are versatile and can be filled with a variety of fresh vegetables, making them a great option for vegetarians and anyone looking to add more plant-based meals to their diet. Not only are they easy to prepare, but they also make for a colorful and appealing meal that can be served as a main dish or an appetizer.
To create the perfect vegetarian sushi rolls, it’s important to balance flavors and textures. The combination of seasoned sushi rice and crisp, fresh vegetables such as cucumber, avocado, and carrots delivers a satisfying bite. You can also experiment with different ingredients like pickled radish or bell peppers to add an extra layer of taste.
With a few kitchen tools and some basic ingredients, you can create these delicious rolls in the comfort of your own home.
Ingredients (for 4-6 people):
- 2 cups sushi rice
- 2 1/2 cups water
- 1/4 cup rice vinegar
- 2 tablespoons sugar
- 1 teaspoon salt
- 6 sheets of nori (seaweed)
- 1 cucumber, julienned
- 1 avocado, sliced
- 1 large carrot, julienned
- 1 bell pepper, julienned
- Soy sauce for serving
- Pickled ginger for serving
- Wasabi for serving
Instructions:
- Prepare the Sushi Rice:
- Rinse the sushi rice under cold water until the water runs clear. This step helps remove excess starch, resulting in fluffy rice.
- In a medium saucepan, combine the rinsed rice and water. Bring to a boil over medium-high heat, then reduce the heat to low, cover, and simmer for 18-20 minutes until the water is absorbed.
- Remove from heat and let it sit covered for 10 minutes. Meanwhile, mix rice vinegar, sugar, and salt in a small bowl until dissolved. Gently fold this mixture into the cooked rice, using a wooden spatula to avoid mashing the grains. Allow the rice to cool to room temperature.
- Prepare the Vegetables:
- While the rice is cooling, prepare your vegetables. Julienne the cucumber, carrot, and bell pepper. Slice the avocado thinly. Set these aside.
- Assemble the Sushi Rolls:
- Place a bamboo sushi mat on a flat surface and lay a sheet of nori on top, shiny side down.
- Spread a thin layer of prepared sushi rice over the nori, leaving a 1-inch border at the top.
- Arrange a line of cucumber, avocado, carrot, and bell pepper across the center of the rice.
- Using the bamboo mat, carefully roll the nori over the filling, applying gentle pressure to form a tight roll. Wet the top border of the nori with a little water to seal the roll.
- Slice and Serve:
- Using a sharp knife, slice the roll into bite-sized pieces. Wipe the knife with a damp cloth between cuts to guarantee clean slices.
- Arrange the slices on a serving platter and serve with soy sauce, pickled ginger, and wasabi on the side.
Extra Tips:
When making vegetarian sushi rolls, always verify that your knife is sharp to achieve clean cuts through the rolls. If you don’t have a bamboo mat, you can use parchment paper to help roll the sushi.
Feel free to experiment with different vegetable combinations or add cream cheese for a richer flavor. Remember to keep the rice covered with a damp cloth to prevent it from drying out while assembling the rolls.
Finally, practice makes perfect, so don’t be discouraged if your first few rolls aren’t perfect – they’ll still taste delicious!
Falafel Wraps With Tzatziki

Falafel Wraps With Tzatziki are a delightful vegetarian fast food option that combines the flavorful and crispy falafel with a revitalizing tzatziki sauce. This Middle-Eastern inspired dish is perfect for a quick lunch or dinner and can easily be customized with your favorite vegetables and toppings.
The falafel patties are made from ground chickpeas mixed with herbs and spices, then fried to perfection. When paired with a creamy tzatziki sauce made from yogurt, cucumber, and dill, these wraps offer a satisfying balance of textures and flavors.
The key to making an outstanding falafel wrap is to make certain that the falafel is crispy on the outside and soft on the inside, while the tzatziki adds a cool and tangy contrast. You can serve these wraps with warm pita bread or soft flatbreads, and add fresh vegetables like lettuce, tomatoes, and red onions for extra crunch.
Perfect for serving 4-6 people, this recipe isn’t only delicious but also nutritious, making it an ideal choice for vegetarians and anyone looking to enjoy a healthy meal.
Ingredients (for 4-6 people):
- 2 cups dried chickpeas, soaked overnight
- 1 small onion, roughly chopped
- 4 cloves garlic
- 1 cup fresh parsley leaves
- 1 cup fresh cilantro leaves
- 1 teaspoon ground cumin
- 1 teaspoon ground coriander
- 1/2 teaspoon baking powder
- Salt and pepper to taste
- Vegetable oil for frying
- 6 pita breads or flatbreads
- 2 cups lettuce, shredded
- 1 cup cherry tomatoes, halved
- 1 small red onion, thinly sliced
For the Tzatziki Sauce:
- 1 cup Greek yogurt
- 1 cucumber, grated and drained
- 2 tablespoons fresh dill, chopped
- 2 cloves garlic, minced
- 1 tablespoon olive oil
- 1 tablespoon lemon juice
- Salt and pepper to taste
Cooking Instructions:
- Prepare the Falafel Mixture: Drain the soaked chickpeas and add them to a food processor along with onion, garlic, parsley, cilantro, cumin, coriander, baking powder, salt, and pepper. Pulse until the mixture is combined but still has some texture.
- Form the Falafel Patties: Transfer the mixture to a bowl and refrigerate for about 30 minutes to firm up. Once chilled, take about 2 tablespoons of the mixture and form into small patties or balls.
- Fry the Falafel: Heat vegetable oil in a large skillet over medium heat. Once hot, add the falafel patties and cook for about 3-4 minutes on each side until golden brown and crispy. Remove and drain on paper towels.
- Make the Tzatziki Sauce: In a bowl, combine Greek yogurt, grated cucumber, dill, garlic, olive oil, lemon juice, salt, and pepper. Mix well and refrigerate until ready to serve.
- Assemble the Wraps: Warm the pita breads or flatbreads slightly. Spread a generous amount of tzatziki sauce on each bread, then layer with lettuce, cherry tomatoes, red onion, and falafel patties.
- Serve: Fold the bread over the fillings and serve immediately while the falafel is still warm.
Extra Tips:
For the best texture, make sure not to over-process the falafel mixture; it should be coarse and crumbly rather than a paste. If the mixture is too wet, add a tablespoon or two of chickpea flour to help bind it.
When frying, make certain that the oil is hot enough so the falafel cooks evenly and becomes crispy without absorbing too much oil. Feel free to experiment with different herbs or spices to customize the flavor to your liking.
Grilled Vegetable Panini

The Grilled Vegetable Panini is a delightful vegetarian fast food option that combines the savory flavors of grilled vegetables with the creamy, tangy goodness of cheese, all nestled between slices of crusty bread. This sandwich is perfect for lunch or a light dinner, offering both nutrition and satisfaction in every bite.
With its colorful array of vegetables and the warm, toasted bread, it’s a feast for both the eyes and the palate. This recipe isn’t only easy to prepare but also versatile, allowing you to use your favorite seasonal vegetables or whatever you have on hand.
For this recipe, you’ll need fresh and vibrant vegetables like bell peppers, zucchini, and eggplant. These are grilled to perfection, bringing out their natural sweetness and adding a smoky flavor to the sandwich. Paired with melty cheese and a spread of pesto or any sauce of your choice, this Grilled Vegetable Panini is a crowd-pleaser.
Whether you’re serving it at a family gathering or enjoying it as a quick meal, this panini is sure to impress with its rich flavors and wholesome ingredients.
Ingredients (for 4-6 servings):
- 2 red bell peppers
- 2 zucchinis
- 1 large eggplant
- 1 red onion
- Olive oil for grilling
- Salt and pepper to taste
- 6 slices of your choice of crusty bread (such as ciabatta or sourdough)
- 1 cup of mozzarella cheese, shredded
- 1/2 cup of pesto sauce
- Butter for spreading on bread
Cooking Instructions:
- Prepare the Vegetables: Start by washing and drying all the vegetables. Slice the bell peppers, zucchinis, and eggplant into 1/4-inch thick slices. Cut the red onion into rings. Make sure all slices are roughly the same thickness to guarantee even grilling.
- Grill the Vegetables: Preheat your grill or grill pan over medium-high heat. Lightly brush the vegetables with olive oil and season with salt and pepper. Grill the vegetables for about 3-4 minutes on each side, or until they’ve nice grill marks and are tender. Remove from the grill and set aside.
- Assemble the Panini: Spread a thin layer of butter on one side of each bread slice. On the unbuttered side of half the slices, spread a generous amount of pesto sauce. Layer the grilled vegetables evenly on top, followed by a sprinkle of shredded mozzarella cheese. Top with the remaining bread slices, buttered side facing out.
- Grill the Panini: Heat a panini press or a skillet over medium heat. Place the assembled sandwiches on the press or in the skillet. If using a skillet, press the sandwiches down with a heavy pan. Cook for 3-4 minutes on each side, or until the bread is golden brown and the cheese has melted.
- Serve: Remove the paninis from the heat and let them cool for a minute before slicing them in half. Serve warm and enjoy the medley of flavors and textures.
Extra Tips: For an extra flavor boost, consider adding a few fresh basil leaves inside the panini before grilling. If you prefer a more spicy kick, a thin layer of spicy mustard or a few slices of jalapeño can be added.
Eggplant Parmesan Sandwich

Eggplant Parmesan Sandwich is a delightful vegetarian fast food option that’s both satisfying and flavorful. This dish combines crispy breaded eggplant slices with rich, savory marinara sauce and melted cheese, all sandwiched between soft, toasted bread. It’s perfect for a quick lunch or dinner and offers a delicious alternative to traditional meat sandwiches.
To make this Eggplant Parmesan Sandwich, you’ll start by preparing the eggplant. The eggplant is sliced, breaded, and baked until crispy. Once the eggplant slices are ready, they’re layered with marinara sauce and cheese, then broiled to melt the cheese. Finally, the eggplant and sauce mixture is sandwiched between slices of toasted bread to create a delicious, hearty meal.
Ingredients (Serves 4-6):
- 2 medium eggplants
- 1 cup all-purpose flour
- 3 large eggs
- 2 cups breadcrumbs
- 1 teaspoon garlic powder
- 1 teaspoon dried oregano
- Salt and pepper to taste
- 2 cups marinara sauce
- 2 cups shredded mozzarella cheese
- 1 cup grated Parmesan cheese
- 6 Italian sandwich rolls or sub rolls
- Olive oil spray
Cooking Instructions:
- Prepare the Eggplant: Wash the eggplants and slice them into 1/2-inch thick rounds. Sprinkle them with salt and let them sit for about 20 minutes to draw out excess moisture. Pat them dry with a paper towel.
- Bread the Eggplant: Set up a breading station with three shallow dishes: one with flour, one with beaten eggs, and one with breadcrumbs mixed with garlic powder, oregano, salt, and pepper. Dip each eggplant slice in the flour, then the egg, and finally coat with the breadcrumb mixture.
- Bake the Eggplant: Preheat your oven to 400°F (200°C). Place the breaded eggplant slices on a baking sheet lined with parchment paper and spray lightly with olive oil. Bake for 20-25 minutes, flipping halfway through, until golden and crispy.
- Assemble the Sandwiches: Preheat your broiler. On a separate baking sheet, place the bottom halves of the sandwich rolls. Layer each with a few slices of baked eggplant, a generous spoonful of marinara sauce, and a mix of mozzarella and Parmesan cheese.
- Melt the Cheese: Place the baking sheet under the broiler for about 2-3 minutes, or until the cheese is melted and bubbly. Watch closely to avoid burning.
- Finish and Serve: Top each sandwich with the remaining half of the roll. Serve hot, and enjoy your Eggplant Parmesan Sandwich!
Extra Tips:
For the best results, choose fresh, firm eggplants with smooth skin. If you prefer a more classic taste, you can fry the eggplant slices instead of baking them, though this will increase the calorie content.
To add more flavor, consider adding fresh basil leaves or a sprinkle of red pepper flakes before serving. If you want to make the dish healthier, try using whole wheat rolls or gluten-free bread for a dietary-friendly version.
Spinach and Feta Stuffed Quesadillas

Spinach and Feta Stuffed Quesadillas are a delightful vegetarian fast food option that combines the savory flavors of feta cheese with the nutritious benefits of spinach. This quick and easy dish is perfect for a weeknight dinner or a casual gathering with friends and family. The crispy tortilla encases a rich and creamy filling, offering a satisfying crunch with every bite.
Plus, these quesadillas are versatile and can be customized to suit various taste preferences. Packed with nutrients, spinach is a powerhouse of vitamins and minerals, while feta cheese provides a tangy and creamy contrast. The combination of these ingredients creates a delectable filling that’s both satisfying and healthy.
These quesadillas aren’t only delicious but also simple to prepare, making them an excellent choice for those looking to enjoy a fast yet wholesome meal.
Ingredients for 4-6 servings:
- 8 large flour tortillas
- 2 cups fresh spinach, chopped
- 1 cup crumbled feta cheese
- 1 cup shredded mozzarella cheese
- 1 small onion, finely chopped
- 2 cloves garlic, minced
- 1 tablespoon olive oil
- Salt and pepper to taste
- 1 teaspoon dried oregano
- 1 teaspoon cumin
- 2 tablespoons butter
Cooking Instructions:
- Prepare the Filling: Heat olive oil in a large skillet over medium heat. Add the chopped onion and garlic, sautéing until the onion becomes translucent. Stir in the chopped spinach and cook until wilted, about 3-4 minutes. Season the mixture with salt, pepper, oregano, and cumin. Remove from heat and allow to cool slightly.
- Mix Cheeses: In a large bowl, combine the crumbled feta cheese and shredded mozzarella cheese. Add the spinach mixture to the bowl and mix thoroughly until all ingredients are well incorporated.
- Assemble Quesadillas: Lay out the flour tortillas on a clean surface. Spoon a generous amount of the spinach and cheese mixture onto one half of each tortilla. Fold the other half over to cover the filling, pressing down gently to seal.
- Cook Quesadillas: Heat a large non-stick skillet or griddle over medium heat. Melt a small amount of butter in the skillet. Place the folded quesadillas in the skillet and cook for about 3-4 minutes on each side, or until the tortillas are golden brown and the cheese is melted.
- Serve: Remove the quesadillas from the skillet and let them cool for a minute before slicing into wedges. Serve warm with your favorite salsa or sour cream on the side.
Extra Tips:
For an extra burst of flavor, consider adding a pinch of red pepper flakes to the spinach mixture for a hint of spice. If you prefer a more substantial filling, you can include sautéed mushrooms or roasted red peppers.
To guarantee the tortillas become perfectly crispy, avoid overfilling, which can cause the filling to spill out during cooking. Additionally, using a non-stick skillet will help achieve an even golden color without sticking. If you have leftovers, these quesadillas reheat well in a toaster oven, maintaining their delicious texture and flavor.
Lentil Sloppy Joes

Lentil Sloppy Joes are a delicious and healthy twist on the classic American comfort food, perfect for vegetarians and anyone looking to enjoy a meat-free meal. Packed with protein-rich lentils, these Sloppy Joes offer a satisfying texture and flavor that mimics the traditional ground beef version. Best of all, they’re quick to prepare and can be served on toasted buns for a simple yet fulfilling meal that both kids and adults will love.
The hearty lentils are cooked in a tangy tomato-based sauce with a touch of sweetness, creating a rich and savory filling that pairs beautifully with the soft buns. This dish isn’t only a great alternative for vegetarians but also a fantastic option for those seeking to incorporate more plant-based meals into their diet. Serve these Lentil Sloppy Joes with a side of coleslaw or a green salad for a complete and balanced meal.
Ingredients (serving size: 4-6 people):
- 1 cup dry lentils, rinsed and drained
- 2 1/2 cups water
- 1 tablespoon olive oil
- 1 medium onion, finely chopped
- 1 red bell pepper, diced
- 3 cloves garlic, minced
- 1 tablespoon chili powder
- 1 teaspoon smoked paprika
- 1 teaspoon cumin
- 1/4 teaspoon cayenne pepper (optional)
- 1 cup tomato sauce
- 2 tablespoons tomato paste
- 1 tablespoon soy sauce
- 1 tablespoon maple syrup
- Salt and pepper to taste
- 4-6 whole wheat hamburger buns
Cooking Instructions:
- Cook the Lentils: In a medium saucepan, combine the rinsed lentils and water. Bring to a boil over medium-high heat, then reduce the heat to a simmer. Cover and cook for about 20-25 minutes, or until the lentils are tender but not mushy. Drain any excess water and set aside.
- Sauté Aromatics: While the lentils are cooking, heat the olive oil in a large skillet over medium heat. Add the chopped onion and diced bell pepper, and sauté for about 5 minutes, or until the onion is translucent and the pepper is softened.
- Add Garlic and Spices: Stir in the minced garlic, chili powder, smoked paprika, cumin, and cayenne pepper (if using). Cook for another minute, stirring constantly, to allow the spices to become fragrant.
- Prepare the Sauce: Add the tomato sauce, tomato paste, soy sauce, and maple syrup to the skillet. Stir well to combine all the ingredients.
- Combine Lentils and Sauce: Add the cooked lentils to the skillet and mix everything together. Allow the mixture to simmer for 5-10 minutes, stirring occasionally, until the sauce thickens and the flavors meld together. Season with salt and pepper to taste.
- Toast the Buns: While the lentil mixture is simmering, toast the hamburger buns until they’re golden brown.
- Assemble the Sloppy Joes: Spoon a generous portion of the lentil mixture onto the bottom half of each toasted bun. Top with the other half of the bun and serve hot.
Extra Tips:
For an extra kick, you can add a dash of hot sauce to the lentil mixture before serving. If you prefer a slightly sweeter Sloppy Joe, increase the amount of maple syrup to suit your taste.
These Lentil Sloppy Joes can also be made in advance and stored in the refrigerator for up to three days; simply reheat the lentil filling before serving. Feel free to customize the recipe with additional vegetables such as carrots or zucchini for added nutrition. Enjoy experimenting with different spices and toppings to make this dish uniquely yours.
Veggie Pizza With Homemade Dough

Veggie pizza is a delicious and healthy option for those who are looking to enjoy a fast food treat without the meat. Not only does it pack a punch with its vibrant array of vegetables, but making it at home allows you to control the quality of ingredients and customize toppings to suit your taste. This recipe brings you a delightful homemade dough that serves as the perfect base for your choice of fresh vegetables, creating a nutritious meal that’s both satisfying and easy to prepare.
Making pizza dough from scratch may seem overwhelming, but it’s simpler than you might think. With just a few ingredients and a little bit of patience, you can create a soft and chewy crust that serves as a canvas for a variety of toppings. Paired with a rich tomato sauce and a selection of vibrant vegetables, this veggie pizza becomes a masterpiece of flavors that you can enjoy with family and friends. This recipe is designed to serve 4-6 people, making it ideal for a cozy dinner or a fun lunch gathering.
Ingredients (Serves 4-6):
For the Dough:
- 2 cups all-purpose flour
- 1 packet (2 1/4 teaspoons) active dry yeast
- 1 teaspoon sugar
- 3/4 cup warm water (about 110°F)
- 1 tablespoon olive oil
- 1 teaspoon salt
For the Toppings:
- 1 cup tomato sauce
- 1 cup shredded mozzarella cheese
- 1/2 cup sliced bell peppers (any color)
- 1/2 cup sliced red onion
- 1/2 cup sliced mushrooms
- 1/4 cup sliced black olives
- 1/4 cup chopped fresh spinach
- 1 teaspoon dried oregano
- 1 teaspoon dried basil
- Salt and pepper to taste
Cooking Instructions:
- Prepare the Dough: In a small bowl, dissolve the sugar in warm water and sprinkle the yeast on top. Let it sit for about 5 minutes, or until it becomes frothy. This activates the yeast.
- Mix the Dough: In a large mixing bowl, combine the flour and salt. Create a well in the center and pour in the yeast mixture and olive oil. Stir until a dough forms.
- Knead the Dough: Transfer the dough to a floured surface and knead it for about 8-10 minutes, or until the dough is smooth and elastic. If the dough is sticky, add a little more flour as needed.
- Let the Dough Rise: Place the dough in a lightly oiled bowl, cover it with a damp cloth, and let it rise in a warm area for about 1 hour, or until it has doubled in size.
- Preheat the Oven: Preheat your oven to 475°F (245°C) and place a pizza stone or a baking sheet in the oven to heat up.
- Prepare the Toppings: While the dough is rising, prepare your toppings by slicing the vegetables and having the cheese and tomato sauce ready.
- Shape the Dough: Once the dough has risen, punch it down to release the air and roll it out into a 12-inch circle on a floured surface. Transfer it to a piece of parchment paper for easy handling.
- Assemble the Pizza: Spread the tomato sauce evenly over the dough, leaving a small border for the crust. Sprinkle the mozzarella cheese over the sauce, then arrange the vegetables on top. Sprinkle oregano, basil, salt, and pepper over the vegetables.
- Bake the Pizza: Carefully transfer the pizza along with the parchment paper onto the preheated pizza stone or baking sheet. Bake for 12-15 minutes, or until the crust is golden brown and the cheese is bubbly and slightly browned.
- Serve: Remove the pizza from the oven and let it cool for a few minutes. Slice and serve warm.
Extra Tips:
When making homemade pizza dough, it’s essential to verify the water is at the right temperature to activate the yeast. Too hot can kill the yeast, and too cold mightn’t activate it properly.
Additionally, feel free to experiment with different vegetables or cheeses to make the pizza uniquely yours. Adding a sprinkle of crushed red pepper flakes can give it a spicy kick, and a drizzle of balsamic glaze over the top after baking can introduce a sweet and tangy flavor.