
As the leaves crunch underfoot and the air turns crisp, my kitchen transforms into a haven of creativity. Halloween is the perfect time to whip up delightfully spooky treats that are as fun to make as they are to eat. Picture Spooky Spider Deviled Eggs with olive “spiders” crawling over creamy yolks. Or maybe Mummy Hot Dogs wrapped in snug pastry bandages. There’s a cauldron full of enchanting delights to charm your festive table.
Spooky Spider Deviled Eggs
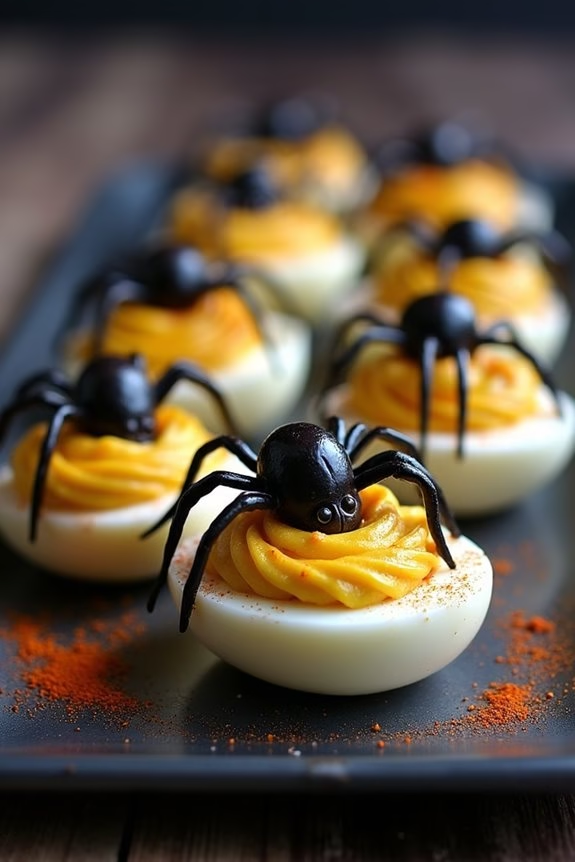
Spooky Spider Deviled Eggs are a perfect addition to any Halloween party spread, assured to delight and maybe even spook your guests a little. These deviled eggs aren’t only a festive treat but also a delicious snack that balances the creamy richness of the yolk mixture with the slight tanginess of mayonnaise and mustard. The eerie appearance is achieved by crafting edible spiders out of black olives, making this dish both visually appealing and fun to create.
This recipe is suitable for 4-6 people, making it an ideal choice for small gatherings or as a part of a larger Halloween-themed menu. It’s a simple yet effective way to impress your friends and family with your culinary creativity. The combination of flavors and the clever presentation make Spooky Spider Deviled Eggs a crowd-pleaser that will have everyone reaching for more.
Ingredients (Serving Size: 4-6 people):
- 6 large eggs
- 1/4 cup mayonnaise
- 1 teaspoon Dijon mustard
- 1/2 teaspoon white vinegar
- Salt and pepper, to taste
- Paprika (for garnish)
- 1 can of pitted black olives
Instructions:
- Boil the eggs: Place the eggs in a single layer in a saucepan and cover them with water. Bring the water to a boil over medium-high heat. Once boiling, remove the saucepan from heat, cover it, and let it sit for 12 minutes.
- Prepare the eggs: After 12 minutes, transfer the eggs to a bowl of ice water to cool them quickly. Let them sit for about 5 minutes before peeling them.
- Cut the eggs: Slice each egg in half lengthwise and carefully remove the yolks, placing them in a medium-sized bowl.
- Make the filling: Mash the egg yolks with a fork until crumbly. Add the mayonnaise, Dijon mustard, white vinegar, salt, and pepper to the yolks. Mix until smooth and creamy.
- Fill the egg whites: Spoon or pipe the yolk mixture back into the egg white halves, mounding slightly.
- Create the spiders: Slice the black olives in half. Use one half as the spider’s body and cut the other half into thin strips to form the spider legs. Position the olive pieces on top of each filled egg to resemble spiders.
- Garnish and serve: Lightly sprinkle each egg with paprika for added color and flavor. Arrange on a platter and serve chilled.
Extra Tips:
To guarantee the perfect texture for your deviled egg filling, make sure the yolk mixture is smooth and free of lumps. If you prefer a smoother consistency, you can use a hand mixer.
When peeling the eggs, gently tap and roll them on a hard surface to crack the shell, making it easier to remove. Additionally, if you’re preparing these eggs in advance, keep the filling and egg whites separate until just before serving to maintain freshness and prevent the eggs from becoming soggy.
Mummy Hot Dogs
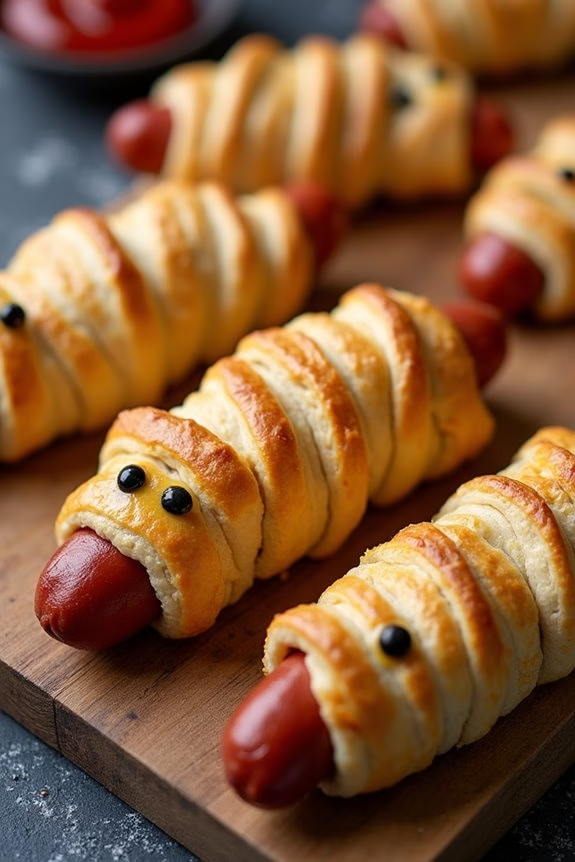
Mummy Hot Dogs are a fun and spooky treat perfect for Halloween parties or a festive family meal. These are fundamentally hot dogs wrapped in crescent roll dough to mimic a mummy’s bandages, then baked until golden brown. The result is a deliciously flaky and savory snack that’s both visually appealing and tasty. Kids and adults alike will enjoy these playful bites, and they’re simple enough to involve the little ones in the kitchen.
This recipe is designed to serve 4-6 people, making it ideal for a small gathering. You can easily adjust the ingredient quantities to serve a larger crowd. With just a few ingredients and minimal preparation time, you can whip up a batch of these mummy hot dogs in no time. They’re best served warm, fresh from the oven, with your favorite dipping sauces like ketchup or mustard.
Ingredients (Serves 4-6):
- 1 can of crescent roll dough
- 8 hot dogs
- 1 egg, beaten
- 1 tablespoon of water
- Mustard or ketchup for decoration (optional)
Cooking Instructions:
- Preheat the Oven: Start by preheating your oven to 375°F (190°C). This will guarantee that the mummy hot dogs cook evenly and develop a nice golden color.
- Prepare the Dough: Open the can of crescent roll dough and unroll it onto a clean surface. Using a knife or a pizza cutter, cut the dough into thin strips, about 1/4 inch wide.
- Wrap the Hot Dogs: Take each hot dog and wrap it with the dough strips, leaving a small gap at one end for the “face” of the mummy. Make sure to overlap the strips slightly to give the appearance of bandages.
- Create the Egg Wash: In a small bowl, mix the beaten egg with a tablespoon of water. Use a pastry brush to lightly coat the dough-wrapped hot dogs. This will give them a shiny, golden finish once baked.
- Bake the Mummy Hot Dogs: Place the wrapped hot dogs on a baking sheet lined with parchment paper. Bake in the preheated oven for about 12-15 minutes or until the dough is golden brown and cooked through.
- Decorate the Mummies: Once out of the oven, let the mummy hot dogs cool slightly. Use mustard or ketchup to dot on eyes at the exposed end of the hot dog to complete the mummy look.
Extra Tips:
To guarantee the mummy hot dogs come out perfect every time, make sure not to wrap the dough too tightly around the hot dogs, as it needs room to expand while baking.
If you’re making these ahead of time, wrap the hot dogs and store them in the refrigerator until you’re ready to bake.
For added flavor, consider adding a slice of cheese underneath the dough before wrapping. This will melt while baking, adding a gooey surprise inside the mummy. Enjoy your spooky and delicious mummy hot dogs!
Witch’s Brew Cheese Dip
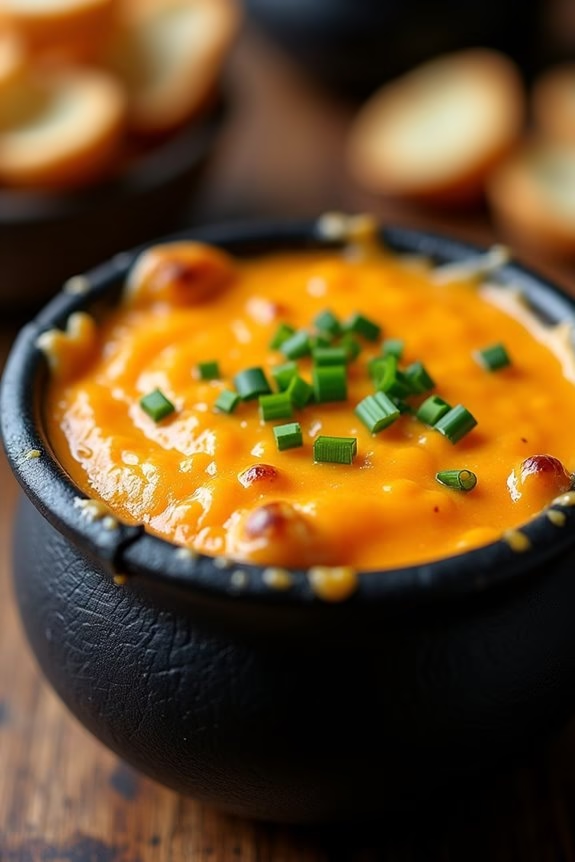
Witch’s Brew Cheese Dip is a delightful and spooky addition to your Halloween party menu. This creamy and cheesy dip isn’t only easy to make but also adds a touch of eerie charm to your festivities. Served warm and gooey, it’s perfect for dipping with fresh vegetables, breadsticks, or tortilla chips. The combination of flavors creates a magical experience for your taste buds, making it a must-try for your Halloween gathering.
This dip isn’t only a crowd-pleaser but also a conversation starter with its enchanting presentation. The rich blend of cheeses, combined with a hint of spice and a touch of garlic, creates a hauntingly delicious concoction. As your guests scoop up the cheesy goodness, they’ll be delighted by the bubbling, cauldron-like appearance, reminiscent of a witch’s brew. Serve it in a fun cauldron-shaped bowl to enhance the Halloween theme and watch as it becomes a centerpiece of your spooky soirée.
Ingredients for 4-6 people:
- 2 cups shredded cheddar cheese
- 1 cup shredded mozzarella cheese
- 1 package (8 oz) cream cheese, softened
- 1/2 cup sour cream
- 1/4 cup milk
- 2 cloves garlic, minced
- 1 teaspoon smoked paprika
- 1/2 teaspoon cayenne pepper
- Salt and pepper to taste
- 1 tablespoon chopped chives (for garnish)
- Breadsticks, tortilla chips, or vegetable sticks for dipping
Instructions:
- Preheat the Oven: Start by preheating your oven to 350°F (175°C). This guarantees that your dip will cook evenly and develop a perfectly melted and bubbly top.
- Mix the Cheeses: In a large mixing bowl, combine the shredded cheddar cheese, shredded mozzarella cheese, and cream cheese. Confirm the cream cheese is softened to mix easily with the shredded cheeses.
- Add the Creamy Ingredients: Stir in the sour cream and milk into the cheese mixture. This will help create a smooth, creamy texture for your dip.
- Season the Dip: Add the minced garlic, smoked paprika, cayenne pepper, and a pinch of salt and pepper. Mix everything thoroughly until all ingredients are well combined and evenly distributed.
- Transfer to Baking Dish: Spoon the cheese mixture into an oven-safe baking dish. Spread it evenly to guarantee a uniform cooking process.
- Bake the Dip: Place the baking dish in the preheated oven and bake for 20-25 minutes, or until the dip is hot and bubbly. The top should be slightly golden brown.
- Garnish and Serve: Once baked, remove the dip from the oven and allow it to cool slightly. Sprinkle chopped chives over the top for a fresh, colorful garnish. Serve warm with breadsticks, tortilla chips, or vegetable sticks.
Extra Tips:
For an extra touch of spookiness, consider serving the dip in a small, black cauldron-shaped dish to fit the Halloween theme. You can also add a few drops of green food coloring to the dip mixture before baking to intensify the ‘witch’s brew’ appearance.
If you prefer a milder dip, reduce the amount of cayenne pepper. Finally, you can prepare the dip a day in advance and store it in the refrigerator. Simply bake it just before serving to enjoy it fresh and hot.
Pumpkin Patch Dirt Cups
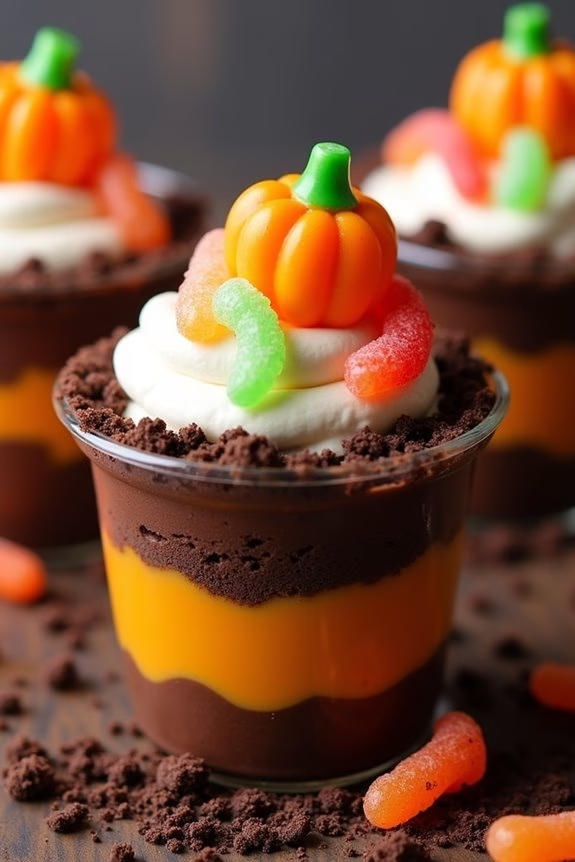
Pumpkin Patch Dirt Cups are a delightful and fun Halloween dessert that combines the rich flavors of chocolate and the seasonal taste of pumpkin. These no-bake treats are perfect for parties and family gatherings, providing a sweet surprise for both kids and adults alike.
By layering creamy pudding with crushed cookies and topping it off with festive decorations, these cups mimic the appearance of a spooky pumpkin patch, complete with candy pumpkins and gummy worms for an added touch of Halloween magic.
The great thing about Pumpkin Patch Dirt Cups is their simplicity and versatility. With just a few basic ingredients, you can create a dessert that looks impressive and tastes delicious. This recipe serves 4-6 people, making it ideal for a small party or a family treat.
Whether you’re a seasoned chef or a novice in the kitchen, this recipe is easy to follow and sure to be a hit.
Ingredients for 4-6 servings:
- 1 package (3.9 oz) instant chocolate pudding mix
- 2 cups cold milk
- 1 cup canned pumpkin puree
- 1 teaspoon pumpkin pie spice
- 1 package (14.3 oz) chocolate sandwich cookies
- 1 cup whipped topping
- Candy pumpkins
- Gummy worms
Cooking Instructions:
- Prepare the Pudding: In a large mixing bowl, combine the instant chocolate pudding mix with the cold milk. Whisk the mixture for about 2 minutes until it thickens. Set aside to allow the pudding to set.
- Add Pumpkin Flavor: In a separate bowl, mix the canned pumpkin puree with the pumpkin pie spice until well combined. Gently fold this mixture into the prepared chocolate pudding, ensuring an even blend.
- Crush the Cookies: Place the chocolate sandwich cookies in a resealable plastic bag. Use a rolling pin or a heavy object to crush the cookies into fine crumbs. These will serve as the “dirt” in your cups.
- Layer the Cups: Take individual cups or jars and begin layering. Start with a spoonful of the pumpkin chocolate pudding mixture, followed by a layer of the crushed cookie crumbs. Repeat the layers until the cups are nearly full, finishing with a layer of cookie crumbs on top.
- Add Decorations: Top each cup with a dollop of whipped topping. Decorate with candy pumpkins and gummy worms to create a pumpkin patch scene.
- Chill and Serve: Place the completed cups in the refrigerator for at least 30 minutes to chill before serving. This will help the flavors meld together and give the pudding a firmer texture.
Extra Tips:
For an extra special touch, consider using themed cups or jars to serve your Pumpkin Patch Dirt Cups. You can also experiment with different toppings, such as crushed graham crackers for a different texture or edible glitter for a touch of sparkle.
If you’re preparing these for a larger party, simply double the ingredients to make more servings. Ultimately, let your creativity shine when decorating the cups; the more festive they look, the more they’ll delight your guests!
Ghostly Pizza Bagels
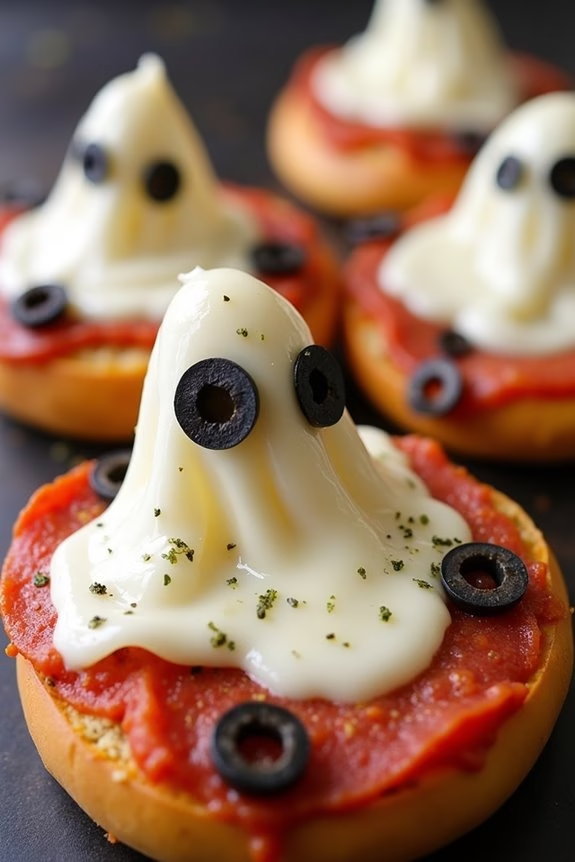
Ghostly Pizza Bagels are a fun and spooky treat perfect for your Halloween festivities. These little bites aren’t only delicious but also creatively designed to add a touch of eerie excitement to your party spread. The combination of chewy bagels, melted cheese shaped like ghosts, and a tangy tomato sauce base makes for a delightful snack that both kids and adults will enjoy.
Plus, they’re simple to make and can be customized with your favorite toppings, making them a versatile option for any gathering.
The charm of Ghostly Pizza Bagels lies in their playful appearance and easy preparation. With just a few basic ingredients and minimal time in the kitchen, you can create a dish that looks impressive and tastes great. The key is to use mozzarella cheese, which when melted, forms the ghostly figures atop the bagels.
By using cookie cutters, you can give the melted cheese its ghostly shape, while olive slices serve as spooky eyes. It’s a creative and tasty way to celebrate the Halloween spirit with a dish that’s sure to be a hit among guests of all ages.
Ingredients (Serves 4-6):
- 6 bagels, sliced in half
- 1 cup tomato or pizza sauce
- 12 slices of mozzarella cheese
- 24 black olive slices
- 1 cup pepperoni slices or other toppings of choice
- 1 tablespoon olive oil
- 1 teaspoon dried oregano
- Salt and pepper to taste
Cooking Instructions:
- Preheat the Oven: Start by preheating your oven to 375°F (190°C). This guarantees that your bagels will cook evenly and the cheese will melt perfectly.
- Prepare the Bagels: Lay the sliced bagels on a baking sheet, cut side up. Brush each half lightly with olive oil to add flavor and help the edges crisp up during baking.
- Add the Sauce: Spread a generous layer of tomato or pizza sauce over each bagel half. Make sure to cover the entire surface for a rich, tangy base.
- Shape the Cheese: Using a ghost-shaped cookie cutter, cut ghost shapes out of the mozzarella slices. If you don’t have a ghost cutter, you can use a knife to cut the shapes freehand.
- Assemble the Toppings: Place the ghost-shaped cheese slices on top of the sauce-covered bagels. Add olive slices to create eyes and mouth for each ghost. If desired, add additional toppings like pepperoni slices around the cheese.
- Season and Bake: Sprinkle each bagel with a pinch of dried oregano, salt, and pepper. Place the baking sheet in the preheated oven and bake for 10-12 minutes, or until the cheese is melted and bubbly.
- Serve and Enjoy: Remove the Ghostly Pizza Bagels from the oven and allow them to cool for a few minutes before serving. They’re best enjoyed warm so that the cheese is perfectly gooey.
Extra Tips:
For an extra crispy base, you can toast the bagel halves before adding the sauce and toppings. If you’re serving these at a party, consider setting up a “decorate your own bagel” station where guests can add their own toppings.
This can be a fun activity, especially for kids. You can also experiment with different types of cheese or sauces to match various dietary preferences. Finally, don’t forget to have fun with the presentation; arranging them on a Halloween-themed platter can enhance the spooky ambiance of your event.
Frankenstein Rice Krispie Treats
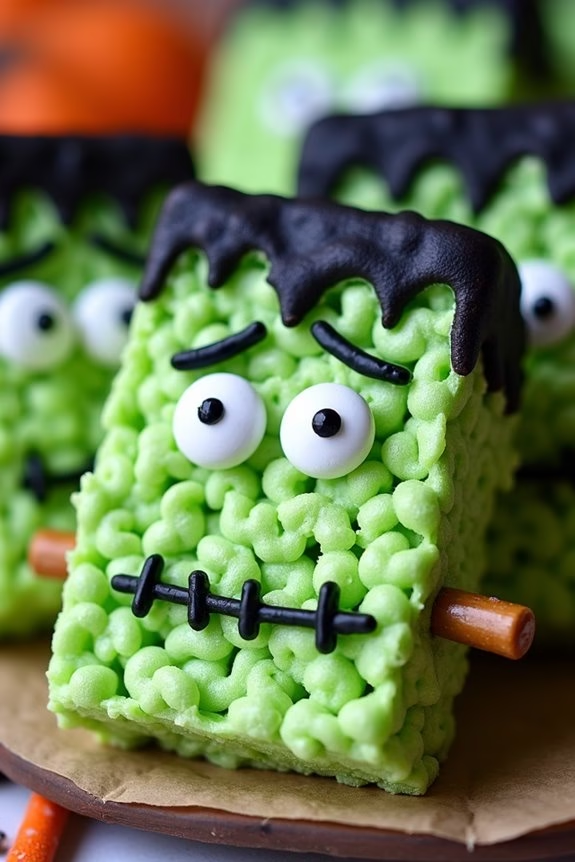
Frankenstein Rice Krispie Treats are a fun and spooky way to celebrate Halloween with a sweet and gooey twist. These treats are perfect for parties, gatherings, or simply as a festive snack for kids and adults alike. With their bright green color and monster-like appearance, they’re sure to be a hit and add a playful touch to your Halloween spread.
The combination of marshmallows, rice cereal, and a hint of food coloring creates a delicious and eye-catching treat that’s both easy to make and enjoyable to eat.
These Frankenstein Rice Krispie Treats can be customized with various decorations to give each monster its unique personality. You can use candy eyes, chocolate chips, or even colored icing to create the perfect monstrous face. The best part about this recipe is its simplicity, making it a great activity to involve kids in the kitchen.
With just a few ingredients and some creativity, you can whip up these delightful treats and bring a little Halloween magic to your table.
Ingredients (serving size: 4-6 people):
- 6 cups of Rice Krispies cereal
- 1 package (10 oz) of mini marshmallows
- 3 tablespoons of unsalted butter
- Green food coloring
- 1 teaspoon of vanilla extract
- Candy eyes
- Black decorating gel or chocolate chips
- Pretzel sticks (optional for neck bolts)
Instructions:
- Prepare the Pan: Start by greasing a 9×13-inch baking pan with butter or non-stick spray. This will prevent the treats from sticking to the pan when you transfer the mixture later.
- Melt the Butter and Marshmallows: In a large saucepan, melt the butter over low heat. Once the butter is melted, add the mini marshmallows to the saucepan. Stir continuously until the marshmallows are completely melted and the mixture is smooth. Be sure to keep the heat low to prevent the marshmallows from burning.
- Add Color and Flavor: Remove the saucepan from the heat and quickly stir in the vanilla extract. Add a few drops of green food coloring to the melted marshmallow mixture, stirring until you achieve the desired shade of green. Feel free to add more food coloring for a brighter hue.
- Combine with Cereal: Pour the Rice Krispies cereal into the saucepan with the green marshmallow mixture. Stir well until all the cereal is evenly coated with the marshmallow mixture. Make sure there are no dry spots.
- Transfer to Pan and Shape: Pour the mixture into the prepared baking pan. Use a buttered spatula or wax paper to press the mixture evenly into the pan. Allow it to cool slightly before proceeding to the next step.
- Decorate the Faces: Once the Rice Krispie layer has set, cut it into squares or rectangles to form Frankenstein’s head. Use the candy eyes to create the monster’s eyes, and use the black decorating gel or chocolate chips to draw a mouth and stitches. If desired, insert pretzel sticks on the sides for neck bolts.
- Set and Serve: Allow the decorated treats to set completely at room temperature before serving. This will guarantee that the decorations stay in place and the treats hold their shape.
Extra Tips:
When making these Frankenstein Rice Krispie Treats, it’s important to work quickly when mixing and shaping the mixture, as it can harden if left too long. If you find the mixture sticking to your hands or utensils, lightly coat them with butter or non-stick spray.
For a more personalized touch, consider using different colors of food coloring to create a variety of monster faces. Additionally, storing the treats in an airtight container will keep them fresh for several days, making them a perfect make-ahead option for your Halloween festivities.
Bloody Eyeball Punch
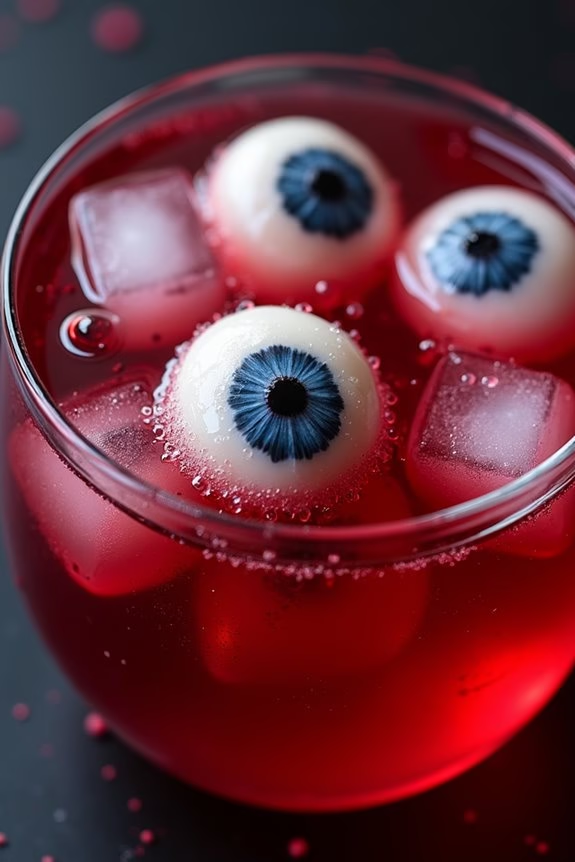
Halloween is a time for spooky fun, and nothing sets the scene better than a festive and creepy punch. The Bloody Eyeball Punch isn’t just a treat for the taste buds; it’s a visual masterpiece that will leave your guests both delighted and horrified.
Combining vibrant red fruit juices with eerie eyeball garnishes, this punch is the perfect addition to any Halloween gathering. Crafted for serving 4-6 people, this punch is great for small to medium-sized parties.
The chilling effect of floating lychee eyeballs filled with blueberries, complemented by the deep red hues of the juice, creates an unforgettable illusion of watching eyes staring back from the punch bowl. Prepare to impress your guests with this easy-to-make and deliciously spooky Halloween beverage.
Ingredients:
- 1 liter cranberry juice
- 500 ml sparkling water
- 250 ml pomegranate juice
- 12 canned lychees
- 12 fresh or frozen blueberries
- Ice cubes
- 1/2 cup lime juice
- 1/4 cup sugar
- 1/2 cup grenadine syrup
Cooking Instructions:
- Prepare the Eyeballs: Drain the canned lychees and pat them dry with a paper towel. Carefully insert a blueberry into the cavity of each lychee to create the appearance of an eyeball. Set these aside in the refrigerator to chill and firm up.
- Mix the Base: In a large punch bowl, combine the cranberry juice, pomegranate juice, and lime juice. Stir in the sugar until it’s fully dissolved. This will be the base of your punch, providing a sweet and tangy flavor profile.
- Add the Fizz: Just before serving, slowly add the sparkling water to the juice mixture. This will give your punch a delightful effervescence that enhances the drinking experience.
- Incorporate the Grenadine: Carefully pour the grenadine syrup into the punch. It will sink to the bottom initially, creating a layered look that mimics the appearance of blood, adding to the punch’s creepy aesthetic.
- Chill the Punch: Add ice cubes to the punch bowl to keep the drink cool and invigorating. You can also pre-chill all the juice ingredients to guarantee the punch is served at the perfect temperature.
- Serve with Eyeballs: Finally, gently place the prepared lychee “eyeballs” into the punch. As they float, they’ll add a spooky touch that’s both fun and thematic for Halloween.
Extra Tips:
For an even spookier presentation, consider adding a few drops of red food coloring to intensify the blood-like appearance of the punch.
Using flavored sparkling water, such as lime or berry, can add an extra layer of flavor complexity. If you want to keep the punch colder for longer, freeze some of the cranberry juice in an ice cube tray and use these instead of regular ice cubes.
This way, your punch won’t get diluted as the ice melts. Remember that the visual impact is as important as the taste, so take your time arranging the eyeballs just before your guests arrive.
Bat Wing Cupcakes
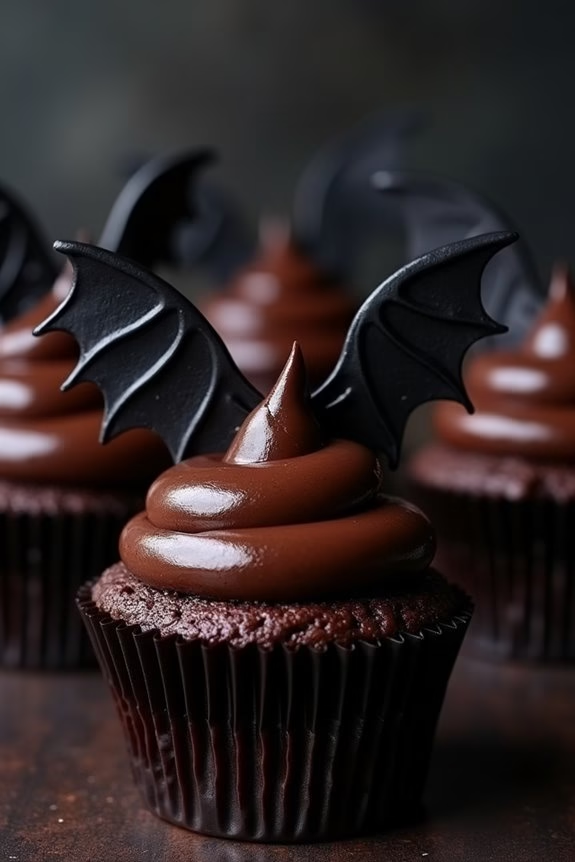
Bat Wing Cupcakes are a spooky and delicious treat perfect for Halloween festivities. These cupcakes feature rich chocolate flavors, topped with a decadent dark chocolate ganache, and adorned with eerie bat wing toppers for a hauntingly delightful appearance. Ideal for Halloween parties or a fun family baking session, these cupcakes are bound to impress both kids and adults with their creative design and mouthwatering taste.
Creating Bat Wing Cupcakes involves a few different components: the chocolate cupcakes, the dark chocolate ganache, and the bat wing decorations. Each element adds to the overall experience, creating a dessert that’s as visually striking as it’s tasty. The recipe below is designed to serve 4-6 people, making it a great option for a small gathering or a special Halloween treat.
Ingredients:
- For the Chocolate Cupcakes:
- 1 cup all-purpose flour
- 1 cup granulated sugar
- 1/2 cup unsweetened cocoa powder
- 1 teaspoon baking powder
- 1/2 teaspoon baking soda
- 1/4 teaspoon salt
- 1/2 cup milk
- 1/4 cup vegetable oil
- 1 large egg
- 1 teaspoon vanilla extract
- 1/2 cup boiling water
- For the Dark Chocolate Ganache:
- 1 cup heavy cream
- 8 ounces dark chocolate, finely chopped
- For the Bat Wing Decorations:
- Black fondant or black candy melts
Instructions:
- Prepare the Cupcake Batter:
- Preheat your oven to 350°F (180°C) and line a cupcake tin with paper liners.
- In a large mixing bowl, combine the flour, sugar, cocoa powder, baking powder, baking soda, and salt.
- Add the milk, vegetable oil, egg, and vanilla extract to the dry ingredients. Mix until well combined.
- Carefully stir in the boiling water until the batter is smooth and well-mixed (the batter will be thin).
- Bake the Cupcakes:
- Pour the batter into the prepared cupcake liners, filling each about 2/3 full.
- Bake in the preheated oven for 18-20 minutes, or until a toothpick inserted in the center of a cupcake comes out clean.
- Allow the cupcakes to cool completely on a wire rack before frosting.
- Make the Dark Chocolate Ganache:
- Heat the heavy cream in a small saucepan over medium heat until it begins to simmer. Don’t let it boil.
- Pour the hot cream over the chopped dark chocolate in a heatproof bowl. Let it sit for a minute to melt the chocolate.
- Stir the mixture until smooth and glossy. Allow it to cool slightly until it thickens to a spreadable consistency.
- Decorate the Cupcakes:
- Spread or pipe the cooled ganache over the top of each cooled cupcake.
- Roll out the black fondant or melt black candy melts to form bat wings. Shape them into wing designs and let them set if using candy melts.
- Insert the bat wings into the ganache on each cupcake for a spooky effect.
Extra Tips:
To guarantee your Bat Wing Cupcakes are a hit, make sure your ganache has cooled enough for a perfect spreadable consistency—this will make it easier to attach the bat wings.
If using fondant for the wings, you can prepare them a day in advance to save time.
Additionally, if you prefer a more intense chocolate flavor, consider adding a teaspoon of instant coffee granules to the cupcake batter. This will enhance the chocolate without adding a coffee taste.
Enjoy your Halloween festivities with these delightful treats!
Monster Mouth Apple Snacks

Monster Mouth Apple Snacks are a fun and festive treat perfect for celebrating Halloween. These spooky snacks aren’t only visually appealing but are also a healthy alternative to the usual sugary treats enjoyed during the holiday season. Made with fresh apples, peanut butter, and a few other simple ingredients, these snacks mimic the look of monster mouths, complete with sharp almond teeth.
They’re easy to make and require no baking, making them an ideal activity for kids and adults alike to enjoy together.
These ghoulish bites offer a great combination of flavors and textures, with the crispness of the apples complementing the creamy peanut butter and the crunch of the almonds. Not only are they fun to assemble, but they’re also a delicious and nutritious option for any Halloween party.
Plus, with the flexibility to customize based on dietary needs and preferences, Monster Mouth Apple Snacks can be adapted for various tastes and allergies. This recipe serves 4-6 people, making it perfect for small gatherings or family fun nights.
Ingredients:
- 3 large apples (any variety)
- 1/2 cup peanut butter (or any nut/seed butter of your choice)
- 1/4 cup slivered almonds
- 1/4 cup small marshmallows
- 1 tablespoon lemon juice (optional, to prevent browning)
Instructions:
- Prepare the Apples: Wash the apples thoroughly under running water and pat them dry with a clean towel. Core the apples and slice each one into quarters.
- Slice the Apples: Take each quarter and slice it into thin wedges, about 1/2 inch thick. If using lemon juice, lightly brush the slices to prevent them from browning.
- Spread the Peanut Butter: Take one apple slice and spread approximately one teaspoon of peanut butter on the cut side. Confirm the peanut butter is evenly spread to act as the “glue” for the rest of the ingredients.
- Assemble the Monster Mouth: Place another apple slice on top of the peanut butter-coated slice, with the peanut butter sides facing each other, to create a mouth shape.
- Add the Teeth: Gently press several slivered almonds into the peanut butter to create “teeth” sticking out from between the apple slices.
- Create the Tongue: To add a tongue, place a small marshmallow inside the gap between the two apple slices. If you prefer, you can cut the marshmallow in half for a more tongue-like shape.
- Repeat the Process: Continue assembling the remaining apple slices until all the monster mouths are complete.
Extra Tips:
When preparing Monster Mouth Apple Snacks, consider using a variety of apple types for a mix of colors and flavors. If peanut allergies are a concern, substitute with sunflower seed butter or another nut-free alternative.
For an added festive touch, use colored marshmallows or dye them with food coloring to create monster tongues in different shades. Finally, serve these snacks fresh, as they’re best enjoyed on the same day to maintain their crisp texture and vibrant appearance.
Creepy Crawly Pasta Salad
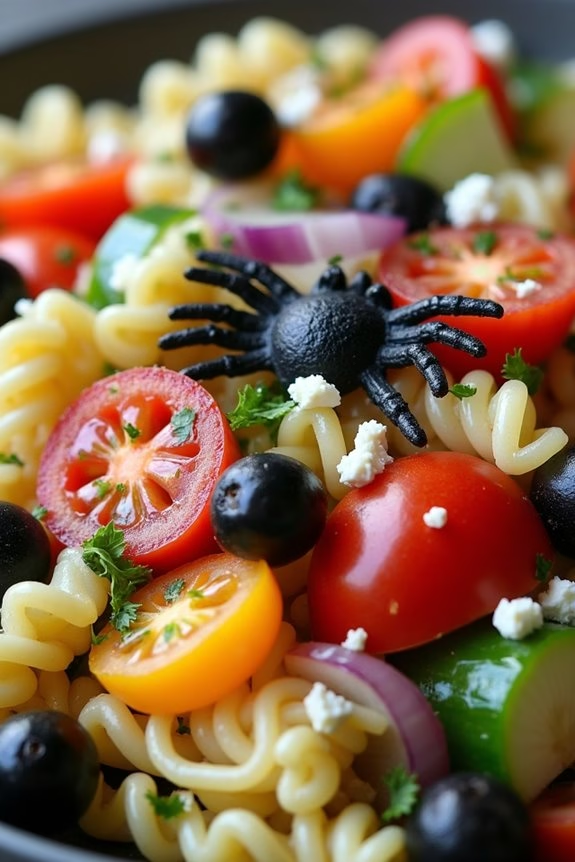
Creepy Crawly Pasta Salad is a fun and frightful dish perfect for Halloween gatherings. This colorful and ghoulish salad combines eerie-shaped pasta with a medley of fresh vegetables and a tangy dressing, creating a dish that’s as spooky as it’s delicious. The pasta is the star of the show, with shapes that resemble worms and creepy crawlies, making it a hit with both kids and adults.
Whether you’re hosting a Halloween party or simply want to serve up something festive, this pasta salad is sure to delight and entertain your guests. This dish isn’t only visually appealing but also packed with flavor and nutrition. The fresh vegetables provide a satisfying crunch, while the dressing ties everything together with its zesty and savory notes.
The best part is that it’s easy to prepare and can be made in advance, allowing you to focus on other aspects of your event. With a serving size designed for 4-6 people, it’s perfect for small to medium gatherings. So, gather your ingredients and get ready to whip up a dish that will leave your guests talking long after the party is over.
Ingredients for 4-6 servings:
- 12 oz (340 g) Halloween-themed pasta (like bat, spider, or worm shapes)
- 1 cup cherry tomatoes, halved
- 1 cup black olives, sliced
- 1 cup bell peppers, diced (use orange and green for a Halloween theme)
- 1 cup cucumber, diced
- 1/2 cup red onion, thinly sliced
- 1/2 cup feta cheese, crumbled
- 1/4 cup fresh basil, chopped
- 1/4 cup fresh parsley, chopped
- 1/2 cup Italian dressing
- Salt and pepper to taste
Cooking Instructions:
- Cook the Pasta: Begin by bringing a large pot of salted water to a boil. Add the Halloween-themed pasta and cook according to the package instructions until al dente. Once cooked, drain the pasta and rinse it with cold water to stop the cooking process. This also helps to cool the pasta for the salad.
- Prepare the Vegetables: While the pasta is cooking, prepare the vegetables. Slice the cherry tomatoes in half, dice the bell peppers and cucumber, thinly slice the red onion, and slice the black olives. Set the vegetables aside in a large mixing bowl.
- Combine Ingredients: Add the cooked and cooled pasta to the bowl of vegetables. Next, add the crumbled feta cheese, chopped basil, and parsley. Toss the ingredients gently to combine them evenly.
- Dress the Salad: Pour the Italian dressing over the pasta and vegetable mixture. Use salad tongs or two large spoons to toss everything together thoroughly, ensuring the dressing coats all the ingredients. Season with salt and pepper to taste.
- Chill and Serve: Cover the salad with plastic wrap or transfer it to an airtight container. Chill it in the refrigerator for at least 30 minutes before serving to allow the flavors to meld together. Before serving, give the salad one final toss and adjust seasoning if necessary.
Extra Tips:
For an extra spooky effect, consider adding some Halloween-themed garnishes such as edible fake eyeballs made from mozzarella balls and olives, or use food coloring to tint the pasta water for a more vibrant hue.
If you want to make the salad ahead of time, prepare the salad up to a day in advance, but keep the dressing separate and mix it in just before serving to preserve the freshness and texture of the vegetables. Feel free to customize the salad with other vegetables or proteins, such as grilled chicken or chickpeas, to suit your taste preferences.
Vampire Bite Marshmallow Pops
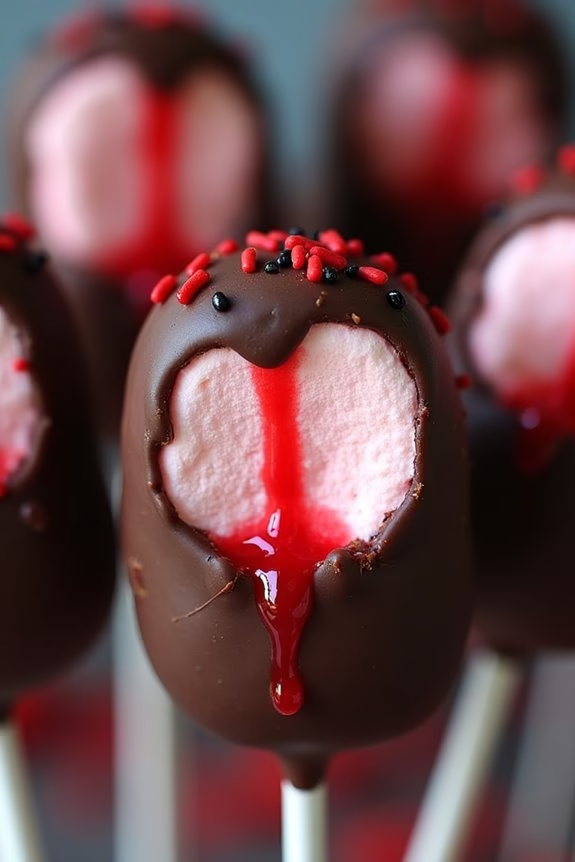
Searching for a spooktacular treat to add a touch of whimsy to your Halloween celebrations? Seek no further than these Vampire Bite Marshmallow Pops.
These delightful treats are both fun to make and delicious to eat, making them perfect for parties or just a festive snack at home. The combination of fluffy marshmallows, sweet chocolate, and a hint of red food coloring creates a treat that resembles a vampire’s bite, adding a playful yet eerie element to your Halloween spread.
Making Vampire Bite Marshmallow Pops isn’t only simple but also an enjoyable activity for the whole family. These pops are versatile and can be customized to suit your Halloween theme or personal taste preferences.
Whether you’re hosting a party or simply searching for a creative Halloween project, these marshmallow pops will surely impress your guests with their unique look and delectable taste.
Ingredients (serves 4-6 people):
- 12 large marshmallows
- 12 lollipop sticks or wooden skewers
- 1 cup semi-sweet chocolate chips
- 1 tablespoon coconut oil or shortening
- 1/4 cup red candy melts or red food coloring gel
- Red sprinkles (optional)
- Black food coloring gel (optional, for extra detail)
Instructions:
1. Prepare the Marshmallows:
Insert a lollipop stick into each marshmallow, making sure it’s secure but not piercing through the other side. Arrange the marshmallow pops on a baking sheet lined with parchment paper.
2. Melt the Chocolate:
In a microwave-safe bowl, combine the semi-sweet chocolate chips and coconut oil. Microwave in 30-second intervals, stirring in between, until the mixture is smooth and melted. Be careful not to overheat.
3. Coat the Marshmallows:
Dip each marshmallow into the melted chocolate, covering about two-thirds of the marshmallow. Allow any excess chocolate to drip off, then place the marshmallow back on the parchment paper.
4. Create Vampire Bites:
Using a toothpick, gently press two small indentations into the chocolate coating on each marshmallow to mimic vampire bite marks.
5. Add Red Detail:
Melt the red candy melts according to package instructions, or mix a small amount of red food coloring gel with a few drops of water to create a red liquid. Use a clean toothpick to apply the red liquid to the bite marks, allowing it to drip slightly for an authentic look.
6. Optional Details:
For added detail, use black food coloring gel to create small dots or lines around the marshmallow for a more dramatic effect. Sprinkle red sprinkles over the chocolate if desired.
7. Set and Serve:
Allow the marshmallow pops to set completely at room temperature or refrigerate for quicker setting. Serve on a platter or wrap individually for party favors.
Extra Tips:
For the best results, verify that the chocolate coating is smooth and even by gently tapping the lollipop stick on the side of the bowl after dipping.
If you find it challenging to work with candy melts, red food coloring gel with a bit of water can serve as an excellent alternative for the “blood” detail. Always allow each layer to set before adding additional details to avoid smudging.
These pops can be made a day in advance and stored in an airtight container, making them convenient for party prep.
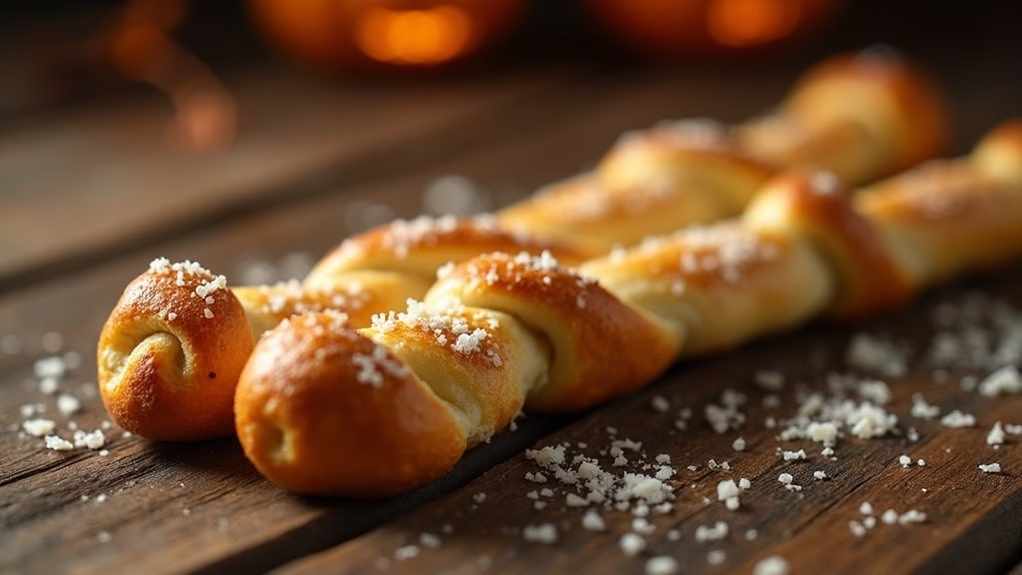
Skeleton Bone Breadsticks

Skeleton Bone Breadsticks are a fun and spooky addition to your Halloween party spread. These eerie breadsticks aren’t only delicious but also add a festive touch to your table. Shaped to resemble bones, they’re perfect for dipping into a cauldron of marinara sauce or serving alongside a steaming bowl of soup.
Whether you’re hosting a Halloween gathering or just want to enjoy a themed dinner with family, these breadsticks are sure to be a hit.
Made from simple ingredients, these breadsticks are easy to prepare and bake. They’ve a light, crispy texture on the outside while remaining soft and chewy on the inside. With a hint of garlic and a sprinkle of Parmesan cheese, they’re bursting with flavor. Best of all, you can make them ahead of time and reheat them just before serving, making them a convenient choice for any Halloween celebration.
Ingredients for Skeleton Bone Breadsticks (Serves 4-6):
- 2 cups all-purpose flour
- 1 packet active dry yeast (about 2 1/4 teaspoons)
- 3/4 cup warm water (110°F)
- 1 tablespoon olive oil
- 1 teaspoon salt
- 1 teaspoon sugar
- 1 teaspoon garlic powder
- 1/4 cup grated Parmesan cheese
- 2 tablespoons melted butter
- Coarse sea salt (for sprinkling)
- Marinara sauce (for dipping, optional)
Cooking Instructions:
- Prepare the Dough: In a large mixing bowl, dissolve the active dry yeast and sugar in warm water. Let it sit for about 5 minutes until it becomes frothy. This indicates that the yeast is active.
- Mix Ingredients: Add the olive oil, salt, and garlic powder to the yeast mixture. Gradually add the flour, one cup at a time, mixing well after each addition until a soft dough forms.
- Knead the Dough: Transfer the dough onto a lightly floured surface and knead for about 5-7 minutes until it becomes smooth and elastic. Form it into a ball.
- Let the Dough Rise: Place the dough in a lightly oiled bowl, cover it with a damp cloth, and let it rise in a warm place for about 1 hour or until it has doubled in size.
- Shape the Breadsticks: Preheat your oven to 400°F (200°C). Punch down the risen dough and divide it into 12 equal pieces. Roll each piece into a rope about 6-8 inches long. To create the bone shape, tie a knot at each end of the rope.
- Prepare for Baking: Place the shaped dough sticks on a baking sheet lined with parchment paper. Brush each breadstick with melted butter and sprinkle with grated Parmesan cheese and a little coarse sea salt.
- Bake the Breadsticks: Bake in the preheated oven for 12-15 minutes or until golden brown. Remove from the oven and let them cool slightly before serving.
Extra Tips: For an extra eerie effect, you can add a drop of black food coloring to the dough to give your breadsticks an even spookier appearance. If you’re short on time, you can use store-bought pizza dough as a substitute for homemade dough.
Be sure to keep an eye on the breadsticks while they’re baking to prevent them from becoming too crispy. Serve them warm with a side of marinara sauce for dipping to enhance the flavor experience.