

I still remember the first time I tried baking angel food cake; it was a total disaster, but the fluffy texture had me hooked.
Over the years, I’ve experimented with countless recipes, and I’ve finally curated a list of my top 12 favorites. Picture a Lemon Zest Angel Cake that’s like a burst of sunshine or a Coconut Dream Cake that transports you to a tropical paradise.
Whether you’re a fan of classic flavors or crave something with a twist, there’s something here to tantalize your taste buds. Ever wondered what makes Coffee Mocha Angel Cake irresistible? Let’s find out together.

Classic Angel Food Cake
Classic Angel Food Cake
A Classic Angel Food Cake is a light and airy dessert that’s perfect for any occasion. Known for its fluffy texture and delicate flavor, this cake is a crowd-pleaser that’s surprisingly simple to make from scratch. Unlike other cakes, Angel Food Cake doesn’t use butter or oil, which makes it a healthier option. Instead, it relies on the whipped egg whites to achieve its signature airy texture. This cake pairs beautifully with fresh berries, a dusting of powdered sugar, or a dollop of whipped cream.
The key to making a successful Angel Food Cake lies in the technique. It’s vital to properly beat the egg whites to form stiff peaks, which will give the cake its light and fluffy structure. Additionally, making sure that you use the correct pan and cooling method will help achieve the desired texture and prevent the cake from collapsing. Follow this detailed recipe to create a Classic Angel Food Cake that serves 4-6 people.
Ingredients:
- 1 cup cake flour
- 1 1/2 cups granulated sugar
- 12 large egg whites, at room temperature
- 1 1/2 teaspoons cream of tartar
- 1/4 teaspoon salt
- 1 teaspoon vanilla extract
- 1/2 teaspoon almond extract (optional)
Instructions:
- Preheat and Prepare: Preheat your oven to 350°F (175°C). Make sure that your tube pan (preferably ungreased) is ready. An ungreased pan is vital as it allows the cake to cling to the sides and rise properly.
- Sift the Dry Ingredients: In a medium bowl, sift together the cake flour and 3/4 cup of the granulated sugar. Sifting is important to make certain the flour is light and will blend easily with the egg whites.
- Beat Egg Whites: In a large mixing bowl, beat the egg whites on medium speed until foamy. Add cream of tartar and salt; continue beating until soft peaks form.
- Add Sugar Gradually: Gradually add the remaining 3/4 cup of sugar, a tablespoon at a time, while continuing to beat the egg whites. Increase the mixer speed to high and beat until stiff peaks form and the mixture is glossy.
- Fold in Flavors and Flour: Gently fold in the vanilla and almond extract using a spatula. Carefully fold in the flour mixture in thirds, making sure to incorporate fully without deflating the egg whites.
- Transfer to Pan: Spoon the batter into the prepared tube pan. Smooth the top with a spatula to guarantee even baking.
- Bake: Place the cake in the preheated oven and bake for 35-40 minutes, or until a toothpick inserted in the center comes out clean.
- Cool: Remove the cake from the oven and immediately invert the pan onto a heatproof bottle or funnel. Allow the cake to cool completely in this position, which helps maintain its structure.
- Remove from Pan: Once cooled, run a knife around the edges of the pan to loosen the cake. Gently remove the cake from the pan and serve as desired.
Extra Tips:
When separating the egg whites, make sure there’s no yolk in the whites, as even a small amount of fat can prevent them from whipping properly. It’s also important to use a completely clean and dry mixing bowl and beaters.
If you’re looking to add a bit more flavor, consider adding lemon zest or a bit of coconut extract to the batter. Remember, patience is key when folding in the flour mixture to maintain the fluffiness of the cake. Enjoy your Classic Angel Food Cake with seasonal fruits or a light glaze to enhance its heavenly texture.
Lemon Zest Angel Cake
Lemon Zest Angel Cake
Lemon Zest Angel Cake is a delightful twist on the classic angel food cake, incorporating the invigorating and tangy flavor of lemon zest to create a light and airy dessert that’s perfect for any occasion. The cake is known for its fluffy texture, achieved by whipping egg whites until they reach stiff peaks, and the subtle yet stimulating aroma of lemon zest elevates its flavor profile.
This cake pairs beautifully with fresh berries or a dollop of whipped cream, making it a versatile treat that can be enjoyed year-round. This recipe is designed to serve 4-6 people, guaranteeing that everyone gets a generous slice of this heavenly dessert. By following the precise steps and using the right ingredients, you’ll be able to create a Lemon Zest Angel Cake that’s both visually appealing and deliciously satisfying.
Whether you’re preparing it for a family gathering or a special celebration, this cake is sure to impress your guests with its delightful combination of flavors and textures.
Ingredients:
- 1 cup cake flour
- 1 ½ cups granulated sugar, divided
- 12 large egg whites, room temperature
- 1 ½ teaspoons cream of tartar
- ¼ teaspoon salt
- 1 tablespoon lemon zest
- 1 teaspoon vanilla extract
- 2 tablespoons fresh lemon juice
Cooking Instructions:
- Preheat the Oven: Begin by preheating your oven to 350°F (175°C). This guarantees that when your batter is ready, the oven will be at the ideal temperature for baking.
- Prepare the Dry Ingredients: In a medium-sized bowl, sift together the cake flour and ¾ cup of granulated sugar. Sifting helps to aerate the flour and guarantee that it’s finely textured, which is essential for the lightness of the cake.
- Whip the Egg Whites: In a large mixing bowl, combine the room temperature egg whites, cream of tartar, and salt. Using an electric mixer, beat the mixture on medium speed until soft peaks form. Gradually add the remaining ¾ cup of granulated sugar, a little at a time, and continue beating until stiff, glossy peaks form.
- Add Flavorings: Gently fold in the lemon zest, vanilla extract, and fresh lemon juice using a spatula. Be careful not to deflate the egg whites while incorporating these ingredients, as this will help maintain the cake’s airy texture.
- Incorporate the Flour Mixture: Sift the flour mixture over the whipped egg whites in three additions, gently folding in each addition with a spatula. Take care to maintain as much volume as possible by using a light hand while folding.
- Transfer to a Pan: Gently spoon the batter into an ungreased 10-inch tube pan. Smooth the top with a spatula to guarantee even baking.
- Bake the Cake: Place the pan in the preheated oven and bake for 35-40 minutes, or until the top is golden brown and a toothpick inserted into the center comes out clean.
- Cool the Cake: Once baked, remove the cake from the oven and invert the pan onto a wire rack. Allow the cake to cool completely in this position to prevent it from collapsing.
- Remove and Serve: Once cooled, gently run a knife around the edges of the pan to release the cake. Invert the cake onto a serving platter and slice with a serrated knife. Serve with fresh berries or whipped cream, if desired.
Extra Tips:
To achieve the best results, guarantee that all utensils and bowls used for beating the egg whites are completely clean and free of any grease or residue. Even a small amount of oil can prevent the egg whites from reaching their full volume.
Additionally, using room temperature egg whites is essential for achieving the desired stiffness and texture. If you don’t have a tube pan, use a bundt pan, but be mindful that the cooking time might vary slightly.
Finally, resist the temptation to grease the pan, as the cake needs to cling to the sides to rise properly.
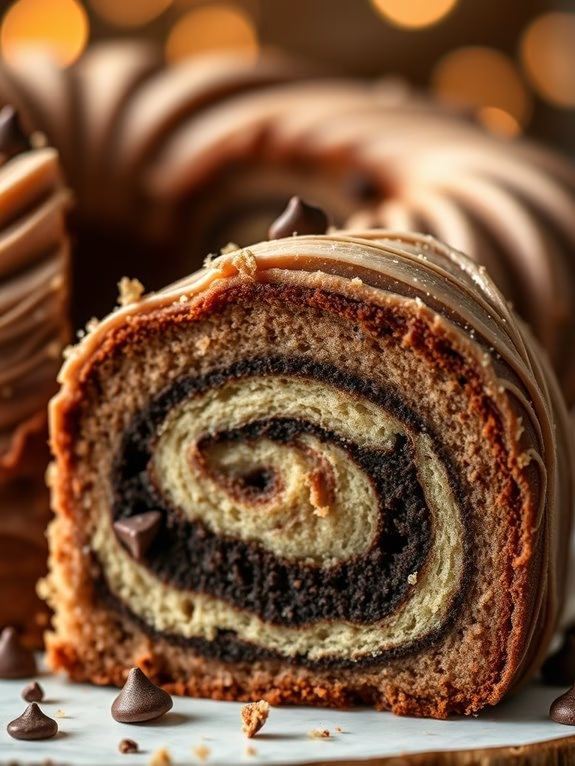
Chocolate Swirl Delight
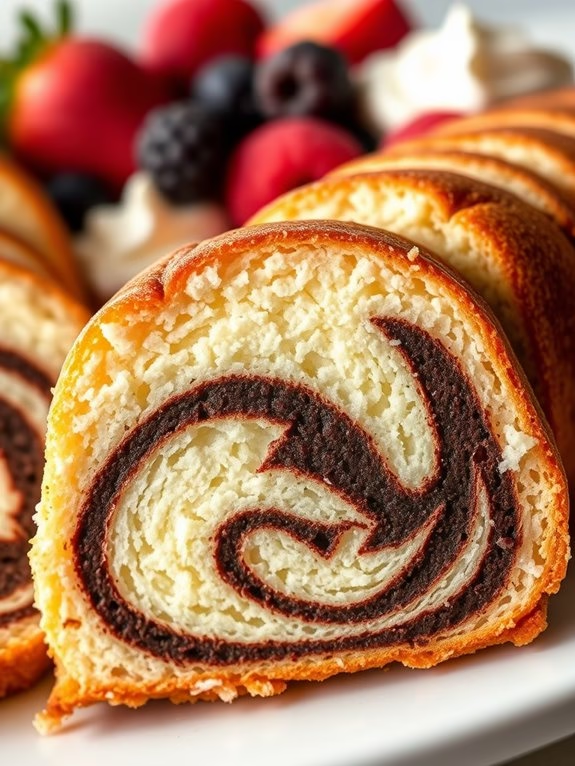
Recipe: Chocolate Swirl Delight Angel Food Cake
Indulge in the heavenly combination of light, airy angel food cake and rich, decadent chocolate with our Chocolate Swirl Delight. This delightful dessert marries the classic texture of angel food cake with luscious swirls of chocolate, creating a treat that’s perfect for any occasion.
Whether you’re hosting a dinner party or simply craving something sweet, this cake is sure to impress your guests and satisfy your sweet tooth.
The beauty of this recipe lies in its simplicity and elegance. The fluffy angel food cake serves as a delicate canvas for the bold chocolate swirls, offering a balanced taste that isn’t overly sweet.
As you slice into the cake, the marbled pattern reveals itself, adding a touch of visual appeal to this already delicious dessert. Serve it plain, or with a dollop of whipped cream or fresh berries for an extra special touch.
Ingredients (Serves 4-6):
- 1 cup cake flour
- 1 1/2 cups granulated sugar
- 12 large egg whites, at room temperature
- 1 1/2 teaspoons cream of tartar
- 1/4 teaspoon salt
- 1 teaspoon vanilla extract
- 1/4 cup unsweetened cocoa powder
- 2 tablespoons boiling water
Cooking Instructions:
- Preheat the Oven: Begin by preheating your oven to 350°F (175°C). This guarantees that the oven reaches the perfect temperature by the time you’re ready to bake the cake.
- Prepare the Cocoa Mixture: In a small bowl, combine the unsweetened cocoa powder and boiling water. Stir until smooth and set aside to cool slightly. This will be used to create the chocolate swirl in the cake.
- Mix Dry Ingredients: Sift the cake flour and 1/2 cup of granulated sugar together in a medium-sized bowl. Sifting helps to aerate the flour and create a lighter cake texture.
- Beat Egg Whites: In a large mixing bowl, use an electric mixer to beat the egg whites until foamy. Add cream of tartar and salt, then continue beating until soft peaks form.
- Incorporate Sugar: Gradually add the remaining 1 cup of granulated sugar, a little at a time, while continuing to beat the mixture. Beat until stiff, glossy peaks form.
- Add Vanilla: Gently fold in the vanilla extract to the egg white mixture. Be careful not to deflate the egg whites as you do this.
- Combine with Dry Ingredients: Gradually sift the flour mixture over the beaten egg whites, folding gently with a spatula just until combined. Be gentle to retain the airiness of the batter.
- Create Chocolate Swirl: Remove about 1 cup of the batter and mix it with the cooled cocoa mixture. Spoon half of the plain batter into an ungreased 10-inch tube pan, then drop spoonfuls of the chocolate batter over it. Swirl gently with a knife to create a marbled effect. Top with the remaining plain batter.
- Bake the Cake: Place the pan in the preheated oven and bake for 35-40 minutes, or until the cake is golden brown and springs back when touched lightly. Avoid opening the oven during baking to prevent collapsing.
- Cool and Serve: Invert the pan onto a bottle or funnel to cool completely. Once cooled, run a knife around the edges to loosen the cake, then remove from the pan. Slice and serve as desired.
Extra Tips:
When making angel food cake, it’s essential to confirm that there are no traces of yolk in your egg whites as they can prevent the whites from whipping up properly.
Additionally, make sure all your mixing bowls and utensils are free from grease. The tube pan should remain ungreased, as the batter needs to cling to the sides to rise properly.
If you don’t have a tube pan, a bundt pan can work in a pinch, but be sure it doesn’t have a non-stick coating.
Finally, be patient while cooling the cake upside down; this helps maintain its height and fluffiness.
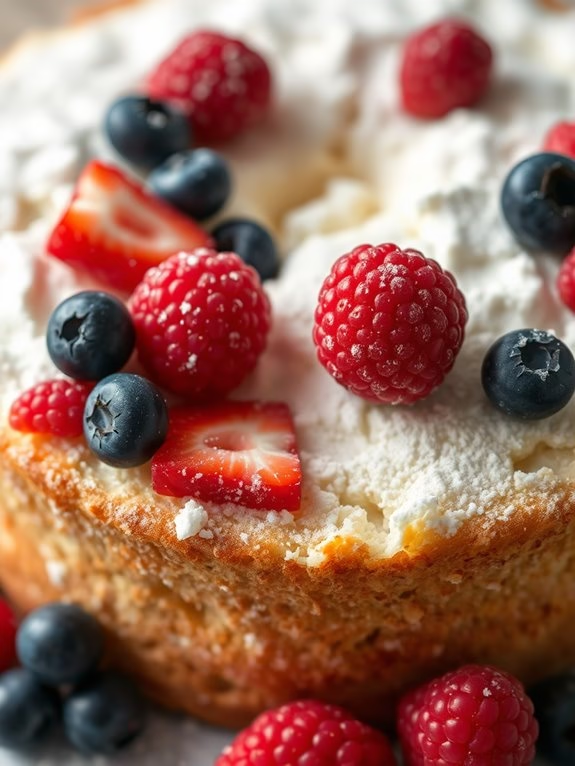
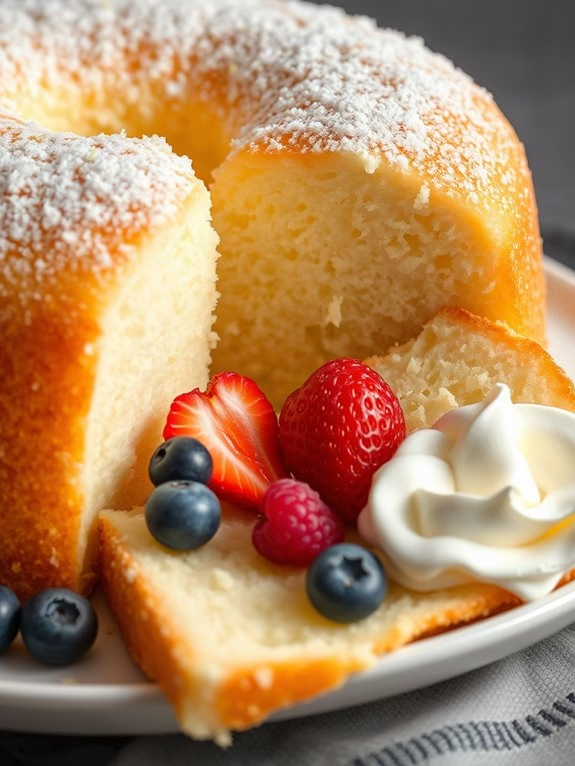
Berry Burst Angel Cake

Berry Burst Angel Cake
Angel food cake is a heavenly dessert known for its light and airy texture, and when combined with the vibrant flavors of fresh berries, it becomes an irresistible treat. The Berry Burst Angel Cake is a delightful dessert perfect for summer gatherings or any occasion that calls for a touch of sweetness. This cake isn’t only visually stunning with its layers of berries, but it also offers a burst of flavors with every bite, marrying the subtle vanilla essence of the angel cake with the tartness and sweetness of the berries.
Preparing this Berry Burst Angel Cake is a wonderful way to celebrate the abundance of fresh produce. The cake itself is made from a simple batter of egg whites, sugar, and flour, guaranteeing a delicate and fluffy texture. Topped with a medley of fresh strawberries, raspberries, and blueberries, it becomes a show-stopping centerpiece that’s both delicious and beautiful. This recipe serves 4-6 people, making it perfect for a small gathering or family dessert.
Ingredients:
- 1 cup of cake flour
- 1 1/2 cups of granulated sugar, divided
- 12 large egg whites, at room temperature
- 1 1/2 teaspoons cream of tartar
- 1/4 teaspoon salt
- 1 teaspoon vanilla extract
- 1 cup fresh strawberries, hulled and sliced
- 1 cup fresh raspberries
- 1 cup fresh blueberries
- 2 tablespoons lemon juice
- 2 tablespoons powdered sugar (optional, for dusting)
Instructions:
- Preheat and Prepare: Preheat your oven to 350°F (175°C). Make sure you have a clean, ungreased angel food cake pan ready. The ungreased pan is essential for the cake to rise properly.
- Mix Dry Ingredients: In a medium bowl, sift together the cake flour and 3/4 cup of the granulated sugar. Sifting guarantees that the mixture is light and free of lumps.
- Beat Egg Whites: In a large mixing bowl, beat the egg whites on medium speed until foamy. Add the cream of tartar and salt, then increase the speed to high and continue to beat until soft peaks form.
- Add Sugar Gradually: Gradually add the remaining 3/4 cup of granulated sugar, a few tablespoons at a time, beating well after each addition. Continue beating until stiff peaks form and the mixture is glossy. Be careful not to overbeat.
- Fold in Dry Ingredients: Using a spatula, gently fold in the flour mixture, a little at a time, until just combined. Be careful to maintain the airiness of the batter. Finally, fold in the vanilla extract.
- Bake the Cake: Pour the batter evenly into the prepared angel food cake pan. Gently smooth the top with a spatula. Bake in the preheated oven for 35-40 minutes, or until the top is golden brown and a toothpick inserted into the center comes out clean.
- Cool and Remove Cake: Once baked, remove the cake from the oven and immediately invert the pan onto a wire rack to cool completely. This helps maintain the cake’s structure. Once cooled, run a knife around the edges and center tube to release the cake.
- Prepare Berry Topping: In a bowl, mix the sliced strawberries, raspberries, blueberries, and lemon juice. Toss gently to combine. Let the mixture sit for a few minutes to allow the berries to release their juices.
- Assemble and Serve: Place the cooled cake on a serving platter. Spoon the berry mixture over the top of the cake, guaranteeing an even distribution. Dust with powdered sugar if desired, and serve immediately.
Extra Tips:
To guarantee your Berry Burst Angel Cake is as light and airy as possible, make sure all utensils and bowls used for the egg whites are completely clean and free of any grease.
The cream of tartar helps stabilize the egg whites, but if you don’t have it on hand, a little lemon juice can also work.
Use fresh berries for the topping for the best flavor and presentation, but if fresh berries aren’t available, frozen berries can be used after being thawed and drained.
For added flavor, consider adding a few mint leaves to the berry topping.
Coconut Dream Cake
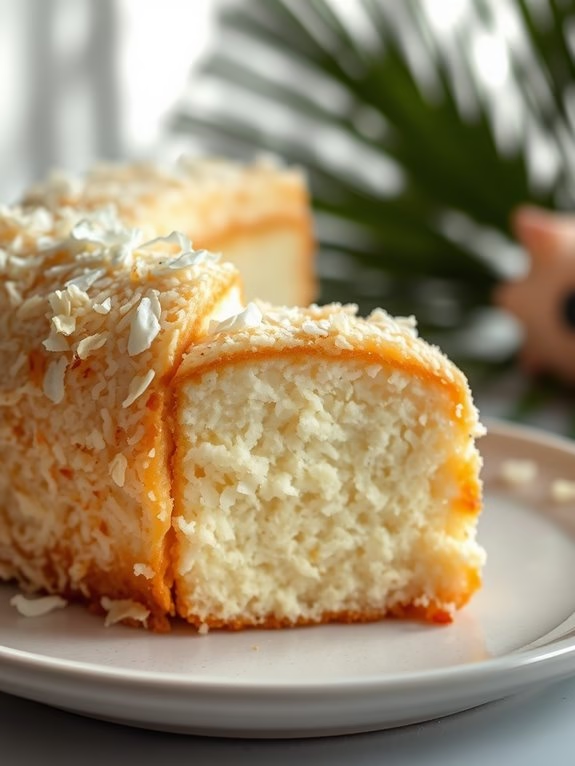
Coconut Dream Cake
Indulge in the light and airy texture of this delightful Coconut Dream Cake, a perfect twist on the classic angel food cake. With its fluffy structure and subtle coconut flavor, this cake is the epitome of a tropical dessert dream. Ideal for a warm-weather gathering or as a comforting treat any time of year, the Coconut Dream Cake pairs beautifully with a variety of toppings, from fresh fruits to decadent sauces.
This recipe serves 4-6 people, guaranteeing that everyone gets a heavenly slice of this cloud-like creation. By incorporating coconut milk and shredded coconut, the cake obtains a moist yet airy consistency that’s sure to impress. Not only is it a visual delight, but the combination of textures and flavors will leave your taste buds yearning for another bite.
Ingredients:
- 1 cup all-purpose flour
- 1 1/2 cups granulated sugar, divided
- 12 large egg whites, room temperature
- 1/2 teaspoon salt
- 1 1/4 teaspoons cream of tartar
- 1 teaspoon vanilla extract
- 1/2 cup coconut milk
- 1/2 cup sweetened shredded coconut
- 1/4 cup unsweetened coconut flakes, for garnish
Instructions:
- Preheat the Oven: Begin by preheating your oven to 350°F (175°C). Make sure your oven rack is positioned in the lower third section to guarantee even baking.
- Prepare the Dry Ingredients: In a medium bowl, sift together the flour and 3/4 cup of the granulated sugar. Sifting helps to aerate the flour and sugar, providing the cake with its signature light texture.
- Beat the Egg Whites: In a large mixing bowl, combine the room temperature egg whites, salt, and cream of tartar. Using an electric mixer, beat on medium speed until soft peaks form. Gradually add the remaining 3/4 cup of granulated sugar, a tablespoon at a time, and continue beating until stiff peaks are achieved.
- Incorporate the Flavorings: Gently fold in the vanilla extract and coconut milk into the egg white mixture using a spatula. Be careful not to deflate the egg whites as this will affect the cake’s fluffiness.
- Combine with Dry Ingredients: Gradually fold the sifted flour and sugar mixture into the egg whites in small batches. Add the sweetened shredded coconut as you fold, ensuring an even distribution throughout the batter.
- Transfer to Cake Pan: Pour the batter into an ungreased 10-inch angel food cake pan. Smooth the top with a spatula to even the surface. This pan shape is essential as it helps the cake climb and rise properly during baking.
- Bake the Cake: Place the cake in the preheated oven and bake for 35-40 minutes, or until a toothpick inserted into the center comes out clean. The top should be golden brown and spring back when touched lightly.
- Cool the Cake: Once baked, invert the cake pan immediately onto a bottle or a heatproof funnel. Let the cake cool completely in this position to maintain its height and structure.
- Garnish and Serve: Carefully remove the cake from the pan using a thin knife to loosen the edges. Decorate the top with unsweetened coconut flakes just before serving.
Extra Tips:
For the best results, guarantee that your mixing bowl and beaters are completely clean and free of any grease, as fat can prevent the egg whites from whipping properly.
If desired, add a hint of lime zest to the batter for an extra burst of tropical flavor. Additionally, avoid opening the oven door during baking to maintain a consistent temperature, which is essential for the cake’s rise.
Enjoy your Coconut Dream Cake with a side of fresh berries or a dollop of whipped cream to enhance the tropical experience.
Almond Infused Angel Cake
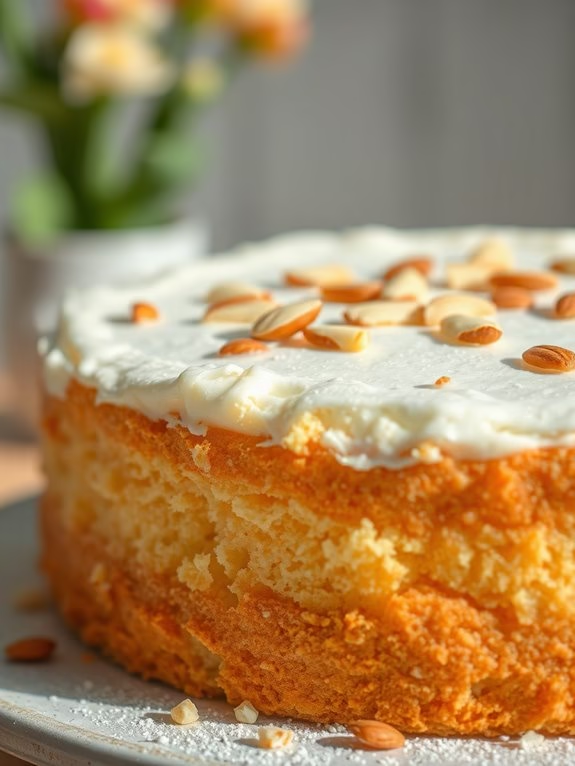
Almond Infused Angel Cake
Angel food cake is well-loved for its light and airy texture, and when infused with almond flavor, it takes on a delightful twist that makes it perfect for any occasion. The almond essence adds a subtle nutty note that complements the cake’s sweet, fluffy nature. This Almond Infused Angel Cake is perfect for serving as a standalone dessert or paired with fresh berries and whipped cream for an extra special treat.
Baking this cake requires a few specific techniques to guarantee you achieve that characteristic airy texture. It’s important to have a gentle hand when folding the ingredients and to use the right type of pan. An ungreased tube pan is essential to allow the batter to climb the sides and create the perfect height and structure. Follow this recipe to make a heavenly Almond Infused Angel Cake that serves 4-6 people.
Ingredients:
- 1 cup cake flour
- 1 1/4 cups granulated sugar, divided
- 12 large egg whites, at room temperature
- 1 1/2 teaspoons cream of tartar
- 1 teaspoon pure almond extract
- 1/2 teaspoon vanilla extract
- 1/4 teaspoon salt
- 1/4 cup sliced almonds, toasted (optional, for garnish)
Cooking Instructions:
- Preheat Oven: Start by preheating your oven to 350°F (175°C). This guarantees the oven is at the right temperature when your batter is ready.
- Prepare Dry Ingredients: In a medium bowl, sift together the cake flour and 1/2 cup of the granulated sugar. Sifting helps to aerate the mixture, preventing lumps and guaranteeing a smooth batter.
- Beat Egg Whites: In a large, clean, and dry mixing bowl, add the egg whites. Beat on medium speed with an electric mixer until they become foamy. This is vital for achieving the cake’s signature airy texture.
- Add Cream of Tartar and Sugar: Gradually add the cream of tartar and continue to beat the egg whites. Slowly add the remaining 3/4 cup of sugar, a tablespoon at a time, and beat on medium-high speed until soft peaks form.
- Incorporate Flavors: Add the almond and vanilla extracts, and continue beating until the egg whites form stiff, glossy peaks. This means the peaks should stand up firmly without drooping when you lift the beaters.
- Fold in Dry Ingredients: Gently fold the flour and sugar mixture into the egg whites in three batches. Use a spatula to fold, not stir, to maintain the airiness of the batter.
- Transfer to Pan: Carefully pour the batter into an ungreased 10-inch tube pan. This type of pan is vital for the cake to rise and maintain its shape.
- Bake: Bake the cake in the preheated oven for 35-40 minutes, or until the top is golden brown and a toothpick inserted into the center comes out clean.
- Cool the Cake: Remove the cake from the oven and immediately invert the pan onto a bottle or funnel. Allow the cake to cool completely in this position to prevent it from collapsing.
- Remove from Pan and Serve: Once cool, run a knife around the edges of the pan to release the cake. Remove it from the pan, garnish with toasted almonds if desired, and serve.
Extra Tips:
When making Angel Food Cake, guarantee that your mixing bowl and beaters are impeccably clean and dry; any trace of oil or yolk can prevent the egg whites from whipping up properly. The room temperature of the egg whites is also vital for maximum volume.
For added almond flavor, consider adding a few drops of almond extract to your garnish whipped cream. Remember not to grease the pan, as the batter needs to cling to the sides to rise properly. Enjoy your Almond Infused Angel Cake with a side of fresh berries for a revitalizing addition.

Pineapple Paradise Cake
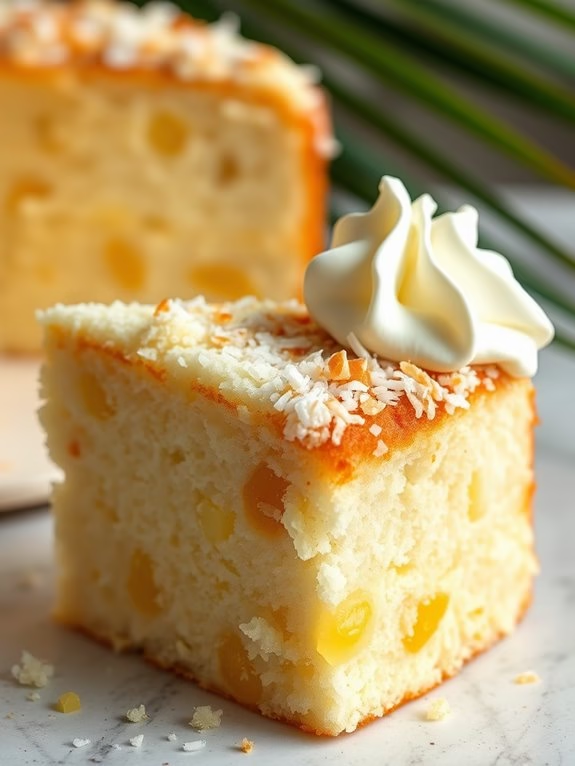
Pineapple Paradise Cake
Indulge in the tropical flavors of Pineapple Paradise Cake, a delightful twist on the classic fluffy angel food cake. This dessert combines the light, airy texture of angel food cake with the sweet and tangy essence of pineapple, creating a revitalizing treat perfect for any occasion.
The cake isn’t only easy to make but also a beautiful centerpiece for your dessert table, offering a taste of paradise in every bite. The Pineapple Paradise Cake is ideal for gatherings or family dinners, serving 4-6 people with its delightful tropical taste.
The combination of ingredients results in a cake that’s both moist and flavorful, capturing the essence of a tropical getaway right in your kitchen. With a few simple steps, you can transform ordinary ingredients into an extraordinary dessert that will leave your guests asking for seconds.
Ingredients:
- 1 cup cake flour
- 1 1/2 cups granulated sugar
- 12 large egg whites (room temperature)
- 1 1/2 teaspoons cream of tartar
- 1/4 teaspoon salt
- 1 teaspoon vanilla extract
- 1 cup crushed pineapple, drained
- 1/2 cup pineapple juice
- 1/2 cup shredded coconut (optional)
- 1 cup whipped cream (optional for topping)
Cooking Instructions:
- Preheat the Oven: Start by preheating your oven to 350°F (175°C). Don’t grease the angel food cake pan to guarantee the cake rises properly.
- Sift Dry Ingredients: In a medium bowl, sift together the cake flour and half of the granulated sugar (3/4 cup). This guarantees a fine, airy texture in the cake.
- Beat Egg Whites: In a large mixing bowl, beat the egg whites on medium speed until foamy. Add cream of tartar and salt, and continue beating until soft peaks form.
- Add Sugar Gradually: Gradually add the remaining sugar (3/4 cup) while continuing to beat the egg whites on high speed until stiff, glossy peaks form. This process should take about 5-7 minutes.
- Fold in Dry Ingredients: Carefully fold the flour-sugar mixture into the egg whites in three additions, using a spatula. Use a gentle folding motion to maintain the volume of the egg whites.
- Incorporate Flavors: Gently fold in the vanilla extract, crushed pineapple, and pineapple juice until evenly distributed. Be careful not to overmix.
- Transfer to Pan: Pour the batter into an ungreased 10-inch angel food cake pan. Smooth the top with a spatula.
- Bake: Place the pan in the preheated oven and bake for 35-40 minutes, or until the cake is golden brown and a toothpick inserted into the center comes out clean.
- Cool Upside Down: Once baked, invert the cake pan onto a wire rack or over a bottle to cool completely. This helps to maintain the cake’s height and prevent it from collapsing.
- Remove from Pan: Run a knife around the edges of the pan to loosen the cake once it’s cooled. Carefully remove the cake from the pan.
- Optional Toppings: For added flavor, top the cake with shredded coconut or a dollop of whipped cream before serving.
Extra Tips:
Guarantee all your mixing bowls and utensils are clean and free of any grease to allow the egg whites to whip properly. Room temperature egg whites are essential for achieving maximum volume, so plan accordingly.
When folding in ingredients, use a light hand to avoid deflating the batter. If you choose to top the cake with whipped cream or coconut, do so just before serving to maintain the cake’s texture.
Enjoy your slice of Pineapple Paradise Cake with a cold glass of pineapple juice or a scoop of vanilla ice cream for an enhanced tropical experience!
Raspberry Ripple Angel Cake

Raspberry Ripple Angel Cake
Raspberry Ripple Angel Cake is a delightful twist on the classic angel food cake, adding a fruity burst of flavor with ripples of fresh raspberry puree throughout the airy, fluffy cake. This cake is perfect for any occasion, whether it’s a summer picnic or a special celebration. Its light texture and sweet-tart flavor make it a crowd-pleaser.
The cake is made with simple ingredients and, when paired with a dollop of whipped cream or a scoop of vanilla ice cream, becomes an irresistible dessert that will have everyone asking for seconds.
The key to achieving the perfect Raspberry Ripple Angel Cake is to guarantee the egg whites are whipped to stiff peaks, which gives the cake its signature loft and fluffiness. The raspberry ripple is created by gently folding a fresh raspberry puree into the angel food batter, resulting in beautiful swirls of berry goodness. With a serving size of 4-6 people, this recipe is perfect for a small gathering or family dessert.
Ingredients (Serves 4-6):
- 1 cup cake flour
- 1 1/2 cups granulated sugar, divided
- 12 large egg whites, at room temperature
- 1 1/2 teaspoons cream of tartar
- 1/4 teaspoon salt
- 1 teaspoon vanilla extract
- 1/2 teaspoon almond extract
- 1 cup fresh raspberries
- 2 tablespoons granulated sugar (for raspberry puree)
Cooking Instructions:
- Preheat and Prepare: Preheat your oven to 350°F (175°C). Don’t grease the angel food cake pan, as the cake needs to cling to the sides for support as it rises.
- Make the Raspberry Puree: In a small saucepan, combine the fresh raspberries and 2 tablespoons of sugar. Cook over medium heat, stirring occasionally, until the raspberries break down and form a smooth sauce, about 5 minutes. Strain the mixture through a fine mesh sieve to remove seeds, and set aside to cool.
- Mix Dry Ingredients: In a small bowl, sift together the cake flour and 3/4 cup of the granulated sugar. Sifting guarantees there are no lumps and helps aerate the flour.
- Whip Egg Whites: In a large, clean mixing bowl, beat the egg whites on medium speed until foamy. Add the cream of tartar and salt, then continue beating until soft peaks form.
- Add Sugar Gradually: Gradually add the remaining 3/4 cup of granulated sugar, a tablespoon at a time, while continuing to beat the egg whites until stiff peaks form. The peaks should stand up straight without drooping when the beaters are lifted.
- Add Flavors: Gently fold in the vanilla and almond extracts into the whipped egg whites using a spatula.
- Incorporate Dry Ingredients: Sift the flour mixture over the beaten egg whites in three additions, folding gently after each addition. Be careful not to deflate the egg whites.
- Add Raspberry Ripple: Gently fold the cooled raspberry puree into the batter, creating swirls. Avoid over-mixing to maintain the ripple effect.
- Bake the Cake: Carefully pour the batter into the ungreased angel food cake pan. Smooth the top with a spatula. Bake in the preheated oven for 35-40 minutes, or until the top is golden brown and springs back when lightly touched.
- Cool and Serve: Invert the cake pan onto a cooling rack and allow the cake to cool completely in the pan. Once cooled, use a thin knife to loosen the cake from the sides and center of the pan before carefully removing it. Serve with whipped cream or fresh raspberries, if desired.
Extra Tips:
When making Raspberry Ripple Angel Cake, guarantee the mixing bowl and beaters are completely clean and dry; any grease or moisture can prevent the egg whites from whipping properly.
Be gentle when folding the flour and raspberry puree into the egg whites to maintain the cake’s airy texture. If using frozen raspberries, thaw them completely and drain any excess liquid before making the puree.
Finally, always cool the cake upside down to prevent it from collapsing, maintaining its light and fluffy structure.
Coffee Mocha Angel Cake
Coffee Mocha Angel Cake is a delightful twist on the classic angel food cake, combining the light, airy texture of the cake with the rich flavors of coffee and chocolate. This cake is perfect for coffee lovers who enjoy a sweet treat that isn’t too heavy. The subtle mocha flavor adds a sophisticated touch, making it an excellent choice for dessert at a dinner party or a special occasion.
The lightness of angel food cake comes from the whipped egg whites, which create a delicate and fluffy texture. Incorporating coffee and cocoa into the batter gives the cake a unique depth of flavor while still maintaining its signature cloud-like consistency. This recipe is designed to serve 4-6 people, making it an ideal dessert to share with family and friends.
Ingredients for Coffee Mocha Angel Cake (Serves 4-6):
- 1 cup of cake flour
- 1 1/2 cups of granulated sugar
- 12 large egg whites, at room temperature
- 1 1/2 teaspoons cream of tartar
- 1/4 teaspoon salt
- 1/2 cup strong brewed coffee, cooled
- 2 tablespoons unsweetened cocoa powder
- 1 teaspoon vanilla extract
- 1/2 cup mini chocolate chips (optional)
Cooking Instructions:
- Preheat the Oven: Preheat your oven to 350°F (175°C). Confirm your oven rack is in the lower third position to guarantee even baking of the cake.
- Prepare the Dry Ingredients: In a medium bowl, sift together the cake flour and 1/2 cup of sugar. This step guarantees a fine texture and removes any lumps.
- Whip the Egg Whites: In a large mixing bowl, beat the egg whites on medium speed until foamy. Add the cream of tartar and salt, then increase the speed to high. Gradually add the remaining sugar, a tablespoon at a time, until soft peaks form.
- Add Flavors: Gently fold in the brewed coffee, cocoa powder, and vanilla extract into the whipped egg whites, being careful not to deflate the mixture.
- Incorporate Dry Ingredients: Gradually fold in the sifted flour and sugar mixture into the egg white mixture using a spatula. Fold until just combined, making sure you maintain the airy texture.
- Add Chocolate Chips: If using, gently fold in the mini chocolate chips until evenly distributed throughout the batter.
- Bake the Cake: Pour the batter into an ungreased angel food cake pan. Smooth the top with a spatula. Bake for 35-40 minutes, or until the top is golden brown and a toothpick inserted into the center comes out clean.
- Cool the Cake: Once baked, immediately invert the cake pan onto a cooling rack and let it cool completely. This step prevents the cake from collapsing.
- Remove from Pan: Once cooled, carefully run a knife around the edges of the pan to release the cake. Gently remove the cake from the pan and place it on a serving plate.
Extra Tips:
When making Coffee Mocha Angel Cake, it’s vital to verify that the egg whites are at room temperature before whipping, as this helps them reach their maximum volume.
Additionally, be gentle when folding in the flour and flavorings to avoid deflating the egg whites, which are key to the cake’s airy texture.
Using a tube pan is essential, as it allows the cake to rise properly and cool upside down, which prevents it from collapsing.
Finally, if you prefer a more pronounced coffee flavor, you can increase the amount of coffee or use espresso for a stronger taste.
Orange Sunshine Cake
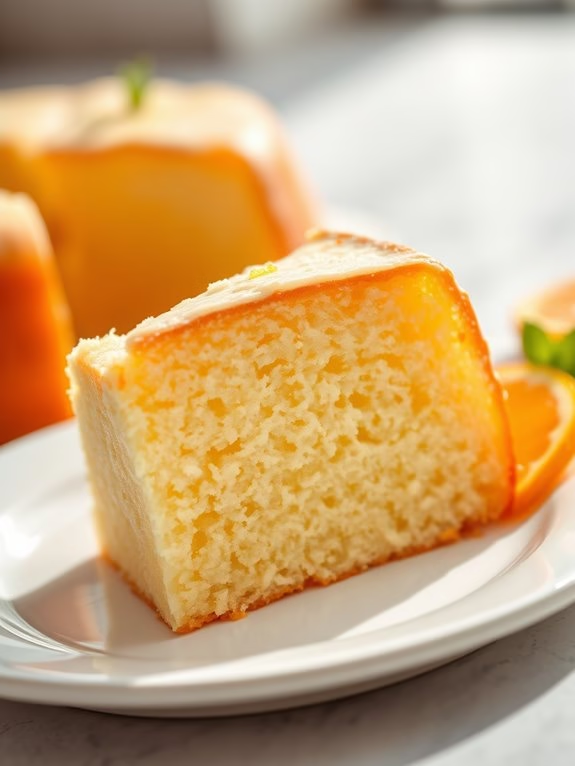
Orange Sunshine Cake
Orange Sunshine Cake is a delightful variation of classic angel food cake that captures the essence of a sunny day with its vibrant citrus flavor. Light, fluffy, and infused with a zesty orange aroma, this cake is perfect for any occasion, from a casual tea party to a formal dinner.
Its airy texture and invigorating taste make it a favorite among those who enjoy a lighter dessert option. This cake pairs the delicate texture of angel food cake with a burst of citrusy goodness, thanks to the addition of fresh orange juice and zest. The result is a dessert that isn’t only visually appealing but also tantalizingly fragrant.
Serve it with a dollop of whipped cream or a scoop of vanilla ice cream to enhance its delightful flavors. Whether you’re looking to impress guests or simply indulge your taste buds, Orange Sunshine Cake is sure to brighten your day.
Ingredients (serving size: 4-6 people):
- 1 cup cake flour
- 1 1/4 cups granulated sugar, divided
- 1 1/2 cups egg whites (about 10-12 large eggs)
- 1/4 teaspoon salt
- 1 teaspoon cream of tartar
- 1/2 teaspoon vanilla extract
- 1/2 cup fresh orange juice
- 1 tablespoon orange zest
- 1/2 teaspoon almond extract (optional)
Cooking Instructions:
1. Preheat the oven: Start by preheating your oven to 350°F (175°C). Make sure that your oven rack is positioned in the lower third of the oven.
2. Prepare the dry ingredients****: Sift the cake flour and 1/4 cup of the granulated sugar together in a medium bowl. Repeat the sifting process three times to make certain the mixture is light and well-aerated. Set aside.
3. Beat the egg whites: In a large mixing bowl, combine the egg whites and salt. Beat them on medium speed using a stand mixer or hand mixer until frothy. Gradually add the cream of tartar and continue beating until soft peaks form.
4. Incorporate sugar and flavorings: Gradually add the remaining 1 cup of granulated sugar to the egg whites, about 2 tablespoons at a time, while continually beating. Increase the mixer speed to medium-high and continue until stiff peaks form.
Gently fold in the vanilla extract, almond extract (if using), orange juice, and orange zest using a spatula.
5. Fold in dry ingredients: Carefully sift the flour and sugar mixture over the beaten egg whites in small batches. Gently fold the dry ingredients into the egg whites using a spatula, being careful not to deflate the mixture.
6. Transfer to the pan: Pour the batter into an ungreased 10-inch tube pan. Smooth the top with a spatula and tap the pan lightly on the counter to remove any large air bubbles.
7. Bake the cake: Place the pan in the preheated oven and bake for 35-40 minutes, or until the cake is golden brown and springs back when lightly touched.
8. Cool and serve: Remove the cake from the oven and invert the pan over a cooling rack. Allow the cake to cool completely in the pan upside-down. Once cooled, run a knife around the edges and center tube to release the cake. Serve slices with your choice of topping.
Extra Tips:
When making the Orange Sunshine Cake, it’s essential to confirm that your mixing bowl and beaters are completely free of grease to achieve the perfect meringue.
Additionally, be gentle when folding the dry ingredients into the egg whites to maintain the cake’s light and airy texture. If you want an extra pop of orange flavor, consider garnishing the cake with candied orange slices or a drizzle of orange glaze.
For best results, use fresh, high-quality oranges to maximize the cake’s citrus aroma and taste.
Nutty Caramel Angel Cake
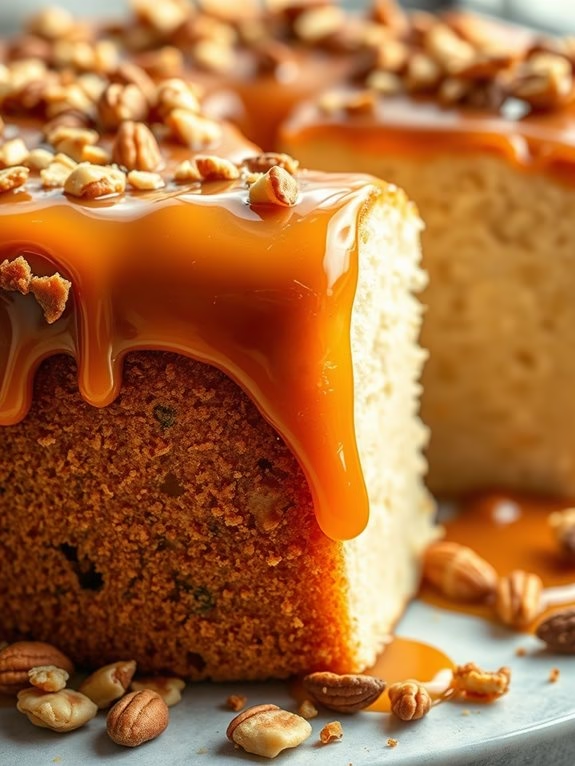
Nutty Caramel Angel Cake is a delightful twist on the traditional angel food cake, where the light, airy texture of the classic dessert meets the rich flavors of nuts and caramel. This cake is perfect for any gathering, providing a balance of sweetness and nuttiness that’s sure to impress your guests. Its fluffy texture guarantees that it remains light on the palate, making it an ideal dessert after a hearty meal. The inclusion of caramel and nuts not only adds depth to the flavor but also creates a beautiful presentation that will catch everyone’s eye.
The key to achieving the perfect Nutty Caramel Angel Cake lies in maintaining the delicate structure of the angel food cake while incorporating the additional ingredients. By carefully folding in the nuts and drizzling the caramel with precision, you can create a dessert that’s both visually stunning and deliciously satisfying. This recipe serves 4-6 people, making it a wonderful option for small gatherings or family dinners. Follow the instructions below to create this delectable treat that’s sure to become a favorite in your dessert repertoire.
Ingredients:
- 1 cup of cake flour
- 1 1/2 cups of granulated sugar
- 12 large egg whites, at room temperature
- 1 1/2 teaspoons cream of tartar
- 1/4 teaspoon salt
- 1 teaspoon vanilla extract
- 1/2 teaspoon almond extract
- 1 cup chopped assorted nuts (such as pecans or walnuts)
- 1 cup caramel sauce
- 1/4 cup chopped nuts for garnish
Instructions:
- Preheat the Oven: Begin by preheating your oven to 350°F (175°C). This guarantees that the oven is at the right temperature when the cake is ready to bake.
- Prepare the Cake Batter: In a medium bowl, sift together the cake flour and 3/4 cup of sugar. In a separate large mixing bowl, beat the egg whites on medium speed until frothy, then add the cream of tartar and salt. Increase the speed to high and continue to beat until soft peaks form.
- Incorporate the Sugar: Gradually add the remaining 3/4 cup of sugar to the egg whites, one tablespoon at a time, beating continuously until stiff peaks form. This process helps stabilize the egg whites and gives the cake its signature light texture.
- Add Flavorings: Gently fold in the vanilla and almond extracts with a spatula, taking care not to deflate the egg whites.
- Combine Dry Ingredients: Gradually sift the flour and sugar mixture over the egg whites, folding it in gently using a spatula. Continue until all the dry ingredients are incorporated.
- Fold in Nuts: Carefully fold in the chopped assorted nuts until evenly distributed throughout the batter.
- Bake the Cake: Spoon the batter into an ungreased 10-inch tube pan. Smooth the top with a spatula. Bake in the preheated oven for 35-40 minutes, or until the top is golden brown and springs back when lightly pressed.
- Cool the Cake: Once baked, remove the cake from the oven and invert the pan onto a wire rack. Allow the cake to cool completely upside down in the pan to prevent it from collapsing.
- Release and Garnish: Once cooled, run a knife around the edges of the pan to release the cake. Carefully drizzle the caramel sauce over the top of the cake, allowing it to drip down the sides. Sprinkle with additional chopped nuts for garnish.
Extra Tips:
When making Nutty Caramel Angel Cake, verify that your egg whites are at room temperature for peak volume. Be gentle when folding in ingredients to maintain the cake’s light structure. If you don’t have a tube pan, a bundt pan can be a substitute, but the cake may not rise as high.
Finally, for an extra flavor boost, toast the nuts before folding them into the batter to enhance their nuttiness. Enjoy your creation with a scoop of ice cream or a dollop of whipped cream for a truly indulgent experience.
Mint Chocolate Chip Cake
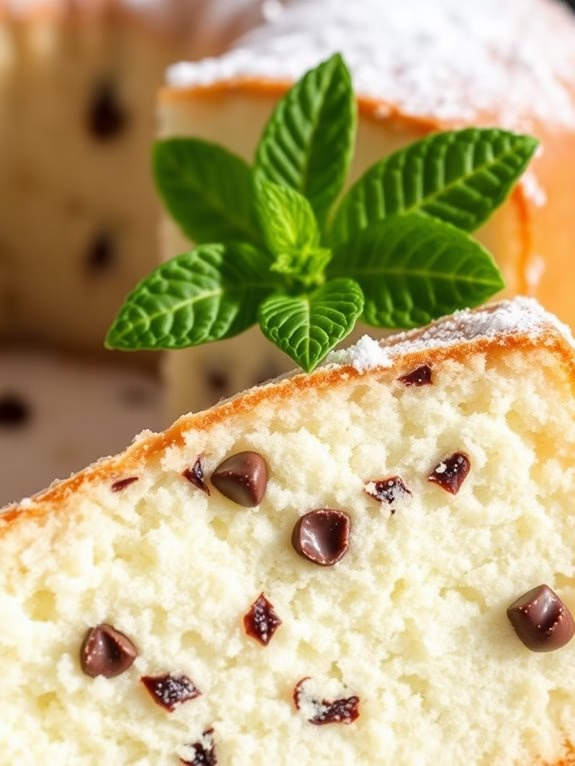
Fluffy Mint Chocolate Chip Angel Food Cake
Indulge in the delightful combination of mint and chocolate with this Fluffy Mint Chocolate Chip Angel Food Cake. This cake is a twist on the classic angel food cake, incorporating the invigorating flavor of mint and the richness of chocolate chips. It’s perfect for those who enjoy a light and airy dessert with a hint of something extra.
Whether you’re serving it at a dinner party or enjoying it with a cup of tea, this cake is sure to please.
The key to achieving the perfect texture for an angel food cake is to whip the egg whites until they form stiff peaks. This gives the cake its characteristic fluffiness and lightness. The addition of mint extract and chocolate chips creates a harmonious blend of flavors that both rejuvenates and satisfies the taste buds.
This recipe serves 4-6 people, making it ideal for small gatherings or family dinners.
Ingredients:
- 1 cup cake flour
- 1 1/2 cups granulated sugar
- 12 large egg whites
- 1 1/2 teaspoons cream of tartar
- 1/4 teaspoon salt
- 1 teaspoon pure vanilla extract
- 1 teaspoon mint extract
- 3/4 cup mini chocolate chips
- Fresh mint leaves for garnish (optional)
- Powdered sugar for dusting (optional)
Cooking Instructions:
- Preheat the Oven: Preheat your oven to 350°F (175°C). Don’t grease the angel food cake pan as the batter needs to cling to the sides to rise properly.
- Mix Dry Ingredients: In a medium bowl, sift together the cake flour and 3/4 cup of the granulated sugar. Set aside.
- Beat Egg Whites: In a large mixing bowl, beat the egg whites on medium speed until foamy. Add the cream of tartar and salt, then increase the speed to high. Continue beating until soft peaks form.
- Add Sugar Gradually: Gradually add the remaining 3/4 cup of sugar to the egg whites, one tablespoon at a time, beating continuously until stiff peaks form.
- Incorporate Flavors: Gently fold in the vanilla extract and mint extract.
- Fold in Flour Mixture: Using a spatula, gently fold the flour mixture into the egg whites in three additions, being careful not to deflate the batter. Fold in the mini chocolate chips.
- Pour and Bake: Pour the batter into an ungreased angel food cake pan. Smooth the top with a spatula. Bake for 35-40 minutes, or until the cake is golden brown and springs back when lightly touched.
- Cool the Cake: Remove the cake from the oven and invert the pan onto a cooling rack. Allow the cake to cool completely upside down in the pan.
- Release and Serve: Once cooled, run a knife around the edges of the pan to release the cake. Remove it from the pan and place it on a serving platter. Dust with powdered sugar and garnish with fresh mint leaves if desired.
Extra Tips:
To guarantee your egg whites whip properly, make sure your bowl and beaters are completely clean and free of any grease. It’s also essential that no yolks are mixed in with the whites.
When folding in the flour and chocolate chips, do so gently to maintain the airiness of the batter. This cake can be stored at room temperature for a day or two, but it’s best enjoyed fresh to fully appreciate its light texture and minty chocolate flavors.