
Sitting by the twinkling lights of my Christmas tree, I’m reminded of the cozy mornings filled with festive breakfasts that bring warmth to the heart. Picture gingerbread pancakes or candy cane French toast adding a touch of holiday magic to your table. These sweet recipes, each with their own unique flavor, can turn your holiday mornings into treasured memories. Ready to explore more festive breakfast delights?
Gingerbread Pancakes for a Spicy Start
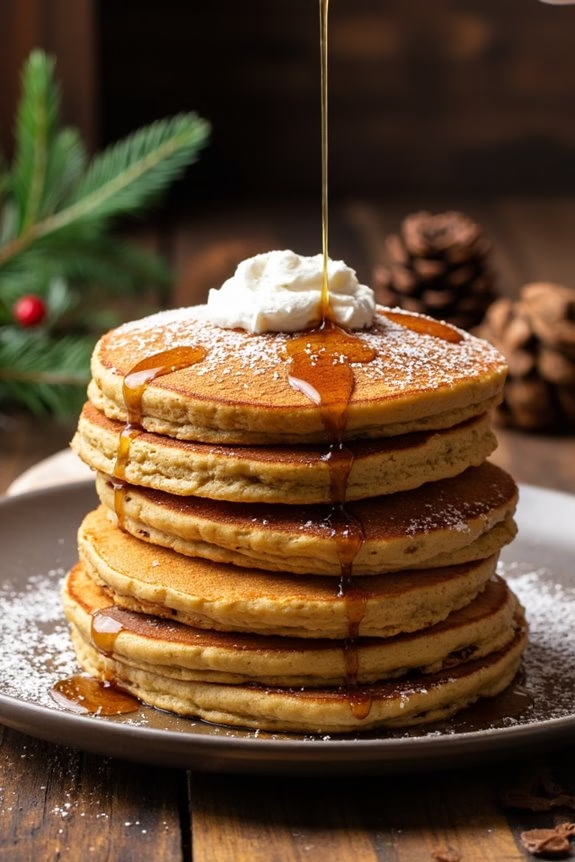
Start your Christmas morning with the warm, spicy aroma of Gingerbread Pancakes. These pancakes are perfect for bringing festive cheer to your breakfast table, combining the classic flavors of ginger, cinnamon, and nutmeg with the fluffy texture of homemade pancakes.
Whether you’re serving them with a drizzle of maple syrup or a dollop of whipped cream, these pancakes are certain to make your holiday breakfast special.
Gingerbread Pancakes aren’t only delicious but also simple to prepare, making them a great choice for a leisurely Christmas morning. The combination of molasses and spices creates a rich, aromatic batter that cooks into light, tender pancakes.
The key to achieving the perfect texture is to avoid overmixing your batter, allowing it to rest briefly to guarantee the baking powder can work its magic. Serve with your favorite breakfast accompaniments for a complete festive meal.
Ingredients (Serves 4-6):
- 2 cups all-purpose flour
- 1 tablespoon baking powder
- 1 teaspoon baking soda
- 1/2 teaspoon salt
- 1 teaspoon ground ginger
- 1 teaspoon ground cinnamon
- 1/2 teaspoon ground nutmeg
- 1/4 teaspoon ground cloves
- 1/3 cup brown sugar
- 2 large eggs
- 1 1/2 cups milk
- 1/3 cup molasses
- 1/4 cup unsalted butter, melted
- 1 teaspoon vanilla extract
Instructions:
- Prepare the Dry Ingredients: In a large mixing bowl, whisk together the all-purpose flour, baking powder, baking soda, salt, ground ginger, ground cinnamon, ground nutmeg, ground cloves, and brown sugar until well combined.
- Mix the Wet Ingredients: In another bowl, beat the eggs and then add the milk, molasses, melted butter, and vanilla extract. Stir until the mixture is smooth and the molasses has fully dissolved.
- Combine Wet and Dry Ingredients: Pour the wet ingredients into the bowl of dry ingredients. Gently stir the mixture with a spatula or wooden spoon until just combined. It’s okay if the batter is a little lumpy; overmixing will make the pancakes tough.
- Rest the Batter: Allow the batter to rest for about 5 minutes. This will help the baking powder activate, giving the pancakes a light and fluffy texture.
- Cook the Pancakes: Heat a non-stick skillet or griddle over medium heat. Lightly grease with butter or cooking spray. Pour about 1/4 cup of batter for each pancake onto the hot surface. Cook until bubbles form on the surface and the edges start to look dry, about 2-3 minutes. Flip and cook for another 2 minutes until golden brown.
- Serve: Serve the Gingerbread Pancakes warm with your choice of toppings. Maple syrup, whipped cream, or a sprinkle of powdered sugar are all great options.
Extra Tips:
For the best results, confirm that your eggs and milk are at room temperature before mixing; this helps the ingredients combine more smoothly.
If you prefer a stronger ginger flavor, you can increase the amount of ground ginger slightly. Additionally, for extra fluffiness, separate the egg yolks and whites, beat the egg whites until soft peaks form, and fold them into the batter at the end.
This will give your pancakes an extra lift. Enjoy your festive breakfast!
Candy Cane French Toast for Mint Lovers
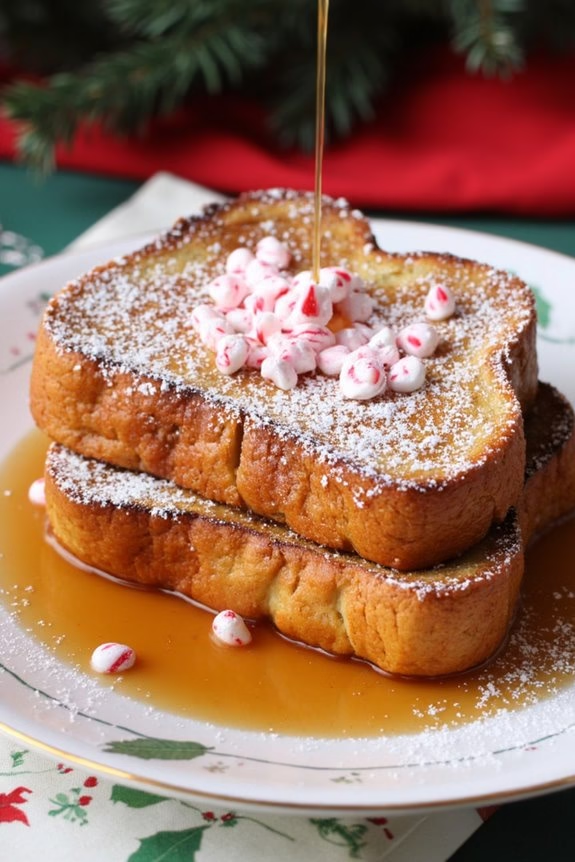
Start your Christmas morning with a delightful twist on a classic breakfast favorite – Candy Cane French Toast. This festive treat combines the comforting flavors of traditional French toast with the invigorating zing of peppermint, guaranteed to excite the taste buds of mint lovers.
The dish is perfect for bringing some holiday cheer to your breakfast table and is fun to prepare with family and friends. The peppermint extract and crushed candy canes bring a seasonal touch, making it an ideal choice for anyone looking to add a bit of magic to their morning meal.
This recipe is designed to serve 4-6 people, making it an excellent choice for small gatherings or family breakfasts. The rich, creamy texture of the French toast is beautifully complemented by the minty sweetness, creating a harmonious balance that embodies the spirit of Christmas.
Whether you’re hosting a festive brunch or simply wanting to surprise your loved ones with a special breakfast, this Candy Cane French Toast is sure to become a new holiday tradition.
Ingredients (serves 4-6):
- 6 large eggs
- 1 cup whole milk
- 1 teaspoon vanilla extract
- 1 teaspoon peppermint extract
- 1/4 cup granulated sugar
- 1/2 teaspoon ground cinnamon
- 1/4 teaspoon salt
- 12 slices of brioche or challah bread
- 4 tablespoons unsalted butter
- 1/2 cup crushed candy canes
- Maple syrup, for serving
- Powdered sugar, for garnish
Instructions:
- Prepare the Batter: In a large mixing bowl, whisk together the eggs, milk, vanilla extract, peppermint extract, sugar, cinnamon, and salt until well combined and smooth. This mixture will act as the flavorful custard base for the French toast.
- Soak the Bread: Arrange the slices of brioche or challah bread in a single layer in a shallow dish. Pour the egg mixture over the bread, ensuring each slice is thoroughly coated. Let the bread soak for about 10 minutes, turning once, to allow it to absorb the flavors fully.
- Preheat the Skillet: Place a large non-stick skillet or griddle over medium heat. Add 1 tablespoon of butter and let it melt, spreading evenly over the surface.
- Cook the French Toast: Once the butter is melted and the skillet is hot, gently place the soaked bread slices in the skillet. Cook each side for about 3-4 minutes, or until golden brown and slightly crispy. You may need to do this in batches, adding more butter as needed.
- Add the Candy Cane Crunch: After flipping the bread to cook the second side, sprinkle a generous amount of crushed candy canes onto each slice. The heat will slightly melt the candy, adding a delightful minty crunch to the French toast.
- Serve and Enjoy: Once all the slices are cooked and topped with candy cane, transfer them to a serving platter. Dust with powdered sugar and serve immediately with warm maple syrup on the side.
Extra Tips:
For the best results, use day-old brioche or challah bread as it tends to absorb the egg mixture better without becoming too soggy.
If you prefer a stronger mint flavor, adjust the amount of peppermint extract to your taste. Feel free to get creative with toppings; whipped cream or a drizzle of chocolate sauce can add an extra layer of indulgence.
Finally, if you’re preparing this dish for children or those sensitive to mint, consider serving the crushed candy canes on the side so guests can sprinkle them according to their preference.
Cranberry Orange Muffins With a Zesty Punch
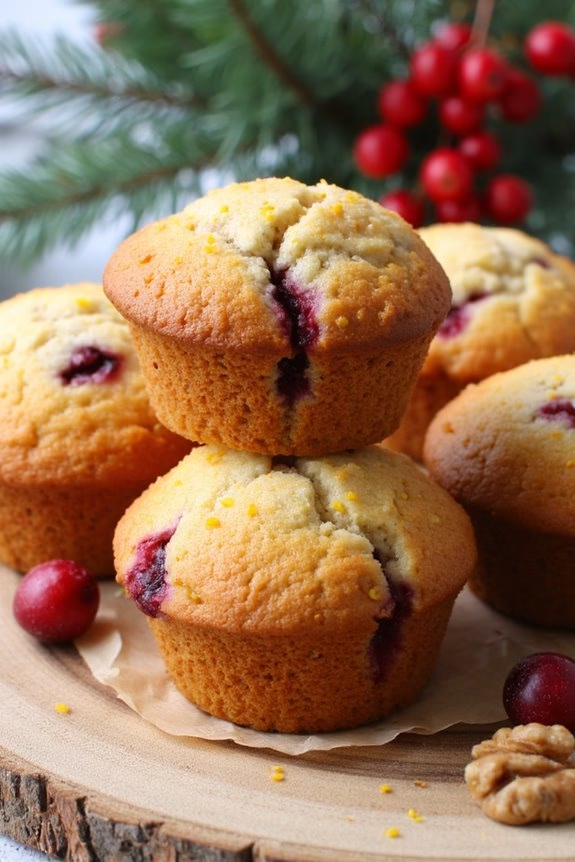
Start your Christmas morning with a burst of flavor by baking Cranberry Orange Muffins with a Zesty Punch. These delightful muffins combine the tartness of fresh cranberries with the bright, citrusy notes of orange zest and juice, creating a symphony of flavors that are sure to awaken your senses.
Perfectly moist and tender, these muffins aren’t only easy to whip up but also make your kitchen smell heavenly, adding to the festive spirit of the holiday season.
These muffins are a wonderful addition to any Christmas breakfast spread, whether you’re hosting a brunch for family and friends or simply enjoying a quiet morning at home. The combination of fresh, juicy cranberries and the zing of orange guarantees that each bite is as invigorating as it’s satisfying.
Plus, the recipe yields a serving size of 4-6 people, making it an ideal choice for small gatherings or a cozy family breakfast.
Ingredients (Serves 4-6):
- 2 cups all-purpose flour
- 1 cup granulated sugar
- 1 tablespoon baking powder
- 1/2 teaspoon baking soda
- 1/4 teaspoon salt
- 1/2 cup unsalted butter, melted
- 3/4 cup freshly squeezed orange juice
- 1 tablespoon orange zest
- 2 large eggs
- 1 teaspoon vanilla extract
- 1 1/2 cups fresh cranberries
- 1/2 cup chopped walnuts (optional)
Cooking Instructions:
- Preheat the Oven: Start by preheating your oven to 375°F (190°C). Line a 12-cup muffin tin with paper liners or lightly grease the cups with butter or cooking spray.
- Mix Dry Ingredients: In a large mixing bowl, whisk together the flour, sugar, baking powder, baking soda, and salt until well combined. This will guarantee even distribution of leavening agents and sugar throughout the batter.
- Blend Wet Ingredients: In another bowl, mix the melted butter, orange juice, orange zest, eggs, and vanilla extract. Whisk until the mixture is smooth and well combined.
- Combine Mixtures: Gradually add the wet ingredients to the dry ingredients, stirring gently until just combined. Be careful not to overmix; the batter should be slightly lumpy.
- Fold in Additions: Gently fold in the fresh cranberries and walnuts (if using) until evenly distributed throughout the batter. This step guarantees that the cranberries remain intact and the walnuts add a delightful crunch.
- Fill Muffin Cups: Divide the batter evenly among the prepared muffin cups, filling each about 3/4 full to allow room for rising.
- Bake: Place the muffin tin in the preheated oven and bake for 18-22 minutes, or until a toothpick inserted into the center of a muffin comes out clean. The muffins should be golden brown on top.
- Cool and Serve: Allow the muffins to cool in the tin for about 5 minutes, then transfer them to a wire rack to cool completely. Serve warm or at room temperature for the best flavor.
Extra Tips:
For an extra zesty punch, consider adding an additional teaspoon of orange zest to the batter or sprinkling a little on top of the muffins before baking.
If fresh cranberries aren’t available, you can substitute with frozen cranberries, just be sure to add them directly from the freezer to the batter to prevent them from becoming too mushy.
Finally, if you prefer a sweeter muffin, you can drizzle a simple glaze made of powdered sugar and orange juice over the top once the muffins have cooled.
Enjoy these muffins with a cup of coffee or hot chocolate for a truly festive Christmas morning treat!
Eggnog Waffles to Warm Your Soul
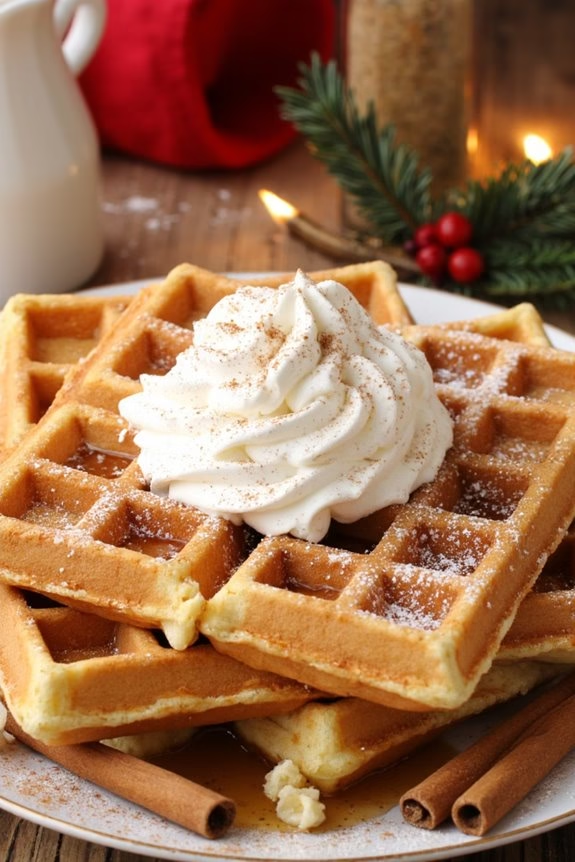
Eggnog Waffles are a delightful and festive treat that’s perfect for a Christmas morning breakfast or brunch. These waffles combine the creamy richness of eggnog with the warmth of spices, creating a cozy and aromatic start to your holiday.
Whether you’re serving them to family or guests, these waffles are bound to impress with their golden, crispy exterior and soft, fluffy interior.
Making Eggnog Waffles isn’t only simple but also a wonderful way to incorporate the classic Christmas beverage into your meal. The batter is infused with the flavors of nutmeg, vanilla, and cinnamon, capturing the essence of the holiday season.
Serve them with a dusting of powdered sugar, a drizzle of maple syrup, or even a dollop of whipped cream for an extra indulgent touch. Here’s how you can prepare a batch for 4-6 people:
Ingredients:
- 2 cups all-purpose flour
- 2 tablespoons granulated sugar
- 1 tablespoon baking powder
- 1/2 teaspoon salt
- 1/2 teaspoon ground nutmeg
- 1/2 teaspoon ground cinnamon
- 2 large eggs
- 2 cups eggnog
- 1/4 cup unsalted butter, melted
- 1 teaspoon vanilla extract
- Cooking spray or additional melted butter for waffle iron
Instructions:
- Preheat the Waffle Iron: Begin by preheating your waffle iron to the desired setting, usually medium-high, as this guarantees a crispy exterior.
- Mix Dry Ingredients: In a large mixing bowl, whisk together the flour, sugar, baking powder, salt, nutmeg, and cinnamon. Confirm the spices are evenly distributed throughout the mixture.
- Combine Wet Ingredients: In a separate bowl, beat the eggs, then add the eggnog, melted butter, and vanilla extract. Whisk until all ingredients are well combined.
- Create the Batter: Pour the wet ingredients into the bowl with the dry ingredients. Gently stir until just combined. Be careful not to overmix; it’s okay if the batter is a bit lumpy.
- Prepare the Waffle Iron: Lightly coat the waffle iron with cooking spray or brush with melted butter to prevent sticking.
- Cook the Waffles: Pour an appropriate amount of batter onto the preheated waffle iron, spreading it out to cover the surface evenly. Close the lid and cook according to the manufacturer’s instructions, usually 3-5 minutes, or until the waffles are golden brown and crisp.
- Serve Immediately: Remove the waffles and serve hot with your choice of toppings.
Extra Tips:
For an even more intense eggnog flavor, consider using spiked eggnog if you enjoy a hint of alcohol in your breakfast treats.
If you prefer a lighter waffle, substitute part of the all-purpose flour with whole wheat flour for added texture and nutrition.
Additionally, if you’re not serving the waffles immediately, keep them warm in a low oven (around 200°F) to maintain their crispness until ready to serve.
Enjoy your festive breakfast with a steaming cup of coffee or hot chocolate for the perfect holiday morning experience.
Indulgent Cinnamon Roll Breakfast Casserole

Indulgent Cinnamon Roll Breakfast Casserole is the perfect festive treat to start your Christmas morning. This delightful dish combines the warm, comforting flavors of cinnamon rolls with a creamy custard base, creating a breakfast casserole that’s both indulgent and satisfying. The recipe is simple enough for a leisurely holiday morning yet special enough to make your family and guests feel truly spoiled.
Imagine the aroma of cinnamon wafting through your home, setting the scene for a joyful day filled with laughter and festive cheer.
The beauty of this breakfast casserole lies in its ability to be prepared the night before, allowing you to spend more quality time with your loved ones on Christmas morning. It’s the perfect dish for serving a crowd, with its generous combination of fluffy cinnamon rolls drenched in a rich, milky custard and topped with a sweet glaze.
Whether you’re hosting a holiday brunch or simply want to treat your family to a memorable breakfast, this casserole is sure to impress and delight.
Ingredients (Serves 4-6):
- 2 cans (12.4 oz each) refrigerated cinnamon rolls with icing
- 4 large eggs
- 1/2 cup heavy cream
- 2 teaspoons vanilla extract
- 1 teaspoon ground cinnamon
- 1/4 teaspoon ground nutmeg
- 1/2 cup maple syrup
- 1/2 cup chopped pecans (optional)
- Non-stick cooking spray
Cooking Instructions:
- Preheat the Oven: Begin by preheating your oven to 375°F (190°C). This will guarantee that your casserole bakes evenly.
- Prepare the Baking Dish: Lightly grease a 9×13 inch baking dish with non-stick cooking spray. This will prevent the casserole from sticking to the dish and make for easier serving.
- Arrange the Cinnamon Rolls: Open the cans of cinnamon rolls and set the icing aside for later. Cut each roll into quarters and evenly distribute them across the bottom of the prepared baking dish.
- Mix the Custard: In a medium mixing bowl, whisk together the eggs, heavy cream, vanilla extract, ground cinnamon, and ground nutmeg until well combined. This mixture will form the custard base of your casserole.
- Assemble the Casserole: Pour the custard mixture evenly over the cinnamon roll pieces in the baking dish, ensuring each piece is covered. Drizzle the maple syrup over the top and sprinkle with chopped pecans if using.
- Bake the Casserole: Place the baking dish in the preheated oven and bake for 25-30 minutes or until the cinnamon rolls are golden brown and the custard is set.
- Add the Finishing Touches: Once baked, remove the casserole from the oven and allow it to cool slightly. Drizzle the reserved icing over the top of the casserole, spreading it evenly.
- Serve and Enjoy: Slice the casserole into pieces and serve warm. Enjoy the festive flavors and the joy it brings to your holiday breakfast table.
Extra Tips:
For added convenience, this casserole can be assembled the night before. Simply cover and refrigerate overnight, then bake the following morning.
If you prefer a slightly crispier texture, remove the casserole from the refrigerator about 30 minutes before baking to allow it to come to room temperature.
For an even more decadent version, consider adding a handful of raisins or a sprinkle of brown sugar to the custard mixture. This dish pairs beautifully with a fresh fruit salad or a hot cup of cocoa for a complete and festive breakfast experience.
Red Velvet Crepes With Festive Cream Cheese
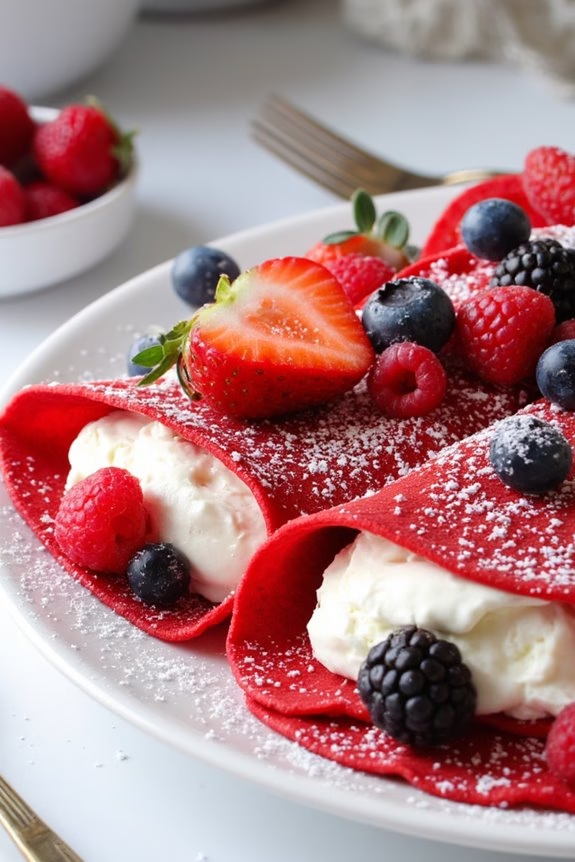
Red Velvet Crepes with Festive Cream Cheese are a delightful way to celebrate Christmas morning with a touch of elegance and festivity. These vibrant red crepes, enhanced with cocoa and a hint of vanilla, create a stunning base for the creamy, sweet, and slightly tangy cream cheese filling. The combination of colors and flavors encapsulates the essence of the holiday spirit, making it an ideal breakfast or brunch dish to share with family and friends.
The crepes are soft and tender, wrapping around the luscious filling, creating a perfect blend of textures and tastes. The process of making Red Velvet Crepes is surprisingly simple, turning an ordinary breakfast into something extraordinary. The secret lies in achieving the right balance of ingredients to create crepes that aren’t only visually appealing but also delicious.
The cream cheese filling is infused with festive flavors, such as a hint of orange zest or a sprinkle of cinnamon, adding an extra layer of holiday cheer. Whether you serve them plain or garnish with fresh berries and a dusting of powdered sugar, these crepes are sure to bring warmth and joy to your Christmas breakfast table.
Ingredients for 4-6 servings:
- 1 cup all-purpose flour
- 1 tablespoon cocoa powder
- 2 tablespoons granulated sugar
- 1/4 teaspoon salt
- 1 1/4 cups milk
- 2 large eggs
- 1 tablespoon unsalted butter, melted
- 1 teaspoon vanilla extract
- 1 tablespoon red food coloring
- 8 ounces cream cheese, softened
- 1/4 cup powdered sugar
- 1 teaspoon vanilla extract
- 1 tablespoon orange zest (optional)
- Fresh berries and powdered sugar for garnish (optional)
Cooking Instructions:
- Prepare the Batter: In a large mixing bowl, whisk together the flour, cocoa powder, sugar, and salt. In a separate bowl, combine the milk, eggs, melted butter, vanilla extract, and red food coloring. Gradually pour the wet ingredients into the dry ingredients, whisking continuously until you achieve a smooth batter. Let the batter rest for about 15 minutes to eliminate any air bubbles.
- Make the Crepes: Heat a non-stick skillet or crepe pan over medium heat. Lightly grease the pan with a bit of butter or cooking spray. Pour about 1/4 cup of the batter into the pan, swirling it around to cover the bottom evenly. Cook for 1-2 minutes until the edges begin to lift and the crepe is set. Flip the crepe and cook for another 30 seconds. Transfer to a plate and repeat with the remaining batter.
- Prepare the Cream Cheese Filling: In a medium bowl, beat the softened cream cheese until smooth. Add the powdered sugar, vanilla extract, and orange zest (if using), and continue to beat until the mixture is creamy and well combined.
- Assemble the Crepes: Spread a generous spoonful of the cream cheese filling onto each crepe. Fold the crepes into quarters or roll them up, depending on your preference. Arrange the crepes on a serving platter.
- Garnish and Serve: Optionally, garnish with fresh berries and a dusting of powdered sugar before serving. Serve immediately and enjoy the festive flavors.
Extra Tips:
To guarantee your crepes are perfectly smooth and free of lumps, consider using a blender to mix the batter for a few seconds. This technique can help achieve the ideal consistency. If you find your batter too thick, add a little more milk to thin it out.
Additionally, confirm your pan is adequately heated before cooking the crepes to prevent sticking. For added flavor, you can incorporate holiday spices like cinnamon or nutmeg into the cream cheese filling. Enjoy experimenting with different garnishes to personalize your Red Velvet Crepes and make them even more festive!
Chocolate Peppermint Oatmeal for Cozy Mornings
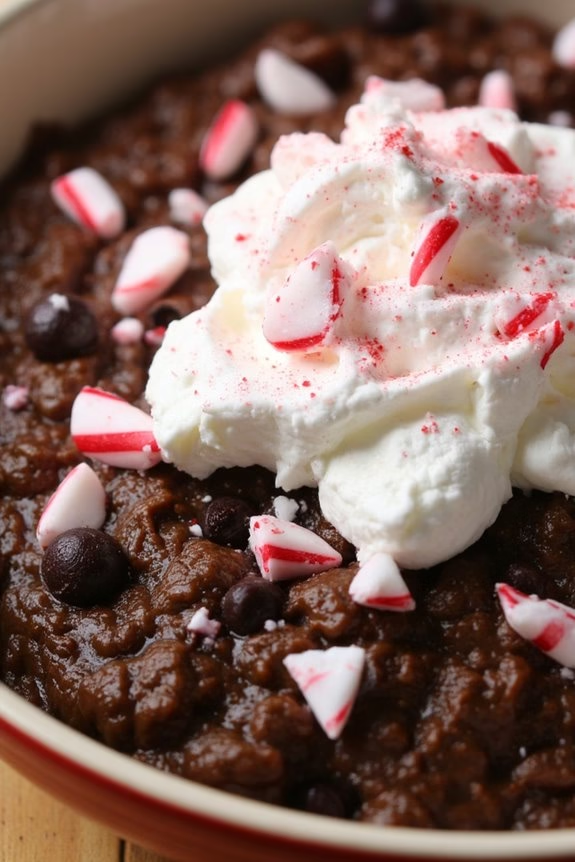
There’s nothing quite like the comforting warmth of a bowl of oatmeal on a chilly Christmas morning, and when you add the festive flavors of chocolate and peppermint, it becomes a truly delightful treat.
This Chocolate Peppermint Oatmeal recipe is perfect for cozy mornings spent with family. The rich, creamy texture of oats combined with the sweetness of chocolate and the invigorating hint of peppermint makes this dish a holiday favorite.
Whether you’re opening gifts around the tree or simply enjoying a peaceful morning, this oatmeal will provide the ideal start to your day.
Not only is this recipe delicious, but it’s also quick and easy to prepare, making it ideal for busy holiday mornings. With a few simple ingredients, you can whip up a nutritious breakfast that feels indulgent.
The aroma of peppermint and chocolate wafting through your home will set the perfect festive mood. Gather your loved ones around the breakfast table and savor the seasonal flavors of this delightful oatmeal.
Ingredients (Serves 4-6 people):
- 2 cups rolled oats
- 4 cups milk (or a non-dairy alternative)
- 1/2 cup cocoa powder
- 1/2 cup sugar
- 1/2 teaspoon salt
- 1 teaspoon vanilla extract
- 1/2 teaspoon peppermint extract
- 1/2 cup semi-sweet chocolate chips
- Crushed candy canes or peppermint candies for garnish
- Whipped cream for topping (optional)
Cooking Instructions:
- Prepare the Base: In a medium saucepan, combine the rolled oats, milk, cocoa powder, sugar, and salt. Stir the mixture to verify the cocoa powder is well integrated and there are no lumps.
- Cook the Oats: Place the saucepan over medium heat and bring the mixture to a gentle boil. Once boiling, reduce the heat to low and let it simmer, stirring occasionally, until the oats are tender and have absorbed most of the liquid, about 10-15 minutes.
- Add Flavors: Once the oatmeal has reached your desired consistency, remove the saucepan from the heat. Stir in the vanilla and peppermint extracts thoroughly to infuse the oatmeal with flavor.
- Incorporate Chocolate Chips: Gently fold in the semi-sweet chocolate chips, allowing them to melt slightly into the hot oatmeal, creating a rich, chocolatey texture.
- Serve and Garnish: Spoon the oatmeal into bowls. Top each serving with a dollop of whipped cream if desired, and sprinkle with crushed candy canes or peppermint candies for an extra festive touch.
Extra Tips:
For a creamier oatmeal, consider using full-fat milk or adding a splash of cream just before serving.
If you prefer a stronger peppermint flavor, you can adjust the amount of peppermint extract to suit your taste.
Be careful not to overcook the oatmeal, as it can become too thick; if this happens, simply stir in a bit more milk to reach your preferred consistency.
For an added crunch, consider sprinkling some chopped nuts or granola on top. Enjoy your festive breakfast with a warm cup of cocoa or peppermint tea to complement the oatmeal’s flavors.
Stollen Bread With Marzipan Magic
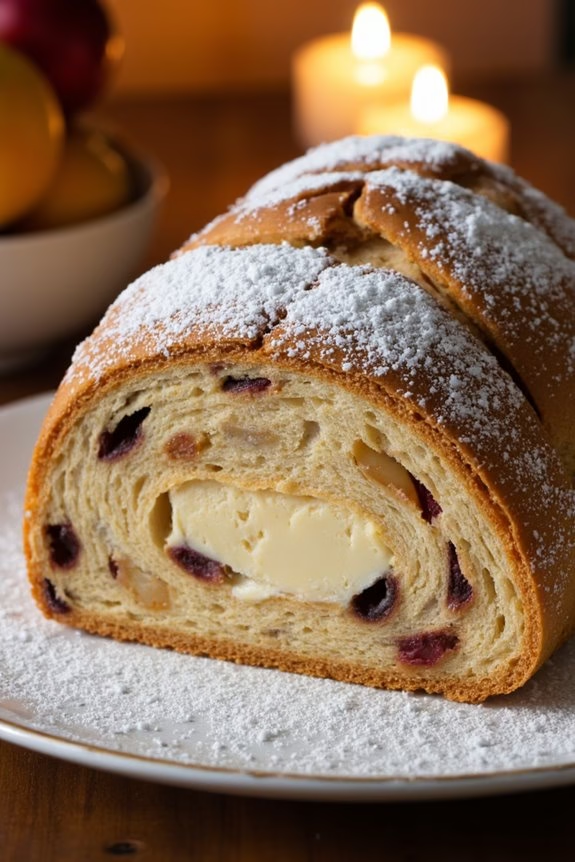
Stollen Bread With Marzipan Magic is a delightful German Christmas treat that infuses the festive spirit into your breakfast table. This rich, sweet bread is loaded with dried fruits and nuts, with a luscious marzipan center that adds an unexpected burst of flavor.
It’s a traditional holiday favorite, often dusted with powdered sugar to resemble the snowy winter landscape. Perfect for a Christmas morning, this bread can be paired with a warm cup of coffee or tea, making your holiday breakfast extra special.
Creating Stollen Bread requires some time and attention, but the end result is worth the effort. As the bread bakes, your kitchen will fill with the heavenly aroma of spices and fruit, setting the perfect holiday mood.
The combination of soft bread, chewy fruits, crunchy nuts, and creamy marzipan is sure to delight your family and guests. Even if you’re new to bread-making, this recipe is straightforward and forgiving. So, put on your favorite Christmas tunes, and let’s make some magic happen in the kitchen!
Ingredients for 4-6 servings:
- 3 3/4 cups all-purpose flour
- 1/2 cup granulated sugar
- 1 cup whole milk
- 2 1/4 teaspoons active dry yeast
- 1/2 cup unsalted butter, softened
- 1/2 teaspoon salt
- 1 teaspoon vanilla extract
- 1/2 teaspoon ground cinnamon
- 1/4 teaspoon ground nutmeg
- 1 cup mixed dried fruits (such as raisins, currants, or candied orange peel)
- 1/2 cup chopped nuts (such as almonds or walnuts)
- 7 ounces marzipan
- 1/2 cup powdered sugar for dusting
Cooking Instructions:
1. Prepare the Dough: Warm the milk until it’s lukewarm (about 100°F/38°C). In a small bowl, dissolve the yeast in the warm milk and let it sit for 5-10 minutes until it becomes frothy.
In a large bowl, combine the flour, sugar, salt, cinnamon, and nutmeg. Add the yeast mixture, softened butter, and vanilla extract. Mix until a dough forms.
2. Knead and Rise**: Turn the dough out onto a floured surface and knead** for about 8-10 minutes until smooth and elastic. Place the dough in a lightly greased bowl, cover it with a clean towel, and let it rise in a warm place for about 1-2 hours, or until it doubles in size.
3. Add the Fruits and Nuts: Once the dough has risen, punch it down and gently knead in the dried fruits and nuts until they’re evenly distributed throughout the dough.
4. Shape the Bread: Roll the marzipan into a log that’s slightly shorter than the length of the dough. Roll out the dough into a rectangle, place the marzipan log in the center, and fold the dough over the marzipan, pinching the edges to seal.
5. Final Rise: Place the formed bread onto a baking sheet lined with parchment paper. Cover it with a towel and let it rise for another 30-45 minutes.
6. Bake: Preheat your oven to 350°F (175°C). Bake the Stollen for 30-35 minutes, or until it’s golden brown and sounds hollow when tapped on the bottom.
7. Cool and Dust: Remove the bread from the oven and let it cool on a wire rack. Once cool, dust generously with powdered sugar before serving.
Extra Tips:
For the best flavor, soak your dried fruits in rum or orange juice overnight for a more intense taste. Keep an eye on the bread as it bakes; if it browns too quickly, cover it with aluminum foil to prevent over-browning.
Stollen tends to taste even better the next day, as the flavors meld together, so feel free to bake it a day in advance. Store any leftovers in an airtight container to keep it fresh. Enjoy your festive creation!
Maple Pecan Scones for Nutty Delights

Start your festive Christmas morning with a batch of delightful Maple Pecan Scones. These scones are a perfect blend of nutty flavors and sweet maple syrup, making them an irresistible treat for breakfast. The rich, buttery texture combined with the crunch of pecans offers a delicious contrast, while the subtle sweetness from the maple syrup ties everything together beautifully.
Serve these scones warm with a pat of butter or a drizzle of extra maple syrup for an indulgent breakfast that will have your family and guests reaching for seconds.
Maple Pecan Scones aren’t only easy to make but also a great way to bring a homemade touch to your Christmas breakfast table. They can be prepared in advance and baked fresh in the morning, filling your home with a delightful aroma.
Whether you’re having a quiet morning with your family or hosting a festive breakfast gathering, these scones are sure to be a hit. With simple ingredients and straightforward steps, you’ll have a batch of scones ready to enjoy in no time.
Ingredients for 4-6 Servings:
- 2 cups all-purpose flour
- 1/4 cup granulated sugar
- 1 tablespoon baking powder
- 1/2 teaspoon salt
- 1/2 cup unsalted butter, chilled and cubed
- 1/2 cup chopped pecans
- 1/3 cup pure maple syrup
- 1/2 cup heavy cream
- 1 teaspoon vanilla extract
- 1 egg, beaten (for egg wash)
- Additional maple syrup for drizzling (optional)
Cooking Instructions:
- Preheat Oven: Preheat your oven to 400°F (200°C) and line a baking sheet with parchment paper.
- Mix Dry Ingredients: In a large bowl, whisk together the flour, sugar, baking powder, and salt. This guarantees that the dry ingredients are evenly distributed.
- Cut in Butter: Add the chilled, cubed butter to the dry ingredients. Using a pastry cutter or your fingers, cut in the butter until the mixture resembles coarse crumbs.
- Add Pecans: Stir in the chopped pecans, making sure they’re evenly distributed throughout the mixture.
- Combine Wet Ingredients: In a separate bowl, mix the maple syrup, heavy cream, and vanilla extract. Pour this mixture into the dry ingredients.
- Form Dough: Gently mix until the dough just comes together. Be careful not to overmix, as this will make the scones tough.
- Shape and Cut: Transfer the dough onto a lightly floured surface and shape it into a circle about 1 inch thick. Cut the dough into 8 wedges and place them on the prepared baking sheet.
- Egg Wash: Brush the tops of the scones with the beaten egg to give them a nice golden color when baked.
- Bake: Bake in the preheated oven for 15-18 minutes, or until the scones are golden brown and a toothpick inserted into the center comes out clean.
- Cool and Serve: Allow the scones to cool for a few minutes on a wire rack. Serve warm with an optional drizzle of maple syrup.
Extra Tips:
For an added twist, consider toasting the pecans prior to adding them to the dough for a deeper nutty flavor. Confirm that the butter is very cold before incorporating it into the flour mixture; this helps in creating a flaky texture.
If you prefer a sweeter scone, you can sprinkle a little sugar on top of the scones before baking. Remember, scones are best enjoyed fresh, but they can be stored in an airtight container for up to two days. Simply reheat them in a warm oven before serving.
Christmas Tree Donuts for Fun Festivities

Celebrate the holiday season with these delightful Christmas Tree Donuts that are sure to bring joy to your festive breakfast table. These whimsical treats aren’t only visually stunning but also deliciously enticing, making them a perfect centerpiece for your morning festivities.
Shaped like charming Christmas trees, these donuts are glazed with a vibrant green icing and adorned with colorful sprinkles, capturing the magic and sparkle of the holiday season. The preparation process is simple and fun, making it a great activity to share with family, especially the little ones.
You’ll be using a basic donut recipe as the base, which is then transformed into a festive delight with the help of some creative decorating. Whether you’re looking to add some cheer to your breakfast or create a memorable experience for your guests, these Christmas Tree Donuts are bound to be a hit.
Ingredients (Serves 4-6):
- 2 cups all-purpose flour
- 1/2 cup granulated sugar
- 2 teaspoons baking powder
- 1/2 teaspoon salt
- 1/2 cup whole milk
- 2 large eggs
- 1/4 cup unsalted butter, melted
- 1 teaspoon vanilla extract
- Green food coloring
- 1 cup powdered sugar
- 2-3 tablespoons milk (for glaze)
- Assorted sprinkles and edible stars
Instructions:
- Preheat and Prepare: Preheat your oven to 350°F (175°C). Lightly grease a donut pan with cooking spray or butter to prevent sticking.
- Mix Dry Ingredients: In a large bowl, whisk together the flour, granulated sugar, baking powder, and salt until well combined.
- Blend Wet Ingredients: In a separate bowl, mix the whole milk, eggs, melted butter, and vanilla extract. Gradually add the wet mixture to the dry ingredients, stirring until just combined. Be careful not to overmix.
- Add Color: Add a few drops of green food coloring to the donut batter and mix gently until the color is evenly distributed. Adjust the shade to your preference.
- Fill the Donut Pan: Spoon the batter into the prepared donut pan, filling each mold about 3/4 full. Smooth the tops with a spatula.
- Bake: Bake in the preheated oven for 12-15 minutes, or until the donuts are lightly golden and a toothpick inserted comes out clean.
- Cool: Remove the donuts from the oven and let them cool in the pan for about 5 minutes. Transfer them to a wire rack to cool completely.
- Prepare the Glaze: In a small bowl, combine the powdered sugar with 2-3 tablespoons of milk, adjusting the consistency as needed. Add green food coloring to achieve a bright green glaze.
- Decorate: Dip the cooled donuts into the glaze, allowing any excess to drip off. Immediately decorate with sprinkles and place a star on top to mimic a Christmas tree.
- Set: Allow the glaze to set for about 10 minutes before serving.
Extra Tips:
When making these Christmas Tree Donuts, make certain that your donut pan is well-greased to prevent sticking and maintain the perfect shape.
If you don’t have a donut pan, you can use a muffin tin and create a hole in the center of each donut using a smaller cutter. For a more vibrant green, consider using gel-based food coloring, which provides a richer hue without affecting the batter’s consistency.
Finally, get creative with the decorations – kids will love adding their personal touch with different types of sprinkles and edible embellishments. Enjoy your festive creation as part of a cheerful holiday breakfast spread!
Apple Cinnamon Strudel for a Classic Touch
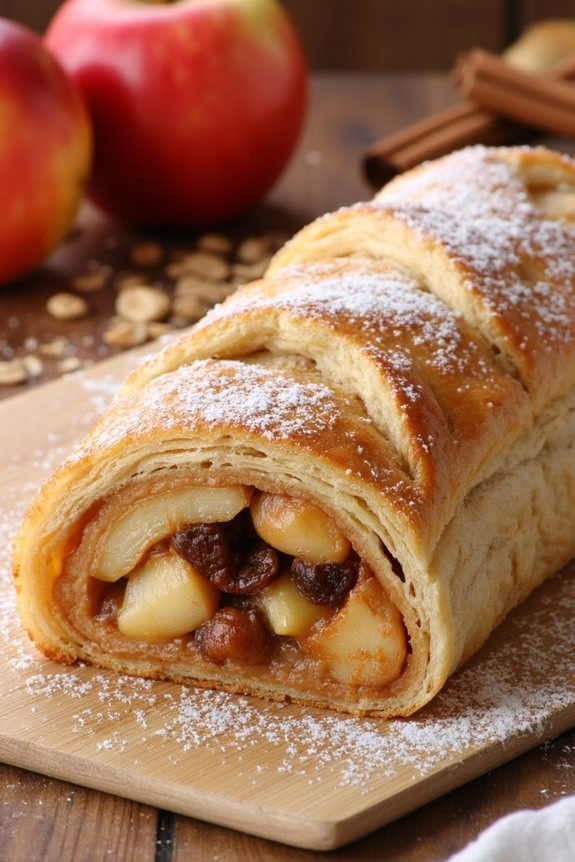
Apple Cinnamon Strudel for a Classic Touch is a delightful addition to any festive Christmas breakfast. This timeless pastry combines the warm, comforting flavors of apples and cinnamon in a flaky, buttery crust that will fill your home with the irresistible aroma of holiday cheer.
Whether served warm from the oven or at room temperature, this strudel is a family favorite that can be enjoyed as a breakfast treat or a lovely dessert after your Christmas meal. This recipe serves 4-6 people, making it a perfect choice for a cozy family gathering.
The combination of soft, spiced apples and crisp pastry creates a mouthwatering contrast that’s sure to please. Making an Apple Cinnamon Strudel might seem intricate, but with some attention to detail and the right ingredients, you’ll be able to create a bakery-quality pastry right in your own kitchen.
Follow the instructions below to craft this delicious holiday staple.
Ingredients for 4-6 servings:
- 1 sheet of puff pastry, thawed
- 3 large apples (such as Granny Smith or Honeycrisp), peeled, cored, and thinly sliced
- 1/2 cup granulated sugar
- 1 teaspoon ground cinnamon
- 1/4 teaspoon ground nutmeg
- 1 tablespoon lemon juice
- 1/4 cup raisins (optional)
- 1/4 cup chopped walnuts (optional)
- 2 tablespoons unsalted butter, melted
- 1 egg, beaten (for egg wash)
- Powdered sugar, for dusting
Cooking Instructions:
1. Prepare the Apples: In a large bowl, combine the sliced apples, granulated sugar, ground cinnamon, ground nutmeg, and lemon juice. Toss the mixture well to guarantee the apples are evenly coated with the spices and sugar.
If using, stir in the raisins and walnuts for added texture and flavor.
2. Roll out the Pastry: On a lightly floured surface, roll out the thawed puff pastry sheet into a rectangle approximately 12×16 inches. This will guarantee you have enough pastry to enclose the apple filling fully.
3. Fill the Pastry: Spread the apple mixture evenly over the center of the pastry, leaving about a 1-inch border on all sides. Drizzle the melted butter over the apples for added richness.
4. Fold and Seal: Carefully fold one long side of the pastry over the filling, then fold the opposite side over to cover it completely, overlapping slightly.
Fold the shorter ends under to seal the packet. Transfer the strudel to a baking sheet lined with parchment paper, seam side down.
5. Apply the Egg Wash: Brush the top and sides of the strudel with the beaten egg. This will help achieve a golden, glossy finish when baked.
Use a sharp knife to make a few slits on top of the pastry to allow steam to escape during baking.
6. Bake: Preheat the oven to 375°F (190°C). Bake the strudel in the preheated oven for 35-40 minutes or until the pastry is golden brown and crispy.
7. Cool and Serve: Allow the strudel to cool slightly before dusting it with powdered sugar. Slice and serve warm or at room temperature for a delicious holiday breakfast treat.
Extra Tips:
When selecting apples, opt for varieties that hold their shape well during baking, like Granny Smith or Honeycrisp.
If you prefer your strudel with a little extra crunch, lightly toast the walnuts before adding them to the filling. If you want to prepare ahead, assemble the strudel up to the point of baking, refrigerate it overnight, and bake fresh in the morning.
For an extra indulgent touch, serve with a dollop of whipped cream or a scoop of vanilla ice cream.
Snowman Pancakes to Delight the Kids
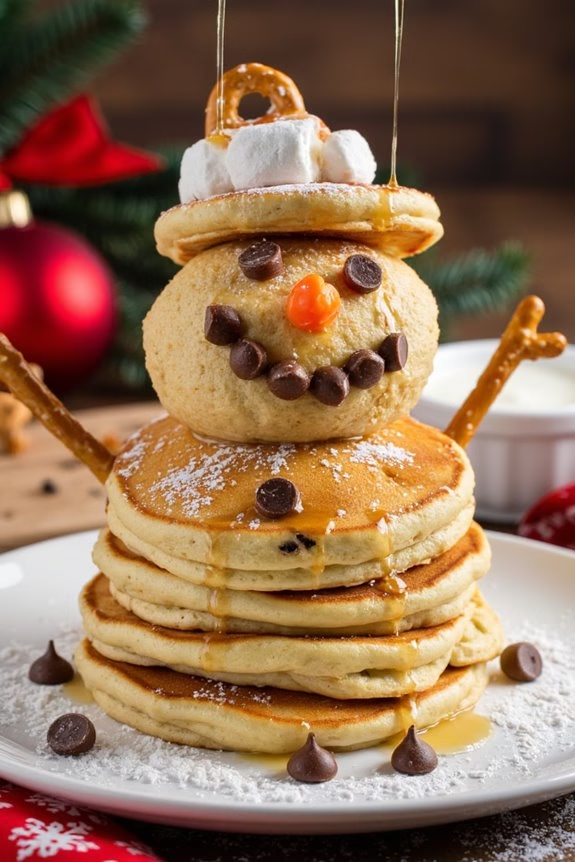
Christmas morning is the perfect time to infuse a little magic into breakfast, and what better way to do that than with a stack of delightful Snowman Pancakes? These whimsical pancakes are as fun to make as they’re to eat and will surely bring a smile to any child’s face.
With just a little creativity and some basic ingredients, you can transform ordinary pancakes into a festive holiday treat that’s perfect for starting a day of Christmas cheer.
These Snowman Pancakes aren’t just about the look; they’re delicious, fluffy, and sure to be a hit with both kids and adults. The idea is simple: create a snowman shape with pancakes, add some enticing decorations to give him a face and buttons, and voila, you’ve got a breakfast that’s both adorable and tasty.
Serve these with a side of syrup or a sprinkle of powdered sugar for a little extra sweetness on a special morning.
Ingredients for 4-6 servings:
- 2 cups all-purpose flour
- 2 tablespoons sugar
- 2 teaspoons baking powder
- 1/2 teaspoon baking soda
- 1/2 teaspoon salt
- 2 cups buttermilk
- 2 large eggs
- 1/4 cup unsalted butter, melted
- Cooking spray or extra butter for the pan
- Chocolate chips (for eyes and buttons)
- Mini marshmallows (for snowman hat)
- Pretzel sticks (for arms)
- Orange candy or carrot slices (for noses)
Cooking Instructions:
- Prepare the Batter: In a large mixing bowl, whisk together the flour, sugar, baking powder, baking soda, and salt. In a separate bowl, combine the buttermilk, eggs, and melted butter. Gradually pour the wet ingredients into the dry ingredients, stirring gently until just combined. Avoid overmixing to keep the pancakes fluffy.
- Heat the Griddle: Preheat a non-stick griddle or large skillet over medium heat. Lightly coat with cooking spray or a bit of butter to prevent sticking.
- Shape the Snowmen: Pour the batter onto the griddle to form pancakes in three sizes: large, medium, and small for the snowman body, head, and hat. Make sure each snowman has one of each size. Cook until bubbles form on the surface, then flip and cook for another 1-2 minutes until golden brown.
- Assemble the Snowmen: Arrange the pancakes on a plate, starting with the largest at the bottom and stacking the medium and small pancakes on top. Use chocolate chips to form eyes and buttons, mini marshmallows for the snowman’s hat, pretzel sticks for arms, and orange candy or carrot slices for the nose.
- Serve and Enjoy: Serve the snowman pancakes warm, with syrup on the side for dipping or drizzling. Dust with powdered sugar for a snowy effect if desired.
Extra Tips: To make sure your pancakes are perfectly round and evenly cooked, use a pancake dispenser or a measuring cup to pour the batter.
Also, be sure to keep the griddle or pan at a consistent medium heat to avoid burning. If cooking for a large group, keep the finished pancakes warm in a low oven until ready to serve.
For a healthier twist, you can substitute whole wheat flour for half of the all-purpose flour, or add a bit of vanilla extract for extra flavor.
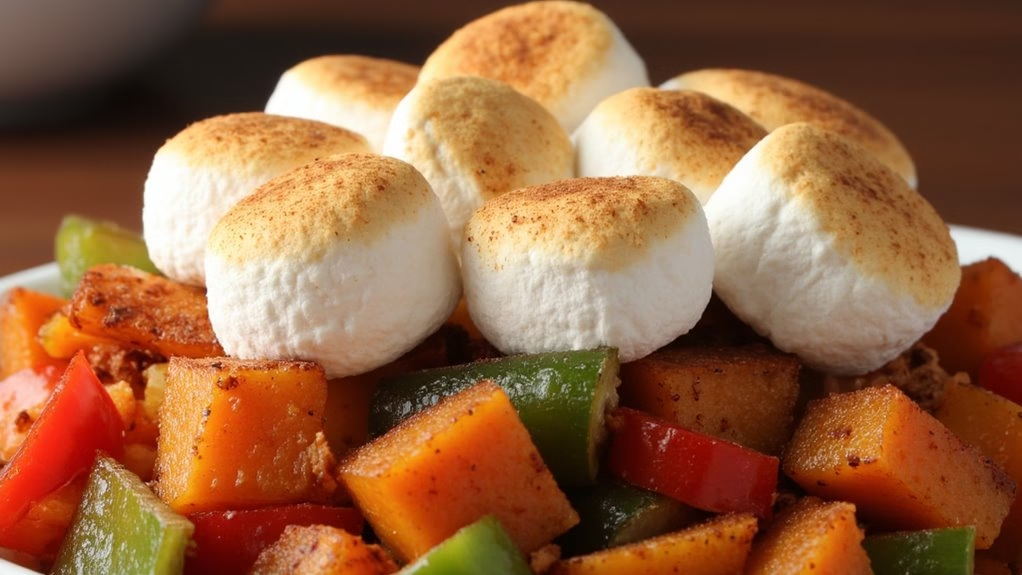
Sweet Potato Hash With Marshmallow Topping
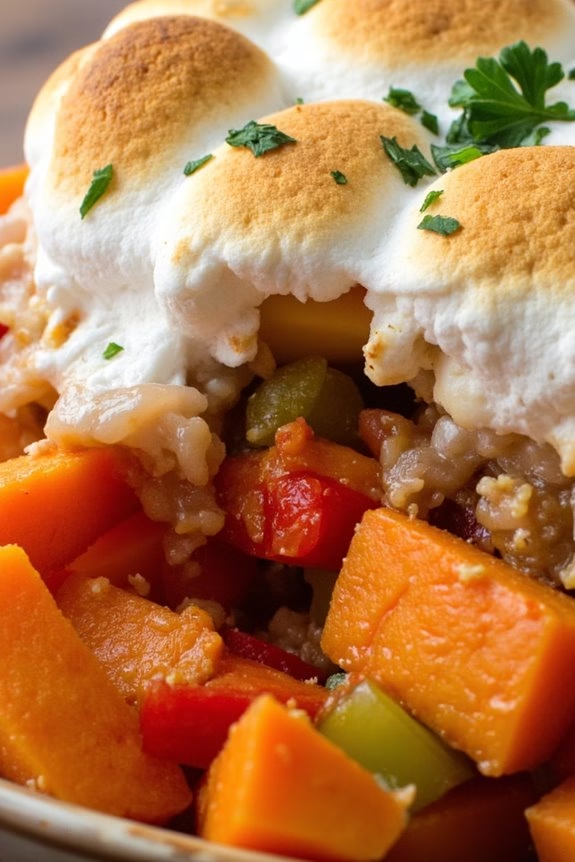
Bring a touch of sweetness and festivity to your Christmas morning with this delectable Sweet Potato Hash with Marshmallow Topping. This dish combines the earthy richness of sweet potatoes with the gooey sweetness of marshmallows, creating a harmonious blend of flavors and textures that’s certain to delight your family and friends.
Perfect for a cozy breakfast or brunch, this dish offers a delightful balance of savory and sweet, with a hint of holiday spice to elevate the experience. The sweet potato hash is first cooked to perfection with onions, bell peppers, and spices, creating a savory base that’s both hearty and comforting.
The addition of a marshmallow topping adds a whimsical touch, evoking the warmth and joy of the holiday season. This dish serves 4-6 people, making it an ideal choice for a festive gathering or a special breakfast treat. Easy to prepare and full of flavor, it’s certain to become a cherished part of your holiday traditions.
Ingredients (Serves 4-6):
- 4 medium sweet potatoes, peeled and diced
- 1 large onion, diced
- 1 red bell pepper, diced
- 1 green bell pepper, diced
- 3 tablespoons olive oil
- 1 teaspoon salt
- 1/2 teaspoon black pepper
- 1 teaspoon ground cinnamon
- 1/2 teaspoon ground nutmeg
- 1 cup mini marshmallows
- 2 tablespoons fresh parsley, chopped (optional for garnish)
Instructions:
- Prepare the Sweet Potatoes: Begin by peeling and dicing the sweet potatoes into small, uniform cubes. This guarantees even cooking and allows the sweet potatoes to caramelize beautifully.
- Cook the Vegetables: In a large skillet, heat the olive oil over medium heat. Add the diced onion and bell peppers, sautéing them until they become soft and fragrant, about 5 minutes.
- Add Sweet Potatoes and Spices: Add the diced sweet potatoes to the skillet, stirring them into the onion and pepper mixture. Season with salt, pepper, cinnamon, and nutmeg. Stir well to coat the sweet potatoes with the spices.
- Cook Until Tender: Cover the skillet and allow the sweet potatoes to cook for about 15-20 minutes, stirring occasionally, until they’re tender and slightly crispy on the edges.
- Preheat Oven: Preheat your oven to 375°F (190°C).
- Transfer to Baking Dish: Once the sweet potatoes are cooked, transfer the mixture to a baking dish. Spread it out evenly to create a level surface.
- Add Marshmallow Topping: Sprinkle the mini marshmallows evenly over the top of the sweet potato mixture in the baking dish.
- Bake: Place the baking dish in the preheated oven and bake for about 5-7 minutes, or until the marshmallows are melted and golden brown.
- Serve and Garnish: Remove from the oven and allow to cool slightly before serving. Garnish with fresh parsley if desired for a pop of color.
Extra Tips:
For an added layer of flavor, consider incorporating a pinch of cayenne pepper to add a subtle kick to the dish. If you prefer a vegan version, substitute the marshmallows with a vegan-friendly brand.
Additionally, you can prepare the sweet potato hash a day in advance, refrigerate it, and simply add the marshmallows and bake on Christmas morning for a stress-free breakfast. Enjoy this delightful dish with a side of fresh fruit or a warm cup of coffee for the perfect holiday breakfast experience.