

The holiday season is almost here, and that means it’s time to start planning those special breakfasts that bring everyone together. Picture the joy of waking up to gingerbread pancakes or savoring the rich taste of peppermint mocha waffles. These festive breakfast ideas capture the warmth and spirit of the season. They create moments you’ll cherish with your loved ones. Let’s look at what makes each of these breakfasts extra special.
Gingerbread Pancakes With Maple Syrup

Gingerbread Pancakes With Maple Syrup are a delightful holiday treat that perfectly capture the warmth and spice of the season. These pancakes are fluffy, aromatic, and infused with the classic flavors of gingerbread, including ginger, cinnamon, and molasses. Topped with a generous drizzle of maple syrup, they make for a festive and satisfying breakfast option that can bring joy to any Christmas morning.
These pancakes are easy to make and are perfect for feeding a small crowd of 4-6 people. The ingredients come together quickly, making it an ideal recipe for a leisurely holiday breakfast. Whether you’re serving them to family or friends, these pancakes are sure to be a hit with their rich flavors and comforting aroma.
Ingredients (Serves 4-6):
- 1 3/4 cups all-purpose flour
- 2 teaspoons baking powder
- 1 teaspoon baking soda
- 1/4 teaspoon salt
- 1 teaspoon ground ginger
- 1 teaspoon ground cinnamon
- 1/4 teaspoon ground cloves
- 1/4 cup molasses
- 1/4 cup brown sugar, packed
- 2 large eggs
- 1 cup milk
- 1/4 cup unsalted butter, melted
- 1 teaspoon vanilla extract
- Maple syrup, for serving
Cooking Instructions:
- Mix Dry Ingredients: In a large mixing bowl, whisk together the flour, baking powder, baking soda, salt, ginger, cinnamon, and cloves until well combined. This guarantees the spices are evenly distributed throughout the pancake batter.
- Combine Wet Ingredients: In a separate bowl, whisk together the molasses, brown sugar, eggs, milk, melted butter, and vanilla extract until smooth. The molasses and brown sugar add a rich depth of flavor to the pancakes.
- Combine Wet and Dry Mixes: Pour the wet ingredients into the dry ingredients and gently stir until just combined. Be careful not to overmix, as this can result in tough pancakes. A few lumps in the batter are perfectly fine.
- Preheat Skillet: Heat a non-stick skillet or griddle over medium heat. You can lightly grease the skillet if necessary to prevent sticking.
- Cook Pancakes: Pour 1/4 cup of batter onto the skillet for each pancake. Cook for about 2-3 minutes, or until bubbles form on the surface and the edges look set. Flip the pancakes and cook for an additional 2 minutes, or until golden brown.
- Serve: Stack the pancakes on a plate and serve warm with maple syrup drizzled generously over the top. Enjoy the warm, festive flavors of gingerbread complemented by the sweetness of maple syrup.
Extra Tips:
For a fluffier pancake, let the batter rest for about 5-10 minutes after mixing. This allows the baking powder to activate, leading to lighter pancakes.
If you prefer a stronger ginger flavor, consider adding an extra pinch of ground ginger or even a dash of nutmeg for added warmth.
Also, for a creative twist, you can add a handful of chocolate chips or chopped nuts to the batter.
Finally, make sure your skillet is at the right temperature; too hot, and the pancakes will burn before cooking through, too cool, and they’ll be pale and undercooked.
Enjoy your Gingerbread Pancakes With Maple Syrup!
Cranberry Orange Scones
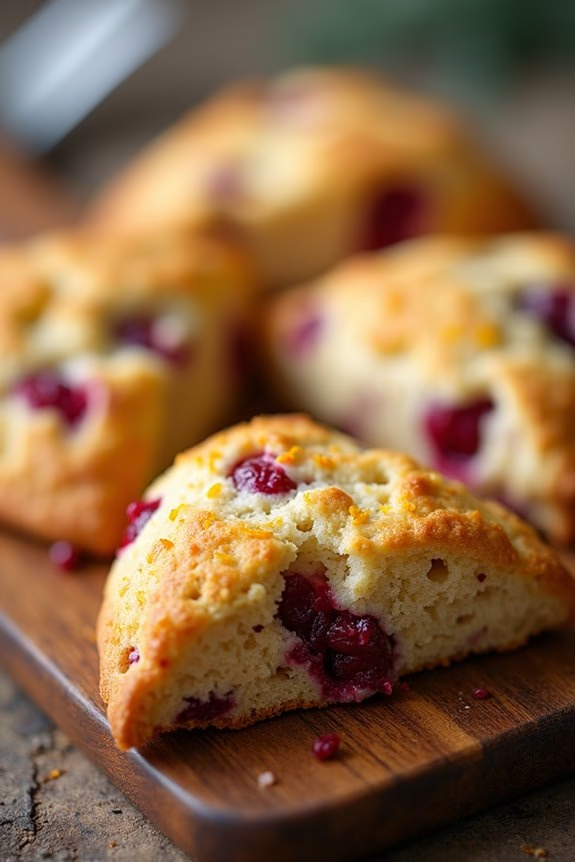
Cranberry Orange Scones are a delightful addition to any Christmas breakfast spread, offering a burst of festive flavors that combine tart cranberries with the zesty brightness of orange.
These scones are perfect for a holiday morning, as they’re simple to make and pair wonderfully with a hot cup of tea or coffee. Their slightly crumbly texture and sweet citrus aroma will fill your kitchen with the smell of Christmas and cheer up your holiday mornings.
Preparing Cranberry Orange Scones involves creating a dough enriched with butter, sugar, and cream, then adding the tangy twist of cranberries and orange zest. The process is straightforward and doesn’t require any special equipment, making it an ideal recipe for both experienced and novice bakers.
With the following recipe, you can easily whip up a batch to serve 4-6 people, providing a warm and satisfying start to your festive day.
Ingredients:
- 2 cups all-purpose flour
- 1/3 cup granulated sugar
- 1 tablespoon baking powder
- 1/2 teaspoon salt
- 1/2 cup unsalted butter, cold and diced
- 1/2 cup dried cranberries
- Zest of 1 large orange
- 2/3 cup heavy cream
- 1 large egg
- 1 teaspoon vanilla extract
Instructions:
- Preheat the Oven: Preheat your oven to 400°F (200°C) and line a baking sheet with parchment paper or a silicone baking mat.
- Mix Dry Ingredients: In a large mixing bowl, whisk together the flour, sugar, baking powder, and salt until well combined.
- Incorporate Butter: Add the cold, diced butter to the flour mixture. Use a pastry cutter or your fingers to cut the butter into the dry ingredients until the mixture resembles coarse crumbs.
- Add Cranberries and Orange Zest: Stir in the dried cranberries and orange zest, guaranteeing they’re evenly distributed throughout the mixture.
- Prepare Wet Ingredients: In a separate bowl, whisk together the heavy cream, egg, and vanilla extract until smooth.
- Combine Wet and Dry Ingredients: Make a well in the center of the dry ingredients and pour in the wet mixture. Gently mix with a fork until the dough just comes together. Be careful not to overwork the dough.
- Form the Dough: Turn the dough out onto a lightly floured surface and knead gently until it forms a cohesive ball. Pat the dough into a circle about 1 inch thick.
- Cut the Scones: Using a sharp knife, cut the dough circle into 8 wedges and place them on the prepared baking sheet, spacing them about 2 inches apart.
- Bake: Bake in the preheated oven for 15-18 minutes, or until the scones are golden brown on the edges and a toothpick inserted in the center comes out clean.
- Cool and Serve: Allow the scones to cool on the baking sheet for a few minutes before transferring to a wire rack. Serve warm or at room temperature.
Extra Tips:
To guarantee your Cranberry Orange Scones have the perfect texture, make sure not to overmix the dough, as this can make the scones tough.
Using cold butter is vital, as it creates flaky layers when it melts in the oven. If you prefer fresh cranberries over dried ones, you can substitute them, but you may need to adjust the sugar to balance the tartness.
Finally, these scones can be drizzled with a simple glaze made from powdered sugar and orange juice for an extra touch of sweetness.
Eggnog French Toast Casserole
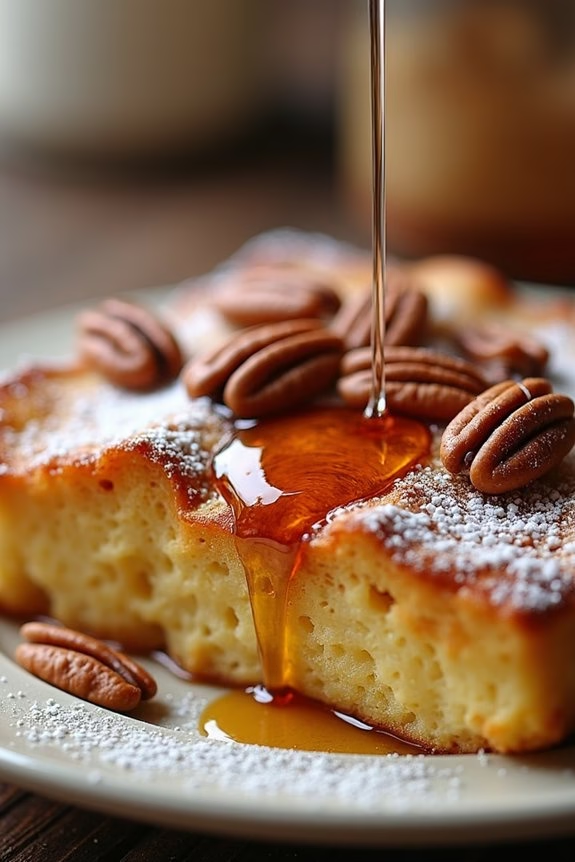
Eggnog French Toast Casserole is the perfect festive breakfast dish to serve on Christmas morning. This delightful casserole combines the warm, spiced flavors of eggnog with the comforting texture of French toast, creating a rich and satisfying meal that everyone will love.
Its make-ahead convenience allows for a stress-free morning, giving you more time to enjoy with family. Whether you’re hosting a brunch or simply want to treat your household to a special holiday breakfast, this dish is certain to become a new Christmas tradition.
This casserole is baked to golden perfection, where the top becomes slightly crisp while the inside remains custardy and flavorful. The use of eggnog in place of traditional milk adds a unique holiday twist, infusing the dish with notes of nutmeg and vanilla.
The preparation is simple, yet the result is impressive, making it an ideal choice for both novice and experienced cooks. Serve it with a dusting of powdered sugar, a drizzle of maple syrup, or a dollop of whipped cream for an indulgent breakfast treat.
Ingredients (Serves 4-6):
- 1 loaf of French bread (about 12 ounces), cut into 1-inch cubes
- 6 large eggs
- 2 cups eggnog
- 1 teaspoon vanilla extract
- 1 teaspoon ground cinnamon
- 1/2 teaspoon ground nutmeg
- 1/4 cup granulated sugar
- 1/4 teaspoon salt
- 1/2 cup chopped pecans (optional)
- 2 tablespoons unsalted butter, melted
- Powdered sugar, for serving
- Maple syrup, for serving
Instructions:
- Prepare the Bread: Begin by cutting the loaf of French bread into 1-inch cubes. Arrange the bread cubes evenly in a greased 9×13-inch baking dish. If you prefer a softer texture, use slightly stale bread to better absorb the custard.
- Make the Custard: In a large mixing bowl, whisk together the eggs, eggnog, vanilla extract, cinnamon, nutmeg, sugar, and salt until well combined. Confirm the mixture is smooth and the spices are evenly distributed.
- Assemble the Casserole: Pour the eggnog mixture evenly over the bread cubes, pressing down gently with a spatula to verify all the bread is soaked. Sprinkle chopped pecans over the top, if using, for added texture and flavor.
- Chill the Casserole: Cover the dish with aluminum foil or plastic wrap and refrigerate for at least 2 hours, or overnight, to allow the bread to fully absorb the custard.
- Preheat and Bake: Preheat your oven to 350°F (175°C). Remove the casserole from the refrigerator, uncover, and drizzle with the melted butter. Bake in the preheated oven for 45-50 minutes, or until the top is golden brown and the custard is set.
- Serve: Let the casserole cool slightly before serving. Dust with powdered sugar and serve warm with maple syrup on the side. Add a dollop of whipped cream for an extra festive touch.
Extra Tips:
For an even richer flavor, consider using a combination of eggnog and heavy cream in the custard. You can also add a splash of rum extract for an authentic eggnog taste.
If you need to make this dish ahead of time, the casserole can be fully assembled and refrigerated up to 24 hours in advance. Additionally, leftovers can be stored in an airtight container in the refrigerator for up to 3 days and reheated in the oven or microwave before serving.
Savory Christmas Quiche

A savory Christmas quiche is a delightful and versatile dish that can add a touch of elegance and flavor to your holiday breakfast table. This dish combines a flaky, buttery crust with a rich and creamy filling, packed with festive ingredients like spinach, roasted red peppers, and a blend of cheese. The quiche is perfect for serving a crowd and can be made ahead of time, allowing you to enjoy a stress-free morning with your loved ones.
The beauty of a savory Christmas quiche lies in its adaptability. You can adjust the filling to include your favorite vegetables, meats, or cheeses, making it a personalized dish that caters to your family’s taste preferences. Whether you choose to enjoy it warm from the oven or at room temperature, this quiche is sure to be a hit and become a cherished part of your Christmas morning tradition.
Ingredients (Serves 4-6):
- 1 refrigerated pie crust (or homemade if preferred)
- 6 large eggs
- 1 cup heavy cream
- 1 cup fresh spinach, chopped
- 1/2 cup roasted red peppers, chopped
- 1 cup shredded Gruyère cheese
- 1/4 cup grated Parmesan cheese
- 1/4 teaspoon salt
- 1/4 teaspoon black pepper
- 1/4 teaspoon nutmeg
- 1/2 teaspoon garlic powder
Instructions:
- Preheat the Oven: Preheat your oven to 375°F (190°C). This guarantees that the quiche bakes evenly.
- Prepare the Crust: Roll out the pie crust into a 9-inch pie dish. Trim any excess dough around the edges and gently press it into the dish. Prick the bottom with a fork to prevent bubbling. You may choose to blind bake the crust for 10 minutes to guarantee a crispy bottom.
- Prepare the Filling: In a large mixing bowl, whisk together the eggs, heavy cream, salt, pepper, nutmeg, and garlic powder until well combined.
- Add the Fillings: Stir in the chopped spinach, roasted red peppers, Gruyère cheese, and Parmesan cheese into the egg mixture. Mix until all ingredients are evenly distributed.
- Assemble the Quiche: Pour the filling into the prepared pie crust, spreading it out evenly with a spatula.
- Bake the Quiche: Place the quiche in the preheated oven and bake for 35-40 minutes, or until the filling is set and the top is golden brown. You can test doneness by inserting a knife into the center; it should come out clean.
- Cool and Serve: Allow the quiche to cool for at least 10 minutes before slicing. This resting time helps the quiche set further and makes slicing easier.
Extra Tips:
To add a touch of sweetness and additional flavor, consider including caramelized onions in the filling. If you prefer a meatier quiche, diced cooked bacon or ham can be wonderful additions.
For those who want a gluten-free option, you can make this quiche crustless by simply pouring the filling into a greased pie dish. Finally, if making ahead, store the quiche covered in the refrigerator and reheat in a low oven before serving to maintain its delicious texture.
Peppermint Mocha Waffles
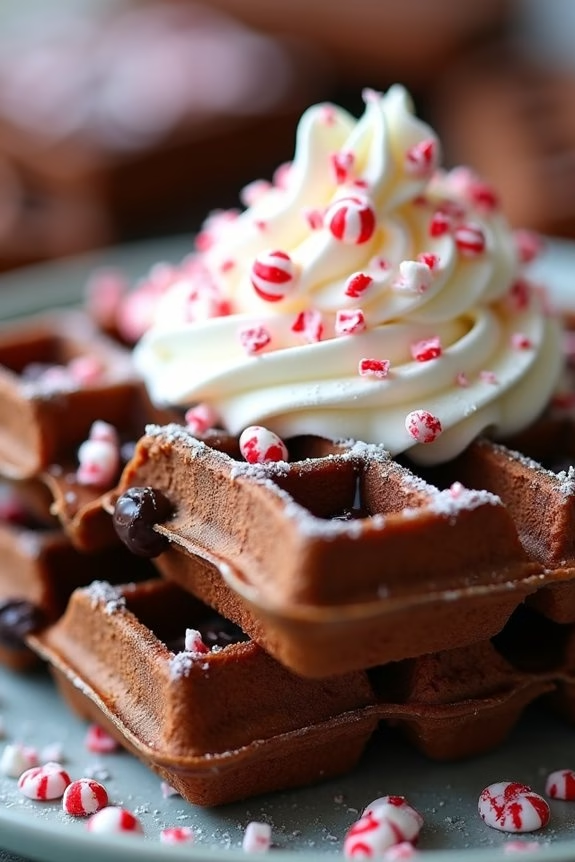
Indulge in the festive spirit of Christmas morning with these delightful Peppermint Mocha Waffles. These waffles are a perfect blend of rich chocolate, fresh peppermint, and robust coffee flavors, making them a unique and delicious treat. They’re certain to become a family favorite during the holiday season.
The aroma of freshly brewed coffee combined with cocoa and peppermint will fill your kitchen, creating an atmosphere of warmth and joy.
These Peppermint Mocha Waffles aren’t only scrumptious but also incredibly easy to make. They’re a great way to start the day, providing a comforting and energizing breakfast that everyone will love. The combination of flavors offers a sophisticated twist on the classic waffle, making them perfect for a special occasion like Christmas morning.
Serve them with a dollop of whipped cream and a sprinkle of crushed peppermint candies for an extra festive touch.
Ingredients for 4-6 people:
- 2 cups all-purpose flour
- 1/3 cup unsweetened cocoa powder
- 1 tablespoon baking powder
- 1/2 teaspoon salt
- 1/4 cup granulated sugar
- 3 large eggs
- 1 1/2 cups whole milk
- 1/3 cup strong brewed coffee, cooled
- 1/2 cup unsalted butter, melted
- 1 teaspoon vanilla extract
- 1 teaspoon peppermint extract
- 1/2 cup mini chocolate chips
- Crushed peppermint candies (optional, for garnish)
- Whipped cream (optional, for serving)
Instructions:
- Preheat Waffle Iron: Begin by preheating your waffle iron according to the manufacturer’s instructions. This guarantees the waffles will cook evenly and achieve a crispy exterior.
- Mix Dry Ingredients: In a large mixing bowl, whisk together the flour, cocoa powder, baking powder, salt, and granulated sugar until well combined. Mixing the dry ingredients first guarantees even distribution and prevents clumps in the batter.
- Prepare Wet Ingredients: In a separate bowl, beat the eggs until they’re frothy. Add the milk, brewed coffee, melted butter, vanilla extract, and peppermint extract. Stir until all the wet ingredients are well combined.
- Combine Wet and Dry Ingredients: Gradually add the wet ingredients to the dry ingredients, stirring gently until just combined. Be careful not to overmix, as this can make the waffles tough. The batter should be slightly lumpy.
- Fold in Chocolate Chips: Gently fold the mini chocolate chips into the batter. This will guarantee that each waffle has a delightful burst of chocolate in every bite.
- Cook the Waffles: Pour the batter onto the preheated waffle iron. The amount of batter will depend on the size of your waffle iron, but typically about 1/2 cup per waffle is sufficient. Close the lid and cook until the waffles are golden brown and crisp, about 4-5 minutes.
- Serve: Carefully remove the waffles from the waffle iron and serve immediately. Top with whipped cream and crushed peppermint candies if desired.
Extra Tips:
To make certain your Peppermint Mocha Waffles turn out perfect every time, make sure not to overfill the waffle iron, as this can cause batter overflow and uneven cooking.
For an extra minty kick, consider adding a few drops more of peppermint extract according to your taste preference. If you prefer a sweeter flavor, dust the finished waffles with powdered sugar before serving.
Additionally, these waffles can be made ahead of time and reheated in a toaster or oven, making them a convenient option for a busy Christmas morning. Enjoy your festive breakfast!
Festive Fruit Salad With Pomegranate and Mint

Looking to add a burst of color and flavor to your Christmas breakfast table? This Festive Fruit Salad With Pomegranate and Mint is the perfect solution. It’s not only visually stunning but also a revitalizing and nutritious addition to your holiday spread. The combination of sweet and juicy fruits, tart pomegranate seeds, and fragrant mint leaves creates a harmonious blend that’s sure to delight your family and guests.
Whether you’re serving it as a light starter or a vibrant accompaniment to a hearty breakfast, this salad is bound to become a holiday favorite.
The beauty of this fruit salad lies in its simplicity and versatility. You can easily customize it based on the fruits you have on hand or your personal preferences. The key is to use fresh, ripe fruits to guarantee maximum flavor and juiciness.
The addition of pomegranate seeds not only enhances the dish with their jewel-like appearance but also adds a delightful crunch and a burst of tartness. Fresh mint leaves take the salad to another level with their invigorating aroma and taste.
Let’s explore the ingredients and steps to create this delightful Festive Fruit Salad for 4-6 people.
Ingredients:
- 2 cups of fresh pineapple, cubed
- 2 cups of strawberries, hulled and quartered
- 1 cup of blueberries
- 1 cup of green grapes, halved
- 1 pomegranate, seeds only
- 1/4 cup of fresh mint leaves, roughly chopped
- Juice of 1 lime
- 2 tablespoons of honey
Instructions:
- Prepare the Fruits: Begin by washing all the fruits thoroughly under cold water. Pat them dry with a clean kitchen towel. This guarantees that any dirt or residue is removed and the fruits are clean and ready for consumption.
- Cube the Pineapple: Peel and core the pineapple, then cut it into bite-sized cubes. Place the cubes in a large mixing bowl. Pineapple provides a sweet and tangy flavor that’s the base of our salad.
- Hull and Quarter the Strawberries: Remove the stems from the strawberries, then cut them into quarters. Add them to the bowl with the pineapple. Strawberries add a vibrant red color and sweetness to the salad.
- Add Blueberries and Grapes: Toss in the blueberries and halved green grapes to the bowl. These fruits add a variety of textures and flavors, from the tartness of blueberries to the crispness of grapes.
- Extract Pomegranate Seeds: Carefully remove the seeds from the pomegranate and add them to the fruit mixture. The pomegranate seeds bring a burst of tartness and a festive touch to the salad.
- Chop and Add Mint Leaves: Roughly chop the fresh mint leaves and sprinkle them over the fruit salad. Mint leaves introduce a refreshing aroma and taste that complements the sweetness of the fruits.
- Make the Dressing: In a small bowl, whisk together the lime juice and honey until well combined. This dressing will enhance the natural sweetness of the fruits and add a subtle tang.
- Combine and Toss: Pour the lime and honey dressing over the fruit salad. Gently toss the salad to make sure the dressing evenly coats all the fruit pieces. Be careful not to mash the fruits while mixing.
- Chill and Serve: Cover the salad bowl with plastic wrap and refrigerate for at least 30 minutes to allow the flavors to meld together. Serve chilled for the best taste experience.
Extra Tips:
When preparing this Festive Fruit Salad, feel free to experiment with different fruit combinations based on what’s in season or your personal preference.
Consider adding slices of kiwi or segments of orange for more variety. To easily remove pomegranate seeds, cut the pomegranate in half and tap the back with a wooden spoon over a bowl.
For an added touch, you can top the salad with a handful of toasted nuts, such as almonds or walnuts, for extra crunch and flavor. Finally, for a vegan-friendly version, replace honey with maple syrup or agave nectar.
Enjoy your vibrant and delicious Christmas breakfast!
Holiday Cinnamon Rolls With Cream Cheese Frosting

Holiday Cinnamon Rolls With Cream Cheese Frosting are a delightful way to start your Christmas morning. These tender, fluffy rolls are swirled with a sweet cinnamon filling and topped with a rich, creamy frosting that adds the perfect touch of indulgence. The warm, spicy aroma of cinnamon fills the kitchen as these rolls bake, creating an inviting atmosphere that beckons family and friends to gather around the table.
Perfect for a festive breakfast or brunch, these cinnamon rolls aren’t only delicious but also relatively simple to prepare. The process involves making a soft yeast dough, rolling it out, and spreading a cinnamon-sugar mixture before baking to golden perfection.
Once out of the oven, the rolls are slathered with a decadent cream cheese frosting that melts into the warm dough, creating a gooey, irresistible treat. Your loved ones will surely appreciate the effort and love poured into making this delectable holiday breakfast.
Ingredients (Serves 4-6)
- 2 ¼ teaspoons active dry yeast
- 1 cup warm milk (110°F/45°C)
- ½ cup granulated sugar
- 1/3 cup unsalted butter, melted
- 1 teaspoon salt
- 2 eggs
- 4 cups all-purpose flour
- 1 cup brown sugar, packed
- 2 ½ tablespoons ground cinnamon
- 1/3 cup unsalted butter, softened
- 4 ounces cream cheese, softened
- 1/4 cup unsalted butter, softened
- 1 ½ cups powdered sugar
- ½ teaspoon vanilla extract
- Pinch of salt
Cooking Instructions
- Prepare the Dough: In a large mixing bowl, dissolve the yeast in warm milk. Let it sit for about 5 minutes until frothy. Add the granulated sugar, melted butter, salt, eggs, and flour. Mix until the dough comes together, then knead on a floured surface for about 5-7 minutes until smooth and elastic.
- Let the Dough Rise: Place the dough in a lightly greased bowl, cover it with a damp cloth, and let it rise in a warm place for about 1 hour or until it has doubled in size.
- Make the Filling: In a small bowl, combine the brown sugar and cinnamon. Roll the risen dough out into a rectangle (about 16×12 inches). Spread the softened butter over the dough, then sprinkle the cinnamon-sugar mixture evenly over the top.
- Form the Rolls: Starting at the long edge, tightly roll the dough into a log. Cut the log into 12 equal slices and place them into a greased baking dish.
- Second Rise: Cover the baking dish with a cloth and let the rolls rise for another 30 minutes until they look puffy.
- Bake the Rolls: Preheat the oven to 350°F (175°C). Bake the rolls for 25-30 minutes or until they’re golden brown.
- Prepare the Frosting: While the rolls are baking, make the frosting by beating together the cream cheese, butter, powdered sugar, vanilla extract, and a pinch of salt until creamy and smooth.
- Frost the Rolls: Once the rolls are out of the oven, allow them to cool for 5 minutes before spreading the cream cheese frosting over the top. Serve warm.
Extra Tips
For the best results, verify that all your ingredients are at room temperature before you start. This helps the dough rise better and the frosting mix more smoothly.
If you’re preparing the rolls in advance, you can refrigerate them overnight after the second rise. In the morning, let them come to room temperature for about 30 minutes before baking. This makes it easy to have freshly baked rolls on Christmas morning without all the early morning prep work.
Smoked Salmon and Cream Cheese Bagels

For a festive and sophisticated Christmas breakfast, Smoked Salmon and Cream Cheese Bagels make for a delightful and satisfying option. This dish combines the rich flavors of smoked salmon with the creamy texture of cream cheese, all nestled within a perfectly toasted bagel. The addition of fresh toppings like capers, red onions, and dill enhances the flavor profile, making it a gourmet experience that’s both easy to prepare and impressive to serve.
Whether you’re hosting a holiday brunch or having a peaceful morning with family, these bagels will surely add a touch of elegance to your Christmas morning.
Preparing Smoked Salmon and Cream Cheese Bagels is a breeze, requiring minimal cooking and allowing more time to enjoy with loved ones. The beauty of this dish lies in its versatility and simplicity, allowing you to customize toppings according to personal preferences. You can opt for plain bagels or elevate the taste with options like sesame or everything bagels.
Serve these delicious bagels as part of a larger breakfast spread or as a standalone treat to celebrate the season.
Ingredients (Serves 4-6):
- 6 bagels (plain, sesame, or everything)
- 8 oz cream cheese, softened
- 8 oz smoked salmon, thinly sliced
- 1 small red onion, thinly sliced
- 1/4 cup capers
- 1/4 cup fresh dill, chopped
- 1 lemon, cut into wedges
- Salt and pepper to taste
Cooking Instructions:
- Prepare the Bagels: Slice each bagel in half and toast them to your desired level of crispiness. You can use a toaster or oven to achieve the perfect golden-brown texture.
- Spread the Cream Cheese: Once the bagels are toasted, generously spread the softened cream cheese on each half. Confirm an even layer for a smooth, creamy base.
- Add the Salmon: Lay thin slices of smoked salmon on top of the cream cheese. Be sure to cover the entire surface to guarantee that each bite is filled with the delicious, smoky flavor.
- Top with Onions and Capers: Distribute the thinly sliced red onions evenly across the salmon layer. Then, sprinkle capers over the top to add a burst of tanginess.
- Garnish with Dill: Finish by sprinkling fresh dill over the top. This gives the dish a fresh, aromatic touch that complements the other ingredients.
- Season and Serve: Lightly season with salt and pepper. Serve the bagels with lemon wedges on the side for an extra zesty kick.
Extra Tips:
For the best results, allow the cream cheese to come to room temperature before spreading; this guarantees a smooth and easy application. If you prefer a more robust flavor, consider adding a thin layer of horseradish or mustard beneath the salmon.
For a healthier twist, use whole-grain or multigrain bagels. When serving, arrange the bagels attractively on a platter with lemon wedges and extra dill as garnish, creating a visually appealing presentation that guests will love.
Christmas Tree Shaped Pastry Bites

Celebrate the festive spirit with these delightful Christmas Tree Shaped Pastry Bites, perfect for adding a touch of whimsy to your holiday breakfast table. These bites aren’t only visually appealing but also deliciously savory, making them a hit with both kids and adults alike. The flaky pastry, combined with the rich flavors of pesto and cheese, creates a perfect harmony that will have everyone reaching for seconds.
Whether you’re hosting a holiday brunch or looking for a fun breakfast treat, these pastry bites are certain to impress. Crafting these Christmas Tree Shaped Pastry Bites involves minimal ingredients and effort, allowing you to focus on enjoying the festivities. The use of ready-made puff pastry sheets simplifies the process, while the addition of vibrant green pesto adds a festive touch.
You can also customize the filling with your favorite cheeses and meats for an extra special treat. With this easy-to-follow recipe, you’ll be able to create a memorable breakfast that captures the joy and warmth of the holiday season.
Ingredients (Serves 4-6)
- 1 sheet of ready-made puff pastry
- 1/2 cup of green pesto
- 1/2 cup of shredded mozzarella cheese
- 1/4 cup of grated Parmesan cheese
- 1 egg, beaten
- 1 tablespoon of sesame seeds (optional)
- Fresh basil leaves, for garnish
Instructions
- Preheat and Prepare: Preheat your oven to 400°F (200°C). Line a baking sheet with parchment paper to prevent sticking.
- Prepare the Puff Pastry: Roll out the puff pastry sheet on a lightly floured surface. Using a sharp knife or a pizza cutter, cut the pastry into long strips, about 1 inch wide.
- Add the Filling: Spread a thin layer of pesto over each strip of pastry. Sprinkle both the mozzarella and Parmesan cheeses evenly over the pesto-covered strips.
- Form the Trees: Starting at one end of each strip, fold back the pastry in a zig-zag fashion to form a tree shape. Place each shaped pastry onto the prepared baking sheet.
- Egg Wash and Decorate: Brush the tops of the pastry trees with the beaten egg to give them a shiny finish once baked. Sprinkle sesame seeds over the tops for added texture and flavor.
- Bake: Place the baking sheet in the preheated oven and bake for 12-15 minutes, or until the pastries are golden brown and puffed up.
- Garnish: Once baked, remove the pastries from the oven and let them cool slightly. Garnish with fresh basil leaves to enhance the festive appearance.
Extra Tips
When making these Christmas Tree Shaped Pastry Bites, make sure that your puff pastry is well-chilled before use, as this will help it to rise and puff up nicely.
If you prefer a different filling, consider using sun-dried tomato paste or a combination of ham and cheese. For a sweet version, omit the pesto and cheese, and instead, fill the pastry with a cinnamon sugar mixture.
Remember to work quickly with the puff pastry to prevent it from becoming too soft and difficult to handle. Enjoy your delightful pastries warm from the oven for the best flavor and texture.
Spiced Apple and Walnut Oatmeal
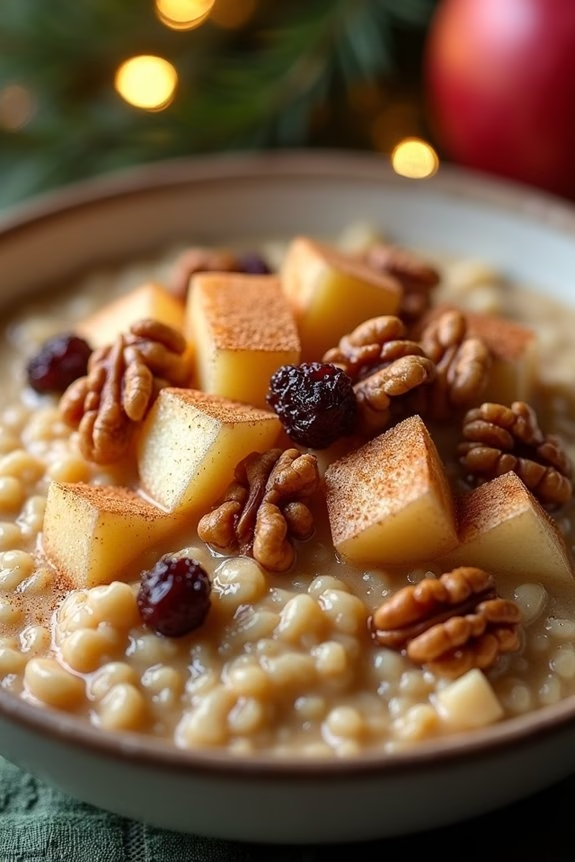
Spiced Apple and Walnut Oatmeal is a warm, comforting breakfast dish perfect for Christmas morning. This hearty oatmeal is infused with aromatic spices such as cinnamon and nutmeg, which bring out the natural sweetness of the apples. The addition of crunchy walnuts adds a delightful texture and a nutty flavor, which pairs beautifully with the creamy oats.
This dish not only satisfies your taste buds but also provides a nutritious start to your day, keeping you energized and full as you enjoy the holiday festivities. Perfect for serving a group of family and friends, this recipe caters to 4-6 people, making it an ideal choice for a cozy breakfast gathering.
The simplicity of the dish allows you to prepare it quickly, so you can spend more time enjoying the company of your loved ones. Whether you’re looking to impress your guests or simply want to indulge in a delicious and wholesome breakfast, Spiced Apple and Walnut Oatmeal is sure to become a holiday favorite.
Ingredients (Serves 4-6):
- 2 cups rolled oats
- 4 cups water or milk (or a combination of both)
- 2 large apples, peeled, cored, and diced
- 1 cup walnuts, chopped
- 1/4 cup brown sugar
- 1 teaspoon ground cinnamon
- 1/2 teaspoon ground nutmeg
- 1/4 teaspoon salt
- 1 teaspoon vanilla extract
- Optional: 1/4 cup raisins or dried cranberries
Instructions:
- Prepare the Oats: In a large saucepan, combine the rolled oats with water or milk. If you prefer a creamier consistency, use more milk. Bring the mixture to a simmer over medium heat.
- Add the Apples and Spices: Once the oats begin to simmer, add the diced apples, brown sugar, ground cinnamon, ground nutmeg, and salt. Stir well to incorporate all the ingredients.
- Cook the Oatmeal: Reduce the heat to low and continue to cook the oatmeal, stirring occasionally, for about 15-20 minutes, or until the oats are tender and the apples have softened.
- Incorporate the Walnuts and Flavorings: Stir in the chopped walnuts, vanilla extract, and any optional ingredients like raisins or dried cranberries. Cook for an additional 2-3 minutes to allow the flavors to meld together.
- Serve: Remove the oatmeal from the heat and let it sit for a minute before serving. Spoon the oatmeal into bowls and garnish with additional walnuts or a sprinkle of cinnamon if desired.
Extra Tips:
For an even richer flavor, consider toasting the walnuts in a dry skillet for a few minutes before adding them to the oatmeal. This will enhance their natural nuttiness and add an extra depth of flavor to the dish.
Additionally, if you want to make this dish vegan, simply use a plant-based milk such as almond or oat milk. To save time on Christmas morning, you can prepare the dry ingredients the night before, so all you need to do is combine them with the liquid and cook when you’re ready for breakfast.
Red Velvet Pancakes With Cream Cheese Glaze
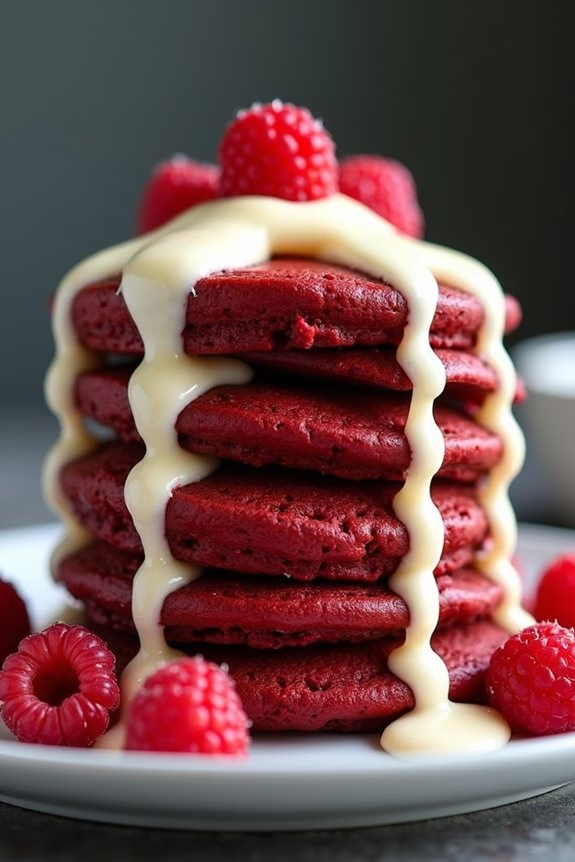
Red Velvet Pancakes With Cream Cheese Glaze are a delightful breakfast option that adds a festive touch to your Christmas morning. These pancakes are a colorful twist on the classic buttermilk pancakes, infused with a rich cocoa flavor and a hint of vanilla. The cream cheese glaze drizzled over the top adds a creamy, tangy sweetness that perfectly complements the pancakes’ velvety texture. This dish not only looks beautiful with its vibrant red hue but also tastes divine, making it a delightful treat for your family and friends.
Preparing Red Velvet Pancakes With Cream Cheese Glaze is easier than you might think, and it’s a perfect way to start your holiday celebrations. The pancakes are made with readily available ingredients, and the glaze can be prepared in advance to save time on Christmas morning.
Whether you’re serving a small family breakfast or entertaining a group of 4-6 people, this recipe is sure to impress and bring a smile to everyone’s face. Gather your ingredients and follow the simple steps below to create this delicious holiday breakfast.
Ingredients for 4-6 servings:
- 2 cups all-purpose flour
- 2 tablespoons unsweetened cocoa powder
- 2 tablespoons granulated sugar
- 1 tablespoon baking powder
- 1/2 teaspoon baking soda
- 1/2 teaspoon salt
- 2 large eggs
- 1 1/2 cups buttermilk
- 1/2 cup whole milk
- 1 teaspoon vanilla extract
- 2 tablespoons red food coloring
- 1/4 cup unsalted butter, melted
- 1 tablespoon white vinegar
- For the Cream Cheese Glaze:
- 4 ounces cream cheese, softened
- 1/2 cup powdered sugar
- 1 teaspoon vanilla extract
- 2-3 tablespoons milk
Cooking Instructions:
- Prepare the Dry Ingredients: In a large bowl, whisk together the flour, cocoa powder, granulated sugar, baking powder, baking soda, and salt until well combined. This guarantees even distribution of the leavening agents and cocoa.
- Mix Wet Ingredients: In another bowl, beat the eggs and then add the buttermilk, whole milk, vanilla extract, red food coloring, melted butter, and vinegar. Mix until the ingredients are thoroughly combined and you have a uniform red mixture.
- Combine Dry and Wet Ingredients: Gradually pour the wet ingredients into the dry ingredients, stirring gently with a spatula until just combined. Be careful not to overmix, as this can make the pancakes tough. The batter should be slightly lumpy.
- Cook the Pancakes: Heat a non-stick skillet or griddle over medium heat. Lightly grease with butter or cooking spray. Pour 1/4 cup of batter onto the skillet for each pancake. Cook until bubbles form on the surface and the edges look set, about 2-3 minutes. Flip and cook the other side for another 1-2 minutes until cooked through. Repeat with the remaining batter.
- Prepare the Cream Cheese Glaze: In a medium bowl, beat the softened cream cheese until smooth. Gradually add the powdered sugar and vanilla extract, mixing until combined. Slowly add milk, one tablespoon at a time, until the glaze reaches your desired consistency.
- Serve: Stack the pancakes on a plate and generously drizzle the cream cheese glaze over the top. Serve immediately for the best texture and flavor.
Extra Tips:
For the best results, verify all your ingredients are at room temperature before starting, especially the cream cheese, which will mix more smoothly with the other glaze ingredients.
If you don’t have buttermilk, you can make a substitute by adding 1 tablespoon of lemon juice or vinegar to 1 cup of milk and letting it sit for 5 minutes before using.
Adjust the amount of red food coloring to achieve your desired shade of red. For a festive touch, consider garnishing with fresh berries or a sprinkle of powdered sugar.
Sausage and Cheese Breakfast Strata

Start your Christmas morning with a hearty and flavorful Sausage and Cheese Breakfast Strata. This dish is a delightful combination of savory sausage, creamy cheese, and fluffy bread, all soaked overnight in a rich egg mixture. Perfect for serving a family or a small gathering, this strata isn’t only delicious but also convenient.
Preparing it the night before allows the flavors to meld together beautifully, and all you’ll have to do on Christmas morning is pop it into the oven and enjoy the delightful aromas wafting through your home.
This breakfast strata is versatile, allowing you to customize it with your favorite ingredients. Whether you stick with the classic sausage and cheese or add your own twist with vegetables or different types of cheese, this dish is sure to be a holiday favorite. Its ease of preparation and delicious taste make it a perfect addition to your Christmas breakfast menu, guaranteeing everyone starts the day with a satisfying meal.
Ingredients for 4-6 servings:
- 1 pound breakfast sausage
- 6 large eggs
- 2 cups whole milk
- 1 teaspoon Dijon mustard
- 1 teaspoon salt
- 1/2 teaspoon black pepper
- 1/2 teaspoon garlic powder
- 4 cups cubed day-old bread
- 1 cup shredded cheddar cheese
- 1/2 cup grated Parmesan cheese
- 2 tablespoons unsalted butter, melted
- 1/4 cup chopped fresh parsley (optional)
Cooking Instructions:
- Prepare the Sausage: In a large skillet over medium heat, cook the breakfast sausage until browned and cooked through, breaking it into smaller pieces with a spatula. Once cooked, drain any excess fat and set the sausage aside to cool slightly.
- Mix the Egg Mixture: In a large mixing bowl, whisk together the eggs, whole milk, Dijon mustard, salt, black pepper, and garlic powder until well combined. This mixture will form the custard that binds the strata together.
- Layer the Ingredients: Grease a 9×13-inch baking dish with some of the melted butter. Spread the cubed bread evenly in the dish. Top with the cooked sausage, shredded cheddar cheese, and grated Parmesan cheese, guaranteeing even distribution throughout the dish.
- Combine and Refrigerate: Pour the egg mixture over the layered ingredients, pressing down gently with the back of a spoon to guarantee all the bread cubes are soaked with the egg mixture. Cover the dish with plastic wrap and refrigerate for at least 4 hours, or ideally overnight, to allow the flavors to meld and the bread to absorb the custard.
- Bake the Strata: Preheat your oven to 350°F (175°C). Remove the strata from the refrigerator and let it sit at room temperature for about 15 minutes. Drizzle the remaining melted butter over the top and cover the dish with aluminum foil. Bake in the preheated oven for 30 minutes, then remove the foil and bake for an additional 20-25 minutes, or until the strata is puffed, golden brown, and cooked through.
- Garnish and Serve: Once baked, remove the strata from the oven and let it cool for about 5 minutes before garnishing with chopped fresh parsley if desired. Slice and serve warm.
Extra Tips:
For the best results, use day-old bread as it will better absorb the egg mixture without becoming too soggy. Feel free to experiment with different types of bread, such as sourdough or whole grain, to add a unique flavor to your strata.
If you’d like to add vegetables, consider sautéing bell peppers, onions, or spinach with the sausage for an extra boost of nutrition. Finally, verify the strata is fully cooked by inserting a knife in the center; it should come out clean when done. Enjoy your festive breakfast!
Chocolate Hazelnut Crepes

Christmas morning calls for a special breakfast, and what could be more indulgent than Chocolate Hazelnut Crepes? These thin, delicate pancakes are filled with a luscious chocolate hazelnut spread, offering a perfect balance of sweetness and nuttiness. Ideal for a festive breakfast, these crepes are sure to delight family and friends, providing a luxurious start to your holiday celebrations.
The beauty of Chocolate Hazelnut Crepes lies in their simplicity and versatility. The crepe itself is a basic batter that transforms into a soft, pliable canvas for the rich filling. Whether you’re serving them as a main breakfast dish or as a part of a larger Christmas brunch, these crepes are bound to become a holiday favorite. With a serving size of 4-6 people, this recipe guarantees everyone at your table gets to enjoy this delightful dish.
Ingredients for Chocolate Hazelnut Crepes:
- 1 cup all-purpose flour
- 2 tablespoons granulated sugar
- 2 large eggs
- 1 cup milk
- 1/2 cup water
- 2 tablespoons melted butter (plus extra for cooking)
- 1 teaspoon vanilla extract
- 1/2 teaspoon salt
- 1 cup chocolate hazelnut spread (such as Nutella)
- Optional toppings: chopped hazelnuts, powdered sugar, fresh berries, whipped cream
Cooking Instructions:
- Prepare the Crepe Batter: In a large mixing bowl, whisk together the flour, sugar, and salt. In a separate bowl, beat the eggs and then gradually add the milk, water, melted butter, and vanilla extract. Slowly pour the wet ingredients into the dry ingredients, whisking continuously to prevent lumps. Mix until you achieve a smooth batter. Let the batter rest for at least 30 minutes, which allows the gluten to relax and results in more tender crepes.
- Cook the Crepes: Heat a non-stick skillet or crepe pan over medium heat and lightly grease it with a small amount of butter. Pour approximately 1/4 cup of batter into the pan, tilting the pan in a circular motion to evenly spread the batter. Cook for about 1-2 minutes or until the edges start to lift and the bottom is golden brown. Flip with a spatula and cook the other side for about 30 seconds. Transfer the cooked crepe to a plate and repeat with the remaining batter, adding more butter to the pan as needed.
- Fill the Crepes: Once all crepes are cooked, take one crepe at a time and spread about 2 tablespoons of chocolate hazelnut spread over one side of the crepe. Fold the crepe in half, then in half again to form a triangle. Repeat with the remaining crepes.
- Serve and Garnish: Arrange the filled crepes on a serving platter. For added flavor and presentation, sprinkle with chopped hazelnuts, a dusting of powdered sugar, and a handful of fresh berries. If desired, add a dollop of whipped cream on the side.
Extra Tips:
To guarantee your crepes are perfectly thin and even, consider using a crepe spreader or simply practice the wrist motion to spread the batter evenly across the pan. If the batter thickens as it sits, thin it out with a tablespoon of milk at a time.
Brie and Cranberry Croissant Sandwiches
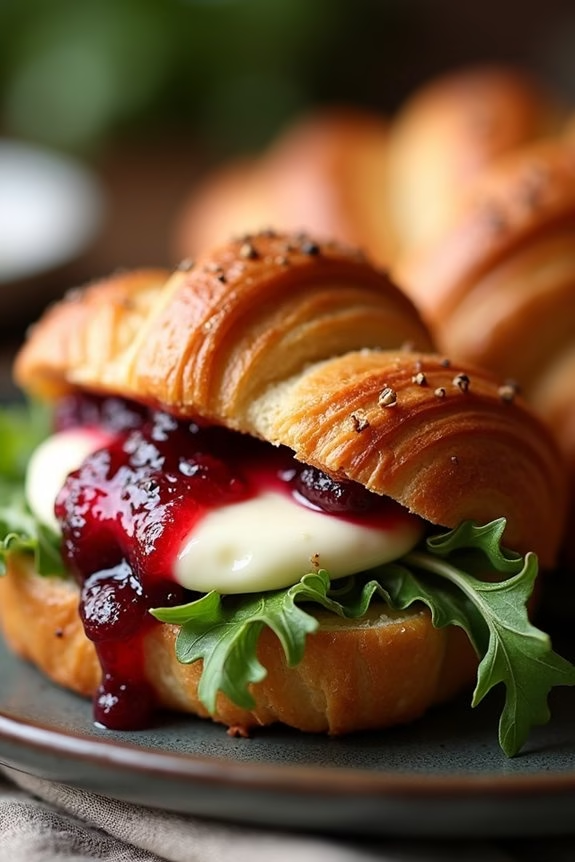
Brie and Cranberry Croissant Sandwiches are a delightful and festive option for your Christmas breakfast. These sandwiches combine the creamy richness of Brie cheese with the tangy sweetness of cranberry sauce, all nestled inside a buttery, flaky croissant. This flavor combination is sure to bring a sense of holiday joy to your breakfast table.
Perfect for a leisurely morning with family, these sandwiches are both indulgent and easy to make, allowing you to spend more time enjoying the festivities. The contrast between the earthy cheese and the vibrant cranberry sauce is enhanced by the light and airy texture of the croissant, creating a harmonious balance of flavors and textures.
This dish isn’t only visually appealing but also incredibly satisfying, making it a hit with both adults and kids alike. Whether you’re hosting a small family gathering or a larger festive breakfast, Brie and Cranberry Croissant Sandwiches are sure to impress and delight your guests.
Ingredients (Serves 4-6):
- 6 large croissants
- 8 oz Brie cheese
- 1 cup cranberry sauce (store-bought or homemade)
- 2 tablespoons unsalted butter
- Fresh arugula (optional)
- Salt and pepper to taste
Cooking Instructions:
- Preheat and Prepare: Preheat your oven to 350°F (175°C). Line a baking sheet with parchment paper for easy clean-up.
- Slice the Croissants: Carefully slice each croissant in half horizontally using a serrated knife to avoid crushing the flaky pastry.
- Prepare the Brie: Slice the Brie cheese into thin, even pieces. If the Brie is too soft, you can place it in the freezer for about 10 minutes to make slicing easier.
- Assemble the Sandwiches: Spread a generous layer of cranberry sauce on the bottom half of each croissant. Layer slices of Brie over the cranberry sauce. Optional: Add a handful of fresh arugula on top for an added peppery flavor.
- Close and Butter: Place the top half of each croissant over the fillings. Melt the butter and brush it lightly over the tops of the croissants to enhance their golden color and flavor.
- Bake the Sandwiches: Place the assembled croissant sandwiches on the prepared baking sheet. Bake in the preheated oven for about 10-12 minutes, or until the Brie has melted and the croissants are warm and lightly toasted.
- Serve: Remove from the oven and allow to cool slightly before serving. Season with a pinch of salt and pepper to taste.
Extra Tips:
To guarantee your Brie and Cranberry Croissant Sandwiches are at their best, use fresh, quality ingredients. A good-quality croissant will make a significant difference in taste and texture.
If you prefer a homemade touch, consider making your own cranberry sauce to customize the sweetness and tartness to your liking. Ultimately, these sandwiches are quite versatile; you can experiment by adding sliced turkey or ham for an additional layer of flavor, making them heartier and more filling for those with bigger appetites.