

When it comes to hosting a Christmas potluck, there’s nothing quite like impressing your guests with dishes that look straight out of a magazine. I love crafting recipes that are both visually stunning and absolutely delicious. Think of serving up delicate Cranberry Brie Bites or a rich Lobster Bisque. These recipes will have your friends in awe of your culinary skills. Ready to make your holiday gathering a feast for the eyes and the taste buds?
Cranberry Brie Bites

Cranberry Brie Bites are a delightful appetizer that’s perfect for any holiday gathering, especially a Christmas potluck. These bite-sized treats combine the creamy richness of Brie cheese with the tartness of cranberry sauce, all encased in a warm, buttery puff pastry shell. They’re easy to prepare, visually appealing, and guaranteed to be a hit with guests of all ages.
Whether you’re hosting or attending a festive get-together, these Cranberry Brie Bites are an elegant and tasty addition to the menu.
The beauty of this dish lies in its simplicity and the balance of flavors. The puff pastry provides a flaky, buttery base that pairs beautifully with the creamy, mild flavor of Brie cheese. The cranberry sauce adds a touch of sweetness and tartness, making each bite a harmonious blend of textures and tastes.
Plus, the recipe is versatile enough to allow for some creative variations, such as adding nuts or herbs for extra flavor. This recipe serves 4-6 people, making it perfect for a small gathering or as part of a larger spread.
Ingredients:
- 1 sheet of puff pastry, thawed
- 1/2 cup cranberry sauce (homemade or store-bought)
- 8 ounces Brie cheese
- 1 egg, beaten
- Optional: chopped walnuts or pecans
- Optional: fresh rosemary or thyme sprigs for garnish
Instructions:
- Prepare the Puff Pastry: Preheat your oven to 375°F (190°C). Lightly flour your work surface and roll out the thawed puff pastry sheet. Cut the pastry into 2-inch squares, which should yield about 24 squares.
- Assemble the Bites: Place a pastry square in each cup of a mini muffin tin, pressing gently to form a small cup. Cut the Brie into small pieces, roughly 3/4 inch in size, and place one piece in each pastry cup.
- Add the Cranberry Sauce: Spoon approximately 1 teaspoon of cranberry sauce over the top of the Brie in each cup. If desired, sprinkle a few chopped nuts on top for added texture and flavor.
- Bake the Bites: Brush the edges of the pastry with the beaten egg to give them a golden finish. Bake in the preheated oven for 15-20 minutes, or until the pastry is puffed and golden brown.
- Garnish and Serve: Once baked, remove the bites from the oven and let them cool slightly. Garnish with fresh rosemary or thyme sprigs, if desired, for a festive touch. Serve warm for the best flavor and texture.
Extra Tips:
When working with puff pastry, make sure it’s properly thawed but still cold before you begin. This guarantees the pastry puffs up beautifully in the oven.
If you’re making these bites ahead of time, you can assemble them and keep them in the fridge until you’re ready to bake. They can also be frozen after baking and reheated in the oven at 350°F (175°C) for about 10 minutes.
If you prefer a sweeter touch, consider using a cranberry-orange sauce or adding a little honey drizzle on top before serving.
Prosciutto-Wrapped Asparagus
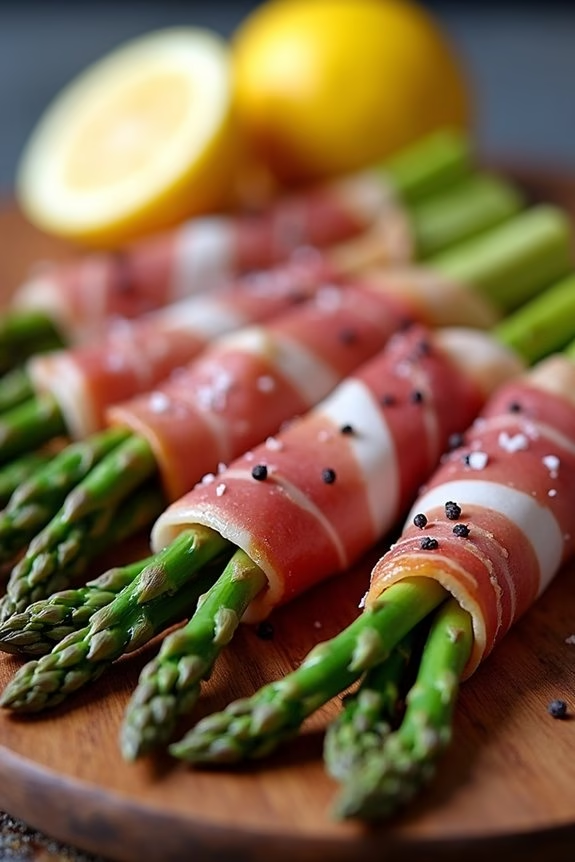
Prosciutto-wrapped asparagus is a delightful and elegant appetizer, perfect for a Christmas potluck or any festive gathering. The salty, savory flavor of the prosciutto beautifully complements the fresh, crisp asparagus, creating a harmonious blend that will impress your guests. This dish isn’t only easy to prepare but also presents beautifully on a platter, adding a touch of sophistication to your holiday spread.
The key to making the perfect prosciutto-wrapped asparagus lies in selecting fresh, tender asparagus spears and high-quality prosciutto. When baked, the prosciutto becomes slightly crispy, while the asparagus remains tender yet firm, offering a satisfying contrast in textures. This simple yet delicious recipe can be prepared in advance, allowing you to enjoy the festivities without spending too much time in the kitchen.
Ingredients (Serves 4-6):
- 1 pound fresh asparagus spears (about 24 spears)
- 12 slices of prosciutto
- 2 tablespoons olive oil
- 1 teaspoon freshly ground black pepper
- 1/2 teaspoon sea salt
- 1 lemon, cut into wedges (for serving)
Instructions:
- Preheat and Prepare: Preheat your oven to 400°F (200°C). Trim the woody ends from the asparagus spears by snapping or cutting about 1 to 2 inches off the bottom.
- Wrap the Asparagus: Lay a slice of prosciutto on a flat surface. Place an asparagus spear at one end of the prosciutto, then roll the prosciutto around the asparagus, leaving the tips exposed. Repeat this process for all the asparagus spears.
- Season and Arrange: Place the wrapped asparagus spears on a baking sheet lined with parchment paper. Drizzle the olive oil over them and sprinkle with freshly ground black pepper and sea salt for added flavor.
- Bake: Bake in the preheated oven for 12-15 minutes, or until the prosciutto is crispy and the asparagus is tender. Be cautious not to overcook as you want the asparagus to maintain a slight crunch.
- Serve: Once cooked, remove the asparagus from the oven and transfer them to a serving platter. Serve warm with lemon wedges on the side for guests to squeeze over the asparagus for an added burst of freshness.
Extra Tips:
For the best results, choose asparagus spears that are uniform in size to guarantee even cooking. If the prosciutto slices are large, consider cutting them in half lengthwise to avoid overpowering the asparagus.
Additionally, you can add a sprinkle of grated Parmesan cheese before baking for an extra layer of flavor. This dish can be prepared a few hours in advance and stored in the fridge; simply pop it in the oven before serving.
Enjoy this festive appetizer with a glass of your favorite white wine for a truly memorable holiday experience.
Truffled Mashed Potatoes
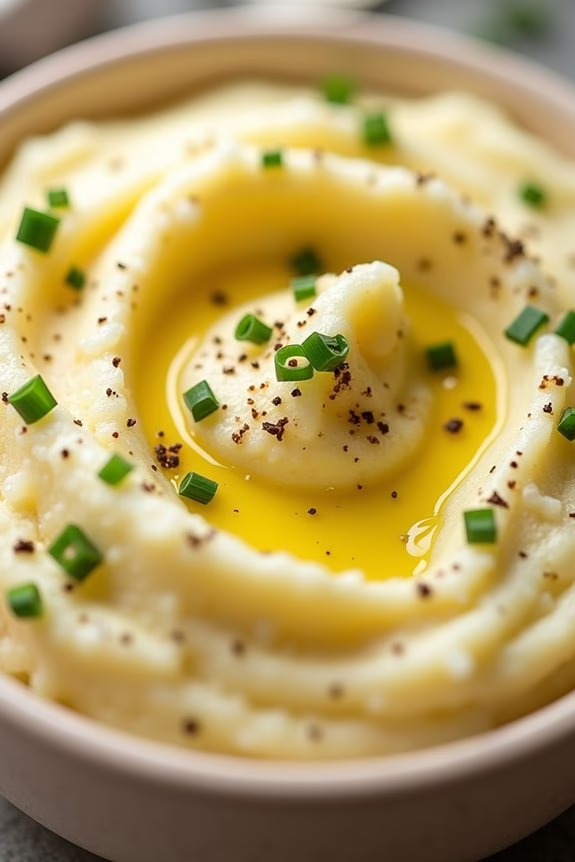
Indulge your taste buds this holiday season with a luxurious twist on a classic favorite: Truffled Mashed Potatoes. This creamy, velvety dish is infused with the rich aroma and flavor of truffles, elevating your Christmas potluck to a gourmet experience. Perfect as a side dish, these mashed potatoes pair beautifully with a variety of main courses, adding a touch of elegance and sophistication to your festive table.
Truffled Mashed Potatoes aren’t only delicious but also simple to prepare, making them an ideal choice for a busy holiday schedule. The subtle earthiness of the truffle oil complements the buttery richness of the potatoes, creating a harmonious and indulgent flavor profile. Whether you’re a seasoned chef or a novice cook, this recipe is sure to impress your guests and become a beloved addition to your holiday repertoire.
Ingredients for 4-6 servings:
- 3 pounds of Yukon Gold potatoes, peeled and cubed
- 1 cup heavy cream
- 1/2 cup unsalted butter
- 2 tablespoons truffle oil
- Salt to taste
- Freshly ground black pepper to taste
- Chopped fresh chives for garnish (optional)
Cooking Instructions:
- Prepare the Potatoes: Start by peeling and cubing the Yukon Gold potatoes into uniform pieces to guarantee even cooking. Place the cubed potatoes into a large pot and cover them with cold water.
- Cook the Potatoes: Bring the pot of potatoes to a boil over medium-high heat. Once boiling, reduce the heat to a simmer and cook the potatoes until they’re fork-tender, about 15-20 minutes. Drain the potatoes thoroughly.
- Heat the Cream and Butter: While the potatoes are cooking, combine the heavy cream and unsalted butter in a small saucepan. Heat over low heat until the butter is melted and the mixture is warm. Don’t allow it to boil.
- Mash the Potatoes: Return the drained potatoes to the pot or a large mixing bowl. Using a potato masher or a ricer, mash the potatoes until they reach your desired consistency. For a smoother texture, consider using a hand mixer on low speed.
- Incorporate the Truffle Flavor: Gradually add the warm cream and butter mixture to the mashed potatoes, stirring continuously to combine. Drizzle in the truffle oil and continue to mix until everything is well incorporated. Season the mashed potatoes with salt and freshly ground black pepper to taste.
- Serve: Transfer the truffled mashed potatoes to a serving dish. If desired, garnish with chopped fresh chives for a pop of color and added flavor. Serve immediately while warm.
Extra Tips:
For the best results, use Yukon Gold potatoes as they provide a naturally buttery flavor and creamy texture, ideal for mashing.
Be cautious with the truffle oil; a little goes a long way in imparting its distinct aroma and flavor. Adjust the amount according to your preference, but start with the recommended quantity to avoid overpowering the dish.
If you have access to fresh truffles, consider shaving a small amount over the top just before serving for an extra touch of luxury.
Finally, make sure not to overmix the potatoes, as this can result in a gluey texture. Enjoy your festive feast!
Honey Garlic Glazed Carrots
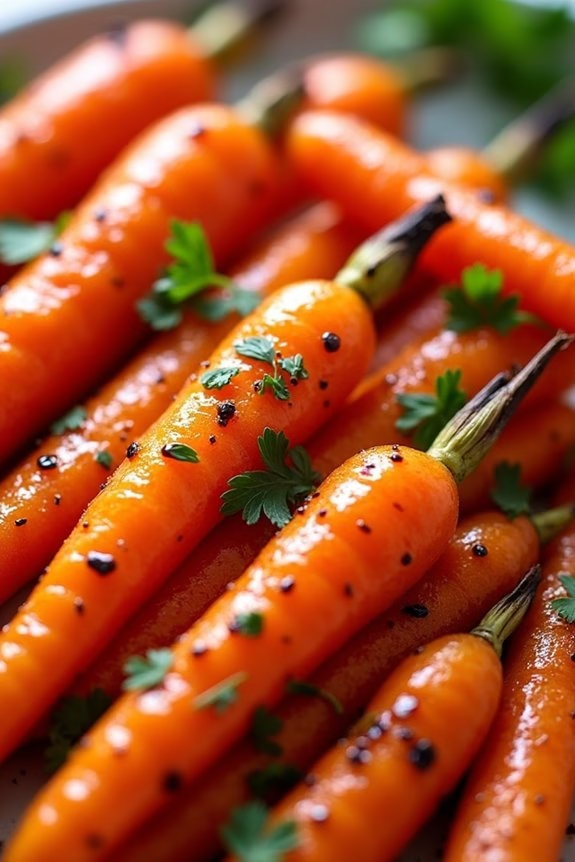
Honey Garlic Glazed Carrots are a delightful addition to any Christmas potluck. This dish is a perfect combination of sweet and savory, providing a beautiful burst of flavor with every bite. The natural sweetness of the carrots is enhanced by a sticky honey garlic glaze, making them a popular choice among both children and adults.
Not only are they easy to prepare, but they also add a vibrant splash of color to your holiday table, making them a festive and delicious treat. This recipe is designed to serve 4-6 people, making it ideal for gatherings. The carrots are roasted to perfection, allowing them to caramelize slightly and soak up the fragrant garlic and honey mixture.
Whether you’re hosting or attending a potluck, these Honey Garlic Glazed Carrots are sure to be a hit, offering a perfect balance of flavors that complement any main dish.
Ingredients:
- 1 ½ pounds of carrots, peeled and cut into sticks
- 3 tablespoons of honey
- 2 tablespoons of olive oil
- 3 cloves of garlic, minced
- Salt and pepper to taste
- 1 tablespoon of fresh parsley, chopped (optional, for garnish)
Instructions:
- Preheat the Oven: Preheat your oven to 400°F (200°C) to guarantee it’s hot and ready for roasting the carrots.
- Prepare the Carrots: Peel the carrots and cut them into uniform sticks, approximately 3 inches long. Uniformity in size helps them cook evenly.
- Make the Glaze: In a small bowl, combine the honey, olive oil, and minced garlic. Stir well to create a consistent glaze.
- Season the Carrots: Place the carrot sticks on a large baking sheet. Drizzle the honey garlic glaze over them, guaranteeing they’re well coated. Sprinkle salt and pepper to taste.
- Roast the Carrots: Spread the carrots in a single layer on the baking sheet to guarantee even cooking. Place them in the preheated oven and roast for 25-30 minutes, or until they’re tender and slightly caramelized, stirring halfway through.
- Garnish and Serve: Once roasted to perfection, remove the carrots from the oven. For added freshness and color, sprinkle chopped fresh parsley over the top before serving.
Extra Tips: For a more intense flavor, you can marinate the carrots in the honey garlic mixture for a few hours before roasting. If you want a bit of heat, consider adding a pinch of red pepper flakes to the glaze.
For those who prefer a vegan option, substitute honey with maple syrup for a different yet equally delicious sweetness. Ultimately, remember to check the carrots occasionally while roasting to prevent overcooking and guarantee they remain tender-crisp.
Fig and Goat Cheese Tartlets
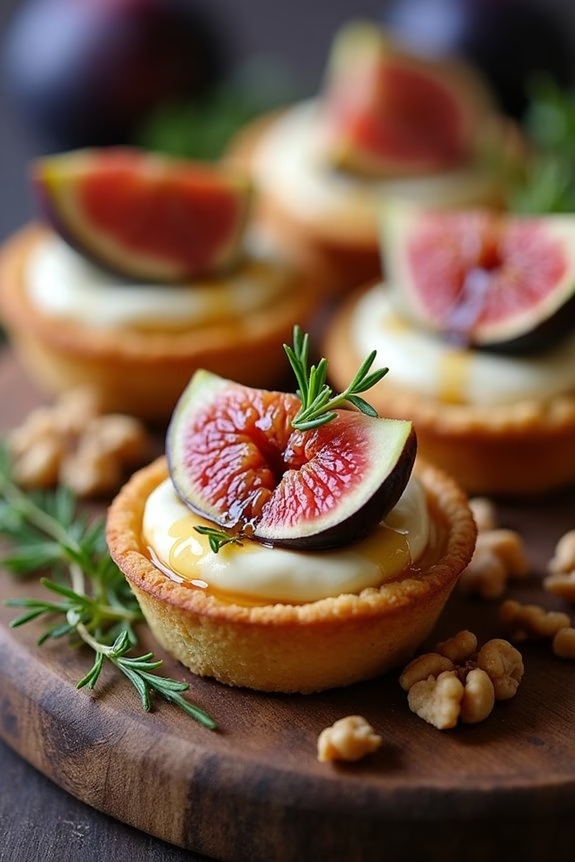
When it comes to festive gatherings, these Fig and Goat Cheese Tartlets are a perfect blend of sophistication and flavor. They’re ideal for a Christmas potluck, offering a delightful mix of creamy goat cheese and the sweet, rich flavor of figs, all encased in a buttery tart shell.
These bite-sized treats aren’t only beautiful to look at but also bursting with complex flavors that are sure to impress your guests. The tartlets can be served as an appetizer or a dessert, making them a versatile addition to your holiday menu.
The tartlets are easy to prepare and require minimal ingredients, yet they deliver a gourmet touch to any spread. The creamy goat cheese provides a tangy counterpoint to the sweetness of the figs, while a hint of honey ties everything together with a touch of natural sweetness.
You can make the tart shells from scratch or use pre-made pastry to save time. Either way, these Fig and Goat Cheese Tartlets are sure to become a new holiday favorite.
Ingredients for 4-6 servings:
- 1 package of pre-made mini tart shells (or homemade if preferred)
- 8 oz. goat cheese, softened
- 1/2 cup heavy cream
- 1/4 cup honey, plus extra for drizzling
- 1/2 teaspoon vanilla extract
- 8 fresh figs, quartered
- 1/4 cup chopped walnuts (optional)
- Fresh thyme leaves for garnish (optional)
- Salt and pepper to taste
Cooking Instructions:
- Prepare the Tart Shells: If using pre-made mini tart shells, preheat the oven according to package instructions and bake the shells for a few minutes until they’re lightly golden. If making from scratch, prepare your pastry dough and line the tartlet pans, baking until lightly golden.
- Make the Goat Cheese Filling: In a medium bowl, combine the softened goat cheese, heavy cream, honey, and vanilla extract. Whisk until the mixture is smooth and creamy. Season with a pinch of salt and pepper to enhance the flavor profile.
- Assemble the Tartlets: Once the tart shells are ready and cooled, fill each one with a generous spoonful of the goat cheese mixture. Smooth the tops with the back of a spoon or a spatula.
- Add the Figs: Top each tartlet with a quarter of a fresh fig, gently pressing them into the cheese filling.
- Optional Garnish: Sprinkle chopped walnuts over the tartlets for added crunch. Drizzle with a little extra honey, and garnish with fresh thyme leaves for a festive touch.
- Final Touches: Place the tartlets on a serving platter and drizzle a bit more honey over the top for added sweetness. Serve immediately, or refrigerate for up to an hour before serving.
Extra Tips:
For a deeper flavor, consider roasting the figs for a few minutes before placing them on the tartlets. This will enhance their natural sweetness and add a caramelized touch to the dish.
If you want to add an extra layer of flavor, you can also sprinkle a little freshly cracked black pepper over the top before serving. Make sure the goat cheese is at room temperature before mixing, as this will make it easier to achieve a smooth, creamy filling.
Enjoy these tartlets warm or at room temperature for the best flavor experience.
Herb-Crusted Beef Tenderloin
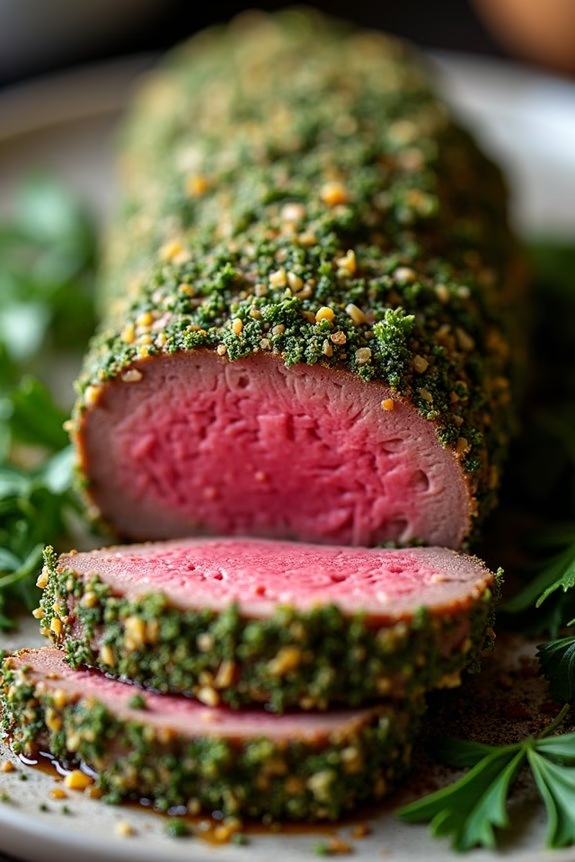
Herb-Crusted Beef Tenderloin is a luxurious dish that can elevate any Christmas potluck, making it a crowd favorite. This elegant and savory centerpiece features a juicy, melt-in-your-mouth beef tenderloin that’s perfectly seasoned and encrusted with a fragrant blend of herbs. The crust not only adds texture and flavor but also creates a stunning presentation perfect for festive gatherings.
Whether you’re hosting or contributing to a holiday feast, this dish is sure to impress with its simplicity and exquisite taste.
The tenderloin is known for its tenderness and subtle flavor, which pairs wonderfully with aromatic herbs like rosemary, thyme, and parsley. A gentle sear followed by oven roasting guarantees it remains succulent and perfectly cooked. This recipe serves 4-6 people and is designed to be both straightforward and rewarding, allowing you to enjoy the holiday celebrations without spending all your time in the kitchen.
Ingredients (Serves 4-6):
- 1 (2-3 pound) beef tenderloin, trimmed
- 2 tablespoons olive oil
- 2 teaspoons salt
- 1 teaspoon freshly ground black pepper
- 2 tablespoons Dijon mustard
- 3 cloves garlic, minced
- 2 tablespoons fresh rosemary, chopped
- 2 tablespoons fresh thyme, chopped
- 2 tablespoons fresh parsley, chopped
Cooking Instructions:
- Prepare the Beef:
- Preheat your oven to 425°F (220°C).
- Pat the beef tenderloin dry with paper towels to remove excess moisture. This will help the crust adhere better and facilitate a good sear.
- Season the Beef:
- Rub the entire tenderloin with olive oil, salt, and freshly ground black pepper. Make sure it’s evenly coated for maximum flavor.
- Create the Herb Crust:
- In a small bowl, mix together the Dijon mustard, minced garlic, rosemary, thyme, and parsley to form a paste.
- Spread the herb mixture evenly over the entire surface of the beef tenderloin, pressing gently to adhere the herbs.
- Sear the Tenderloin:
- Heat a large oven-safe skillet over medium-high heat. Once hot, add the tenderloin and sear it on all sides until browned, about 3-4 minutes per side.
- Roast the Tenderloin:
- Transfer the skillet with the tenderloin to the preheated oven. Roast for 20-25 minutes, or until the internal temperature reaches 135°F (57°C) for medium-rare. Adjust the time if you prefer different doneness.
- Rest and Slice:
- Remove the tenderloin from the oven and let it rest for at least 10 minutes before slicing. This allows the juices to redistribute, resulting in a moister final product.
Extra Tips:
For the best results, make sure to use a meat thermometer to check the internal temperature of the tenderloin. This guarantees that it reaches your desired level of doneness without overcooking.
If possible, use fresh herbs instead of dried ones, as they provide a more vibrant flavor and better texture for the crust. Additionally, be sure to let the beef come to room temperature before cooking to ensure even cooking throughout.
Enjoy this delectable dish alongside some roasted vegetables or a creamy potato gratin for a complete festive meal.
Pomegranate and Pear Salad
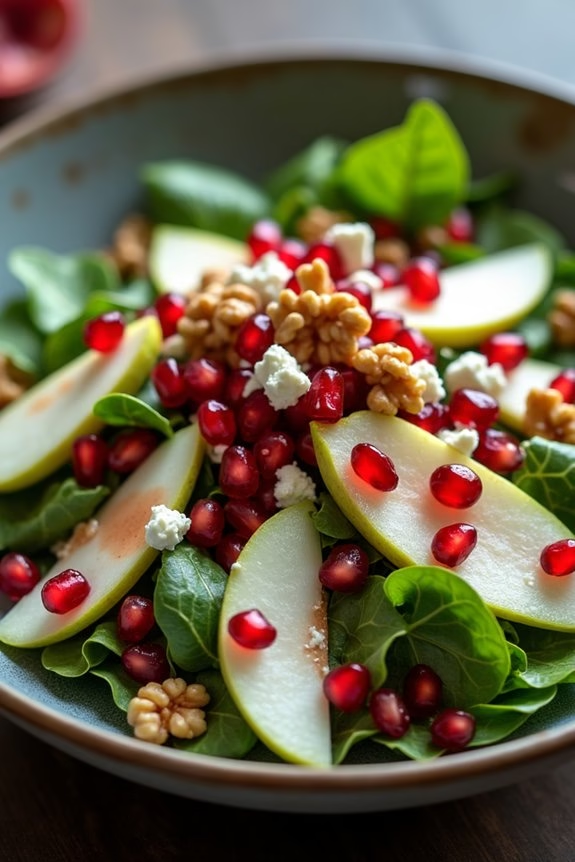
Celebrate the festive season with a revitalizing and vibrant Pomegranate and Pear Salad, a perfect addition to any Christmas potluck. This salad combines the crisp sweetness of ripe pears with the juicy tartness of pomegranate seeds, creating a delightful contrast in flavors. The addition of crunchy walnuts and creamy goat cheese elevates the texture, while a simple yet elegant dressing ties all the elements together, ensuring that each bite is a burst of holiday goodness.
Whether you’re hosting or attending a potluck, this salad is sure to impress with its colorful presentation and harmonious taste. The Pomegranate and Pear Salad isn’t only delicious but also nutritious, providing a healthy option amidst the rich and indulgent holiday dishes. The natural sweetness of the fruit means there’s no need for added sugars, and the healthy fats from the walnuts add a satisfying crunch.
Additionally, pomegranates are packed with antioxidants, making this dish as wholesome as it’s tasty. Best of all, this salad is quick and easy to prepare, allowing you to spend more time enjoying the festivities with family and friends.
Ingredients (serves 4-6):
- 2 ripe pears, thinly sliced
- 1 pomegranate, seeds removed
- 4 cups mixed greens (such as arugula, spinach, or kale)
- 1/2 cup crumbled goat cheese
- 1/2 cup walnuts, toasted
- 3 tablespoons olive oil
- 1 tablespoon balsamic vinegar
- 1 teaspoon honey
- Salt and pepper to taste
Instructions:
- Prepare the Ingredients: Begin by washing and drying the mixed greens thoroughly. Slice the pears into thin wedges, ensuring they’re evenly sliced for consistent presentation. Remove the seeds from the pomegranate and set them aside in a bowl.
- Toast the Walnuts: In a small skillet over medium heat, toast the walnuts for about 5 minutes, stirring frequently until they’re golden brown and aromatic. Be careful not to burn them. Once toasted, remove them from the heat and let them cool.
- Make the Dressing: In a small bowl, whisk together the olive oil, balsamic vinegar, honey, salt, and pepper until well combined. Adjust the seasoning to taste.
- Assemble the Salad: In a large salad bowl, combine the mixed greens, sliced pears, pomegranate seeds, toasted walnuts, and crumbled goat cheese. Toss the ingredients gently to combine, ensuring that the goat cheese is evenly distributed.
- Dress the Salad: Drizzle the prepared dressing over the salad and toss gently to coat all the ingredients evenly. Serve immediately to enjoy the fresh flavors at their best.
Extra Tips:
When selecting pears for this salad, opt for varieties like Bosc or Anjou, which hold their shape well and offer a pleasant sweetness. To prevent the pears from browning, you can toss them in a little lemon juice before adding them to the salad.
For added convenience, prepare the salad components ahead of time and assemble them just before serving to keep everything crisp and fresh. If you prefer a vegan option, you can substitute the goat cheese with avocado slices or a vegan cheese alternative.
Lobster Bisque
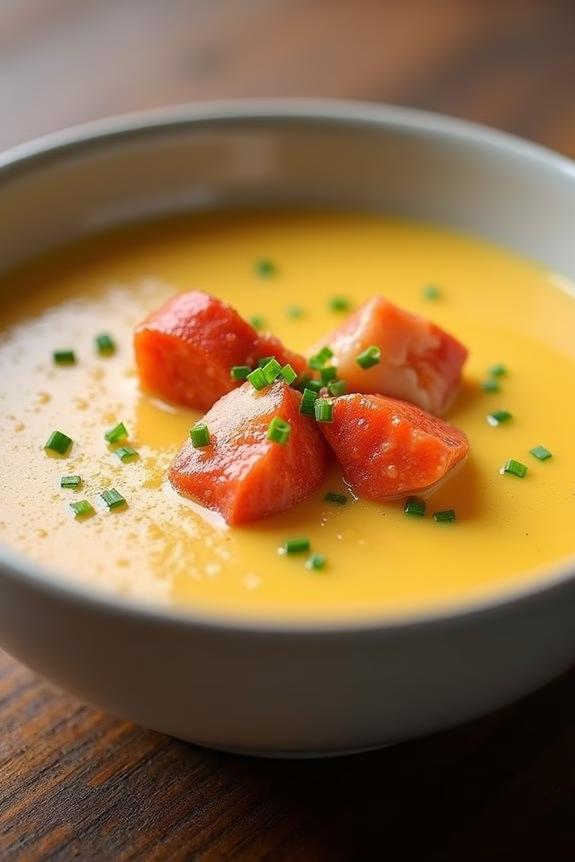
Lobster bisque is a luxurious and creamy seafood soup that’s perfect for a Christmas potluck. It combines the richness of lobster with a smooth, velvety texture that brings a touch of elegance to any festive gathering. This decadent bisque is made by simmering lobster shells to create a flavorful stock, then blending it with cream and aromatic vegetables to achieve a silky finish.
As a highlight of your holiday menu, this lobster bisque is certain to impress your guests with its savory depth and rich flavors. Ideal for serving 4-6 people, this recipe for lobster bisque is both simple and sophisticated, making it a great choice for an intimate holiday meal or a larger gathering.
The key to a perfect bisque is using fresh lobster and taking the time to extract maximum flavor from the shells. Paired with crusty bread or served in small cups as an appetizer, this dish will certainly make a memorable addition to your Christmas celebration.
Ingredients:
- 2 live lobsters (1.5 pounds each)
- 2 tablespoons olive oil
- 1 onion, chopped
- 2 carrots, chopped
- 2 stalks celery, chopped
- 4 cloves garlic, minced
- 3 tablespoons tomato paste
- 1 teaspoon dried thyme
- 1/2 teaspoon cayenne pepper
- 1/4 cup brandy
- 1 cup white wine
- 4 cups fish or seafood stock
- 1 cup heavy cream
- Salt and pepper, to taste
- 2 tablespoons butter
- 2 tablespoons flour
- Fresh chives, chopped (for garnish)
Instructions:
- Cook the Lobsters: Begin by boiling the lobsters. Bring a large pot of salted water to a boil. Add the lobsters and cook for 8-10 minutes until bright red. Remove and let them cool. Once cooled, remove the meat and set it aside. Keep the shells for the stock.
- Make the Stock: In a large pot, heat the olive oil over medium heat. Add the lobster shells, onion, carrots, celery, and garlic. Sauté for 5-7 minutes until the vegetables are soft and the shells are fragrant. Stir in the tomato paste, thyme, and cayenne pepper.
- Deglaze and Simmer: Pour in the brandy and white wine, scraping up any bits stuck to the bottom of the pot. Let it simmer for about 5 minutes until the liquid reduces by half. Add the seafood stock and bring to a boil. Reduce the heat and let it simmer for 30 minutes to extract the flavors.
- Strain the Stock: After simmering, strain the stock through a fine-mesh sieve into another pot, discarding the solids. Return the strained stock to the pot and bring it to a gentle simmer.
- Thicken the Bisque: In a separate saucepan, melt the butter over medium heat. Stir in the flour to form a roux and cook for 2 minutes. Gradually whisk in the heavy cream until smooth. Slowly add this mixture to the simmering stock, whisking continuously until the bisque thickens.
- Blend and Season: Use an immersion blender to blend the bisque until smooth. Alternatively, you can blend it in batches using a regular blender. Season with salt and pepper to taste.
- Add Lobster Meat: Chop the reserved lobster meat into bite-sized pieces and add it to the bisque. Allow it to warm through for about 5 minutes.
- Serve and Garnish: Ladle the bisque into bowls, garnish with chopped chives, and serve hot with crusty bread.
Extra Tips:
When preparing lobster bisque, verify the lobsters are as fresh as possible for the best flavor. The quality of the seafood stock also greatly impacts the dish, so consider making your own if time allows.
For a smoother texture, you can strain the bisque after blending. Adjust the cayenne pepper to your taste preference, adding more for a spicier dish or omitting it for a milder flavor. Finally, be cautious when blending hot liquids, as they can expand and cause splattering.
Roasted Vegetable Medley
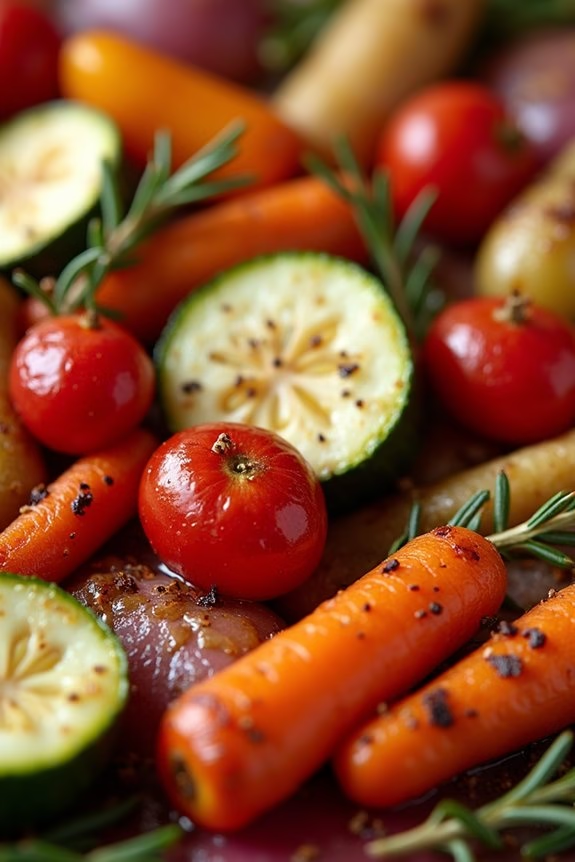
A Roasted Vegetable Medley is a vibrant and flavorful addition to any Christmas potluck. This dish combines a variety of colorful vegetables, each contributing its unique taste and texture to the mix. Roasting the vegetables brings out their natural sweetness and creates a delicious caramelized exterior. The combination of tender and crispy veggies makes this medley a delightful centerpiece on your festive table.
Not only is this dish visually appealing, but it’s also a healthy option that’s certain to please both vegetarians and meat-lovers alike.
Preparing a Roasted Vegetable Medley is quite simple and allows for flexibility in the choice of vegetables. You can customize the medley based on your preferences or what’s seasonally available. This recipe serves 4-6 people and can be easily scaled to accommodate more guests. The process is quick, making it ideal for those busy holiday schedules. With minimal preparation and cooking time, you’ll have a beautiful dish ready to impress your friends and family.
Ingredients (serves 4-6):
- 2 medium carrots, peeled and sliced
- 2 medium parsnips, peeled and sliced
- 1 red bell pepper, chopped
- 1 yellow bell pepper, chopped
- 1 zucchini, sliced
- 1 red onion, cut into wedges
- 200g cherry tomatoes, halved
- 3 tablespoons olive oil
- 1 teaspoon dried thyme
- 1 teaspoon dried rosemary
- Salt and pepper to taste
Cooking Instructions:
- Preheat the Oven: Begin by preheating your oven to 425°F (220°C). This high temperature will help caramelize the vegetables, enhancing their natural flavors.
- Prepare the Vegetables: Wash and prepare all the vegetables as directed. Confirm that the pieces are roughly the same size to promote even cooking.
- Season the Vegetables: In a large mixing bowl, combine the sliced carrots, parsnips, bell peppers, zucchini, red onion, and cherry tomatoes. Drizzle with olive oil, and sprinkle with thyme, rosemary, salt, and pepper. Toss everything together until the vegetables are well-coated in the oil and seasoning.
- Arrange on Baking Sheet: Spread the seasoned vegetables out in a single layer on a large baking sheet. Confirm there’s space between them to allow proper roasting and prevent steaming.
- Roast the Vegetables: Place the baking sheet in the preheated oven. Roast for 25-30 minutes, stirring halfway through, until the vegetables are tender and lightly browned.
- Serve: Once done, remove the roasted vegetables from the oven and transfer them to a serving platter. Serve warm as a side dish or as part of your potluck spread.
Extra Tips:
To enhance the flavor profile, consider adding a splash of balsamic vinegar or a sprinkle of freshly grated Parmesan cheese before serving. You can also add or substitute other vegetables such as sweet potatoes, Brussels sprouts, or mushrooms based on your preference.
For a bit of heat, add a pinch of red pepper flakes. Remember, the key to a great vegetable medley is to balance the vegetables’ cook times, so adjust sizes as necessary if substituting ingredients.
Chocolate Peppermint Mousse Cups

Indulge your guests this holiday season with these decadent Chocolate Peppermint Mousse Cups. These delightful treats combine the rich, smooth taste of chocolate with the invigorating zing of peppermint, making them a perfect festive dessert for your Christmas potluck.
Each bite provides a luscious blend of flavors and textures that will leave your friends and family asking for seconds.
These mousse cups aren’t only delicious but also visually appealing, making them a show-stopping addition to your dessert table. The recipe is designed to serve 4-6 people, and it’s surprisingly simple to prepare.
With a few key ingredients and a little bit of time, you can create a dessert that’s sure to impress your guests and bring a little extra cheer to your holiday gathering.
Ingredients (serves 4-6):
- 1 cup heavy cream
- 1 cup semi-sweet chocolate chips
- 2 tablespoons sugar
- 1/2 teaspoon peppermint extract
- 1/2 teaspoon vanilla extract
- 1/4 cup crushed peppermint candies
- Whipped cream for topping (optional)
- Additional crushed peppermint candies for garnish
Cooking Instructions:
- Melt the Chocolate: In a small saucepan over low heat, combine the semi-sweet chocolate chips and 1/4 cup of the heavy cream. Stir continuously until the chocolate is completely melted and the mixture is smooth. Remove from heat and let it cool slightly.
- Prepare the Whipped Cream Mixture: In a large mixing bowl, combine the remaining heavy cream and sugar. Use an electric mixer to beat the mixture on medium speed until soft peaks form. This should take about 3-4 minutes.
- Flavor the Mousse: Gently fold in the peppermint extract and vanilla extract into the whipped cream mixture. Be careful not to deflate the whipped cream.
- Combine Chocolate and Cream: Once the chocolate has cooled slightly, gently fold it into the whipped cream mixture until fully incorporated and smooth. Avoid over-mixing to maintain the mousse’s light and airy texture.
- Assemble the Cups: Spoon the chocolate peppermint mousse into serving cups, filling each cup about 3/4 full. Sprinkle the top of each mousse cup with crushed peppermint candies.
- Chill the Mousse: Place the mousse cups in the refrigerator for at least 2 hours to set properly. This chilling time allows the flavors to meld and the mousse to firm up.
- Serve and Garnish: Before serving, top each mousse cup with a dollop of whipped cream (if desired) and a sprinkling of additional crushed peppermint candies for a festive touch.
Extra Tips:
For an extra touch of elegance, you can serve these mousse cups in clear glass jars or ramekins to showcase the layers and garnishes.
If you prefer a more intense peppermint flavor, you can increase the peppermint extract to 3/4 teaspoon. Additionally, you can prepare these mousse cups a day in advance; simply keep them refrigerated until ready to serve.
This make-ahead option can be a real time-saver during the busy holiday season. Enjoy your festive Chocolate Peppermint Mousse Cups with loved ones for a memorable holiday treat!
Raspberry Almond Linzer Cookies

Raspberry Almond Linzer Cookies are a delightful treat certain to impress at any Christmas potluck. Originating from Austria, these cookies are known for their delicate, buttery texture and the sweet-tart flavor of raspberry jam sandwiched between layers of almond-infused dough. Not only are they delicious, but their intricate cut-out design makes them a visually stunning addition to any dessert spread. Perfect for sharing, these cookies are sure to become a holiday favorite.
To prepare these festive cookies, you’ll need to start with a rich, buttery dough flavored with ground almonds and a hint of vanilla. Once baked, the cookies are traditionally dusted with powdered sugar before being assembled with a layer of raspberry jam. The combination of the lightly sweetened dough, the fruity jam, and the snowy dusting of sugar creates a cookie that’s both elegant and irresistible. This recipe serves 4-6 people, making it an ideal contribution to your Christmas gathering.
Ingredients:
- 1 cup unsalted butter, softened
- 2/3 cup granulated sugar
- 1 teaspoon vanilla extract
- 1 large egg yolk
- 2 cups all-purpose flour
- 1/2 cup ground almonds
- 1/4 teaspoon salt
- 1/2 cup raspberry jam
- Powdered sugar for dusting
Instructions:
- Prepare the Dough: In a large mixing bowl, cream together the softened butter and granulated sugar until light and fluffy. Mix in the vanilla extract and egg yolk until well combined.
- Combine Dry Ingredients: In a separate bowl, whisk together the all-purpose flour, ground almonds, and salt. Gradually add this to the butter mixture, mixing until a soft dough forms. Divide the dough in half, wrap each portion in plastic wrap, and refrigerate for at least 1 hour.
- Roll and Cut the Dough: Preheat your oven to 350°F (175°C) and line two baking sheets with parchment paper. On a lightly floured surface, roll out one portion of the dough to about 1/8-inch thickness. Use a round cookie cutter to cut out cookies, and a smaller cutter to make a window in half of them.
- Bake the Cookies: Place the cookies on the prepared baking sheets and bake for 10-12 minutes, or until the edges are lightly golden. Allow them to cool completely on a wire rack.
- Assemble the Cookies: Spread a thin layer of raspberry jam on the whole cookies. Dust the tops of the cookies with the windows with powdered sugar, then gently sandwich them together with the jam-covered cookies.
- Serve and Enjoy: Arrange the finished cookies on a decorative plate and enjoy their festive appearance and delightful taste.
Extra Tips:
When making Raspberry Almond Linzer Cookies, verify the dough is properly chilled before rolling out to prevent sticking. If the dough becomes too soft while working, simply return it to the fridge for a few minutes.
For added flavor, you can toast the ground almonds lightly before incorporating them into the dough. Additionally, if you don’t have a small cookie cutter for the windows, a bottle cap works as a great substitute.
Finally, feel free to experiment with different jams like apricot or blackberry for a unique twist on this classic cookie.