
Hosting breakfast for a group can feel overwhelming, but don’t worry—I’ve got some sweet and simple ideas to help you out. Think fluffy pancake bites with a drizzle of maple syrup or Nutella-stuffed crepes that everyone will love. A make-ahead French toast casserole is also on the list to save you time while delighting your guests. Curious about these delicious options? Let’s explore these easy yet delightful treats together.
Fluffy Pancake Bites With Maple Syrup
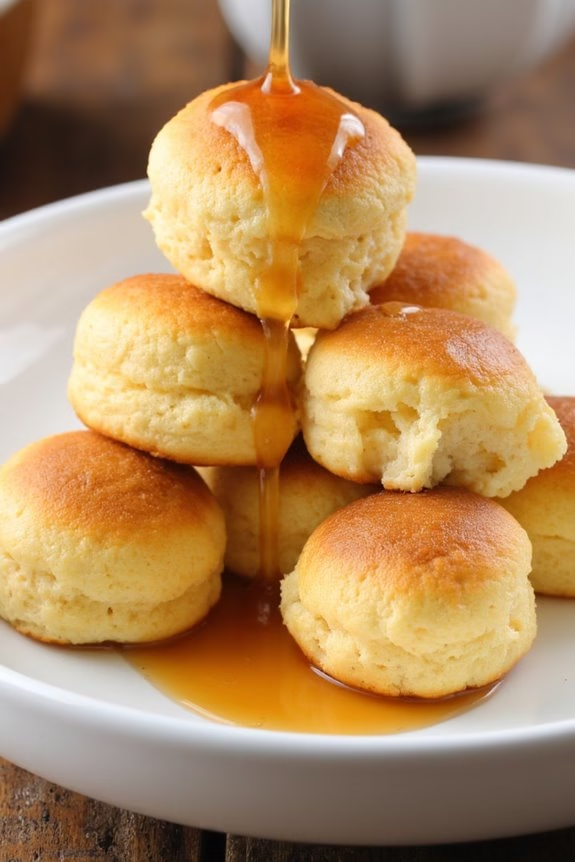
Fluffy Pancake Bites With Maple Syrup are a delightful twist on traditional pancakes, offering a bite-sized treat perfect for breakfast or brunch. These mini pancakes are soft, airy, and bursting with flavor, making them an instant favorite among both kids and adults.
Served with a generous drizzle of maple syrup, they’re the ultimate comfort food that brings warmth and coziness to your morning routine. Their small size also makes them ideal for a buffet-style breakfast, allowing guests to enjoy them without needing utensils.
These pancake bites are easy to make and require just a few simple ingredients that you likely already have in your pantry. The key to their fluffiness is in the batter, which incorporates baking powder for lift and a touch of sugar for sweetness.
Once cooked to golden perfection, they’re best served warm, allowing the maple syrup to soak into each bite. Whether you’re hosting a family breakfast or simply treating yourself, these pancake bites are sure to be a hit.
Ingredients for 4-6 servings:
- 2 cups all-purpose flour
- 2 tablespoons sugar
- 1 tablespoon baking powder
- 1/2 teaspoon salt
- 1 1/2 cups milk
- 2 large eggs
- 1/4 cup melted butter, plus extra for cooking
- 1 teaspoon vanilla extract
- Maple syrup, for serving
Cooking Instructions:
- Prepare the Batter: In a large mixing bowl, whisk together the flour, sugar, baking powder, and salt. In a separate bowl, combine the milk, eggs, melted butter, and vanilla extract. Gradually pour the wet ingredients into the dry ingredients, whisking until just combined. Be careful not to overmix; a few lumps are okay.
- Heat the Pan: Place a large non-stick skillet or griddle over medium heat. Lightly grease the pan with a small amount of melted butter to prevent sticking.
- Cook the Pancake Bites: Using a tablespoon, drop small dollops of batter onto the hot skillet, leaving enough space between each to allow for spreading. Cook for about 1-2 minutes or until bubbles form on the surface. Flip the pancake bites with a spatula and cook for an additional 1-2 minutes, or until golden brown.
- Serve: Transfer the cooked pancake bites to a serving platter and cover with a clean kitchen towel to keep them warm while you cook the remaining batter. Once all pancake bites are cooked, serve them warm with a generous drizzle of maple syrup.
Extra Tips:
For even fluffier pancake bites, let the batter sit for about 5 minutes before cooking to allow the baking powder to activate thoroughly. If you want to add a twist, consider mixing in mini chocolate chips, blueberries, or diced bananas to the batter.
Additionally, make sure your skillet or griddle is at the right temperature before cooking the pancake bites; too hot can cause them to brown too quickly, while too cool may result in undercooked centers. Enjoy experimenting with different toppings like whipped cream or a sprinkle of powdered sugar for an extra touch of sweetness.
Make-Ahead French Toast Casserole

If you’re looking for a delightful breakfast that requires minimal morning effort, the Make-Ahead French Toast Casserole is a perfect choice. This dish combines the comforting flavors of traditional French toast with the convenience of a casserole, making it ideal for a family brunch or a special weekend breakfast.
By preparing it the night before, all you need to do in the morning is pop it in the oven and enjoy the heavenly aroma filling your kitchen.
This casserole is rich, sweet, and satisfying, featuring layers of soft bread soaked in a custard-like mixture of eggs, milk, and warm spices. Topped with a sprinkle of sugar and a hint of cinnamon, it bakes to a golden perfection with a deliciously crisp top and a soft, creamy interior.
Serve it with a drizzle of maple syrup or a dollop of fresh whipped cream for an indulgent treat that will have everyone asking for seconds.
Ingredients (Serves 4-6):
- 1 loaf of French bread, sliced into 1-inch thick pieces
- 6 large eggs
- 2 cups whole milk
- 1/2 cup heavy cream
- 1/2 cup granulated sugar
- 1/4 cup brown sugar
- 1 tablespoon vanilla extract
- 1 teaspoon ground cinnamon
- 1/4 teaspoon ground nutmeg
- 1/4 teaspoon salt
- 2 tablespoons butter, melted
- 3 tablespoons granulated sugar (for topping)
- 1 teaspoon ground cinnamon (for topping)
Cooking Instructions:
- Prepare the Bread: Start by greasing a 9×13-inch baking dish. Arrange the slices of French bread in the dish, slightly overlapping them.
- Make the Custard Mixture: In a large bowl, whisk together the eggs, milk, heavy cream, granulated sugar, brown sugar, vanilla extract, cinnamon, nutmeg, and salt until well combined.
- Combine Bread and Custard: Pour the custard mixture evenly over the bread slices, ensuring that all pieces are soaked. Gently press down on the bread to help it absorb the liquid.
- Chill Overnight: Cover the baking dish with plastic wrap and refrigerate overnight, or for at least 8 hours. This allows the bread to fully absorb the custard mixture.
- Preheat and Prepare Topping: When ready to bake, preheat your oven to 350°F (175°C). In a small bowl, mix together the 3 tablespoons of granulated sugar and 1 teaspoon of cinnamon.
- Add Topping and Bake: Remove the plastic wrap from the casserole. Drizzle the melted butter over the top, then sprinkle with the cinnamon-sugar mixture. Bake in the preheated oven for 45-50 minutes, or until the top is golden brown and the custard is set.
- Serve: Allow the casserole to cool slightly before serving. Enjoy it warm with your choice of toppings such as maple syrup, fresh berries, or whipped cream.
Extra Tips:
For a more decadent experience, consider adding a layer of cream cheese between the bread slices or sprinkling chopped nuts like pecans or walnuts on top before baking.
If you prefer a less sweet casserole, reduce the amount of sugar in the custard mixture. To prevent the casserole from drying out, make sure not to overbake it; it should be just set in the center when you remove it from the oven.
If you need to reheat leftovers, cover the dish with aluminum foil and warm it in the oven to maintain its moist texture.
Overnight Cinnamon Roll Bake

Overnight Cinnamon Roll Bake is a delightful dish that transforms your breakfast routine into an indulgent treat. Perfect for weekend mornings or special occasions, this dish combines the comforting flavors of cinnamon and sugar with a creamy icing topping.
The beauty of this recipe lies in its simplicity and convenience, allowing you to prepare the dish the night before and simply bake it in the morning. This not only saves time but also fills your home with the irresistible aroma of freshly baked cinnamon rolls.
This recipe for Overnight Cinnamon Roll Bake serves 4-6 people, making it ideal for a family breakfast or a cozy brunch gathering with friends. The preparation involves minimal effort, yet the result is a breakfast that looks and tastes like a labor of love.
With each bite, you’ll enjoy the soft, gooey texture of the rolls and the sweet, spicy notes of cinnamon, all topped with a rich, creamy glaze. So, gather your ingredients, follow the simple steps, and treat yourself to a morning delight that everyone will love.
Ingredients:
- 2 cans of refrigerated cinnamon rolls with icing
- 4 large eggs
- 1/2 cup milk
- 1/2 cup heavy cream
- 1/4 cup granulated sugar
- 1 tablespoon vanilla extract
- 1 teaspoon ground cinnamon
- 1/4 teaspoon ground nutmeg
- Cooking spray
Cooking Instructions:
- Prepare the Baking Dish: Lightly grease a 9×13 inch baking dish with cooking spray. This will prevent the cinnamon rolls from sticking to the dish and guarantee easy removal after baking.
- Cut the Cinnamon Rolls: Open the cans of refrigerated cinnamon rolls and set the icing aside. Cut each roll into quarters and evenly distribute them in the prepared baking dish.
- Mix the Custard: In a medium bowl, whisk together the eggs, milk, heavy cream, granulated sugar, vanilla extract, ground cinnamon, and nutmeg until well combined. This mixture will serve as the custard base that soaks into the cinnamon rolls, adding flavor and moisture.
- Pour Over the Rolls: Pour the custard mixture evenly over the cut-up cinnamon rolls in the baking dish. Use a spatula to press down gently, ensuring all pieces are coated and submerged in the liquid.
- Cover and Refrigerate: Cover the baking dish with plastic wrap or aluminum foil and refrigerate overnight. This allows the custard to fully soak into the rolls, enhancing the flavor and texture.
- Preheat and Bake: In the morning, preheat your oven to 350°F (175°C). Remove the cover from the baking dish and bake for 35-40 minutes or until the top is golden brown and the custard is set.
- Ice and Serve: Once baked, remove from the oven and let it cool for a few minutes. Warm the reserved icing from the cinnamon roll cans and drizzle it over the baked rolls. Serve warm for best flavor.
Extra Tips:
For an added layer of flavor, you can sprinkle some chopped pecans or walnuts over the cinnamon rolls before baking for a delightful crunch.
Additionally, if you prefer a more pronounced spice flavor, feel free to adjust the amount of cinnamon and nutmeg to your liking. Make sure to check the bake in the last few minutes to avoid over-browning, as ovens may vary.
This dish can also be prepared and frozen before baking, allowing you to have a delicious breakfast ready with minimal effort on busy mornings.
Berry Parfait Bars for a Fresh Start
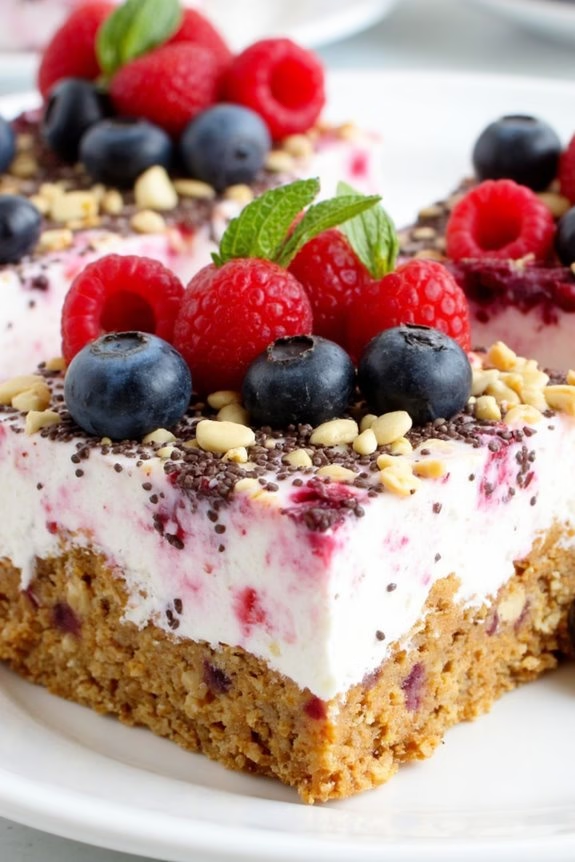
Kickstart your morning with a delightful and nutritious breakfast that combines the sweet and tangy flavors of fresh berries with the creamy richness of Greek yogurt.
These Berry Parfait Bars aren’t only visually appealing but also packed with antioxidants, vitamins, and protein to keep you energized throughout the day. Perfect for a family breakfast or a brunch gathering, these bars are a treat that feels indulgent while still being healthy.
The recipe offers a harmonious blend of textures with a crunchy granola base, a creamy layer of yogurt mixed with honey, and a vibrant topping of mixed berries. You can prepare these bars ahead of time, making them a convenient option for busy mornings.
Let’s get into the details of how you can create these delicious Berry Parfait Bars for 4-6 people.
Ingredients:
- 2 cups of granola
- 1 cup of Greek yogurt
- 2 tablespoons of honey
- 1 teaspoon of vanilla extract
- 1 cup of mixed berries (strawberries, blueberries, raspberries)
- 1 tablespoon of chia seeds
- 1 tablespoon of melted coconut oil
- 1/4 cup of crushed nuts (optional)
- Mint leaves for garnish (optional)
Instructions:
1. Prepare the Granola Base: In a medium-sized mixing bowl, combine 2 cups of granola with 1 tablespoon of melted coconut oil. Stir until the granola is evenly coated.
Press the granola mixture firmly into the bottom of a lined 8×8-inch baking dish to create an even layer. This will form the crunchy base of your parfait bars.
2. Create the Yogurt Layer: In another bowl, mix 1 cup of Greek yogurt with 2 tablespoons of honey and 1 teaspoon of vanilla extract. Stir until well combined.
Spread this mixture evenly over the granola base, making sure it covers the entire surface.
3. Add the Berry Topping: Rinse and pat dry 1 cup of mixed berries. Distribute the berries evenly over the yogurt layer.
Sprinkle 1 tablespoon of chia seeds over the berries for added texture and nutritional value.
4. Optional Nut Topping: If desired, sprinkle 1/4 cup of crushed nuts over the berry layer for an extra crunch.
Press gently to make sure the nuts stick to the yogurt.
5. Chill the Bars: Cover the dish with plastic wrap and refrigerate for at least 2 hours, or until the yogurt is set and the bars can be sliced without falling apart.
6. Serve and Garnish: Once set, slice into bars. Garnish with fresh mint leaves if desired, and serve chilled.
Enjoy your revitalizing and nutritious Berry Parfait Bars!
Extra Tips:
To make the Berry Parfait Bars even more enticing, consider experimenting with different types of granola or adding a layer of fruit puree between the granola and yogurt layers for added flavor.
If you’re preparing these bars ahead of time, they can be stored in an airtight container in the refrigerator for up to three days.
For a vegan version, substitute the Greek yogurt with coconut yogurt and use maple syrup in place of honey.
Quick Banana Bread Muffins
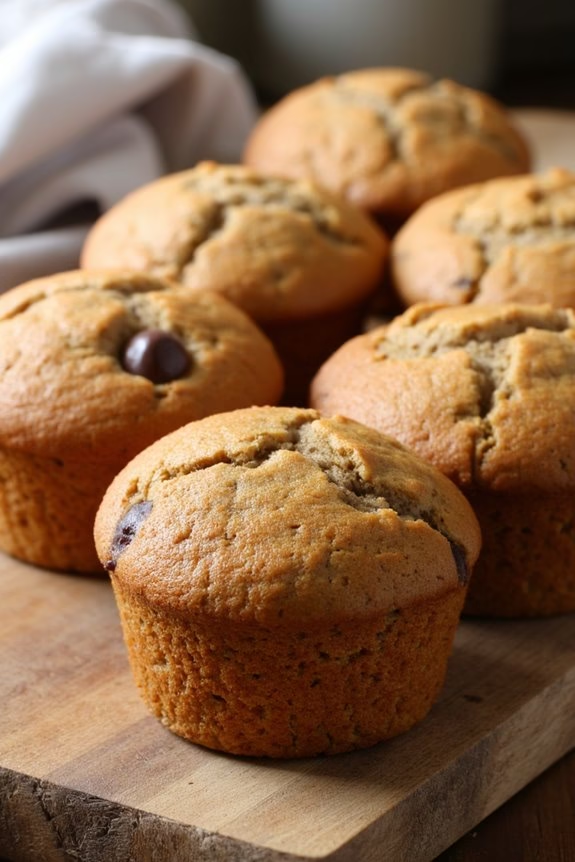
There’s nothing quite like starting your day with the comforting aroma of freshly baked banana bread wafting through your home. Quick Banana Bread Muffins are the ideal sweet breakfast treat for those on the go, offering the classic taste of banana bread in a convenient, portable form.
These muffins are perfect for busy mornings when you need something delicious and satisfying in a hurry. With their moist, tender crumb and rich banana flavor, they’re sure to become a family favorite.
These muffins aren’t only quick to prepare but also incredibly versatile. You can enjoy them plain or jazz them up with your favorite mix-ins like chocolate chips, nuts, or dried fruit. The recipe is straightforward and requires minimal ingredients, making it an excellent choice for novice bakers.
In just a few simple steps, you’ll have a batch of warm, inviting muffins ready to enjoy with your morning coffee or as a midday snack. Let’s explore the recipe and get baking!
Ingredients (Serves 4-6)
- 3 ripe bananas
- 1/3 cup melted butter
- 3/4 cup sugar
- 1 large egg, beaten
- 1 teaspoon vanilla extract
- 1 teaspoon baking soda
- Pinch of salt
- 1 1/2 cups all-purpose flour
- Optional: 1/2 cup chopped walnuts or chocolate chips
Cooking Instructions
- Preheat and Prepare: Preheat your oven to 350°F (175°C). Line a muffin tin with paper liners or lightly grease it with cooking spray to prevent the muffins from sticking.
- Mash Bananas: In a large mixing bowl, mash the ripe bananas with a fork or potato masher until smooth. The bananas should be free of large lumps to guarantee a uniform batter.
- Mix Wet Ingredients: Add the melted butter to the mashed bananas and stir until combined. Then, mix in the sugar, beaten egg, and vanilla extract. Stir the mixture until all the wet ingredients are well incorporated.
- Combine Dry Ingredients: In a separate bowl, whisk together the baking soda, salt, and all-purpose flour. Gradually add the dry ingredients to the wet mixture, stirring gently until just combined. Avoid over-mixing to keep the muffins tender.
- Add Optional Mix-Ins: If using, fold in the chopped walnuts or chocolate chips until evenly distributed throughout the batter.
- Fill Muffin Tins: Spoon the batter into the prepared muffin tin, filling each cup about 3/4 full. This will allow room for the muffins to rise without overflowing.
- Bake: Place the muffin tin in the preheated oven and bake for 20-25 minutes, or until a toothpick inserted into the center of a muffin comes out clean. The tops should be golden brown and slightly springy to the touch.
- Cool and Serve: Allow the muffins to cool in the tin for a few minutes before transferring them to a wire rack to cool completely. Serve warm or at room temperature.
Extra Tips
For the best flavor, use overripe bananas with plenty of brown spots on their skins; the riper the banana, the sweeter and more flavorful the muffins will be.
If you’re in a pinch and your bananas aren’t quite ripe enough, try baking them in the oven at 300°F (150°C) for about 15-20 minutes to soften and enhance their sweetness.
Additionally, you can make a large batch of these muffins and freeze them. Simply thaw them at room temperature or warm them in the microwave for a quick, ready-to-eat breakfast option.
Decadent Nutella-Stuffed Crepes

Decadent Nutella-Stuffed Crepes are a delightful way to begin your morning with a burst of sweetness. These delicate, thin pancakes are filled with rich and creamy Nutella, creating a heavenly breakfast treat that both kids and adults will adore. Perfect for a weekend brunch or a special occasion, these crepes are sure to impress with their elegant appearance and indulgent flavor.
The combination of the soft crepe and the luscious hazelnut spread makes for a breakfast that’s both satisfying and luxurious. Preparing these crepes might seem challenging at first, but with a little practice, you’ll be flipping them like a pro. The key to perfect crepes is getting the batter just right and cooking them on a hot, well-greased pan.
Once you’ve mastered the crepes, stuffing them with Nutella is the easy and fun part. Serve them with a dusting of powdered sugar, a dollop of whipped cream, or a handful of fresh berries for an extra touch of elegance. Whether you’re serving them to family or guests, Decadent Nutella-Stuffed Crepes are bound to become a breakfast favorite.
Ingredients (Serving Size: 4-6 people)
- 1 cup all-purpose flour
- 2 tablespoons granulated sugar
- 1/4 teaspoon salt
- 3 large eggs
- 1 1/2 cups milk
- 2 tablespoons melted butter
- 1 teaspoon vanilla extract
- 1 cup Nutella
- Butter or oil for greasing the pan
- Optional toppings: powdered sugar, whipped cream, fresh berries
Cooking Instructions
- Prepare the Batter: In a large mixing bowl, whisk together the flour, sugar, and salt. In another bowl, beat the eggs, then add the milk, melted butter, and vanilla extract. Gradually pour the wet ingredients into the dry ingredients, whisking until you have a smooth batter. Let the batter rest for at least 30 minutes to allow the flour to absorb the liquids.
- Heat the Pan: Place a non-stick skillet or crepe pan over medium heat. Once hot, lightly grease the pan with butter or oil, using a paper towel to spread it evenly.
- Cook the Crepes: Pour about 1/4 cup of batter into the center of the pan, tilting and rotating the pan quickly to spread the batter into a thin, even layer. Cook for about 1-2 minutes until the edges start to lift and the underside is lightly golden. Flip the crepe and cook for another 1-2 minutes on the other side. Transfer the cooked crepe to a plate and cover with a kitchen towel to keep warm. Repeat with the remaining batter.
- Stuff the Crepes: Spread 2-3 tablespoons of Nutella over one side of each crepe, then fold the crepe in half, and then in half again to form a triangle, or roll them up.
- Serve and Garnish: Arrange the crepes on a serving platter. Dust with powdered sugar and add a dollop of whipped cream or fresh berries if desired. Serve immediately while warm.
Extra Tips
For the best results, let the batter rest, as this helps to relax the gluten, giving you tender crepes. If your first crepe doesn’t come out perfectly, don’t worry; the first crepe often acts as a test for the pan temperature and batter consistency.
Adjust the heat as necessary to prevent burning. If the batter seems too thick, whisk in a little more milk for a thinner consistency. When spreading Nutella, if it’s too thick to spread easily, briefly microwave it to soften. Enjoy your crepes fresh, as they taste best right off the pan!
Chocolate Chip Scones to Share

When it comes to sweet breakfast treats, chocolate chip scones are a delightful option that can easily be shared with friends and family. These scrumptious scones are perfect for a cozy morning gathering or as a quick breakfast to pair with your favorite cup of coffee or tea.
With their buttery texture and rich chocolatey flavor, chocolate chip scones offer a comforting start to the day. This recipe is crafted to serve 4-6 people, making it ideal for a small brunch or a family breakfast. The preparation is straightforward, and the ingredients are simple, allowing you to whip up a batch of these delicious scones in no time.
They’re best enjoyed warm from the oven, where the chocolate chips are still slightly melted, providing that extra touch of indulgence.
Ingredients (Serves 4-6):
- 2 cups all-purpose flour
- 1/3 cup granulated sugar
- 1 tablespoon baking powder
- 1/2 teaspoon salt
- 1/2 cup unsalted butter, cold and cubed
- 2/3 cup semi-sweet chocolate chips
- 1 teaspoon vanilla extract
- 1/2 cup buttermilk
- 1 large egg
- Additional sugar for sprinkling (optional)
Cooking Instructions:
- Preheat the Oven: Begin by preheating your oven to 400°F (200°C). Line a baking sheet with parchment paper for easy cleanup and to prevent the scones from sticking.
- Mix Dry Ingredients: In a large mixing bowl, combine the flour, sugar, baking powder, and salt. Stir the dry ingredients together until they’re evenly distributed.
- Incorporate Butter: Add the cold, cubed butter to the dry mixture. Using a pastry cutter or your fingertips, blend the butter into the flour until the mixture resembles coarse crumbs. This step is essential for giving the scones their flaky texture.
- Add Chocolate Chips: Stir in the chocolate chips, making sure they’re evenly distributed throughout the flour and butter mixture.
- Combine Wet Ingredients: In a small bowl, whisk together the buttermilk, egg, and vanilla extract until well combined.
- Form the Dough: Create a well in the center of the dry ingredients and pour in the wet mixture. Gently mix with a spatula or wooden spoon until a dough forms. Be careful not to overmix, as this can lead to tough scones.
- Shape the Scones: Turn the dough onto a lightly floured surface and knead gently for a few seconds to bring it together. Pat the dough into a round disc about 1-inch thick. Cut the disc into 8 wedges and transfer them to the prepared baking sheet.
- Bake: Optionally, sprinkle a little sugar on top of each scone for added sweetness. Bake in the preheated oven for 15-20 minutes or until the scones are golden brown and firm to the touch.
- Cool and Serve: Allow the scones to cool on the baking sheet for a few minutes before transferring them to a wire rack. Serve warm or at room temperature.
Extra Tips:
For best results, make sure that your butter is very cold before incorporating it into the flour mixture. This helps create a flaky texture.
If you don’t have buttermilk on hand, you can make a substitute by mixing 1/2 cup of milk with 1/2 tablespoon of lemon juice or vinegar and letting it sit for 5 minutes.
Additionally, feel free to experiment by adding a handful of nuts or a pinch of cinnamon to the dough for an extra twist on flavor. Enjoy your chocolate chip scones as they are, or with a dollop of clotted cream or jam for a more decadent treat.
Brown Sugar Sweet Potato Waffles

Wake up your taste buds with the perfect mix of sweet and savory by indulging in Brown Sugar Sweet Potato Waffles. These delightful waffles aren’t only a treat for your palate but also a nutritious start to your day. Packed with the goodness of sweet potatoes, they provide a rich source of vitamins and fiber, all while delivering a deliciously sweet flavor enhanced by the addition of brown sugar.
Whether you’re serving these for a leisurely weekend breakfast or a special brunch gathering, they’re sure to impress. The soft, fluffy texture of these waffles combined with their subtle sweetness makes them a versatile breakfast option. They pair wonderfully with a variety of toppings, from maple syrup and whipped cream to fresh fruits and nuts.
This recipe makes 4-6 servings, allowing everyone at the table to enjoy this scrumptious morning delight. Prepare to experience a breakfast that’s both comforting and energizing, as these waffles are quick to whip up and delightful to devour.
Ingredients (Serves 4-6):
- 2 cups all-purpose flour
- 2 tablespoons brown sugar
- 1 tablespoon baking powder
- 1 teaspoon ground cinnamon
- 1/2 teaspoon salt
- 2 large eggs
- 1 1/2 cups milk
- 1 cup mashed sweet potatoes (about 2 medium sweet potatoes)
- 1/4 cup melted butter
- 1 teaspoon vanilla extract
Instructions:
- Prepare the Sweet Potatoes: Begin by peeling and cubing the sweet potatoes. Boil them in a pot of water until they’re tender, which usually takes about 15-20 minutes. Drain the water and mash the sweet potatoes until smooth. Set aside to cool slightly.
- Mix Dry Ingredients: In a large mixing bowl, combine the all-purpose flour, brown sugar, baking powder, ground cinnamon, and salt. Whisk them together until evenly mixed.
- Combine Wet Ingredients: In another bowl, beat the eggs and then add the milk, mashed sweet potatoes, melted butter, and vanilla extract. Stir until the mixture is smooth and well combined.
- Create the Batter: Pour the wet ingredients into the bowl of dry ingredients. Gently stir until the mixture is just combined; be careful not to over-mix as this can make the waffles dense.
- Preheat the Waffle Iron: Set your waffle iron to the desired temperature, usually the medium-high setting is ideal for a crispy outside and a fluffy inside.
- Cook the Waffles: Once the waffle iron is hot, lightly grease it with cooking spray or a brush of oil. Pour an appropriate amount of batter onto the iron, ensuring not to overfill. Close the lid and cook until the waffles are golden brown and crisp, usually about 5-7 minutes, depending on your waffle iron.
- Serve and Enjoy: Remove the waffles carefully and serve immediately with your choice of toppings such as maple syrup, fresh berries, or a dollop of yogurt.
Extra Tips:
To guarantee your Brown Sugar Sweet Potato Waffles are perfectly crisp on the outside and soft on the inside, avoid opening the waffle iron too early during cooking. Allowing them to cook undisturbed will help them achieve a nice golden-brown color.
You can make the batter a day ahead and store it in the fridge overnight, which can enhance the flavors and give you a head start on your morning. If you have leftover waffles, they can be stored in an airtight container in the fridge for up to three days and can be reheated in a toaster or oven to bring back their crispiness.
Easy Raspberry Danish Squares

Start your morning with a delightful treat by preparing Easy Raspberry Danish Squares. These squares are a perfect combination of flaky pastry, sweet raspberry filling, and a light glaze to top it all off.
Whether you’re hosting a brunch, enjoying a weekend breakfast with family, or simply treating yourself to a sweet start to the day, these raspberry danish squares won’t disappoint. Not only are they delicious, but they’re also remarkably easy to make, allowing you to spend more time savoring them rather than preparing them.
Made with store-bought puff pastry, this recipe is a convenient way to create a bakery-style breakfast at home. The simplicity of the ingredients and the straightforward preparation make it accessible for bakers of all skill levels. With just a few steps, you’ll have a tray of golden, flaky danish squares that are bursting with raspberry flavor, ready to be enjoyed by 4-6 people.
Ingredients for 4-6 servings:
- 1 package of puff pastry (2 sheets)
- 1 cup raspberry preserves
- 1 egg (for egg wash)
- 1 tablespoon water (for egg wash)
- 1/2 cup powdered sugar
- 1-2 tablespoons milk
- 1 teaspoon vanilla extract
Cooking Instructions:
- Preheat the Oven: Start by preheating your oven to 400°F (200°C). This guarantees your pastry bakes evenly and achieves that perfect golden color.
- Prepare the Puff Pastry: Thaw the puff pastry sheets according to package instructions. Once thawed, on a lightly floured surface, roll out each sheet slightly to eliminate any creases and guarantee even thickness.
- Cut the Pastry: Cut each puff pastry sheet into nine equal squares. You should have a total of 18 squares from two sheets.
- Add Raspberry Filling: Place a tablespoon of raspberry preserves in the center of each square. Be careful not to overfill to prevent the preserves from leaking out during baking.
- Create Egg Wash: In a small bowl, whisk together the egg and water. This will be used to seal the pastry and give it a shiny finish.
- Seal and Shape: Fold each square into a triangle, pressing the edges together with a fork to seal. Brush the tops with egg wash for a beautiful gloss once baked.
- Bake the Danish Squares: Arrange the squares on a baking sheet lined with parchment paper. Bake in the preheated oven for 15-18 minutes or until they’re puffed and golden brown.
- Prepare the Glaze: While the danish squares are baking, mix together powdered sugar, milk, and vanilla extract in a small bowl until smooth. Adjust the consistency with more milk if necessary.
- Cool and Glaze: Once the squares are done baking, allow them to cool slightly on a wire rack. Drizzle the glaze over the warm danish squares before serving.
Extra Tips:
For best results, confirm your puff pastry remains cold until it’s ready to be worked with, as this helps it to rise properly in the oven.
If you prefer a bit of texture, consider adding a sprinkle of sliced almonds on top of the raspberry preserves before sealing the pastry. Additionally, you can substitute the raspberry preserves with other fruit fillings like apricot or blueberry to suit your taste.
Enjoy these pastries fresh out of the oven for the best flakiness and flavor.
Coconut and Pineapple Breakfast Cups
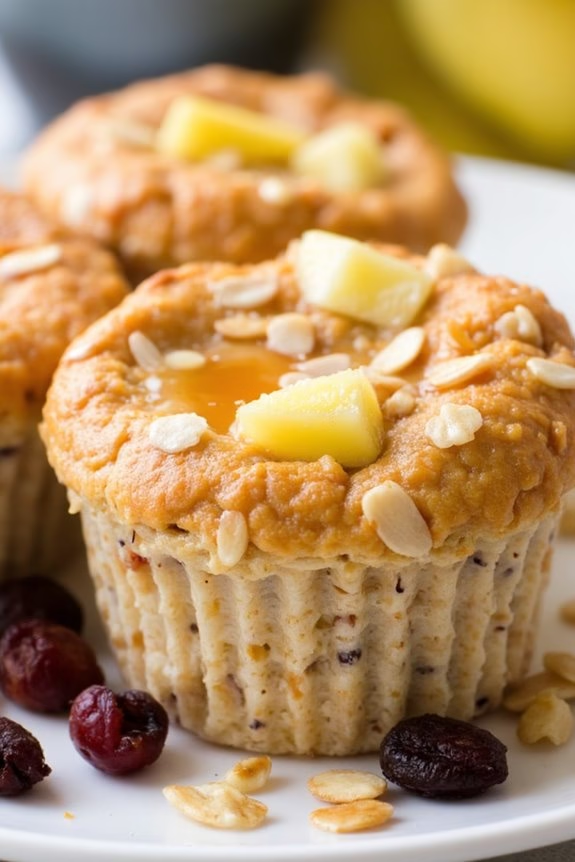
Coconut and Pineapple Breakfast Cups are a tropical delight that can elevate your morning routine with their sweet and invigorating flavors.
These delightful breakfast cups combine the creamy texture of coconut with the juicy tang of pineapple, creating a harmonious blend that’s both satisfying and energizing. Perfect for a sunny morning or when you’re dreaming of a tropical getaway, these breakfast cups are easy to prepare and will surely become a family favorite.
The recipe is designed to serve 4-6 people, making it ideal for a family breakfast or a weekend brunch with friends. These breakfast cups aren’t only delicious but also nutritious, offering a good balance of carbohydrates, healthy fats, and natural sugars.
Let’s plunge into this sweet breakfast idea that brings a taste of the tropics to your table.
Ingredients
- 1 cup rolled oats
- 1 cup coconut milk
- 1/2 cup shredded coconut (unsweetened)
- 1/4 cup honey or maple syrup
- 1 teaspoon vanilla extract
- 1/2 teaspoon ground cinnamon
- 1 cup fresh pineapple chunks
- 1/4 cup chopped nuts (such as almonds or pecans)
- 1/4 cup dried cranberries or raisins
- A pinch of salt
Cooking Instructions
- Preheat the Oven: Start by preheating your oven to 350°F (175°C). This will guarantee that your breakfast cups bake evenly and are ready to go as soon as your ingredients are prepared.
- Prepare the Oat Mixture: In a large mixing bowl, combine the rolled oats, coconut milk, shredded coconut, honey or maple syrup, vanilla extract, ground cinnamon, and a pinch of salt. Stir well until all ingredients are thoroughly mixed, creating a cohesive and aromatic batter.
- Add Pineapple and Nuts: Gently fold in the fresh pineapple chunks, chopped nuts, and dried cranberries or raisins. Confirm that the pineapple and nuts are evenly distributed throughout the oat mixture for consistent flavor in each cup.
- Fill the Muffin Tins: Line a muffin tin with paper liners or lightly grease it with coconut oil. Spoon the mixture into each cup, filling them almost to the top. This recipe should make about 12 breakfast cups, depending on the size of your muffin tin.
- Bake: Place the muffin tin in the preheated oven and bake for 20-25 minutes, or until the tops are golden brown and a toothpick inserted into the center comes out clean.
- Cool and Serve: Allow the breakfast cups to cool in the tin for about 5 minutes before transferring them to a wire rack to cool completely. Serve warm or at room temperature for a delicious breakfast treat.
Extra Tips
For an extra touch of sweetness, consider drizzling a bit more honey or maple syrup over the top of the breakfast cups before serving.
If you prefer a creamier texture, you can also add a dollop of yogurt or a scoop of vanilla ice cream. Feel free to experiment with different nuts or dried fruits to suit your taste preferences.
These breakfast cups are also great for meal prep, as they can be stored in an airtight container for up to three days, providing a quick and delicious breakfast option throughout the week.
Lemon Poppy Seed Loaf

If you’re looking to start your day with a delightful burst of citrusy sweetness, this Lemon Poppy Seed Loaf is the perfect choice. With its bright lemon flavor and subtle crunch from the poppy seeds, this loaf makes for a revitalizing breakfast treat. It’s moist, tender, and pairs wonderfully with a cup of coffee or tea.
Whether you’re hosting a brunch or simply want to treat yourself to a sweet morning delight, this recipe is sure to impress.
This Lemon Poppy Seed Loaf serves 4-6 people and is both easy to make and pleasing to the senses. The balance of tangy lemon with the nutty poppy seeds creates a delightful texture and flavor that will leave you reaching for another slice. Plus, the loaf is topped with a lemon glaze that adds an extra layer of zing and sweetness, making it a perfect addition to any breakfast table.
Ingredients:
- 1 1/2 cups all-purpose flour
- 1 teaspoon baking powder
- 1/2 teaspoon salt
- 1 tablespoon poppy seeds
- 1/2 cup unsalted butter, softened
- 1 cup granulated sugar
- 2 large eggs
- 1 tablespoon lemon zest
- 1/4 cup fresh lemon juice
- 1/2 cup milk
- 1 teaspoon vanilla extract
For the Lemon Glaze:
- 1/2 cup powdered sugar
- 2 tablespoons fresh lemon juice
Instructions:
- Preheat the Oven: Begin by preheating your oven to 350°F (175°C). Grease a 9×5 inch loaf pan with butter or non-stick spray to prevent sticking.
- Mix Dry Ingredients: In a medium-sized bowl, combine the flour, baking powder, salt, and poppy seeds. Whisk these ingredients together to make sure they’re evenly distributed.
- Cream Butter and Sugar: In a large mixing bowl, beat the softened butter and granulated sugar together with an electric mixer until the mixture is light and fluffy, about 2-3 minutes.
- Add Eggs and Lemon: Add the eggs one at a time to the butter mixture, beating well after each addition. Stir in the lemon zest and lemon juice, mixing until everything is well combined.
- Combine with Dry Ingredients: Gradually add the dry ingredients to the wet mixture, alternating with the milk. Begin and end with the dry ingredients. Mix until just combined; don’t overmix. Stir in the vanilla extract.
- Bake the Loaf: Pour the batter into the prepared loaf pan. Smooth the top with a spatula. Bake in the preheated oven for 45-50 minutes or until a toothpick inserted into the center comes out clean.
- Prepare the Lemon Glaze: While the loaf is baking, make the glaze. In a small bowl, whisk together the powdered sugar and lemon juice until smooth.
- Cool and Glaze the Loaf: Once baked, remove the loaf from the oven and allow it to cool in the pan for about 10 minutes. Transfer it to a wire rack. Drizzle the lemon glaze over the warm loaf and let it set.
Extra Tips:
For an even more pronounced lemon flavor, consider adding an extra tablespoon of lemon zest to the batter. If you prefer a tangier glaze, adjust the lemon juice and powdered sugar ratio to your taste.
For those who enjoy a bit of crunch, a handful of chopped nuts like almonds or walnuts can be mixed into the batter. Remember, the key to a moist loaf is to avoid overmixing the batter; mix just until the ingredients are combined.
Enjoy your Lemon Poppy Seed Loaf slightly warm or at room temperature for the best flavor experience.
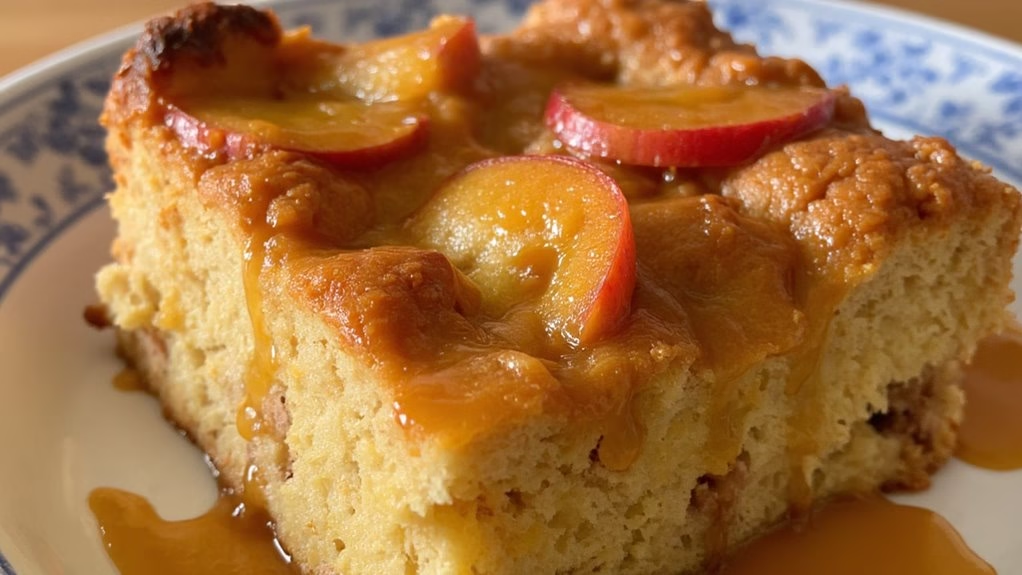
Caramel Apple Bread Pudding
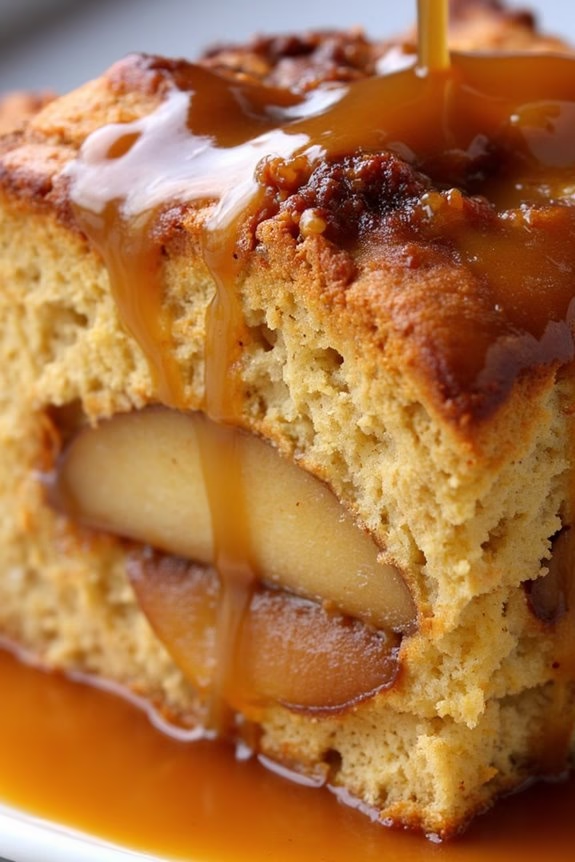
Caramel Apple Bread Pudding is a delightful breakfast treat that combines the comforting flavors of cinnamon, apples, and caramel into a rich and satisfying dish. This recipe is perfect for a weekend brunch or a special occasion breakfast that will leave your family and friends asking for seconds.
The combination of tender bread soaked in a sweet custard, layered with caramelized apples, and topped with a luscious caramel sauce makes it a breakfast indulgence worth trying.
This bread pudding isn’t only delicious but also a great way to use up any leftover bread you might have. The key to a perfect caramel apple bread pudding is allowing the flavors to meld together as the bread absorbs the custard, creating a creamy and flavorful base.
The apples add a delightful tartness that balances the sweetness of the caramel, making each bite a harmonious blend of flavors and textures.
Ingredients (Serving Size: 4-6 people)
- 1 loaf of day-old bread (preferably brioche or challah), cubed
- 3 large apples, peeled, cored, and sliced
- 1 cup granulated sugar
- 1 cup brown sugar, divided
- 1/2 cup unsalted butter
- 4 large eggs
- 2 cups whole milk
- 1 cup heavy cream
- 1 tablespoon vanilla extract
- 1 teaspoon ground cinnamon
- 1/2 teaspoon nutmeg
- Pinch of salt
- 1/4 cup caramel sauce (store-bought or homemade)
Cooking Instructions
1. Prepare the Bread and Apples: Preheat your oven to 350°F (175°C). Grease a 9×13-inch baking dish. Spread the cubed bread evenly in the dish.
In a large skillet, melt 1/4 cup of butter over medium heat, then add the apple slices. Sprinkle with 1/2 cup of brown sugar and cook until the apples are soft and caramelized, about 10 minutes. Spread the caramelized apples over the bread cubes in the baking dish.
2. Make the Custard: In a large mixing bowl, whisk together the eggs, granulated sugar, remaining 1/2 cup of brown sugar, milk, cream, vanilla extract, cinnamon, nutmeg, and salt until well combined.
Pour this mixture evenly over the bread and apples, pressing down gently to guarantee the bread absorbs the custard.
3. Bake the Pudding: Cover the baking dish with aluminum foil and bake in the preheated oven for 30 minutes. Remove the foil and continue baking for an additional 15-20 minutes, or until the top is golden brown and the custard is set.
4. Add the Caramel Sauce: Remove the bread pudding from the oven and let it cool slightly. Drizzle the caramel sauce over the top before serving warm.
Extra Tips
For the best results, use slightly stale bread as it better absorbs the custard without becoming too mushy. If your bread is fresh, you can dry it out in the oven at a low temperature for about 10 minutes before using it.
Additionally, try experimenting with different types of apples to vary the flavor profile; tart apples like Granny Smith provide a nice contrast to the sweet caramel. If you’re feeling adventurous, consider adding a splash of bourbon or rum to the custard for an adult twist on this classic dish.