
When Halloween arrives, I absolutely adore getting creative with themed foods that are both fun and easy to make. Picture serving Creepy-Crawly Spider Cupcakes or savory Mummy Dogs at your next gathering. These treats are sure to impress without needing expert skills in the kitchen. Want to add a unique twist to your celebration? Explore these easy-to-follow recipes that’ll delight your taste buds and captivate your guests.
Creepy-Crawly Spider Cupcakes

Imagine a Halloween party with a tray of cupcakes that not only look delicious but are also delightfully eerie. Creepy-Crawly Spider Cupcakes are a perfect addition to your Halloween spread. These cupcakes are chocolatey, moist, and topped with a spooky spider design that will thrill both kids and adults alike. Making them is as fun as eating them, and they’re sure to be a conversation starter at your Halloween gathering.
To create these ghoulish treats, we’ll need to start with a rich chocolate cupcake base. The chocolate cupcakes will be topped with a luscious chocolate frosting, and then decorated with licorice and candy eyes to form the spider’s body and legs. This recipe makes enough for 4-6 people, ensuring everyone at your party can enjoy a creepy crawler.
Ingredients:
- 1 cup all-purpose flour
- 1 cup granulated sugar
- 1/2 cup unsweetened cocoa powder
- 1 teaspoon baking powder
- 1/2 teaspoon baking soda
- 1/2 teaspoon salt
- 1/2 cup whole milk
- 1/4 cup vegetable oil
- 1 large egg
- 1 teaspoon vanilla extract
- 1/2 cup boiling water
- 1 cup chocolate frosting
- Black licorice strips (for legs)
- Candy eyes
Instructions:
- Preheat your oven to 350°F (175°C) and line a cupcake tin with paper liners. This prepares the tin for baking and prevents the cupcakes from sticking.
- Mix dry ingredients: In a large bowl, whisk together the flour, sugar, cocoa powder, baking powder, baking soda, and salt until well combined.
- Combine wet ingredients: In another bowl, mix the milk, vegetable oil, egg, and vanilla extract. Stir until smooth.
- Blend mixtures: Gradually add the wet ingredients to the dry ingredients, stirring gently. Once combined, carefully add the boiling water and mix until smooth. The batter will be thin.
- Fill and bake: Pour the batter into the prepared cupcake liners, filling each about two-thirds full. Bake for 18-20 minutes or until a toothpick inserted into the center comes out clean. Remove from oven and let cool completely.
- Frost the cupcakes: Once cooled, spread chocolate frosting generously over each cupcake to create a smooth surface.
- Decorate: Cut the licorice into small pieces to make spider legs. Place four licorice pieces on each side of the cupcake to resemble legs. Add two candy eyes on top of the frosting to complete the spider look.
- Serve: These cupcakes are best served fresh. Present them on a Halloween-themed tray for added effect.
Extra Tips:
When cutting the licorice, use scissors for precise and clean cuts. If you’re using candy eyes that are too large, consider using mini chocolate chips instead. For a more intense chocolate flavor, consider adding a tablespoon of espresso powder to the batter. If you’re short on time, you can use a store-bought chocolate cake mix and frosting, just make sure to follow the package instructions for preparation.
Finally, be creative with your spiders; you can use different candies to give each one its own personality!
Ghoulishly Good Guacamole
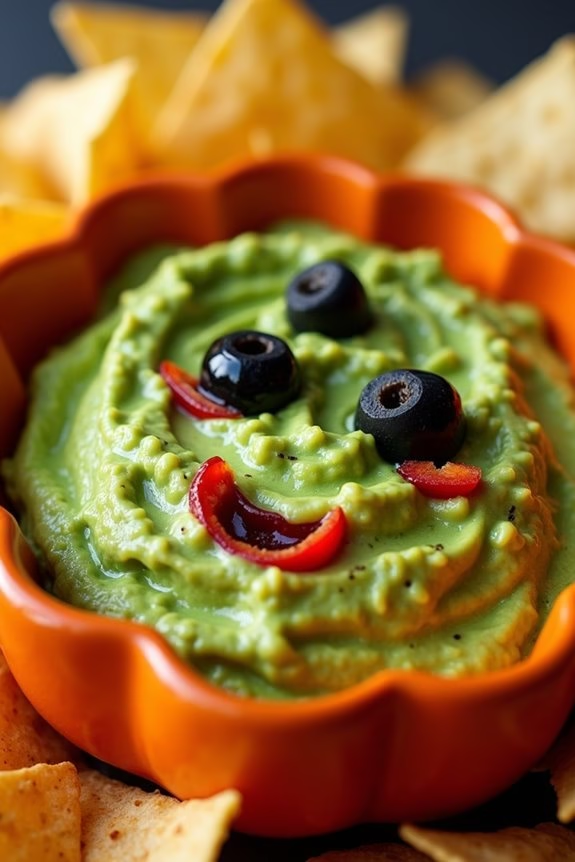
Elevate your Halloween festivities with a spooky twist on a classic party favorite – Ghoulishly Good Guacamole. This vibrant, green dip isn’t only delicious but also perfectly captures the eerie spirit of Halloween. By adding a few creative touches, you can transform an ordinary guacamole into a centerpiece that will leave your guests both delighted and intrigued.
This tantalizing treat combines the creamy richness of avocados with zesty lime, spicy jalapeño, and a touch of garlic, making it a flavorful addition to your Halloween spread.
To create this hauntingly tasty guacamole, we’ll be serving 4-6 people, ensuring there’s enough for everyone to enjoy. With the addition of a few decorative elements like black olive “spiders” or a “ghoulish face” made from sliced vegetables, this dish won’t only taste amazing but also serve as a spooky visual treat. So, gather your ingredients and prepare to wow your friends and family with this ghoulishly good creation.
Ingredients:
- 4 ripe avocados
- 1 lime, juiced
- 1 small red onion, finely chopped
- 1 jalapeño, seeded and finely chopped
- 2 garlic cloves, minced
- 1 medium tomato, diced
- Salt and pepper, to taste
- Black olives, for decoration
- Sliced red bell pepper, for decoration
- Tortilla chips, for serving
Instructions:
- Prepare the Avocados: Cut the avocados in half, remove the pits, and scoop the flesh into a mixing bowl. Using a fork, mash the avocado until you achieve a smooth yet slightly chunky consistency.
- Add Lime Juice: Pour the freshly squeezed lime juice over the mashed avocado. This not only adds flavor but also helps prevent the avocado from browning.
- Mix in Vegetables: Add the finely chopped red onion, diced tomato, and minced garlic to the avocado mixture. Stir well to combine all the ingredients evenly.
- Spice it Up: Add the finely chopped jalapeño to the guacamole. Adjust the quantity based on your preferred level of spiciness. Season with salt and pepper to taste, and mix thoroughly.
- Decorate for Halloween: Transfer the guacamole to a serving bowl. Use black olives to create “spiders” or sliced red bell pepper to form a “ghoulish face” on the surface of the guacamole. Get creative with your designs!
- Serve: Place the bowl of Ghoulishly Good Guacamole amidst a platter of tortilla chips for serving. Enjoy this spooky and delicious dip with friends and family.
Extra Tips:
For an even spookier presentation, consider using a pumpkin or skull-shaped bowl to serve your guacamole. If you prefer a milder guacamole, you can omit the jalapeño or substitute it with a milder pepper.
To keep your guacamole fresh and green for a longer period, press a piece of plastic wrap directly onto the surface of the guacamole to minimize exposure to air. Additionally, feel free to customize your decorations with other vegetables or edible items that fit the Halloween theme.
This dish isn’t only a feast for the taste buds but also a visual delight that will make your Halloween gathering unforgettable.
Monster Mash Popcorn Balls
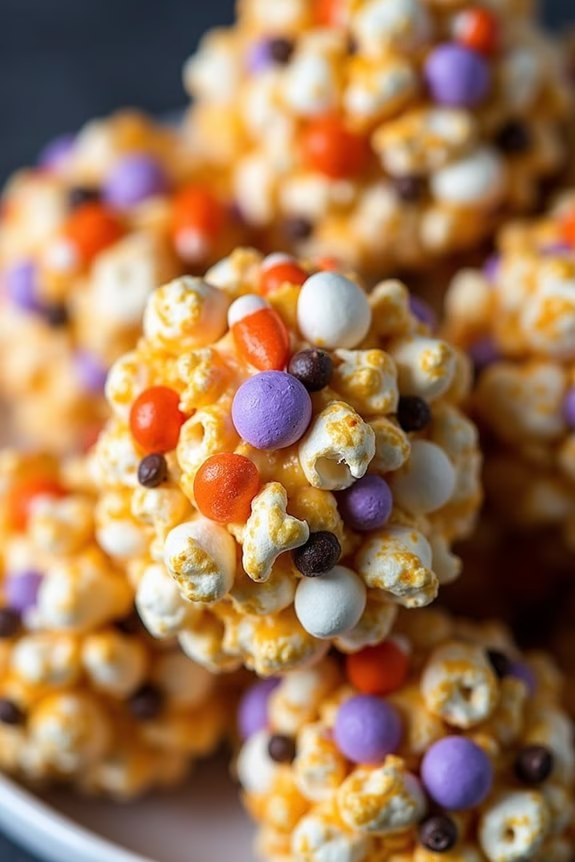
Monster Mash Popcorn Balls are a spooky and delightful treat perfect for any Halloween gathering. These sweet and salty spheres of flavor won’t only please the taste buds but also add an eerie charm to your dessert table.
Combining the crunch of popcorn with a sticky, sweet coating, these popcorn balls are enhanced with colorful candies to resemble the vibrant hues of a monster mash. They’re easy to make and are certain to be a hit with both kids and adults alike.
Ideal for serving a group of 4-6 people, Monster Mash Popcorn Balls are a versatile and fun project to make with family or friends. The ingredients are simple and can be found in most kitchens or local grocery stores.
Whether you’re hosting a large Halloween party or a small family gathering, these popcorn balls are a crowd pleaser and can be made in advance, allowing you to focus on other festive preparations.
Ingredients for 4-6 servings:
- 10 cups popped popcorn
- 1 cup granulated sugar
- 1/3 cup light corn syrup
- 1/4 cup water
- 1/4 teaspoon salt
- 1/4 cup unsalted butter
- 1 teaspoon vanilla extract
- 1 cup mini marshmallows
- 1 cup Halloween-themed candies (such as candy corn or gummy worms)
- 1/4 cup mini chocolate chips
- Optional: food coloring (green, purple, or orange)
Instructions:
- Prepare the Popcorn Base: Start by popping the popcorn using your preferred method, whether it’s on the stove or with a popcorn maker. Once popped, remove any unpopped kernels and place the popcorn in a large bowl.
- Create the Syrup: In a medium saucepan, combine sugar, corn syrup, water, and salt. Cook over medium heat, stirring constantly, until the sugar has dissolved completely. Add the butter and continue to cook until the mixture reaches a temperature of 235°F (soft-ball stage) on a candy thermometer.
- Flavor and Color: Remove the saucepan from heat and stir in the vanilla extract. If you’d like to add food coloring, do so now, mixing until the color is evenly distributed and reaches your desired hue.
- Combine Ingredients: Pour the syrup over the popcorn, tossing quickly to coat all pieces evenly. Add the mini marshmallows, Halloween-themed candies, and mini chocolate chips, stirring gently to distribute them throughout the popcorn.
- Shape the Popcorn Balls: Once the mixture is cool enough to handle but still warm, grease your hands lightly with butter or cooking spray. Form the popcorn into balls, approximately the size of a baseball, pressing gently to guarantee they hold their shape. Place them on a baking sheet lined with parchment paper to set.
- Cool and Serve: Allow the popcorn balls to cool completely at room temperature. Once cooled, they’re ready to serve or can be wrapped individually in cellophane for a festive presentation.
Extra Tips:
When making Monster Mash Popcorn Balls, it’s important to work swiftly once the syrup is ready, as it can harden quickly. Greasing your hands will prevent the mixture from sticking while shaping the balls.
Be creative with the candies you choose to mix in, as this can add to the Halloween theme and make each batch uniquely fun. If you want to add a bit of extra flavor, consider sprinkling a bit of cinnamon or pumpkin spice into the syrup before pouring it over the popcorn.
Enjoy your monstrous creation, and have a spooktacular Halloween!
Mummy Dogs

Mummy Dogs are a fun and festive way to celebrate Halloween with a delicious twist on the classic pig-in-a-blanket. These spooky snacks are perfect for parties or a family dinner, as they’re both easy to prepare and a delight to eat. Wrapped in crescent dough to resemble mummies, these hot dogs are sure to be a hit with both kids and adults. With just a few ingredients, you can whip up these adorable appetizers in no time.
Whether you’re hosting a Halloween party or simply want to surprise your family with a themed dinner, Mummy Dogs are an excellent choice. They aren’t only easy and quick to make, but also versatile enough to allow for creativity in presentation. You can use mustard or ketchup to create little eyes on these mummies, adding to the fun factor. Serve them with a variety of dipping sauces and watch them disappear off the plate!
Ingredients (Serving Size: 4-6 people)
- 8 hot dogs
- 1 can (8 oz) refrigerated crescent rolls
- 1 large egg, beaten
- Mustard or ketchup for decorating
Cooking Instructions
- Preheat the Oven: Set your oven to 375°F (190°C) to guarantee it’s hot enough to bake the dough evenly.
- Prepare the Dough: Unroll the crescent rolls and separate them into four rectangles. Press the perforations to seal them, creating a smooth dough sheet.
- Cut the Dough: Using a knife or a pizza cutter, cut each dough rectangle into 10 thin strips. You should have a total of 40 strips.
- Wrap the Hot Dogs: Take one hot dog and wrap 4-5 strips of dough around it, leaving a small space for the face. The dough should overlap slightly to resemble a mummy’s bandages.
- Arrange on Baking Sheet: Place the wrapped hot dogs on a baking sheet lined with parchment paper or a silicone mat. Leave a bit of space between each mummy dog.
- Egg Wash: Brush each mummy dog lightly with the beaten egg. This will give them a nice golden color when baked.
- Bake: Place the baking sheet in the oven and bake for 12-15 minutes, or until the dough is golden brown and crispy.
- Decorate: Remove the mummy dogs from the oven and let them cool slightly. Use mustard or ketchup to dot eyes on the exposed part of the hot dog.
Extra Tips
When making Mummy Dogs, you can experiment with different types of sausages or cheese-stuffed hot dogs for added flavor. For a vegetarian option, use veggie dogs instead of traditional hot dogs.
Confirm the dough strips aren’t too thick, as they’ll expand during baking and can cover too much of the hot dog. Keep an eye on the baking time, as ovens can vary, and you don’t want the dough to over-brown.
Serve immediately for the best taste, although leftovers can be reheated in an oven or microwave.
Witch’s Brew Punch
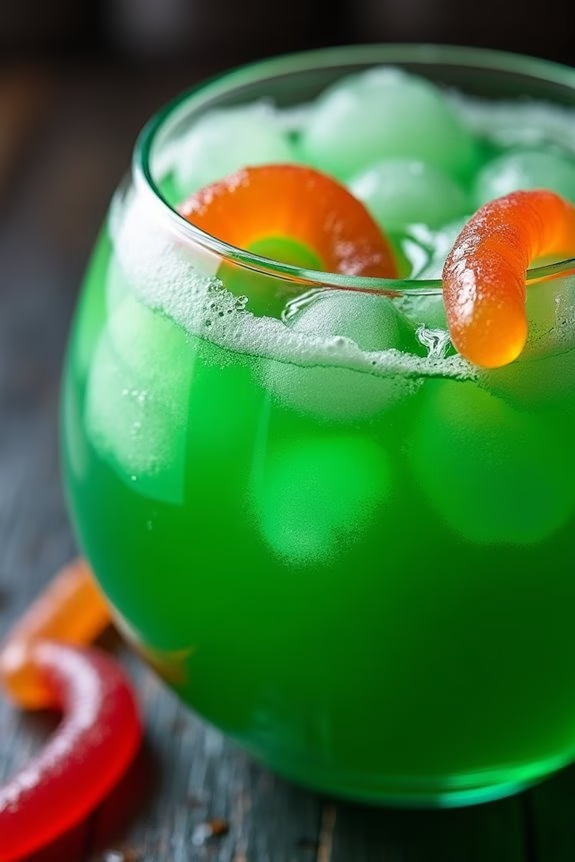
Witch’s Brew Punch is a spooktacular beverage that will bring a ghoulish delight to your Halloween festivities. This eerie concoction is perfect for setting the mood at your party, offering a vibrant and mysterious allure that intrigues both adults and children alike. The deep green hue of the punch evokes images of bubbling cauldrons and spells, making it a perfect centerpiece for your Halloween table.
Combining a mix of fruity flavors with a surprising fizz, Witch’s Brew Punch is as delicious as it’s eye-catching, guaranteeing it will be a hit among your guests. This punch not only tastes great but is also incredibly easy to prepare, requiring just a few simple ingredients that are readily available at most grocery stores.
It’s an ideal choice for busy hosts who want to create a memorable experience without spending hours in the kitchen. The recipe is flexible, allowing you to adjust the sweetness and fizz to your preference, making it a versatile addition to any Halloween gathering. Plus, it can easily be scaled up for larger parties, ensuring everyone gets a taste of this enchanting brew.
Ingredients for Witch’s Brew Punch (serving size: 4-6 people):
- 4 cups of lemon-lime soda
- 2 cups of pineapple juice
- 2 cups of lime sherbet
- 1 cup of orange juice
- Green food coloring (optional)
- 1/2 cup of gummy worms for garnish
- Ice cubes
Cooking Instructions:
- Combine the Liquid Ingredients: In a large punch bowl, pour in the lemon-lime soda, pineapple juice, and orange juice. Stir the mixture gently to combine the flavors, guaranteeing a uniform blend of the juices and soda.
- Add the Sherbet: Carefully add the lime sherbet to the punch. Allow it to melt slightly, then stir gently until the sherbet has mostly dissolved, creating a frothy and creamy texture within the punch.
- Color the Punch: If you desire a more intense green color to enhance the Halloween theme, add a few drops of green food coloring. Stir the mixture until the color is evenly distributed throughout the punch.
- Prepare for Serving: Add ice cubes to the punch bowl to keep the drink chilled. Arrange the gummy worms around the edge of the bowl or float them on top of the punch for a creepy garnish that adds to the thematic presentation.
- Serve the Punch: Ladle the punch into individual glasses for your guests, guaranteeing each serving has a piece of gummy worm as a garnish. Serve immediately to enjoy the frothy texture and vibrant flavors.
Extra Tips:
To enhance the spooky ambiance, consider serving the Witch’s Brew Punch in a cauldron-shaped punch bowl or with mist from dry ice for a theatrical effect. If you’re using dry ice, handle it with care, and ensure it’s fully evaporated before serving, as it should never be ingested.
Adjust the sweetness of the punch by adding more or less sherbet according to your taste preference. For an adult version, a splash of rum or vodka can be added to the mix. Always taste-test before serving to guarantee the flavor balance is just right for your Halloween celebration.
Eyeball Caprese Bites
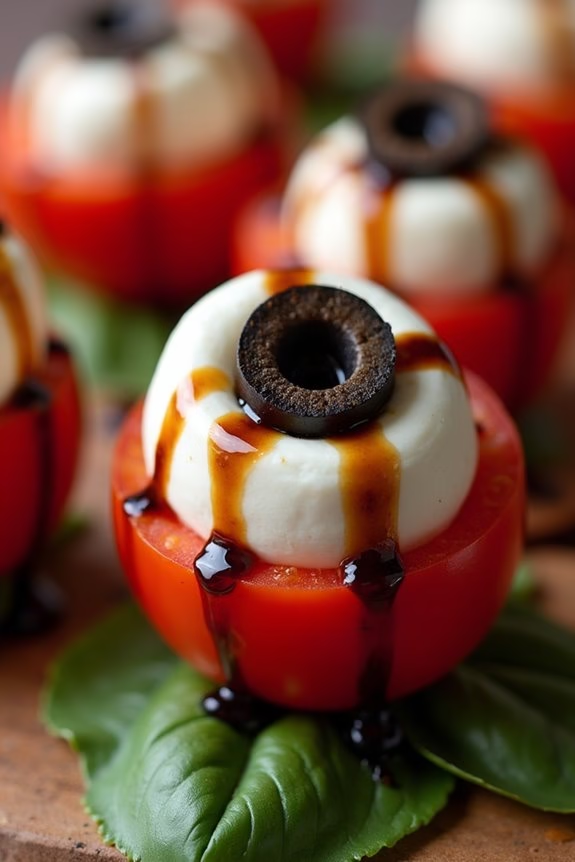
Halloween is the perfect time to get creative in the kitchen, and Eyeball Caprese Bites are a spooky yet delicious treat that can add a festive touch to your party spread.
These eerie appetizers are a playful twist on the classic Caprese salad, featuring mozzarella balls, olives, and cherry tomatoes cleverly arranged to resemble eyeballs. The combination of fresh basil, creamy mozzarella, and ripe tomatoes isn’t only visually striking but also tantalizing for the taste buds.
Ideal for a serving size of 4-6 people, these Eyeball Caprese Bites are easy to assemble and will surely be a hit at your Halloween gathering. Whether you’re hosting a party or simply looking to amuse your family with themed snacks, these bites are a great choice. They’re quick to prepare, making them an ideal last-minute addition to your Halloween menu.
Ingredients:
- 20 cherry tomatoes
- 20 small mozzarella balls (bocconcini)
- 20 large black olives (pitted)
- 20 fresh basil leaves
- 2 tablespoons balsamic glaze
- Salt and pepper to taste
- Toothpicks or small skewers
Instructions:
- Prepare the Ingredients: Begin by rinsing the cherry tomatoes and basil leaves under cold water. Pat them dry with a paper towel. Make sure your mozzarella balls are drained and ready for use.
- Assemble the Eyeballs: Take a cherry tomato and slice off the top to create a flat surface. Place a mozzarella ball on top of the sliced part of the tomato. This will serve as the “white” of the eyeball.
- Add the Pupil: Slice a black olive into thin rings. Take one ring and place it on top of the mozzarella ball to serve as the “pupil” of the eyeball.
- Secure with a Toothpick: Pierce a toothpick or skewer through the assembled tomato, mozzarella ball, and olive, securing them together. Add a fresh basil leaf at the bottom of the skewer for a pop of color and flavor.
- Season and Dress: Arrange the assembled Eyeball Caprese Bites on a serving platter. Drizzle with balsamic glaze and sprinkle with salt and pepper to taste.
- Serve and Enjoy: Once all bites are assembled and seasoned, serve them to your guests and enjoy the spooky yet tasty creation.
Extra Tips:
For an extra touch of creepiness, consider using red or green olives instead of black to change the appearance of the pupils, giving your eyeballs a unique look.
You can also experiment with different flavored balsamic glazes for added depth of flavor. To save time, you can prepare the components ahead of time and assemble them just before serving to guarantee freshness.
These bites are best served chilled, so keep them in the refrigerator until your guests arrive.
Ghostly White Chocolate Pretzels
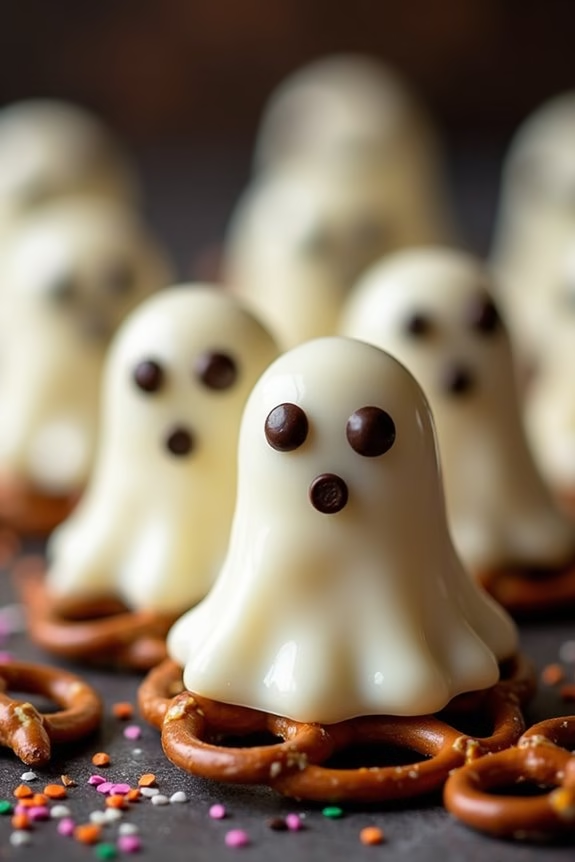
Ghostly White Chocolate Pretzels are a delightful and spooky treat perfect for your Halloween festivities. These easy-to-make snacks combine the satisfying crunch of pretzels with the creamy sweetness of white chocolate, all dressed up in a ghostly theme.
They’re ideal for Halloween parties, as a fun activity with kids, or simply as a sweet treat to enjoy during the spooky season. The best part is that these treats require minimal ingredients and effort, making them a great choice for both novice and experienced cooks.
The white chocolate coating gives the pretzels a ghostly appearance, and you can enhance this effect by adding small chocolate chips or edible eyes to create faces. With just a few simple steps, you’ll have a batch of Ghostly White Chocolate Pretzels ready to chill and serve.
This recipe serves 4-6 people, making it a great option for a small gathering or family night.
Ingredients:
- 12 oz white chocolate chips or melting wafers
- 24 large pretzel rods
- 48 mini chocolate chips or edible candy eyes
- Sprinkles (optional, for additional decoration)
- Parchment paper
Instructions:
1. Prepare Your Work Area: Begin by lining a baking sheet with parchment paper. This will prevent the pretzels from sticking and make clean-up easier.
2. Melt the White Chocolate: Place the white chocolate chips or melting wafers in a microwave-safe bowl. Microwave the chocolate in 30-second intervals, stirring in between each interval, until it’s completely melted and smooth.
Be careful not to overheat, as white chocolate can burn easily.
3. Coat the Pretzels: Dip each pretzel rod into the melted white chocolate, using a spoon to help cover about two-thirds of each rod. Let any excess chocolate drip off before placing the pretzel on the prepared baking sheet.
4. Add the Eyes: While the chocolate is still wet, press two mini chocolate chips or candy eyes onto the coated portion of each pretzel to create the ghostly face. If desired, add sprinkles for extra decoration.
5. Set the Chocolate: Allow the pretzels to sit at room temperature until the chocolate is completely set. Alternatively, you can place the baking sheet in the refrigerator for about 10-15 minutes to speed up the process.
6. Serve and Enjoy: Once the chocolate is firm, your Ghostly White Chocolate Pretzels are ready to serve. Arrange them on a festive platter and enjoy the spooky treat!
Extra Tips:
When melting the white chocolate, be patient and stir frequently to avoid burning. If you prefer, you can use a double boiler instead of a microwave to melt the chocolate more gently.
For a fun twist, try using different colored chocolate melts to create a variety of ghostly colors. If you have any leftover chocolate, drizzle it over the pretzels for a decorative effect.
These pretzels store well in an airtight container for a few days, making them a perfect make-ahead treat for your Halloween celebrations.
Pumpkin Patch Brownies
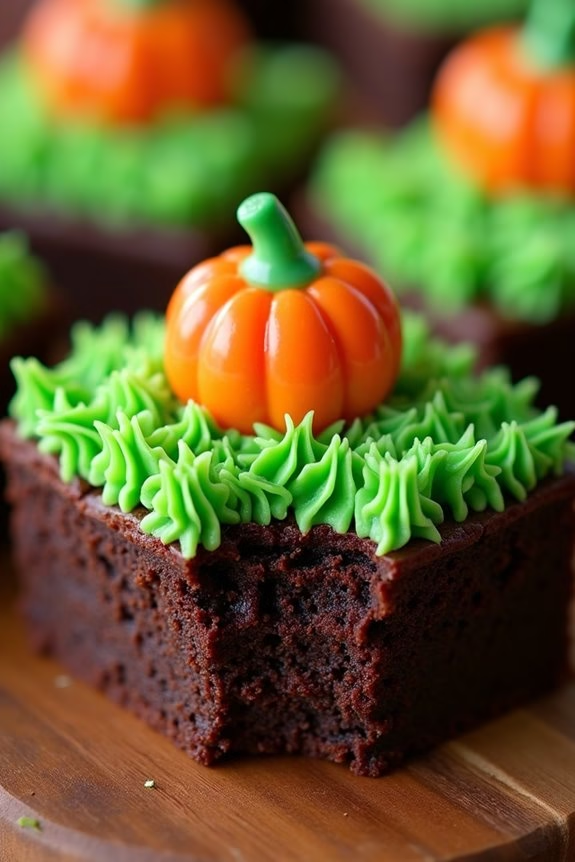
Pumpkin Patch Brownies are a delightful treat perfect for celebrating Halloween. These brownies combine the rich, chocolatey goodness of traditional brownies with a festive twist — a vibrant pumpkin patch scene on top! The base is fudgy and dense, while the decoration adds a playful touch that captures the essence of fall and Halloween.
This recipe isn’t only delicious but also fun to make, allowing you to release your creativity and make a dessert that’s both tasty and visually appealing.
The magic of Pumpkin Patch Brownies lies in their decoration. By using colorful frosting and candy pumpkins, you can transform a simple brownie into a miniature pumpkin patch. These brownies are great for parties, family gatherings, or just a cozy night in. They’re sure to be a hit with kids and adults alike, as the sweet and velvety chocolate paired with the festive toppings make for a delectable treat.
Below is the recipe to create this spooky and delicious dessert for 4-6 people.
Ingredients:
- 1 cup unsalted butter
- 2 cups granulated sugar
- 1 cup all-purpose flour
- 1 cup unsweetened cocoa powder
- 4 large eggs
- 1 teaspoon vanilla extract
- 1/2 teaspoon salt
- 1/2 teaspoon baking powder
- 1 cup semi-sweet chocolate chips
- Green tinted frosting
- Candy pumpkins (approximately 12)
Instructions:
- Preheat the Oven: Begin by preheating your oven to 350°F (175°C). This guarantees that your brownies will bake evenly.
- Prepare the Baking Pan: Grease a 9×13 inch baking pan or line it with parchment paper. This will prevent the brownies from sticking to the pan after baking.
- Melt the Butter: In a medium saucepan, melt the butter over low heat. Once melted, remove it from the heat and allow it to cool slightly.
- Mix the Wet Ingredients: In a large mixing bowl, combine the melted butter, granulated sugar, and vanilla extract. Beat in the eggs one at a time, mixing well after each addition until the mixture is smooth.
- Combine the Dry Ingredients: In a separate bowl, sift together the flour, cocoa powder, salt, and baking powder. This helps to remove any lumps and guarantees an even mixture.
- Blend Everything Together: Gradually add the dry ingredients to the wet mixture, stirring until well combined. Fold in the chocolate chips.
- Bake the Brownies: Pour the batter into the prepared baking pan, spreading it evenly. Bake in the preheated oven for 25-30 minutes or until a toothpick inserted in the center comes out with a few moist crumbs.
- Cool and Decorate: Allow the brownies to cool completely in the pan. Once cooled, spread the green tinted frosting over the top to create a grassy effect. Arrange candy pumpkins on top of the frosting to resemble a pumpkin patch.
Extra Tips:
To make your Pumpkin Patch Brownies even more festive, consider using different shades of green frosting to add depth to your “grass.” You can also add other Halloween-themed candies or edible decorations to enhance the look of your pumpkin patch.
If you’re short on time, store-bought brownie mix and frosting can be used, but homemade always adds a special touch. Remember to let the brownies cool completely before frosting to guarantee the decorations stay in place. Happy Halloween baking!
Spooky Stuffed Peppers
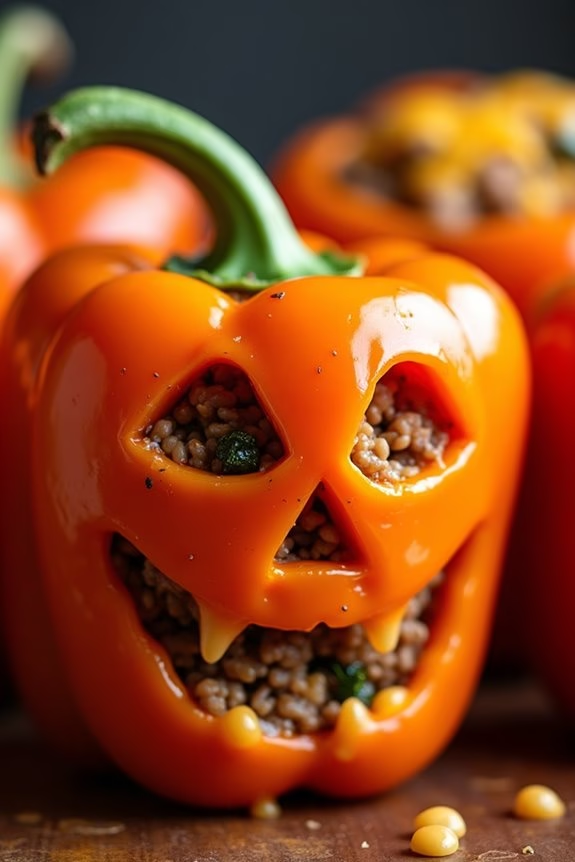
As Halloween approaches, there’s no better way to celebrate than by enjoying themed foods that delight both the eyes and the taste buds. “Spooky Stuffed Peppers” are a perfect addition to any Halloween menu, offering a fun and eerie twist on a classic dish.
These delightful treats not only taste great but also look the part, with bell peppers carved to resemble jack-o’-lanterns, making them a great centerpiece for your Halloween spread. Whether you’re hosting a party or enjoying a festive family dinner, these stuffed peppers are bound to impress.
Filled with a savory mixture of seasoned ground beef, rice, and vegetables, these peppers are as nutritious as they’re delicious. The combination of flavors and textures, from the tender baked peppers to the hearty filling, guarantees that this dish is a crowd-pleaser. Plus, the spooky jack-o’-lantern faces make them a hit with kids and adults alike.
This recipe serves 4-6 people, providing enough to share or to enjoy leftovers the next day.
Ingredients:
- 6 medium-sized orange bell peppers
- 1 pound ground beef
- 1 cup cooked rice
- 1 medium onion, finely chopped
- 2 cloves garlic, minced
- 1 can (14.5 oz) diced tomatoes, drained
- 1 cup shredded cheddar cheese
- 1 teaspoon Italian seasoning
- Salt and pepper to taste
- 2 tablespoons olive oil
Cooking Instructions:
- Prepare the Peppers: Preheat your oven to 375°F (190°C). Cut the tops off the bell peppers and remove the seeds and membranes. Using a small knife, carefully carve jack-o’-lantern faces into one side of each pepper. Set aside.
- Cook the Filling: In a large skillet, heat the olive oil over medium heat. Add the chopped onion and garlic, sautéing until the onion becomes translucent. Add the ground beef, cooking until browned and fully cooked. Drain any excess fat.
- Mix the Ingredients: Stir in the cooked rice, diced tomatoes, Italian seasoning, salt, and pepper. Allow the mixture to cook for an additional 5 minutes, stirring occasionally. Remove from heat and mix in half of the shredded cheese.
- Stuff the Peppers: Fill each carved pepper with the beef and rice mixture, packing it tightly. Place the filled peppers upright in a baking dish.
- Bake the Peppers: Cover the dish with aluminum foil and bake in the preheated oven for 25 minutes. Remove the foil, sprinkle the remaining cheese on top of each pepper, and bake uncovered for another 10 minutes or until the cheese is melted and bubbly.
- Serve: Allow the peppers to cool slightly before serving. Enjoy the spooky presentation and delicious flavors!
Extra Tips:
For best results, choose peppers that can stand upright on their own. You can also experiment with different fillings, such as adding black beans or using turkey instead of beef for a lighter option.
If time is a factor, prepare the filling in advance and store it in the refrigerator until ready to stuff the peppers. Additionally, be careful when carving the peppers to avoid cutting too close to the edges, as this might cause them to collapse during baking.
Bat Wing Chicken Bites

Transform your Halloween party into a spooky feast with these delightful Bat Wing Chicken Bites! Perfectly seasoned and oven-baked to a crispy finish, these chicken bites aren’t only a visual treat but also a gastronomic delight. Their dark, eerie appearance mimics bat wings, making them the ultimate festive snack to serve at your Halloween gathering.
With a blend of spices and a hint of sweetness from honey, these chicken bites will undoubtedly leave your guests clamoring for more. This recipe is designed to serve 4-6 people, making it ideal for a small party or family gathering. The preparation is simple, requiring just a few pantry staples and some creativity to achieve the desired spooky effect.
Whether you’re hosting a sophisticated Halloween dinner or a casual get-together, these Bat Wing Chicken Bites are sure to be a hit. So roll up your sleeves and let’s get cooking!
Ingredients:
- 2 pounds chicken wings
- 1 tablespoon baking powder
- 2 teaspoons salt
- 1 teaspoon black pepper
- 1 teaspoon garlic powder
- 1 teaspoon onion powder
- 1 teaspoon smoked paprika
- 1 tablespoon soy sauce
- 1 tablespoon honey
- Black food coloring (gel or liquid)
- Cooking spray or oil
Instructions:
- Preheat the Oven: Begin by preheating your oven to 400°F (200°C). Line a baking sheet with aluminum foil and place a wire rack on top. This will allow the chicken wings to cook evenly and become crispy.
- Prepare the Chicken Wings: In a large bowl, combine the baking powder, salt, black pepper, garlic powder, onion powder, and smoked paprika. Pat the chicken wings dry with paper towels to remove any excess moisture, then toss them in the spice mixture to guarantee they’re well coated.
- Add Color and Flavor: In a small bowl, mix the soy sauce, honey, and a few drops of black food coloring. Adjust the amount of food coloring to achieve the desired dark color. Pour this mixture over the chicken wings, ensuring each wing is evenly coated.
- Bake the Wings: Arrange the wings on the prepared wire rack, making sure they’re spread out and not touching each other. Lightly spray the wings with cooking spray to aid in crisping. Bake in the preheated oven for 40-50 minutes, flipping halfway through, until the wings are crispy and fully cooked.
- Serve and Enjoy: Once done, remove the wings from the oven and let them cool for a few minutes. Arrange them on a platter and serve with your favorite dipping sauce.
Extra Tips:
To achieve the best results, verify the wings are completely dry before tossing them in the spice mixture; this helps the coating adhere better and results in a crispier texture.
If you prefer spicier wings, consider adding a pinch of cayenne pepper to the spice mix. For a deeper black color, use gel food coloring as it tends to be more concentrated than liquid food coloring.
Finally, remember to keep an eye on the wings while they bake to prevent overcooking. Enjoy your spooky, delicious creation!
Bloody Berry Smoothie
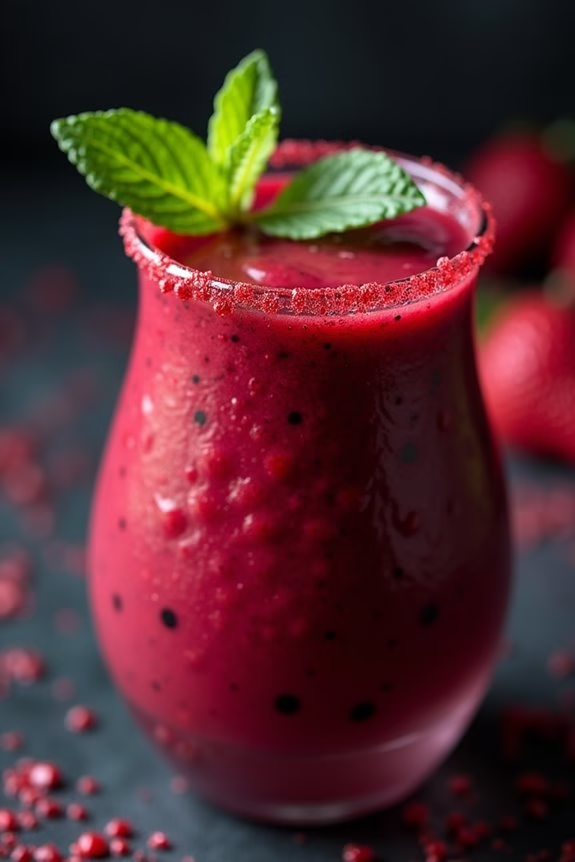
Halloween is the perfect time to get creative with your food and drinks, and a Bloody Berry Smoothie is an ideal treat for both kids and adults. This spooky drink isn’t only delicious but also visually striking with its deep red color, reminiscent of a classic Halloween horror theme.
Made with a blend of berries and a touch of natural sweetness, this smoothie is both invigorating and nutritious, making it a great addition to any Halloween party or gathering.
The Bloody Berry Smoothie combines the rich flavors of strawberries, raspberries, and blackberries to create a tantalizing tartness balanced by the creaminess of yogurt and the subtle sweetness of honey. It’s simple to prepare, requiring just a few ingredients and a blender.
Whether you’re serving it as a healthy breakfast option or as a fun party drink, this smoothie is sure to be a hit. The best part is that it can be easily adjusted to suit different dietary preferences, making it a versatile choice for your Halloween menu.
Ingredients (Serving Size: 4-6 People):
- 2 cups fresh or frozen strawberries
- 1 cup fresh or frozen raspberries
- 1 cup fresh or frozen blackberries
- 2 cups Greek yogurt
- 1 cup almond milk (or milk of choice)
- 3 tablespoons honey
- 1 teaspoon vanilla extract
- Ice cubes (optional)
- Fresh mint leaves (for garnish, optional)
Cooking Instructions:
- Prepare the Berries: If using fresh berries, rinse them thoroughly under cold water and drain well. If the berries are frozen, verify they’re slightly thawed for easier blending.
- Add Ingredients to Blender: In a blender, combine the strawberries, raspberries, blackberries, Greek yogurt, almond milk, honey, and vanilla extract. If you prefer a colder and thicker smoothie, add a handful of ice cubes.
- Blend Until Smooth: Secure the lid on the blender and blend on high speed until the mixture is smooth and creamy. This should take about 1-2 minutes. Stop occasionally to scrape down the sides of the blender to confirm all ingredients are fully incorporated.
- Taste and Adjust: Taste the smoothie and adjust the sweetness if necessary by adding more honey or a splash of milk for a thinner consistency. Blend again briefly to mix any additions.
- Serve: Pour the smoothie into glasses or jars. For an extra spooky touch, garnish each glass with a fresh mint leaf. Serve immediately for the best flavor and texture.
Extra Tips:
For a more dramatic presentation, dip the rim of each glass in water, then into a plate of red sugar to create a “bloody” rim effect.
You can also freeze the berries ahead of time to omit the need for ice cubes, confirming the smoothie remains thick and flavorful.
For those who prefer a dairy-free option, substitute the Greek yogurt with a plant-based alternative like coconut yogurt. Adjust the sweetness by using agave syrup or maple syrup instead of honey if desired.
Enjoy your chilling and delicious Bloody Berry Smoothie as a festive addition to your Halloween celebrations!
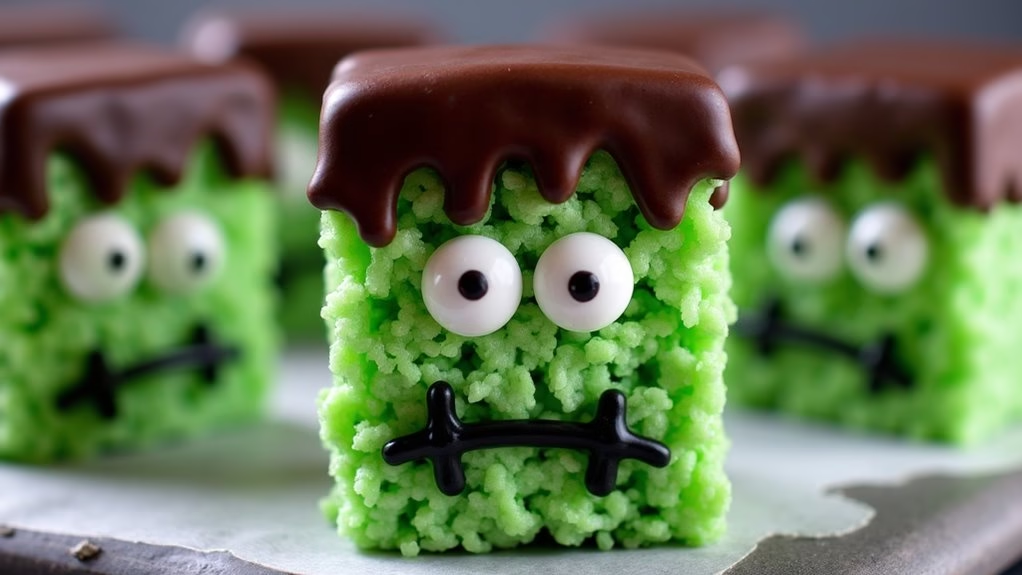
Frankenstein Rice Krispie Treats
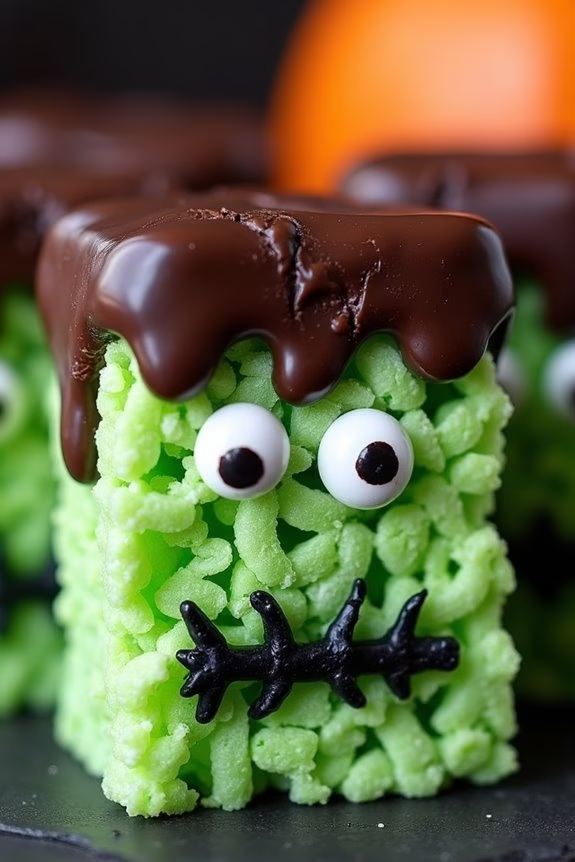
Frankenstein Rice Krispie Treats are a spooky and fun twist on the classic Rice Krispie Treats, perfect for any Halloween celebration. These green-hued, marshmallowy delights are shaped and decorated to resemble the iconic monster, Frankenstein, making them a hit with both kids and adults.
Not only are they visually appealing, but they also maintain the chewy, crunchy texture that makes Rice Krispie Treats a beloved dessert. These treats are surprisingly easy to make and require minimal ingredients, making them an excellent choice for a last-minute Halloween treat.
With a little creativity and some simple decorating techniques, you can transform these ordinary snacks into spooky masterpieces. Whether you’re hosting a Halloween party or just want to surprise your family with a fun treat, Frankenstein Rice Krispie Treats are sure to delight.
Ingredients for 4-6 servings:
- 6 cups Rice Krispies cereal
- 3 tablespoons unsalted butter
- 1 package (10 oz) mini marshmallows
- Green food coloring
- Black decorating gel
- Candy eyes
- 1/4 cup chocolate chips
- 1/4 cup white chocolate chips
Cooking Instructions:
- Prepare the Pan: Begin by lining a 9×13 inch baking pan with parchment paper or foil, ensuring it covers the sides for easy removal.
- Melt the Butter and Marshmallows: In a large saucepan, melt the butter over low heat. Once melted, add the mini marshmallows and stir continuously until they’re completely melted and smooth.
- Add Food Coloring: Remove the saucepan from the heat and add a few drops of green food coloring. Stir well until the color is evenly distributed. Adjust the color by adding more drops if necessary to achieve the desired shade of green.
- Mix with Cereal: Pour the Rice Krispies cereal into the saucepan and quickly fold it into the marshmallow mixture until all the cereal is well-coated.
- Shape the Treats: Transfer the mixture to the prepared baking pan. Use a buttered spatula or wax paper to press and spread the mixture evenly across the pan. Allow it to cool for a few minutes.
- Cut into Shapes: Once the mixture is set but still pliable, cut it into rectangles or squares using a sharp knife. These will form the base of your Frankenstein heads.
- Decorate the Face: Melt the chocolate chips and white chocolate chips separately in microwave-safe bowls in 30-second intervals, stirring in between until smooth. Use the melted chocolate as “hair” by spreading it on the top edge of each rectangle. Place candy eyes just below the chocolate hair.
- Add Details: Using the black decorating gel, draw a mouth and stitch marks to complete the Frankenstein face. Let the treats sit until the chocolate is set.
Extra Tips:
For an even more monstrous look, consider adding bolts made from pretzel sticks on the sides of the treats. If you want to make the treats more colorful, you can use different shades of green food coloring to create depth in the Frankenstein faces.
Store the treats in an airtight container at room temperature and serve within two days for peak freshness. If serving at a party, consider placing them on a platter with Halloween-themed decorations for an added spooky touch.